Ansible之playbook剧本
Ansible之playbook剧本
YAML语法
-
yaml文件以---开头,表明这是一个yaml文件。但即使没有使用---开头,也不会有什么影响。
-
yaml中使用"#"作为注释符,可以注释整行,也可以注释行内从"#"开始的内容。
-
yaml中的字符串通常不用加任何引号,即使它包含了某些特殊字符。但有些情况下,必须加引号,最常见的是在引用变量的时候。
-
关于布尔值的书写格式,即true/false的表达式。playbook中的布尔值非常灵活:模块的参数:这时布尔值作为字符串被ansible解析。接受yes/on/1/true/no/off/0/false;非模块的参数:这时布尔值被yaml解释器解析,完全遵循yaml语法。接受不区分大小写的true/yes/on/y/false/no/off/n。建议遵循ansible的官⽅规范,模块的布尔参数采⽤yes/no,⾮模块的布尔参数采⽤True/False。
playbook语法
每个play都包含一个hosts和一个tasks,hosts定义的是inventory中带控制的主机,tasks下定义的是一系列task任务列表,比如调用各个模块。这些task按顺序一次执行一个,直到所有被筛选出来的主机都执行了这个task之后才会移动到下一个task上进行同样的操作。 需要注意的是,虽然只有被筛选出来的主机会执行对应的task,但是所有主机(此处的所有主机表示的是,hosts选项所指定的那些主机)都会收到相同的task指令,所有主机收到指令后,ansible主控端会筛选某些主机,并通过ssh在远程执行任务。
YAML字典
YAML中使用key/value对也称为字典、散列或关联数组。
在key/value对中,键与值通过由冒号和空格组成的分隔符隔开。
# 例如name: ldhport: 80/tcp
YAML列表
在YAML中,列表类似于其他编程语言中的数组,为表示一组列表项,使用一个短划线加一个空格作为每个列表项的前缀。
# 例如hosts:- server1- server2
列表也可使用内嵌块表示,其中多个列表项用方括号括起来并由逗号和空格隔开。
# 例如hosts: [server1, server2]
playbook的使用
ansible-playbook用于运行剧本;-C测试运行结果,并不是真的执行任务。
示例1
# 1、安装httpd,在node1执行# 2、开机自启# 3、给/var/www/html目录创建软链接/www# 4、从http://ansible.example.com/index.html下载至/www# 5、能够访问该web站点---- name: webstationhosts: node1tasks:- name: repo_baseosyum_repository: file: servername: aadescription: aa1baseurl: http://ansible.example.com/rhel9/BaseOSenabled: yesgpgcheck: no- name: repo_appstreamyum_repository: file: servername: ccdescription: cc1baseurl: http://ansible.example.com/rhel9/AppStreamenabled: yesgpgcheck: no- name: install httpdyum:name: httpdstate: present- name: set firewalldfirewalld: service: httpstate: enabledpermanent: yesimmediate: yes- name: create linkfile: src: /var/www/htmldest: /wwwstate: link- name: get file indexget_url: url: http://ansible.example.com/index.htmldest: /www/setype: httpd_sys_content_t- name: restart httpdservice: name: httpdstate: restartedenabled: yes
示例2
notify handlers用法(当完成......任务时,则进行......任务)
# 对主机node1执行,当创建user2用户后,创建/tmp/ldh文件---- name: this is a test playbookhosts: node1tasks:- name: create user1user:name: user1state: present- name: create user2user: name: user2state: presentnotify: - file3handlers: - name: file3file: path: /tmp/ldhstate: touch
示例3
tags用法:给任务打标签,一个任务可以有多个标签,使用-t选项来指定需要指定的任务标签。
ansible预置了5个特殊的tag:
-
always:如果添加此标签,不管是否指定该任务,都执行。
-
never:不执行标签,只有-t选项指定nerver标签时才会执行。
-
tagged:只执行带有标签的任务,nerver标签的任务不会执行。
-
untagged:只执行不带标签的任务,always标签的任务也会执行。
-
all:所有任务都执行,默认标签。
可以同时使用多个标签,需要用逗号隔开。
# 语法tags: - always
# 查看tag的标签类型ansible-playbook --list-tags
---- name: test playbookhosts: node1tasks: - name: create user3user: name: user3state: presenttags: - l1- l2 - name: create user4user:name: user4state: presenttags: - l2- l3- name: create user5user: name: user5state: presenttags: - l3- l4
ansible-playbook --skip-tags l1 该剧本的名称# 跳过l1,执行其他任务,除了nerver
ansible-playbook --tags always ~ # 只执行always标签
ansible-playbook --tags tagged ~ # 执行带有标签的任务,除了nerver标签
ansible-playbook --tags untagged ~ # 执行不带标签的任务,但是带有always标签的任务仍然会执行
ansible-playbook --tags nerver ~ # 执行带有nerver标签的任务,带有always标签的任务仍然会执行
练习
使用ansible的playbook完成以下操作 node1 属于 test01 主机组 node2 属于 test02 主机组 node3 和 node4 属于 web 主机组 node5 属于 test05 主机组 web 组属于 webtest 主机组
[student@master ansible]$ vim inventory[test01]
node1[test02]
node2[web]
node3
node4[test05]
node5[webtest:children]
web
练习1
对node1主机操作,安装httpd服务,网页存放在/www目录中,能够通过curl http://node1访问到网页内容为welcome to luoqi
[student@master ansible]$ vim node1.yml
---
- name: webhosts: node1tasks:- name: repo_baseosyum_repository:file: servername: aadescription: aa1baseurl: http://ansible.example.com/rhel9/BaseOSenabled: yesgpgcheck: no- name: repo_appstreamyum_repository:file: servername: ccdescription: cc1baseurl: http://ansible.example.com/rhel9/AppStreamenabled: yesgpgcheck: no- name: install httpdyum:name: httpdstate: present- name: mkdir /wwwfile:path: /wwwstate: directorysetype: httpd_sys_content_t- name: touch /www/index.htmlcopy:content: "welcome to luoqi\n"dest: /www/index.htmlsetype: httpd_sys_content_t- name: replace /etc/httpd/conf/httpd.conf:/var/www/htmlreplace:path: /etc/httpd/conf/httpd.confregexp: /var/www/htmlreplace: /wwwbackup: yes- name: replace /etc/httpd/conf/httpd.conf:/var/wwwreplace:path: /etc/httpd/conf/httpd.confregexp: /var/wwwreplace: /www- name: restart httpdservice:name: httpdstate: restartedenabled: yes- name: set firewalld for httpdfirewalld:port: 80/tcpstate: enabledpermanent: yesimmediate: yes
# 验证
[student@master ansible]$ ansible-playbook node1.yml
[student@master ansible]$ curl http://node1

练习2
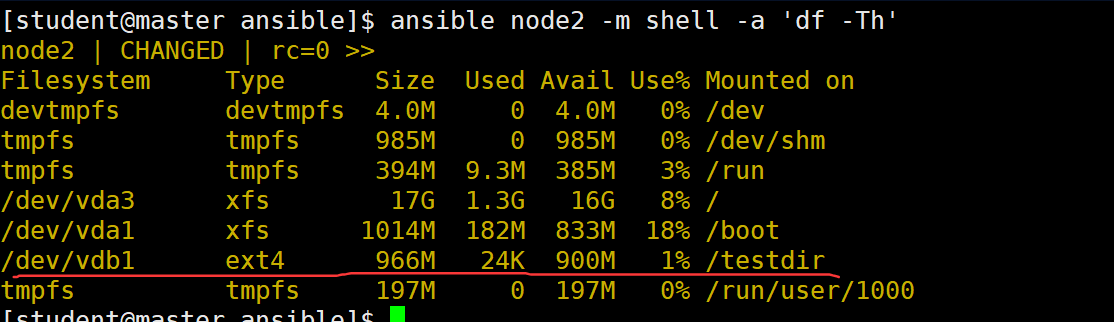
对node2主机操作,创建一个1000MiB的分区,格式化成ext4的文件系统,并挂载到/testdir目录下。使用ansible node2 -m shell -a 'df -Th'验证。
[student@master ansible]$ vim node2.yml
---
- name: partedhosts: node2tasks:- name: mkpartparted:device: /dev/vdbnumber: 1part_type: primarypart_start: 10MiBpart_end: 1010MiBstate: present- name: filesystemfilesystem:dev: /dev/vdb1fstype: ext4- name: mkdir /testdirfile:path: /testdirstate: directory- name: mountmount:src: /dev/vdb1path: /testdirfstype: ext4state: mounted
# 验证
[student@master ansible]$ ansible-playbook node2.yml
[student@master ansible]$ ansible node2 -m shell -a 'df -Th'
练习3
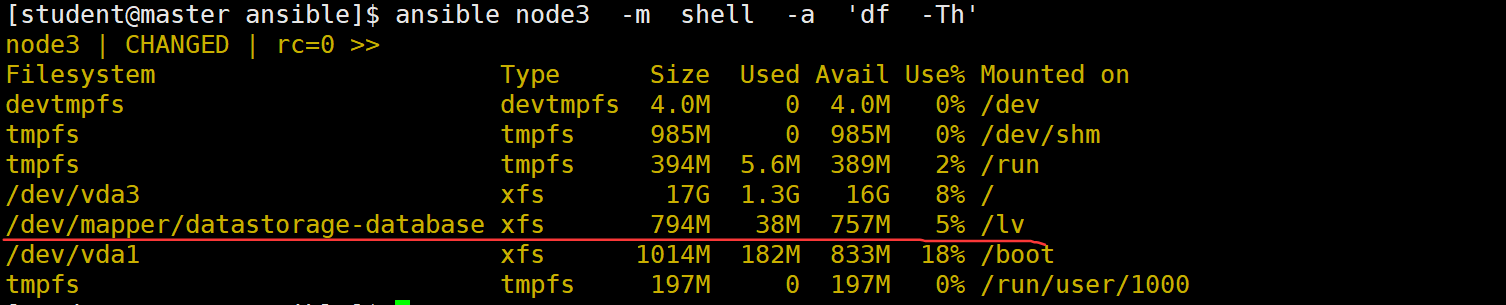
对node3主机操作创建卷组datastorage,逻辑卷database,大小为800M,格式化为xfs的文件系统,并挂载到/lv目录下,使用ansible node3 -m shell -a 'df -Th'验证。
[student@master ansible]$ vim node3.yml
---
- name: lvhosts: node3tasks:- name: repo_baseosyum_repository:file: servername: aadescription: aa1baseurl: http://ansible.example.com/rhel9/BaseOSenabled: yesgpgcheck: no- name: repo_appstreamyum_repository:file: servername: ccdescription: cc1baseurl: http://ansible.example.com/rhel9/AppStreamenabled: yesgpgcheck: no- name: install lvm2yum:name: lvm2state: present- name: mkpartparted:device: /dev/vdbnumber: 1part_type: primarypart_start: 10MiBpart_end: 2010MiBstate: present- name: create vglvg:pvs: /dev/vdb1vg: datastoragestate: present- name: create lvlvol:lv: databasesize: 800Mvg: datastoragestate: present- name: filesystemfilesystem:dev: /dev/datastorage/databasefstype: xfs- name: mkdir /lvfile:path: /lvstate: directory- name: mountmount:src: /dev/datastorage/databasepath: /lvfstype: xfsstate: mounted
# 验证
[student@master ansible]$ ansible-playbook node3.yml
[student@master ansible]$ ansible node3  -m  shell  -a  'df  -Th'
练习4
创建名为/home/student/ansible/tools.yml 的 playbook,能够实现以下目的:
-
将 php 和 tftp 软件包安装到 test01、test02 和 web 主机组中的主机上
-
将 RPM Development Tools 软件包组安装到 test01 主机组中的主机上
-
将 test01 主机组中的主机上所有软件包升级到最新版本
[student@master ansible]$ vim tools.yml
---
- name: lvhosts:test01test02webtasks:- name: repo_baseosyum_repository:file: servername: aadescription: aa1baseurl: http://ansible.example.com/rhel9/BaseOSenabled: yesgpgcheck: no- name: repo_appstreamyum_repository:file: servername: ccdescription: cc1baseurl: http://ansible.example.com/rhel9/AppStreamenabled: yesgpgcheck: no- name: install php tftpyum:name: phpstate: present- name: install php tftpyum:name: tftpstate: present
- name: install RPM Development Toolshosts: test01tasks:- name: install RPM Development Toolsyum:name: "@Development tools"state: present- name: latesthosts: test01tasks:- name: latestyum:name: "*"state: latest
练习5
编写剧本/home/student/ansible/jihua.yml
-
在 test02 组中的被管理主机运行
-
为用户 student 创建计划任务: student 用户每隔 5 分钟执行 echo "hello tarena"
[student@master ansible]$ vim jihua.yml
---
- name: cronhosts: test02tasks:- name: croncron:name: a jobuser: studentjob: echo "hello tarena"minute: "*/5"state: present
# 验证
[student@master ansible]$ ansible-playbook jihua.yml
[student@master ansible]$ ansible test02 -m shell -a 'crontab -u student -l'

练习6
创建剧本/home/student/ansible/webdev.yml,满足下列要求:
-
在 test01 主机组运行
-
创建目录/webdev,属于 webdev 组,权限为 rwxrwxr-x,具有 SetGID 特殊权限
-
使用符号链接/var/www/html/webdev(链接目录) 链接到/webdev (源目录)目录
-
创建文件/webdev/index.html,内容是 It's works!
-
查看 test01 主机组的 web 页面 http://node1/webdev/将显示 It's works!
[student@master ansible]$ vim webdev.yml
# 练习1中已经安装过httpd了
---
- name: webhosts: test01tasks:- name: create webdevuser:name: webdevstate: present- name: mkdir /webdevfile:path: /webdevgroup: webdevmode: '2775'setype: httpd_sys_content_tstate: directory- name: create linkfile:src: /webdevdest: /var/www/html/webdevsetype: httpd_sys_content_tstate: link- name: touch /webdev/index.htmlcopy:content: "It's works!\n"dest: /webdev/index.htmlsetype: httpd_sys_content_t- name: replacereplace:path: /etc/httpd/conf/httpd.confregexp: DocumentRoot "/www"replace: DocumentRoot "/var/www/html"backup: yes- name: replacereplace:path: /etc/httpd/conf/httpd.confregexp: <Directory "/www">replace: <Directory "/var/www">backup: yes- name: restart httpdservice:name: httpdstate: restartedenabled: yes
# 验证
[student@master ansible]$ ansible-playbook webdev.yml
[student@master ansible]$ curl http://node1/webdev/
