Cilium动手实验室: 精通之旅---23.Advanced Gateway API Use Cases
Cilium动手实验室: 精通之旅---23.Advanced Gateway API Use Cases
- 1. Lab说明
- 1.1 高级网关 API 使用案例
- 2. 负载均衡器
- 2.1 部署应用程序
- 2.2 部署 Gateway 和 HTTPRoute
- 3. HTTP 标头请求修饰符
- 3.1 部署 HTTPRoute
- 3.2 可观测性
- 4. HTTP 响应标头重写
- 5. HTTP 流量镜像
- 5.1 demo应用部署
- 5.2 部署镜像路由
- 6. HTTP URL 重写
- 7. HTTP 流量重定向
- 7.1 部署流量重定向
- 7.2 重定向到新主机名和新前缀
- 7.3 重定向 - 新状态代码和新前缀
- 7.4 重定向 - 从 HTTP 到 HTTPS 和新前缀
- 8. 跨命名空间支持
- 8.1 ACME 的跨命名空间
- 8.2 跨命名空间网关
- 9. 部署 gRPC 路由
- 9.1 部署基于 gRPC 的应用程序
- 9.2 部署 gRPCRoute
- 9.3 向后端服务发出 gRPC 请求
- 10. 内部L7 流量管理
- 10.1 部署示例应用程序
- 10.2 部署东西 HTTPRoute
- 10.3 验证东西向 L7 流量管理
- 10.4 东西向负载均衡
- 10.5 90/10 流量拆分
- 10.6 超时
- 10.7 小测验
- 11. 最终测试
- 11.1 题目
- 11.2 解题
1. Lab说明
Lab登录
https://isovalent.com/labs/cilium-gateway-api-advanced/
1.1 高级网关 API 使用案例
在我们可以使用 Gateway API 功能安装 Cilium 之前,有几个重要的先决条件需要了解
- 必须配置
Cilium 并将 kubeProxyReplacement设置为 true。 must事先安装来自 Gateway API 的 CRD(自定义资源定义)。
作为实验室部署脚本的一部分,安装了多个 CRD。验证它们是否可用。
root@server:~# kubectl get crd \gatewayclasses.gateway.networking.k8s.io \gateways.gateway.networking.k8s.io \httproutes.gateway.networking.k8s.io \referencegrants.gateway.networking.k8s.io \tlsroutes.gateway.networking.k8s.io \grpcroutes.gateway.networking.k8s.io
NAME                                        CREATED AT
gatewayclasses.gateway.networking.k8s.io    2025-06-05T03:16:30Z
gateways.gateway.networking.k8s.io          2025-06-05T03:16:30Z
httproutes.gateway.networking.k8s.io        2025-06-05T03:16:31Z
referencegrants.gateway.networking.k8s.io   2025-06-05T03:16:31Z
tlsroutes.gateway.networking.k8s.io         2025-06-05T03:16:32Z
grpcroutes.gateway.networking.k8s.io        2025-06-05T03:16:32Z
在实验室部署期间,使用以下标志安装 Cilium:
--set kubeProxyReplacement=true \
--set gatewayAPI.enabled=true
让我们看看我们的实验室环境,看看 Cilium 是否安装正确。以下命令将等待 Cilium 启动并运行并报告其状态:
root@server:~# cilium status --wait/¯¯\/¯¯\__/¯¯\    Cilium:             OK\__/¯¯\__/    Operator:           OK/¯¯\__/¯¯\    Envoy DaemonSet:    OK\__/¯¯\__/    Hubble Relay:       OK\__/       ClusterMesh:        disabledDaemonSet              cilium                   Desired: 3, Ready: 3/3, Available: 3/3
DaemonSet              cilium-envoy             Desired: 3, Ready: 3/3, Available: 3/3
Deployment             cilium-operator          Desired: 1, Ready: 1/1, Available: 1/1
Deployment             hubble-relay             Desired: 1, Ready: 1/1, Available: 1/1
Containers:            cilium                   Running: 3cilium-envoy             Running: 3cilium-operator          Running: 1clustermesh-apiserver    hubble-relay             Running: 1
Cluster Pods:          4/4 managed by Cilium
Helm chart version:    1.17.1
Image versions         cilium             quay.io/cilium/cilium:v1.17.1@sha256:8969bfd9c87cbea91e40665f8ebe327268c99d844ca26d7d12165de07f702866: 3cilium-envoy       quay.io/cilium/cilium-envoy:v1.31.5-1739264036-958bef243c6c66fcfd73ca319f2eb49fff1eb2ae@sha256:fc708bd36973d306412b2e50c924cd8333de67e0167802c9b48506f9d772f521: 3cilium-operator    quay.io/cilium/operator-generic:v1.17.1@sha256:628becaeb3e4742a1c36c4897721092375891b58bae2bfcae48bbf4420aaee97: 1hubble-relay       quay.io/cilium/hubble-relay:v1.17.1@sha256:397e8fbb188157f744390a7b272a1dec31234e605bcbe22d8919a166d202a3dc: 1
验证 Cilium 是否已启用并部署了 Gateway API 功能:
root@server:~# cilium config view | grep -w "enable-gateway-api "
enable-gateway-api                                true
2. 负载均衡器
2.1 部署应用程序
首先,让我们在集群中部署一个示例 echo 应用程序。应用程序将回复客户端,并在回复的正文中包含有关原始请求标头的信息。我们将使用此信息来说明 Gateway 如何修改标头和其他 HTTP 参数。
使用以下命令查看 YAML 文件。您将看到我们正在部署 Pod 和关联的服务 (echo-1)。
root@server:~# yq echo-servers.yaml
---
apiVersion: v1
kind: Service
metadata:labels:app: echo-1name: echo-1
spec:ports:- port: 8080name: highprotocol: TCPtargetPort: 8080selector:app: echo-1
---
apiVersion: apps/v1
kind: Deployment
metadata:labels:app: echo-1name: echo-1
spec:replicas: 1selector:matchLabels:app: echo-1template:metadata:labels:app: echo-1spec:containers:- image: gcr.io/kubernetes-e2e-test-images/echoserver:2.2name: echo-1ports:- containerPort: 8080env:- name: NODE_NAMEvalueFrom:fieldRef:fieldPath: spec.nodeName- name: POD_NAMEvalueFrom:fieldRef:fieldPath: metadata.name- name: POD_NAMESPACEvalueFrom:fieldRef:fieldPath: metadata.namespace- name: POD_IPvalueFrom:fieldRef:fieldPath: status.podIP
应用配置
kubectl apply -f echo-servers.yaml
检查应用程序是否已正确部署:
root@server:~# kubectl get pods,svc
NAME                          READY   STATUS    RESTARTS   AGE
pod/echo-1-597b976bc7-h24jb   1/1     Running   0          52sNAME                 TYPE        CLUSTER-IP      EXTERNAL-IP   PORT(S)    AGE
service/echo-1       ClusterIP   10.96.145.113   <none>        8080/TCP   52s
service/kubernetes   ClusterIP   10.96.0.1       <none>        443/TCP    136m
请注意,此 Service 仅面向内部 (ClusterIP),因此无法从集群外部访问这些 Service。
2.2 部署 Gateway 和 HTTPRoute
httproute的配置
root@server:~# yq http-route.yaml
---
apiVersion: gateway.networking.k8s.io/v1beta1
kind: HTTPRoute
metadata:name: example-route-1
spec:parentRefs:- name: cilium-gwrules:- matches:- path:type: PathPrefixvalue: /echobackendRefs:- kind: Servicename: echo-1port: 8080
Gateway的配置
root@server:~# yq gateway.yaml
---
apiVersion: gateway.networking.k8s.io/v1beta1
kind: Gateway
metadata:name: cilium-gw
spec:gatewayClassName: ciliumlisteners:- protocol: HTTPport: 80name: web-gw-echoallowedRoutes:namespaces:from: Same
让我们使用以下清单部署 Gateway 和 HTTPRoute:
kubectl apply -f gateway.yaml -f http-route.yaml
确认部署的状态
root@server:~# k get svc,gateway,httproutes
NAME                               TYPE           CLUSTER-IP      EXTERNAL-IP      PORT(S)        AGE
service/cilium-gateway-cilium-gw   LoadBalancer   10.96.151.105   172.18.255.200   80:31484/TCP   4s
service/echo-1                     ClusterIP      10.96.145.113   <none>           8080/TCP       3m43s
service/kubernetes                 ClusterIP      10.96.0.1       <none>           443/TCP        139mNAME                                          CLASS    ADDRESS          PROGRAMMED   AGE
gateway.gateway.networking.k8s.io/cilium-gw   cilium   172.18.255.200   True         4sNAME                                                  HOSTNAMES   AGE
httproute.gateway.networking.k8s.io/example-route-1               4s
让我们检索此 IP 地址:
root@server:~# GATEWAY=$(kubectl get gateway cilium-gw -o jsonpath='{.status.addresses[0].value}')
echo $GATEWAY
172.18.255.200
请注意,此 IP 地址是由 Cilium 的 LB-IPAM(负载均衡器 IP 地址管理)功能分配的
现在,我们来检查基于 URL 路径的流量是否由 Gateway API 代理。
检查是否可以向该外部地址发出 HTTP 请求:
root@server:~# curl --fail -s http://$GATEWAY/echoHostname: echo-1-597b976bc7-h24jbPod Information:node name: kind-worker2pod name: echo-1-597b976bc7-h24jbpod namespace: defaultpod IP: 10.244.2.66Server values:server_version=nginx: 1.12.2 - lua: 10010Request Information:client_address=10.244.2.75method=GETreal path=/echoquery=request_version=1.1request_scheme=httprequest_uri=http://172.18.255.200:8080/echoRequest Headers:accept=*/* host=172.18.255.200 user-agent=curl/8.5.0 x-envoy-internal=true x-forwarded-for=172.18.0.1 x-forwarded-proto=http x-request-id=b40cd4a9-89ef-497c-8170-e469f043356e Request Body:-no body in request-3. HTTP 标头请求修饰符
借助此功能,Cilium Gateway API 允许我们添加、删除或编辑传入流量的 HTTP 标头。
最好通过 try without with the feature 来验证这一点。我们将使用相同的 echo 服务器。
3.1 部署 HTTPRoute
HTTPRoute配置
root@server:~# yq echo-header-http-route.yaml
---
apiVersion: gateway.networking.k8s.io/v1beta1
kind: HTTPRoute
metadata:name: header-http-echo
spec:parentRefs:- name: cilium-gwrules:- matches:- path:type: PathPrefixvalue: /cilium-add-a-request-header#filters:#- type: RequestHeaderModifier#  requestHeaderModifier:#    add:#    - name: my-cilium-header-name#      value: my-cilium-header-valuebackendRefs:- name: echo-1port: 8080
让我们使用以下清单部署一个 HTTPRoute 资源(我们使用的是上一个任务中部署的相同网关)。
kubectl apply -f echo-header-http-route.yaml
让我们检索网关 IP 地址:
root@server:~# GATEWAY=$(kubectl get gateway cilium-gw -o jsonpath='{.status.addresses[0].value}')
echo $GATEWAY
172.18.255.200
向该外部地址发出 HTTP 请求:
root@server:~# curl --fail -s http://$GATEWAY/cilium-add-a-request-headerHostname: echo-1-597b976bc7-h24jbPod Information:node name: kind-worker2pod name: echo-1-597b976bc7-h24jbpod namespace: defaultpod IP: 10.244.2.66Server values:server_version=nginx: 1.12.2 - lua: 10010Request Information:client_address=10.244.2.75method=GETreal path=/cilium-add-a-request-headerquery=request_version=1.1request_scheme=httprequest_uri=http://172.18.255.200:8080/cilium-add-a-request-headerRequest Headers:accept=*/* host=172.18.255.200 user-agent=curl/8.5.0 x-envoy-internal=true x-forwarded-for=172.18.0.1 x-forwarded-proto=http x-request-id=83eab8a2-102b-4f55-b0f8-ca052278615b Request Body:-no body in request-并取消注释 echo-header-http-route.yaml 的注释行
root@server:~# yq echo-header-http-route.yaml
---
apiVersion: gateway.networking.k8s.io/v1beta1
kind: HTTPRoute
metadata:name: header-http-echo
spec:parentRefs:- name: cilium-gwrules:- matches:- path:type: PathPrefixvalue: /cilium-add-a-request-headerfilters:- type: RequestHeaderModifierrequestHeaderModifier:add:- name: my-cilium-header-namevalue: my-cilium-header-valuebackendRefs:- name: echo-1port: 8080
应用 HTTPRoute:
kubectl apply -f echo-header-http-route.yaml
现在让我们检查一下 Cilium Gateway API 是否修改了标头:
再次向该地址发出 curl HTTP 请求:
root@server:~# curl --fail -s http://$GATEWAY/cilium-add-a-request-headerHostname: echo-1-597b976bc7-42zjqPod Information:node name: kind-workerpod name: echo-1-597b976bc7-42zjqpod namespace: defaultpod IP: 10.244.1.78Server values:server_version=nginx: 1.12.2 - lua: 10010Request Information:client_address=10.244.1.80method=GETreal path=/cilium-add-a-request-headerquery=request_version=1.1request_scheme=httprequest_uri=http://172.18.255.200:8080/cilium-add-a-request-headerRequest Headers:accept=*/* host=172.18.255.200 my-cilium-header-name=my-cilium-header-value user-agent=curl/8.5.0 x-envoy-internal=true x-forwarded-for=172.18.0.1 x-forwarded-proto=http x-request-id=4a628c7b-ce4b-4440-9efb-37b1c23de3ea Request Body:-no body in request-
您应该看到,在回复的 Request Headers 部分中,该标头 my-cilium-header-name=my-cilium-header-value 已添加到 HTTP 请求中。
请注意,您还可以删除或编辑从客户端发送的 HTTP 请求标头。
3.2 可观测性
可观测平台 Hubble 来观察流量,并使用 Gateway API 筛选您添加的特定 HTTP 路径:
root@server:~# hubble observe --http-path "/cilium-add-a-request-header"
Jun  5 06:21:53.343: 172.18.0.1:36402 (ingress) -> default/echo-1-597b976bc7-42zjq:8080 (ID:11908) http-request FORWARDED (HTTP/1.1 GET http://172.18.255.200/cilium-add-a-request-header)
Jun  5 06:21:53.344: 172.18.0.1:36402 (ingress) <- default/echo-1-597b976bc7-42zjq:8080 (ID:11908) http-response FORWARDED (HTTP/1.1 200 1ms (GET http://172.18.255.200/cilium-add-a-request-header))
您可以看到流量是如何通过 Cilium L7 Ingress(实现网关 API)发送的,并且您可以使用 Hubble 使用第 7 层过滤器(如 HTTP 路径)来观察流量。
4. HTTP 响应标头重写
HTTPRoute配置文件:
root@server:~# yq response-header-modifier-http-route.yaml
---
apiVersion: gateway.networking.k8s.io/v1beta1
kind: HTTPRoute
metadata:name: response-header-modifier
spec:parentRefs:- name: cilium-gwrules:- matches:- path:type: PathPrefixvalue: /multiplefilters:- type: ResponseHeaderModifierresponseHeaderModifier:add:- name: X-Header-Add-1value: header-add-1- name: X-Header-Add-2value: header-add-2- name: X-Header-Add-3value: header-add-3backendRefs:- name: echo-1port: 8080
让我们使用以下清单部署 HTTPRoute:
kubectl apply -f response-header-modifier-http-route.yaml
请注意这一次,如何使用 type: ResponseHeaderModifier 过滤器修改标头的响应 。
我们将一次性添加 3 个标头。
让我们检索网关 IP 地址:
GATEWAY=$(kubectl get gateway cilium-gw -o jsonpath='{.status.addresses[0].value}')
echo $GATEWAY
检查是否可以向该外部地址发出 HTTP 请求:
root@server:~# curl --fail -s http://$GATEWAY/multipleHostname: echo-1-597b976bc7-42zjqPod Information:node name: kind-workerpod name: echo-1-597b976bc7-42zjqpod namespace: defaultpod IP: 10.244.1.78Server values:server_version=nginx: 1.12.2 - lua: 10010Request Information:client_address=10.244.1.80method=GETreal path=/multiplequery=request_version=1.1request_scheme=httprequest_uri=http://172.18.255.200:8080/multipleRequest Headers:accept=*/* host=172.18.255.200 user-agent=curl/8.5.0 x-envoy-internal=true x-forwarded-for=172.18.0.1 x-forwarded-proto=http x-request-id=92b055a0-5b6f-48f7-97da-6d36ad16ae16 Request Body:-no body in request-
请注意,数据包的正文包含有关原始请求的详细信息。
如果运行以下命令:
root@server:~# curl --fail -s http://$GATEWAY/multiple | grep "Request Headers" -A 10
Request Headers:accept=*/*  host=172.18.255.200  user-agent=curl/8.5.0  x-envoy-internal=true  x-forwarded-for=172.18.0.1  x-forwarded-proto=http  x-request-id=57ce6df0-0f08-41f0-b4ba-0792e67c36e9  Request Body:-no body in request-
要显示响应的标头,我们可以在详细模式下运行 curl:
root@server:~# curl -v --fail -s http://$GATEWAY/multiple
*   Trying 172.18.255.200:80...
* Connected to 172.18.255.200 (172.18.255.200) port 80
> GET /multiple HTTP/1.1
> Host: 172.18.255.200
> User-Agent: curl/8.5.0
> Accept: */*
>
< HTTP/1.1 200 OK
< date: Thu, 05 Jun 2025 06:26:20 GMT
< content-type: text/plain
< server: envoy
< x-envoy-upstream-service-time: 0
< x-header-add-1: header-add-1
< x-header-add-2: header-add-2
< x-header-add-3: header-add-3
< transfer-encoding: chunked
< Hostname: echo-1-597b976bc7-42zjqPod Information:node name:      kind-workerpod name:       echo-1-597b976bc7-42zjqpod namespace:  defaultpod IP: 10.244.1.78Server values:server_version=nginx: 1.12.2 - lua: 10010Request Information:client_address=10.244.1.80method=GETreal path=/multiplequery=request_version=1.1request_scheme=httprequest_uri=http://172.18.255.200:8080/multipleRequest Headers:accept=*/*  host=172.18.255.200  user-agent=curl/8.5.0  x-envoy-internal=true  x-forwarded-for=172.18.0.1  x-forwarded-proto=http  x-request-id=dea451da-4db1-4f0c-b35a-f1cad4836325  Request Body:-no body in request-* Connection #0 to host 172.18.255.200 left intact
同样,您可以看到使用 Cilium Gateway API 修改 HTTP 流量 - 传入请求或传出响应是多么简单。
5. HTTP 流量镜像
5.1 demo应用部署
使用 Gateway 将发往后端的流量镜像到另一个后端。
当您想要引入服务的 v2 或仅用于故障排除和分析目的时,这非常有用。
我们将使用不同的演示应用程序。此演示应用程序将部署一些 Pod 和服务 - infra-backend-v1 和 infra-backend-v2。我们会将发往 infra-backend-v1 的流量镜像到 infra-backend-v2。
验证演示应用程序是否已正确部署:
root@server:~# kubectl get -f demo-app.yaml
NAME                       TYPE        CLUSTER-IP      EXTERNAL-IP   PORT(S)    AGE
service/infra-backend-v1   ClusterIP   10.96.128.114   <none>        8080/TCP   5m44sNAME                               READY   UP-TO-DATE   AVAILABLE   AGE
deployment.apps/infra-backend-v1   1/1     1            1           5m44sNAME                       TYPE        CLUSTER-IP      EXTERNAL-IP   PORT(S)    AGE
service/infra-backend-v2   ClusterIP   10.96.222.192   <none>        8080/TCP   5m44sNAME                               READY   UP-TO-DATE   AVAILABLE   AGE
deployment.apps/infra-backend-v2   1/1     1            1           5m44s
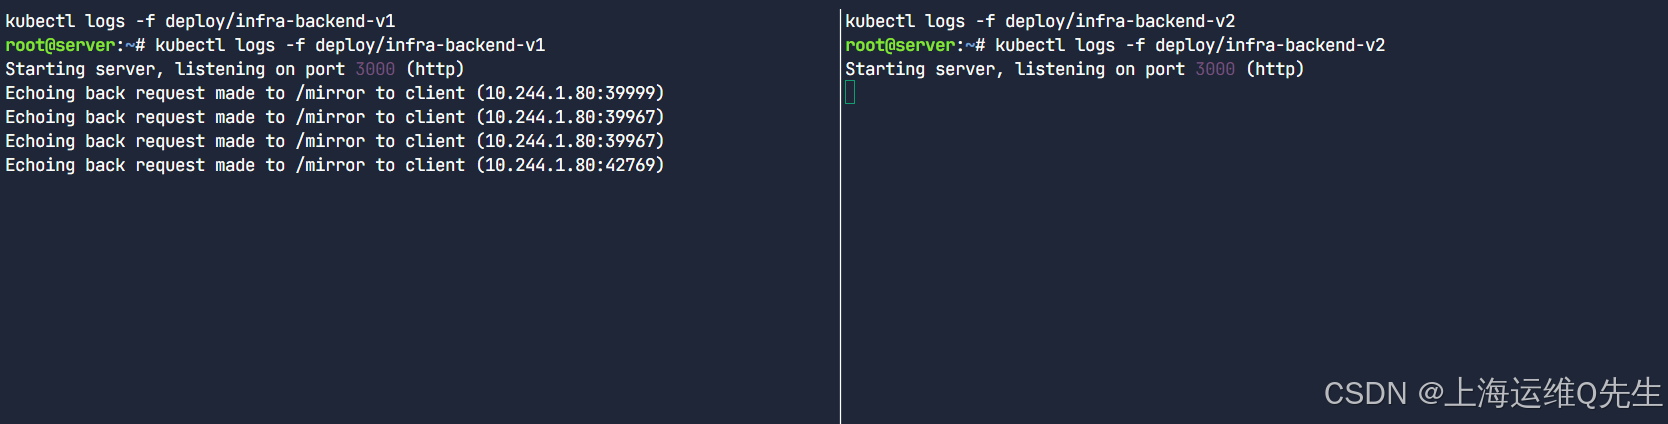
我们准备了一个 HTTPRoute 清单,用于将 HTTP 请求镜像到不同的后端。将流量镜像到不同的后端可用于故障排除、分析和可观测性。请注意,虽然我们可以将流量镜像到另一个后端,但我们会忽略来自该后端的响应。
流量镜像配置文件:
root@server:~# yq http-mirror-route.yaml
---
apiVersion: gateway.networking.k8s.io/v1beta1
kind: HTTPRoute
metadata:name: request-mirror
spec:parentRefs:- name: cilium-gwrules:- matches:- path:type: PathPrefixvalue: /mirror#filters:#- type: RequestMirror#  requestMirror:#    backendRef:#      name: infra-backend-v2#      port: 8080backendRefs:- name: infra-backend-v1port: 8080
部署 HTTPRoute:
kubectl apply -f http-mirror-route.yaml
检索网关 IP 地址:
GATEWAY=$(kubectl get gateway cilium-gw -o jsonpath='{.status.addresses[0].value}')
echo $GATEWAY
向网关发出请求:
root@server:~# curl -s http://$GATEWAY/mirror | jq
{"path": "/mirror","host": "172.18.255.200","method": "GET","proto": "HTTP/1.1","headers": {"Accept": ["*/*"],"User-Agent": ["curl/8.5.0"],"X-Envoy-Internal": ["true"],"X-Forwarded-For": ["172.18.0.1"],"X-Forwarded-Proto": ["http"],"X-Request-Id": ["859931d1-dcbf-45d8-93b2-b2e4fecb0cf9"]},"namespace": "default","ingress": "","service": "","pod": "infra-backend-v1-586756576f-j9qwb"
}
此时,流量只在backend-v1上产生
5.2 部署镜像路由
编辑 http-mirror-route.yaml
root@server:~# yq http-mirror-route.yaml
---
apiVersion: gateway.networking.k8s.io/v1beta1
kind: HTTPRoute
metadata:name: request-mirror
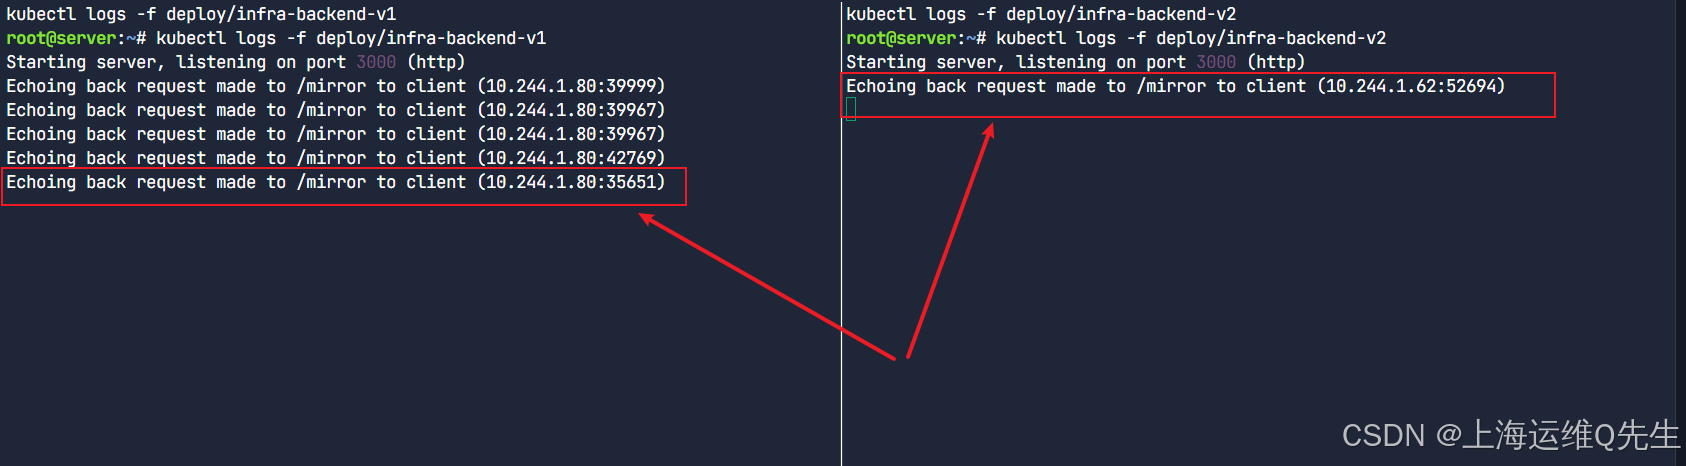
spec:parentRefs:- name: cilium-gwrules:- matches:- path:type: PathPrefixvalue: /mirrorfilters:- type: RequestMirrorrequestMirror:backendRef:name: infra-backend-v2port: 8080backendRefs:- name: infra-backend-v1port: 8080
应用它:
kubectl apply -f http-mirror-route.yaml
向网关发出新请求:
root@server:~# curl -s http://$GATEWAY/mirror | jq
{"path": "/mirror","host": "172.18.255.200","method": "GET","proto": "HTTP/1.1","headers": {"Accept": ["*/*"],"User-Agent": ["curl/8.5.0"],"X-Envoy-Internal": ["true"],"X-Forwarded-For": ["172.18.0.1"],"X-Forwarded-Proto": ["http"],"X-Request-Id": ["14e70bf0-faf7-45fa-9861-eeef6a8fd21a"]},"namespace": "default","ingress": "","service": "","pod": "infra-backend-v1-586756576f-j9qwb"
}
显然镜像发生了
6. HTTP URL 重写
在此任务中,我们将使用网关重写 HTTP 请求中使用的路径。
让我们再次从检索网关 IP 地址开始:
GATEWAY=$(kubectl get gateway cilium-gw -o jsonpath='{.status.addresses[0].value}')
echo $GATEWAY
我们准备了一个 HTTPRoute 来重写 HTTP 请求中的 URL。
配置文件如下:
root@server:~# yq http-rewrite-route.yaml
---
apiVersion: gateway.networking.k8s.io/v1beta1
kind: HTTPRoute
metadata:name: rewrite-path
spec:parentRefs:- name: cilium-gwrules:- matches:- path:type: PathPrefixvalue: /prefix/onefilters:- type: URLRewriteurlRewrite:path:type: ReplacePrefixMatchreplacePrefixMatch: /onebackendRefs:- name: infra-backend-v1port: 8080
让我们应用它。
kubectl apply -f http-rewrite-route.yaml
使用此清单,我们会将请求 URL 中的 /prefix/one 替换为 /one。
现在,我们来检查一下基于 URL 路径的流量是否由 Gateway API 代理和更改:
向该外部地址和路径发出 HTTP 请求:
root@server:~# curl -s http://$GATEWAY/prefix/one | jq
{"path": "/one","host": "172.18.255.200","method": "GET","proto": "HTTP/1.1","headers": {"Accept": ["*/*"],"User-Agent": ["curl/8.5.0"],"X-Envoy-Internal": ["true"],"X-Envoy-Original-Path": ["/prefix/one"],"X-Forwarded-For": ["172.18.0.1"],"X-Forwarded-Proto": ["http"],"X-Request-Id": ["fccacd99-9107-41b3-89db-80ba5156101c"]},"namespace": "default","ingress": "","service": "","pod": "infra-backend-v1-586756576f-j9qwb"
}
它告诉我们什么?网关将原始请求从 “/prefix/one” 更改为 “/one” (请参阅上面输出中的 “path”)。
请注意,当我们使用 Envoy 进行 L7 流量处理时,该 Envoy 还会在数据包中添加有关原始路径的信息(请参阅 “X-Envoy-Original-Path”)。
7. HTTP 流量重定向
7.1 部署流量重定向
让我们部署 HTTPRoute - 我们将在整个任务中逐节审查它。
root@server:~# yq redirect-route.yaml
apiVersion: gateway.networking.k8s.io/v1beta1
kind: HTTPRoute
metadata:name: redirect-path
spec:parentRefs:- name: cilium-gwrules:- matches:- path:type: PathPrefixvalue: /original-prefixfilters:- type: RequestRedirectrequestRedirect:path:type: ReplacePrefixMatchreplacePrefixMatch: /replacement-prefix- matches:- path:type: PathPrefixvalue: /path-and-hostfilters:- type: RequestRedirectrequestRedirect:hostname: example.orgpath:type: ReplacePrefixMatchreplacePrefixMatch: /replacement-prefix- matches:- path:type: PathPrefixvalue: /path-and-statusfilters:- type: RequestRedirectrequestRedirect:path:type: ReplacePrefixMatchreplacePrefixMatch: /replacement-prefixstatusCode: 301- matches:- path:type: PathPrefixvalue: /scheme-and-hostfilters:- type: RequestRedirectrequestRedirect:hostname: example.orgscheme: "https"
让我们部署 HTTPRoute - 我们将在整个任务中逐节审查它。
kubectl apply -f redirect-route.yaml
让我们检索网关 IP 地址:
GATEWAY=$(kubectl get gateway cilium-gw -o jsonpath='{.status.addresses[0].value}')
echo $GATEWAY
向该外部地址和路径发出 HTTP 请求:
请注意,我们在 curl 请求中使用 -l 来跟踪重定向(默认情况下,curl 不会跟踪重定向)。请注意,我们使用 curl 的 verbose 选项来查看响应标头。
root@server:~# curl -l -v http://$GATEWAY/original-prefix
*   Trying 172.18.255.200:80...
* Connected to 172.18.255.200 (172.18.255.200) port 80
> GET /original-prefix HTTP/1.1
> Host: 172.18.255.200
> User-Agent: curl/8.5.0
> Accept: */*
>
< HTTP/1.1 302 Found
< location: http://172.18.255.200:80/replacement-prefix
< date: Thu, 05 Jun 2025 06:53:06 GMT
< server: envoy
< content-length: 0
<
* Connection #0 to host 172.18.255.200 left intact
该位置在 Redirect messages 中用于告诉客户端要去哪里。如您所见,客户端被重定向到 http://172.18.255.200:80/replacement-prefix 。
7.2 重定向到新主机名和新前缀
您还可以将客户端定向到其他主机。检查第二条规则:
root@server:~# yq '.spec.rules[1]' redirect-route.yaml
matches:- path:type: PathPrefixvalue: /path-and-host
filters:- type: RequestRedirectrequestRedirect:hostname: example.orgpath:type: ReplacePrefixMatchreplacePrefixMatch: /replacement-prefix
向该外部地址和路径发出 HTTP 请求:
root@server:~# curl -l -v http://$GATEWAY/path-and-host
*   Trying 172.18.255.200:80...
* Connected to 172.18.255.200 (172.18.255.200) port 80
> GET /path-and-host HTTP/1.1
> Host: 172.18.255.200
> User-Agent: curl/8.5.0
> Accept: */*
>
< HTTP/1.1 302 Found
< location: http://example.org:80/replacement-prefix
< date: Thu, 05 Jun 2025 06:54:45 GMT
< server: envoy
< content-length: 0
<
* Connection #0 to host 172.18.255.200 left intact
如您所见,客户端被重定向到 http://example.org:80/replacement-prefix 。主机名和路径前缀均已修改。
7.3 重定向 - 新状态代码和新前缀
接下来,您还可以修改状态代码。默认情况下,如您所见,重定向状态代码为 302。这意味着资源已临时移动。
要指示客户端尝试访问的资源已永久移动,您可以使用状态代码 301。您还可以将其与前缀替换结合使用。
检查第三条规则:
root@server:~# yq '.spec.rules[2]' redirect-route.yaml
matches:- path:type: PathPrefixvalue: /path-and-status
filters:- type: RequestRedirectrequestRedirect:path:type: ReplacePrefixMatchreplacePrefixMatch: /replacement-prefixstatusCode: 301
向该外部地址和路径发出 HTTP 请求:
root@server:~# curl -l -v http://$GATEWAY/path-and-status
*   Trying 172.18.255.200:80...
* Connected to 172.18.255.200 (172.18.255.200) port 80
> GET /path-and-status HTTP/1.1
> Host: 172.18.255.200
> User-Agent: curl/8.5.0
> Accept: */*
>
< HTTP/1.1 301 Moved Permanently
< location: http://172.18.255.200:80/replacement-prefix
< date: Thu, 05 Jun 2025 06:55:55 GMT
< server: envoy
< content-length: 0
<
* Connection #0 to host 172.18.255.200 left intact
如您所见,返回的状态代码为 301 Moved Permanented,客户端被重定向到 http://172.18.255.200:80/replacement-prefix 。
7.4 重定向 - 从 HTTP 到 HTTPS 和新前缀
最后,我们还可以更改方案 ,例如告诉客户端使用 HTTPS 而不是 HTTP。
您可以使用第四条规则来实现这一点:
root@server:~# yq '.spec.rules[3]' redirect-route.yaml
matches:- path:type: PathPrefixvalue: /scheme-and-host
filters:- type: RequestRedirectrequestRedirect:hostname: example.orgscheme: "https"
向该外部地址和路径发出 HTTP 请求:
root@server:~# curl -l -v http://$GATEWAY/scheme-and-host
*   Trying 172.18.255.200:80...
* Connected to 172.18.255.200 (172.18.255.200) port 80
> GET /scheme-and-host HTTP/1.1
> Host: 172.18.255.200
> User-Agent: curl/8.5.0
> Accept: */*
>
< HTTP/1.1 302 Found
< location: https://example.org:443/scheme-and-host
< date: Thu, 05 Jun 2025 06:57:05 GMT
< server: envoy
< content-length: 0
<
* Connection #0 to host 172.18.255.200 left intact
如您所见,客户端最初尝试通过 HTTP 进行连接,并被重定向到 https://example.org:443/scheme-and-host 。
8. 跨命名空间支持
8.1 ACME 的跨命名空间
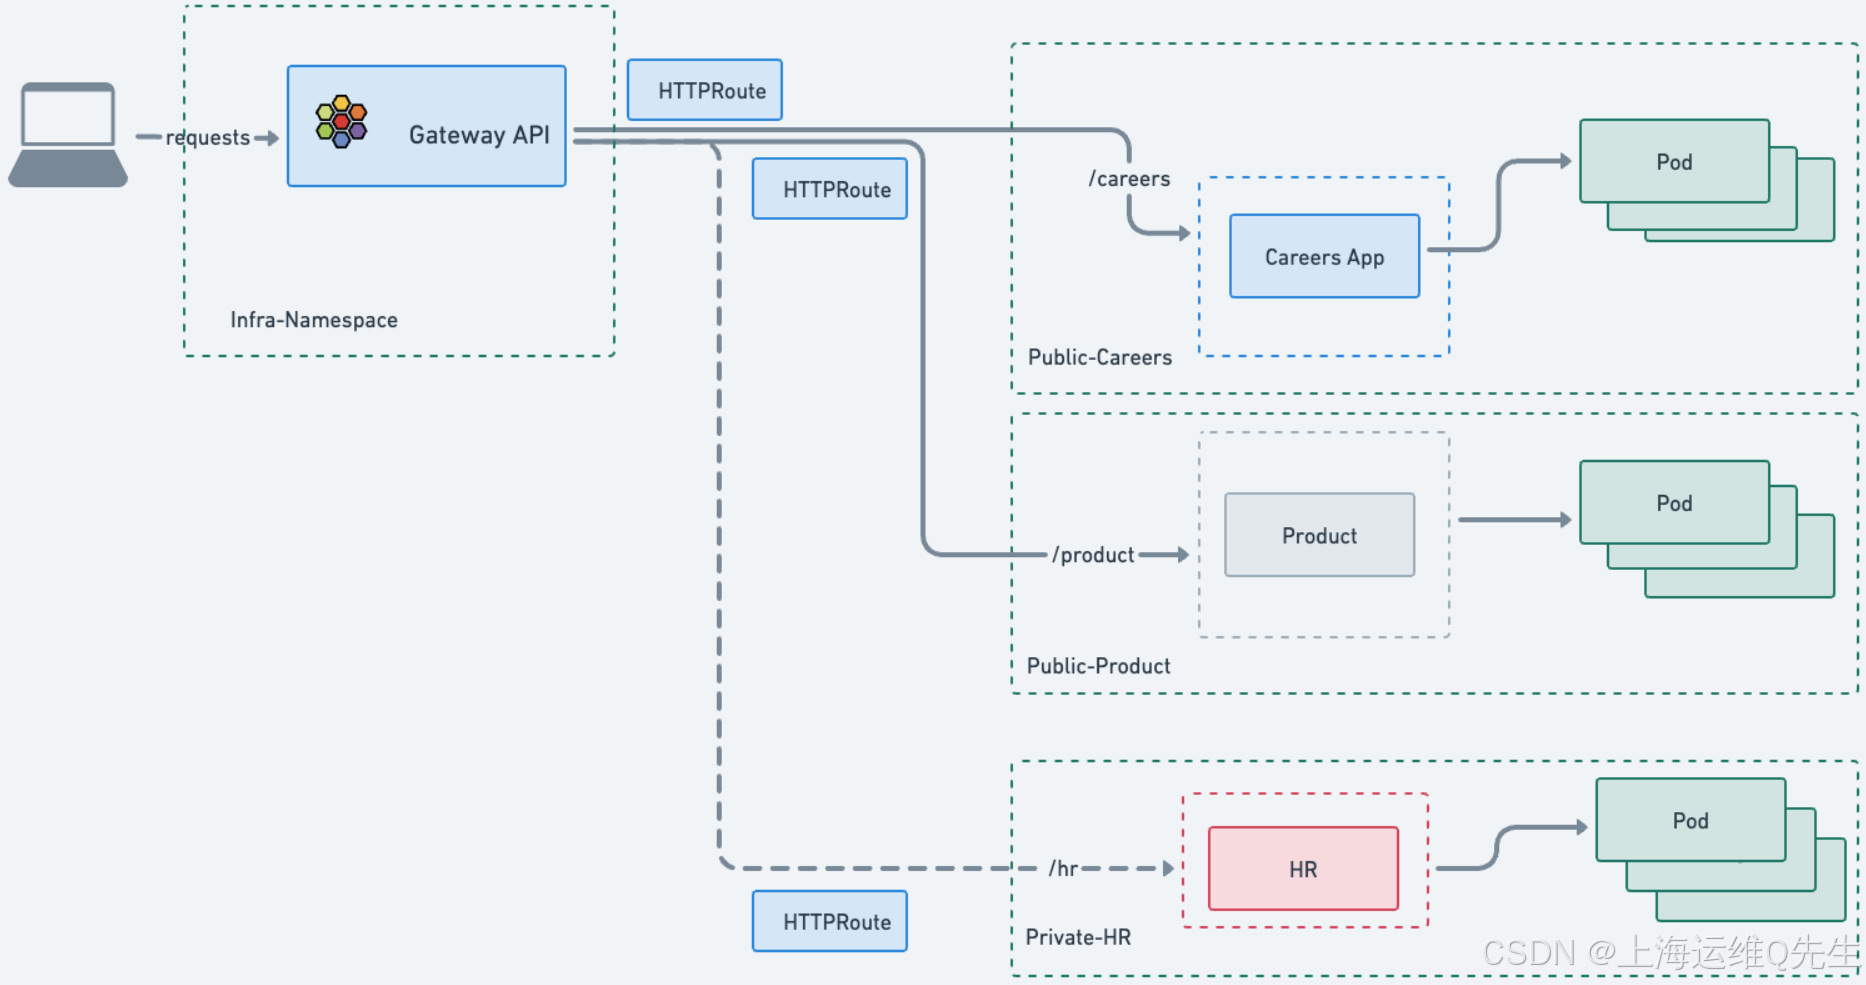
在此任务中,我们将考虑一家虚构的 ACME 公司和 ACME 中的三个不同的业务部门。它们中的每一个都有自己的环境、应用程序和命名空间。
- 招聘团队有一个面向公众的
careers应用程序,申请人可以在其中提交他们的简历。 - 产品团队有一个面向公众
product应用程序,潜在客户可以在其中了解有关 ACME 产品的更多信息。 - HR 团队有一个面向内部的
HR应用程序,用于存储私人员工详细信息。
每个应用程序都部署在其自己的 Namespace 中。由于 careers 和 product 都是面向公众的应用程序,因此安全团队批准使用共享的 Gateway API。共享 Gateway API 的一个好处是平台和安全团队可以集中控制 Gateway API,包括其证书管理。在公有云中,它还将降低成本(每个应用程序的网关 API 需要一个公有 IP 和一个云负载均衡器,它们不是免费资源)。
但是,安全团队不希望 HR 详细信息被公开和从集群外部访问,因此不批准从 hr 命名空间到网关的 HTTPRoute 附件。
8.2 跨命名空间网关
初始化此任务后,创建了四个命名空间:一个共享的 infra-ns 命名空间和三个业务部门中每个命名空间的命名空间。
使用以下方式验证:
root@server:~# kubectl get ns --show-labels \infra-ns careers product hr
NAME       STATUS   AGE     LABELS
infra-ns   Active   2m38s   kubernetes.io/metadata.name=infra-ns
careers    Active   2m37s   kubernetes.io/metadata.name=careers,shared-gateway-access=true
product    Active   2m38s   kubernetes.io/metadata.name=product,shared-gateway-access=true
hr         Active   2m38s   kubernetes.io/metadata.name=hr
请注意,product 和 careers 都有 shared-gateway-access=true 标签,但 hr 没有。
确认下配置文件内容:
root@server:~# yq cross-namespace.yaml
---
apiVersion: gateway.networking.k8s.io/v1beta1
kind: Gateway
metadata:name: shared-gatewaynamespace: infra-ns
spec:gatewayClassName: ciliumlisteners:- name: shared-httpprotocol: HTTPport: 80allowedRoutes:namespaces:from: Selectorselector:matchLabels:shared-gateway-access: "true"
---
apiVersion: gateway.networking.k8s.io/v1beta1
kind: HTTPRoute
metadata:name: cross-namespacenamespace: hr
spec:parentRefs:- name: shared-gatewaynamespace: infra-nsrules:- matches:- path:type: PathPrefixvalue: /hrbackendRefs:- kind: Servicename: echo-hrport: 9080
---
apiVersion: gateway.networking.k8s.io/v1beta1
kind: HTTPRoute
metadata:name: cross-namespacenamespace: product
spec:parentRefs:- name: shared-gatewaynamespace: infra-nsrules:- matches:- path:type: PathPrefixvalue: /productbackendRefs:- kind: Servicename: echo-productport: 9080
---
apiVersion: gateway.networking.k8s.io/v1beta1
kind: HTTPRoute
metadata:name: cross-namespacenamespace: careers
spec:parentRefs:- name: shared-gatewaynamespace: infra-nsrules:- matches:- path:type: PathPrefixvalue: /careersbackendRefs:- kind: Servicename: echo-careersport: 9080
让我们使用以下清单部署 Gateway 和 HTTPRoutes:
kubectl apply -f cross-namespace.yaml
到目前为止,您应该已经熟悉了 manifest 的绝大多数内容。以下是一些差异。首先,在 Gateway 定义中,请注意它已部署在 infra-ns 命名空间中:
metadata:name: shared-gatewaynamespace: infra-ns
此部分可能看起来也很陌生:
allowedRoutes:namespaces:from: Selectorselector:matchLabels:shared-gateway-access: "true"
此网关使用 Namespace selector (命名空间选择器) 来定义允许附加的 HTTPRoutes。这允许基础设施团队通过允许列出一组命名空间来限制谁或哪些应用程序可以使用此网关。
只有标记为 shared-gateway-access: "true" 的命名空间才能将其路由附加到共享网关。
在 HTTPRoute 定义中,请注意我们如何在 parentRefs 中引用共享网关 。我们指定要附加到的 Gateway 及其所在的 Namespace。
让我们测试 HTTPRoutes。首先,让我们获取网关 IP:
GATEWAY=$(kubectl get gateway shared-gateway -n infra-ns -o jsonpath='{.status.addresses[0].value}')
echo $GATEWAY
现在,让我们连接到 product 和 careers Services:
root@server:~# curl -s -o /dev/null -w "%{http_code}\n" http://$GATEWAY/product
200
此命令应返回 200 状态代码。
root@server:~# curl -s -o /dev/null -w "%{http_code}\n" http://$GATEWAY/careers
200
此命令应返回也是 200 状态代码。
尝试连接到 hr 服务:
root@server:~# curl -s -o /dev/null -w "%{http_code}\n" http://$GATEWAY/hr
404
它应该返回 404。为什么?
网关将忽略 hr 命名空间中具有 infra-ns/shared-gateway 的 parentRef 的 HTTPRoute,因为未满足附件约束(命名空间标签)。
通过检查 HTTPRoutes 的状态,使用以下命令进行验证:
root@server:~# echo "Product HTTPRoute Status"
kubectl get httproutes.gateway.networking.k8s.io -n product -o jsonpath='{.items[0].status.parents[0].conditions[0]}' | jq
echo "Careers HTTPRoute Status"
kubectl get httproutes.gateway.networking.k8s.io -n careers -o jsonpath='{.items[0].status.parents[0].conditions[0]}' | jq
echo "HR HTTPRoute Status"
kubectl get httproutes.gateway.networking.k8s.io -n hr -o jsonpath='{.items[0].status.parents[0].conditions[0]}' | jq
Product HTTPRoute Status
{"lastTransitionTime": "2025-06-05T07:01:26Z","message": "Accepted HTTPRoute","observedGeneration": 1,"reason": "Accepted","status": "True","type": "Accepted"
}
Careers HTTPRoute Status
{"lastTransitionTime": "2025-06-05T07:01:26Z","message": "Accepted HTTPRoute","observedGeneration": 1,"reason": "Accepted","status": "True","type": "Accepted"
}
HR HTTPRoute Status
{"lastTransitionTime": "2025-06-05T07:01:26Z","message": "HTTPRoute is not allowed to attach to this Gateway due to namespace selector restrictions","observedGeneration": 1,"reason": "NotAllowedByListeners","status": "False","type": "Accepted"
}
前两个应该是 “Accepted HTTPRoute”,而最后一个应该被拒绝(其状态应该是 False,消息应该以 开头)。 HTTPRoute is not allowed to attach to this Gateway
此功能为工程师提供了多种选择:如果需要,可以为每个命名空间或每个应用程序使用专用的 Gateway API,或者使用共享的 Gateway API 进行集中管理并降低潜在成本。
9. 部署 gRPC 路由
9.1 部署基于 gRPC 的应用程序
使用以下命令安装应用程序。
确认配置文件内容:
root@server:~# yq /opt/gcp-microservices-demo.yml
# Copyright 2018 Google LLC
#
# Licensed under the Apache License, Version 2.0 (the "License");
# you may not use this file except in compliance with the License.
# You may obtain a copy of the License at
#
#      http://www.apache.org/licenses/LICENSE-2.0
#
# Unless required by applicable law or agreed to in writing, software
# distributed under the License is distributed on an "AS IS" BASIS,
# WITHOUT WARRANTIES OR CONDITIONS OF ANY KIND, either express or implied.
# See the License for the specific language governing permissions and
# limitations under the License.# ----------------------------------------------------------
# WARNING: This file is autogenerated. Do not manually edit.
# ----------------------------------------------------------# [START gke_release_kubernetes_manifests_microservices_demo]
---
apiVersion: apps/v1
kind: Deployment
metadata:name: emailservicelabels:app: emailservice
spec:selector:matchLabels:app: emailservicetemplate:metadata:labels:app: emailservicespec:serviceAccountName: emailserviceterminationGracePeriodSeconds: 5securityContext:fsGroup: 1000runAsGroup: 1000runAsNonRoot: truerunAsUser: 1000containers:- name: serversecurityContext:allowPrivilegeEscalation: falsecapabilities:drop:- ALLprivileged: falsereadOnlyRootFilesystem: trueimage: us-central1-docker.pkg.dev/google-samples/microservices-demo/emailservice:v0.10.2ports:- containerPort: 8080env:- name: PORTvalue: "8080"- name: DISABLE_PROFILERvalue: "1"readinessProbe:periodSeconds: 5grpc:port: 8080livenessProbe:periodSeconds: 5grpc:port: 8080resources:requests:cpu: 100mmemory: 64Milimits:cpu: 200mmemory: 128Mi
---
apiVersion: v1
kind: Service
metadata:name: emailservicelabels:app: emailservice
spec:type: ClusterIPselector:app: emailserviceports:- name: grpcport: 5000targetPort: 8080
---
apiVersion: v1
kind: ServiceAccount
metadata:name: emailservice
---
apiVersion: apps/v1
kind: Deployment
metadata:name: checkoutservicelabels:app: checkoutservice
spec:selector:matchLabels:app: checkoutservicetemplate:metadata:labels:app: checkoutservicespec:serviceAccountName: checkoutservicesecurityContext:fsGroup: 1000runAsGroup: 1000runAsNonRoot: truerunAsUser: 1000containers:- name: serversecurityContext:allowPrivilegeEscalation: falsecapabilities:drop:- ALLprivileged: falsereadOnlyRootFilesystem: trueimage: us-central1-docker.pkg.dev/google-samples/microservices-demo/checkoutservice:v0.10.2ports:- containerPort: 5050readinessProbe:grpc:port: 5050livenessProbe:grpc:port: 5050env:- name: PORTvalue: "5050"- name: PRODUCT_CATALOG_SERVICE_ADDRvalue: "productcatalogservice:3550"- name: SHIPPING_SERVICE_ADDRvalue: "shippingservice:50051"- name: PAYMENT_SERVICE_ADDRvalue: "paymentservice:50051"- name: EMAIL_SERVICE_ADDRvalue: "emailservice:5000"- name: CURRENCY_SERVICE_ADDRvalue: "currencyservice:7000"- name: CART_SERVICE_ADDRvalue: "cartservice:7070"resources:requests:cpu: 100mmemory: 64Milimits:cpu: 200mmemory: 128Mi
---
apiVersion: v1
kind: Service
metadata:name: checkoutservicelabels:app: checkoutservice
spec:type: ClusterIPselector:app: checkoutserviceports:- name: grpcport: 5050targetPort: 5050
---
apiVersion: v1
kind: ServiceAccount
metadata:name: checkoutservice
---
apiVersion: apps/v1
kind: Deployment
metadata:name: recommendationservicelabels:app: recommendationservice
spec:selector:matchLabels:app: recommendationservicetemplate:metadata:labels:app: recommendationservicespec:serviceAccountName: recommendationserviceterminationGracePeriodSeconds: 5securityContext:fsGroup: 1000runAsGroup: 1000runAsNonRoot: truerunAsUser: 1000containers:- name: serversecurityContext:allowPrivilegeEscalation: falsecapabilities:drop:- ALLprivileged: falsereadOnlyRootFilesystem: trueimage: us-central1-docker.pkg.dev/google-samples/microservices-demo/recommendationservice:v0.10.2ports:- containerPort: 8080readinessProbe:periodSeconds: 5grpc:port: 8080livenessProbe:periodSeconds: 5grpc:port: 8080env:- name: PORTvalue: "8080"- name: PRODUCT_CATALOG_SERVICE_ADDRvalue: "productcatalogservice:3550"- name: DISABLE_PROFILERvalue: "1"resources:requests:cpu: 100mmemory: 220Milimits:cpu: 200mmemory: 450Mi
---
apiVersion: v1
kind: Service
metadata:name: recommendationservicelabels:app: recommendationservice
spec:type: ClusterIPselector:app: recommendationserviceports:- name: grpcport: 8080targetPort: 8080
---
apiVersion: v1
kind: ServiceAccount
metadata:name: recommendationservice
---
apiVersion: apps/v1
kind: Deployment
metadata:name: frontendlabels:app: frontend
spec:selector:matchLabels:app: frontendtemplate:metadata:labels:app: frontendannotations:sidecar.istio.io/rewriteAppHTTPProbers: "true"spec:serviceAccountName: frontendsecurityContext:fsGroup: 1000runAsGroup: 1000runAsNonRoot: truerunAsUser: 1000containers:- name: serversecurityContext:allowPrivilegeEscalation: falsecapabilities:drop:- ALLprivileged: falsereadOnlyRootFilesystem: trueimage: us-central1-docker.pkg.dev/google-samples/microservices-demo/frontend:v0.10.2ports:- containerPort: 8080readinessProbe:initialDelaySeconds: 10httpGet:path: "/_healthz"port: 8080httpHeaders:- name: "Cookie"value: "shop_session-id=x-readiness-probe"livenessProbe:initialDelaySeconds: 10httpGet:path: "/_healthz"port: 8080httpHeaders:- name: "Cookie"value: "shop_session-id=x-liveness-probe"env:- name: PORTvalue: "8080"- name: PRODUCT_CATALOG_SERVICE_ADDRvalue: "productcatalogservice:3550"- name: CURRENCY_SERVICE_ADDRvalue: "currencyservice:7000"- name: CART_SERVICE_ADDRvalue: "cartservice:7070"- name: RECOMMENDATION_SERVICE_ADDRvalue: "recommendationservice:8080"- name: SHIPPING_SERVICE_ADDRvalue: "shippingservice:50051"- name: CHECKOUT_SERVICE_ADDRvalue: "checkoutservice:5050"- name: AD_SERVICE_ADDRvalue: "adservice:9555"- name: SHOPPING_ASSISTANT_SERVICE_ADDRvalue: "shoppingassistantservice:80"# # ENV_PLATFORM: One of: local, gcp, aws, azure, onprem, alibaba# # When not set, defaults to "local" unless running in GKE, otherwies auto-sets to gcp# - name: ENV_PLATFORM#   value: "aws"- name: ENABLE_PROFILERvalue: "0"# - name: CYMBAL_BRANDING#   value: "true"# - name: ENABLE_ASSISTANT#   value: "true"# - name: FRONTEND_MESSAGE#   value: "Replace this with a message you want to display on all pages."# As part of an optional Google Cloud demo, you can run an optional microservice called the "packaging service".# - name: PACKAGING_SERVICE_URL#   value: "" # This value would look like "http://123.123.123"resources:requests:cpu: 100mmemory: 64Milimits:cpu: 200mmemory: 128Mi
---
apiVersion: v1
kind: Service
metadata:name: frontendlabels:app: frontend
spec:type: ClusterIPselector:app: frontendports:- name: httpport: 80targetPort: 8080
---
apiVersion: v1
kind: Service
metadata:name: frontend-externallabels:app: frontend
spec:type: LoadBalancerselector:app: frontendports:- name: httpport: 80targetPort: 8080
---
apiVersion: v1
kind: ServiceAccount
metadata:name: frontend
---
apiVersion: apps/v1
kind: Deployment
metadata:name: paymentservicelabels:app: paymentservice
spec:selector:matchLabels:app: paymentservicetemplate:metadata:labels:app: paymentservicespec:serviceAccountName: paymentserviceterminationGracePeriodSeconds: 5securityContext:fsGroup: 1000runAsGroup: 1000runAsNonRoot: truerunAsUser: 1000containers:- name: serversecurityContext:allowPrivilegeEscalation: falsecapabilities:drop:- ALLprivileged: falsereadOnlyRootFilesystem: trueimage: us-central1-docker.pkg.dev/google-samples/microservices-demo/paymentservice:v0.10.2ports:- containerPort: 50051env:- name: PORTvalue: "50051"- name: DISABLE_PROFILERvalue: "1"readinessProbe:grpc:port: 50051livenessProbe:grpc:port: 50051resources:requests:cpu: 100mmemory: 64Milimits:cpu: 200mmemory: 128Mi
---
apiVersion: v1
kind: Service
metadata:name: paymentservicelabels:app: paymentservice
spec:type: ClusterIPselector:app: paymentserviceports:- name: grpcport: 50051targetPort: 50051
---
apiVersion: v1
kind: ServiceAccount
metadata:name: paymentservice
---
apiVersion: apps/v1
kind: Deployment
metadata:name: productcatalogservicelabels:app: productcatalogservice
spec:selector:matchLabels:app: productcatalogservicetemplate:metadata:labels:app: productcatalogservicespec:serviceAccountName: productcatalogserviceterminationGracePeriodSeconds: 5securityContext:fsGroup: 1000runAsGroup: 1000runAsNonRoot: truerunAsUser: 1000containers:- name: serversecurityContext:allowPrivilegeEscalation: falsecapabilities:drop:- ALLprivileged: falsereadOnlyRootFilesystem: trueimage: us-central1-docker.pkg.dev/google-samples/microservices-demo/productcatalogservice:v0.10.2ports:- containerPort: 3550env:- name: PORTvalue: "3550"- name: DISABLE_PROFILERvalue: "1"readinessProbe:grpc:port: 3550livenessProbe:grpc:port: 3550resources:requests:cpu: 100mmemory: 64Milimits:cpu: 200mmemory: 128Mi
---
apiVersion: v1
kind: Service
metadata:name: productcatalogservicelabels:app: productcatalogservice
spec:type: ClusterIPselector:app: productcatalogserviceports:- name: grpcport: 3550targetPort: 3550
---
apiVersion: v1
kind: ServiceAccount
metadata:name: productcatalogservice
---
apiVersion: apps/v1
kind: Deployment
metadata:name: cartservicelabels:app: cartservice
spec:selector:matchLabels:app: cartservicetemplate:metadata:labels:app: cartservicespec:serviceAccountName: cartserviceterminationGracePeriodSeconds: 5securityContext:fsGroup: 1000runAsGroup: 1000runAsNonRoot: truerunAsUser: 1000containers:- name: serversecurityContext:allowPrivilegeEscalation: falsecapabilities:drop:- ALLprivileged: falsereadOnlyRootFilesystem: trueimage: us-central1-docker.pkg.dev/google-samples/microservices-demo/cartservice:v0.10.2ports:- containerPort: 7070env:- name: REDIS_ADDRvalue: "redis-cart:6379"resources:requests:cpu: 200mmemory: 64Milimits:cpu: 300mmemory: 128MireadinessProbe:initialDelaySeconds: 15grpc:port: 7070livenessProbe:initialDelaySeconds: 15periodSeconds: 10grpc:port: 7070
---
apiVersion: v1
kind: Service
metadata:name: cartservicelabels:app: cartservice
spec:type: ClusterIPselector:app: cartserviceports:- name: grpcport: 7070targetPort: 7070
---
apiVersion: v1
kind: ServiceAccount
metadata:name: cartservice
---
apiVersion: apps/v1
kind: Deployment
metadata:name: redis-cartlabels:app: redis-cart
spec:selector:matchLabels:app: redis-carttemplate:metadata:labels:app: redis-cartspec:securityContext:fsGroup: 1000runAsGroup: 1000runAsNonRoot: truerunAsUser: 1000containers:- name: redissecurityContext:allowPrivilegeEscalation: falsecapabilities:drop:- ALLprivileged: falsereadOnlyRootFilesystem: trueimage: redis:alpineports:- containerPort: 6379readinessProbe:periodSeconds: 5tcpSocket:port: 6379livenessProbe:periodSeconds: 5tcpSocket:port: 6379volumeMounts:- mountPath: /dataname: redis-dataresources:limits:memory: 256Micpu: 125mrequests:cpu: 70mmemory: 200Mivolumes:- name: redis-dataemptyDir: {}
---
apiVersion: v1
kind: Service
metadata:name: redis-cartlabels:app: redis-cart
spec:type: ClusterIPselector:app: redis-cartports:- name: tcp-redisport: 6379targetPort: 6379
---
apiVersion: apps/v1
kind: Deployment
metadata:name: loadgeneratorlabels:app: loadgenerator
spec:selector:matchLabels:app: loadgeneratorreplicas: 1template:metadata:labels:app: loadgeneratorannotations:sidecar.istio.io/rewriteAppHTTPProbers: "true"spec:serviceAccountName: loadgeneratorterminationGracePeriodSeconds: 5restartPolicy: AlwayssecurityContext:fsGroup: 1000runAsGroup: 1000runAsNonRoot: truerunAsUser: 1000initContainers:- command:- /bin/sh- -exc- |MAX_RETRIES=12RETRY_INTERVAL=10for i in $(seq 1 $MAX_RETRIES); doecho "Attempt $i: Pinging frontend: ${FRONTEND_ADDR}..."STATUSCODE=$(wget --server-response http://${FRONTEND_ADDR} 2>&1 | awk '/^  HTTP/{print $2}')if [ $STATUSCODE -eq 200 ]; thenecho "Frontend is reachable."exit 0fiecho "Error: Could not reach frontend - Status code: ${STATUSCODE}"sleep $RETRY_INTERVALdoneecho "Failed to reach frontend after $MAX_RETRIES attempts."exit 1name: frontend-checksecurityContext:allowPrivilegeEscalation: falsecapabilities:drop:- ALLprivileged: falsereadOnlyRootFilesystem: trueimage: busybox:latestenv:- name: FRONTEND_ADDRvalue: "frontend:80"containers:- name: mainsecurityContext:allowPrivilegeEscalation: falsecapabilities:drop:- ALLprivileged: falsereadOnlyRootFilesystem: trueimage: us-central1-docker.pkg.dev/google-samples/microservices-demo/loadgenerator:v0.10.2env:- name: FRONTEND_ADDRvalue: "frontend:80"- name: USERSvalue: "10"- name: RATEvalue: "1"resources:requests:cpu: 300mmemory: 256Milimits:cpu: 500mmemory: 512Mi
---
apiVersion: v1
kind: ServiceAccount
metadata:name: loadgenerator
---
apiVersion: apps/v1
kind: Deployment
metadata:name: currencyservicelabels:app: currencyservice
spec:selector:matchLabels:app: currencyservicetemplate:metadata:labels:app: currencyservicespec:serviceAccountName: currencyserviceterminationGracePeriodSeconds: 5securityContext:fsGroup: 1000runAsGroup: 1000runAsNonRoot: truerunAsUser: 1000containers:- name: serversecurityContext:allowPrivilegeEscalation: falsecapabilities:drop:- ALLprivileged: falsereadOnlyRootFilesystem: trueimage: us-central1-docker.pkg.dev/google-samples/microservices-demo/currencyservice:v0.10.2ports:- name: grpccontainerPort: 7000env:- name: PORTvalue: "7000"- name: DISABLE_PROFILERvalue: "1"readinessProbe:grpc:port: 7000livenessProbe:grpc:port: 7000resources:requests:cpu: 100mmemory: 64Milimits:cpu: 200mmemory: 128Mi
---
apiVersion: v1
kind: Service
metadata:name: currencyservicelabels:app: currencyservice
spec:type: ClusterIPselector:app: currencyserviceports:- name: grpcport: 7000targetPort: 7000
---
apiVersion: v1
kind: ServiceAccount
metadata:name: currencyservice
---
apiVersion: apps/v1
kind: Deployment
metadata:name: shippingservicelabels:app: shippingservice
spec:selector:matchLabels:app: shippingservicetemplate:metadata:labels:app: shippingservicespec:serviceAccountName: shippingservicesecurityContext:fsGroup: 1000runAsGroup: 1000runAsNonRoot: truerunAsUser: 1000containers:- name: serversecurityContext:allowPrivilegeEscalation: falsecapabilities:drop:- ALLprivileged: falsereadOnlyRootFilesystem: trueimage: us-central1-docker.pkg.dev/google-samples/microservices-demo/shippingservice:v0.10.2ports:- containerPort: 50051env:- name: PORTvalue: "50051"- name: DISABLE_PROFILERvalue: "1"readinessProbe:periodSeconds: 5grpc:port: 50051livenessProbe:grpc:port: 50051resources:requests:cpu: 100mmemory: 64Milimits:cpu: 200mmemory: 128Mi
---
apiVersion: v1
kind: Service
metadata:name: shippingservicelabels:app: shippingservice
spec:type: ClusterIPselector:app: shippingserviceports:- name: grpcport: 50051targetPort: 50051
---
apiVersion: v1
kind: ServiceAccount
metadata:name: shippingservice
---
apiVersion: apps/v1
kind: Deployment
metadata:name: adservicelabels:app: adservice
spec:selector:matchLabels:app: adservicetemplate:metadata:labels:app: adservicespec:serviceAccountName: adserviceterminationGracePeriodSeconds: 5securityContext:fsGroup: 1000runAsGroup: 1000runAsNonRoot: truerunAsUser: 1000containers:- name: serversecurityContext:allowPrivilegeEscalation: falsecapabilities:drop:- ALLprivileged: falsereadOnlyRootFilesystem: trueimage: us-central1-docker.pkg.dev/google-samples/microservices-demo/adservice:v0.10.2ports:- containerPort: 9555env:- name: PORTvalue: "9555"resources:requests:cpu: 200mmemory: 180Milimits:cpu: 300mmemory: 300MireadinessProbe:initialDelaySeconds: 20periodSeconds: 15grpc:port: 9555livenessProbe:initialDelaySeconds: 20periodSeconds: 15grpc:port: 9555
---
apiVersion: v1
kind: Service
metadata:name: adservicelabels:app: adservice
spec:type: ClusterIPselector:app: adserviceports:- name: grpcport: 9555targetPort: 9555
---
apiVersion: v1
kind: ServiceAccount
metadata:name: adservice
# [END gke_release_kubernetes_manifests_microservices_demo]
使用以下命令安装应用程序。
kubectl apply -f /opt/gcp-microservices-demo.yml
由于 gRPC 是二进制编码的,因此您还需要 gRPC 服务的 proto 定义才能发出 gRPC 请求。下载此内容以用于演示应用程序:
curl -o demo.proto https://raw.githubusercontent.com/GoogleCloudPlatform/microservices-demo/main/protos/demo.proto
9.2 部署 gRPCRoute
您可以在 grpc-route.yaml 中找到 gRPC 定义:
root@server:~# yq grpc-route.yaml
apiVersion: gateway.networking.k8s.io/v1
kind: GRPCRoute
metadata:name: productcatalogservice-rule
spec:parentRefs:- namespace: defaultname: cilium-gwrules:- matches:- method:service: hipstershop.ProductCatalogServicemethod: ListProductsbackendRefs:- name: productcatalogserviceport: 3550
---
apiVersion: gateway.networking.k8s.io/v1
kind: GRPCRoute
metadata:name: currencyservice-rule
spec:parentRefs:- namespace: defaultname: cilium-gwrules:- matches:- method:service: hipstershop.CurrencyServicemethod: GetSupportedCurrenciesbackendRefs:- name: currencyserviceport: 7000
这定义了将请求路由到 productcatalogservice 和 currencyservice 微服务的路径。
让我们部署它:
kubectl apply -f grpc-route.yaml
让我们检索负载均衡器的 IP 地址:
GATEWAY=$(kubectl get gateway cilium-gw -o jsonpath='{.status.addresses[0].value}')
echo $GATEWAY
9.3 向后端服务发出 gRPC 请求
在使用 Cilium Gateway API 验证 gRPC 路由之前,让我们验证一下应用程序是否已准备就绪:
root@server:~# k get deployments,svc
NAME                                    READY   UP-TO-DATE   AVAILABLE   AGE
deployment.apps/adservice               1/1     1            1           2m24s
deployment.apps/cartservice             1/1     1            1           2m24s
deployment.apps/checkoutservice         1/1     1            1           2m24s
deployment.apps/currencyservice         1/1     1            1           2m24s
deployment.apps/echo-1                  1/1     1            1           49m
deployment.apps/emailservice            1/1     1            1           2m24s
deployment.apps/frontend                1/1     1            1           2m24s
deployment.apps/infra-backend-v1        1/1     1            1           42m
deployment.apps/infra-backend-v2        1/1     1            1           42m
deployment.apps/loadgenerator           1/1     1            1           2m24s
deployment.apps/paymentservice          1/1     1            1           2m24s
deployment.apps/productcatalogservice   1/1     1            1           2m24s
deployment.apps/recommendationservice   1/1     1            1           2m24s
deployment.apps/redis-cart              1/1     1            1           2m24s
deployment.apps/shippingservice         1/1     1            1           2m24sNAME                               TYPE           CLUSTER-IP      EXTERNAL-IP      PORT(S)        AGE
service/adservice                  ClusterIP      10.96.51.247    <none>           9555/TCP       2m24s
service/cartservice                ClusterIP      10.96.13.45     <none>           7070/TCP       2m24s
service/checkoutservice            ClusterIP      10.96.249.150   <none>           5050/TCP       2m24s
service/cilium-gateway-cilium-gw   LoadBalancer   10.96.89.106    172.18.255.200   80:30730/TCP   49m
service/currencyservice            ClusterIP      10.96.140.54    <none>           7000/TCP       2m24s
service/echo-1                     ClusterIP      10.96.69.125    <none>           8080/TCP       49m
service/emailservice               ClusterIP      10.96.42.152    <none>           5000/TCP       2m24s
service/frontend                   ClusterIP      10.96.83.181    <none>           80/TCP         2m24s
service/frontend-external          LoadBalancer   10.96.189.72    172.18.255.202   80:32276/TCP   2m24s
service/infra-backend-v1           ClusterIP      10.96.128.114   <none>           8080/TCP       42m
service/infra-backend-v2           ClusterIP      10.96.222.192   <none>           8080/TCP       42m
service/kubernetes                 ClusterIP      10.96.0.1       <none>           443/TCP        3h52m
service/paymentservice             ClusterIP      10.96.183.182   <none>           50051/TCP      2m24s
service/productcatalogservice      ClusterIP      10.96.127.193   <none>           3550/TCP       2m24s
service/recommendationservice      ClusterIP      10.96.248.178   <none>           8080/TCP       2m24s
service/redis-cart                 ClusterIP      10.96.117.155   <none>           6379/TCP       2m24s
service/shippingservice            ClusterIP      10.96.1.171     <none>           50051/TCP      2m24s
让我们尝试访问应用程序的货币服务,其中列出了购物应用程序支持的货币:
root@server:~# grpcurl -plaintext -proto ./demo.proto $GATEWAY:80 hipstershop.CurrencyService/GetSupportedCurrencies | jq
{"currencyCodes": ["EUR","USD","JPY","BGN","CZK","DKK","GBP","HUF","PLN","RON","SEK","CHF","ISK","NOK","HRK","RUB","TRY","AUD","BRL","CAD","CNY","HKD","IDR","ILS","INR","KRW","MXN","MYR","NZD","PHP","SGD","THB","ZAR"]
}
此外,请尝试使用以下命令访问产品目录服务:
root@server:~# grpcurl -plaintext -proto ./demo.proto $GATEWAY:80 hipstershop.ProductCatalogService/ListProducts | jq
{"products": [{"id": "OLJCESPC7Z","name": "Sunglasses","description": "Add a modern touch to your outfits with these sleek aviator sunglasses.","picture": "/static/img/products/sunglasses.jpg","priceUsd": {"currencyCode": "USD","units": "19","nanos": 990000000},"categories": ["accessories"]},{"id": "66VCHSJNUP","name": "Tank Top","description": "Perfectly cropped cotton tank, with a scooped neckline.","picture": "/static/img/products/tank-top.jpg","priceUsd": {"currencyCode": "USD","units": "18","nanos": 990000000},"categories": ["clothing","tops"]},{"id": "1YMWWN1N4O","name": "Watch","description": "This gold-tone stainless steel watch will work with most of your outfits.","picture": "/static/img/products/watch.jpg","priceUsd": {"currencyCode": "USD","units": "109","nanos": 990000000},"categories": ["accessories"]},{"id": "L9ECAV7KIM","name": "Loafers","description": "A neat addition to your summer wardrobe.","picture": "/static/img/products/loafers.jpg","priceUsd": {"currencyCode": "USD","units": "89","nanos": 990000000},"categories": ["footwear"]},{"id": "2ZYFJ3GM2N","name": "Hairdryer","description": "This lightweight hairdryer has 3 heat and speed settings. It's perfect for travel.","picture": "/static/img/products/hairdryer.jpg","priceUsd": {"currencyCode": "USD","units": "24","nanos": 990000000},"categories": ["hair","beauty"]},{"id": "0PUK6V6EV0","name": "Candle Holder","description": "This small but intricate candle holder is an excellent gift.","picture": "/static/img/products/candle-holder.jpg","priceUsd": {"currencyCode": "USD","units": "18","nanos": 990000000},"categories": ["decor","home"]},{"id": "LS4PSXUNUM","name": "Salt & Pepper Shakers","description": "Add some flavor to your kitchen.","picture": "/static/img/products/salt-and-pepper-shakers.jpg","priceUsd": {"currencyCode": "USD","units": "18","nanos": 490000000},"categories": ["kitchen"]},{"id": "9SIQT8TOJO","name": "Bamboo Glass Jar","description": "This bamboo glass jar can hold 57 oz (1.7 l) and is perfect for any kitchen.","picture": "/static/img/products/bamboo-glass-jar.jpg","priceUsd": {"currencyCode": "USD","units": "5","nanos": 490000000},"categories": ["kitchen"]},{"id": "6E92ZMYYFZ","name": "Mug","description": "A simple mug with a mustard interior.","picture": "/static/img/products/mug.jpg","priceUsd": {"currencyCode": "USD","units": "8","nanos": 990000000},"categories": ["kitchen"]}]
}
您应该在输出中看到 JSON 中的产品集合,包括candle holder、sunglasses和sunglasses!
10. 内部L7 流量管理
10.1 部署示例应用程序
我们把应用部署在 gamma 命名空间中
配置文件内容:
root@server:~# yq gamma-manifest.yaml
---
apiVersion: v1
kind: Namespace
metadata:name: gamma
---
apiVersion: apps/v1
kind: Deployment
metadata:name: echo-v1namespace: gammalabels:app: echo
spec:selector:matchLabels:app: echoversion: v1template:metadata:labels:app: echoversion: v1spec:containers:- name: echoimage: gcr.io/k8s-staging-gateway-api/echo-advanced:v20240412-v1.0.0-394-g40c666fdimagePullPolicy: IfNotPresentargs:- --tcp=9090- --port=8080- --grpc=7070- --port=8443- --tls=8443- --crt=/cert.crt- --key=/cert.key
---
apiVersion: v1
kind: Service
metadata:name: echo-v1namespace: gamma
spec:selector:app: echoversion: v1ports:- name: httpport: 80appProtocol: httptargetPort: 8080- name: http-altport: 8080appProtocol: http- name: httpsport: 443targetPort: 8443- name: tcpport: 9090- name: grpcport: 7070appProtocol: grpc
---
apiVersion: apps/v1
kind: Deployment
metadata:name: echo-v2namespace: gammalabels:app: echo
spec:selector:matchLabels:app: echoversion: v2template:metadata:labels:app: echoversion: v2spec:containers:- name: echoimage: gcr.io/k8s-staging-gateway-api/echo-advanced:v20240412-v1.0.0-394-g40c666fdimagePullPolicy: IfNotPresentargs:- --tcp=9090- --port=8080- --grpc=7070- --port=8443- --tls=8443- --crt=/cert.crt- --key=/cert.key
---
apiVersion: v1
kind: Service
metadata:name: echo-v2namespace: gamma
spec:selector:app: echoversion: v2ports:- name: httpport: 80appProtocol: httptargetPort: 8080- name: http-altport: 8080appProtocol: http- name: httpsport: 443targetPort: 8443- name: tcpport: 9090- name: grpcport: 7070appProtocol: grpc
---
apiVersion: v1
kind: Service
metadata:name: echonamespace: gamma
spec:selector:app: echoports:- name: httpport: 80appProtocol: httptargetPort: 8080- name: http-altport: 8080appProtocol: http- name: httpsport: 443targetPort: 8443- name: tcpport: 9090- name: grpcport: 7070appProtocol: grpc
---
apiVersion: v1
kind: Pod
metadata:name: clientnamespace: gamma
spec:containers:- name: netshootimage: nicolaka/netshoot:latestcommand: ["sleep", "infinite"]
使用以下命令安装应用程序。
kubectl apply -f gamma-manifest.yaml
等待所有 Pod 都运行:
root@server:~# kubectl -n gamma get pods,svc
NAME                           READY   STATUS    RESTARTS   AGE
pod/client                     1/1     Running   0          14s
pod/echo-v1-5d8d6c7585-fbnxr   1/1     Running   0          14s
pod/echo-v2-58dd495596-jpq4p   1/1     Running   0          14sNAME              TYPE        CLUSTER-IP      EXTERNAL-IP   PORT(S)                                     AGE
service/echo      ClusterIP   10.96.156.225   <none>        80/TCP,8080/TCP,443/TCP,9090/TCP,7070/TCP   14s
service/echo-v1   ClusterIP   10.96.151.103   <none>        80/TCP,8080/TCP,443/TCP,9090/TCP,7070/TCP   14s
service/echo-v2   ClusterIP   10.96.7.131     <none>        80/TCP,8080/TCP,443/TCP,9090/TCP,7070/TCP   14s
10.2 部署东西 HTTPRoute
让我们在 gamma 命名空间中部署一个 HTTPRoute。
在 gamma-route.yaml 中检查它的定义:
root@server:~# yq gamma-route.yaml
---
apiVersion: gateway.networking.k8s.io/v1
kind: HTTPRoute
metadata:name: gamma-routenamespace: gamma
spec:parentRefs:- group: ""kind: Servicename: echorules:- matches:- path:type: Exactvalue: /v1backendRefs:- name: echo-v1port: 80- matches:- path:type: Exactvalue: /v2backendRefs:- name: echo-v2port: 80
您会注意到,我们没有像之前的挑战那样将路由附加到(南/北)网关,而是使用 parentRefs 字段将路由附加到名为 echo 的父服务。
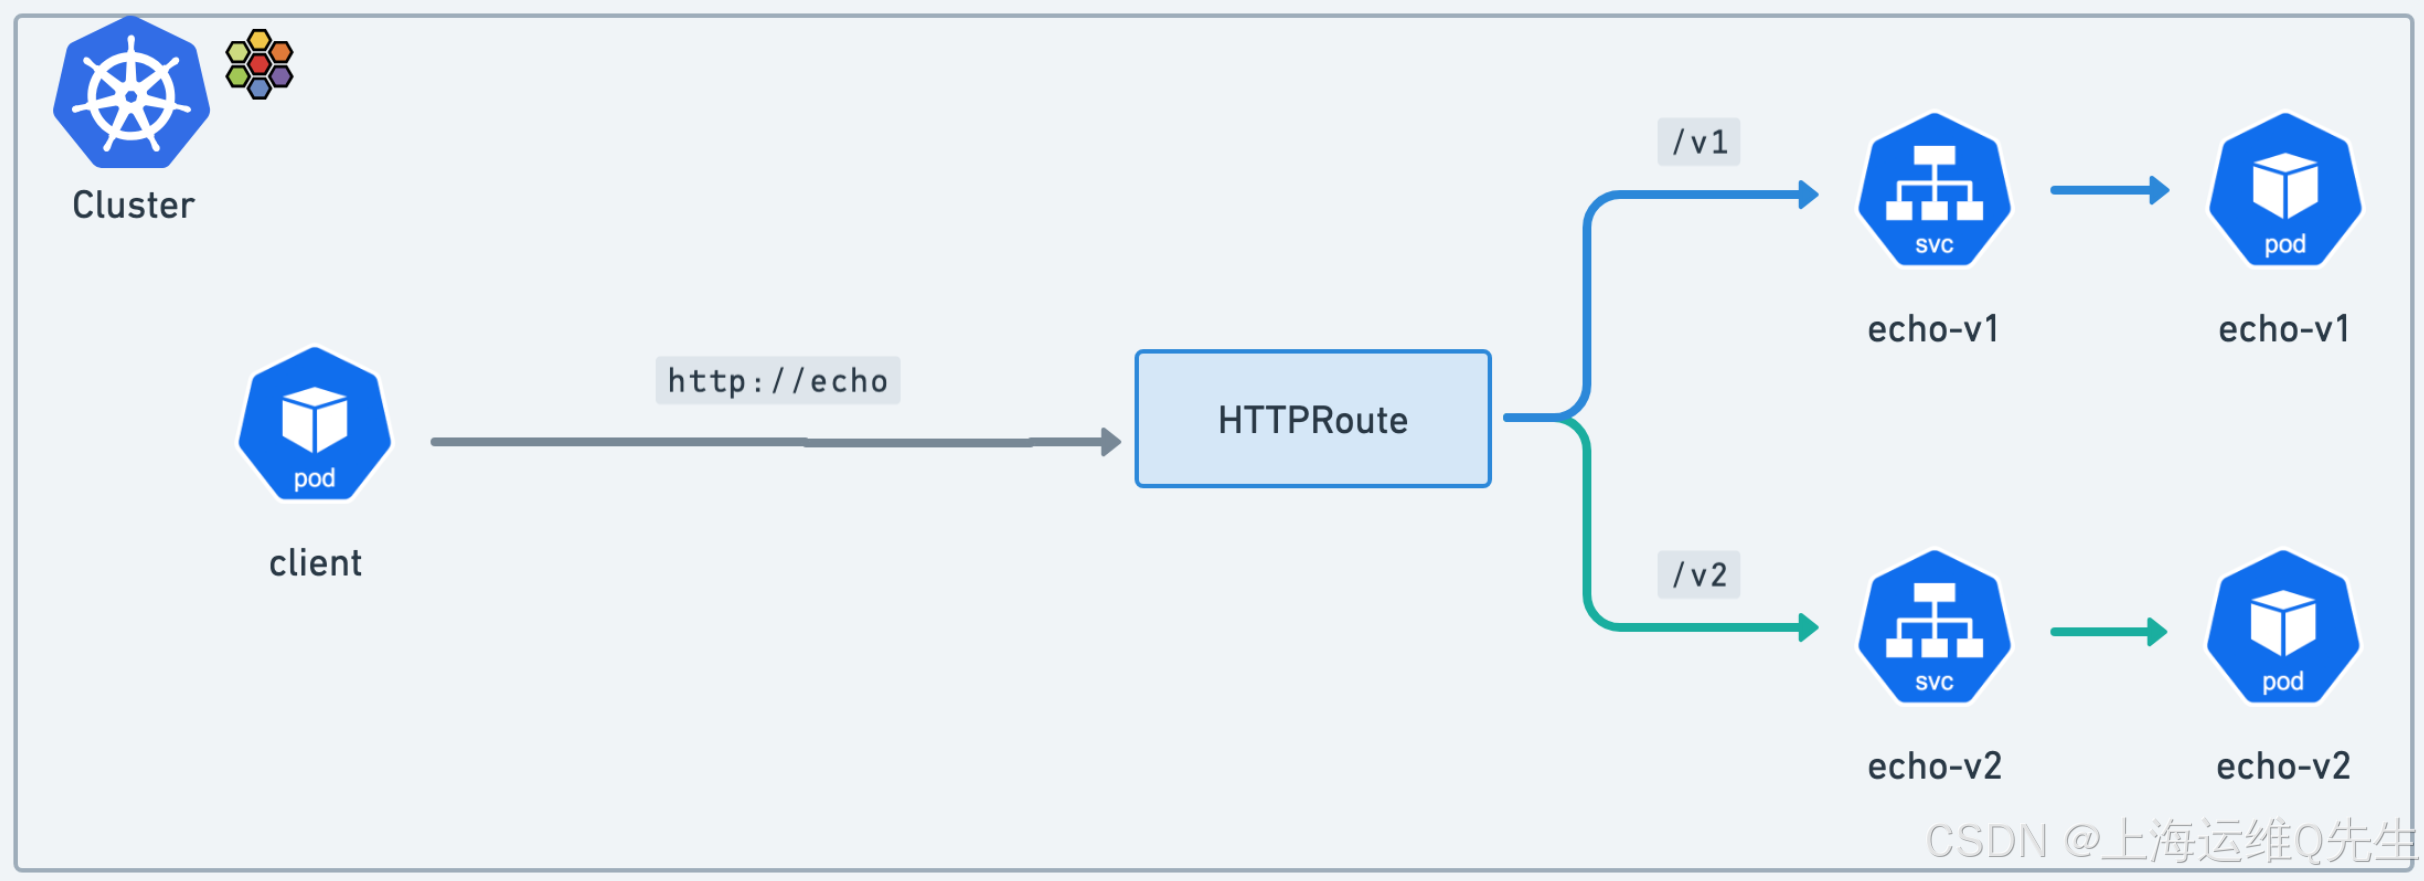
绑定到此父服务的流量将被 Cilium 拦截,并通过每个节点的 Envoy 代理路由。
请注意我们如何将流量转发到 echo-v1 服务的 /v1 路径,v2 也是如此。例如,这就是我们如何对内部应用程序进行 a/b 或绿色/蓝色金丝雀测试。
让我们部署它:
kubectl apply -f gamma-route.yaml
10.3 验证东西向 L7 流量管理
与之前的任务不同,我们从集群外部通过南北网关访问集群内的服务,而这次我们将从集群内部的客户端向同样位于集群(东西)流量中的服务发出请求。
让我们验证一下我们的集群客户端是否已准备就绪:
root@server:~# kubectl get -n gamma pods client
NAME     READY   STATUS    RESTARTS   AGE
client   1/1     Running   0          3m14s
让我们尝试从客户端访问 http://echo/v1。echo-v1 的 echo Pod 将回复信息,包括它自己的主机名。
root@server:~# kubectl -n gamma exec -it client -- curl http://echo/v1
ServiceVersion=
ServicePort=8080
Host=echo
URL=/v1
Method=GET
Proto=HTTP/1.1
IP=10.244.1.80
RequestHeader=Accept:*/*
RequestHeader=User-Agent:curl/8.7.1
RequestHeader=X-Envoy-Internal:true
RequestHeader=X-Forwarded-For:10.244.1.234
RequestHeader=X-Forwarded-Proto:http
RequestHeader=X-Request-Id:a614487b-e6ec-4e99-a1b0-3c7ffba66ae6
Hostname=echo-v1-5d8d6c7585-fbnxr
回复中的最后一行应遵循以下格式:
Hostname=echo-v1-*********-*****
现在,让我们从客户端访问 http://echo/v2。这一次,流量将被转发到为 echo-v2 服务提供服务的 echo Pod。让我们通过使用 grep 进行过滤来验证 echo-v2 Pod 是否收到了流量:
root@server:~# kubectl -n gamma exec -it client -- curl http://echo/v2
ServiceVersion=
ServicePort=8080
Host=echo
URL=/v2
Method=GET
Proto=HTTP/1.1
IP=10.244.1.80
RequestHeader=Accept:*/*
RequestHeader=User-Agent:curl/8.7.1
RequestHeader=X-Envoy-Internal:true
RequestHeader=X-Forwarded-For:10.244.1.234
RequestHeader=X-Forwarded-Proto:http
RequestHeader=X-Request-Id:b60bf3f6-3993-41f3-a6d2-a523a9170671
Hostname=echo-v2-58dd495596-jpq4p
如您所见,使用与 Gateway API 相同的 API 和逻辑,我们能够对集群内的东西向流量进行基于路径的路由。
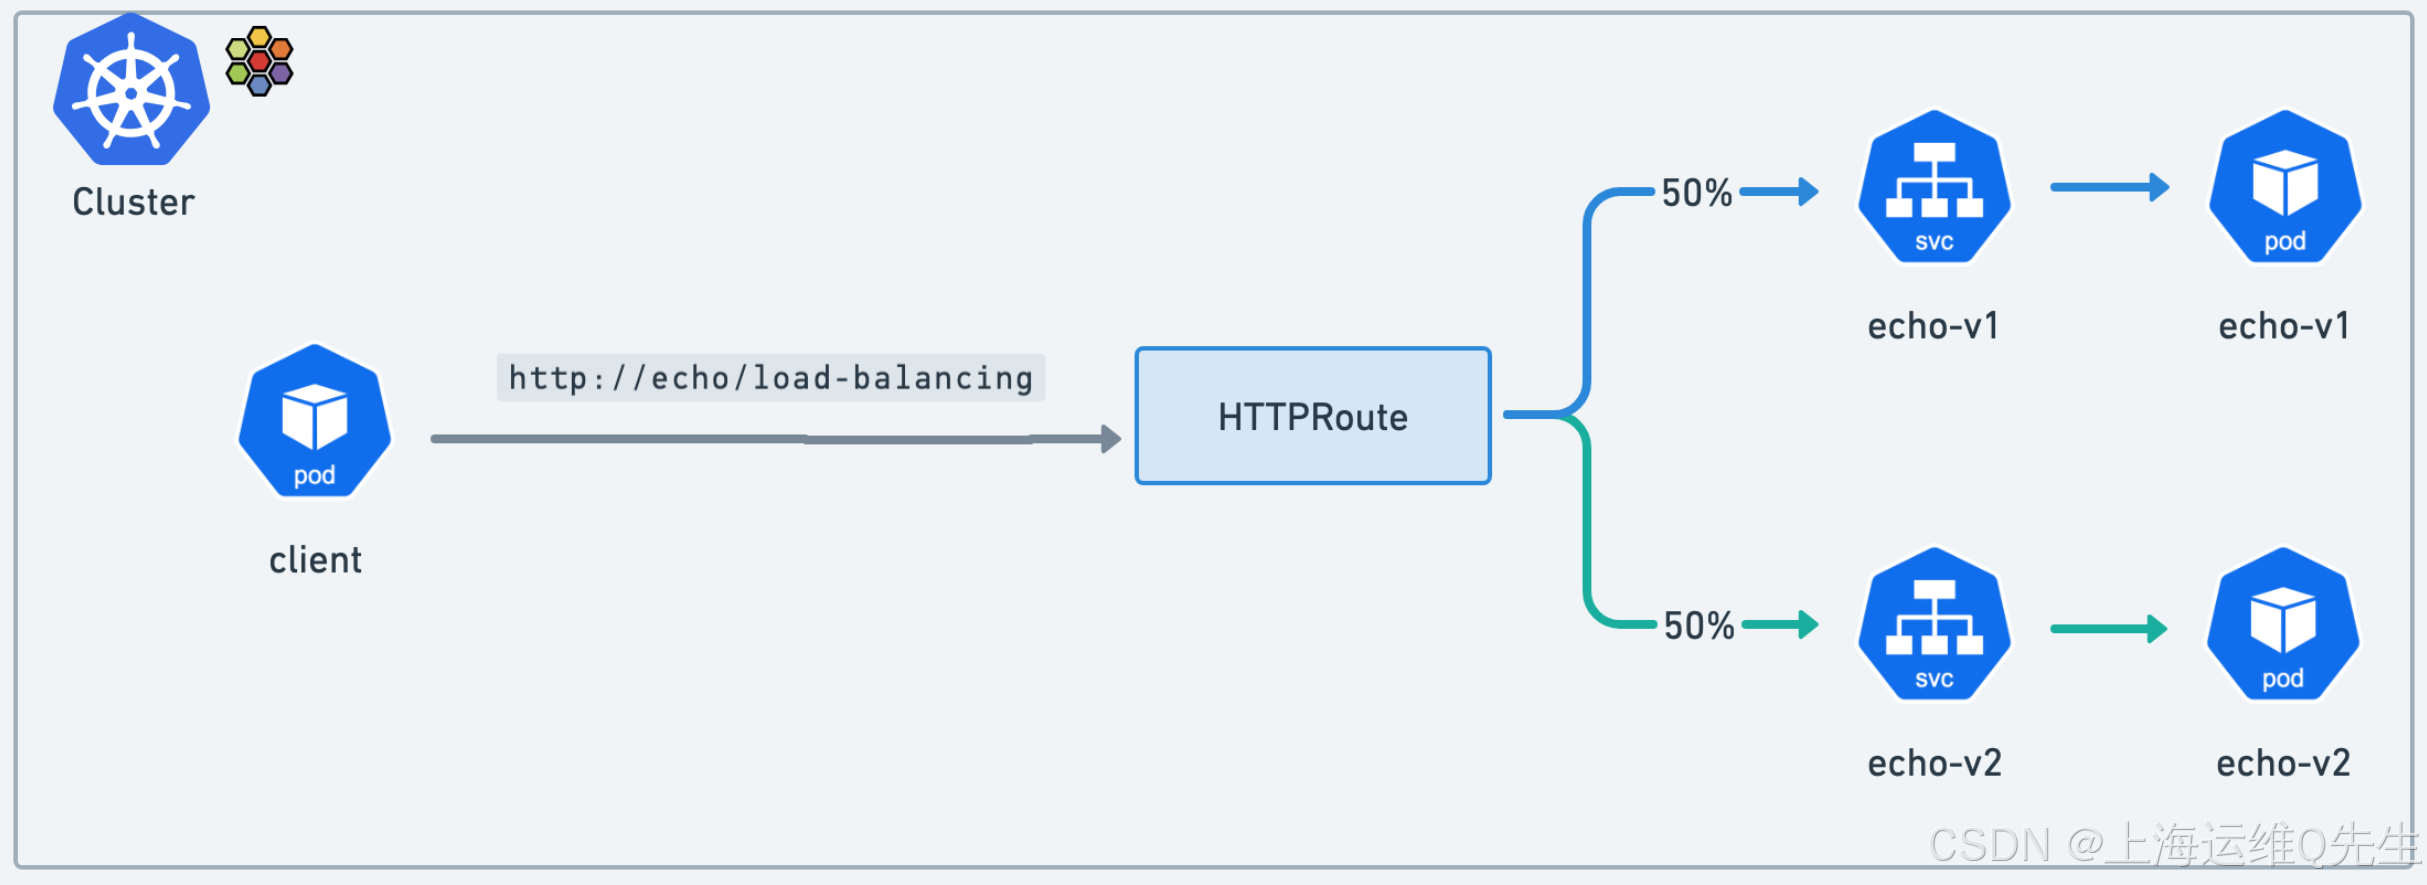
10.4 东西向负载均衡
我们在第一个 Gateway API 实验中探讨了这个用例,我们在 2 个服务之间进行了一些流量拆分。同样,使用相同的 API,我们现在可以在集群中为东西向流量执行此作。
确认下 HTTPRoute 清单。
root@server:~# yq load-balancing-http-route.yaml
---
apiVersion: gateway.networking.k8s.io/v1
kind: HTTPRoute
metadata:name: gamma-routenamespace: gamma
spec:parentRefs:- group: ""kind: Servicename: echorules:- matches:- path:type: Exactvalue: /v1backendRefs:- name: echo-v1port: 80- matches:- path:type: Exactvalue: /v2backendRefs:- name: echo-v2port: 80- matches:- path:type: PathPrefixvalue: /load-balancingbackendRefs:- kind: Servicename: echo-v1port: 80weight: 50- kind: Servicename: echo-v2port: 80weight: 50
让我们使用以下清单更新 gamma HTTPRoute:
kubectl apply -f load-balancing-http-route.yaml
此清单添加了一个具有简单 L7 代理路由的规则:对于路径以 /load-balancing 开头的 HTTP 流量,将流量转发到 echo-v1 和 echo-v2 服务。
backendRefs:- kind: Servicename: echo-v1port: 80weight: 50- kind: Servicename: echo-v2port: 80weight: 50
注意均匀的 50/50 权重。
让我们通过运行循环并计算请求数来仔细检查流量是否在两个服务之间均匀分配。运行以下脚本。
root@server:~# kubectl -n gamma exec -it client -- bash -c '
for _ in {1..500}; docurl -s -k "http://echo/load-balancing" >> curlresponses.txt;
done
grep -o "Hostname=echo-v1" curlresponses.txt | sort | uniq -c
grep -o "Hostname=echo-v2" curlresponses.txt | sort | uniq -c
'257 Hostname=echo-v1243 Hostname=echo-v2
10.5 90/10 流量拆分
这一次,我们将应用不同的权重。

编辑 load-balancing-http-route.yaml 文件。将权重从 echo-v1 和 echo-v2 的 50 替换为 echo-v1 的 90 和 echo-v2 的 10。
root@server:~# yq load-balancing-http-route.yaml
---
apiVersion: gateway.networking.k8s.io/v1
kind: HTTPRoute
metadata:name: gamma-routenamespace: gamma
spec:parentRefs:- group: ""kind: Servicename: echorules:- matches:- path:type: Exactvalue: /v1backendRefs:- name: echo-v1port: 80- matches:- path:type: Exactvalue: /v2backendRefs:- name: echo-v2port: 80- matches:- path:type: PathPrefixvalue: /load-balancingbackendRefs:- kind: Servicename: echo-v1port: 80weight: 90- kind: Servicename: echo-v2port: 80weight: 10
应用配置:
k apply -f load-balancing-http-route.yaml
让我们再次运行测试脚本并计算响应数:
root@server:~# kubectl -n gamma exec -it client -- bash -c '
for _ in {1..1000}; docurl -s -k "http://echo/load-balancing" >> curlresponses9010.txt;
done
grep -o "Hostname=echo-v1" curlresponses9010.txt | sort | uniq -c
grep -o "Hostname=echo-v2" curlresponses9010.txt | sort | uniq -c
'894 Hostname=echo-v1106 Hostname=echo-v2
验证响应是否分散,其中大约 90% 的响应传播到 echo-1,大约 10% 的响应传播到 echo-2。
10.6 超时
HTTPRoutes 支持将超时作为一项实验性功能。让我们将其应用于之前部署的 gamma-route 的 /v1 路径。
首先,检查服务的响应标头:
root@server:~# kubectl -n gamma exec -it client -- curl http://echo/v1
ServiceVersion=
ServicePort=8080
Host=echo
URL=/v1
Method=GET
Proto=HTTP/1.1
IP=10.244.1.80
RequestHeader=Accept:*/*
RequestHeader=User-Agent:curl/8.7.1
RequestHeader=X-Envoy-Internal:true
RequestHeader=X-Forwarded-For:10.244.1.234
RequestHeader=X-Forwarded-Proto:http
RequestHeader=X-Request-Id:1d22cdb3-4ae2-4e07-84b2-fc48cd10088e
Hostname=echo-v1-5d8d6c7585-fbnxr
此时没有提到超时的标头。
让我们为路由添加 10 毫秒的超时。
root@server:~# yq load-balancing-http-route.yaml
---
apiVersion: gateway.networking.k8s.io/v1
kind: HTTPRoute
metadata:name: gamma-routenamespace: gamma
spec:parentRefs:- group: ""kind: Servicename: echorules:- matches:- path:type: Exactvalue: /v1backendRefs:- name: echo-v1port: 80timeouts:request: 10msbackendRefs:- name: echo-v1port: 80- matches:- path:type: Exactvalue: /v2backendRefs:- name: echo-v2port: 80- matches:- path:type: PathPrefixvalue: /load-balancingbackendRefs:- kind: Servicename: echo-v1port: 80weight: 90- kind: Servicename: echo-v2port: 80weight: 10
这次我们修改了/v1部分的配置
- matches:- path:type: Exactvalue: /v1backendRefs:- name: echo-v1port: 80timeouts:request: 10ms
应用配置
kubectl apply -f load-balancing-http-route.yaml
现在,再次检查该服务:
root@server:~# kubectl -n gamma exec -it client -- curl http://echo/v1
ServiceVersion=
ServicePort=8080
Host=echo
URL=/v1
Method=GET
Proto=HTTP/1.1
IP=10.244.1.80
RequestHeader=Accept:*/*
RequestHeader=User-Agent:curl/8.7.1
RequestHeader=X-Envoy-Expected-Rq-Timeout-Ms:10   <<---------超时设置的新 Envoy 标头
RequestHeader=X-Envoy-Internal:true
RequestHeader=X-Forwarded-For:10.244.1.234
RequestHeader=X-Forwarded-Proto:http
RequestHeader=X-Request-Id:fd77f55f-6187-4fca-a447-13181a7c4707
Hostname=echo-v1-5d8d6c7585-fbnxr
再次修改超时时间,改为1,并重新发布
root@server:~# yq load-balancing-http-route.yaml
---
apiVersion: gateway.networking.k8s.io/v1
kind: HTTPRoute
metadata:name: gamma-routenamespace: gamma
spec:parentRefs:- group: ""kind: Servicename: echorules:- matches:- path:type: Exactvalue: /v1backendRefs:- name: echo-v1port: 80timeouts:request: 1msbackendRefs:- name: echo-v1port: 80- matches:- path:type: Exactvalue: /v2backendRefs:- name: echo-v2port: 80- matches:- path:type: PathPrefixvalue: /load-balancingbackendRefs:- kind: Servicename: echo-v1port: 80weight: 90- kind: Servicename: echo-v2port: 80weight: 10
root@server:~# k apply -f load-balancing-http-route.yaml
httproute.gateway.networking.k8s.io/gamma-route configured
再次检查服务:
鉴于阈值非常低,您现在应该在大多数时间获得超时(如果没有,请尝试多次):
root@server:~# kubectl -n gamma exec -it client -- curl http://echo/v1
upstream request timeout
root@server:~# kubectl -n gamma exec -it client -- curl http://echo/v1
ServiceVersion=
ServicePort=8080
Host=echo
URL=/v1
Method=GET
Proto=HTTP/1.1
IP=10.244.1.80
RequestHeader=Accept:*/*
RequestHeader=User-Agent:curl/8.7.1
RequestHeader=X-Envoy-Expected-Rq-Timeout-Ms:1  <--------------
RequestHeader=X-Envoy-Internal:true
RequestHeader=X-Forwarded-For:10.244.1.234
RequestHeader=X-Forwarded-Proto:http
RequestHeader=X-Request-Id:4c47f46d-34d3-42d0-8da2-b32d08a51ad6
Hostname=echo-v1-5d8d6c7585-fbnxr
10.7 小测验
×	With the Gateway API, you can modify HTTP request headers but not HTTP response headers.
√	Cross-namespace attachment is bi-directional.
√	To do traffic splitting into your cluster, you can adjust the weights set to the Services.
×	With the Gateway API, you can add a HTTP header to your request but you cannot remove or edit them.
11. 最终测试
11.1 题目
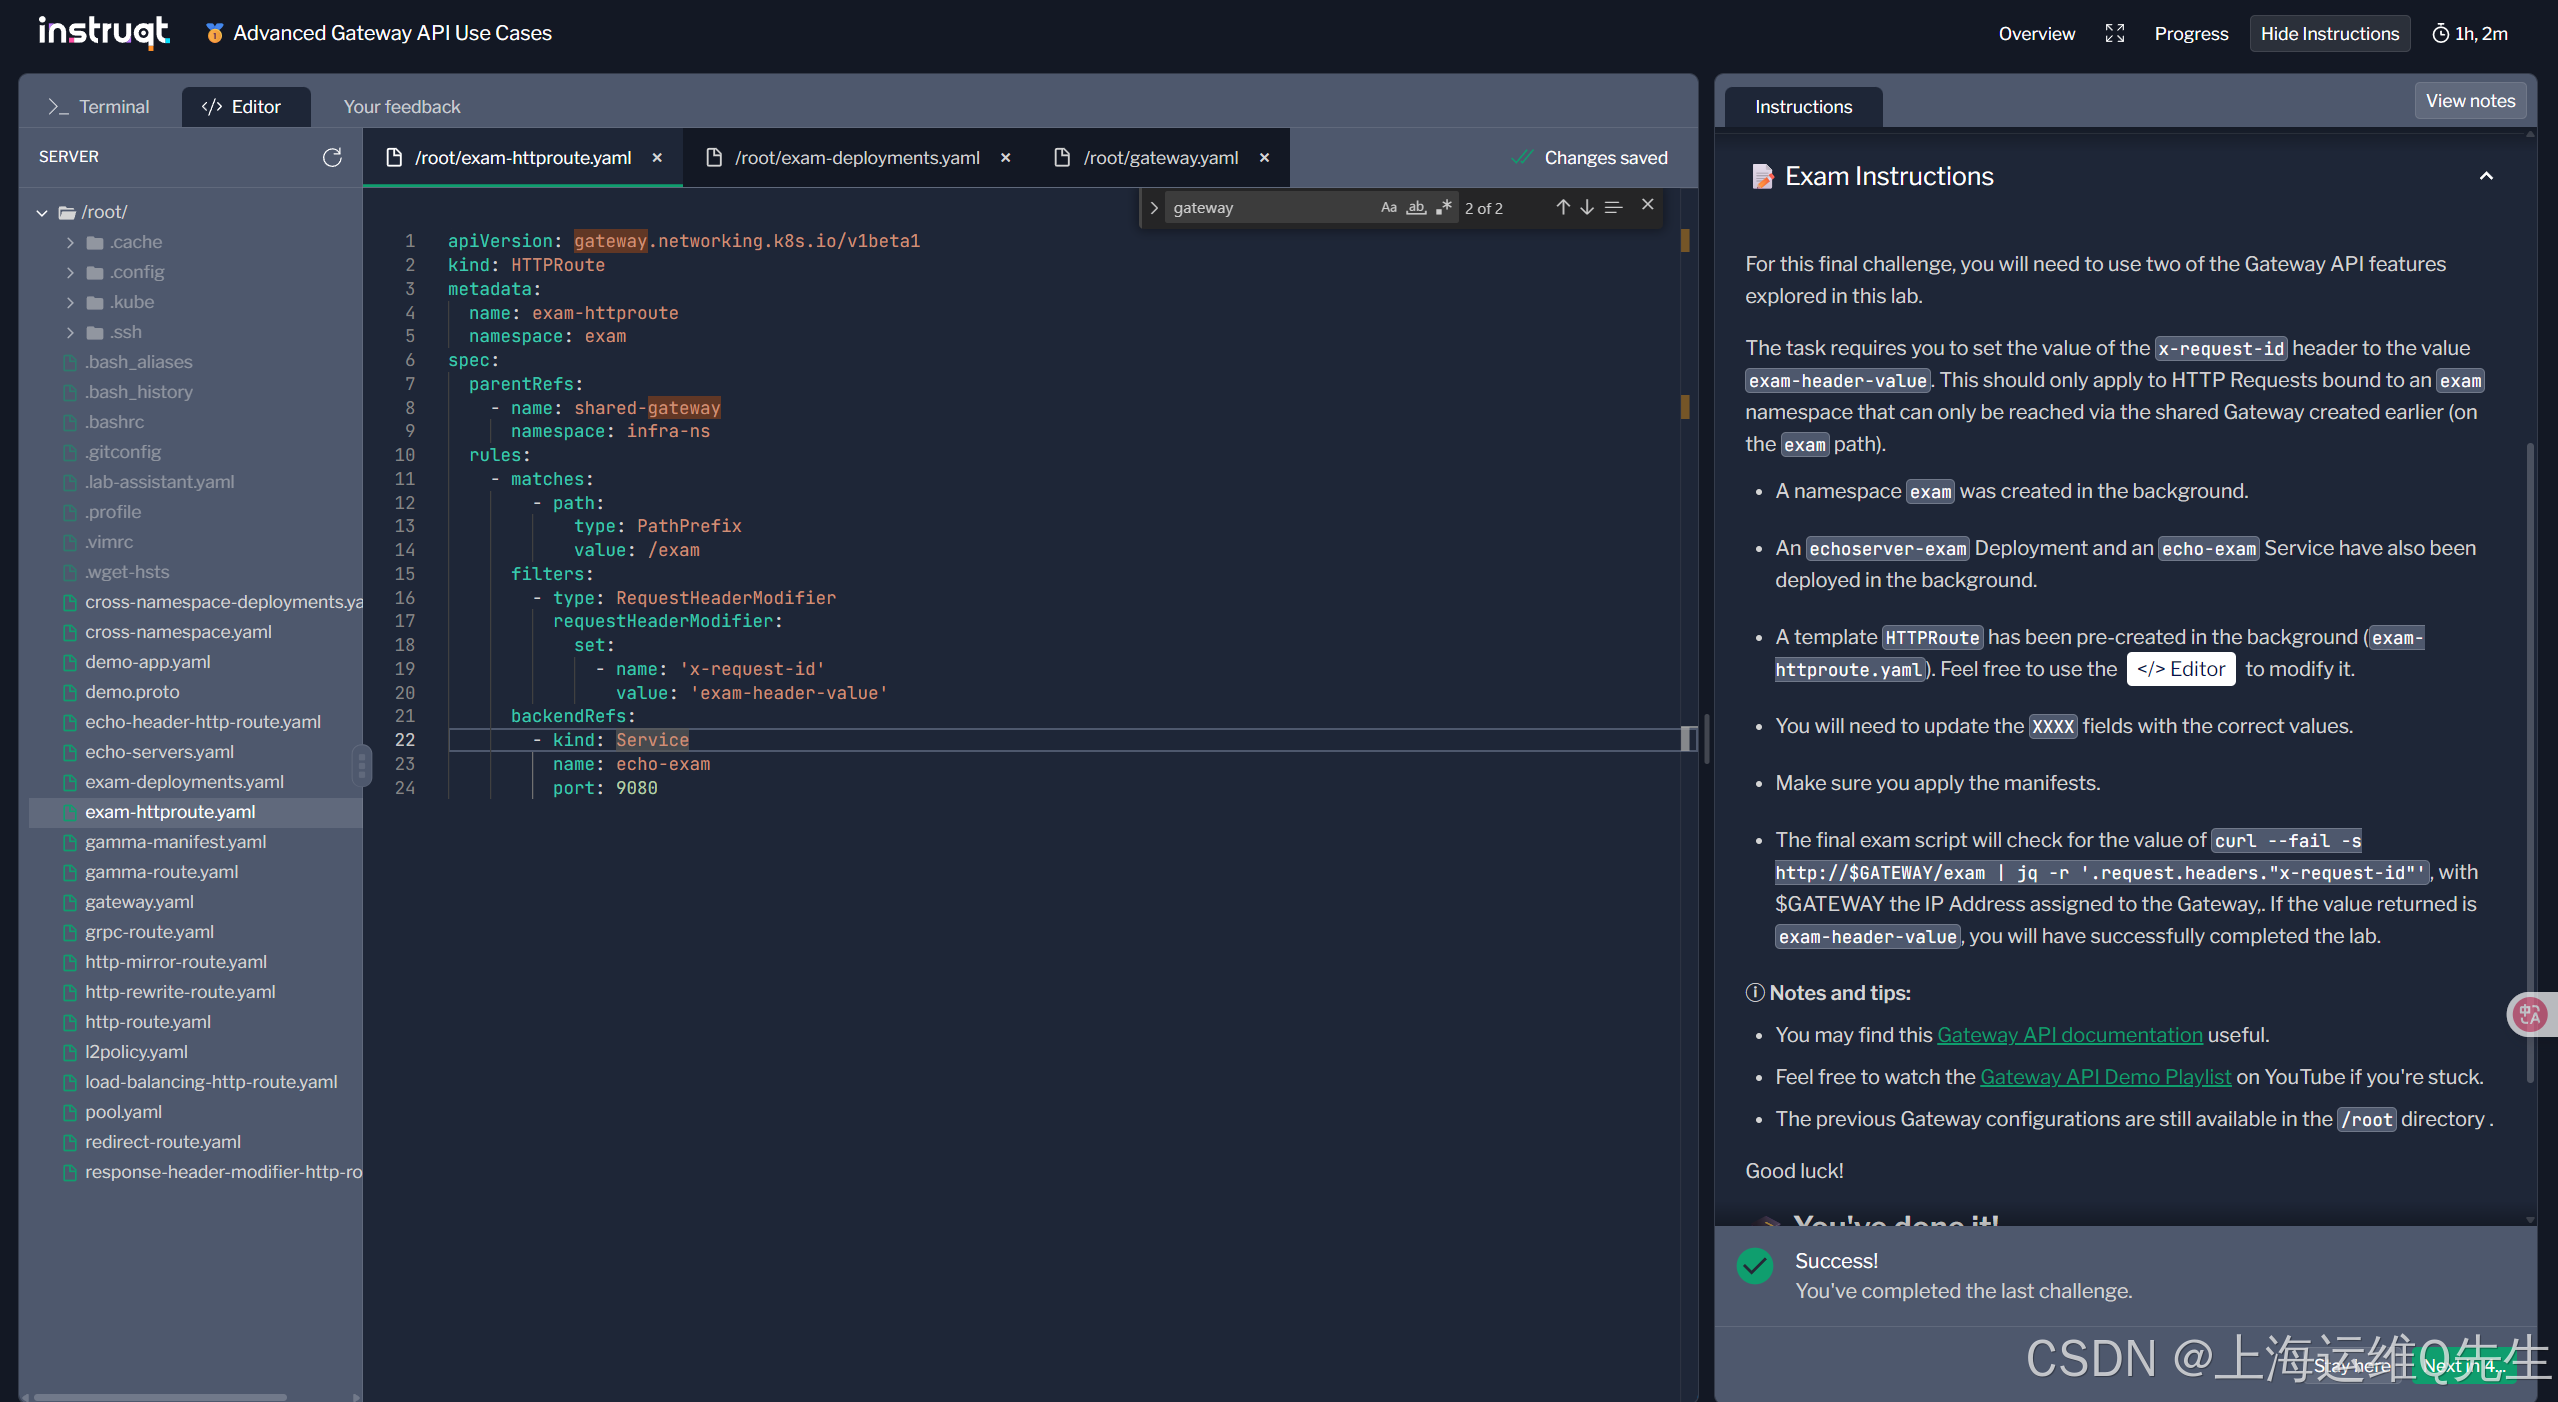
该任务要求您将 x-request-id 标头的值设置为值 exam-header-value。这应仅适用于绑定到exam命名空间的 HTTP 请求,该命名空间只能通过之前创建的共享网关(在exam路径上)访问。
- 在后台创建了一个命名空间
exam。 echoserver-examDeployment 和echo-examService 也已在后台部署。- 已在后台预先创建了模板
HTTPRoute(exam-httproute.yaml)。 - 您需要使用正确的值更新
XXXX字段。 - 确保应用清单。
- 期末考试脚本将检查
curl --fail -s http://$GATEWAY/exam | jq -r '.request.headers."x-request-id"'的值,其中 $GATEWAY 分配给网关的 IP 地址。如果返回的值为exam-header-value,则表示您将成功完成实验。
11.2 解题
- 确认ns开启了shared-gateway-access
root@server:~# k get ns --show-labels exam
NAME   STATUS   AGE   LABELS
exam   Active   56s   kubernetes.io/metadata.name=exam,shared-gateway-access=true
- 应用配置文件
root@server:~# k apply -f exam-httproute.yaml
httproute.gateway.networking.k8s.io/exam-httproute created
root@server:~# yq exam-httproute.yaml
---
apiVersion: gateway.networking.k8s.io/v1beta1
kind: HTTPRoute
metadata:name: exam-httproutenamespace: exam
spec:parentRefs:- name: shared-gatewaynamespace: infra-nsrules:- matches:- path:type: PathPrefixvalue: /examfilters:- type: RequestHeaderModifierrequestHeaderModifier:set:- name: 'x-request-id'value: 'exam-header-value'backendRefs:- kind: Servicename: echo-examport: 9080
获取GATEWAY
GATEWAY=$(kubectl get gateway cilium-gw -o jsonpath='{.status.addresses[0].value}')
echo $GATEWAY
测试
curl --fail -s http://$GATEWAY/exam | jq -r '.request.headers."x-request-id"'
确认无误后提交!
新徽标GET!