【iOS】cell的复用以及自定义cell
【iOS】cell的复用以及自定义cell
文章目录
- 【iOS】cell的复用以及自定义cell
- 前言
- cell的复用
- 手动(非注册)
- 自动(注册)
- 自定义cell
前言
- cell的复用及自定义cell是UITableView或UICollectionView的一个重要优化机制,当用户滚动视图时,只有少量可见的cell会被创建与显示,暂时不可见的,都会缓存起来以备后面复用,这个机制主要是为了提高应用性能。(创建与销毁都是相对开销高的操作,通过复用cell,可以避免不必要的视图创建与销毁,从而提高应用的滚动性能)
UICollectionView = 更自由、更强大的“多列列表”控件,适合做复杂的网格/横滑页面,如相册等
- 自定义cell可以更好的控制cell的外观和行为,提高代码的可读与维护性,自定义cell的步骤主要有:创建自定义cell类(继承于UITableViewCell),添加UI元素(如标签,按钮等),设置cell的布局(即调整组数与行数或者位置),及在TableView中使用自定义Cell。
实际开发里,我们通常会结合使用cell复用与自定义cell,可以达到优化性能和满足特定需求的目的
cell的复用
cell复用的主要概念前面已经讲了,下面主要介绍其内容,cell的复用主要有两种方法,分为自动(注册)和手动复用(非注册),现在更推荐自动的方式。二者的主要区别在于是否注册复用标识符,以及使用了哪个方法来取cell。
手动(非注册)
不用注册 cell,而是自己判断是否有复用的 cell,如果没有就手动创建一个。
-
在 cellForRowAtIndexPath中使用 dequeueReusableCellWithIdentifier:
UITableViewCell *cell = [tableView dequeueReusableCellWithIdentifier:@"cellID"];这行代码会从复用池中拿出一个标识为 “cellID” 的 cell,如果有就复用,如果没有,返回 nil
-
判断cell是否是nil如果是就手动创建
if (!cell) {cell = [[UITableViewCell alloc] initWithStyle:UITableViewCellStyleDefault reuseIdentifier:@"cellID"];
}
这里你必须手动 alloc/init 一个 cell,否则返回的是空的,程序会崩溃
-
配置cell的内容
cell.textLabel.text = [NSString stringWithFormat:@"第 %ld 行", indexPath.row];
代码示例:
- (UITableViewCell *)tableView:(UITableView *)tableView cellForRowAtIndexPath:(NSIndexPath *)indexPath {// 第一步:尝试从复用池取 cellUITableViewCell *cell = [tableView dequeueReusableCellWithIdentifier:@"cellID"];// 第二步:如果没有可复用的,就手动 new 一个if (!cell) {cell = [[UITableViewCell alloc] initWithStyle:UITableViewCellStyleDefault reuseIdentifier:@"cellID"];}// 第三步:配置 cell 内容cell.textLabel.text = [NSString stringWithFormat:@"第 %ld 行", indexPath.row];return cell;
}
自动(注册)
只需要正确地设置复用标识符并在需要时请求复用的cell 主要步骤如下:
-
注册cell
在使用 tableView 前(通常在
viewDidLoad中),注册 cell 的类文件:[self.tableView registerClass:[MyTableViewCell class] forCellReuseIdentifier:@"cellID"]; -
在 cellForRowAtIndexPath中获取复用的 Cell 使用 dequeueReusableCellWithIdentifier:forIndexPath:获取 cell,无需手动判断 nil:
- (UITableViewCell *)tableView:(UITableView *)tableView cellForRowAtIndexPath:(NSIndexPath *)indexPath {// 自动复用,不用判断 cell 是否为nilMyTableViewCell *cell = [tableView dequeueReusableCellWithIdentifier:@"cellID" forIndexPath:indexPath];return cell;
}
自定义cell
前面提到自定义cell是在开发iOS应用时常用的一种方式,可以更好的控制cell的外观和行为
一般来说要实现自定义cell需要先实现两个协议:UITableViewDelegate和 UITableViewDataSource
UITableViewDelegate这个协议主要用于实现显示单元格,设置单元格的行高和对于制定的单元格的操作设置头视图和尾视图。这个协议中没有必须完成的方法,里面的都是可选方法
有如下方法:
// Display customization- (void)tableView:(UITableView *)tableView willDisplayCell:(UITableViewCell *)cell forRowAtIndexPath:(NSIndexPath *)indexPath;
- (void)tableView:(UITableView *)tableView willDisplayHeaderView:(UIView *)view forSection:(NSInteger)section API_AVAILABLE(ios(6.0));
- (void)tableView:(UITableView *)tableView willDisplayFooterView:(UIView *)view forSection:(NSInteger)section API_AVAILABLE(ios(6.0));
- (void)tableView:(UITableView *)tableView didEndDisplayingCell:(UITableViewCell *)cell forRowAtIndexPath:(NSIndexPath*)indexPath API_AVAILABLE(ios(6.0));
- (void)tableView:(UITableView *)tableView didEndDisplayingHeaderView:(UIView *)view forSection:(NSInteger)section API_AVAILABLE(ios(6.0));
- (void)tableView:(UITableView *)tableView didEndDisplayingFooterView:(UIView *)view forSection:(NSInteger)section API_AVAILABLE(ios(6.0));// Variable height support- (CGFloat)tableView:(UITableView *)tableView heightForRowAtIndexPath:(NSIndexPath *)indexPath;
- (CGFloat)tableView:(UITableView *)tableView heightForHeaderInSection:(NSInteger)section;
- (CGFloat)tableView:(UITableView *)tableView heightForFooterInSection:(NSInteger)section;
UITableViewDataSource
有以下两个必须实现的方法:
- (NSInteger)tableView:(UITableView *)tableView numberOfRowsInSection:(NSInteger)section;
//返回指定分区的行数
- (UITableViewCell *)tableView:(UITableView *)tableView cellForRowAtIndexPath:(NSIndexPath *)indexPath;
//为指定索引路径(indexPath)创建并配置单元格。
除此之外还有很多可选的方法,举出主要的几个:
- (NSInteger)numberOfSectionsInTableView:(UITableView *)tableView;
//确定表格视图里分区(section)的数量。若你没有实现该方法,系统会默认返回 1 个分区。
- (nullable NSString *)tableView:(UITableView *)tableView titleForHeaderInSection:(NSInteger)section;
//为指定分区设置文本形式的头部标题。若不实现该方法,分区将没有头部标题。
- (nullable NSString *)tableView:(UITableView *)tableView titleForFooterInSection:(NSInteger)section;
//为指定分区设置文本形式的底部标题。若不实现该方法,分区将没有底部标题。- (BOOL)tableView:(UITableView *)tableView canEditRowAtIndexPath:(NSIndexPath *)indexPath;
//判断指定行是否可以进入编辑状态(如删除、插入等操作)。若不实现该方法,系统默认所有行都可以编辑。
自定义cell主要的步骤包括:
- 创建自定义cell类:首先,需要创建一个新的类,通常会继承自UITableViewCell或UICollectionViewCell
- 添加UI元素:在这个自定义cell类中,我们可以添加你需要的UI元素或者属性,如UILabel,UIImageView等。
- 实现初始化方法:在自定义cell类的初始化方法中,需要初始化我们添加的UI元素,并添加到cell的contentView上。
- 设置cell的布局:还需要在自定义cell类中设置UI元素的布局,可以使用自己设置的方法layout来进行自己的布局
- 在TableView中使用自定义cell:在TableView的tableView(_:cellForRowAt:)方法中,我们需要先通过复用标识符尝试获取一个可复用的cell,如果没有获取到,那么就创建一个新的自定义cell实例,并返回。
代码示例:
MyTableViewCell.h
#import <UIKit/UIKit.h>NS_ASSUME_NONNULL_BEGIN@interface MyTableViewCell : UITableViewCell@property (nonatomic, strong) UILabel *label;
@property (nonatomic, strong) UIButton *button;
@property (nonatomic, strong) UIImageView *ImageView;@endNS_ASSUME_NONNULL_END
MyTableViewCell.m
#import "MyTableViewCell.h"@implementation MyTableViewCell- (instancetype)initWithStyle:(UITableViewCellStyle)style reuseIdentifier:(NSString *)reuseIdentifier {self = [super initWithStyle:style reuseIdentifier:reuseIdentifier];if (self) {self.label = [[UILabel alloc] init];self.label.font = [UIFont systemFontOfSize:16];self.label.textColor = [UIColor blackColor];[self.contentView addSubview:self.label];self.button = [UIButton buttonWithType:UIButtonTypeSystem];[self.button setTitleColor:[UIColor blueColor] forState:UIControlStateNormal];[self.contentView addSubview:self.button];self.ImageView = [[UIImageView alloc] init];self.ImageView.contentMode = UIViewContentModeScaleAspectFit;self.ImageView.clipsToBounds = YES;[self.contentView addSubview: self.ImageView];}return self;
}- (void)layoutSubviews {[super layoutSubviews];self.ImageView.frame = CGRectMake(10, 10, 60, 60);self.label.frame = CGRectMake(80, 15, 200, 30);self.button.frame = CGRectMake(self.contentView.bounds.size.width - 80, 15, 60, 40);
}@end
ViewController.h
#import <UIKit/UIKit.h>@interface ViewController : UIViewController<UITableViewDelegate, UITableViewDataSource>@property (nonatomic, strong) UITableView *tableView;@end
ViewController.m
#import "ViewController.h"
#import "MyTableViewCell.h"static NSString *str = @"id";@interface ViewController ()@end@implementation ViewController- (void)viewDidLoad {[super viewDidLoad];self.tableView = [[UITableView alloc] initWithFrame:self.view.bounds style:UITableViewStyleGrouped];self.tableView.delegate = self;self.tableView.dataSource = self;self.tableView.backgroundColor = [UIColor grayColor];[self.tableView registerClass:[MyTableViewCell class] forCellReuseIdentifier:str];[self.view addSubview:self.tableView];
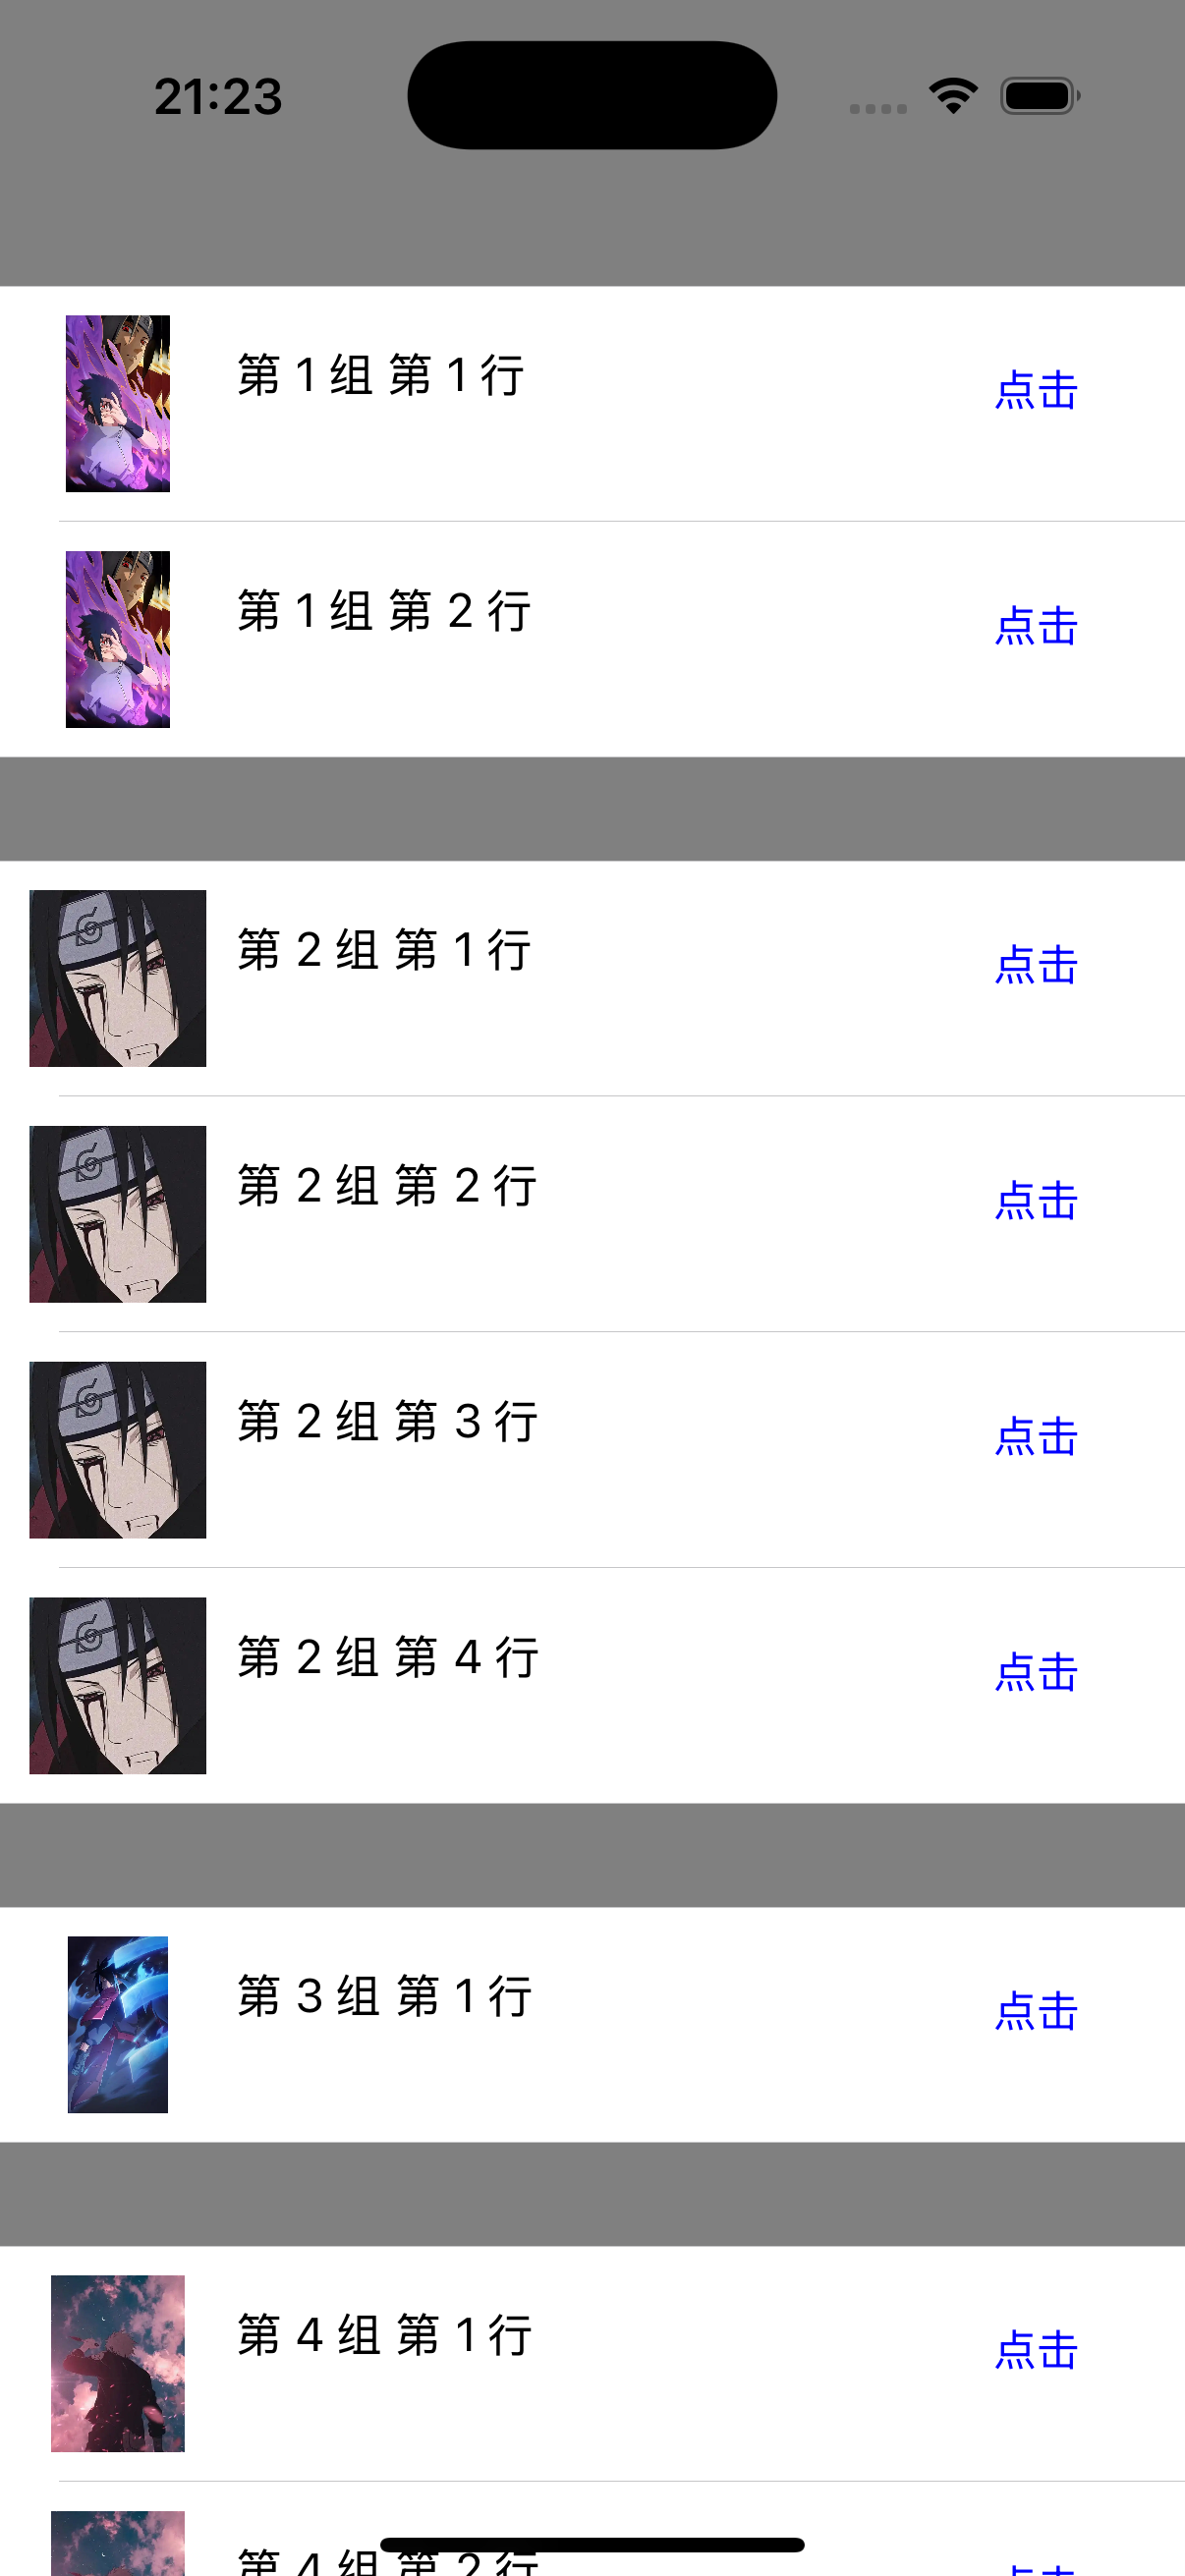
}- (NSInteger)numberOfSectionsInTableView:(UITableView *)tableView {return 4;
}- (NSInteger)tableView:(UITableView *)tableView numberOfRowsInSection:(NSInteger)section {switch (section) {case 0:return 2;case 1:return 4;case 2:return 1;case 3:return 3;default:return 0;}
}- (CGFloat)tableView:(UITableView *)tableView heightForRowAtIndexPath:(NSIndexPath *)indexPath {return 80;
}- (UITableViewCell*)tableView:(UITableView *)tableView cellForRowAtIndexPath:(NSIndexPath *)indexPath {MyTableViewCell *cell = [tableView dequeueReusableCellWithIdentifier:str forIndexPath:indexPath];cell.label.text = [NSString stringWithFormat:@"第 %ld 组 第 %ld 行", indexPath.section + 1, indexPath.row + 1];[cell.button setTitle:@"点击" forState:UIControlStateNormal];NSString *imageName = [NSString stringWithFormat: @"ima%lu.jpg", indexPath.section + 1];cell.ImageView.image = [UIImage imageNamed: imageName];return cell;
}@end