论文分类打榜赛Baseline(2):InternLM昇腾硬件微调实践
本文来自社区投稿,作者丁一超
书生大模型实战营第5期已正式启动,本期实战营新增「论文分类打榜赛」,以帮助学员更好地掌握大模型技能。
本文将手把手带领大家如何基于昇腾微调 InternLM 模型,轻松上手论文自动分类任务。从环境配置、数据准备,到 模型微调和推理部署,完整教程不藏私。即使你是模型微调新手,也能快速参与打榜实践!
InternLM开源链接:
https://github.com/InternLM/InternLM
在线体验链接:
https://chat.intern-ai.org.cn/
1.环境配置
创建云脑任务
登录OpenI平台并创建云脑任务(https://openi.pcl.ac.cn/)。
- 计算资源:昇腾NPU
- 资源规格:按下图圈红处选择
- 镜像:openmind_cann8
- 选择模型:internlm2_5-7b-chat(找到【选择模型】-【公开模型】,搜索框内输入【internlm2_5】,在出来的列表里选择【internlm2_5-7b-chat】)

全部选择完成后点【新建任务】即可完成云脑任务创建。因为需要拉取模型文件,所以这一步的时间会有点长,第一次加载整个过程有可能会需要 1-2 小时,后续再加载就快了。耐心等到任务状态由【Waiting】变为【Running】即可,期间可以先学习其他内容。
当任务状态变为【Runing】后,点【调试】就可以开始体验操作了。

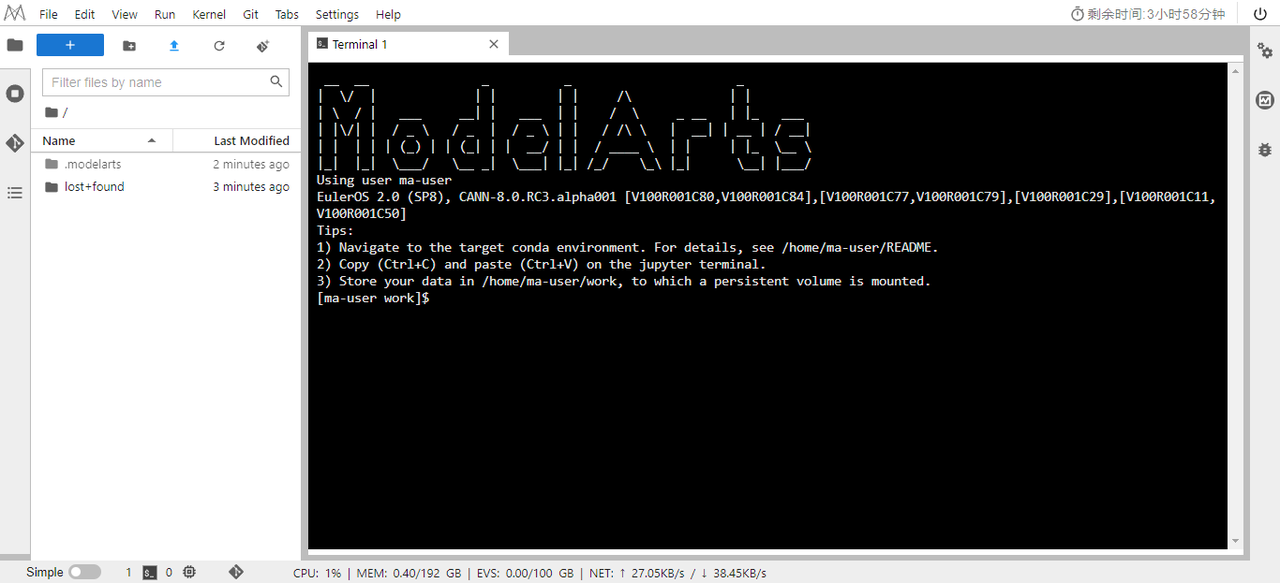
Tips:启智社区的调试任务单次运行只能 4 小时,另外除了 /home/ma-user/work 目录下的文件在环境结束后都会恢复。
创建 Conda 环境
conda create -n internlm  python=3.10 -y
conda activate internlm
pip install torch==2.3.1 torch-npu==2.3.1 torchaudio==2.3.1 torchvision
Tips:因为启智社区环境关机后 /home/ma-user/work 目录外的文件会被还原,所以如果想后面继续使用这个调试任务又不想多花一点时间重新配置环境的话,可以在创建 conda 环境的时候使用以下命令,关机后再开直接执行 conda activate 即可。
conda create -p /home/ma-user/work/anaconda/internlm python=3.10 -y
conda activate /home/ma-user/work/anaconda/internlm
克隆代码仓
git clone https://github.moeyy.xyz/https://github.com/InternLM/lmdeploy
git clone https://github.moeyy.xyz/https://github.com/InternLM/xtuner.git
安装 LMDeploy
cd lmdeploy
pip install -r requirements_ascend.txt -i https://mirrors.tuna.tsinghua.edu.cn/pypi/web/simple
LMDEPLOY_TARGET_DEVICE=ascend pip3 install -v --no-build-isolation -e .
安装 Transformers4.48.0
pip install transformers==4.48.0
安装 deepspeed 及 mpi4py
pip install deepspeed==0.16.2
conda install mpi4py
安装 XTuner
cd ../xtuner/
# 删除requirements/runtime.txt中的第一行bitsandbytes==0.45.0
# 删除requirements.txt文件中的-r requirements/deepspeed.txt 这一行
pip install -e '.[all]'
将模型导入到容器内
这一步建议第一次创建好云脑任务启动完成就执行好,以免后面模型如果有更新,可能会出现只有部分文件同步到容器中的情况。
# 导入包
from c2net.context import prepare, upload_output
# 初始化导入数据集和预训练模型到容器内
c2net_context = prepare()
如果遇到没有成功加载模型的话,可以看下 notebook 用的 kernel 是不是【MindSpore】。
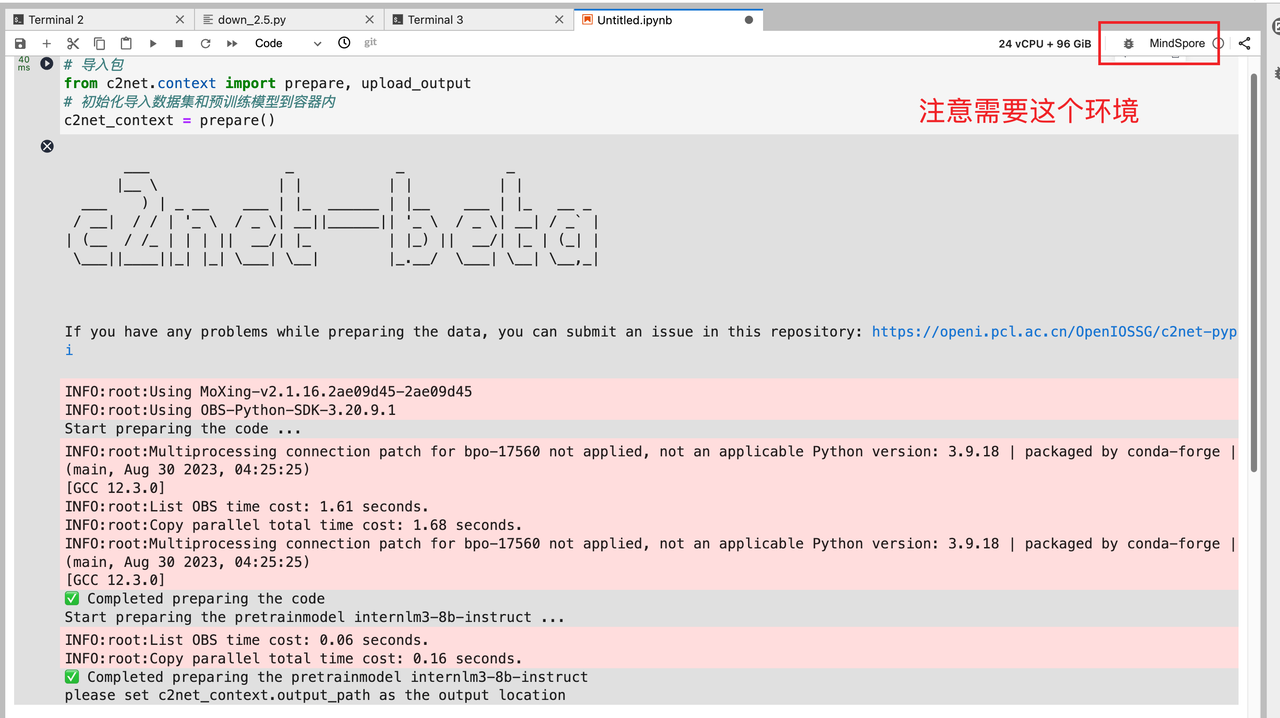
模型导入到容器内会存放在该路径下:/home/ma-user/work/pretrainmodel
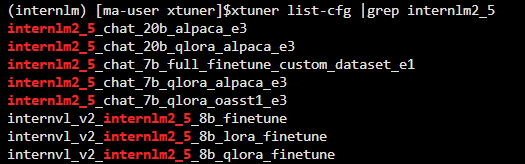
验证 XTuner
因为 XTuner 暂时没有 internlm3 的配置文件,不过可以使用 internlm2.5 的配置文件修改一下也是能够使用的。
xtuner list-cfg |grep internlm2_5
复制配置文件
找到 internlm2_5_chat_7b_qlora_alpaca_e3,然后复制到 config/internlm2_5_chat_7b_qlora_alpaca_e3_copy.py
mkdir config
xtuner copy-cfg internlm2_5_chat_7b_qlora_alpaca_e3 ./config
2.准备训练数据
数据获取
modelscope download --dataset JimmyMa99/smartflow-arxiv-dataset --local_dir ./datasets/smartflow-arxiv-dataset
数据集转换
关于数据详情可参考这篇文章的数据部分。
https://blog.csdn.net/2402_82411485/article/details/148402132?spm=1001.2014.3001.5501
原本的数据是 swift 版本,因此需要创建一个数据集转换脚本 convert_to_alpaca.py
touch convert_to_alpaca.py
数据集转换脚本 convert_to_alpaca.py 代码如下:
import json
import os
import argparsedef convert_to_alpaca_format(input_file, output_file):"""将 Swift 格式的数据转换为 Alpaca 格式输入格式:{"system": "你是个优秀的论文分类师","conversation": [{"human": "Based on the title...","assistant": "D"}]}输出格式 (Alpaca):{"instruction": "根据论文的标题、作者和摘要,确定该论文的科学类别。","input": "Based on the title...","output": "D"}"""print(f"转换数据: {input_file} -> {output_file}")converted_data = []with open(input_file, "r", encoding="utf-8") as f:for line in f:try:data = json.loads(line.strip())# 检查数据结构if "system" not in data or "conversation" not in data:print(f"警告: 数据缺少必要字段: {data}")continue# 从 system 提取指令instruction = data.get("system", "")if not instruction:instruction = "根据论文的标题、作者和摘要,确定该论文的科学类别。"# 处理对话for turn in data["conversation"]:if "human" in turn and "assistant" in turn:# 创建新的 Alpaca 格式数据new_data = {"instruction": instruction,"input": turn["human"],"output": turn["assistant"],}converted_data.append(new_data)except json.JSONDecodeError:print(f"警告: 无法解析JSON行: {line}")except Exception as e:print(f"处理行时发生错误: {str(e)}")# 写入输出文件with open(output_file, "w", encoding="utf-8") as f:for item in converted_data:f.write(json.dumps(item, ensure_ascii=False) + "\n")print(f"转换完成! 共转换 {len(converted_data)} 条数据")if __name__ == "__main__":parser = argparse.ArgumentParser(description="转换数据到Alpaca格式")parser.add_argument("--input",type=str,required=True,help="输入文件路径 (swift_formatted_sft_train_data.jsonl)",)parser.add_argument("--output", type=str, required=True, help="输出文件路径")args = parser.parse_args()convert_to_alpaca_format(args.input, args.output)
执行代码转换:
python convert_to_alpaca.py --input datasets/smartflow-arxiv-dataset/swift_formatted_sft_train_data.jsonl --output datasets/sftdata.jsonl
3.模型训练
链接模型地址
ln -s /home/ma-user/work/pretrainmodel/internlm2_5-7b-chat ./
修改 config 文件 internlm2_5_chat_7b_qlora_alpaca_e3.py
# 第34行修改为模型地址
pretrained_model_name_or_path = "internlm2_5-7b-chat"# 第38行修改为数据集地址
- alpaca_en_path = "tatsu-lab/alpaca"
+ alpaca_en_path = "datasets/sftdata.jsonl"# 第110行-121行替换为下面这段
alpaca_en = dict(type=process_hf_dataset,dataset=dict(type=load_dataset, path='json', data_files=alpaca_en_path),tokenizer=tokenizer,max_length=max_length,dataset_map_fn=alpaca_map_fn,template_map_fn=dict(type=template_map_fn_factory, template=prompt_template),remove_unused_columns=True,shuffle_before_pack=True,pack_to_max_length=pack_to_max_length,use_varlen_attn=use_varlen_attn,
)
在 NPU 上微调还需要修改以下两段代码:
# 代码头引入库的部分
- from transformers import (AutoModelForCausalLM, AutoTokenizer,BitsAndBytesConfig)
+ from transformers import (AutoModelForCausalLM, AutoTokenizer)#######################################################################
#                      PART 2  Model & Tokenizer                      #
######################################################################## 第86行左右删除
- quantization_config=dict(
-            type=BitsAndBytesConfig,
-            load_in_4bit=True,
-            load_in_8bit=False,
-            llm_int8_threshold=6.0,
-            llm_int8_has_fp16_weight=False,
-            bnb_4bit_compute_dtype=torch.float16,
-            bnb_4bit_use_double_quant=True,
-            bnb_4bit_quant_type='nf4')
启动微调训练
xtuner train config/internlm2_5_chat_7b_qlora_alpaca_e3_copy.py --deepspeed deepspeed_zero1
模型格式转换
xtuner convert pth_to_hf ./config/internlm2_5_chat_7b_qlora_alpaca_e3_copy.py ${pth_file} ./hf #pth_file位置填写训练后保存的权重地址,取最后一个iter开头的文件夹即可,一般在work_dir目录下
模型合并
xtuner convert merge ./internlm2_5-7b-chat ./hf ./merged --max-shard-size 2GB --device npu
如果模型使用的不是 InternLM2.5 而是 InternLM3-8B 的话,模型合并完毕后看一下 merged 目录下有没有一个 modeling_internlm3.py。如果没有的话需要手动复制到合并后的目录下。
cp -r ./internlm3-8b-instruct/modeling_internlm3.py ./merged
4.模型评测
可参考这篇文章中的模型评测部分
https://blog.csdn.net/2402_82411485/article/details/148402132?spm=1001.2014.3001.5501
5.提交模型完成评测
前置条件
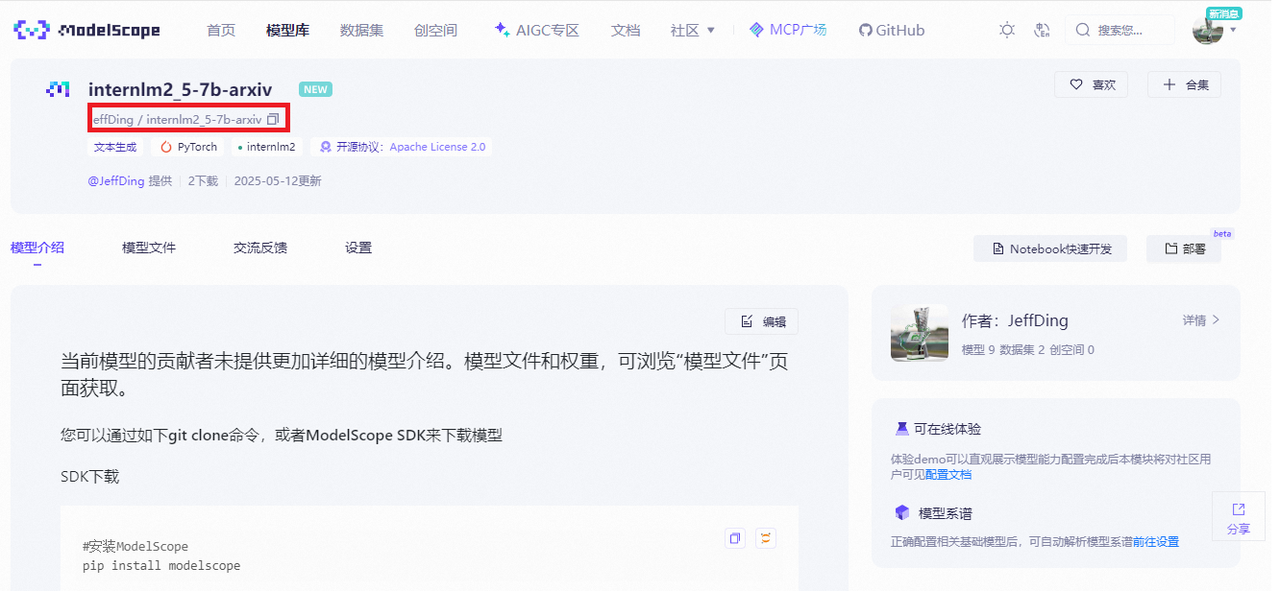
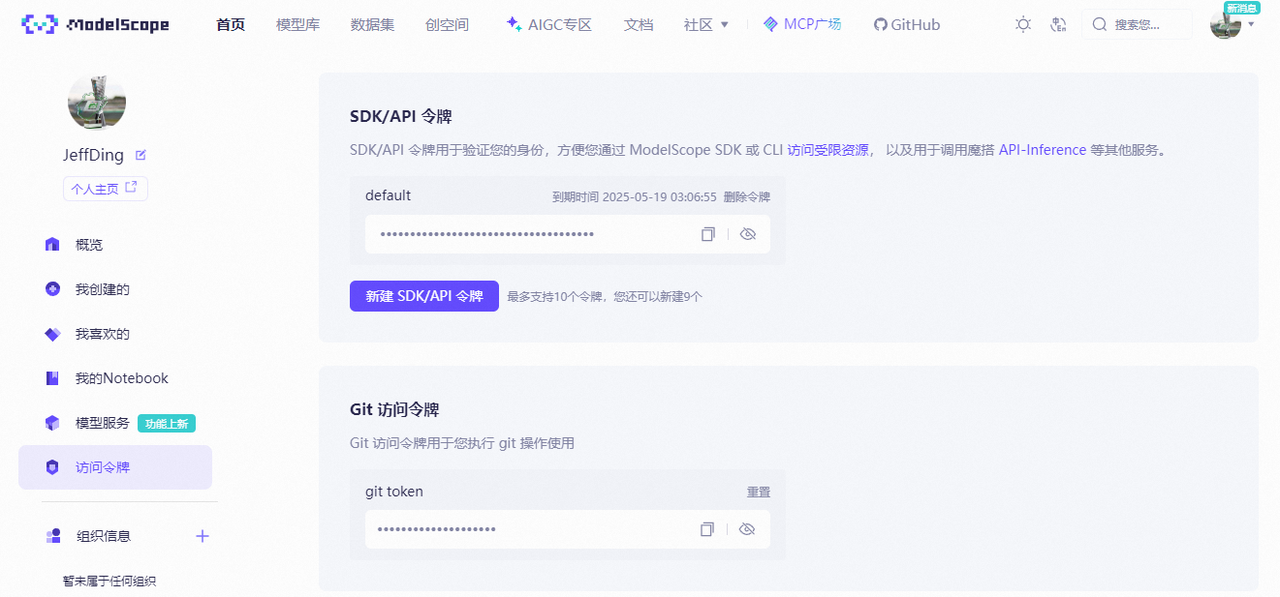
获取 hub_model_id,如下图圈红部分
hub_token 获取:【账号设置】-【访问令牌】复制SDK/API令牌即可
上传模型到魔搭
因为 OpenI 环境无法安装 git-lfs,所以只能使用 modelscope 库进行模型的上传
创建一个上传的 python 脚本 upload.py
cd ~/work
touch upload.py
代码脚本如下:
from modelscope.hub.api import HubApi
from modelscope.hub.constants import Licenses, ModelVisibilityYOUR_ACCESS_TOKEN = '你的ACCESS_TOKEN'   #需要手动修改,获取地址https://www.modelscope.cn/my/myaccesstoken
api = HubApi()
api.login(YOUR_ACCESS_TOKEN)owner_name = '你的用户名'   #需要手动修改
model_name = '模型名称'     #需要手动修改
model_id = f"{owner_name}/{model_name}"api.create_model(model_id,visibility=ModelVisibility.PUBLIC,license=Licenses.APACHE_V2,chinese_name="模型中文名"   #需要手动修改,写英文的也没事
)api.upload_folder(repo_id=f"{owner_name}/{model_name}", #前面获取的hub_model_idfolder_path='xtuner/merged',  #合并以后的模型目录commit_message='upload model folder to repo', #commit信息随便填
)
执行上传脚本
cd ~/work
python upload.py
将上传至魔搭的模型提交至比赛评测平台
填写下方表单即可完成提交
https://aicarrier.feishu.cn/share/base/form/shrcn0JkjbZKMeMPw04uHCWc5Pg
6.参赛奖励
在以下时间点,排行榜位列前 10 的选手将获得相应奖励:
- 6 月 10 日 20:00:前 10 名获得 InternStudio 平台 1688 算力点
- 6 月 17 日 20:00:前 10 名获得 InternStudio 平台 999 算力点
- 6 月 24 日 20:00:前 10 名获得 InternStudio 平台 666 算力点
- 6 月 30 日 20:00:前 10 名额外获得 官方证书
注:算力有效期仅第五期实战营内有效
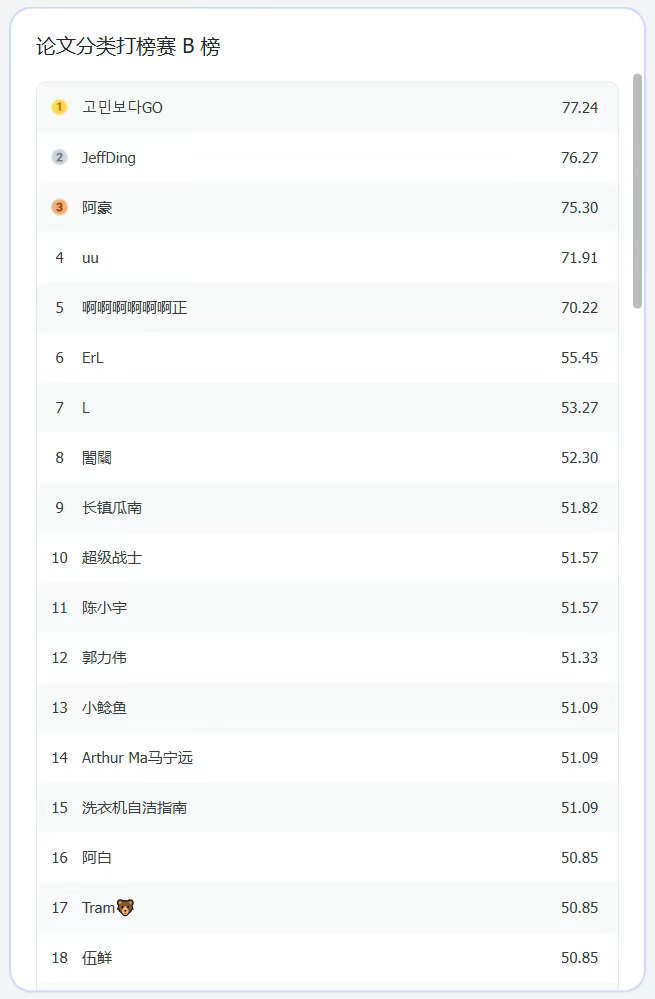
6 月 6 日榜单部分截图
访问下方链接可查看全部榜单内容
https://aicarrier.feishu.cn/share/base/dashboard/shrcnqpXY6Uy9FodNF3It75GSNe?iframeFrom=docx&ccm_open=iframe
本文主要介绍了如何基于昇腾硬件微调 InternLM 模型,并应用于论文分类任务,涵盖了从环境配置、数据准备到模型训练与评测的完整流程,希望对大家参加赛事有所帮助。