嵌入式人工智能应用-第三章 opencv操作8 图像特征之LBP特征 下
1 人脸识别
人脸识别可以基于 LBP 特征 来实现,OpenCV 实际上已经为我们封装好了一个完整的 LBP 人脸识别模型。确保你安装的是 OpenCV 3.4+ 或 OpenCV 4.x(含 opencv_contrib)。低的版本无法运行。
OpenCV 提供了三个主流的人脸识别器:
2 实现步骤
1.收集人脸数据(灰度图,每张图对应一个标签 ID)
-
使用 LBPHFaceRecognizer 训练模型
-
保存或加载模型
2.1 搜集图片,进行预处理
注意地方:
-
每个人最好准备 10 张不同角度和光照的灰度图
-
图像统一尺寸(如 100x100)
-
图像预处理:equalizeHist() 可以增强对比度
也可以使用开源数据库
- LFW(Labeled Faces in the Wild): 包含多个名人的人脸图像,每个图像都有相应的标签。
- FER2013: 用于情感识别,包含多种情感的人脸图像。
- CelebA: 包含超过20万张名人图像,并提供多种标签(如性别、年龄、表情等)。
数据集格式:通常会将图像和标签按照一定结构组织。以下是一个简单的文件结构示例:
#include <iostream>
#include <dirent.h>
#include <sys/stat.h>
#include <opencv2/opencv.hpp>using namespace std;
using namespace cv;// 设置统一尺寸
const Size targetSize(100, 100);// 目录路径
const string input_dir = "dataset/";
const string output_dir = "processed/";bool isImageFile(const string& filename) {return filename.find(".jpg") != string::npos ||filename.find(".png") != string::npos ||filename.find(".jpeg") != string::npos;
}int main() {// 创建输出目录mkdir(output_dir.c_str(), 0755);DIR* dir = opendir(input_dir.c_str());if (!dir) {cerr << "无法打开目录: " << input_dir << endl;return -1;}dirent* entry;while ((entry = readdir(dir)) != nullptr) {string filename = entry->d_name;if (filename == "." || filename == "..") continue;if (!isImageFile(filename)) continue;string input_path = input_dir + filename;Mat img = imread(input_path);if (img.empty()) {cerr << "无法读取图像: " << input_path << endl;continue;}// 转为灰度Mat gray;cvtColor(img, gray, COLOR_BGR2GRAY);// 缩放Mat resized;resize(gray, resized, targetSize);// 直方图均衡Mat equalized;equalizeHist(resized, equalized);// 保存处理后的图像string output_path = output_dir + filename;imwrite(output_path, equalized);cout << "处理并保存: " << output_path << endl;closedir(dir);return 0;
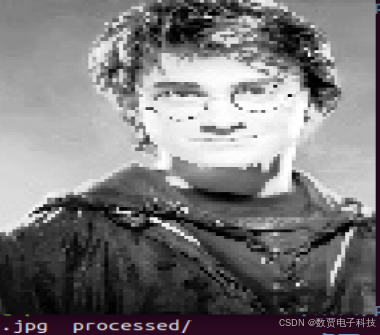
}处理结果:
./processed/
├── harry_01.jpeg
├── harry_02.jpeg
├── harry_03.jpeg
├── hermi_01.jpeg
├── hermi_02.jpeg
└── hermi_03.jpeg
处理后结果
2.2 执行训练模块(LBPH)
#include <opencv2/opencv.hpp>
#include <opencv2/face.hpp>
#include <iostream>
#include <fstream>
#include <dirent.h>
#include <map>using namespace std;
using namespace cv;
using namespace cv::face;const string image_dir = "processed/";
const string model_path = "lbph_model.xml";
const string label_file = "labels.txt";bool isImageFile(const string& filename) {return filename.find(".jpg") != string::npos ||filename.find(".png") != string::npos ||filename.find(".jpeg") != string::npos;
}// 从文件名中提取标签前缀(如 person1_01.jpg -> person1)
string extractNamePrefix(const string& filename) {return filename.substr(0, filename.find("_"));
}int main() {vector<Mat> images;vector<int> labels;map<string, int> nameToLabel;int nextLabel = 1;DIR* dir = opendir(image_dir.c_str());if (!dir) {cerr << "无法打开图像目录: " << image_dir << endl;return -1;}dirent* entry;while ((entry = readdir(dir)) != nullptr) {string filename = entry->d_name;if (filename == "." || filename == ".." || !isImageFile(filename)) continue;string filepath = image_dir + filename;Mat img = imread(filepath, IMREAD_GRAYSCALE);if (img.empty()) continue;// resize 以防尺寸不一致resize(img, img, Size(100, 100));string name = extractNamePrefix(filename);if (nameToLabel.find(name) == nameToLabel.end()) {nameToLabel[name] = nextLabel++;}int label = nameToLabel[name];images.push_back(img);labels.push_back(label);}closedir(dir);if (images.empty()) {cerr << "没有找到图像用于训练。" << endl;return -1;}// 训练模型Ptr<LBPHFaceRecognizer> recognizer = LBPHFaceRecognizer::create();recognizer->train(images, labels);recognizer->save(model_path);cout << "✅ 模型保存至: " << model_path << endl;// 保存标签映射ofstream labelOut(label_file);for (const auto& pair : nameToLabel) {labelOut << pair.second << " " << pair.first << endl;cout << "标签映射: " << pair.second << " -> " << pair.first << endl;}labelOut.close();cout << "✅ 标签文件保存至: " << label_file << endl;return 0;
}
处理结果输出:

2.3 加载模型并预测:
#include <opencv2/opencv.hpp>
#include <opencv2/face.hpp>
#include <iostream>using namespace std;
using namespace cv;
using namespace cv::face;int main(int argc, char** argv) {if (argc != 2) {cout << "用法: " << argv[0] << " test_image.jpg" << endl;return -1;}string model_path = "lbph_model.xml";string test_image_path = argv[1];// 加载模型Ptr<LBPHFaceRecognizer> recognizer = LBPHFaceRecognizer::create();recognizer->read(model_path);// 读取灰度图像Mat img = imread(test_image_path, IMREAD_GRAYSCALE);if (img.empty()) {cerr << "无法加载图像: " << test_image_path << endl;return -1;}// 图像尺寸应与训练时一致(例如100x100),否则 resizeSize expectedSize(100, 100);resize(img, img, expectedSize);// 预测标签与置信度int predictedLabel = -1;double confidence = 0.0;recognizer->predict(img, predictedLabel, confidence);cout << "识别结果: 标签 = " << predictedLabel << ", 置信度 = " << confidence << endl;// 显示图像并标注结果Mat showImg;cvtColor(img, showImg, COLOR_GRAY2BGR);putText(showImg, "Label: " + to_string(predictedLabel), Point(10, 25),FONT_HERSHEY_SIMPLEX, 0.8, Scalar(0, 255, 0), 2);imshow("Test Image", showImg);waitKey(0);return 0;
}
3 人脸识别总结
3.1 置信度介绍
在 recognizer->predict() 中返回的置信度(double confidence)表示模型对这个预测的“不确定性”:
值越小,模型越确信预测是对的(越“像”训练图像)
值越大,模型越不确定(与任何训练图像都不够相似)
这是 LBPH 的内部距离度量(欧氏距离),不是概率,范围没有固定的上限。
3.2 提升置信度方法
- 每人训练图片数量多一些(8~10张效果最好)
- 表情、角度、光照变化要有覆盖
- 训练图像分辨率一致(100x100)
- 图像预处理:灰度 + 直方图均衡
- 避免训练图像重复或过于相似