网络编程--下篇
网络编程–下篇
文接上回。网络编程-上篇
地址:https://blog.csdn.net/okok__TXF/article/details/148263709
本文项目见Gitee仓库:【其中的netty-sp模块】
即时通信Websocket
网址:https://gitee.com/quercus-sp204/sourcecode-and-demos
1.回顾NIO
首先与传统BIO对比,传统BIO的本质是同步阻塞模型,每个连接对应一个线程,线程在read()/write()时因等待数据而阻塞。当线程阻塞时,CPU需保存当前线程状态并切换到其他线程,频繁切换导致性能损耗;此外,每个线程需要分配栈内存(默认1MB),万级连接下内存迅速耗尽。
还有了解到操作系统的相关知识:
操作系统的文件描述符(File Descriptor):FD的本质是内核为每个I/O资源(如Socket、文件)分配的唯一标识符,通过int类型管理,在BIO里面,线程在调用read()时,若对应FD的数据未就绪,内核将线程置为休眠状态,直到数据到达或超时。
NIO基于此种问题,提出操作系统级多路复用:最开始的时候,有**select()系统调用**,poll()
select()系统调用:【他的问题】
监听的FD集合大小受限(默认1024)
每次调用需从用户态拷贝FD集合到内核态,效率低下。
线性扫描所有FD,时间复杂度O(n)。poll()的改进:使用链表结构解除FD数量限制,但仍有O(n)。
在现代多路复用:epoll(Linux)、IOCP(Windows),重点就是epoll了
epoll的核心优势
它是基于事件驱动的:仅关注活跃的FD,时间复杂度O(1)。
内核-用户态共享内存:通过mmap()避免FD集合的重复拷贝。
在Java NIO中,
- SelectorProvider机制:
- 在Linux下使用
epoll,在Windows下使用IOCP(通过sun.nio.ch.WindowsSelectorProvider)。 - 通过
Selector.open()自动加载平台最佳实现。
- 在Linux下使用
- Selector的关键流程:
- 注册Channel:将Channel的FD绑定到Selector,关注指定事件(如OP_READ)。
- 事件轮询:调用
select()(底层触发epoll_wait()),获取就绪的FD集合。 - 事件处理:遍历就绪的SelectionKey,执行对应的I/O操作。
这中间,还有耳熟能详的**零拷贝(Zero-Copy)**技术:它是一种高效的数据传输技术,它可以将数据从内核空间直接传输到应用程序的内存空间中。
2.Netty源码简要分析
Netty的基本使用及概念本文就不赘述了。在源码剖析之前,需要来看一下几个知识点:
2.0.1 Netty的Future、Promise
Netty中有非常多的异步操作,netty 中的 Future 与 jdk 中的 Future 同名,但是是两个接口
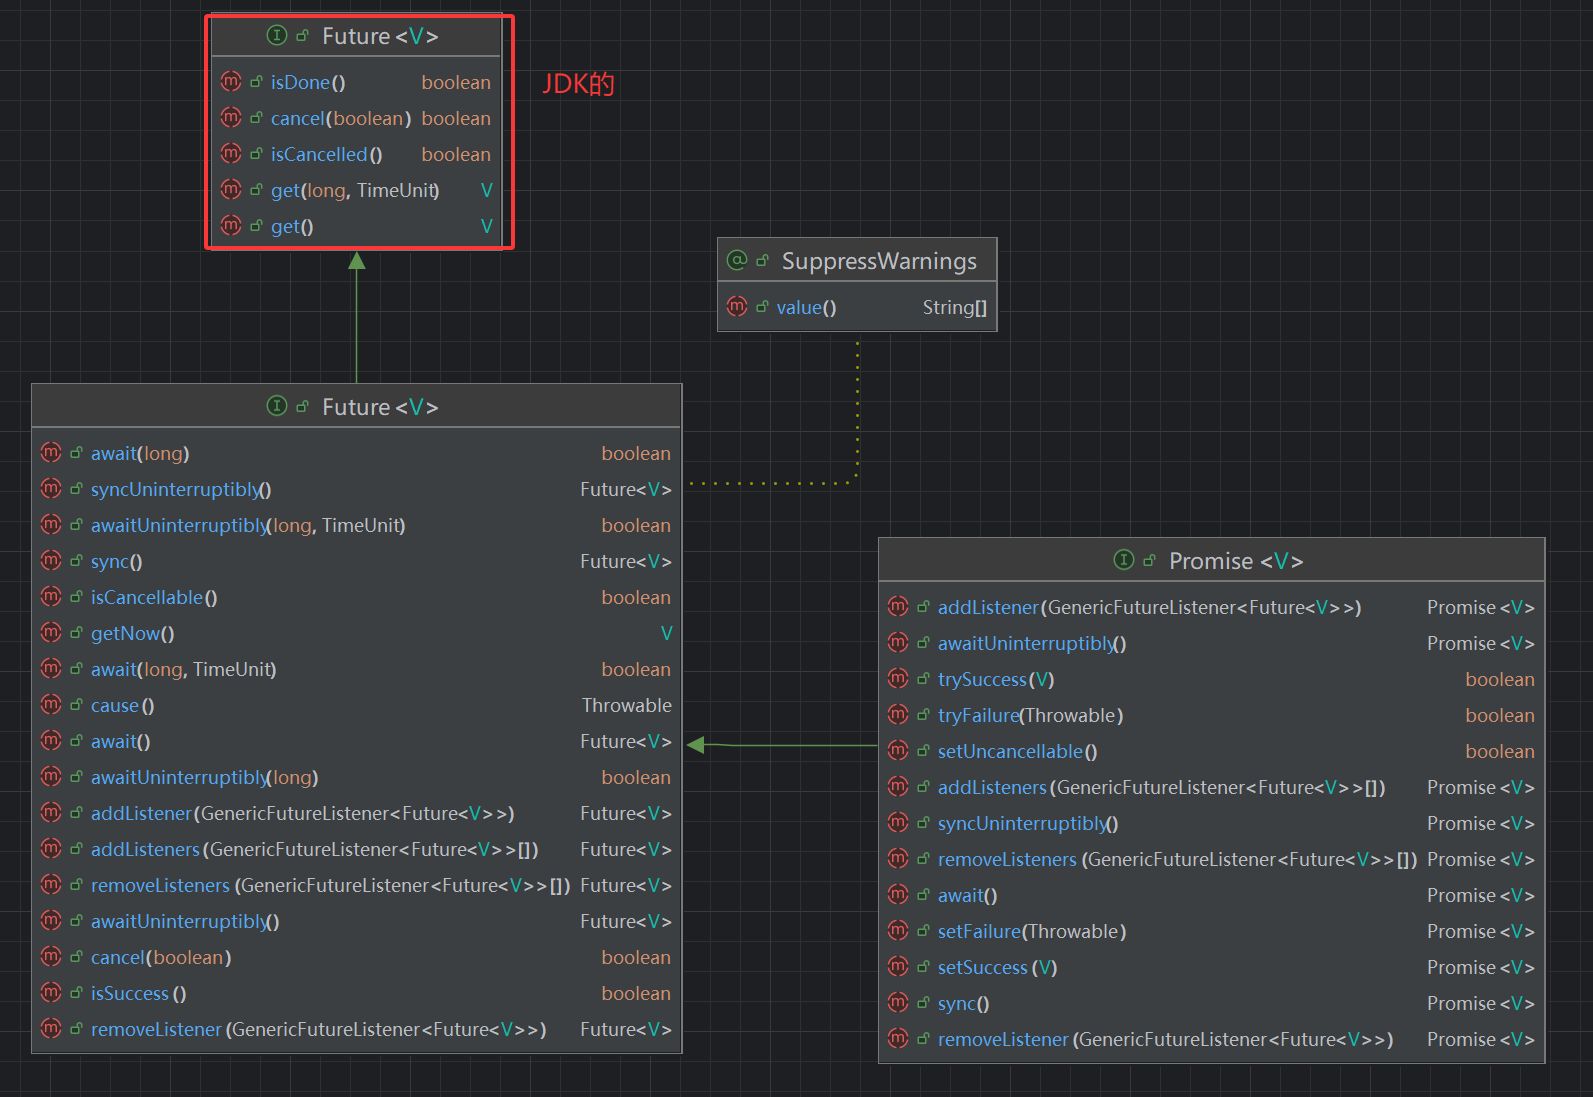
可以从上图中看出来,netty 的 Future 继承自 jdk 的 Future,而 Promise 又对 netty Future 进行了扩展。
首先JDK的Future是Java 标准库中的异步计算结果容器,仅支持同步获取结果,他的核心方法get()(阻塞等待结果)、isDone()(检查是否完成),其局限性被动式获取结果:只能通过轮询(isDone())或阻塞(get())方式获取结果,缺乏主动通知机制;不支持回调函数,无法直接链式调用或组合多个Future。
ExecutorService executor = Executors.newFixedThreadPool(2);
Future<String> future = executor.submit(() -> {Thread.sleep(1000);return "Result";
});
// 阻塞等待结果
try {String result = future.get();
} catch (ExecutionException e) {Throwable realCause = e.getCause(); // 需要解包异常
}
然后是Netty的Future,继承自 JDK Future,扩展了异步监听能力,对其功能进行了增强:addListener():异步监听结果(成功或失败)、await()/sync():同步等待结果,支持超时控制、isSuccess()/cause():区分成功或失败状态;如下所示:它加了 sync() 和 await() 用于阻塞等待,还加了 Listeners,只要任务结束去回调 Listener 们就可以了,那么我们就不一定要主动调用 isDone() 来获取状态,或通过 get() 阻塞方法来获取值。可以通过Listener来回调了。
// 源码
public interface Future<V> extends java.util.concurrent.Future<V> {// 状态细化boolean isSuccess();boolean isCancellable();Throwable cause(); // 直接获取异常// 非阻塞监听Future<V> addListener(GenericFutureListener<? extends Future<? super V>> listener);// 同步控制Future<V> sync() throws InterruptedException; // 等待直到成功Future<V> await() throws InterruptedException; // 等待不抛异常
}// 示例
ChannelFuture future = channel.writeAndFlush(message);
future.addListener(f -> {if (f.isSuccess()) {System.out.println("ok了");} else {System.err.println("出现错误: " + f.cause());}
});
上面的sync()和await()是干嘛的呢?
在 Netty 的异步编程模型中,sync() 和 await() 是 Future 接口提供的两种阻塞等待方法,它们都用于等待异步操作完成,但在行为上有重要区别。
sync() 方法:调用 await() 阻塞等待任务完成;任务完成后,检查是否失败(通过 cause());若失败,重新抛出异常(rethrowIfFailed())
// DefaultPromise.java
@Override
public Future<V> sync() throws InterruptedException {await();  // 等待任务完成rethrowIfFailed();  // 检查并抛出异常return this;
}
private void rethrowIfFailed() {Throwable cause = cause();if (cause != null) {throw new ExecutionException(cause);}
}
// Netty示例
ChannelFuture future = channel.connect("example.com", 80);
try {// 阻塞当前线程,等待连接完成future.sync(); // 若失败,直接抛出异常System.out.println("连接成功");
} catch (InterruptedException e) {System.err.println("等待被中断: " + e);Thread.currentThread().interrupt(); // 恢复中断状态
} catch (IOException e) {System.err.println("连接失败: " + e);
}
await() 方法:通过 wait() 或 LockSupport.parkNanos() 阻塞当前线程;任务完成后自动唤醒,不处理异常
// DefaultPromise.java
@Override
public Promise<V> await() throws InterruptedException {if (isDone())  return this;// 中断了if (Thread.interrupted()) {throw new InterruptedException(toString());}checkDeadLock(); // 检查死锁synchronized (this) {while (!isDone()) {incWaiters();try {wait();} finally {decWaiters();}}}return this;
}// Netty示例
ChannelFuture future = channel.connect("example.com", 80);
try {// 阻塞当前线程,等待连接完成future.await();if (future.isSuccess()) {System.out.println("连接成功");} else {System.err.println("连接失败: " + future.cause());}
} catch (InterruptedException e) {System.err.println("等待被中断: " + e);Thread.currentThread().interrupt(); // 恢复中断状态
}
他们两个方法都可以链式调用:
// 使用 sync() 阻塞后获取 Channel
Channel channel = bootstrap.connect("example.com", 80).sync().channel();
// 使用 await() 阻塞后添加回调
future.await().addListener(f -> {if (f.isSuccess()) {System.out.println("操作成功");}
});
| 特性 | await() | sync() |
|---|---|---|
| 异常处理 | 不抛出操作异常,需手动检查cause() | 自动抛出IOException(操作失败时) |
| 返回值 | 返回Future本身(用于链式调用) | 返回Future本身(用于链式调用) |
| 适用场景 | 需要自定义异常处理逻辑 | 简化异常处理,依赖自动异常传播 |
sync() 和 await()黄金法则:
- 当必须确保操作成功时 → 使用
sync() - 当只需等待操作完成时 → 使用
await() - 在性能敏感路径 → 优先使用
addListener()异步回调
最后来看的是Netty的Promise,继承自 Netty Future,支持手动设置结果,它的setSuccess()/setFailure():主动设置结果或异常,主要是桥梁作用:连接异步操作的生产者和消费者,生产者通过Promise设置结果,消费者通过Future监听。
//==== 源码
public interface Promise<V> extends Future<V> {// 结果设置Promise<V> setSuccess(V result);boolean trySuccess(V result);Promise<V> setFailure(Throwable cause);boolean tryFailure(Throwable cause);// 状态转换boolean setUncancellable();
}//====示例
// 创建Promise作为结果控制器
Promise<String> promise = eventLoop().newPromise();
// 异步操作完成后设置结果
channel.writeAndFlush(msg).addListener(future -> {if (future.isSuccess()) {promise.setSuccess("ok了");} else {promise.setFailure(future.cause());}
});
// 添加业务监听器
promise.addListener(f -> {if (f.isSuccess()) {System.out.println("结果: " + f.getNow());} else {f.cause().printStackTrace();}
});
下面总结一下他们三者:
| 特性 | JDK Future | Netty Future | Netty Promise |
|---|---|---|---|
| 继承关系 | 独立接口 | 继承 JDK Future | 继承 Netty Future |
| 结果设置 | 由异步任务内部设置 | 只读,不可外部设置 | 可通过setSuccess()/setFailure()外部设置 |
| 回调机制 | 无 | 支持addListener()回调 | 支持addListener()回调 |
| 阻塞获取 | 支持get()阻塞 | 支持get()阻塞 | 支持get()阻塞 |
| 非阻塞操作 | 不支持 | 支持非阻塞监听 | 支持非阻塞监听 |
| 适用场景 | 简单异步任务结果获取 | 网络操作结果监听(如 Netty Channel) | 自定义异步操作结果控制 |
| 取消任务 | 支持(cancel()) | 不支持 | 不支持 |
使用示例:
// 1.同步处理任务成功
public static void test1() throws ExecutionException, InterruptedException {DefaultEventLoop eventExecutors = new DefaultEventLoop();DefaultPromise<Integer> promise = new DefaultPromise<>(eventExecutors);eventExecutors.execute(()->{try {Thread.sleep(1000);} catch (InterruptedException e) {e.printStackTrace();}log.info("设置结果了, {}",10);promise.setSuccess(10);});log.info("开始.");log.info("{}",promise.getNow()); // 还没有结果log.info("{}",promise.get()); // 阻塞获取结果eventExecutors.shutdownGracefully();
}//2.异步处理任务成功
public static void test2() throws InterruptedException {DefaultEventLoop eventExecutors = new DefaultEventLoop();DefaultPromise<Integer> promise = new DefaultPromise<>(eventExecutors);// 设置回调,异步接收结果promise.addListener(future -> {// 这里的 future 就是上面的 promiselog.debug("结果 {}",future.getNow());});// 等待 1000 后设置成功结果eventExecutors.execute(()->{try {Thread.sleep(1000);} catch (InterruptedException e) {e.printStackTrace();}log.debug("set success, {}",10);promise.setSuccess(10);});log.debug("start...");eventExecutors.shutdownGracefully();
}
在上面的例子2中,是异步的,这个是怎么做到的呢?
// DefaultPromise.java
@Override
public Promise<V> setSuccess(V result) {if (setSuccess0(result)) { // 会调用这个setSuccess0方法return this;}throw new IllegalStateException("complete already: " + this);
}
private boolean setSuccess0(V result) {return setValue0(result == null ? SUCCESS : result);
}
private boolean setValue0(Object objResult) {if (RESULT_UPDATER.compareAndSet(this, null, objResult) ||RESULT_UPDATER.compareAndSet(this, UNCANCELLABLE, objResult)) {if (checkNotifyWaiters()) {notifyListeners(); // 这里会通知所有的Listener!完成异步回调}return true;}return false;
}
2.0.1 Netty零拷贝
在网络编程上篇,我们已经知道该技术了。网络编程-上篇
地址:https://blog.csdn.net/okok__TXF/article/details/148263709
- 文件传输中的 FileRegion:利用操作系统的
sendfile()机制(如 Linux 的sendfile系统调用),直接在内核空间完成数据传输
File file = new File("largefile.bin");
RandomAccessFile raf = new RandomAccessFile(file, "r");
// FileRegion:Netty 的接口,封装文件传输的元数据(文件通道、起始位置、长度)
// DefaultFileRegion:通过 FileChannel.transferTo() 调用操作系统的 sendfile 系统调用,直接将文件数据从磁盘传输到网络套接字
FileRegion region = new DefaultFileRegion(raf.getChannel(), 0, file.length());channel.writeAndFlush(region).addListener(future -> {raf.close(); // 确保资源释放
});
- Direct ByteBuf(直接内存):使用
java.nio.ByteBuffer.allocateDirect()分配直接内存,绕过 JVM 堆内存,数据直接存储在操作系统内存中。
ByteBuf buffer = ctx.alloc().directBuffer(data.length);
buffer.writeBytes(data);
ctx.writeAndFlush(buffer);  // 直接传输到网络,无需拷贝到堆内存
- 基于 CompositeByteBuf 的逻辑合并:将多个 ByteBuf 合并为一个逻辑上的 ByteBuf,避免数据实际复制
CompositeByteBuf compositeByteBuf = Unpooled.compositeBuffer();
ByteBuf buffer1 = Unpooled.buffer(10);
ByteBuf buffer2 = Unpooled.buffer(20);
// 将buffer1和buffer2合并到compositeByteBuf中(逻辑合并,无需数据复制)
compositeByteBuf.addComponents(true, buffer1, buffer2);
- 基于 ByteBuf.slice () 的视图操作:将一个
ByteBuf切片为多个共享存储区域的子缓冲区
ByteBuf header = originalBuf.slice(0, 5);  // 共享原始内存
ByteBuf body = originalBuf.slice(5, 10);
最佳实践指南
-
文件传输必用 FileRegion
try (FileInputStream in = new FileInputStream(file)) {FileRegion region = new DefaultFileRegion(in.getChannel(), 0, file.length());channel.writeAndFlush(region); } -
协议组装使用 CompositeByteBuf
CompositeByteBuf compBuf = ByteBufAllocator.DEFAULT.compositeBuffer(); compBuf.addComponent(true, headerBuf); compBuf.addComponent(true, bodyBuf); -
启用内存池化
// 全局配置 bootstrap.option(ChannelOption.ALLOCATOR, PooledByteBufAllocator.DEFAULT); -
大块数据用直接内存
ByteBuf largeBuf = ctx.alloc().directBuffer(8192); -
引用计数防泄漏
pipeline.addLast(new SimpleChannelInboundHandler<ByteBuf>() {@Overrideprotected void channelRead0(ChannelHandlerContext ctx, ByteBuf msg) {// 自动释放}
});
2.1 Echo服务端客户端介绍
本节往下就以最简单的Echo例子,来简要剖析一下Netty的源码:
服务端代码
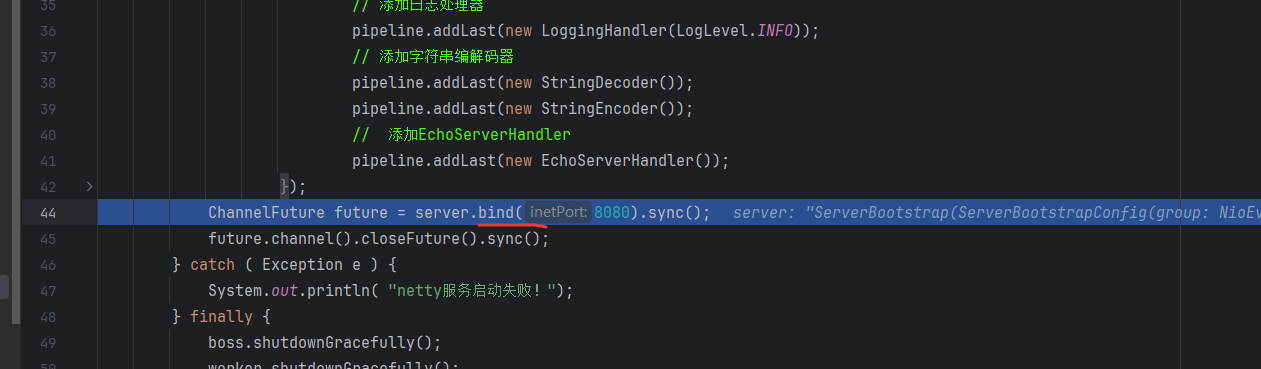
public class EchoServer {public static void main(String[] args) {NioEventLoopGroup boss = new NioEventLoopGroup(1);NioEventLoopGroup worker = new NioEventLoopGroup(8);try {ServerBootstrap server = new ServerBootstrap();server.group(boss, worker).channel(NioServerSocketChannel.class).option(ChannelOption.SO_BACKLOG, 1024).childHandler(new ChannelInitializer<SocketChannel>() {@Overrideprotected void initChannel(SocketChannel ch) throws Exception {ChannelPipeline pipeline = ch.pipeline();// 添加日志处理器pipeline.addLast(new LoggingHandler(LogLevel.INFO));// 添加字符串编解码器pipeline.addLast(new StringDecoder());pipeline.addLast(new StringEncoder());//  添加EchoServerHandlerpipeline.addLast(new EchoServerHandler());}});ChannelFuture future = server.bind(8080).sync();future.channel().closeFuture().sync();} catch ( Exception e ) {System.out.println( "netty服务启动失败!");} finally {boss.shutdownGracefully();worker.shutdownGracefully();}}
}
// 处理器
public class EchoServerHandler extends ChannelInboundHandlerAdapter {@Overridepublic void channelRead(ChannelHandlerContext ctx, Object msg) throws Exception {System.out.println("【收到来自客户端】:" + msg);if ( msg.toString().equals("exit")) {ctx.channel().close();}else ctx.channel().writeAndFlush(msg); // 写回客户端}
}
客户端代码
public class EchoClient {public static void main(String[] args) {NioEventLoopGroup work = new NioEventLoopGroup(2);Bootstrap client = new Bootstrap();Scanner in = new Scanner(System.in);try {client.group(work).channel(NioSocketChannel.class).option(ChannelOption.TCP_NODELAY, true).handler(new ChannelInitializer<SocketChannel>() {@Overrideprotected void initChannel(SocketChannel ch) throws Exception {ChannelPipeline pipeline = ch.pipeline();pipeline.addLast(new LoggingHandler(LogLevel.INFO));pipeline.addLast(new StringDecoder());pipeline.addLast(new StringEncoder());pipeline.addLast(new EchoClientHandler());}});ChannelFuture future = client.connect("127.0.0.1", 8080).sync();// 放到另一个线程里面去给服务器发消息Thread thread = new Thread(new WriteThread(future, in));thread.start();thread.join();} catch ( Exception e ) {System.out.println( "netty客户端启动失败!");} finally {work.shutdownGracefully();in.close();}}private static class WriteThread implements Runnable {private final ChannelFuture future;private final Scanner in;public WriteThread(ChannelFuture future, Scanner in) {this.future = future;this.in = in;}@Overridepublic void run() {String str;while ( true ) {str = in.nextLine();future.channel().writeAndFlush(str);if ( "exit".equals(str) ) {System.out.println("【客户端线程】要结束了");try {future.channel().closeFuture().sync();} catch (InterruptedException e) {throw new RuntimeException(e);}break;}}}}
}
// 处理器
public class EchoClientHandler extends ChannelInboundHandlerAdapter {@Overridepublic void channelRead(ChannelHandlerContext ctx, Object msg) throws Exception {System.out.println( "【收到来自服务端】:" + msg);}
}
以上面例子为基础,接下来简要分析一下Netty源码
其实不管是Netty的服务端,还是客户端代码,整体都是一个模板,甚至可以说,Netty应用模板差不多都是一个样子的。通过一个启动器,然后点点点进行一系列配置,然后绑定/连接端口,来启动应用。
- ServerBootstrap 类用于创建服务端实例,Bootstrap 用于创建客户端实例。
ServerBootstrap server = new ServerBootstrap(); // 服务端
Bootstrap client = new Bootstrap(); // 客户端
- 两个 EventLoopGroup:boss 和 worker,它们涉及的是 Netty 的线程模型,可以看到服务端有两个 group,而客户端只有一个,它们就是 Netty 中的线程池。
// 服务端有两个
NioEventLoopGroup boss = new NioEventLoopGroup(1);
NioEventLoopGroup worker = new NioEventLoopGroup(8);// 客户端只有一个EventLoopGroup
NioEventLoopGroup work = new NioEventLoopGroup(2);
- channel用来指定通道类型【这下面两个是基于TCP连接的】
// 服务端指定的是NioServerSocketChannel,它是io.netty.channel.socket.nio;
xx.channel(NioServerSocketChannel.class)
// 客户端是 NioSocketChannel,io.netty.channel.socket.nio;
xx.channel(NioSocketChannel.class)
- 接下来是handler链的编写,服务端是childHandler,客户端是handler【handler()是发生在初始化的时候,childHandler()是发生在客户端连接之后】
Handler(处理器):Handler 是 Netty 的核心组件,负责处理网络事件(如数据读写、连接建立/关闭等)。分为两类 ①ChannelInboundHandler:处理入站事件(数据接收、连接激活等);②ChannelOutboundHandler:处理出站事件(数据发送、连接关闭等)
ChildHandler(子处理器):仅在服务端使用,用于配置 每个新连接(SocketChannel)的处理器链。当客户端连接建立时,服务端通过 ChildHandler 初始化该连接的 ChannelPipeline。
Option(通用配置):配置 父通道(如 ServerSocketChannel)的底层 Socket 参数,影响服务端监听行为
| 参数 | 作用 | 示例 |
|---|---|---|
SO_BACKLOG | 设置 TCP 全连接队列长度,控制并发连接数 | .option(ChannelOption.SO_BACKLOG, 1024) |
SO_REUSEADDR | 允许地址复用,避免端口占用问题 | .option(ChannelOption.SO_REUSEADDR, true) |
SO_LINGER | 设置关闭连接时的延迟时间(单位秒) | .option(ChannelOption.SO_LINGER, 10) |
ChildOption(子通道配置):配置 子通道(SocketChannel)的底层 Socket 参数,影响客户端与服务端的数据传输行为
| 参数 | 作用 | 示例 |
|---|---|---|
TCP_NODELAY | 禁用 Nagle 算法,减少小数据包延迟 | .childOption(ChannelOption.TCP_NODELAY, true) |
SO_KEEPALIVE | 启用 TCP 保活机制,检测空闲连接 | .childOption(ChannelOption.SO_KEEPALIVE, true) |
SO_SNDBUF/SO_RCVBUF | 设置发送/接收缓冲区大小,优化吞吐量 | .childOption(ChannelOption.SO_SNDBUF, 1024 * 1024) |
上述四者他们统一比较一下:
| 组件 | 作用范围 | 典型场景 |
|---|---|---|
| Handler | 业务逻辑处理 | 数据编解码、心跳检测、业务协议解析 |
| ChildHandler | 新连接初始化 | 为每个客户端连接添加空闲检测、协议解码器 |
| Option | 父通道(服务端监听) | 控制最大并发连接数、地址复用 |
| ChildOption | 子通道(客户端连接) | 优化数据传输性能(如禁用Nagle算法)、设置保活机制 |
2.2 EventLoopGroup
从例子中,最开始是new了NioEventLoopGroup,那么这个东西到底是干嘛的呢?
EventLoopGroup 是 Netty 异步事件驱动模型的核心组件,本质是 线程池的抽象,负责管理一组 EventLoop 线程,协调网络 I/O 事件的处理和任务调度。每个 EventLoop 绑定一个独立线程,处理多个 Channel 的 I/O 事件和用户任务。Netty 提供了多种 EventLoopGroup 实现,根据底层 I/O 模型和平台适配性分类如下:
①NioEventLoopGroup(通用非阻塞 I/O)
适用于全平台,基于 JDK NIO 实现,是我们最常用的。
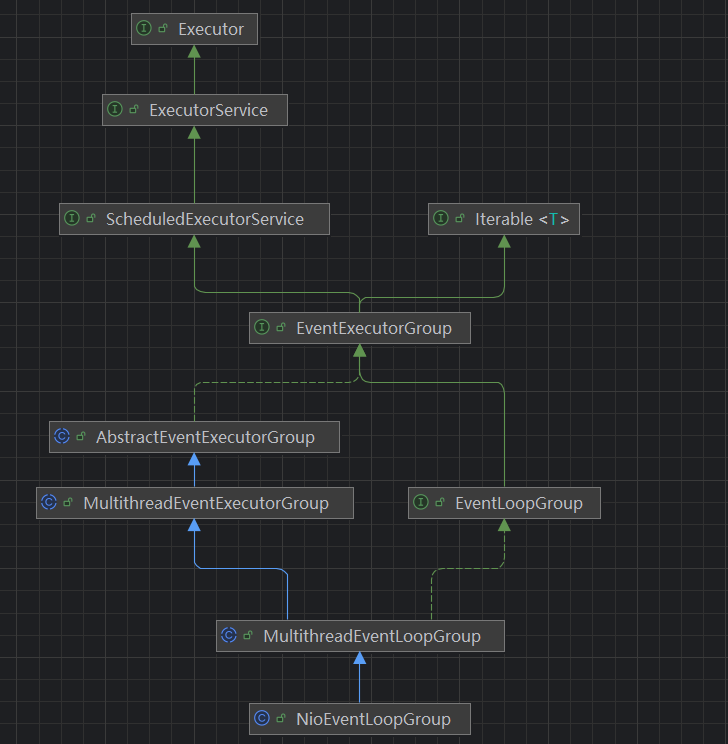
通过这个类间关系,我们可以得知,NioEventLoopGroup,可以看作是一个线程池了。
现在从其构造函数一步一步Debug调试看一下:
NioEventLoopGroup worker = new NioEventLoopGroup(8); // 这里就拿这个来说// 一、NioEventLoopGroup.java
public NioEventLoopGroup(int nThreads) {this(nThreads, (Executor) null);
}
public NioEventLoopGroup(int nThreads, Executor executor) {// SelectorProvider.provider()是JDK提供的方法this(nThreads, executor, SelectorProvider.provider()); // 这里会多往下面传一个参数
}
public NioEventLoopGroup(int nThreads, Executor executor, final SelectorProvider selectorProvider) {// 这里会多往下传一个参数: DefaultSelectStrategyFactorythis(nThreads, executor, selectorProvider, DefaultSelectStrategyFactory.INSTANCE);
}
// 到这里就调用父类的构造器了
public NioEventLoopGroup(int nThreads, Executor executor, final SelectorProvider selectorProvider,final SelectStrategyFactory selectStrategyFactory) {// 最后一个参数是拒绝策略:REJECT = new RejectedExecutionHandler() 默认实现是抛异常super(nThreads, executor, selectorProvider, selectStrategyFactory, RejectedExecutionHandlers.reject());
}
然后到父类里面去了
// 二、MultithreadEventLoopGroup.java [上一个类的父类]
protected MultithreadEventLoopGroup(int nThreads, Executor executor, Object... args) {//DEFAULT_EVENT_LOOP_THREADS = Math.max(1, SystemPropertyUtil.getInt(//           "io.netty.eventLoopThreads", NettyRuntime.availableProcessors() * 2));// nThreads 如果是0,那么默认设置为核数 * 2super(nThreads == 0 ? DEFAULT_EVENT_LOOP_THREADS : nThreads, executor, args);
}
又会继续向上,
// MultithreadEventExecutorGroup.java [MultithreadEventLoopGroup的父类]
protected MultithreadEventExecutorGroup(int nThreads, Executor executor, Object... args) {this(nThreads, executor, DefaultEventExecutorChooserFactory.INSTANCE, args);
}
protected MultithreadEventExecutorGroup(int nThreads, Executor executor,EventExecutorChooserFactory chooserFactory, Object... args) {checkPositive(nThreads, "nThreads");// 验证线程数>0//若未提供 executor,则使用 ThreadPerTaskExecutor,其内部通过 DefaultThreadFactory 创建线程。if (executor == null) executor = new ThreadPerTaskExecutor(newDefaultThreadFactory());// 子线程(EventExecutor)初始化children = new EventExecutor[nThreads];// 存储子线程的数组for (int i = 0; i < nThreads; i ++) {boolean success = false;try {// **【newChild 重要】children[i] = newChild(executor, args);// 创建子EventExecutorsuccess = true;} catch (Exception e) {// TODO: Think about if this is a good exception typethrow new IllegalStateException("failed to create a child event loop", e);} finally {//异常处理与资源清理/*当某个子执行器创建失败时1.关闭已创建的所有子执行器2.阻塞等待所有子执行器完全终止3.正确处理线程中断状态*/if (!success) {// 关闭已创建的子执行器for (int j = 0; j < i; j ++) {children[j].shutdownGracefully();}// 等待所有子执行器终止for (int j = 0; j < i; j ++) {EventExecutor e = children[j];try {while (!e.isTerminated()) {e.awaitTermination(Integer.MAX_VALUE, TimeUnit.SECONDS);}} catch (InterruptedException interrupted) {// Let the caller handle the interruption.Thread.currentThread().interrupt();break;}}}}}// 创建执行器选择器chooser = chooserFactory.newChooser(children);// 终止状态监听机制// 给池中每一个线程都设置这个 listener,当监听到所有线程都 terminate【终止】以后,这个线程池就算真正的 terminate 了。final FutureListener<Object> terminationListener = new FutureListener<Object>() {@Overridepublic void operationComplete(Future<Object> future) throws Exception {if (terminatedChildren.incrementAndGet() == children.length) {terminationFuture.setSuccess(null);}}};// 为每个子执行器的终止 Future 添加监听器for (EventExecutor e: children) {e.terminationFuture().addListener(terminationListener);}// 设置 readonlyChildren,它是只读集合Set<EventExecutor> childrenSet = new LinkedHashSet<EventExecutor>(children.length);Collections.addAll(childrenSet, children);readonlyChildren = Collections.unmodifiableSet(childrenSet);
}protected abstract EventExecutor newChild(Executor executor, Object... args) throws Exception;
newChild方法由其子类提供具体实现,这里是NioEventLoopGroup.java,负责创建并初始化每个子 EventLoop(即 NioEventLoop 实例)。每个 NioEventLoop 绑定一个独立线程,负责处理多个 Channel 的 I/O 事件和用户任务。
@Override
protected EventLoop newChild(Executor executor, Object... args) throws Exception {SelectorProvider selectorProvider = (SelectorProvider) args[0]; // 选择器提供者SelectStrategyFactory selectStrategyFactory = (SelectStrategyFactory) args[1];// 选择策略工厂RejectedExecutionHandler rejectedExecutionHandler = (RejectedExecutionHandler) args[2]; // 拒绝策略EventLoopTaskQueueFactory taskQueueFactory = null;// 任务队列工厂EventLoopTaskQueueFactory tailTaskQueueFactory = null;// 尾任务队列工厂int argsLength = args.length;if (argsLength > 3) {taskQueueFactory = (EventLoopTaskQueueFactory) args[3];}if (argsLength > 4) {tailTaskQueueFactory = (EventLoopTaskQueueFactory) args[4];}return new NioEventLoop(this, executor, selectorProvider,selectStrategyFactory.newSelectStrategy(),rejectedExecutionHandler, taskQueueFactory, tailTaskQueueFactory);
}
// 构造方法
NioEventLoop(NioEventLoopGroup parent, Executor executor, SelectorProvider selectorProvider,SelectStrategy strategy, RejectedExecutionHandler rejectedExecutionHandler,EventLoopTaskQueueFactory taskQueueFactory, EventLoopTaskQueueFactory tailTaskQueueFactory) {super(parent, executor, false, newTaskQueue(taskQueueFactory), newTaskQueue(tailTaskQueueFactory),rejectedExecutionHandler);this.provider = ObjectUtil.checkNotNull(selectorProvider, "selectorProvider");this.selectStrategy = ObjectUtil.checkNotNull(strategy, "selectStrategy");// openSelector() 方法,它将创建 NIO 中最重要的一个组件 Selectorfinal SelectorTuple selectorTuple = openSelector();this.selector = selectorTuple.selector;this.unwrappedSelector = selectorTuple.unwrappedSelector;
}
从构造方法开始的这一步已经完成了,线程池 NioEventLoopGroup 创建完成了,并且实例化了池中的所有 NioEventLoop 实例。【NioEventLoopGroup 可以看作是线程池,NioEventLoop 可以看作是线程----不能等同于】
那么就来顺道分析一下NioEventLoop 类,这个类的继承关系也是有点多的,
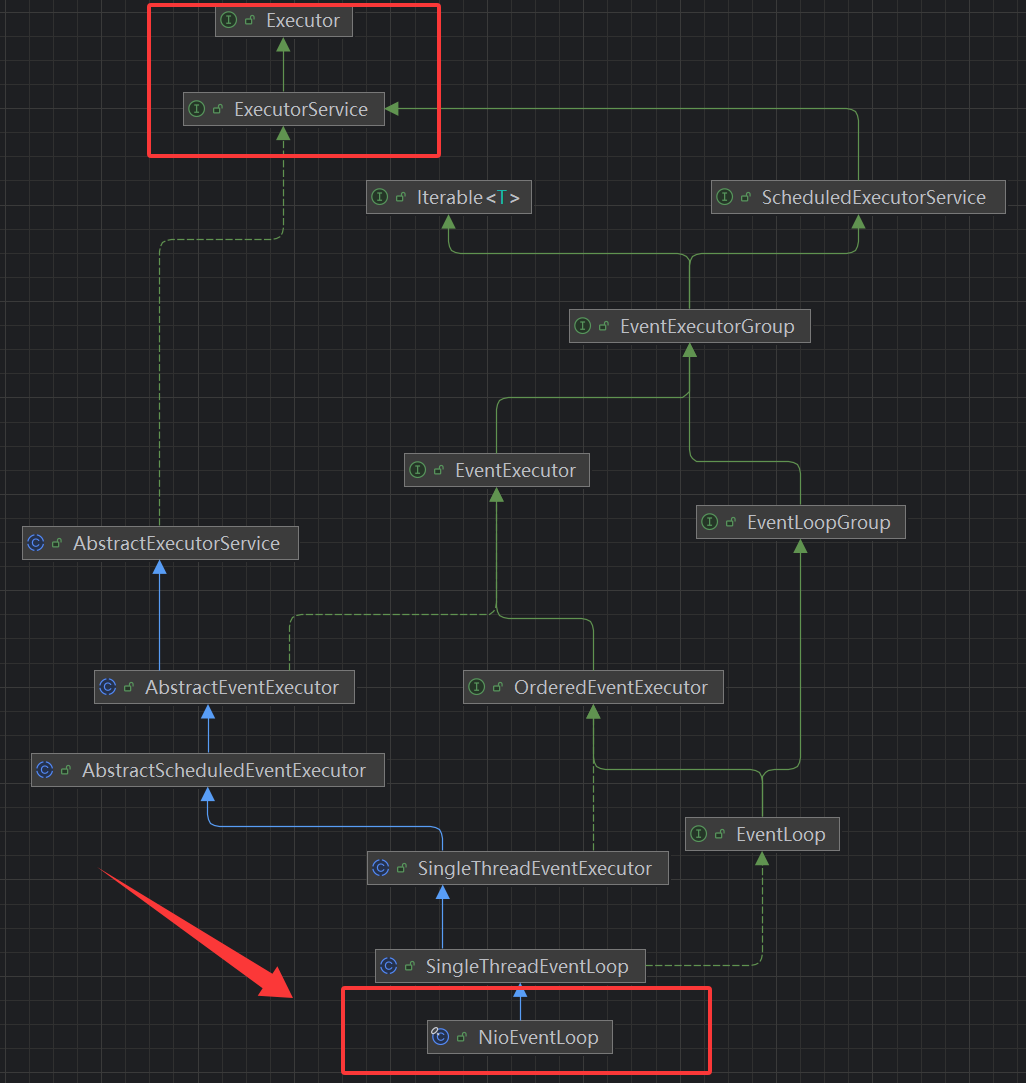
// NioEventLoop.java
public final class NioEventLoop extends SingleThreadEventLoop {// 内部有Nio的一些东西private Selector selector;private Selector unwrappedSelector;private SelectedSelectionKeySet selectedKeys;private final SelectorProvider provider;// 这个方法很长!// 是 Netty NioEventLoop 的核心事件循环逻辑,负责处理 I/O 事件和执行异步任务。@Overrideprotected void run() {int selectCnt = 0;// 连续 select 次数计数器for (;;) {try {int strategy;try {// 事件选择策略strategy = selectStrategy.calculateStrategy(selectNowSupplier, hasTasks());switch (strategy) {case SelectStrategy.CONTINUE:continue;case SelectStrategy.BUSY_WAIT:case SelectStrategy.SELECT:// 阻塞式选择long curDeadlineNanos = nextScheduledTaskDeadlineNanos();if (curDeadlineNanos == -1L) {curDeadlineNanos = NONE; // nothing on the calendar}nextWakeupNanos.set(curDeadlineNanos);try {if (!hasTasks()) {strategy = select(curDeadlineNanos);// 阻塞等待I/O事件,就是NIO的select}} finally {nextWakeupNanos.lazySet(AWAKE);}default:}} catch (IOException e) {//异常处理机制rebuildSelector0();// 重建Selector--JDK NIO 空轮询 bug(Linux epoll 缺陷)selectCnt = 0;handleLoopException(e);continue;}selectCnt++;cancelledKeys = 0;needsToSelectAgain = false;//I/O 比例控制 (ioRatio).......} else if (unexpectedSelectorWakeup(selectCnt)) { // Unexpected wakeup (unusual case)//SELECTOR_AUTO_REBUILD_THRESHOLD = 512/*if (SELECTOR_AUTO_REBUILD_THRESHOLD > 0 &&selectCnt >= SELECTOR_AUTO_REBUILD_THRESHOLD) {// 如果selectCnt >= 512次了,重建selectorrebuildSelector();return true;}*/selectCnt = 0;}} ....}}
}
可以看到它的父类是SingleThreadEventLoop,从名字上看好像是个单线程的
// SingleThreadEventLoop.java
public abstract class SingleThreadEventLoop extends SingleThreadEventExecutor implements EventLoop {}
// SingleThreadEventExecutor.java
@Override
public void execute(Runnable task) {execute0(task);
}
...
private void execute(Runnable task, boolean immediate) {boolean inEventLoop = inEventLoop();addTask(task);if (!inEventLoop) {startThread(); // 这里.....}
}
private void startThread() {if (state == ST_NOT_STARTED) {if (STATE_UPDATER.compareAndSet(this, ST_NOT_STARTED, ST_STARTED)) {boolean success = false;try {doStartThread(); // 这里success = true;} ....}}
}
private void doStartThread() {assert thread == null;executor.execute(new Runnable() {@Overridepublic void run() {thread = Thread.currentThread();if (interrupted) {thread.interrupt();}// 会执行 NioEventLoop 中的 run() 方法---上面那个类很长的run方法SingleThreadEventExecutor.this.run(); //}...
}
②EpollEventLoopGroup(Linux 高性能 I/O)
适用于Linux,基于 Linux epoll 系统调用,高性能。
③DefaultEventLoopGroup(默认实现)
全平台,通用型非 I/O 任务处理,不绑定网络传输
④OioEventLoopGroup(阻塞 I/O)-- 这个可以滚了
每个连接独占一个线程,适用于低并发场景
2.3 Channel
在Netty客户端服务端的模板示例代码中,设置了group之后,紧接着设置了channel,服务端指定的是NioServerSocketChannel,客户端是 NioSocketChannel
// 如下
xx.channel(NioServerSocketChannel.class)
xx.channel(NioSocketChannel.class)// AbstractBootstrap.java
public B channel(Class<? extends C> channelClass) {return channelFactory(new ReflectiveChannelFactory<C>(ObjectUtil.checkNotNull(channelClass, "channelClass")));
}
// 最外层是到这里来了
public B channelFactory(ChannelFactory<? extends C> channelFactory) {...// 就是设置属性,所以重要的是这个channelFactory是怎么来的this.channelFactory = channelFactory;return self();
}
// channelFactory是这么来的:
// new ReflectiveChannelFactory<C>
// ReflectiveChannelFactory.java
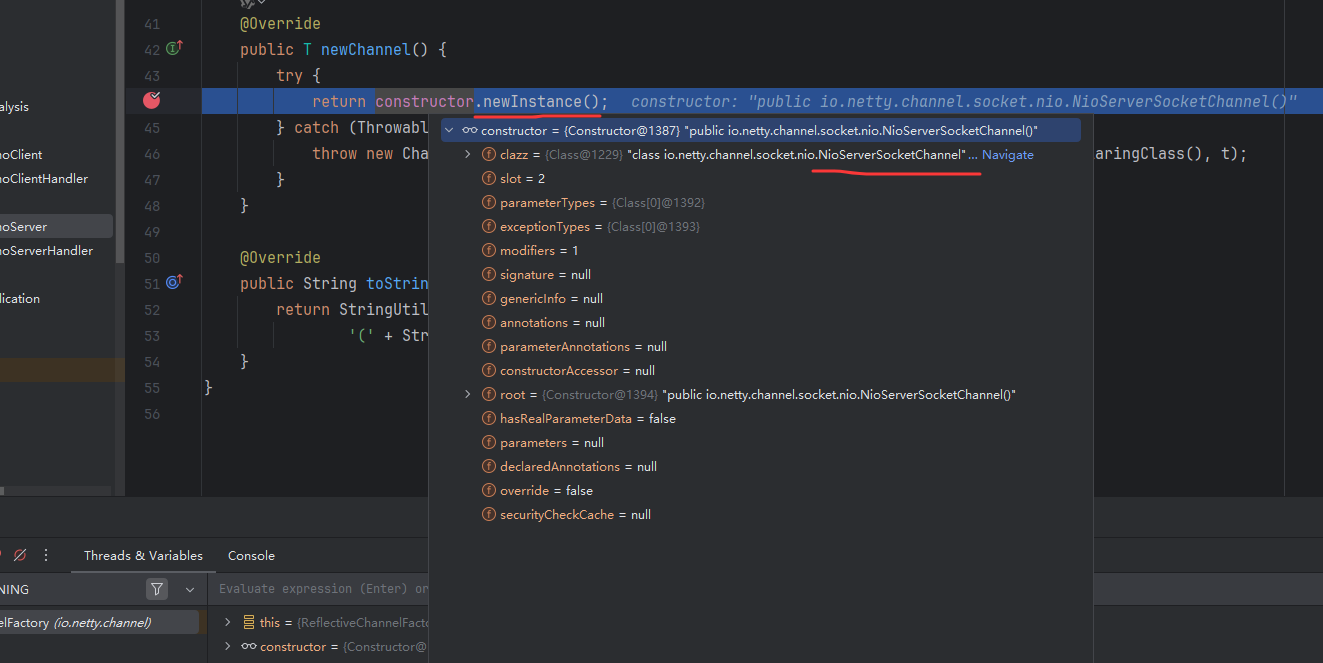
public class ReflectiveChannelFactory<T extends Channel> implements ChannelFactory<T> {public ReflectiveChannelFactory(Class<? extends T> clazz) {..this.constructor = clazz.getConstructor();...}// 有一个newChannel方法!@Overridepublic T newChannel() {..//newChannel() 方法中使用了反射调用 Channel 的无参构造方法来创建 Channelreturn constructor.newInstance();..}
}
newChannel() 调用时间点:
- 对于 NioSocketChannel,由于它充当客户端的功能,它的创建时机在
connect(…)的时候; - 对于 NioServerSocketChannel 来说,它充当服务端功能,它的创建时机在绑定端口
bind(…)的时候。
以bind为例子:
// AbstractBootstrap.java
public ChannelFuture bind(int inetPort) {return bind(new InetSocketAddress(inetPort));
}
public ChannelFuture bind(SocketAddress localAddress) {validate(); // 校验return doBind(ObjectUtil.checkNotNull(localAddress, "localAddress"));
}
// doBind
private ChannelFuture doBind(final SocketAddress localAddress) {final ChannelFuture regFuture = initAndRegister();....
}
// initAndRegister方法--------------------记住这个方法哦!!!!!
final ChannelFuture initAndRegister() {Channel channel = null;try {channel = channelFactory.newChannel(); // 在这里!!!init(channel);} catch (Throwable t) {.....}ChannelFuture regFuture = config().group().register(channel);if (regFuture.cause() != null) {if (channel.isRegistered()) {channel.close();} else {channel.unsafe().closeForcibly();}}return regFuture;
}
调用其构造方法:
// NioServerSocketChannel.java
public NioServerSocketChannel() {this(DEFAULT_SELECTOR_PROVIDER);
}
public NioServerSocketChannel(SelectorProvider provider) {this(provider, null);
}
public NioServerSocketChannel(SelectorProvider provider, InternetProtocolFamily family) {this(newChannel(provider, family)); // 调用了newChannel()方法
}
// 这个方法是NioServerSocketChannel类的静态方法,创建了ServerSocketChannel实例
private static ServerSocketChannel newChannel(SelectorProvider provider, InternetProtocolFamily family) {try {ServerSocketChannel channel =SelectorProviderUtil.newChannel(OPEN_SERVER_SOCKET_CHANNEL_WITH_FAMILY, provider, family);return channel == null ? provider.openServerSocketChannel() : channel;} catch (IOException e) {throw new ChannelException("Failed to open a socket.", e);}
}// 调用了newChannel返回ServerSocketChannel之后
public NioServerSocketChannel(ServerSocketChannel channel) {super(null, channel, SelectionKey.OP_ACCEPT);config = new NioServerSocketChannelConfig(this, javaChannel().socket());
}// super往父类看
// AbstractNioChannel.java
protected AbstractNioChannel(Channel parent, SelectableChannel ch, int readInterestOp) {super(parent);this.ch = ch;this.readInterestOp = readInterestOp;try {ch.configureBlocking(false); // 设置非阻塞!!!} catch (IOException e) {....}
}
客户端同理,只是在connect打断点即可,就留给读者自行探索了。
设置channel大致就是这么多了,主要就是实例化了 JDK 层的 ServerSocketChannel,然后设置了非阻塞模式,所以我们可以得到这样一个信息:
- 【Netty】NioServerSocketChannel <==> 【jdk】ServerSocketChannel
- 【Netty】NioSocketChannel <==>【jdk】 SocketChannel
Netty和NIO有这样一个对应关系。
2.4 ChannelPipepline
这个PipeLine链上的Handler执行顺序本文就不叙述了,读者可以自行前往各大网站。这里给一个示意图:
                                             I/O Requestvia Channel orChannelHandlerContext|
+---------------------------------------------------+---------------+
|                           ChannelPipeline         |               |
|                                                  \|/              |
|    +---------------------+            +-----------+----------+    |
|    | Inbound Handler  N  |            | Outbound Handler  1  |    |
|    +----------+----------+            +-----------+----------+    |
|              /|\                                  |               |
|               |                                  \|/              |
|    +----------+----------+            +-----------+----------+    |
|    | Inbound Handler N-1 |            | Outbound Handler  2  |    |
|    +----------+----------+            +-----------+----------+    |
|              /|\                                  .               |
|               .                                   .               |
| ChannelHandlerContext.fireIN_EVT() ChannelHandlerContext.OUT_EVT()|
|        [ method call]                       [method call]         |
|               .                                   .               |
|               .                                  \|/              |
|    +----------+----------+            +-----------+----------+    |
|    | Inbound Handler  2  |            | Outbound Handler M-1 |    |
|    +----------+----------+            +-----------+----------+    |
|              /|\                                  |               |
|               |                                  \|/              |
|    +----------+----------+            +-----------+----------+    |
|    | Inbound Handler  1  |            | Outbound Handler  M  |    |
|    +----------+----------+            +-----------+----------+    |
|              /|\                                  |               |
+---------------+-----------------------------------+---------------+|                                  \|/
+---------------+-----------------------------------+---------------+
|               |                                   |               |
|       [ Socket.read() ]                    [ Socket.write() ]     |
|                                                                   |
|  Netty Internal I/O Threads (Transport Implementation)            |
+-------------------------------------------------------------------+
//=======
入站处理器中,ctx.fireChannelRead(msg) 是调用下一个入站处理器
在发生出站事件的时候,会从尾部开始触发后续出站处理器的执行
我们弄清楚了Pipeline中的顺序之后,继续从示例代码继续往下分析,现在是设置handler了,本节以服务端举例子:
.childHandler(new ChannelInitializer<SocketChannel>() {@Overrideprotected void initChannel(SocketChannel ch) throws Exception {ChannelPipeline pipeline = ch.pipeline();// 添加日志处理器pipeline.addLast(new LoggingHandler(LogLevel.INFO));// 添加字符串编解码器pipeline.addLast(new StringDecoder());pipeline.addLast(new StringEncoder());//  添加EchoServerHandlerpipeline.addLast(new EchoServerHandler());}
});
使用 Netty 的时候,我们通常就只要写一些自定义的 handler 就可以了,我们定义的这些 handler 会组成一个 pipeline,用于处理 IO 事件,本节介绍的ChannelPipeline不是单独存在的,它是会和Channel、ChannelHandler、ChannelHandlerContext这些东西关联在一起的。
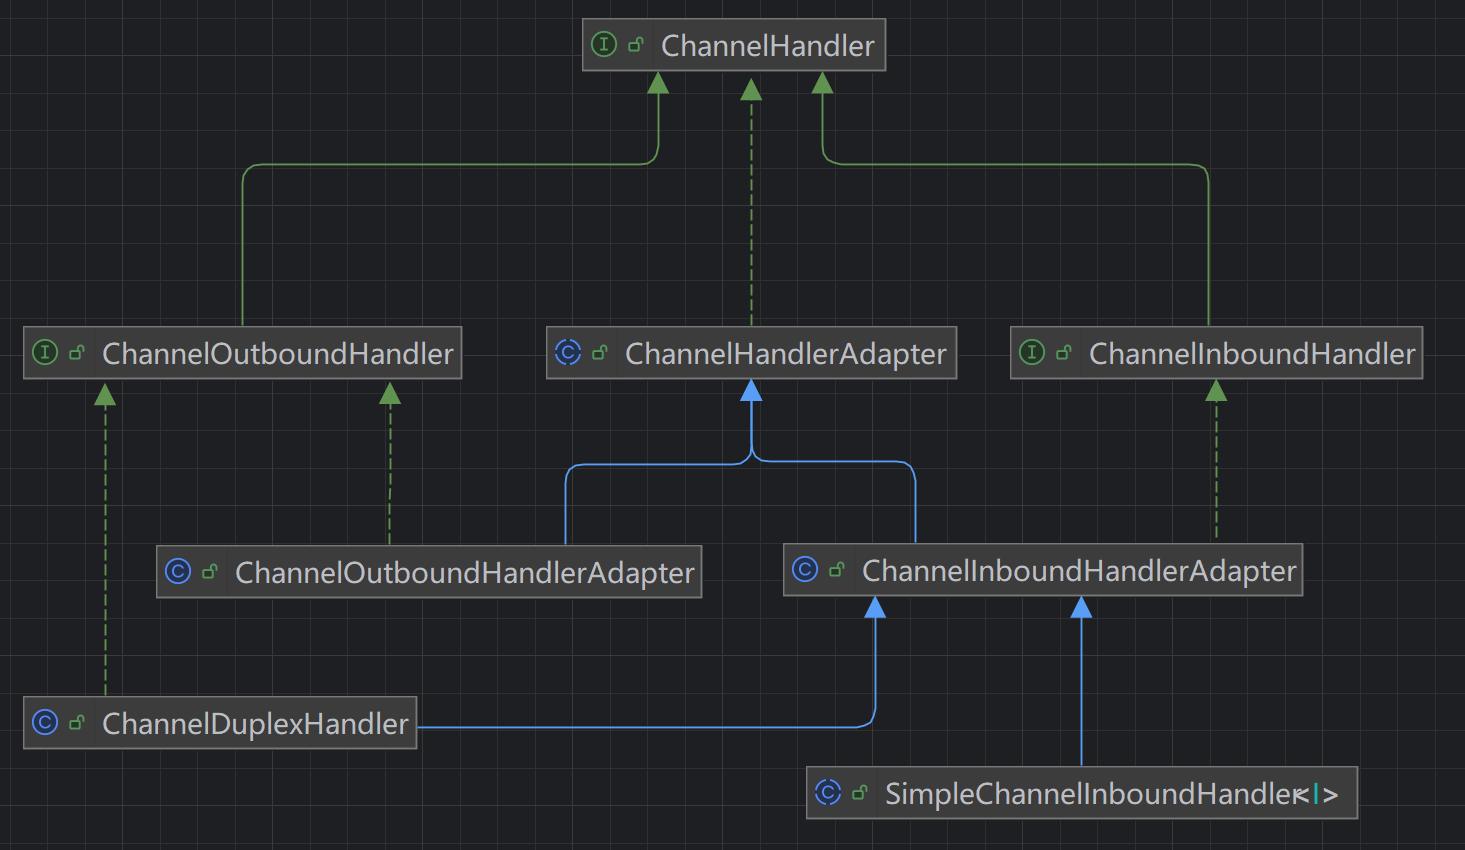
从上图类间关系图可以看到handler主要分为Inbound和Outbound两种处理器,其中还有ChannelDuplexHandler这个特殊的。在 Netty 中,IO 事件被分为 Inbound 事件和 Outbound 事件。
到底什么是入站事件,什么是出站事件呢?其实这个是站在事件流向来看的,比如说,对于Server服务端来说,客户端请求连接,服务端Accept,对于服务端来说,这个事件就是入站事件;对于客户端来说,connect是往外的,则是出站事件;对于write来说,意思指写东西出去,那么这个write就是出站事件;反之,read就是从读取通道数据,则是入站事件。
ChannelPipeline将一系列Handler连在一起,形成一个处理器链。如下图所示:
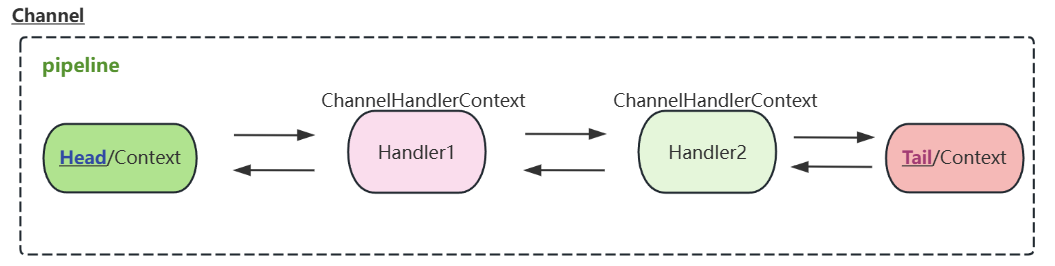
一个 Channel 包含了一个 ChannelPipeline, 而 ChannelPipeline 中又维护了一个由 ChannelHandlerContext 组成的双向链表. 这个链表的头是 HeadContext, 链表的尾是 TailContext, 并且每个 ChannelHandlerContext 中又关联着一个 ChannelHandler.
那我们就需要看一下Netty是如何构建这个handler链的。还记得上一节的创建Channel的时候吗
protected AbstractNioChannel(Channel parent, SelectableChannel ch, int readInterestOp) {super(parent); // 去往父类this.ch = ch;this.readInterestOp = readInterestOp;try {ch.configureBlocking(false); // 设置非阻塞!!!} catch (IOException e) {....}
}// 来到AbstractChannel.java父类
protected AbstractChannel(Channel parent) {this.parent = parent;id = newId();unsafe = newUnsafe();pipeline = newChannelPipeline(); // 这里
}// DefaultChannelPipeline.java类
protected DefaultChannelPipeline(Channel channel) {this.channel = ObjectUtil.checkNotNull(channel, "channel");succeededFuture = new SucceededChannelFuture(channel, null);voidPromise =  new VoidChannelPromise(channel, true);tail = new TailContext(this);head = new HeadContext(this);head.next = tail;tail.prev = head;
}
//
final class TailContext extends AbstractChannelHandlerContext implements ChannelInboundHandler..
final class HeadContext extends AbstractChannelHandlerContextimplements ChannelOutboundHandler, ChannelInboundHandler
这里创建了head和tail, HeadContext 【head有入站出站两种】和 TailContext 继承于 AbstractChannelHandlerContext 的同时也实现了 ChannelHandler 接口了, 因此它们有 Context 和 Handler 的双重属性,这里只是初始化了head和tail,但是中间的其他handler呢?我们自定义的Handler在这里好像并没有创建啊。
在最上面2.1节的末尾,读者还记得那四者的比较吗?ChildHandler(子处理器):仅在服务端使用,用于配置 每个新连接(SocketChannel)的处理器链。当客户端连接建立时,服务端通过 ChildHandler 初始化该连接的 ChannelPipeline。我上面仅仅是分析的Server端的debug结果,此时还没有客户端来连接。childHandler 中指定的 handler 不是给 NioServerSocketChannel 使用的,是给 NioSocketChannel 使用的。
| 特性 | .childHandler() | .handler() |
|---|---|---|
| 作用对象 | 客户端连接 (SocketChannel) | 服务端自身 (ServerSocketChannel) |
| 执行线程 | Worker EventLoop | Boss EventLoop |
| 执行次数 | 每个连接执行一次 | 仅服务启动时执行一次 |
| 典型用途 | 业务处理器/编解码器 | 服务监控/日志记录 |
| 触发时机 | 连接建立后 | 服务启动时 |
紧接着上一节的这个部分:如下所示
// initAndRegister方法
final ChannelFuture initAndRegister() {Channel channel = null;try {channel = channelFactory.newChannel();  // 上一节是进入这里分析的init(channel);  // 【本节看这里,第一处】} catch (Throwable t) {。。。。}// 【本节第二处】ChannelFuture regFuture = config().group().register(channel);。。。return regFuture;
}// 第一处这里来了
@Override
void init(Channel channel) {setChannelOptions(channel, newOptionsArray(), logger);setAttributes(channel, newAttributesArray());//拿到刚刚创建的 channel 内部的 pipeline 实例ChannelPipeline p = channel.pipeline();final EventLoopGroup currentChildGroup = childGroup;final ChannelHandler currentChildHandler = childHandler;final Entry<ChannelOption<?>, Object>[] currentChildOptions = newOptionsArray(childOptions);final Entry<AttributeKey<?>, Object>[] currentChildAttrs = newAttributesArray(childAttrs);final Collection<ChannelInitializerExtension> extensions = getInitializerExtensions();// 开始往 pipeline 中添加一个 handler/*可以看到addLast是往tail前面插入元素private void addLast0(AbstractChannelHandlerContext newCtx) {AbstractChannelHandlerContext prev = tail.prev;newCtx.prev = prev;newCtx.next = tail;prev.next = newCtx;tail.prev = newCtx;}*/p.addLast(new ChannelInitializer<Channel>() {@Overridepublic void initChannel(final Channel ch) {final ChannelPipeline pipeline = ch.pipeline();ChannelHandler handler = config.handler();if (handler != null) {pipeline.addLast(handler);}ch.eventLoop().execute(new Runnable() {@Overridepublic void run() {pipeline.addLast(new ServerBootstrapAcceptor(ch, currentChildGroup, currentChildHandler, currentChildOptions, currentChildAttrs,extensions));}});}});if (!extensions.isEmpty() && channel instanceof ServerChannel) {ServerChannel serverChannel = (ServerChannel) channel;for (ChannelInitializerExtension extension : extensions) {try {extension.postInitializeServerListenerChannel(serverChannel);}...}}
}
经过这一步:这个handler链可以如下所示
head <–> ChannelInitializer <–> tail
然后看【第二处】ChannelFuture regFuture = config().group().register(channel);这个register,一路往下,可以到达这里
// AbstractChannel.java
private void register0(ChannelPromise promise) {try {....boolean firstRegistration = neverRegistered;doRegister(); // 【1】neverRegistered = false;registered = true;....pipeline.invokeHandlerAddedIfNeeded();  // 【2】pipeline 建立了safeSetSuccess(promise);pipeline.fireChannelRegistered(); // 【3】if (isActive()) {if (firstRegistration) {pipeline.fireChannelActive();} else if (config().isAutoRead()) {....beginRead();}}}
}
// 【1】AbstractNioChannel.java
@Override
protected void doRegister() throws Exception {boolean selected = false;for (;;) {try {// 这一行代码与NIO的那个简直一模一样啊selectionKey = javaChannel().register(eventLoop().unwrappedSelector(), 0, this);return;} catch (CancelledKeyException e) {....}}
}
// 【2】跟进会来到这里
// AbstractChannelHandlerContext.java
final void callHandlerAdded() throws Exception {if (setAddComplete()) {// handler()方法得到ChannelHandler// 服务端我们没有配置.handler,配置的是.childHandler// 所以服务端是默认的ServerBootstrap配置的// 但是客户端示例是配置了.handler的// 所以handler()返回的是我们配置的handler().handlerAdded(this); // 看下面分开了服务端、客户端}
}
// ChannelInitializer.java
@Override
public void handlerAdded(ChannelHandlerContext ctx) throws Exception {if (ctx.channel().isRegistered()) {....if (initChannel(ctx)) { // 这里======removeState(ctx);}}
}
private boolean initChannel(ChannelHandlerContext ctx) throws Exception {if (initMap.add(ctx)) { // Guard against re-entrance.try {// 这个喔,看下面分服务端客户端的分开分析initChannel((C) ctx.channel());} ....
}
// 一、如果是服务端也就是ServerBootstrap
p.addLast(new ChannelInitializer<Channel>() {@Overridepublic void initChannel(final Channel ch) {final ChannelPipeline pipeline = ch.pipeline();// 拿到我们.handler(xx)里面配置的, 由于示例服务端没有配置.handler所以是空的// 示例服务端是配置的.childHandler喔ChannelHandler handler = config.handler();if (handler != null) {pipeline.addLast(handler);}// 会添加一个ServerBootstrapAcceptorch.eventLoop().execute(new Runnable() {@Overridepublic void run() {pipeline.addLast(new ServerBootstrapAcceptor(ch, currentChildGroup, currentChildHandler, currentChildOptions, currentChildAttrs,extensions));}});}
});
// 二、如果是客户端呢?
// 但是客户端示例是配置了.handler的,所以handler()返回的是我们配置的
client.group(work).channel(NioSocketChannel.class).option(ChannelOption.TCP_NODELAY, true)// 这里我们配置了的!!!!!!!!!===============.handler(new ChannelInitializer<SocketChannel>() {@Overrideprotected void initChannel(SocketChannel ch) throws Exception {ChannelPipeline pipeline = ch.pipeline();pipeline.addLast(new LoggingHandler(LogLevel.INFO));pipeline.addLast(new StringDecoder());pipeline.addLast(new StringEncoder());pipeline.addLast(new EchoClientHandler());}});// 【2】 执行之后,会来到【3】
// pipeline.fireChannelRegistered(); // 【3】
@Override
public final ChannelPipeline fireChannelRegistered() {// 注意这里的传参是 head/*pipeline 中扔了一个 channelRegistered 事件,这里的 register 属于 Inbound 事件,pipeline 接下来要做的就是执行 pipeline 中的 Inbound handlers 中的 channelRegistered() 方法。从上面的代码,我们可以看出,往 pipeline 中扔出 channelRegistered 事件以后,第一个处理的 handler 是 head。作者:JavaDoop链接:https://juejin.cn/post/6844903710846369806来源:稀土掘金著作权归作者所有。商业转载请联系作者获得授权,非商业转载请注明出处。*/AbstractChannelHandlerContext.invokeChannelRegistered(head);return this;
}static void invokeChannelRegistered(final AbstractChannelHandlerContext next) {EventExecutor executor = next.executor();//会先执行 head.invokeChannelRegistered() 方法if (executor.inEventLoop()) {next.invokeChannelRegistered(); // 这里往下} else {executor.execute(new Runnable() {@Overridepublic void run() {next.invokeChannelRegistered();}});}
}
// AbstractChannelHandlerContext.java
private void invokeChannelRegistered() {if (invokeHandler()) {try {final ChannelHandler handler = handler();final DefaultChannelPipeline.HeadContext headContext = pipeline.head;if (handler == headContext) { // 现在是head--------headContext.channelRegistered(this);} else if (handler instanceof ChannelDuplexHandler) {((ChannelDuplexHandler) handler).channelRegistered(this);} else {((ChannelInboundHandler) handler).channelRegistered(this);}} catch (Throwable t) {invokeExceptionCaught(t);}} else {fireChannelRegistered();}
}
// HeadContext.java ---- 是一个静态内部类,前文见过的
@Overridepublic void channelRegistered(ChannelHandlerContext ctx) {invokeHandlerAddedIfNeeded();//向后传播 Inbound 事件ctx.fireChannelRegistered();}
// AbstractChannelHandlerContext.java
@Override
public ChannelHandlerContext fireChannelRegistered() {// findContextInbound() 方法会沿着 pipeline 找到下一个 Inbound 类型的 handlerinvokeChannelRegistered(findContextInbound(MASK_CHANNEL_REGISTERED));return this;
}
此处附上一张黑马程序员Netty课的一张图,方便读者理解执行顺序:【左边是客户端,右边是服务端】
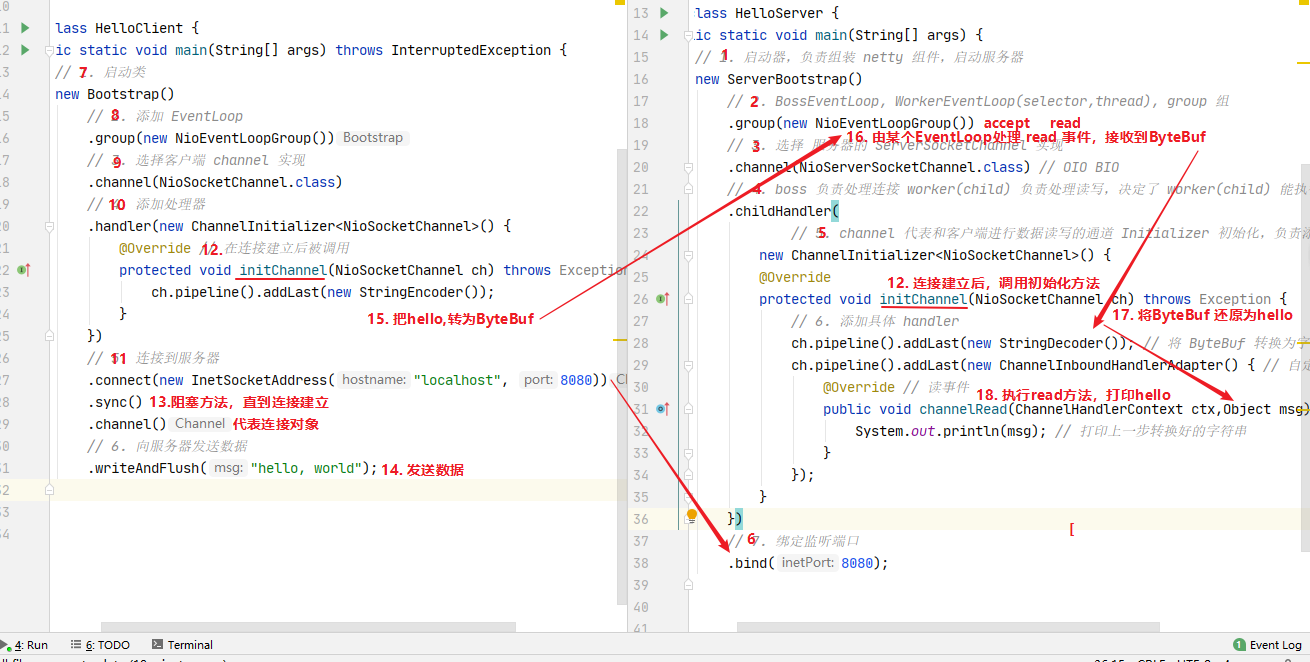
可以看到,在服务端12345配置好后,.childHandler里面的内容执行的时机都到第十几号的顺序了。知道了大概顺序之后,现在看一下客户端的connect,看看可不可以看出什么新东西:
// Bootstrap.java
public ChannelFuture connect(SocketAddress remoteAddress) {...return doResolveAndConnect(remoteAddress, config.localAddress());
}
private ChannelFuture doResolveAndConnect(final SocketAddress remoteAddress, final SocketAddress localAddress) {// 还是会走这个方法,好熟悉啊final ChannelFuture regFuture = initAndRegister(); !final Channel channel = regFuture.channel();....
}// 客户端还是走到了这里 AbstractBootstrap.java
final ChannelFuture initAndRegister() {Channel channel = null;try {channel = channelFactory.newChannel();init(channel);} catch (Throwable t) {....}ChannelFuture regFuture = config().group().register(channel);if (regFuture.cause() != null) {if (channel.isRegistered()) {channel.close();} else {channel.unsafe().closeForcibly();}}return regFuture;
}
3.即时通信-框架整合
1)基本类搭建
本文springboot2.7.18 + netty4.1.89.Final
首先,我们需要一个netty的websocket服务:
@Data
public class NettyWebsocketServer {private int port = 19999;private NettyInitializer nettyInitializer;@Getterprivate static final NettyWebsocketServer instance = new NettyWebsocketServer();private NettyWebsocketServer() {}// 启动服务public void start() {NioEventLoopGroup boss = new NioEventLoopGroup(2);NioEventLoopGroup worker = new NioEventLoopGroup(16);try {ServerBootstrap bootstrap = new ServerBootstrap().group(boss, worker).channel(NioServerSocketChannel.class) // 服务端的channel.option(ChannelOption.CONNECT_TIMEOUT_MILLIS, 3000).childOption(ChannelOption.SO_KEEPALIVE, true).childHandler(nettyInitializer); // 自定义的初始化类ChannelFuture channelFuture = bootstrap.bind(port).sync();System.out.println("netty-websocket服务启动成功! port: " + port);channelFuture.channel().closeFuture().sync();} catch ( Exception e ) {System.out.println("netty服务启动失败!");} finally {// 优雅地关闭EventLoopGroupboss.shutdownGracefully();worker.shutdownGracefully();System.out.println("Netty服务器已关闭");}}
}
接下来,我们看看自定义的初始化器
@Component //把它定义为了spring的组件,可以注入我们需要的对象了
public class NettyInitializer extends ChannelInitializer<SocketChannel> {@Resourceprivate UserDatas userDatas; // 这个就是模拟的与redis、mysql的操作@Resourceprivate ChannelManager channelManager;@Overrideprotected void initChannel(SocketChannel channel) throws Exception {ChannelPipeline pipeline = channel.pipeline();// 1.HTTP 服务基础:解码/聚合pipeline.addLast(new HttpServerCodec())// 添加HTTP编解码器.addLast(new HttpObjectAggregator(1024*64));// 聚合HTTP消息,最大64KB// 授权拦截器:在握手前拦截并校验pipeline.addLast(new WebSocketInterceptor(userDatas)) // 授权拦截器.addLast(new ConnectionAccessHandler(channelManager)); // 连接建立处理器// 2.WebSocket协议:握手 + 压缩(先压缩,再握手)pipeline.addLast(new WebSocketServerCompressionHandler())  // 添加WebSocket消息压缩处理器 【入站出站】.addLast(new WebSocketServerProtocolHandler("/tim")) // 添加WebSocket协议处理器 【入站出站】.addLast(new WebSocketFrameHandler());  // 处理WebSocket帧 -- text帧转为ByteBuf 【入站】// 3.TMessage消息处理pipeline.addLast(new TMessageDecoder())// 添加TMessage解码器 ByteBuf -> TMessage.addLast(new TMessageEncoder())// 添加TMessage编码器 TMessage -> TextWebsocketFrame.addLast(new TMessageHandler()) // 添加TMessage业务处理器.addLast(new GlobalExceptionHandler(channelManager)); // 添加全局异常处理器}
}
在上面的服务类中channelFuture.channel().closeFuture().sync();会阻塞住主线程,由于我们是springboot整合的,这可不能阻塞住啊,所以我们在一个子线程里面单独启动netty服务
// netty服务启动器---有很多种方法,还可以实现xxxRunner接口、监听应用启动完成事件等等等...
@Component
public class NettyStarter {@Value("${websocket.port}")private int port;@Resourceprivate NettyWebsocketServer server; // 这里注入了一个netty的服务@PostConstructpublic void init() {if ( port != 0 ) server.setPort(port);// 新开一个线程启动Netty服务//NettyServer.start();new Thread(server::start).start();}
}//
@Configuration
public class NettyInstanceConfig {// 创建一个NettyWebsocketServer的实例@Beanpublic NettyWebsocketServer nettyWebsocketServer(NettyInitializer nettyInitializer) {NettyWebsocketServer instance = NettyWebsocketServer.getInstance();instance.setNettyInitializer(nettyInitializer);return instance;}
}
这样主要的类都搭建完成了,接下来只要处理好执行链中的各种handler就好了。
2)handler链处理
在第一章也有介绍到,WebSocket握手是基于HTTP协议的,
首先是客户端发送一个http请求【HTTP Upgrade】,请求升级到ws协议;然后服务端处理,此后通信切换为WebSocket协议;
故,最开始需要添加一个HttpServerCodec以确保能够解析和处理这个HTTP请求,保证ws的正常连接;
第二个**HttpObjectAggregator,将分片的 HTTP 消息(如 HttpContent)聚合成完整的FullHttpRequest/FullHttpResponse**,它需要在 HttpServerCodec 之后,确保能处理完整的 HTTP 请求体;
第三个是自定义的WebSocketInterceptor
@Slf4j
public class WebSocketInterceptor extends SimpleChannelInboundHandler<FullHttpRequest> {private final UserDatas userDatas;public WebSocketInterceptor(UserDatas userDatas) {this.userDatas = userDatas;}@Overrideprotected void channelRead0(ChannelHandlerContext ctx, FullHttpRequest request) throws Exception {// 1. 检查是否为 WebSocket 握手请求if (isWebSocketUpgrade(request)) {// 2. 验证权限if (authorize(ctx, request)) {// 3. 验证通过,将请求传递给下一个处理器ctx.fireChannelRead(request.retain());} else {// 4. 验证失败,返回 401 并关闭连接sendUnauthorizedResponse(ctx, request);ctx.close();}}else {// 不是握手请求handleHttpRequest(ctx, request);}}...// 响应未认证成功...// 检查是否为 WebSocket 握手请求...// 鉴权private boolean authorize(ChannelHandlerContext ctx, FullHttpRequest req) {String token = req.headers().get("tim-token");if (token != null ) {User user = userDatas.parseUserByToken(token);if (user != null) { // 说明登录了// ctx.channel().attr(ChannelAttributeKeys.USER_ID).set(user.getUid()); // 给这个channel绑定一个附件log.info("用户 {} 连接TIM成功", user.getUsername());channelManager.addUserChannel(user.getUid(), ctx.channel());return true;}return false;}// 从URI中提取:?token=xxx// QueryStringDecoder decoder = new QueryStringDecoder(req.uri());// if (decoder.parameters().containsKey("token")) {//     String token = decoder.parameters().get("token").get(0);//     return TokenService.verify(token);// }return false;}
}
这个是在 WebSocket 握手前拦截 HTTP 请求,验证 Token权限信息,看一下这个用户是否登录过了。要放在 HttpObjectAggregator 之后,才能获取完整的 HTTP 请求(FullHttpRequest),同时必须在 WebSocket 协议处理器(如 WebSocketServerProtocolHandler)之前,确保握手请求先通过权限验证。
第四个自定义的连接建立处理器:在上面的拦截通过之后,说明该连接放行了
@Slf4j
public class ConnectionAccessHandler extends SimpleChannelInboundHandler<FullHttpRequest> {private final ChannelManager channelManager;public ConnectionAccessHandler(ChannelManager channelManager) {this.channelManager = channelManager;}@Overrideprotected void channelRead0(ChannelHandlerContext ctx, FullHttpRequest msg) throws Exception {Attribute<String> attr = ctx.channel().attr(ChannelAttributeKeys.USER_ID);String uid = attr.get();if (uid != null) {log.info("用户 {} 连接上了TIM!", uid);channelManager.addUserChannel(uid, ctx.channel());}super.channelRead(ctx, msg);}@Overridepublic void channelInactive(ChannelHandlerContext ctx) throws Exception {log.info("连接断开了: {}", ctx.channel().remoteAddress());channelManager.removeUserChannel(ctx.channel());super.channelInactive(ctx);}
}
第五个是**WebSocketServerCompressionHandler**:支持 WebSocket 消息的压缩(如 permessage-deflate 扩展),必须在 WebSocketServerProtocolHandler 之前,以便在握手时协商压缩参数
第六个是**WebSocketServerProtocolHandler**,处理 WebSocket 握手、协议升级、Ping/Pong 帧维护,自动移除 HTTP 处理器,必须在 HTTP 处理器和权限拦截器之后,直接处理 WebSocket 握手请求。握手成功后,会移除 HttpServerCodec 和 HttpObjectAggregator,优化 Pipeline
第七个是WebSocketFrameHandler:将 TextWebSocketFrame 或 BinaryWebSocketFrame 转换为 ByteBuf,供后续解码器处理。需紧接在协议处理器之后,直接处理 WebSocket 帧数据。
public class WebSocketFrameHandler extends SimpleChannelInboundHandler<TextWebSocketFrame> {@Overrideprotected void channelRead0(ChannelHandlerContext ctx, TextWebSocketFrame msg) throws Exception {ByteBuf content = msg.content().retain(); // 保留引用计数ctx.fireChannelRead(content);}
}
最后一部分:
// 将ByteBuf解码为自定义协议对象TMessage,需在WebSocketFrameHandler之后,接收已提取的原始字节数据。
public class TMessageDecoder extends ByteToMessageDecoder {@Overrideprotected void decode(ChannelHandlerContext ctx, ByteBuf in, List<Object> out) throws Exception {// 1. 判断是否有可读字节int readable = in.readableBytes();if (readable == 0) {return;  // 还没收到数据,等待下次调用}// 2.读取所有字节到 byte[]byte[] bytes = new byte[readable];in.readBytes(bytes);// 3.将JSON bytes 反序列化为 TMessageTMessage msg = JSON.parseObject(bytes, TMessage.class);// 4.交给下一个 Handler 处理out.add(msg);}
}
//将TMessage编码为TextWebSocketFrame。 作为出站处理器,需在入站处理器之后,确保出站数据正确包装为WebSocket帧
public class TMessageEncoder extends MessageToMessageEncoder<TMessage> {@Overrideprotected void encode(ChannelHandlerContext ctx, TMessage msg, List<Object> out) throws Exception {// 1. 序列化为 JSON 字符串String json = JSON.toJSONString(msg);// 2. 包装到 TextWebSocketFrameout.add(new TextWebSocketFrame(json));}@Overridepublic boolean acceptOutboundMessage(Object msg) throws Exception {// 仅对 TMessage 对象生效return msg instanceof TMessage;}
}
// 业务处理【入站】......
// 全局异常处理【入站】...
3)注意
在 Netty 中,不同 ChannelHandler 之间共享数据不能直接通过 ThreadLocal 实现,因为 Netty 的 ChannelHandler 可能运行在不同的线程(EventLoop)中,且 ThreadLocal 是线程隔离的。你需要通过 Channel 的 AttributeMap 来传递数据。
Netty的引用计数:
自从Netty4开始,对象的生命周期由它们的引用计数管理,而不是由垃圾收集器管理了,它使用了引用计数来改进分配内存和释放内存的性能。
end.参考
-
https://blog.csdn.net/qq_38263083/article/details/131811502【springBoot + websocket】
-
https://blog.csdn.net/qq_38263083/article/details/131825724【springBoot + netty + websocket】
-
https://juejin.cn/post/6844903704487804941#heading-0 【认真的 Netty 源码解析(一)】-- 绝世好文,强烈建议读者阅读
-
https://juejin.cn/post/6844903710846369806 【认真的 Netty 源码解析(二)】-- 绝世好文,强烈建议读者阅读
-
https://segmentfault.com/a/1190000007308934 【贯穿Netty 的大动脉 1】
-
黑马程序员Netty【https://www.bilibili.com/video/BV1py4y1E7oA/?spm_id_from=333.337.search-card.all.click】