用Qt和deepseek创建自己的问答系统
如果你不想花钱调用deepseek,试试下面的方法。
1: 访问
OpenRouter:
https://openrouter.ai
2: 搜索 DeepSeek-R1 (free)
要使用这个免费模型,你需要:
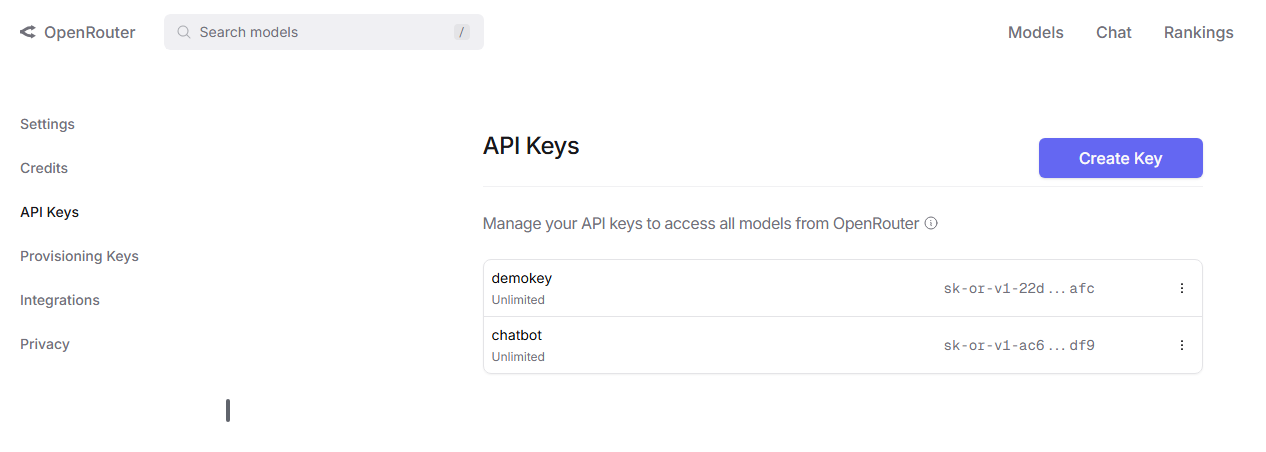
(1)注册 OpenRouter 账户并获取 API 密钥
- 访问 https://openrouter.ai 注册账户
- 在账户设置中获取 API 密钥
(2)运行程序并输入你的 OpenRouter API 密钥
- 程序会提示你输入 API 密钥
- 密钥会被安全地保存在本地设置中
(3)开始使用免费模型进行对话
- 在输入框中输入你的问题
- 点击"发送"按钮或按回车键发送消息
第一次登录要先注册,注册后就可以生成自己的apikey
创建好后,接下来就是代码如何实现:
我用QT创建了一个简单的交互页面,主要含有三个按钮:
- 发送
- 清空
- 密钥重置
密钥重置主要用于更改密钥,点击密钥重置会弹出一个小窗口进行填写密钥,填写完毕后,窗口会打印出密钥已更新。
1、pro配置
QMAKE_PROJECT_DEPTH = 0
QT       += core gui networkgreaterThan(QT_MAJOR_VERSION, 4): QT += widgetsCONFIG += c++11SOURCES += \main.cpp \mainwindow.cpp \deepseek_client.cppHEADERS += \mainwindow.h \deepseek_client.h# Default rules for deployment.
qnx: target.path = /tmp/$${TARGET}/bin
else: unix:!android: target.path = /opt/$${TARGET}/bin
!isEmpty(target.path): INSTALL_ROOT *= 0
2、mainwindow.h
#ifndef MAINWINDOW_H
#define MAINWINDOW_H#include <QMainWindow>
#include <QPushButton>
#include <QLabel>
#include <QLineEdit>
#include <QTextEdit>
#include <QVBoxLayout>
#include <QScrollArea>
#include "deepseek_client.h"class MainWindow : public QMainWindow
{Q_OBJECTpublic:MainWindow(QWidget *parent = nullptr);~MainWindow();private slots:void handleSendMessage();void handleClearChat();void handleAIResponse(const QString &response);void handleAIError(const QString &error);void handleResetApiKey();private:void appendMessage(const QString &message, bool isUser);void setupDeepSeek();void resetApiKey();QWidget *centralWidget;QVBoxLayout *mainLayout;QTextEdit *chatDisplay;QLineEdit *inputField;QPushButton *sendButton;QPushButton *resetApiKeyButton;QPushButton *clearButton;QScrollArea *scrollArea;DeepSeekClient *deepseekClient;
};#endif // MAINWINDOW_H
3、deepseek_client.h
#ifndef DEEPSEEK_CLIENT_H
#define DEEPSEEK_CLIENT_H#include <QObject>
#include <QNetworkAccessManager>
#include <QNetworkReply>
#include <QJsonDocument>
#include <QJsonObject>
#include <QJsonArray>class DeepSeekClient : public QObject
{Q_OBJECTpublic:explicit DeepSeekClient(QObject *parent = nullptr);void setApiKey(const QString &apiKey);void sendMessage(const QString &message);signals:void responseReceived(const QString &response);void errorOccurred(const QString &error);private:QNetworkAccessManager *networkManager;QString apiKey;QString apiEndpoint;
};#endif // DEEPSEEK_CLIENT_H
4、mainwindow.cpp
#include "mainwindow.h"
#include <QVBoxLayout>
#include <QWidget>
#include <QDateTime>
#include <QScrollBar>
#include <QMessageBox>
#include <QSettings>
#include <QInputDialog>MainWindow::MainWindow(QWidget *parent): QMainWindow(parent)
{// 创建中心部件centralWidget = new QWidget(this);setCentralWidget(centralWidget);// 创建主布局mainLayout = new QVBoxLayout(centralWidget);// 创建聊天显示区域chatDisplay = new QTextEdit(this);chatDisplay->setReadOnly(true);chatDisplay->setStyleSheet("QTextEdit { background-color: #f5f5f5; }");mainLayout->addWidget(chatDisplay);// 创建输入区域QHBoxLayout *inputLayout = new QHBoxLayout();inputField = new QLineEdit(this);inputField->setPlaceholderText("输入你的问题...");inputLayout->addWidget(inputField);sendButton = new QPushButton("发送", this);inputLayout->addWidget(sendButton);clearButton = new QPushButton("清空对话", this);inputLayout->addWidget(clearButton);resetApiKeyButton = new QPushButton("重置API密钥", this);inputLayout->addWidget(resetApiKeyButton);mainLayout->addLayout(inputLayout);// 连接信号和槽connect(sendButton, &QPushButton::clicked, this, &MainWindow::handleSendMessage);connect(clearButton, &QPushButton::clicked, this, &MainWindow::handleClearChat);connect(resetApiKeyButton, &QPushButton::clicked, this, &MainWindow::handleResetApiKey);connect(inputField, &QLineEdit::returnPressed, this, &MainWindow::handleSendMessage);// 设置窗口标题和大小setWindowTitle("DeepSeek AI 问答系统");resize(600, 400);// 初始化DeepSeek客户端setupDeepSeek();// 添加欢迎消息appendMessage("你好!我是DeepSeek AI助手,有什么我可以帮你的吗?", false);
}MainWindow::~MainWindow()
{delete deepseekClient;
}void MainWindow::setupDeepSeek()
{deepseekClient = new DeepSeekClient(this);// 从设置中读取API密钥QSettings settings("YourCompany", "DeepSeekChat");QString apiKey = settings.value("apiKey").toString();if (apiKey.isEmpty()) {// 如果没有保存的API密钥,弹出对话框请求输入bool ok;apiKey = QInputDialog::getText(this, "DeepSeek API密钥","请输入你的DeepSeek API密钥:", QLineEdit::Password,"", &ok);if (ok && !apiKey.isEmpty()) {settings.setValue("apiKey", apiKey);}}deepseekClient->setApiKey(apiKey);// 连接信号connect(deepseekClient, &DeepSeekClient::responseReceived,this, &MainWindow::handleAIResponse);connect(deepseekClient, &DeepSeekClient::errorOccurred,this, &MainWindow::handleAIError);
}
void MainWindow::resetApiKey()
{QSettings settings("YourCompany", "DeepSeekChat");settings.remove("apiKey"); // 删除旧的API密钥bool ok;QString apiKey = QInputDialog::getText(this, "DeepSeek API密钥","请输入你的DeepSeek API密钥:", QLineEdit::Password,"", &ok);if (ok && !apiKey.isEmpty()) {settings.setValue("apiKey", apiKey);deepseekClient->setApiKey(apiKey);appendMessage("API密钥已更新", false);} else {appendMessage("API密钥未更新,请稍后重试", false);}
}void MainWindow::handleResetApiKey()
{resetApiKey();
}
void MainWindow::handleSendMessage()
{QString userInput = inputField->text().trimmed();if (userInput.isEmpty()) {return;}// 显示用户消息appendMessage(userInput, true);inputField->clear();// 发送消息到DeepSeekdeepseekClient->sendMessage(userInput);
}void MainWindow::handleClearChat()
{chatDisplay->clear();appendMessage("你好!我是DeepSeek AI助手,有什么我可以帮你的吗?", false);
}void MainWindow::handleAIResponse(const QString &response)
{appendMessage(response, false);
}void MainWindow::handleAIError(const QString &error)
{QMessageBox::warning(this, "错误", "AI响应出错: " + error);
}void MainWindow::appendMessage(const QString &message, bool isUser)
{QString timestamp = QDateTime::currentDateTime().toString("hh:mm:ss");QString formattedMessage = QString("[%1] %2: %3\n").arg(timestamp).arg(isUser ? "你" : "AI").arg(message);chatDisplay->append(formattedMessage);// 滚动到底部QScrollBar *scrollbar = chatDisplay->verticalScrollBar();scrollbar->setValue(scrollbar->maximum());
}
5、deepseek_client.cpp
#include "deepseek_client.h"
#include <QNetworkRequest>
#include <QJsonDocument>
#include <QJsonObject>
#include <QJsonArray>
#include <QDebug>
#include <QTimer>
DeepSeekClient::DeepSeekClient(QObject *parent): QObject(parent), networkManager(new QNetworkAccessManager(this)), apiEndpoint("https://openrouter.ai/api/v1/chat/completions")
{// 设置SSL配置QSslConfiguration sslConfig = QSslConfiguration::defaultConfiguration();sslConfig.setPeerVerifyMode(QSslSocket::VerifyNone);QSslConfiguration::setDefaultConfiguration(sslConfig);
}void DeepSeekClient::setApiKey(const QString &apiKey)
{this->apiKey = apiKey;
}void DeepSeekClient::sendMessage(const QString &message)
{if (apiKey.isEmpty()) {emit errorOccurred("API key not set");return;}QNetworkRequest request(apiEndpoint);request.setHeader(QNetworkRequest::ContentTypeHeader, "application/json");request.setRawHeader("Authorization", QString("Bearer %1").arg(apiKey).toUtf8());QJsonObject jsonObj;jsonObj["model"] = "deepseek/deepseek-r1-zero:free"; // 使用OpenRouter上的免费模型QJsonArray messagesArray;QJsonObject systemMessage;systemMessage["role"] = "system";systemMessage["content"] = "你是一个友好的AI助手,会用简洁专业的语言回答问题。";messagesArray.append(systemMessage);QJsonObject userMessage;userMessage["role"] = "user";userMessage["content"] = message;messagesArray.append(userMessage);jsonObj["messages"] = messagesArray;jsonObj["temperature"] = 0.7;jsonObj["max_tokens"] = 1000;QJsonDocument doc(jsonObj);QByteArray data = doc.toJson();qDebug() << "Sending request to OpenRouter:" << apiEndpoint;qDebug() << "Request data:" << data;QNetworkReply *reply = networkManager->post(request, data);connect(reply, &QNetworkReply::finished, [=]() {if (reply->error() == QNetworkReply::NoError) {QByteArray responseData = reply->readAll();qDebug() << "Response received:" << responseData;QJsonDocument responseDoc = QJsonDocument::fromJson(responseData);QJsonObject responseObj = responseDoc.object();if (responseObj.contains("choices") && responseObj["choices"].isArray()) {QJsonArray choices = responseObj["choices"].toArray();if (!choices.isEmpty()) {QJsonObject choice = choices[0].toObject();if (choice.contains("message")) {QJsonObject messageObj = choice["message"].toObject();QString content = messageObj["content"].toString();emit responseReceived(content);}}} else {QString errorMsg = "Invalid response format: " + QString(responseData);qDebug() << errorMsg;emit errorOccurred(errorMsg);}} else {QString errorMsg = QString("Network error: %1\nStatus code: %2\nResponse: %3").arg(reply->errorString()).arg(reply->attribute(QNetworkRequest::HttpStatusCodeAttribute).toInt()).arg(QString(reply->readAll()));qDebug() << errorMsg;emit errorOccurred(errorMsg);}reply->deleteLater();});// 添加超时处理QTimer::singleShot(30000, [=]() {if (reply && reply->isRunning()) {reply->abort();emit errorOccurred("Request timed out after 30 seconds");}});
}
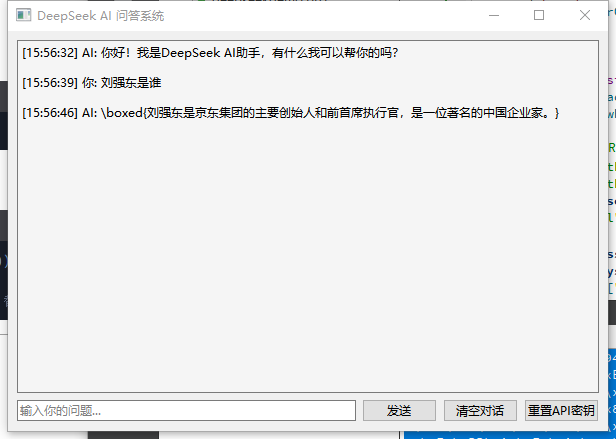
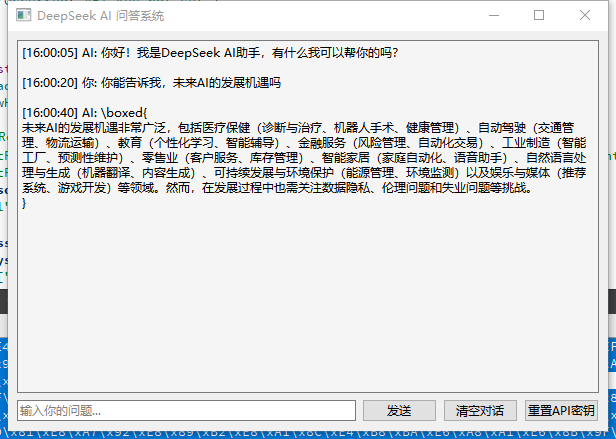
运行结果: