防火墙iptables项目实战
目录
一、网络规划
三、环境准备与检测
1、firewall
(1)配置防火墙各大网卡ip并禁用firewalld和selinux
(2)打开firewall路由转发
2、PC1(内网)
(1)配置ip并禁用firewalld和selinux
(2)配置网关
3、PC2(外网)
(1)配置ip并禁用firewalld和selinux
4、服务器S1(内网)
(1)配置ip并禁用firewalld和selinux
(2)配置网关
(3)下载nginx,并开通服务
5、环境检测
(1)内网连接
(2)外网连接
四、防火墙配置及测试
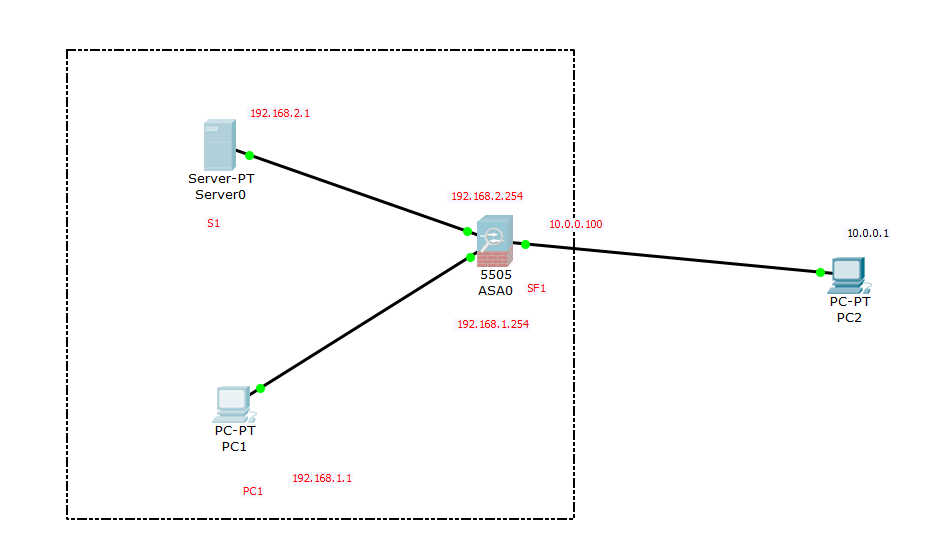
一、网络规划
 二、主机规划
-
内部PC1位于内网区域,地址段为: 192.168.1.0/24,pc1地址为:192.168.1.1/24,网关地址为:192.168.1.254/24
-
服务器S1位于服务器区域,地址段为: 192.168.2.0/24,pc1地址为:192.168.2.1/24,网关地址为:192.168.2.254/24
-
PC2位于互联网区域,模拟外部互联网,地址段为:10.0.0.0/8,pc2地址为:10.0.0.1/8
-
Linux防火墙的三块网卡为别连接不同的网络区域,地址分别为 :ens33 192.168.1.254/24;ens34 10.0.0.100/8;ens35 192.168.2.254/24
三、环境准备与检测
1、firewall
(1)配置防火墙各大网卡ip并禁用firewalld和selinux
[root@SF1 ~] systemctl stop firewalld.service
[root@SF1 ~] setenforce 0
[root@SF1 ~] ifconfig ens160 192.168.1.254/24
[root@SF1 ~] ifconfig ens192 10.0.0.100/8
[root@SF1 ~] ifconfig ens224 192.168.2.254
(2)打开firewall路由转发
[root@SF1 ~] sysctl -p
net.ipv4.ip_forward = 1
2、PC1(内网)
(1)配置ip并禁用firewalld和selinux
[root@PC1 ~] systemctl stop firewalld.service
[root@PC1 ~] setenforce 0
[root@PC1 ~] ifconfig ens160 192.168.1.1/24
(2)配置网关
[root@PC1 ~] route add -net 0/0 gw 192.168.1.254
[root@PC1 ~] route -n
Kernel IP routing table
Destination     Gateway         Genmask         Flags Metric Ref    Use Iface
0.0.0.0         192.168.1.254   0.0.0.0         UG    0      0        0 ens160
192.168.1.0     0.0.0.0         255.255.255.0   U     0      0        0 ens160
192.168.122.0   0.0.0.0         255.255.255.0   U     0      0        0 virbr0
3、PC2(外网)
(1)配置ip并禁用firewalld和selinux
[root@PC2 ~] systemctl stop firewalld.service
[root@PC2 ~] setenforce 0
[root@PC2 ~] ifconfig ens160 10.0.0.1/8
4、服务器S1(内网)
(1)配置ip并禁用firewalld和selinux
[root@S1 ~] systemctl stop firewalld.service
[root@S1 ~] setenforce 0
[root@S1 ~] ifconfig ens160 192.168.2.1/24
(2)配置网关
[root@S1 ~] route add -net 0/0 gw 192.168.2.254
[root@S1 ~] route -n
Kernel IP routing table
Destination     Gateway         Genmask         Flags Metric Ref    Use Iface
0.0.0.0         192.168.2.254   0.0.0.0         UG    0      0        0 ens160
192.168.2.0     0.0.0.0         255.255.255.0   U     0      0        0 ens160
192.168.122.0   0.0.0.0         255.255.255.0   U     0      0        0 virbr0
(3)下载nginx,并开通服务
[root@S1 yum.repos.d] yum -y install nginx
[root@S1 yum.repos.d] systemctl restart nginx[root@S1 yum.repos.d] echo 2025 > /usr/share/nginx/html/index.html
5、环境检测
(1)内网连接
[root@PC1 ~] ping 192.168.2.1
PING 192.168.2.1 (192.168.2.1) 56(84) bytes of data.
64 bytes from 192.168.2.1: icmp_seq=1 ttl=63 time=0.784 ms
64 bytes from 192.168.2.1: icmp_seq=2 ttl=63 time=0.836 ms[root@PC1 ~] ping 10.0.0.100
PING 10.0.0.100 (10.0.0.100) 56(84) bytes of data.
64 bytes from 10.0.0.100: icmp_seq=1 ttl=64 time=0.498 ms
64 bytes from 10.0.0.100: icmp_seq=2 ttl=64 time=0.689 ms[root@PC1 ~] ping 192.168.1.254
PING 192.168.1.254 (192.168.1.254) 56(84) bytes of data.
64 bytes from 192.168.1.254: icmp_seq=1 ttl=64 time=6.42 ms
64 bytes from 192.168.1.254: icmp_seq=2 ttl=64 time=0.651 ms
(2)外网连接
[root@PC1 ~] ping 10.0.0.1
PING 10.0.0.1 (10.0.0.1) 56(84) bytes of data.
^C
--- 10.0.0.1 ping statistics ---
3 packets transmitted, 0 received, 100% packet loss, time 2086ms
##环境搭建之初,内网PC1无法访问外网PC2
四、防火墙配置及测试
1、内部网络中的pc1采用SNAT访问外部互联网,但是无法ping到内部网关
配置
[root@SF1 ~] iptables -t nat -A POSTROUTING -s 192.168.1.0/24 -j MASQUERADE
[root@SF1 ~] iptables -t filter -A INPUT -p icmp --icmp-type 8 -j DROP外网测试
[root@PC1 ~] ping 10.0.0.1
PING 10.0.0.1 (10.0.0.1) 56(84) bytes of data.
64 bytes from 10.0.0.1: icmp_seq=1 ttl=63 time=1.19 ms
64 bytes from 10.0.0.1: icmp_seq=2 ttl=63 time=0.934 ms内部网关测试
[root@PC1 ~] ping 192.168.1.254
PING 192.168.1.254 (192.168.1.254) 56(84) bytes of data.
^C
--- 192.168.1.254 ping statistics ---
2 packets transmitted, 0 received, 100% packet loss, time 1007ms
2、内部网络服务器s1通过DNAT发布服务到互联网。
[root@SF1 ~] iptables -t nat -A PREROUTING -i ens192 -d 10.0.0.100 -p tcp --dport 80 -j DNAT --to-destination 192.168.2.1[root@PC2 ~] curl 10.0.0.100
2025
3、互联网主机pc2能够访问DMZ区域的服务器,但是不能够进行ping和ssh连接。
[root@SF1 ~] iptables -t filter -A INPUT -p icmp --icmp-type 8 -j DROP
[root@SF1 ~] iptables -t filter -A INPUT -p tcp --dport 22 -j DROP[root@PC2 ~] ping 10.0.0.100
PING 10.0.0.100 (10.0.0.100) 56(84) bytes of data.[root@PC2 ~] ssh root@10.0.0.100
ssh: connect to host 10.0.0.100 port 22: Connection timed out