android人脸识别——HowOld测测你的年龄和性别
引言
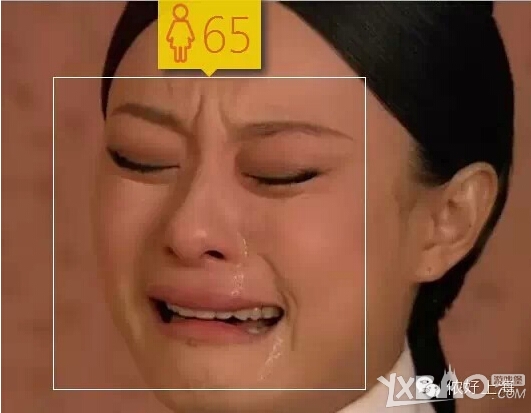
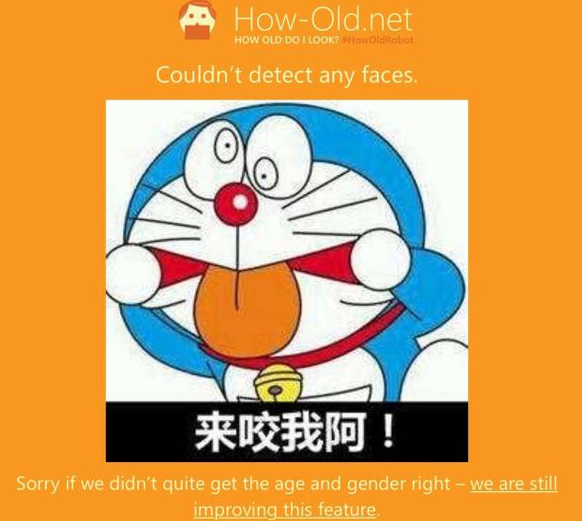
这段时间微软的HowOldRobot 测试年龄的网站非常火,访问量已经爆棚了!不过,这个测试也有很多比较坑爹的地方。比如:。。。。。
再比如。。。
好了 言归正传!今天我们就来看看android中怎么利用人脸识别功能来实现我们自己的HowOld APP
(PS:本人也是借鉴了网上大神的视频和资料 然后自己加以改进,有兴趣的可以去看看慕课网上鸿洋大神的视频http://www.imooc.com/learn/393)
Face++ API
想要使用人脸识别功能,我们需要调用Face++中的一些API来完成工作。Face++的官网地址是:http://www.faceplusplus.com.cn/
使用Face++有几个步骤:
1.注册账号

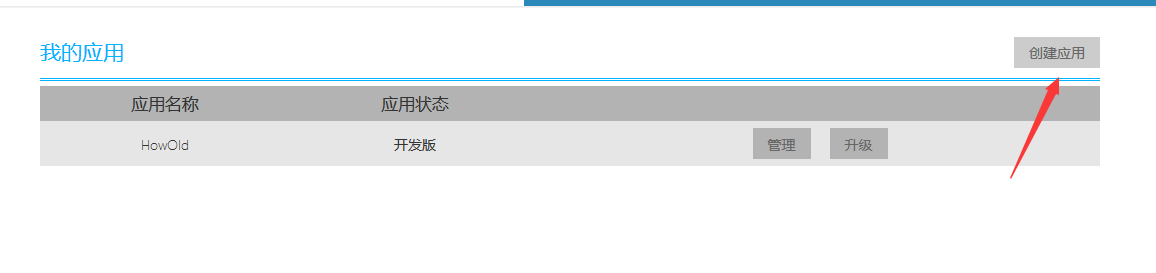
2.创建应用
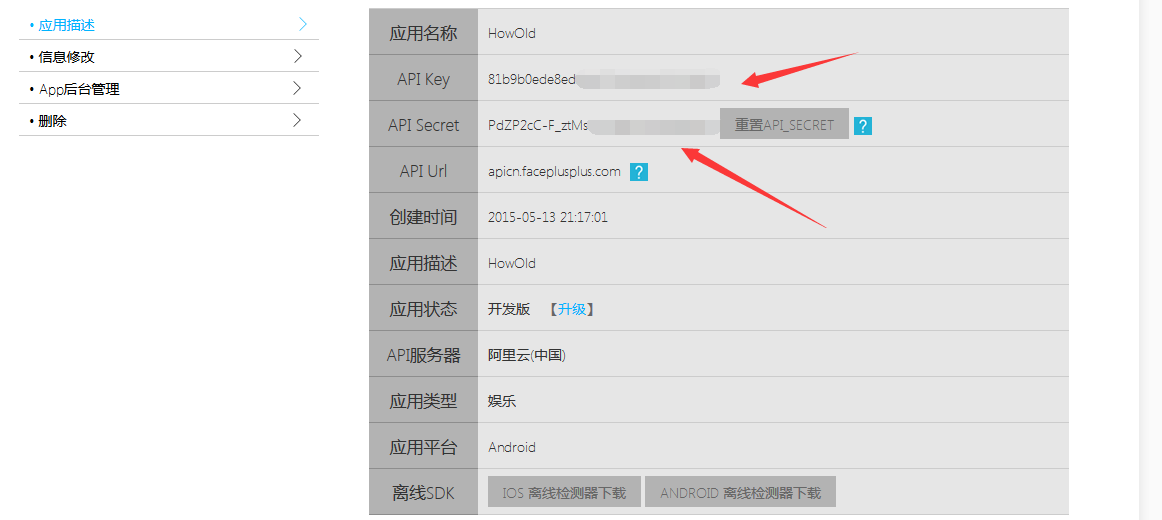
3.复制 Key 和 Sercret
4.下载SDK
5.将SDK放入我们的工程lib目录中
好了 准备工作做完了,接下来就开始编写我们的程序了。
布局
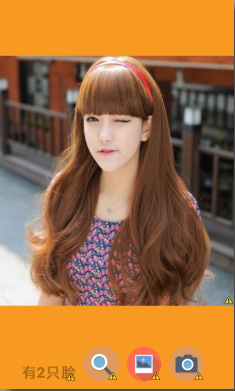
首先是布局文件。下面是我们的界面视图。很简单的布局,上边一张图片 ,下边一个TextView加三个按钮 。没有太多好说的。
MainActivity.xml
<LinearLayout xmlns:android="http://schemas.android.com/apk/res/android"xmlns:tools="http://schemas.android.com/tools"android:layout_width="match_parent"android:layout_height="match_parent"android:background="#F89921"android:orientation="vertical"tools:context="com.game.howold.MainActivity" ><ImageView
        android:id="@+id/face_image"android:layout_width="match_parent"android:layout_height="0dp"android:layout_gravity="center_horizontal"android:layout_marginTop="80dp"android:layout_weight="3"android:scaleType="fitXY"android:src="@drawable/level1" /><LinearLayout
        android:minHeight="80dp"android:id="@+id/bottom_layout"android:layout_width="wrap_content"android:layout_height="0dp"android:layout_gravity="center_horizontal"android:layout_weight="1"android:orientation="horizontal"android:gravity="center_horizontal|bottom"android:padding="10dp" ><TextView
            android:id="@+id/tip"android:layout_width="wrap_content"android:layout_height="wrap_content"android:layout_marginRight="10dp"android:text="有2只脸"android:textColor="#55000000"android:textSize="20sp"android:textStyle="bold" /><ImageButton
            android:id="@+id/detect"android:layout_width="wrap_content"android:layout_height="wrap_content"android:layout_marginRight="10dp"android:background="@drawable/detect" /><ImageButton
            android:id="@+id/open_photo"android:layout_width="wrap_content"android:layout_height="wrap_content"android:layout_marginRight="10dp"android:background="@drawable/photo" /><ImageButton
            android:id="@+id/open_camera"android:layout_width="wrap_content"android:layout_height="wrap_content"android:layout_marginRight="10dp"android:background="@drawable/camera" /></LinearLayout></LinearLayout>
人脸识别工具类
接下来, 我们需要编写一个人脸识别工具类,根据我们传入的图片来进行识别并返回数据。其中Constact是我们的常量工具类,存放我们应用的Key和Secret.
FaceRecognize.class
public class FaceRecognize
{// 回调接口public interface CallBack{// 识别成功void success(JSONObject result);// 识别失败void error(FaceppParseException e);}// 开始识别public static void detect(final Bitmap bitmap, final CallBack callback){new Thread(new Runnable(){@Overridepublic void run(){HttpRequests request = new HttpRequests(Constant.KEY,Constant.SECRET, true, true);Bitmap bmSmall = Bitmap.createBitmap(bitmap, 0, 0,bitmap.getWidth(), bitmap.getHeight());ByteArrayOutputStream baos = new ByteArrayOutputStream();//压缩图片bmSmall.compress(Bitmap.CompressFormat.JPEG, 100, baos);byte[] datas = baos.toByteArray();PostParameters params = new PostParameters();params.setImg(datas);try{//如果识别成功,调用success回调函数JSONObject result = request.detectionDetect(params);if (callback != null){callback.success(result);}} catch (FaceppParseException e){// TODO Auto-generated catch blocke.printStackTrace();if (callback != null){callback.error(e);Log.e("JSONObject", e.toString());}}}}).start();}
}
程序主要逻辑
然后我们在MainActivity中实现我们的主要逻辑。
MainActivity.class
public class MainActivity extends Activity implements OnClickListener
{//从相册选择照片private static final int PICK_CODE = 0X110;//照相private static final int TAKE_PICTURE = 0X114;//识别成功private static final int MSG_SUCCESS = 0X111;//识别失败private static final int MSG_ERROR = 0X112;//剪裁图片private static final int CROP_PHOTO = 0x115;private ImageButton detect, camera, photo;private TextView tip, ageAndgender;private ImageView img;private String mCurrentPhotoPath;private Bitmap mPhotoImg;private Canvas mCanvas;private Paint mPaint;//自定义对话框private CustomProgressDialog dialog;private Uri imageUri;private String filename;private boolean isCamera =false;private Dialog dialogs;private Handler mHandler = new Handler(){public void handleMessage(android.os.Message msg){switch (msg.what){//解析成功case MSG_SUCCESS:dialog.dismiss();//获取JSON数据JSONObject result = (JSONObject) msg.obj;//解析JSON数据parseResult(result);img.setImageBitmap(mPhotoImg);break;//解析失败case MSG_ERROR:dialog.dismiss();String errorMsg = (String) msg.obj;if (TextUtils.isEmpty(errorMsg)){tip.setText("Error!!");}break;default:break;}};};
在上面的代码片段中,我们定义了一些常量和控件,并且使用handler来处理 识别成功和识别失败两种情况。
/*** 解析JSON数据* @param object*/private void parseResult(JSONObject object){Bitmap bitmap = Bitmap.createBitmap(mPhotoImg.getWidth(),mPhotoImg.getHeight(), mPhotoImg.getConfig());mCanvas = new Canvas(bitmap);mCanvas.drawBitmap(mPhotoImg, 0, 0, null);mPaint.setColor(Color.RED);mPaint.setAntiAlias(true);mPaint.setStrokeWidth(3);mPaint.setStrokeCap(Cap.ROUND);JSONArray faces;try{faces = object.getJSONArray("face");int faceCount = faces.length();//未识别出人脸if (faceCount == 0){dialogs = new AlertDialog.Builder(this).setTitle("检测结果").setMessage("长得太抽象o(╯□╰)o,识别不出来").setNegativeButton("重来",new DialogInterface.OnClickListener(){@Overridepublic void onClick(DialogInterface dialog,int which){dialogs.dismiss();}}).create();dialogs.show();return;}tip.setText("发现 " + faceCount + "只 脸 ");//循环处理每一张脸for (int i = 0; i < faceCount; i++){JSONObject face = faces.getJSONObject(i);JSONObject position = face.getJSONObject("position");//脸部中心点X坐标float x = (float) position.getJSONObject("center").getDouble("x");//脸部中心点Y坐标float y = (float) position.getJSONObject("center").getDouble("y");//脸部宽度float width = (float) position.getDouble("width");//脸部高度float height = (float) position.getDouble("height");x = x / 100 * bitmap.getWidth();y = y / 100 * bitmap.getHeight();width = width / 100 * bitmap.getWidth();height = height / 100 * bitmap.getHeight();//绘制年龄性别的显示框mCanvas.drawLine(x - width / 2, y - height / 2, x - width / 2,y + height / 2, mPaint);mCanvas.drawLine(x - width / 2, y - height / 2, x + width / 2,y - height / 2, mPaint);mCanvas.drawLine(x + width / 2, y - height / 2, x + width / 2,y + height / 2, mPaint);mCanvas.drawLine(x - width / 2, y + height / 2, x + width / 2,y + height / 2, mPaint);int age = face.getJSONObject("attribute").getJSONObject("age").getInt("value");String gender = face.getJSONObject("attribute").getJSONObject("gender").getString("value");Bitmap ageBitmap = buildAgeBitmap(age, gender.equals("Male"));int ageWidth = ageBitmap.getWidth();int ageHeight = ageBitmap.getHeight();//对年龄性别的显示框大小进行调整if (bitmap.getWidth() < img.getWidth()&& bitmap.getHeight() < img.getHeight()){float ratio = Math.max(bitmap.getWidth() * 1.0f / img.getWidth(),bitmap.getHeight() * 1.0f / img.getHeight());ageBitmap = Bitmap.createScaledBitmap(ageBitmap,(int) (ageWidth * ratio),(int) (ageHeight * ratio), false);}mCanvas.drawBitmap(ageBitmap, x - ageBitmap.getWidth() / 2, y- height / 2 - ageBitmap.getHeight(), null);mPhotoImg = bitmap;}} catch (JSONException e){e.printStackTrace();}}在parseRusult方法中, 我们解析从服务器中返回的JSON数据,然后获取到我们想要的年龄和性别,脸部位置等数据。
用于服务器返回的脸部中心坐标和宽高等数据是使用在图片中的百分比所表示的,所以我们需要做下面的处理将之转换成真实像素位置。
//脸部中心点X坐标float x = (float) position.getJSONObject("center").getDouble("x");//脸部中心点Y坐标float y = (float) position.getJSONObject("center").getDouble("y");//脸部宽度float width = (float) position.getDouble("width");//脸部高度float height = (float) position.getDouble("height");x = x / 100 * bitmap.getWidth();y = y / 100 * bitmap.getHeight();width = width / 100 * bitmap.getWidth();height = height / 100 * bitmap.getHeight();然后 ,我们绘制脸部的识别框,就是示例图中的那个红色方框。他们是四条线段绘制的。
//绘制年龄性别的显示框mCanvas.drawLine(x - width / 2, y - height / 2, x - width / 2,y + height / 2, mPaint);mCanvas.drawLine(x - width / 2, y - height / 2, x + width / 2,y - height / 2, mPaint);mCanvas.drawLine(x + width / 2, y - height / 2, x + width / 2,y + height / 2, mPaint);mCanvas.drawLine(x - width / 2, y + height / 2, x + width / 2,y + height / 2, mPaint);下一步,我们还需要将 表示性别和年龄的显示框绘制在相应的人脸框的上边,并对显示框做相应的校正,防止其过大。
int age = face.getJSONObject("attribute").getJSONObject("age").getInt("value");String gender = face.getJSONObject("attribute").getJSONObject("gender").getString("value");//年龄显示框的图像Bitmap ageBitmap = buildAgeBitmap(age, gender.equals("Male"));int ageWidth = ageBitmap.getWidth();int ageHeight = ageBitmap.getHeight();//对年龄性别的显示框大小进行调整if (bitmap.getWidth() < img.getWidth()&& bitmap.getHeight() < img.getHeight()){float ratio = Math.max(bitmap.getWidth() * 1.0f / img.getWidth(),bitmap.getHeight() * 1.0f / img.getHeight());ageBitmap = Bitmap.createScaledBitmap(ageBitmap,(int) (ageWidth * ratio),(int) (ageHeight * ratio), false);}mCanvas.drawBitmap(ageBitmap, x - ageBitmap.getWidth() / 2, y- height / 2 - ageBitmap.getHeight(), null);mPhotoImg = bitmap;}} catch (JSONException e){e.printStackTrace();}}我们的性别年龄显示框其实就是一个TextView ,并在左边通过drawableLeft设置了表示性别的图片。buildAgeBitmap函数用于将TextView转换为Bitmap对象
//绘制年龄性别显示框,将TextView转换为Bitmap对象private Bitmap buildAgeBitmap(int age, boolean isMale){ageAndgender = (TextView) getLayoutInflater().inflate(R.layout.age_layout, null);ageAndgender.setText(age + "");if (isMale){ageAndgender.setCompoundDrawablesWithIntrinsicBounds(getResources().getDrawable(R.drawable.male), null, null, null);} else{ageAndgender.setCompoundDrawablesWithIntrinsicBounds(getResources().getDrawable(R.drawable.female), null, null, null);}ageAndgender.setDrawingCacheEnabled(true);ageAndgender.measure(MeasureSpec.makeMeasureSpec(0, MeasureSpec.UNSPECIFIED),MeasureSpec.makeMeasureSpec(0, MeasureSpec.UNSPECIFIED));ageAndgender.layout(0, 0, ageAndgender.getMeasuredWidth(),ageAndgender.getMeasuredHeight());ageAndgender.buildDrawingCache();Bitmap bitmap = Bitmap.createBitmap(ageAndgender.getDrawingCache());return bitmap;}其中age_layout.xml就是性别年龄显示框的布局文件。
age_layout.xml
<?xml version="1.0" encoding="utf-8"?><TextView
       xmlns:android="http://schemas.android.com/apk/res/android"android:id="@+id/ageAndgender"android:layout_width="wrap_content"android:layout_height="wrap_content"android:background="@drawable/hint"android:drawableLeft="@drawable/male"android:textStyle="bold"android:gravity="center"android:text="12"android:textColor="#ffff0000"android:textSize="22sp"android:visibility="invisible" />
拍照、相册、识别处理
最后,我们需要对底部的拍照、相册选择图片和识别按钮进行处理。
@Overridepublic void onClick(View v){switch (v.getId()){//打开相册 选取图片case R.id.open_photo:Intent intent = new Intent();intent.setAction(Intent.ACTION_PICK);intent.setType("image/*");startActivityForResult(intent, PICK_CODE);break;//照相并获取图片case R.id.open_camera://图片名称 时间命名SimpleDateFormat format = new SimpleDateFormat("yyyyMMddHHmmss");Date date = new Date(System.currentTimeMillis());filename = format.format(date);//创建File对象用于存储拍照的图片 SD卡根目录 File path = Environment.getExternalStorageDirectory();File outputImage = new File(path,filename+".jpg");try {if(outputImage.exists()) {outputImage.delete();}outputImage.createNewFile();} catch(IOException e) {e.printStackTrace();}//将File对象转换为Uri并启动照相程序imageUri = Uri.fromFile(outputImage);Intent cameras = new Intent(MediaStore.ACTION_IMAGE_CAPTURE); //照相cameras.putExtra(MediaStore.EXTRA_OUTPUT, imageUri); //指定图片输出地址startActivityForResult(cameras,TAKE_PICTURE); //启动照相//拍完照startActivityForResult() 结果返回onActivityResult()函数break;//开始识别case R.id.detect:if (mCurrentPhotoPath != null&& !mCurrentPhotoPath.trim().equals("")){resizePhoto();} else if(!isCamera){//重置默认图片mPhotoImg = BitmapFactory.decodeResource(getResources(),R.drawable.level1);}dialog.show();//对图片进行识别 FaceRecognize.recognize(mPhotoImg, new CallBack(){@Overridepublic void success(JSONObject result){Message msg = Message.obtain();msg.what = MSG_SUCCESS;msg.obj = result;mHandler.sendMessageDelayed(msg, 500);}@Overridepublic void error(FaceppParseException e){Message msg = Message.obtain();msg.what = MSG_ERROR;msg.obj = e.getErrorMessage();mHandler.sendMessageDelayed(msg, 500);}});break;}}
在OnActivityResult回调方法中,我们分别处理拍照、相册选择照片和图片裁剪等操作。
@Overrideprotected void onActivityResult(int requestCode, int resultCode, Intent data){switch (requestCode){//从相册中选择相片case PICK_CODE:if (data != null){Uri uri = data.getData();Cursor cursor = getContentResolver().query(uri, null, null,null, null);cursor.moveToFirst();int index = cursor.getColumnIndex(MediaStore.Images.ImageColumns.DATA);mCurrentPhotoPath = cursor.getString(index);cursor.close();// 压缩照片resizePhoto();img.setImageBitmap(mPhotoImg);tip.setText("Detect-->");}break;//照相case TAKE_PICTURE:if (resultCode == RESULT_OK){//我们需要对图片进行剪裁Intent intent = new Intent("com.android.camera.action.CROP"); //剪裁intent.setDataAndType(imageUri, "image/*");intent.putExtra("scale", true);//设置宽高比例intent.putExtra("aspectX", 1);intent.putExtra("aspectY", 1);//设置裁剪图片宽高intent.putExtra("outputX", 340);intent.putExtra("outputY", 340);intent.putExtra(MediaStore.EXTRA_OUTPUT, imageUri);Toast.makeText(MainActivity.this, "剪裁图片", Toast.LENGTH_SHORT).show();//广播刷新相册 Intent intentBc = new Intent(Intent.ACTION_MEDIA_SCANNER_SCAN_FILE);intentBc.setData(imageUri); this.sendBroadcast(intentBc); startActivityForResult(intent, CROP_PHOTO); //设置裁剪参数显示图片至ImageView}break;//剪裁图片case CROP_PHOTO://图片解析成Bitmap对象try{//Bitmap bitmap = MediaStore.Images.Media.getBitmap(this.getContentResolver(), imageUri);mPhotoImg = BitmapFactory.decodeStream(getContentResolver().openInputStream(imageUri));Toast.makeText(MainActivity.this, imageUri.toString(), Toast.LENGTH_SHORT).show();isCamera=true;img.setImageBitmap(mPhotoImg);tip.setText("Detect-->"); //将剪裁后照片显示出来} catch (FileNotFoundException e){e.printStackTrace();} break;}super.onActivityResult(requestCode, resultCode, data);}注意,从相册中选择的图片,我们需要重新调整其大小,防止其尺寸过大而使得程序崩溃。resizeBitmap方法用于调整图片大小
//重置图片的大小 对图片进行压缩private void resizePhoto(){BitmapFactory.Options options = new BitmapFactory.Options();options.inJustDecodeBounds = true;BitmapFactory.decodeFile(mCurrentPhotoPath, options);double scaleRatio = Math.max(options.outWidth * 1.0d / 1024f,options.outHeight * 1.0d / 1024f);options.inSampleSize = (int) Math.ceil(scaleRatio);options.inJustDecodeBounds = false;mPhotoImg = BitmapFactory.decodeFile(mCurrentPhotoPath, options);}测试
最后 ,对我们的程序进行测试~

测试结果嘛。。。。。还是阔以的!