树莓派实验
一、在树莓派上完成驱动程序控制的 PWM LED灯。
1.PWM概述
PWM(Pulse Width Modulation,脉宽调制) 是一种通过调节信号脉冲宽度来模拟不同幅度模拟信号的技术。它通过周期性地改变信号的占空比(即在一个信号周期内,高电平持续时间的比例)来控制输出强度,从而实现对设备如LED亮度、电机转速等的精确控制。
PWM的核心在于其输出频率和占空比的可调节性,使得数字设备能够模拟模拟信号的效果。这一技术在嵌入式系统中应用广泛,适用于多种控制场景。
2.PWM的基本原理
1)占空比:占空比定义为在一个信号周期内,高电平的时间占整个周期的比例。
2)频率:频率是PWM信号在单位时间内完成的周期数,以Hz(赫兹)为单位。较高的频率可以有效减少信号控制的抖动,但也可能增加硬件的复杂性。
3)PWM信号的特点 :由一系列高低交替的方波构成。通过改变占空比,可以模拟不同幅度的模拟信号。
3.树莓派上的PWM
1)启用pwm
# vim打开/boot/config.txt
# 在最后一行加入: dtoverlay=pwm
# 保存退出,重启philon@rpi:~ $ sudo vim /boot/config.txt
philon@rpi:~ $ sudo reboot# 重启之后,有两种方式确认pwm已启用
philon@rpi:~ $ lsmod | grep pwm
pwm_bcm2835            16384  1 # 方式1: 加载了官方pwm驱动philon@rpi:~ $ ls /sys/class/pwm/
pwmchip0                        # 方式2: sysfs里可以看到pwmchip0目录
2)搭建硬件环境
3)命令行控制PWM
philon@rpi:~ $ cd /sys/class/pwm/pwmchip0/    # 进入pwm资源目录philon@rpi:~ $ echo 0 > export                # 加载pwm0资源
philon@rpi:~ $ echo 10000000 > pwm0/period    # 设置脉冲周期为10ms(100Hz)
philon@rpi:~ $ echo 8000000 > pwm0/duty_cycle # 设置占空比为8ms
philon@rpi:~ $ echo 1 > pwm0/enable           # 开始输出# 可以自行调整脉冲周期和占空比,得到不同的亮度
# 如果玩够了,记得释放资源
philon@rpi:~ $ echo 0 > pwm0/enable           # 关闭输出
philon@rpi:~ $ echo 0 > unexport              # 卸载pwm0资源
4.驱动控制PWM
代码示例:
struct pwm_device {
const char *label; // name of the PWM device
unsigned long flags; // flags associated with the PWM device
unsigned int hwpwm; // per-chip relative index of the PWM device
unsigned int pwm; // global index of the PWM device
struct pwm_chip *chip; // PWM chip providing this PWM device
void *chip_data; // chip-private data associated with the PWM device
struct pwm_args args; // PWM arguments
struct pwm_state state; // curent PWM channel state
};
struct pwm_device *pwm_request(int pwm_id, const char *label);
void pwm_free(struct pwm_device *pwm);
int pwm_config(struct pwm_device *pwm, int duty_ns, int period_ns)
int pwm_enable(struct pwm_device *pwm)
void pwm_disable(struct pwm_device *pwm)
#define PWMLED_MAX_BRIGHTNESS 1000
typedef enum {
PWMLED_CMD_SET_BRIGHTNESS = 0x1,
PWMLED_CMD_GET_BRIGHTNESS,
} pwmled_cmd_t;
#include <linux/module.h>
#include <linux/fs.h>
#include <linux/miscdevice.h>
#include <linux/pwm.h>
#include “pwmled.h”
MODULE_LICENSE(“Dual MIT/GPL”);
MODULE_AUTHOR(“Phlon | https://ixx.life”);
#define PWMLED_PERIOD 1000000 // 脉冲周期固定为1ms
static struct {
struct pwm_device* pwm;
unsigned int brightness;
} pwmled;
long pwmled_ioctl(struct file *filp, unsigned int cmd, unsigned long arg) {
switch (cmd) {
case PWMLED_CMD_SET_BRIGHTNESS:
pwmled.brightness = arg < PWMLED_MAX_BRIGHTNESS ? arg : PWMLED_MAX_BRIGHTNESS;
pwm_config(pwmled.pwm, pwmled.brightness * 1000, PWMLED_PERIOD);
if (pwmled.brightness > 0) {
pwm_enable(pwmled.pwm);
} else {
pwm_disable(pwmled.pwm);
}
case PWMLED_CMD_GET_BRIGHTNESS:
return pwmled.brightness;
default:
return -EINVAL;
}
return pwmled.brightness;
}
static struct file_operations fops = {
.owner = THIS_MODULE,
.unlocked_ioctl = pwmled_ioctl,
};
static struct miscdevice dev = {
.minor = 0,
.name = “pwmled”,
.fops = &fops,
.nodename = “pwmled”,
.mode = 0666,
};
int __init pwmled_init(void) {
struct pwm_device* pwm = pwm_request(0, “pwm0”);
if (IS_ERR_OR_NULL(pwm)) {
printk(KERN_ERR “failed to request pwm\n”);
return PTR_ERR(pwm);
}
pwmled.pwm = pwm;
pwmled.brightness = 0;
misc_register(&dev);
return 0;
}
module_init(pwmled_init);
void __exit pwmled_exit(void) {
misc_deregister(&dev);
pwm_disable(pwmled.pwm);
pwm_free(pwmled.pwm);
}
module_exit(pwmled_exit);
5.演示
![![[Pasted image 20250602210909.png]]](https://i-blog.csdnimg.cn/direct/cead166ce18f49d69246a6ef8b75b190.png)
二、在树莓派上完成超声波测距程序。
1.超声波测距模块HC-SR04
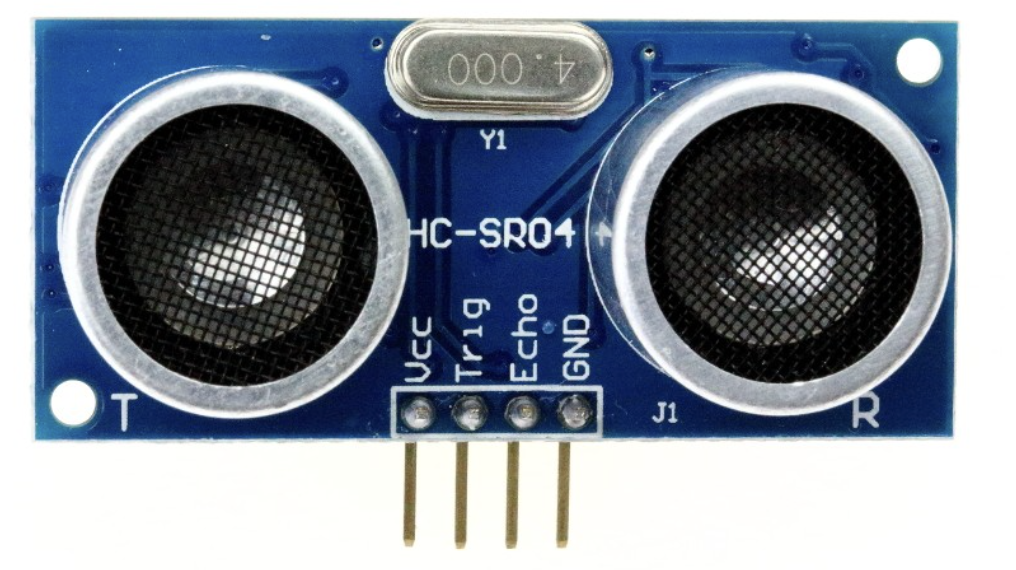
工作原理:
1.树莓派向 Trig 脚发送一个持续 10us 的脉冲信号。
2.HC-SR04 接收到树莓派发送的脉冲信号,开始发送超声波 ,并把 Echo置为高电平。 然后准备接收返回的超声波。
3.当 HC-SR04 接收到返回的超声波 时,把 Echo 置为低电平。
2.树莓派引脚
引脚图:
![![[Pasted image 20250602211145.png]]](https://i-blog.csdnimg.cn/direct/0849efa10a6e4cb993efedcd8ad46c44.png)
引脚连接:
Vcc连接5v电源,GND接地,Trig和Echo连接任意GPIO口。
3.代码实现
import RPi.GPIO as GPIO
import time
GPIO.setmode(GPIO.BCM)
GPIO_TRIGGER = 23
GPIO_ECHO = 24
GPIO.setup(GPIO_TRIGGER, GPIO.OUT)
GPIO.setup(GPIO_ECHO, GPIO.IN)
def distance():
GPIO.output(GPIO_TRIGGER, True)
time.sleep(0.00001)
GPIO.output(GPIO_TRIGGER, False)start_time = time.time()
stop_time = time.time()while GPIO.input(GPIO_ECHO) == 0:start_time = time.time()while GPIO.input(GPIO_ECHO) == 1:stop_time = time.time()
time_elapsed = stop_time - start_time
distance = (time_elapsed * 34300) / 2return distance
if name == ‘main’:
try:
while True:
dist = distance()
print(“Measured Distance = {:.2f} cm”.format(dist))
time.sleep(1)
    # Reset by pressing CTRL + C
except KeyboardInterrupt:print("Measurement stopped by User")GPIO.cleanup()
4.演示
![![[abb6617f5b0ad59873df70ab73129001.png]]](https://i-blog.csdnimg.cn/direct/7aaa18a100ac4111b435536d071697c6.png)