Java 并发编程通关秘籍:多线程基础 + 锁机制 + 工具类 + 性能优化
第一章:多线程基础详解
多线程编程是 Java 开发中的核心技能之一,它允许程序在同一时间执行多个任务,从而充分利用多核 CPU 的计算资源,提高程序的响应速度和吞吐量。本章将从基础概念入手,详细讲解 Java 多线程的核心知识。
1.1 进程与线程的本质区别
进程(Process)是程序在操作系统中的一次执行实例,是系统进行资源分配和调度的基本单位。每个进程都有自己独立的内存空间、文件描述符和系统资源。
线程(Thread) 是进程中的一个执行单元,是 CPU 调度和分派的基本单位。一个进程可以包含多个线程,这些线程共享进程的内存空间和系统资源,但每个线程有自己独立的程序计数器、栈和局部变量。
关键区别对比:
| 维度 | 进程 | 线程 |
|---|---|---|
| 资源占用 | 独立的内存空间和系统资源 | 共享进程的内存和资源 |
| 调度单位 | 操作系统调度的基本单位 | CPU 调度的基本单位 |
| 通信方式 | 进程间通信(IPC)开销较大 | 共享内存通信,开销小 |
| 创建 / 销毁开销 | 开销大 | 开销小 |
| 健壮性 | 一个进程崩溃不影响其他进程 | 一个线程崩溃可能导致整个进程崩溃 |
1.2 为什么需要多线程?深入理解应用场景
1.2.1 提高 CPU 利用率
现代 CPU 通常拥有多个核心,但单线程程序只能利用一个核心。多线程可以将任务分配到不同核心并行执行,充分利用 CPU 资源。
示例场景:
- 服务器端处理大量并发请求
- 数据并行处理(如 MapReduce 计算模型)
1.2.2 提升响应性
在 GUI 应用或 Web 服务器中,单线程可能导致界面卡顿或请求阻塞。多线程可以将耗时操作放到后台线程执行,保持主线程响应。
示例场景:
- Android 应用中的 UI 渲染与耗时任务分离
- Web 服务器中的请求处理与 IO 操作分离
1.2.3 异步与并发编程
多线程是实现异步编程的基础,通过将任务提交到线程池执行,可以避免主线程阻塞。
示例场景:
- 数据库查询与结果处理并行
- 定时任务与周期性任务执行
1.3 Java 中创建线程的三种方式详解
1.3.1 方式一:继承 Thread 类
通过继承Thread类并重写run()方法来定义线程行为。
public class ThreadCreationByExtending {public static void main(String[] args) {// 创建线程实例MyThread thread = new MyThread();// 启动线程(注意:调用start()而非run())thread.start();// 主线程继续执行for (int i = 0; i < 5; i++) {System.out.println("主线程执行: " + i);try {Thread.sleep(100);} catch (InterruptedException e) {e.printStackTrace();}}}
}// 继承Thread类并重写run()方法
class MyThread extends Thread {@Overridepublic void run() {for (int i = 0; i < 5; i++) {System.out.println("子线程执行: " + i);try {Thread.sleep(100);} catch (InterruptedException e) {e.printStackTrace();}}}
}执行结果示例:
主线程执行: 0
子线程执行: 0
主线程执行: 1
子线程执行: 1
主线程执行: 2
子线程执行: 2
主线程执行: 3
子线程执行: 3
主线程执行: 4
子线程执行: 4优缺点分析:
- 优点:实现简单,直接通过
this引用当前线程 - 缺点:Java 单继承限制,无法再继承其他类
- 适用场景:简单的线程任务,无需继承其他类
1.3.2 方式二:实现 Runnable 接口
通过实现Runnable接口的run()方法,并将其传递给Thread类的构造函数。
public class ThreadCreationByImplementing {public static void main(String[] args) {// 创建Runnable实例MyRunnable task = new MyRunnable();// 将Runnable实例传递给Thread构造函数Thread thread = new Thread(task);// 启动线程thread.start();// 主线程继续执行for (int i = 0; i < 5; i++) {System.out.println("主线程执行: " + i);try {Thread.sleep(100);} catch (InterruptedException e) {e.printStackTrace();}}}
}// 实现Runnable接口
class MyRunnable implements Runnable {@Overridepublic void run() {for (int i = 0; i < 5; i++) {System.out.println("子线程执行: " + i);try {Thread.sleep(100);} catch (InterruptedException e) {e.printStackTrace();}}}
}优缺点分析:
- 优点:避免单继承限制,适合多个线程共享同一个任务
- 缺点:任务无返回值,如需返回值需通过共享变量实现
- 适用场景:多个线程执行相同任务逻辑,或需实现多继承效果
1.3.3 方式三:实现 Callable 接口(带返回值)
通过实现Callable接口的call()方法,并结合Future获取异步计算结果。
import java.util.concurrent.*;public class ThreadCreationWithCallable {public static void main(String[] args) {// 创建线程池ExecutorService executor = Executors.newSingleThreadExecutor();// 创建Callable任务MyCallable task = new MyCallable();// 提交任务并获取Future对象Future<Integer> future = executor.submit(task);// 主线程继续执行其他任务System.out.println("主线程继续执行...");try {// 获取任务结果(可能阻塞)Integer result = future.get();System.out.println("任务返回结果: " + result);} catch (InterruptedException | ExecutionException e) {e.printStackTrace();} finally {// 关闭线程池executor.shutdown();}}
}// 实现Callable接口,指定返回值类型
class MyCallable implements Callable<Integer> {@Overridepublic Integer call() throws Exception {System.out.println("Callable任务开始执行...");Thread.sleep(2000);  // 模拟耗时操作return 1 + 2 + 3 + 4 + 5;}
}执行结果示例:
主线程继续执行...
Callable任务开始执行...
任务返回结果: 15优缺点分析:
- 优点:任务有返回值,支持泛型,可抛出受检查异常
- 缺点:实现较复杂,需通过线程池提交任务
- 适用场景:需要获取线程执行结果或处理异常的场景
1.4 三种创建方式的对比与选择策略
| 方式 | 继承 Thread 类 | 实现 Runnable 接口 | 实现 Callable 接口 |
|---|---|---|---|
| 接口 / 超类 | 继承 Thread 类 | 实现 Runnable 接口 | 实现 Callable 接口 |
| 是否有返回值 | 无 | 无 | 有(通过 Future) |
| 是否支持异常 | 仅运行时异常 | 仅运行时异常 | 支持受检查异常 |
| 单继承限制 | 受限制 | 无限制 | 无限制 |
| 代码复杂度 | 简单 | 中等 | 较高 |
| 适用场景 | 简单独立任务 | 多线程共享任务 | 需要返回值的任务 |
1.5 线程的命名与优先级设置
合理设置线程名称和优先级有助于调试和资源分配。
1.5.1 线程命名
public class ThreadNamingExample {public static void main(String[] args) {// 方式1:通过构造函数命名Thread namedThread = new Thread(() -> {System.out.println("当前线程名称: " + Thread.currentThread().getName());}, "MyNamedThread");// 方式2:通过setName()方法命名Thread anotherThread = new Thread(() -> {System.out.println("当前线程名称: " + Thread.currentThread().getName());});anotherThread.setName("AnotherThread");namedThread.start();anotherThread.start();}
}
1.5.2 线程优先级设置
线程优先级范围为 1(最低)到 10(最高),默认优先级为 5。
public class ThreadPriorityExample {public static void main(String[] args) {Thread lowPriorityThread = new Thread(() -> {for (int i = 0; i < 1000; i++) {// 低优先级任务}System.out.println("低优先级线程完成");});Thread highPriorityThread = new Thread(() -> {for (int i = 0; i < 1000; i++) {// 高优先级任务}System.out.println("高优先级线程完成");});// 设置优先级(注意:优先级不保证执行顺序,只是建议)lowPriorityThread.setPriority(Thread.MIN_PRIORITY);  // 1highPriorityThread.setPriority(Thread.MAX_PRIORITY); // 10lowPriorityThread.start();highPriorityThread.start();}
}注意事项:
- 线程优先级只是给操作系统的建议,不保证绝对执行顺序
- 不同操作系统对优先级的支持不同,应避免过度依赖
1.6 线程状态转换详解
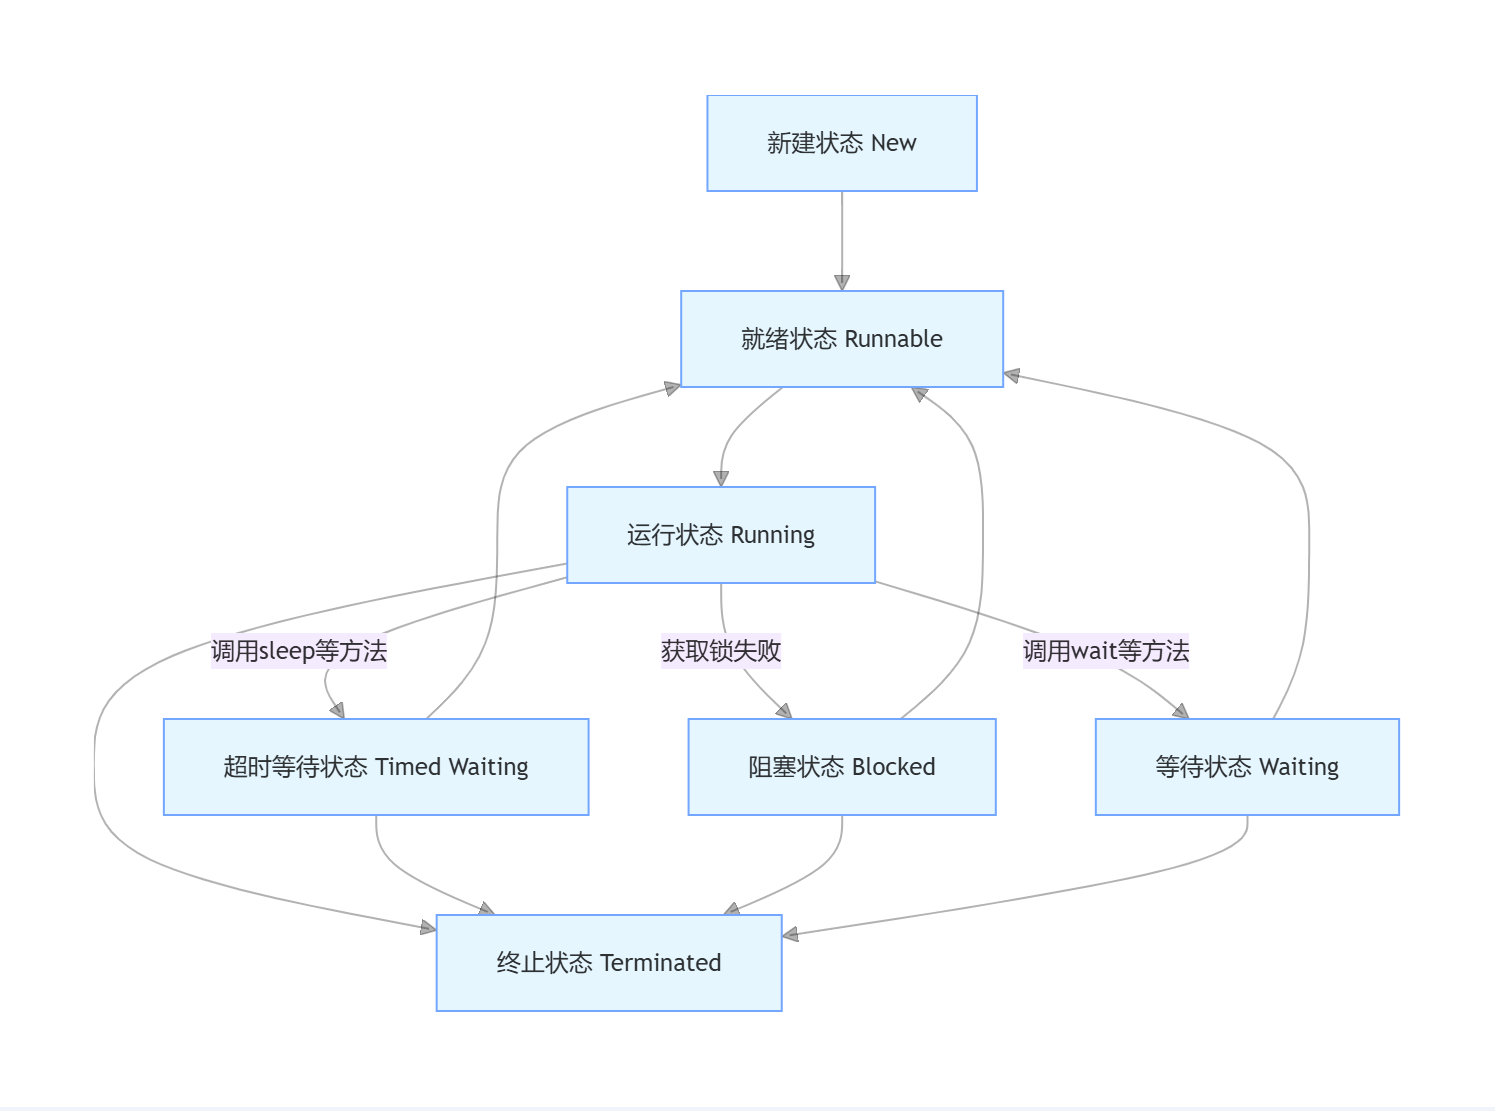
Java 线程的生命周期包含 6 种状态,通过Thread.State枚举表示:
- NEW:线程对象已创建,但尚未调用
start()方法 - RUNNABLE:线程正在 JVM 中执行,或等待 CPU 时间片
- BLOCKED:线程因等待获取锁而被阻塞
- WAITING:线程等待其他线程执行特定操作
- TIMED_WAITING:线程在指定时间内等待
- TERMINATED:线程执行完毕或因异常终止
状态转换图:
1.7 线程常用方法详解
1.7.1 sleep () - 线程休眠
public class SleepExample {public static void main(String[] args) {Thread t = new Thread(() -> {System.out.println("线程开始休眠...");try {// 休眠2秒Thread.sleep(2000);} catch (InterruptedException e) {System.out.println("线程被中断");Thread.currentThread().interrupt(); // 恢复中断状态}System.out.println("线程休眠结束");});t.start();// 主线程休眠1秒后中断子线程try {Thread.sleep(1000);} catch (InterruptedException e) {e.printStackTrace();}t.interrupt();}
}
1.7.2 join () - 线程等待
public class JoinExample {public static void main(String[] args) throws InterruptedException {Thread t = new Thread(() -> {System.out.println("子线程开始执行...");try {Thread.sleep(3000);} catch (InterruptedException e) {e.printStackTrace();}System.out.println("子线程执行完毕");});t.start();System.out.println("主线程等待子线程完成...");t.join(); // 主线程等待t线程执行完毕System.out.println("主线程继续执行");}
}
1.7.3 yield () - 线程让步
public class YieldExample {public static void main(String[] args) {Thread producer = new Thread(() -> {for (int i = 0; i < 5; i++) {System.out.println("生产者生产: " + i);Thread.yield(); // 让步,可能让消费者先执行}});Thread consumer = new Thread(() -> {for (int i = 0; i < 5; i++) {System.out.println("消费者消费: " + i);Thread.yield(); // 让步,可能让生产者先执行}});producer.start();consumer.start();}
}
1.7.4 interrupt () - 线程中断
public class InterruptExample {public static void main(String[] args) {Thread t = new Thread(() -> {while (!Thread.currentThread().isInterrupted()) {System.out.println("线程正在执行...");try {Thread.sleep(1000);} catch (InterruptedException e) {System.out.println("线程被中断,退出循环");Thread.currentThread().interrupt(); // 恢复中断状态break;}}});t.start();// 主线程休眠3秒后中断子线程try {Thread.sleep(3000);} catch (InterruptedException e) {e.printStackTrace();}t.interrupt();}
}
1.8 线程同步基础:volatile 关键字
volatile关键字用于保证变量的可见性,即当一个变量被声明为volatile时:
- 对该变量的写操作会立即刷新到主内存
- 对该变量的读操作会从主内存中读取最新值
-
public class VolatileExample {private static volatile boolean flag = false;public static void main(String[] args) {// 读取线程new Thread(() -> {while (!flag) {// 等待flag变为true}System.out.println("Flag is now true");}).start();// 修改线程new Thread(() -> {try {Thread.sleep(2000);} catch (InterruptedException e) {e.printStackTrace();}flag = true; // 写入操作,会立即刷新到主内存System.out.println("Flag set to true");}).start();} }注意:
volatile仅保证可见性,不保证原子性。对于复合操作(如 i++),仍需使用synchronized或原子类。1.9 实战案例:多线程下载器
以下是一个简单的多线程下载器示例,演示如何使用多线程提高下载效率:
import java.io.*;
import java.net.HttpURLConnection;
import java.net.URL;
import java.util.concurrent.CountDownLatch;public class MultiThreadDownloader {private static final int THREAD_COUNT = 3;  // 线程数量public static void main(String[] args) {String fileUrl = "https://example.com/largefile.zip";String savePath = "downloaded_file.zip";try {URL url = new URL(fileUrl);HttpURLConnection conn = (HttpURLConnection) url.openConnection();int fileSize = conn.getContentLength();conn.disconnect();System.out.println("文件总大小: " + fileSize + " 字节");// 计算每个线程负责的字节数int blockSize = fileSize / THREAD_COUNT;// 创建临时文件数组File[] tempFiles = new File[THREAD_COUNT];// 用于等待所有线程完成CountDownLatch latch = new CountDownLatch(THREAD_COUNT);// 创建并启动多个下载线程for (int i = 0; i < THREAD_COUNT; i++) {int startPos = i * blockSize;int endPos = (i == THREAD_COUNT - 1) ? fileSize : (i + 1) * blockSize;tempFiles[i] = new File(savePath + ".part" + i);new Thread(new DownloadTask(url, tempFiles[i], startPos, endPos, latch)).start();}// 等待所有线程完成latch.await();// 合并临时文件mergeFiles(tempFiles, new File(savePath));// 删除临时文件for (File tempFile : tempFiles) {tempFile.delete();}System.out.println("下载完成: " + savePath);} catch (Exception e) {e.printStackTrace();}}// 下载任务类static class DownloadTask implements Runnable {private final URL url;private final File tempFile;private final int startPos;private final int endPos;private final CountDownLatch latch;public DownloadTask(URL url, File tempFile, int startPos, int endPos, CountDownLatch latch) {this.url = url;this.tempFile = tempFile;this.startPos = startPos;this.endPos = endPos;this.latch = latch;}@Overridepublic void run() {try (RandomAccessFile raf = new RandomAccessFile(tempFile, "rw");HttpURLConnection conn = (HttpURLConnection) url.openConnection()) {// 设置Range头,指定下载的字节范围conn.setRequestProperty("Range", "bytes=" + startPos + "-" + (endPos - 1));try (InputStream in = conn.getInputStream()) {byte[] buffer = new byte[4096];int bytesRead;int currentPos = startPos;while (currentPos < endPos && (bytesRead = in.read(buffer)) != -1) {int bytesToWrite = Math.min(bytesRead, endPos - currentPos);raf.write(buffer, 0, bytesToWrite);currentPos += bytesToWrite;}}System.out.println("线程完成下载: " + tempFile.getName());} catch (Exception e) {e.printStackTrace();} finally {// 通知主线程该线程已完成latch.countDown();}}}// 合并临时文件private static void mergeFiles(File[] tempFiles, File destFile) throws IOException {try (RandomAccessFile destRaf = new RandomAccessFile(destFile, "rw")) {for (File tempFile : tempFiles) {try (RandomAccessFile srcRaf = new RandomAccessFile(tempFile, "r")) {byte[] buffer = new byte[4096];int bytesRead;while ((bytesRead = srcRaf.read(buffer)) != -1) {destRaf.write(buffer, 0, bytesRead);}}}}}
}
1.10 本章总结与最佳实践
- 优先使用实现接口方式:避免单继承限制,提高代码灵活性
- 合理命名线程:便于调试和监控,特别是在复杂系统中
- 谨慎使用线程优先级:不同操作系统对优先级支持不同,依赖优先级可能导致不可预期行为
- 正确处理线程中断:使用
isInterrupted()检查中断状态,在catch块中恢复中断状态 - 理解线程状态转换:掌握线程生命周期,有助于排查线程阻塞或死锁问题
- volatile 适用场景:仅用于保证变量可见性,不用于原子操作
第二章:线程的生命周期与状态控制
在多线程编程中,线程生命周期与状态控制是核心内容。了解线程如何在不同状态间转换,以及怎样合理控制状态,能帮助开发者编写出更高效、稳定的多线程程序。接下来将深入解析 Java 线程的生命周期与状态控制。
2.1 线程的生命周期
Java 线程的生命周期包含 6 种状态,这些状态可通过Thread.State枚举类型获取,它们在程序运行过程中相互转换,构成了线程完整的生命周期。
- 新建状态(New):当使用
new关键字创建一个线程对象时,线程就处于新建状态。此时,线程对象已经被分配了内存,初始化了成员变量,但线程尚未启动,不会执行run方法中的代码。例如:Thread thread = new Thread(() -> {System.out.println("线程执行任务"); });上述代码中,
thread对象创建后就处于新建状态,此时它还未开始执行任务。 - 就绪状态(Runnable):调用线程的
start方法后,线程进入就绪状态。处于该状态的线程已具备执行条件,会被放入可运行线程池中,等待 CPU 调度执行。不过,此时线程并未真正执行,只有当 CPU 为其分配时间片后,线程才会进入运行状态。如:Thread thread = new Thread(() -> {System.out.println("线程执行任务"); }); thread.start();调用
start方法后,thread进入就绪状态,等待获取 CPU 资源。 - 运行状态(Running):当线程获取到 CPU 时间片,开始执行
run方法中的代码时,线程就处于运行状态。在单 CPU 环境下,同一时刻只有一个线程处于运行状态;而在多 CPU 环境中,可能有多个线程同时处于运行状态。 - 阻塞状态(Blocked):线程因某些原因无法继续执行时,会进入阻塞状态,此时它不占用 CPU 资源。常见导致线程进入阻塞状态的情况有:
- 线程尝试获取一个被其他线程占用的锁,在锁被释放前,该线程会进入阻塞状态。
- 线程执行
IO操作,如读取文件或网络数据时,在数据准备好之前,线程会进入阻塞状态。
- 等待状态(Waiting):线程调用
Object类的wait方法、Thread类的join方法,或者LockSupport类的park方法后,会进入等待状态。处于等待状态的线程会一直等待其他线程执行特定操作来唤醒自己 。例如:
public class WaitingStateExample {public static void main(String[] args) {Object lock = new Object();Thread thread = new Thread(() -> {synchronized (lock) {try {System.out.println("线程进入等待状态");lock.wait();System.out.println("线程被唤醒");} catch (InterruptedException e) {e.printStackTrace();}}});thread.start();try {Thread.sleep(2000);synchronized (lock) {lock.notify();}} catch (InterruptedException e) {e.printStackTrace();}}
}上述代码中,线程调用wait方法后进入等待状态,直到其他线程调用notify方法唤醒它。
- 超时等待状态(Timed Waiting):与等待状态类似,但超时等待状态有时间限制。当线程调用
Thread类的sleep方法、Object类的wait方法并指定超时时间、LockSupport类的parkNanos或parkUntil方法时,线程会进入超时等待状态。在指定时间结束后,线程会自动唤醒,或者也可以被其他线程提前唤醒。例如:
public class TimedWaitingStateExample {public static void main(String[] args) {Thread thread = new Thread(() -> {try {System.out.println("线程进入超时等待状态");Thread.sleep(3000);System.out.println("线程超时等待结束");} catch (InterruptedException e) {e.printStackTrace();}});thread.start();}
}这里,线程调用Thread.sleep(3000)后进入超时等待状态,3 秒后自动恢复执行。
- 终止状态(Terminated):当线程的
run方法执行完毕,或者因未捕获的异常导致线程提前结束时,线程就进入终止状态。处于终止状态的线程已经结束执行,无法再被启动 。
2.2 线程状态转换图示

2.3 线程状态控制方法
Java 提供了一系列方法来控制线程状态,合理使用这些方法能有效管理线程执行流程。
- start 方法:在
Thread类中定义,用于将线程从新建状态转换为就绪状态。需要注意的是,一个线程对象的start方法只能调用一次,多次调用会抛出IllegalThreadStateException异常 。 - sleep 方法:同样在
Thread类中,该方法使当前线程进入超时等待状态,暂停执行指定的时间(单位为毫秒)。在sleep期间,线程不会释放持有的锁资源,时间到达后,线程会重新回到就绪状态,等待 CPU 调度。示例如下:
public class SleepExample {public static void main(String[] args) {Thread thread = new Thread(() -> {for (int i = 0; i < 5; i++) {System.out.println("线程执行: " + i);try {Thread.sleep(1000);} catch (InterruptedException e) {e.printStackTrace();}}});thread.start();}
}- join 方法:
join方法用于让一个线程等待另一个线程执行完毕。当在主线程中调用子线程的join方法时,主线程会进入等待状态,直到子线程执行结束后,主线程才会继续执行。join方法还可以指定超时时间,超过该时间后,即使子线程未执行完,主线程也会继续执行。代码示例:
public class JoinExample {public static void main(String[] args) {Thread thread = new Thread(() -> {try {System.out.println("子线程开始执行");Thread.sleep(3000);System.out.println("子线程执行结束");} catch (InterruptedException e) {e.printStackTrace();}});thread.start();try {System.out.println("主线程等待子线程执行完毕");thread.join();System.out.println("子线程已执行完,主线程继续执行");} catch (InterruptedException e) {e.printStackTrace();}}
}- yield 方法:
yield方法使当前线程主动让出 CPU 使用权,从运行状态回到就绪状态,让其他就绪状态的线程有机会执行。不过,yield方法只是一种暗示,具体是否让出 CPU,最终还是由操作系统决定,且yield方法不会使线程进入阻塞状态 。 - interrupt 方法:该方法用于中断线程。当调用线程的
interrupt方法时,会设置线程的中断标志位为true。如果线程处于阻塞状态(如sleep、wait、join),则会抛出InterruptedException异常,并且中断标志位会被重置为false;如果线程处于正常运行状态,则需要在线程内部手动检查中断标志位来处理中断逻辑。例如:
public class InterruptExample {public static void main(String[] args) {Thread thread = new Thread(() -> {while (!Thread.currentThread().isInterrupted()) {System.out.println("线程正在执行");try {Thread.sleep(1000);} catch (InterruptedException e) {System.out.println("线程被中断,重置中断标志位");Thread.currentThread().interrupt();}}System.out.println("线程结束执行");});thread.start();try {Thread.sleep(3000);thread.interrupt();} catch (InterruptedException e) {e.printStackTrace();}}
}- wait、notify 与 notifyAll 方法:这三个方法是
Object类的方法,用于实现线程间的通信。wait方法使当前线程进入等待状态,并释放持有的锁资源;notify方法用于唤醒一个在该对象上等待的线程;notifyAll方法则唤醒所有在该对象上等待的线程 。它们需要在synchronized代码块中使用,因为调用这些方法的前提是线程已经获取了对象的锁。示例如下:
public class WaitNotifyExample {public static void main(String[] args) {Object lock = new Object();Thread thread1 = new Thread(() -> {synchronized (lock) {try {System.out.println("线程1等待");lock.wait();System.out.println("线程1被唤醒");} catch (InterruptedException e) {e.printStackTrace();}}});Thread thread2 = new Thread(() -> {synchronized (lock) {try {Thread.sleep(2000);System.out.println("线程2唤醒其他线程");lock.notify();} catch (InterruptedException e) {e.printStackTrace();}}});thread1.start();thread2.start();}
}
2.4 线程状态控制的注意事项与最佳实践
- 避免过度依赖 sleep 方法:虽然
sleep方法能控制线程执行节奏,但过度使用可能导致线程执行顺序不可控,降低程序的并发性能和可维护性。应优先考虑使用更高级的并发工具来协调线程执行。 - 正确处理中断:在处理线程中断时,要注意在捕获
InterruptedException异常后,根据实际需求决定是否重置中断标志位,以确保线程能够正确响应中断请求。 - 谨慎使用 wait、notify 与 notifyAll:由于
notify方法只能随机唤醒一个等待线程,可能导致某些线程长时间无法被唤醒,出现 “饥饿” 现象。因此,在使用时要充分考虑线程调度的公平性,必要时使用notifyAll方法。同时,务必在synchronized代码块中调用这些方法,否则会抛出IllegalMonitorStateException异常。 - 监控线程状态:在复杂的多线程应用中,通过监控线程状态可以及时发现线程阻塞、死锁等问题。可以使用 Java 提供的
jstack命令或相关的监控工具(如 VisualVM)来查看线程状态,以便进行性能调优和问题排查。
第三章:线程同步与锁机制
在多线程编程中,当多个线程同时访问共享资源时,容易出现数据不一致和竞态条件等问题,线程同步与锁机制正是解决这些问题的关键。接下来将深入介绍 Java 中线程同步的原理与实现方式。
3.1 为什么需要线程同步?
在多线程环境下,多个线程并发访问共享资源(如对象的成员变量、静态变量、文件、数据库连接等)时,如果没有适当的控制,可能会导致数据的不一致性,引发竞态条件(Race Condition)。以下通过一个简单的计数器示例说明问题:
public class Counter {private int count = 0;public void increment() {count++;}public int getCount() {return count;}
}public class RaceConditionExample {public static void main(String[] args) throws InterruptedException {Counter counter = new Counter();Thread thread1 = new Thread(() -> {for (int i = 0; i < 10000; i++) {counter.increment();}});Thread thread2 = new Thread(() -> {for (int i = 0; i < 10000; i++) {counter.increment();}});thread1.start();thread2.start();thread1.join();thread2.join();System.out.println("预期结果:20000,实际结果:" + counter.getCount());}
}上述代码中,两个线程同时对Counter的count变量进行自增操作。由于count++并非原子操作(其执行过程包括读取、加 1、写入三个步骤),在多线程环境下,可能出现两个线程同时读取到相同的count值,导致最终结果小于 20000,出现数据错误。线程同步的目的就是确保在同一时刻,只有一个线程能够访问共享资源,从而避免这类问题。
3.2 synchronized 关键字
3.2.1 原理与使用方式
synchronized是 Java 中最基本的线程同步机制,它通过获取对象锁(Monitor 锁)来实现线程同步。当一个线程进入synchronized修饰的代码块或方法时,它会自动获取对象的锁,其他线程如果也想进入该同步区域,必须等待锁的释放。synchronized有以下三种使用方式:
- 同步实例方法:锁对象为当前实例对象(
this)。
public class SynchronizedMethodExample {private int count = 0;// 同步实例方法public synchronized void increment() {count++;}public int getCount() {return count;}public static void main(String[] args) throws InterruptedException {SynchronizedMethodExample example = new SynchronizedMethodExample();Thread thread1 = new Thread(() -> {for (int i = 0; i < 10000; i++) {example.increment();}});Thread thread2 = new Thread(() -> {for (int i = 0; i < 10000; i++) {example.increment();}});thread1.start();thread2.start();thread1.join();thread2.join();System.out.println("结果:" + example.getCount()); // 输出20000}
}- 同步静态方法:锁对象为当前类的
Class对象,因为静态方法属于类,而非实例。
public class SynchronizedStaticMethodExample {private static int count = 0;// 同步静态方法public static synchronized void increment() {count++;}public static int getCount() {return count;}public static void main(String[] args) throws InterruptedException {Thread thread1 = new Thread(() -> {for (int i = 0; i < 10000; i++) {SynchronizedStaticMethodExample.increment();}});Thread thread2 = new Thread(() -> {for (int i = 0; i < 10000; i++) {SynchronizedStaticMethodExample.increment();}});thread1.start();thread2.start();thread1.join();thread2.join();System.out.println("结果:" + SynchronizedStaticMethodExample.getCount()); // 输出20000}
}- 同步代码块:显式指定锁对象,可以是任意对象,通常使用
this或其他共享对象。
public class SynchronizedBlockExample {private int count = 0;private final Object lock = new Object();public void increment() {// 同步代码块,锁对象为locksynchronized (lock) {count++;}}public int getCount() {return count;}public static void main(String[] args) throws InterruptedException {SynchronizedBlockExample example = new SynchronizedBlockExample();Thread thread1 = new Thread(() -> {for (int i = 0; i < 10000; i++) {example.increment();}});Thread thread2 = new Thread(() -> {for (int i = 0; i < 10000; i++) {example.increment();}});thread1.start();thread2.start();thread1.join();thread2.join();System.out.println("结果:" + example.getCount()); // 输出20000}
}
3.2.2 锁的可重入性
synchronized锁是可重入的,即当一个线程已经持有某个对象的锁时,它可以再次进入该对象的synchronized方法或代码块,而不会发生死锁。例如:
public class ReentrantExample {public synchronized void outerMethod() {System.out.println("进入外部同步方法");innerMethod();System.out.println("退出外部同步方法");}public synchronized void innerMethod() {System.out.println("进入内部同步方法");}public static void main(String[] args) {ReentrantExample example = new ReentrantExample();Thread thread = new Thread(() -> {example.outerMethod();});thread.start();}
}
3.2.3 优缺点分析
- 优点:使用简单,无需手动管理锁的获取与释放;保证同一时刻只有一个线程进入同步区域,有效避免竞态条件。
- 缺点:粒度较粗,可能影响程序性能。例如,如果一个同步方法中包含大量非共享资源的操作,其他线程在等待锁释放时会造成资源浪费;此外,过多的
synchronized使用可能导致死锁问题。
3.3 ReentrantLock
3.3.1 基本使用
ReentrantLock是 Java 5 引入的可重入互斥锁,相比synchronized,它提供了更灵活的锁控制和更强的功能。ReentrantLock使用示例如下:
import java.util.concurrent.locks.ReentrantLock;public class ReentrantLockExample {private int count = 0;private final ReentrantLock lock = new ReentrantLock();public void increment() {lock.lock();try {count++;} finally {lock.unlock();}}public int getCount() {return count;}public static void main(String[] args) throws InterruptedException {ReentrantLockExample example = new ReentrantLockExample();Thread thread1 = new Thread(() -> {for (int i = 0; i < 10000; i++) {example.increment();}});Thread thread2 = new Thread(() -> {for (int i = 0; i < 10000; i++) {example.increment();}});thread1.start();thread2.start();thread1.join();thread2.join();System.out.println("结果:" + example.getCount()); // 输出20000}
}在使用ReentrantLock时,需要手动调用lock方法获取锁,并在finally块中调用unlock方法释放锁,以确保即使在发生异常的情况下,锁也能被正确释放。
3.3.2 高级特性
- 公平锁与非公平锁:
ReentrantLock默认创建非公平锁,即新线程在尝试获取锁时,可能会在已有等待线程之前抢到锁;而公平锁则会按照线程等待的顺序分配锁,更适合对公平性有严格要求的场景。创建公平锁的方式为:ReentrantLock lock = new ReentrantLock(true);。 - 可中断锁:
ReentrantLock的lockInterruptibly方法允许线程在等待锁的过程中响应中断,避免线程无限期等待。例如:
import java.util.concurrent.locks.ReentrantLock;public class InterruptibleLockExample {private final ReentrantLock lock = new ReentrantLock();public void task() {try {lock.lockInterruptibly();try {System.out.println(Thread.currentThread().getName() + " 获取到锁,开始执行任务");Thread.sleep(3000);} catch (InterruptedException e) {System.out.println(Thread.currentThread().getName() + " 在等待锁时被中断");Thread.currentThread().interrupt();} finally {lock.unlock();}} catch (InterruptedException e) {e.printStackTrace();}}public static void main(String[] args) {InterruptibleLockExample example = new InterruptibleLockExample();Thread thread1 = new Thread(() -> example.task(), "线程1");Thread thread2 = new Thread(() -> {try {Thread.sleep(1000);thread1.interrupt();} catch (InterruptedException e) {e.printStackTrace();}}, "中断线程");thread1.start();thread2.start();}
}- 条件变量(Condition):
ReentrantLock通过newCondition方法可以创建多个条件变量,用于实现更复杂的线程间通信,替代synchronized中的wait和notify机制 。
3.3.3 与 synchronized 的对比
| 特性 | synchronized | ReentrantLock |
|---|---|---|
| 获取与释放方式 | 自动获取与释放 | 手动调用lock和unlock |
| 可重入性 | 支持 | 支持 |
| 公平性 | 不支持(非公平) | 支持(可选择公平或非公平) |
| 锁中断 | 不支持 | 支持(lockInterruptibly方法) |
| 条件变量 | 单一wait/notify机制 | 可创建多个Condition对象 |
| 性能 | 在低竞争场景下性能较好,高竞争时性能下降 | 在高竞争场景下性能更优 |
3.4 线程同步的最佳实践
- 减小同步范围:尽量缩小
synchronized代码块或ReentrantLock的作用范围,只对访问共享资源的关键代码进行同步,避免将大量非共享资源的操作包含在内,以提高程序的并发性能。 - 选择合适的锁:根据具体场景选择
synchronized或ReentrantLock。如果对锁的功能要求简单,使用synchronized即可;如果需要公平锁、可中断锁或条件变量等高级功能,则应使用ReentrantLock。 - 避免死锁:在使用多个锁时,要按照固定顺序获取锁,避免循环等待锁的情况发生。例如,若线程 A 需要同时获取锁 X 和锁 Y,线程 B 也需要获取这两个锁,那么应确保两个线程都先获取锁 X,再获取锁 Y,以防止死锁。
- 使用并发集合类:Java 的
java.util.concurrent包中提供了许多线程安全的集合类(如ConcurrentHashMap、CopyOnWriteArrayList),这些类内部已经实现了线程同步机制,在满足需求的情况下,优先使用它们可以简化代码并提高性能 。
第四章:线程间通信
线程间通信是多线程编程中的关键环节,它使得多个线程能够协同工作,避免数据竞争和资源冲突。Java 提供了多种线程间通信机制,本章将深入讲解这些机制的原理与应用。
4.1 wait ()、notify () 和 notifyAll () 方法
wait()、notify()和notifyAll()是Object类的本地方法,用于实现线程间的协作。这些方法必须在synchronized代码块或方法中调用,因为它们依赖于对象的锁机制来确保线程安全。
4.1.1 方法原理
wait():使当前线程进入等待状态,并释放持有的对象锁。该线程会进入对象的等待队列,直到被其他线程调用notify()或notifyAll()唤醒,或者等待超时(如果调用的是wait(long timeout))。notify():随机唤醒一个在该对象等待队列中的线程。被唤醒的线程会重新竞争对象锁,获取锁后才能继续执行。notifyAll():唤醒所有在该对象等待队列中的线程,这些线程会共同竞争对象锁,只有获得锁的线程才能继续执行。
4.1.2 生产者 - 消费者模型示例
生产者 - 消费者模型是线程间通信的经典场景,通过wait()和notify()方法可以实现该模型:
import java.util.LinkedList;
import java.util.Queue;class ProducerConsumer {private final int capacity;private final Queue<Integer> queue = new LinkedList<>();public ProducerConsumer(int capacity) {this.capacity = capacity;}// 生产方法public synchronized void produce(int item) throws InterruptedException {while (queue.size() == capacity) {System.out.println("队列已满,生产者等待");wait();}queue.add(item);System.out.println("生产者生产:" + item);notifyAll(); // 唤醒消费者}// 消费方法public synchronized void consume() throws InterruptedException {while (queue.isEmpty()) {System.out.println("队列已空,消费者等待");wait();}int item = queue.poll();System.out.println("消费者消费:" + item);notifyAll(); // 唤醒生产者}
}public class ProducerConsumerExample {public static void main(String[] args) {ProducerConsumer pc = new ProducerConsumer(3);Thread producerThread = new Thread(() -> {for (int i = 1; i <= 5; i++) {try {pc.produce(i);Thread.sleep(1000);} catch (InterruptedException e) {e.printStackTrace();}}});Thread consumerThread = new Thread(() -> {for (int i = 1; i <= 5; i++) {try {pc.consume();Thread.sleep(1500);} catch (InterruptedException e) {e.printStackTrace();}}});producerThread.start();consumerThread.start();}
}在这个示例中,生产者线程在队列满时调用wait()等待,消费者线程消费后调用notifyAll()唤醒生产者;反之,消费者线程在队列空时等待,生产者线程生产后唤醒消费者。
4.1.3 注意事项
- 必须在同步块中调用:
wait()、notify()和notifyAll()必须在synchronized修饰的方法或代码块中调用,否则会抛出IllegalMonitorStateException异常。 - 避免使用 notify () 导致线程饥饿:由于
notify()随机唤醒一个线程,可能导致某些线程长时间无法被唤醒,产生 “线程饥饿” 问题。在大多数情况下,建议使用notifyAll()以确保公平性。 - 使用 while 循环检查条件:在调用
wait()方法前,应使用while循环检查等待条件,而不是if语句。因为线程被唤醒后,可能由于其他线程的干扰导致条件仍然不满足,此时需要重新等待。
4.2 Condition 接口
Condition接口是 Java 5 引入的更灵活的线程间通信机制,它与ReentrantLock配合使用,功能类似于wait()和notify(),但提供了更强大的控制能力。
4.2.1 基本使用
Condition通过ReentrantLock的newCondition()方法创建,每个ReentrantLock可以创建多个Condition实例,用于实现更精细的线程间协作。
import java.util.concurrent.locks.Condition;
import java.util.concurrent.locks.ReentrantLock;class ConditionExample {private final ReentrantLock lock = new ReentrantLock();private final Condition condition = lock.newCondition();private boolean hasData = false;// 生产者方法public void produce() throws InterruptedException {lock.lock();try {while (hasData) {System.out.println("数据已存在,生产者等待");condition.await(); // 线程等待}// 生产数据hasData = true;System.out.println("生产者生产数据");condition.signalAll(); // 唤醒所有等待线程} finally {lock.unlock();}}// 消费者方法public void consume() throws InterruptedException {lock.lock();try {while (!hasData) {System.out.println("没有数据,消费者等待");condition.await(); // 线程等待}// 消费数据hasData = false;System.out.println("消费者消费数据");condition.signalAll(); // 唤醒所有等待线程} finally {lock.unlock();}}
}public class ConditionMain {public static void main(String[] args) {ConditionExample example = new ConditionExample();Thread producerThread = new Thread(() -> {for (int i = 0; i < 3; i++) {try {example.produce();Thread.sleep(1000);} catch (InterruptedException e) {e.printStackTrace();}}});Thread consumerThread = new Thread(() -> {for (int i = 0; i < 3; i++) {try {example.consume();Thread.sleep(1500);} catch (InterruptedException e) {e.printStackTrace();}}});producerThread.start();consumerThread.start();}
}在这个示例中,Condition的await()方法使线程进入等待状态,signal()和signalAll()方法用于唤醒等待线程,与wait()和notify()的功能类似,但更加灵活。
4.2.2 与 wait ()/notify () 的对比
| 特性 | wait()/notify() | Condition |
|---|---|---|
| 依赖的锁 | 依赖synchronized锁 | 依赖ReentrantLock |
| 多条件支持 | 一个对象只能有一个等待队列 | 一个锁可创建多个Condition,支持多个等待队列 |
| 中断响应 | 等待时只能通过InterruptedException中断 | 支持更灵活的中断响应机制 |
| 等待超时 | wait(long timeout)方法 | await(long time, TimeUnit unit)方法,功能更强大 |
4.3 管道通信(Pipe)
管道通信是 Java 提供的另一种线程间通信方式,通过PipedInputStream和PipedOutputStream实现线程间的数据流传输。
4.3.1 基本原理
PipedOutputStream:用于向管道中写入数据。PipedInputStream:用于从管道中读取数据。- 两个线程分别持有
PipedInputStream和PipedOutputStream,通过管道进行数据传递。
import java.io.IOException;
import java.io.PipedInputStream;
import java.io.PipedOutputStream;class Sender implements Runnable {private PipedOutputStream outputStream;public Sender(PipedOutputStream outputStream) {this.outputStream = outputStream;}@Overridepublic void run() {try {String message = "Hello, Receiver!";outputStream.write(message.getBytes());outputStream.close();} catch (IOException e) {e.printStackTrace();}}
}class Receiver implements Runnable {private PipedInputStream inputStream;public Receiver(PipedInputStream inputStream) {this.inputStream = inputStream;}@Overridepublic void run() {try {byte[] buffer = new byte[1024];int length = inputStream.read(buffer);String message = new String(buffer, 0, length);System.out.println("接收到消息:" + message);inputStream.close();} catch (IOException e) {e.printStackTrace();}}
}public class PipeExample {public static void main(String[] args) {try {PipedOutputStream outputStream = new PipedOutputStream();PipedInputStream inputStream = new PipedInputStream(outputStream);Thread senderThread = new Thread(new Sender(outputStream));Thread receiverThread = new Thread(new Receiver(inputStream));senderThread.start();receiverThread.start();} catch (IOException e) {e.printStackTrace();}}
}在这个示例中,Sender线程通过PipedOutputStream向管道写入数据,Receiver线程通过PipedInputStream从管道读取数据,实现了线程间的通信。
4.4 总结与最佳实践
- 选择合适的通信机制:根据具体场景选择
wait()/notify()、Condition或管道通信。简单的生产者 - 消费者场景可使用wait()/notify();需要更灵活的控制时,使用Condition;涉及数据流传输时,使用管道通信。 - 注意同步与阻塞:无论使用哪种机制,都要确保线程安全,避免死锁和数据竞争。在使用
wait()、await()等方法时,线程会进入阻塞状态,需合理设置唤醒条件。 - 避免过度设计:线程间通信机制虽然强大,但过度使用可能导致代码复杂度过高。尽量保持设计的简洁性,优先使用成熟的设计模式(如生产者 - 消费者模型)。
第五章:线程池
线程池是 Java 多线程编程中的重要工具,它通过预先创建一定数量的线程并管理它们的生命周期,避免了频繁创建和销毁线程带来的性能开销,提高了程序的执行效率和稳定性。本章将深入探讨 Java 线程池的原理、使用方法及最佳实践。
5.1 线程池的基本概念与优势
5.1.1 核心概念
线程池是一种池化技术,其核心思想是预先创建一定数量的线程,当有任务提交时,从线程池中获取线程来执行任务,任务执行完毕后线程不会立即销毁,而是返回线程池等待下一个任务。这种模式将线程的创建和管理与任务的执行分离开来,提高了线程的复用性和系统的整体性能。
5.1.2 主要优势
- 减少线程创建开销:线程的创建和销毁需要消耗系统资源,频繁创建和销毁线程会导致性能下降。线程池通过复用已创建的线程,避免了这些开销。
- 控制并发线程数量:通过设置线程池的大小,可以控制并发线程的数量,防止系统因线程过多导致内存溢出或 CPU 资源耗尽。
- 提高响应速度:由于线程池中的线程已经预先创建,当有任务提交时,无需等待线程创建即可立即执行,提高了系统的响应速度。
- 提供线程管理功能:线程池可以统一管理线程的生命周期,提供任务排队、线程监控等功能,简化了多线程编程的复杂度。
5.2 Java 中的线程池实现
Java 通过java.util.concurrent包提供了丰富的线程池实现,其核心接口和类包括:
- Executor 接口:线程池的基础接口,定义了执行任务的方法
execute(Runnable command)。 - ExecutorService 接口:继承自
Executor,提供了更丰富的方法,如提交任务、关闭线程池等。 - ThreadPoolExecutor 类:线程池的核心实现类,可通过构造函数自定义线程池的各种参数。
- ScheduledExecutorService 接口:继承自
ExecutorService,支持定时和周期性任务执行。 - Executors 工具类:提供了创建各种预配置线程池的静态工厂方法。
5.3 ThreadPoolExecutor 详解
5.3.1 构造函数与核心参数
ThreadPoolExecutor是线程池的核心实现类,其完整构造函数如下:
public ThreadPoolExecutor(int corePoolSize,int maximumPoolSize,long keepAliveTime,TimeUnit unit,BlockingQueue<Runnable> workQueue,ThreadFactory threadFactory,RejectedExecutionHandler handler
)
各参数含义如下:
- corePoolSize:核心线程数,线程池初始化时创建的线程数量。当提交的任务数超过核心线程数时,任务会被放入工作队列。
- maximumPoolSize:线程池允许的最大线程数。当工作队列已满且提交的任务数超过核心线程数时,线程池会创建新线程执行任务,直到线程数达到最大线程数。
- keepAliveTime:非核心线程(超过核心线程数的线程)在空闲时的存活时间。当非核心线程空闲时间超过该值时,会被销毁。
- unit:
keepAliveTime的时间单位。 - workQueue:工作队列,用于存储等待执行的任务。常用的工作队列包括
ArrayBlockingQueue、LinkedBlockingQueue、SynchronousQueue等。 - threadFactory:线程工厂,用于创建线程。可以自定义线程工厂来设置线程的名称、优先级等属性。
- handler:拒绝策略,当工作队列已满且线程数达到最大线程数时,用于处理新提交的任务。
5.3.2 线程池的工作流程
线程池的工作流程如下:
- 当有新任务提交时,线程池首先检查核心线程数是否已满。如果未满,则创建新线程执行任务。
- 如果核心线程数已满,则将任务放入工作队列。
- 如果工作队列已满,则检查线程数是否达到最大线程数。如果未达到,则创建新线程执行任务。
- 如果线程数已达到最大线程数,则执行拒绝策略。
5.4 预配置线程池
Java 提供了几种预配置的线程池,通过Executors工具类创建:
ExecutorService fixedThreadPool = Executors.newFixedThreadPool(5);特点:核心线程数和最大线程数相等,线程数固定;使用无界队列LinkedBlockingQueue存储任务。适用于需要控制并发线程数量的场景。
5.4.2 单线程线程池(SingleThreadExecutor)
ExecutorService singleThreadExecutor = Executors.newSingleThreadExecutor();特点:核心线程数和最大线程数均为 1,只有一个线程执行任务;使用无界队列LinkedBlockingQueue存储任务。适用于需要保证任务顺序执行的场景。
5.4.3 缓存线程池(CachedThreadPool)
ExecutorService cachedThreadPool = Executors.newCachedThreadPool();特点:核心线程数为 0,最大线程数为Integer.MAX_VALUE;使用SynchronousQueue作为工作队列,线程空闲时间超过 60 秒会被销毁。适用于执行大量短期异步任务的场景。
5.4.4 定时任务线程池(ScheduledThreadPool)
ScheduledExecutorService scheduledThreadPool = Executors.newScheduledThreadPool(5);特点:支持定时和周期性任务执行;使用DelayedWorkQueue作为工作队列。适用于需要定时执行任务的场景。
5.5 自定义线程池
虽然预配置线程池使用方便,但在生产环境中,为了避免资源耗尽等问题,通常建议使用ThreadPoolExecutor自定义线程池。以下是一个自定义线程池的示例:
import java.util.concurrent.*;public class CustomThreadPoolExample {public static void main(String[] args) {// 创建自定义线程池ThreadPoolExecutor executor = new ThreadPoolExecutor(5,                      // 核心线程数10,                     // 最大线程数60,                     // 空闲线程存活时间TimeUnit.SECONDS,       // 时间单位new LinkedBlockingQueue<>(100),  // 工作队列Executors.defaultThreadFactory(),  // 线程工厂new ThreadPoolExecutor.CallerRunsPolicy()  // 拒绝策略);// 提交任务for (int i = 0; i < 20; i++) {final int taskId = i;executor.submit(() -> {System.out.println("任务 " + taskId + " 由线程 " + Thread.currentThread().getName() + " 执行");try {Thread.sleep(1000);  // 模拟任务执行时间} catch (InterruptedException e) {e.printStackTrace();}});}// 关闭线程池executor.shutdown();try {if (!executor.awaitTermination(60, TimeUnit.SECONDS)) {executor.shutdownNow();}} catch (InterruptedException e) {executor.shutdownNow();}}
}
在这个示例中,我们创建了一个核心线程数为 5、最大线程数为 10、工作队列容量为 100 的线程池,并使用CallerRunsPolicy作为拒绝策略。当提交的任务数超过线程池的处理能力时,会由提交任务的线程来执行任务,这样可以减缓任务提交的速度,避免系统资源耗尽。
5.6 拒绝策略
当工作队列已满且线程数达到最大线程数时,线程池会执行拒绝策略。Java 提供了四种内置的拒绝策略:
- AbortPolicy(默认):直接抛出
RejectedExecutionException异常,阻止系统正常运行。 - CallerRunsPolicy:由提交任务的线程来执行该任务,这样可以减缓任务提交的速度。
- DiscardPolicy:直接丢弃新提交的任务,不做任何处理。
- DiscardOldestPolicy:丢弃工作队列中最老的任务,然后尝试提交新任务。
除了使用内置的拒绝策略,还可以通过实现RejectedExecutionHandler接口来自定义拒绝策略。
5.7 线程池的监控与关闭
5.7.1 线程池监控
通过ThreadPoolExecutor提供的方法,可以监控线程池的状态:
getActiveCount():获取当前活跃线程数。getCompletedTaskCount():获取已完成的任务数。getTaskCount():获取总任务数(包括已完成和正在执行的任务)。getQueue():获取工作队列。getPoolSize():获取当前线程池的大小。getLargestPoolSize():获取线程池曾经达到的最大线程数。
5.7.2 线程池关闭
关闭线程池有两种方法:
shutdown():平缓关闭线程池,不再接受新任务,但会等待已提交的任务执行完毕。shutdownNow():强制关闭线程池,尝试停止正在执行的任务,并返回未执行的任务列表。
通常建议使用shutdown()方法平缓关闭线程池,并通过awaitTermination()方法等待任务执行完毕:
executor.shutdown();
try {if (!executor.awaitTermination(60, TimeUnit.SECONDS)) {executor.shutdownNow();}
} catch (InterruptedException e) {executor.shutdownNow();
}
5.8 线程池最佳实践
- 避免使用预配置线程池:特别是
Executors.newFixedThreadPool()和Executors.newSingleThreadExecutor(),它们使用无界队列,可能导致内存溢出;Executors.newCachedThreadPool()允许创建的线程数为Integer.MAX_VALUE,可能导致系统资源耗尽。 - 合理配置线程池参数:根据任务类型和系统资源情况,合理设置核心线程数、最大线程数和工作队列大小。例如,对于 CPU 密集型任务,线程数可设置为 CPU 核心数 + 1;对于 IO 密集型任务,线程数可设置得较大。
- 使用有界队列:避免使用无界队列(如
LinkedBlockingQueue),防止任务堆积导致内存溢出。 - 自定义拒绝策略:根据业务需求自定义拒绝策略,确保系统在高负载下能够优雅降级。
- 监控线程池状态:定期监控线程池的状态,及时发现并处理线程池满、任务堆积等问题。
- 设置合理的线程名称:通过自定义线程工厂设置线程名称,方便调试和问题排查。
第六章:原子操作与原子类
在多线程编程中,原子操作与原子类是实现高效线程安全的重要工具。它们通过底层硬件支持,在不使用锁的情况下实现对共享变量的原子性操作,从而避免了锁带来的性能开销和上下文切换问题。本章将深入探讨 Java 中的原子操作与原子类的原理、使用方法及最佳实践。
6.1 原子操作的基本概念
原子操作是指不可被中断的一个或一系列操作,在多线程环境中,原子操作可以保证同一时刻只有一个线程执行该操作,从而避免数据竞争和不一致性问题。例如,对于一个变量的赋值操作,如果是原子操作,则不会出现多个线程同时修改该变量导致的数据错误。
6.1.1 原子操作的重要性
在多线程编程中,许多看似简单的操作实际上并不是原子操作,例如:
int i = 0;
i++; // 非原子操作,包含读取、加1、写入三个步骤在多线程环境下,多个线程同时执行i++操作可能会导致数据不一致。而原子操作可以保证这些操作的原子性,从而避免这类问题。
6.1.2 硬件层的原子性支持
现代处理器提供了特殊的原子指令,如 CAS(Compare-and-Swap),用于实现原子操作。CAS 操作包含三个操作数:内存位置(V)、预期原值(A)和新值(B)。如果内存位置的值与预期原值相匹配,处理器会自动将该位置值更新为新值;否则,处理器不做任何操作。这种原子指令为 Java 中的原子类提供了底层支持。
6.2 Java 中的原子类
Java 在java.util.concurrent.atomic包下提供了一系列原子类,这些原子类基于 CAS 操作实现,可分为以下几类:
6.2.1 基本类型原子类
- AtomicBoolean:布尔类型的原子类,提供原子性的读写操作。
- AtomicInteger:整型的原子类,提供原子性的加减、自增、自减等操作。
- AtomicLong:长整型的原子类,功能与
AtomicInteger类似。
示例:使用 AtomicInteger 实现计数器
import java.util.concurrent.atomic.AtomicInteger;public class AtomicCounter {private AtomicInteger count = new AtomicInteger(0);public void increment() {count.incrementAndGet(); // 原子自增操作}public int getCount() {return count.get();}public static void main(String[] args) throws InterruptedException {AtomicCounter counter = new AtomicCounter();int threadCount = 10;Thread[] threads = new Thread[threadCount];// 创建并启动10个线程,每个线程对计数器执行1000次自增操作for (int i = 0; i < threadCount; i++) {threads[i] = new Thread(() -> {for (int j = 0; j < 1000; j++) {counter.increment();}});threads[i].start();}// 等待所有线程执行完毕for (Thread thread : threads) {thread.join();}// 输出最终结果,应为10000System.out.println("计数器最终值: " + counter.getCount());}
}
6.2.2 引用类型原子类
- AtomicReference:引用类型的原子类,提供对引用的原子性操作。
- AtomicStampedReference:带有版本号的引用类型原子类,可解决 ABA 问题。
- AtomicMarkableReference:带有标记位的引用类型原子类。
示例:使用 AtomicReference 实现简单的缓存
import java.util.concurrent.atomic.AtomicReference;public class AtomicCacheExample {private static final AtomicReference<String> cache = new AtomicReference<>();public static String getCache() {return cache.get();}public static void updateCache(String newValue) {cache.set(newValue);}public static boolean compareAndSet(String expect, String update) {return cache.compareAndSet(expect, update);}public static void main(String[] args) {// 初始化缓存updateCache("初始值");System.out.println("缓存初始值: " + getCache());// 使用CAS操作更新缓存boolean success = compareAndSet("初始值", "新值");System.out.println("CAS操作结果: " + success);System.out.println("缓存当前值: " + getCache());}
}
6.2.3 数组类型原子类
- AtomicIntegerArray:整型数组的原子类,提供对数组元素的原子性操作。
- AtomicLongArray:长整型数组的原子类。
- AtomicReferenceArray:引用类型数组的原子类。
示例:使用 AtomicIntegerArray 实现线程安全的数组操作
import java.util.concurrent.atomic.AtomicIntegerArray;public class AtomicArrayExample {public static void main(String[] args) {int[] array = {1, 2, 3, 4, 5};AtomicIntegerArray atomicArray = new AtomicIntegerArray(array);// 对数组元素进行原子自增操作atomicArray.incrementAndGet(0);System.out.println("数组第一个元素自增后: " + atomicArray.get(0));// 使用CAS操作更新数组元素boolean success = atomicArray.compareAndSet(1, 2, 10);System.out.println("CAS操作结果: " + success);System.out.println("数组第二个元素更新后: " + atomicArray.get(1));}
}
6.2.4 对象属性原子更新器
- AtomicIntegerFieldUpdater:对对象的整型字段进行原子更新。
- AtomicLongFieldUpdater:对对象的长整型字段进行原子更新。
- AtomicReferenceFieldUpdater:对对象的引用类型字段进行原子更新。
示例:使用 AtomicIntegerFieldUpdater 更新对象字段
import java.util.concurrent.atomic.AtomicIntegerFieldUpdater;class MyClass {// 必须是volatile类型,且不能是privatepublic volatile int value;
}public class AtomicFieldUpdaterExample {public static void main(String[] args) {MyClass obj = new MyClass();AtomicIntegerFieldUpdater<MyClass> updater = AtomicIntegerFieldUpdater.newUpdater(MyClass.class, "value");// 原子更新字段值updater.set(obj, 10);System.out.println("初始值: " + obj.value);int newValue = updater.incrementAndGet(obj);System.out.println("自增后的值: " + newValue);}
}
6.2.5 累加器(Java 8+)
- LongAdder:长整型累加器,在高并发场景下性能优于
AtomicLong。 - DoubleAdder:双精度浮点型累加器。
- LongAccumulator:更通用的长整型累加器,支持自定义操作。
- DoubleAccumulator:更通用的双精度浮点型累加器。
示例:使用 LongAdder 实现高性能计数器
import java.util.concurrent.ExecutorService;
import java.util.concurrent.Executors;
import java.util.concurrent.atomic.LongAdder;public class LongAdderExample {public static void main(String[] args) throws InterruptedException {LongAdder counter = new LongAdder();ExecutorService executor = Executors.newFixedThreadPool(10);// 提交1000个任务,每个任务对计数器加1for (int i = 0; i < 1000; i++) {executor.submit(() -> counter.increment());}executor.shutdown();executor.awaitTermination(1, java.util.concurrent.TimeUnit.SECONDS);// 输出最终结果,应为1000System.out.println("计数器最终值: " + counter.sum());}
}
6.3 CAS 操作与 ABA 问题
6.3.1 CAS 操作原理
CAS(Compare-and-Swap)是一种无锁算法,它包含三个操作数:内存位置(V)、预期原值(A)和新值(B)。CAS 操作的原子性由硬件层保证,其执行过程如下:
- 读取内存位置 V 的值。
- 比较该值是否等于预期原值 A。
- 如果相等,则将内存位置 V 的值更新为新值 B;否则,不做任何操作。
- 返回操作是否成功。
Java 中的原子类就是基于 CAS 操作实现的,例如AtomicInteger的incrementAndGet()方法的实现:
public final int incrementAndGet() {return U.getAndAddInt(this, VALUE, 1) + 1;
}其中U.getAndAddInt()是一个本地方法,基于 CAS 操作实现。
6.3.2 ABA 问题
ABA 问题是 CAS 操作中的一个潜在问题。假设一个变量初始值为 A,线程 T1 读取该值后被阻塞,此时线程 T2 将该值改为 B,然后又改回 A。当线程 T1 恢复执行时,发现变量的值仍然是 A,就认为没有发生变化并执行 CAS 操作。但实际上变量的值已经经历了 A→B→A 的变化,这可能会导致一些问题。
6.3.3 解决 ABA 问题
Java 提供了AtomicStampedReference类来解决 ABA 问题,它在每次修改时会更新一个版本号(时间戳)。当执行 CAS 操作时,不仅会比较值,还会比较版本号。只有当值和版本号都符合预期时,才会执行更新操作。
示例:使用 AtomicStampedReference 解决 ABA 问题
import java.util.concurrent.atomic.AtomicStampedReference;public class ABASolutionExample {public static void main(String[] args) {AtomicStampedReference<Integer> reference = new AtomicStampedReference<>(100, 0);int[] stampHolder = new int[1];int value = reference.get(stampHolder);int stamp = stampHolder[0];System.out.println("初始值: " + value + ", 版本号: " + stamp);// 模拟ABA问题Thread t1 = new Thread(() -> {try {// 等待线程T2完成ABA操作Thread.sleep(1000);} catch (InterruptedException e) {e.printStackTrace();}boolean success = reference.compareAndSet(100, 200, stamp, stamp + 1);System.out.println("T1 CAS操作结果: " + success);});Thread t2 = new Thread(() -> {int[] stampHolderT2 = new int[1];int valueT2 = reference.get(stampHolderT2);int stampT2 = stampHolderT2[0];// 第一次修改:A→Breference.compareAndSet(valueT2, 101, stampT2, stampT2 + 1);System.out.println("T2 第一次修改后: " + reference.getReference() + ", 版本号: " + reference.getStamp());// 获取新的版本号int[] stampHolderT2_2 = new int[1];int valueT2_2 = reference.get(stampHolderT2_2);int stampT2_2 = stampHolderT2_2[0];// 第二次修改:B→Areference.compareAndSet(valueT2_2, 100, stampT2_2, stampT2_2 + 1);System.out.println("T2 第二次修改后: " + reference.getReference() + ", 版本号: " + reference.getStamp());});t1.start();t2.start();try {t1.join();t2.join();} catch (InterruptedException e) {e.printStackTrace();}System.out.println("最终值: " + reference.getReference() + ", 版本号: " + reference.getStamp());}
}
6.4 原子类与锁的性能对比
在多线程环境下,原子类和锁都可以实现线程安全,但它们的性能特点不同:
- 原子类:基于 CAS 操作实现,无锁机制,在低竞争场景下性能优于锁;但在高竞争场景下,由于频繁的 CAS 失败会导致性能下降。
- 锁:在竞争激烈的场景下,锁的性能可能优于原子类,因为锁可以避免大量的 CAS 重试操作。
示例:性能对比测试
import java.util.concurrent.CountDownLatch;
import java.util.concurrent.ExecutorService;
import java.util.concurrent.Executors;
import java.util.concurrent.atomic.AtomicInteger;public class PerformanceComparison {private static final int THREAD_COUNT = 10;private static final int OPS_PER_THREAD = 1000000;public static void main(String[] args) throws InterruptedException {testSynchronized();testAtomic();}private static void testSynchronized() throws InterruptedException {CountDownLatch latch = new CountDownLatch(THREAD_COUNT);ExecutorService executor = Executors.newFixedThreadPool(THREAD_COUNT);SynchronizedCounter counter = new SynchronizedCounter();long startTime = System.currentTimeMillis();for (int i = 0; i < THREAD_COUNT; i++) {executor.submit(() -> {for (int j = 0; j < OPS_PER_THREAD; j++) {counter.increment();}latch.countDown();});}latch.await();long endTime = System.currentTimeMillis();System.out.println("Synchronized 耗时: " + (endTime - startTime) + "ms");System.out.println("最终值: " + counter.getCount());executor.shutdown();}private static void testAtomic() throws InterruptedException {CountDownLatch latch = new CountDownLatch(THREAD_COUNT);ExecutorService executor = Executors.newFixedThreadPool(THREAD_COUNT);AtomicCounter counter = new AtomicCounter();long startTime = System.currentTimeMillis();for (int i = 0; i < THREAD_COUNT; i++) {executor.submit(() -> {for (int j = 0; j < OPS_PER_THREAD; j++) {counter.increment();}latch.countDown();});}latch.await();long endTime = System.currentTimeMillis();System.out.println("Atomic 耗时: " + (endTime - startTime) + "ms");System.out.println("最终值: " + counter.getCount());executor.shutdown();}static class SynchronizedCounter {private int count = 0;public synchronized void increment() {count++;}public int getCount() {return count;}}static class AtomicCounter {private AtomicInteger count = new AtomicInteger(0);public void increment() {count.incrementAndGet();}public int getCount() {return count.get();}}
}
6.5 原子类最佳实践
- 优先使用原子类:在简单的线程安全场景下,优先使用原子类而非锁,因为原子类通常具有更好的性能。
- 注意 ABA 问题:在需要考虑 ABA 问题的场景下,使用
AtomicStampedReference或AtomicMarkableReference。 - 高并发场景下考虑累加器:在高并发场景下,使用
LongAdder代替AtomicLong可以获得更好的性能。 - 避免过度使用原子类:虽然原子类性能较好,但在复杂的同步场景下,使用锁可能更合适。
- 结合 volatile 使用:原子类中的变量通常是
volatile类型的,确保变量的可见性。
第七章:并发集合&工具类
在 Java 多线程编程中,并发工具类和集合类是提升开发效率与程序性能的重要武器。它们能够帮助开发者便捷地处理线程同步、数据共享等问题,接下来将深入介绍这些工具的原理与使用方法。
7.1 并发集合类
7.1.1 线程安全的 List 集合
- CopyOnWriteArrayList:适用于读多写少的场景。在执行写操作(如
add、remove)时,会先复制一个新的数组,在新数组上进行修改,最后将原数组引用指向新数组。这种方式保证了读操作的高效性,因为读操作无需加锁,但写操作会有一定的性能开销。
import java.util.Iterator;
import java.util.concurrent.CopyOnWriteArrayList;public class CopyOnWriteArrayListExample {public static void main(String[] args) {CopyOnWriteArrayList<String> list = new CopyOnWriteArrayList<>();list.add("元素1");list.add("元素2");// 多线程读操作new Thread(() -> {Iterator<String> iterator = list.iterator();while (iterator.hasNext()) {System.out.println(Thread.currentThread().getName() + " 读取: " + iterator.next());}}).start();// 写操作new Thread(() -> {list.add("元素3");System.out.println(Thread.currentThread().getName() + " 执行写操作");}).start();}
}- ConcurrentLinkedQueue:基于链表实现的无界线程安全队列,采用无锁算法(CAS 操作),适合高并发场景下的队列操作。它的入队和出队操作都能高效执行,常用于生产者 - 消费者模型。
import java.util.concurrent.ConcurrentLinkedQueue;public class ConcurrentLinkedQueueExample {public static void main(String[] args) {ConcurrentLinkedQueue<Integer> queue = new ConcurrentLinkedQueue<>();queue.add(1);queue.add(2);// 出队操作System.out.println("出队元素: " + queue.poll());// 入队操作queue.add(3);System.out.println("队列大小: " + queue.size());}
}
7.1.2 线程安全的 Map 集合
- ConcurrentHashMap:Java 7 中采用分段锁(Segment)机制,将数据分成多个段,每个段有独立的锁,不同段可以同时进行读写操作,提高并发性能;Java 8 中改为 CAS + 链表 + 红黑树的结构,进一步优化了性能。在多线程环境下,
ConcurrentHashMap是线程安全且高效的键值对存储结构。
import java.util.concurrent.ConcurrentHashMap;public class ConcurrentHashMapExample {public static void main(String[] args) {ConcurrentHashMap<String, Integer> map = new ConcurrentHashMap<>();map.put("key1", 1);map.put("key2", 2);// 获取值System.out.println("获取key1的值: " + map.get("key1"));// 替换值map.replace("key2", 3);System.out.println("替换后key2的值: " + map.get("key2"));}
}- ConcurrentSkipListMap:基于跳表实现的线程安全有序 Map,它通过比较器来维护元素的顺序。在高并发且需要有序性的场景下,
ConcurrentSkipListMap比ConcurrentHashMap更具优势,因为它的查找、插入和删除操作的时间复杂度为 O (log n)。
7.1.3 线程安全的 Set 集合
- CopyOnWriteArraySet:内部基于
CopyOnWriteArrayList实现,利用了 List 的唯一性来保证 Set 的特性。适用于读操作频繁的场景,写操作时会复制底层数组。 - ConcurrentSkipListSet:基于跳表实现的线程安全有序 Set,和
ConcurrentSkipListMap类似,通过比较器保证元素有序,适合在多线程环境下需要有序性和唯一性的场景。
7.2 并发工具类
7.2.1 CountDownLatch:线程等待的 “倒计时器”
CountDownLatch允许一个或多个线程等待其他线程完成操作,通过一个计数器实现线程间的同步。当计数器减为 0 时,等待的线程将被释放。常用于多个子任务并行执行,主线程等待所有子任务完成后再进行汇总处理的场景。
import java.util.concurrent.CountDownLatch;public class CountDownLatchExample {public static void main(String[] args) throws InterruptedException {int taskCount = 5;CountDownLatch latch = new CountDownLatch(taskCount);for (int i = 1; i <= taskCount; i++) {final int taskId = i;new Thread(() -> {try {System.out.println("任务 " + taskId + " 开始执行");Thread.sleep((int) (Math.random() * 2000));System.out.println("任务 " + taskId + " 执行完毕");} catch (InterruptedException e) {e.printStackTrace();} finally {latch.countDown();}}).start();}latch.await();System.out.println("所有任务已完成");}
}
7.2.2 CyclicBarrier:线程间的 “屏障点”
CyclicBarrier用于让多个线程在某个屏障点相互等待,所有线程到达屏障点后,再一起继续执行后续操作。与CountDownLatch不同的是,CyclicBarrier的计数器可以重置并重复使用,适合多线程分阶段执行任务的场景。
import java.util.concurrent.BrokenBarrierException;
import java.util.concurrent.CyclicBarrier;public class CyclicBarrierExample {public static void main(String[] args) {int threadCount = 4;CyclicBarrier barrier = new CyclicBarrier(threadCount, () -> {System.out.println("所有线程已到达屏障点,继续执行");});for (int i = 1; i <= threadCount; i++) {final int threadId = i;new Thread(() -> {try {System.out.println("线程 " + threadId + " 开始执行");Thread.sleep((int) (Math.random() * 2000));System.out.println("线程 " + threadId + " 到达屏障点");barrier.await();} catch (InterruptedException | BrokenBarrierException e) {e.printStackTrace();}}).start();}}
}
7.2.3 Semaphore:资源访问的 “信号量”
Semaphore用于控制同时访问特定资源的线程数量,通过一个虚拟的 “许可证” 机制实现。线程在访问资源前需获取许可证,使用完毕后释放许可证。常用于限制数据库连接池的并发访问数量、控制对共享资源的并发访问等场景。
import java.util.concurrent.Semaphore;public class SemaphoreExample {public static void main(String[] args) {int availablePermits = 3;Semaphore semaphore = new Semaphore(availablePermits);for (int i = 1; i <= 5; i++) {final int threadId = i;new Thread(() -> {try {semaphore.acquire();System.out.println("线程 " + threadId + " 获取到许可证,开始访问资源");Thread.sleep((int) (Math.random() * 2000));System.out.println("线程 " + threadId + " 释放许可证");} catch (InterruptedException e) {e.printStackTrace();} finally {semaphore.release();}}).start();}}
}
7.2.4 Exchanger:线程间的数据 “交换站”
Exchanger允许两个线程在同步点交换数据。当两个线程都调用exchange方法时,它们会交换各自携带的数据,适用于生产者 - 消费者模型中数据缓冲区的交换等场景。
import java.util.concurrent.Exchanger;public class ExchangerExample {public static void main(String[] args) {Exchanger<String> exchanger = new Exchanger<>();new Thread(() -> {try {String data1 = "数据A";System.out.println(Thread.currentThread().getName() + " 准备交换: " + data1);String receivedData = exchanger.exchange(data1);System.out.println(Thread.currentThread().getName() + " 交换到: " + receivedData);} catch (InterruptedException e) {e.printStackTrace();}}, "线程1").start();new Thread(() -> {try {String data2 = "数据B";System.out.println(Thread.currentThread().getName() + " 准备交换: " + data2);String receivedData = exchanger.exchange(data2);System.out.println(Thread.currentThread().getName() + " 交换到: " + receivedData);} catch (InterruptedException e) {e.printStackTrace();}}, "线程2").start();}
}
7.3 工具选择与实践建议
- 根据场景选择工具:如果是读多写少的场景,优先考虑
CopyOnWriteArrayList、ConcurrentHashMap;如果需要有序性,可选择ConcurrentSkipListMap、ConcurrentSkipListSet;在需要线程同步协作时,根据具体需求使用CountDownLatch、CyclicBarrier等工具类。 - 注意性能与线程安全平衡:部分并发集合类和工具类在保证线程安全的同时,会有一定的性能开销,需要根据实际业务场景和性能需求进行权衡。
- 结合其他并发机制:并发集合类和工具类可以与锁、原子类等结合使用,实现更复杂的并发控制逻辑。
第八章:死锁
在多线程编程中,死锁是一种严重的问题,它会导致程序无法继续执行,资源被无限占用。第八章将深入探讨 Java 中死锁的成因、检测方法以及预防和避免策略,帮助开发者写出更健壮的多线程程序。
8.1 死锁的定义与成因
8.1.1 死锁的定义
死锁是指多个线程在执行过程中,因争夺资源而造成的一种互相等待的僵局状态。若无外力干涉,这些线程将永远无法继续执行。例如,线程 A 持有资源 X 并等待资源 Y,线程 B 持有资源 Y 并等待资源 X,此时 A 和 B 相互等待,形成死锁。
8.1.2 死锁产生的四个必要条件
- 互斥条件:资源一次只能被一个线程占用,其他线程不能同时访问该资源。例如,打印机在打印文件时,其他线程无法使用。
- 占有并等待条件:线程在持有至少一个资源的情况下,继续请求其他资源,且在获取新资源前不释放已持有的资源。
- 不可剥夺条件:资源只能由持有它的线程主动释放,其他线程不能强行剥夺。
- 循环等待条件:存在一个线程资源的循环链,链中每个线程都在等待下一个线程所持有的资源。
只有当这四个条件同时满足时,死锁才会发生。要避免死锁,只需破坏其中任意一个条件即可。
8.2 死锁示例代码
以下是一个简单的死锁示例,模拟两个线程争夺两把锁的场景:
public class DeadlockExample {private static final Object resource1 = new Object();private static final Object resource2 = new Object();public static void main(String[] args) {Thread thread1 = new Thread(() -> {synchronized (resource1) {System.out.println(Thread.currentThread().getName() + " 持有 resource1,等待 resource2");try {Thread.sleep(1000);} catch (InterruptedException e) {e.printStackTrace();}synchronized (resource2) {System.out.println(Thread.currentThread().getName() + " 获取到 resource2");}}}, "线程1");Thread thread2 = new Thread(() -> {synchronized (resource2) {System.out.println(Thread.currentThread().getName() + " 持有 resource2,等待 resource1");try {Thread.sleep(1000);} catch (InterruptedException e) {e.printStackTrace();}synchronized (resource1) {System.out.println(Thread.currentThread().getName() + " 获取到 resource1");}}}, "线程2");thread1.start();thread2.start();}
}在上述代码中,线程1先获取resource1,然后等待resource2;线程2先获取resource2,然后等待resource1,满足死锁产生的四个条件,导致死锁发生。
8.3 死锁的检测方法
8.3.1 使用 jstack 命令
jstack是 JDK 自带的命令行工具,用于打印 Java 进程中线程的堆栈信息。通过分析堆栈信息,可以找出死锁的线程和资源。使用步骤如下:
- 使用
jps命令获取 Java 进程的 PID(进程 ID)。 - 执行
jstack <PID>命令,查看线程堆栈信息。若存在死锁,会在输出中显示Found one or more deadlocks:的提示,并列出死锁的线程和资源。
8.3.2 使用 Java Mission Control
Java Mission Control 是一款可视化的性能分析和故障诊断工具,它可以实时监控 Java 应用的运行状态,并自动检测死锁。在工具中,死锁线程会以红色高亮显示,方便开发者定位问题。
8.3.3 代码层面检测
在代码中添加监控逻辑,定期检查线程状态和资源持有情况。例如,可以使用ThreadMXBean接口获取线程信息,通过自定义算法检测是否存在死锁。不过,这种方式实现较为复杂,通常用于对实时性要求较高的场景。
8.4 死锁的预防与避免策略
8.4.1 破坏互斥条件
某些情况下,可以通过将资源设计为可共享访问,避免资源的独占使用。例如,使用读写锁(ReadWriteLock),允许多个线程同时读取资源,仅在写操作时独占资源,从而减少资源竞争。
8.4.2 破坏占有并等待条件
- 一次性分配资源:在一个线程开始执行前,一次性为其分配所有需要的资源。如果无法满足全部资源需求,则不分配任何资源,避免线程持有部分资源后等待其他资源。
- 释放已持资源:当线程请求新资源失败时,主动释放已持有的资源,然后重新尝试获取所有资源。
8.4.3 破坏不可剥夺条件
设计资源分配机制,允许高优先级线程剥夺低优先级线程持有的资源。例如,在操作系统中,高优先级进程可以抢占低优先级进程的 CPU 资源。不过,这种方式在 Java 应用层面实现较为复杂,且可能引发其他问题。
8.4.4 破坏循环等待条件
- 资源排序法:为所有资源分配唯一的序号,线程必须按照序号递增的顺序获取资源。例如,若有资源 A(序号 1)、资源 B(序号 2),线程必须先获取 A,再获取 B,避免循环等待。
public class ResourceOrderingExample {private static final Object resource1 = new Object();private static final Object resource2 = new Object();public static void main(String[] args) {Thread thread1 = new Thread(() -> {synchronized (resource1) {System.out.println(Thread.currentThread().getName() + " 持有 resource1,获取 resource2");synchronized (resource2) {System.out.println(Thread.currentThread().getName() + " 获取到 resource2");}}}, "线程1");Thread thread2 = new Thread(() -> {synchronized (resource1) {System.out.println(Thread.currentThread().getName() + " 持有 resource1,获取 resource2");synchronized (resource2) {System.out.println(Thread.currentThread().getName() + " 获取到 resource2");}}}, "线程2");thread1.start();thread2.start();}
}- 层次化资源分配:将资源划分为不同层次,线程获取资源时,必须先获取高层资源,再获取低层资源,避免跨层次的循环等待。
8.5 死锁处理的最佳实践
- 谨慎使用锁:减少锁的使用范围,避免嵌套锁,尽量缩短持有锁的时间,降低死锁发生的概率。
- 资源隔离:将不同类型的资源分配给不同的线程或线程池,避免资源竞争和循环等待。
- 定期监控:在生产环境中,定期使用死锁检测工具监控应用状态,及时发现并处理潜在的死锁问题。
- 异常处理:在获取资源或执行操作时,正确处理异常,确保资源能够被及时释放,防止因异常导致资源泄漏和死锁。
看到这里,相信你应该掌握了 Java 多线程与并发编程的核心概念和技术。记住,那些让你抓耳挠腮的难题,终会成为你侃侃而谈的经验,继续大胆前行吧!