nginx模块使用、过滤器模块以及handler模块
一、如何使用nginx的模块
1.ngx_code.c:
#include "ngx_config.h"
#include "ngx_conf_file.h"
#include "nginx.h"
#include "ngx_core.h"
#include "ngx_string.h"
#include "ngx_palloc.h"
#include "ngx_array.h"
#include "ngx_hash.h"#include<stdio.h>
#include<stdlib.h>//nginx头文件中又包含下面的两个变量,所以我们必须包含#define unused(x) x=xvolatile ngx_cycle_t *ngx_cycle;void
ngx_log_error_core(ngx_uint_t level, ngx_log_t *log, ngx_err_t err,const char *fmt, ...) {unused(level);unused(log);unused(err);unused(fmt);}void print_pool(ngx_pool_t *pool) {printf("\nlast: %p, end: %p\n", pool->d.last, pool->d.end);}int main(){
#if 0ngx_str_t name =ngx_string("jerry");printf("name --> len:%ld, data: %s\n",name.len,name.data);
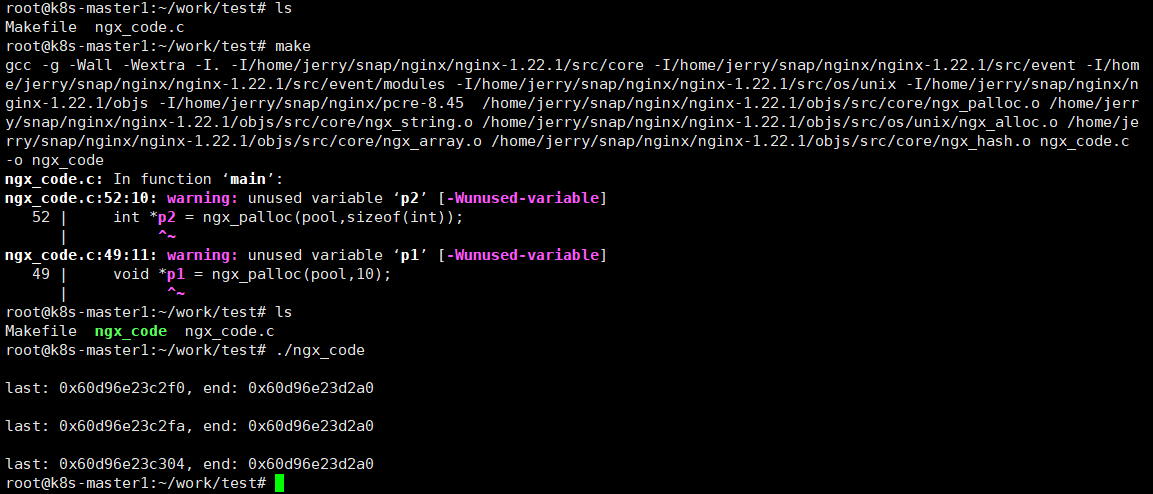
#else//内存池的使用ngx_pool_t *pool = ngx_create_pool(4096,NULL);print_pool(pool);void *p1 = ngx_palloc(pool,10);print_pool(pool);int *p2 = ngx_palloc(pool,sizeof(int));print_pool(pool);ngx_destroy_pool(pool);#endifreturn 0;
}2. Makefile:
CXX = gcc
CXXFLAGS += -g -Wall -WextraNGX_ROOT = /home/jerry/snap/nginx/nginx-1.22.1
PCRE_ROOT = /home/jerry/snap/nginx/pcre-8.45TARGETS = ngx_code
TARGETS_C_FILE = $(TARGETS).cCLEANUP = rm -f $(TARGETS) *.oall: $(TARGETS)clean:$(CLEANUP)CORE_INCS = -I. \-I$(NGX_ROOT)/src/core \-I$(NGX_ROOT)/src/event \-I$(NGX_ROOT)/src/event/modules \-I$(NGX_ROOT)/src/os/unix \-I$(NGX_ROOT)/objs \-I$(PCRE_ROOT) \NGX_PALLOC = $(NGX_ROOT)/objs/src/core/ngx_palloc.o
NGX_STRING = $(NGX_ROOT)/objs/src/core/ngx_string.o
NGX_ALLOC = $(NGX_ROOT)/objs/src/os/unix/ngx_alloc.o
NGX_ARRAY = $(NGX_ROOT)/objs/src/core/ngx_array.o
NGX_HASH = $(NGX_ROOT)/objs/src/core/ngx_hash.o$(TARGETS): $(TARGETS_C_FILE)$(CXX) $(CXXFLAGS) $(CORE_INCS) $(NGX_PALLOC) $(NGX_STRING) $(NGX_ALLOC) $(NGX_ARRAY) $(NGX_HASH) $^ -o $@
3. 编译运行结果如下:
二、 过滤器模块
Nginx 的过滤器(Filter)模块是其 HTTP 处理流程中非常重要的组件,主要用于修改 HTTP 响应的头部或正文内容。它就像一个 “中间处理层”,可以在响应回发给客户端之前,对数据进行加工(如添加内容、压缩、转码等)。具体源码如下:
1. ngx_http_prefix_module.c:
#include <ngx_config.h>
#include <ngx_core.h>
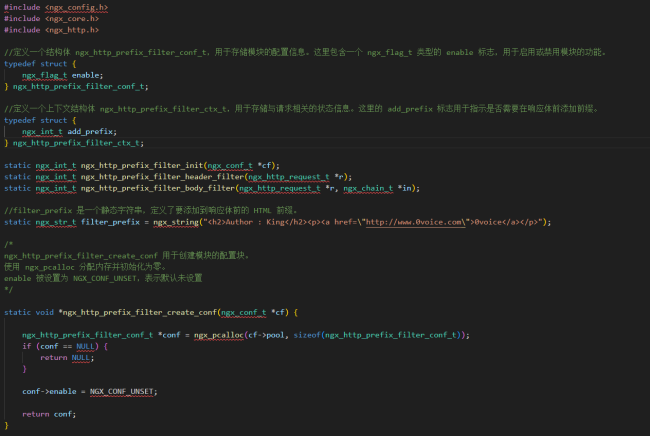
#include <ngx_http.h>//定义一个结构体 ngx_http_prefix_filter_conf_t,用于存储模块的配置信息。这里包含一个 ngx_flag_t 类型的 enable 标志,用于启用或禁用模块的功能。
typedef struct {ngx_flag_t enable;
} ngx_http_prefix_filter_conf_t;//定义一个上下文结构体 ngx_http_prefix_filter_ctx_t,用于存储与请求相关的状态信息。这里的 add_prefix 标志用于指示是否需要在响应体前添加前缀。
typedef struct {ngx_int_t add_prefix;
} ngx_http_prefix_filter_ctx_t;static ngx_int_t ngx_http_prefix_filter_init(ngx_conf_t *cf);
static ngx_int_t ngx_http_prefix_filter_header_filter(ngx_http_request_t *r);
static ngx_int_t ngx_http_prefix_filter_body_filter(ngx_http_request_t *r, ngx_chain_t *in);//filter_prefix 是一个静态字符串,定义了要添加到响应体前的 HTML 前缀。
static ngx_str_t filter_prefix = ngx_string("<h2>Author : King</h2><p><a href=\"http://www.0voice.com\">0voice</a></p>");/*
ngx_http_prefix_filter_create_conf 用于创建模块的配置块。
使用 ngx_pcalloc 分配内存并初始化为零。
enable 被设置为 NGX_CONF_UNSET,表示默认未设置
*/static void *ngx_http_prefix_filter_create_conf(ngx_conf_t *cf) {ngx_http_prefix_filter_conf_t *conf = ngx_pcalloc(cf->pool, sizeof(ngx_http_prefix_filter_conf_t));if (conf == NULL) {return NULL;}conf->enable = NGX_CONF_UNSET;return conf;
}/*
ngx_http_prefix_filter_merge_conf 用于合并父配置和子配置。这里合并 enable 标志的值,
优先使用子配置的值,如果子配置未设置,则使用父配置的值。默认值为 0。
*/static char *ngx_http_prefix_filter_merge_conf(ngx_conf_t *cf, void *parent, void *child) {ngx_http_prefix_filter_conf_t *prev = (ngx_http_prefix_filter_conf_t*)parent;ngx_http_prefix_filter_conf_t *conf = (ngx_http_prefix_filter_conf_t*)child;ngx_conf_merge_value(conf->enable, prev->enable, 0);return NGX_CONF_OK;
}/*
ngx_http_prefix_filter_commands 定义了一个名为 add_prefix 的指令。
该指令可以放在 http、server、location 和 limit 块中。
ngx_conf_set_flag_slot 是处理这个指令的回调函数,用于设置标志位 enable。
*/static ngx_command_t ngx_http_prefix_filter_commands[] = {{ngx_string("add_prefix"),NGX_HTTP_MAIN_CONF|NGX_HTTP_SRV_CONF|NGX_HTTP_LOC_CONF|NGX_HTTP_LMT_CONF|NGX_CONF_FLAG,ngx_conf_set_flag_slot,NGX_HTTP_LOC_CONF_OFFSET,offsetof(ngx_http_prefix_filter_conf_t, enable),NULL},ngx_null_command
};/*
ngx_http_prefix_filter_module_ctx 定义了模块的上下文,
包括创建配置块和合并配置的函数。
ngx_http_prefix_filter_init 用于初始化模块。
*/
static ngx_http_module_t ngx_http_prefix_filter_module_ctx = {NULL,ngx_http_prefix_filter_init,NULL,NULL,NULL,NULL,ngx_http_prefix_filter_create_conf,ngx_http_prefix_filter_merge_conf
};//ngx_http_prefix_filter_module 是模块的主要定义,包括模块的版本、上下文、命令和类型等。
ngx_module_t ngx_http_prefix_filter_module = {NGX_MODULE_V1,&ngx_http_prefix_filter_module_ctx,ngx_http_prefix_filter_commands,NGX_HTTP_MODULE,NULL,NULL,NULL,NULL,NULL,NULL,NULL,NGX_MODULE_V1_PADDING
}; static ngx_http_output_header_filter_pt ngx_http_next_header_filter;
static ngx_http_output_body_filter_pt ngx_http_next_body_filter;/*
ngx_http_prefix_filter_init 是模块初始化函数。它将自定义的头部和主体过滤器插入到 Nginx 的过滤器链中。
ngx_http_prefix_filter_header_filter 和 ngx_http_prefix_filter_body_filter 将被设置为新的过滤器函数。
*/
//总的来说,这个函数就是截胡
static ngx_int_t ngx_http_prefix_filter_init(ngx_conf_t *cf) {ngx_http_next_header_filter = ngx_http_top_header_filter;ngx_http_top_header_filter = ngx_http_prefix_filter_header_filter;ngx_http_next_body_filter = ngx_http_top_body_filter;ngx_http_top_body_filter = ngx_http_prefix_filter_body_filter;return NGX_OK;
}/*
ngx_http_prefix_filter_header_filter 函数用于处理 HTTP 响应头。
如果响应状态码不是 200 OK,直接传递给下一个头部过滤器。检查模块上下文 ctx,
如果存在则直接传递。如果配置 enable 为 0,则直接传递。
否则,根据 Content-Type 判断是否是 text/html,
如果是,将前缀添加到响应头的 content_length 中,
并将 add_prefix 设置为 1。
*/static ngx_int_t ngx_http_prefix_filter_header_filter(ngx_http_request_t *r) {ngx_http_prefix_filter_ctx_t *ctx;ngx_http_prefix_filter_conf_t *conf;if (r->headers_out.status != NGX_HTTP_OK) {return ngx_http_next_header_filter(r);}ctx = ngx_http_get_module_ctx(r, ngx_http_prefix_filter_module);if (ctx) {return ngx_http_next_header_filter(r);}conf = ngx_http_get_module_loc_conf(r, ngx_http_prefix_filter_module);if (conf == NULL) {return ngx_http_next_header_filter(r);}if (conf->enable == 0) {return ngx_http_next_header_filter(r);}ctx = ngx_pcalloc(r->pool, sizeof(ngx_http_prefix_filter_ctx_t));if (ctx == NULL) {return NGX_ERROR;}ctx->add_prefix = 0;ngx_http_set_ctx(r, ctx, ngx_http_prefix_filter_module);if (r->headers_out.content_type.len >= sizeof("text/html") - 1&& ngx_strncasecmp(r->headers_out.content_type.data, (u_char*)"text/html", sizeof("text/html")-1) == 0) {ctx->add_prefix = 1;if (r->headers_out.content_length_n > 0) {r->headers_out.content_length_n += filter_prefix.len;}}//return ngx_http_prefix_filter_header_filter(r);return ngx_http_next_header_filter(r);
}/*
ngx_http_prefix_filter_body_filter 函数用于处理 HTTP 响应体。
首先检查上下文 ctx 和 add_prefix 标志。
如果没有上下文或标志不是 1,直接传递给下一个主体过滤器。
如果 add_prefix 为 1,则设置 add_prefix 为 2,创建一个临时缓冲区 b,将前缀写入缓冲区,并将缓冲区添加到过滤器链 cl 中。
最后,将 cl 链传递给下一个主体过滤器。
*/static ngx_int_t ngx_http_prefix_filter_body_filter(ngx_http_request_t *r, ngx_chain_t *in) {ngx_http_prefix_filter_ctx_t *ctx = ngx_http_get_module_ctx(r, ngx_http_prefix_filter_module);if (ctx == NULL || ctx->add_prefix != 1) {return ngx_http_next_body_filter(r, in);}ctx->add_prefix = 2;ngx_buf_t *b = ngx_create_temp_buf(r->pool, filter_prefix.len);b->start = b->pos = filter_prefix.data;b->last = b->pos + filter_prefix.len;ngx_chain_t *cl = ngx_alloc_chain_link(r->pool);cl->buf = b;cl->next = in;return ngx_http_next_body_filter(r, cl);
}
以下详细解析一下上面的代码:
一、头文件与基础定义
#include <ngx_config.h>
#include <ngx_core.h>
#include <ngx_http.h>
- 作用:包含 Nginx 核心库和 HTTP 模块开发所需的头文件。
ngx_config.h:Nginx 编译相关的配置宏。ngx_core.h:Nginx 核心数据结构(如ngx_str_t、ngx_pool_t)和函数(如内存分配)。ngx_http.h:HTTP 模块开发的核心头文件(如ngx_http_request_t、过滤器相关类型)。二、配置与上下文结构体
// 模块配置结构体(存储全局/局部配置)
typedef struct {ngx_flag_t enable;  // 0=禁用,1=启用(通过配置指令控制)
} ngx_http_prefix_filter_conf_t;// 请求上下文结构体(存储单次请求的状态)
typedef struct {ngx_int_t add_prefix;  // 0=不添加,1=待添加,2=已添加
} ngx_http_prefix_filter_ctx_t;
- 配置结构体:存储模块的全局或局部配置(如是否启用),通过 Nginx 的配置系统(
ngx_command_t)与配置文件中的指令绑定。- 上下文结构体:存储单次 HTTP 请求的状态(如是否需要添加前缀),避免不同请求之间的状态污染(通过
ngx_http_set_ctx与请求绑定)。三、函数声明与前缀内容
static ngx_int_t ngx_http_prefix_filter_init(ngx_conf_t *cf);
static ngx_int_t ngx_http_prefix_filter_header_filter(ngx_http_request_t *r);
static ngx_int_t ngx_http_prefix_filter_body_filter(ngx_http_request_t *r, ngx_chain_t *in);// 要添加的 HTML 前缀内容
static ngx_str_t filter_prefix = ngx_string("<h2>Author : jerry</h2><p><a href=\"http://www.0voice.com\">0voice</a></p>");
- 函数声明:模块初始化函数、头部过滤器、正文过滤器(均为静态,仅在本模块内可见)。
filter_prefix:使用ngx_string宏初始化一个ngx_str_t结构体(包含字符串指针和长度),存储要添加的 HTML 前缀内容。四、配置块创建与合并
// 创建配置块(初始化时调用)
static void *ngx_http_prefix_filter_create_conf(ngx_conf_t *cf) {// 从内存池(cf->pool)中分配配置结构体内存ngx_http_prefix_filter_conf_t *conf = ngx_pcalloc(cf->pool, sizeof(ngx_http_prefix_filter_conf_t));if (conf == NULL) {return NULL;  // 内存分配失败}conf->enable = NGX_CONF_UNSET;  // 初始化为“未设置”状态(由后续合并配置决定默认值)return conf;
}// 合并父子配置(如 http 块与 server 块的配置冲突时)
static char *ngx_http_prefix_filter_merge_conf(ngx_conf_t *cf, void *parent, void *child) {ngx_http_prefix_filter_conf_t *prev = (ngx_http_prefix_filter_conf_t*)parent;  // 父配置(如 http 块)ngx_http_prefix_filter_conf_t *conf = (ngx_http_prefix_filter_conf_t*)child;    // 子配置(如 server/location 块)// 合并 enable 标志:若子配置未设置(NGX_CONF_UNSET),则使用父配置的值;默认值为 0(禁用)ngx_conf_merge_value(conf->enable, prev->enable, 0);return NGX_CONF_OK;  // 合并成功
}
ngx_pcalloc:Nginx 内存池分配函数(自动清零内存),避免野指针。NGX_CONF_UNSET:配置未显式设置时的标记值,通过ngx_conf_merge_value合并父子配置后确定最终值。五、配置指令定义
static ngx_command_t ngx_http_prefix_filter_commands[] = {{ngx_string("add_prefix"),  // 配置指令名(在 nginx.conf 中使用)NGX_HTTP_MAIN_CONF|NGX_HTTP_SRV_CONF|NGX_HTTP_LOC_CONF|NGX_HTTP_LMT_CONF|NGX_CONF_FLAG,  // 指令作用域(http/server/location/limit_except 块)ngx_conf_set_flag_slot,  // 指令处理函数(自动将“on/off”转换为 1/0,赋值给 enable)NGX_HTTP_LOC_CONF_OFFSET,  // 配置存储位置(location 块的配置)offsetof(ngx_http_prefix_filter_conf_t, enable),  // enable 字段在配置结构体中的偏移量NULL  // 额外参数(此处不需要)},ngx_null_command  // 指令数组结束标记
};
- 指令作用域:
NGX_HTTP_MAIN_CONF(http 块)、NGX_HTTP_SRV_CONF(server 块)等,表示该指令可以在这些配置块中使用。ngx_conf_set_flag_slot:Nginx 内置的指令处理函数,用于将on/off转换为ngx_flag_t类型的1/0,并赋值给配置结构体的enable字段。六、模块上下文与模块定义
// 模块上下文(定义模块的初始化、配置相关函数)
static ngx_http_module_t ngx_http_prefix_filter_module_ctx = {NULL,                          // preconfiguration(HTTP 框架初始化前调用)ngx_http_prefix_filter_init,   // postconfiguration(HTTP 框架初始化后调用,用于注册过滤器)NULL,                          // create_main_conf(创建 http 块配置)NULL,                          // init_main_conf(初始化 http 块配置)NULL,                          // create_srv_conf(创建 server 块配置)NULL,                          // merge_srv_conf(合并 server 块配置)ngx_http_prefix_filter_create_conf,  // create_loc_conf(创建 location 块配置)ngx_http_prefix_filter_merge_conf    // merge_loc_conf(合并 location 块配置)
};// 模块主结构体(向 Nginx 注册模块)
ngx_module_t ngx_http_prefix_filter_module = {NGX_MODULE_V1,                 // 模块版本(固定宏)&ngx_http_prefix_filter_module_ctx,  // 模块上下文ngx_http_prefix_filter_commands,     // 配置指令数组NGX_HTTP_MODULE,            // 模块类型(HTTP 模块)NULL,                       // init_master(Master 进程初始化)NULL,                       // init_module(模块初始化,全局仅一次)NULL,                       // init_process(Worker 进程初始化)NULL,                       // exit_process(Worker 进程退出)NULL,                       // exit_module(模块退出)NULL,                       // exit_master(Master 进程退出)NULL,                       // 模块名(可选)NGX_MODULE_V1_PADDING       // 填充字段(保持结构对齐)
};
ngx_http_module_t:HTTP 模块的上下文结构体,定义模块在不同生命周期的回调函数(如postconfiguration用于注册过滤器)。ngx_module_t:Nginx 模块的主结构体,用于向 Nginx 核心注册模块的类型、上下文、指令等信息。七、过滤器链初始化
// 保存原始的头部和正文过滤器链(用于传递请求)
static ngx_http_output_header_filter_pt ngx_http_next_header_filter;
static ngx_http_output_body_filter_pt ngx_http_next_body_filter;// 模块初始化函数(在 HTTP 框架初始化后调用)
static ngx_int_t ngx_http_prefix_filter_init(ngx_conf_t *cf) {// 将自定义头部过滤器插入到链顶,原头部过滤器变为“下一个”ngx_http_next_header_filter = ngx_http_top_header_filter;ngx_http_top_header_filter = ngx_http_prefix_filter_header_filter;// 同理处理正文过滤器链ngx_http_next_body_filter = ngx_http_top_body_filter;ngx_http_top_body_filter = ngx_http_prefix_filter_body_filter;return NGX_OK;  // 初始化成功
}
- 过滤器链机制:Nginx 的 HTTP 响应处理通过 “过滤器链” 实现,每个过滤器处理完后将请求传递给链中的下一个过滤器。
ngx_http_top_header_filter:头部过滤器链的头部指针。通过将自定义过滤器设为新的链头(ngx_http_top_header_filter),并将原链头保存到ngx_http_next_header_filter,确保自定义过滤器优先执行,处理完后通过ngx_http_next_header_filter传递给后续过滤器。八、头部过滤器:
ngx_http_prefix_filter_header_filterstatic ngx_int_t ngx_http_prefix_filter_header_filter(ngx_http_request_t *r) {ngx_http_prefix_filter_ctx_t *ctx; // 请求上下文(存储 add_prefix 标志)ngx_http_prefix_filter_conf_t *conf; // 模块配置(enable 标志)// 1. 仅处理状态码为 200 OK 的响应if (r->headers_out.status != NGX_HTTP_OK) {return ngx_http_next_header_filter(r); // 传递给下一个头部过滤器}// 2. 检查是否已存在上下文(避免重复处理)ctx = ngx_http_get_module_ctx(r, ngx_http_prefix_filter_module);if (ctx) {return ngx_http_next_header_filter(r);}// 3. 获取 location 块的配置(检查是否启用模块)conf = ngx_http_get_module_loc_conf(r, ngx_http_prefix_filter_module);if (conf == NULL || conf->enable == 0) { // 配置不存在或未启用return ngx_http_next_header_filter(r);}// 4. 创建上下文并绑定到请求ctx = ngx_pcalloc(r->pool, sizeof(ngx_http_prefix_filter_ctx_t));if (ctx == NULL) {return NGX_ERROR; // 内存分配失败,终止请求}ctx->add_prefix = 0; // 默认不添加前缀ngx_http_set_ctx(r, ctx, ngx_http_prefix_filter_module); // 绑定上下文到请求// 5. 检查响应类型是否为 text/htmlif (r->headers_out.content_type.len >= sizeof("text/html") - 1 // 确保 content_type 长度足够&& ngx_strncasecmp(r->headers_out.content_type.data, (u_char*)"text/html", sizeof("text/html")-1) == 0) {ctx->add_prefix = 1; // 标记需要添加前缀// 调整 Content-Length(若存在):原长度 + 前缀长度if (r->headers_out.content_length_n > 0) {r->headers_out.content_length_n += filter_prefix.len;}}// 6. 传递给下一个头部过滤器(关键修正:原代码错误递归调用自身,现已修正)return ngx_http_next_header_filter(r); }
- 核心逻辑:
- 仅处理
200 OK响应,避免修改错误页面(如404 Not Found)。- 通过
ngx_http_get_module_ctx检查是否已存在上下文(防止重复处理同一请求)。- 通过
ngx_http_get_module_loc_conf获取当前location块的配置,若未启用则跳过。- 为请求创建上下文(
ngx_http_prefix_filter_ctx_t),并通过ngx_http_set_ctx绑定到请求(生命周期与请求一致)。- 检查响应的
Content-Type是否为text/html(忽略大小写),若是则标记add_prefix=1,并调整Content-Length(避免客户端接收数据时长度不符)。九、正文过滤器:
ngx_http_prefix_filter_body_filterstatic ngx_int_t ngx_http_prefix_filter_body_filter(ngx_http_request_t *r, ngx_chain_t *in) {// 1. 获取请求上下文,检查是否需要添加前缀ngx_http_prefix_filter_ctx_t *ctx = ngx_http_get_module_ctx(r, ngx_http_prefix_filter_module);if (ctx == NULL || ctx->add_prefix != 1) { // 无上下文或未标记添加return ngx_http_next_body_filter(r, in); // 传递给下一个正文过滤器}// 2. 标记前缀已添加(避免重复处理)ctx->add_prefix = 2;// 3. 创建临时缓冲区,存储前缀内容ngx_buf_t *b = ngx_create_temp_buf(r->pool, filter_prefix.len); // 创建指定长度的缓冲区if (b == NULL) {return NGX_ERROR; // 内存分配失败}b->start = b->pos = filter_prefix.data; // 缓冲区起始位置指向前缀内容b->last = b->pos + filter_prefix.len; // 缓冲区结束位置(前缀内容长度)b->temporary = 1; // 标记缓冲区为临时(Nginx 会自动管理内存)// 4. 构造新的缓冲区链(前缀在前,原始内容在后)ngx_chain_t *cl = ngx_alloc_chain_link(r->pool); // 分配链节点if (cl == NULL) {return NGX_ERROR;}cl->buf = b; // 链节点指向前缀缓冲区cl->next = in; // 链的下一个节点指向原始响应体(in 是原始缓冲区链)// 5. 传递给下一个正文过滤器(处理后的链包含前缀+原始内容)return ngx_http_next_body_filter(r, cl); }
- 核心逻辑:
- 检查上下文标志
add_prefix=1(仅当头部过滤器标记需要添加时执行)。- 使用
ngx_create_temp_buf创建临时缓冲区,存储前缀内容(filter_prefix)。- 使用
ngx_alloc_chain_link分配链节点,将前缀缓冲区与原始响应体链(in)拼接,形成新的链(cl->next = in)。- 将新链传递给下一个正文过滤器(如
chunked编码过滤器、gzip过滤器等),最终发送给客户端。十、总结
这段代码实现了一个 Nginx 过滤器模块,核心功能是:在启用
add_prefix on的location块中,对200 OK的text/html响应,在正文前添加固定的 HTML 前缀(如作者信息)。关键流程:
- 配置加载:通过
add_prefix指令控制模块是否启用(on/off)。- 过滤器注册:在
ngx_http_prefix_filter_init中将自定义过滤器插入到过滤器链顶部。- 头部过滤:检查响应状态码、配置、
Content-Type,调整Content-Length并标记需要添加前缀。- 正文过滤:根据标记,将前缀内容插入到响应体前,传递给后续过滤器。
2.config:
ngx_addon_name=ngx_http_prefix_filter_module
HTTP_FILTER_MODULES="$HTTP_FILTER_MODULES ngx_http_prefix_filter_module"
NGX_ADDON_SRCS="$NGX_ADDON_SRCS $ngx_addon_dir/ngx_http_prefix_filter_module.c"
3. 具体操作步骤
3.1 现在文件夹中创建config文件和.c文件

3.2 配置config文件,让源码再逼阿姨的过程中包含自己的Module

3.3 写.c文件
3.4 在源码下config编译
./configure --prefix=/usr/local/nginx --with-http_realip_module --with-http_addition_module --with-http_ssl_module --with-http_gzip_static_module --with-http_secure_link_module --with-http_stub_status_module --with-stream --with-pcre=/home/jerry/snap/nginx/pcre-8.45 --with-zlib=/home/jerry/snap/nginx/zlib-1.2.13 --with-openssl=/home/jerry/snap/nginx/openssl-1.1.1s --add-module=/usr/local/nginx/ngx_code_test/ngx_http_prefix_filter_module
3.5 make + make install
3.6 在我们自己的jerry.conf文件中添加.c文件里的特殊关键字: 这里是add_prefix
root@jerry-virtual-machine:/usr/local/nginx# vim conf/jerry.conf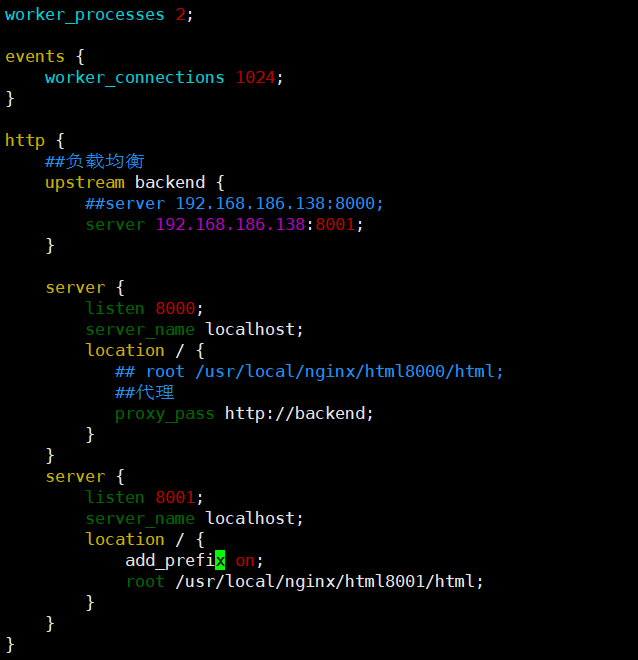
3.7 在对应目录添加html文件:
sudo mkdir -p /usr/local/nginx/html8001/htmlvim index.html:
<!DOCTYPE html>
<html lang="zh-CN">
<head><meta charset="UTF-8"><meta name="viewport" content="width=device-width, initial-scale=1.0"><title>8001 服务页面</title><style>body { font-family: Arial, sans-serif; text-align: center; background-color: #f0f0f0; }.container { margin: 100px auto; padding: 20px; background-color: white; border-radius: 8px; box-shadow: 0 0 10px rgba(0,0,0,0.1); }h1 { color: #2c3e50; }p { color: #7f8c8d; font-size: 1.1em; }</style>
</head>
<body><div class="container"><h1>欢迎访问 8001 端口服务!</h1><p>这是来自 nginx 8001 端口的静态页面。</p><p>当前时间:<span id="currentTime"></span></p></div><script>// 动态显示当前时间function updateTime() {const timeElement = document.getElementById('currentTime');const now = new Date().toLocaleString();timeElement.textContent = now;}// 每秒钟更新一次时间setInterval(updateTime, 1000);updateTime(); // 初始加载时立即显示</script>
</body>
</html>
3.8 启动nginx服务器,使用我们自己的配置文件

3.9 打开浏览器,输入网址加端口:
192.168.186.138:8000

三、Handler模块
在 Nginx 的 HTTP 处理框架中,Handler 模块是处理具体请求的核心组件,负责生成最终的响应内容。当请求经过 Nginx 的路由匹配(如匹配到某个 location 块)后,Nginx 会调用对应的 Handler 来处理请求,例如读取静态文件、与后端程序(如 PHP-FPM、Java 应用)交互获取动态内容等。具体代码如下:
1.ngx_http_handler_count_module.c:
#include <ngx_http.h>
#include <ngx_core.h>#include <arpa/inet.h>
#include <netinet/in.h>
#include <stdio.h>#define ENABLE_RBTREE   1/*
ngx_pv_table_t 结构体定义了一个包含 count 和 addr 的结构体。
count: 记录来自特定 IP 地址的请求次数。
addr: 存储 IP 地址。
*/typedef struct{int count;struct in_addr addr;
}ngx_pv_table_t;ngx_pv_table_t pv_table[256];#if ENABLE_RBTREEstatic ngx_rbtree_t ngx_pv_rbtree;static ngx_rbtree_node_t ngx_pv_sentinel;//插入新结点void ngx_rbtree_insert_count_value(ngx_rbtree_node_t *temp, ngx_rbtree_node_t *node,ngx_rbtree_node_t *sentinel)
{   ngx_rbtree_node_t  **p;for ( ;; ) {/** Timer values* 1) are spread in small range, usually several minutes,* 2) and overflow each 49 days, if milliseconds are stored in 32 bits.* The comparison takes into account that overflow.*//*  node->key < temp->key */
#if 0p = ((ngx_rbtree_key_int_t) (node->key - temp->key) < 0)? &temp->left : &temp->right;
#elseif (node->key < temp->key) {p = &temp->left;} else if (node->key > temp->key) {p = &temp->right;} else { // node->key == temp->keyreturn ;}#endifif (*p == sentinel) {break;}temp = *p;}*p = node;node->parent = temp;node->left = sentinel;node->right = sentinel;ngx_rbt_red(node);
}//
ngx_rbtree_node_t *ngx_rbtree_count_search(ngx_rbtree_t *rbtree, ngx_rbtree_key_t key) {ngx_rbtree_node_t *temp = rbtree->root;ngx_rbtree_node_t  **p;for ( ;; ) {if (key < temp->key) {p = &temp->left;} else if (key > temp->key) {p = &temp->right;} else { // node->key == temp->keyreturn temp;}if (*p == &ngx_pv_sentinel) {return NULL;}temp = *p;}}void ngx_rbtree_count_traversal(ngx_rbtree_t *T, ngx_rbtree_node_t *node, char *html) {	if (node != &ngx_pv_sentinel) {		ngx_rbtree_count_traversal(T, node->left, html);		//printf("key:%d, color:%d\n", node->key, node->color);	char str[INET_ADDRSTRLEN] = {0};char buffer[128] = {0};snprintf(buffer, 128, "req from : %s, count : %d <br/>",inet_ntop(AF_INET, &node->key, str, sizeof(str)), node->data);strcat(html, buffer);ngx_rbtree_count_traversal(T, node->right, html);	}
}#endifchar  *ngx_http_handler_count_set(ngx_conf_t *cf, ngx_command_t *cmd, void *conf);
ngx_int_t ngx_http_handler_count_handler(ngx_http_request_t *r);
ngx_int_t   ngx_http_handler_count_init(ngx_conf_t *cf);/*
ngx_http_handler_count_cmds 定义了一个 Nginx 配置指令 count。
ngx_string("count"): 配置指令的名称。
NGX_HTTP_LOC_CONF | NGX_CONF_NOARGS: 指令作用于位置配置,并且不需要额外参数。
ngx_http_handler_count_set: 当指令被解析时调用的处理函数。
NGX_HTTP_LOC_CONF_OFFSET: 配置项的偏移量。
0: 没有特别的标志。
NULL: 额外的配置项。
*/
static ngx_command_t ngx_http_handler_count_cmds[] = {{ngx_string("count"),NGX_HTTP_LOC_CONF | NGX_CONF_NOARGS,ngx_http_handler_count_set,NGX_HTTP_LOC_CONF_OFFSET,0,NULL},ngx_null_command
};/*ngx_http_handler_count_ctx 定义了模块的上下文。
这些字段用于定义模块的初始化、配置和处理函数。
ngx_http_handler_count_init 被注释掉了,如果需要模块初始化,请取消注释。*/
// share mem
static ngx_http_module_t ngx_http_handler_count_ctx = {NULL,//ngx_http_handler_count_init, //NULL,NULL,NULL,NULL,NULL,NULL,NULL,
}; /*
ngx_http_handler_count_module 定义了模块的主要结构。
NGX_MODULE_V1: 模块的版本。
&ngx_http_handler_count_ctx: 模块上下文。
ngx_http_handler_count_cmds: 模块的配置指令。
NGX_HTTP_MODULE: 模块类型(HTTP 模块)。
NULL: 一些其他的字段(可选)设置为空。
*/ngx_module_t ngx_http_handler_count_module = {NGX_MODULE_V1,&ngx_http_handler_count_ctx,ngx_http_handler_count_cmds,NGX_HTTP_MODULE,NULL,NULL,NULL,NULL,NULL,NULL,NULL,NGX_MODULE_V1_PADDING
};//当在conf文件中遇到count这个命令时,会调用这个回调函数
char  *ngx_http_handler_count_set(ngx_conf_t *cf, ngx_command_t *cmd, void *conf) {
#if ENABLE_RBTREEngx_rbtree_init(&ngx_pv_rbtree,&ngx_pv_sentinel,ngx_rbtree_insert_count_value);
#endif    ngx_http_core_loc_conf_t *corecf = ngx_http_conf_get_module_loc_conf(cf, ngx_http_core_module);corecf->handler = ngx_http_handler_count_handler;return NGX_CONF_OK;}//组织网页
static int ngx_http_encode_page(char *html) {sprintf(html, "<h1>zvoice.jerry</h1>");strcat(html, "<h2>");#if ENABLE_RBTREEngx_rbtree_count_traversal(&ngx_pv_rbtree, ngx_pv_rbtree.root, html);#elseint i = 0;for (i = 0;i < 256;i ++) {if (pv_table[i].count != 0) {char str[INET_ADDRSTRLEN] = {0};char buffer[128] = {0};snprintf(buffer, 128, "req from : %s, count : %d <br/>",inet_ntop(AF_INET, &pv_table[i].addr, str, sizeof(str)), pv_table[i].count);strcat(html, buffer);}}
#endifstrcat(html, "<h2/>");return 0;
}/*
ngx_http_handler_count_handler 函数处理 HTTP 请求。
u_char html[1024] = {0};: 定义一个用于存储 HTML 内容的缓冲区。
int len = sizeof(html);: 获取缓冲区的大小。
struct sockaddr_in *client_addr = (struct sockaddr_in *)r->connection->sockaddr;: 获取客户端地址信息。
计算 idx 作为 IP 地址的索引,将计数增加 1,并更新 pv_table 中的 IP 地址。
使用 ngx_http_encode_page 函数将数据编码成 HTML。
设置 HTTP 响应状态为 200,并设置内容类型为 text/html。
通过 ngx_http_send_header 发送响应头。
创建一个 ngx_buf_t 缓冲区,用于存储 HTML 内容,并通过 ngx_http_output_filter 发送响应体
*///每次发起请求,就会走到这里
ngx_int_t ngx_http_handler_count_handler(ngx_http_request_t *r) {//可以获取到对端的信息u_char html[1024] = {0};int len = sizeof(html);struct sockaddr_in *client_addr = (struct sockaddr_in *)r->connection->sockaddr; // ip#if ENABLE_RBTREE//查找,找到就把count+=ngx_rbtree_key_t key = (ngx_rbtree_key_t)client_addr->sin_addr.s_addr;ngx_rbtree_node_t *node = ngx_rbtree_count_search(&ngx_pv_rbtree, key);if (!node) {node = ngx_pcalloc(r->pool, sizeof(ngx_rbtree_node_t));node->key = key;node->data = 1;ngx_rbtree_insert(&ngx_pv_rbtree, node);} else {node->data ++;}#else//拿到ip后,取最后三位,即256个作为索引,存储对应的ip的count值int idx = client_addr->sin_addr.s_addr >> 24;pv_table[idx].count ++;memcpy(&pv_table[idx].addr, &client_addr->sin_addr, sizeof(client_addr->sin_addr));
#endifngx_http_encode_page((char *)html);//返回状态默认200r->headers_out.status = 200;ngx_str_set(&r->headers_out.content_type, "text/html");//先把http头发出去ngx_http_send_header(r);//接着发body部分ngx_buf_t *b = ngx_pcalloc(r->pool, sizeof(ngx_buf_t));ngx_chain_t out;out.buf = b;out.next = NULL;b->pos = html;b->last = html+len;b->memory = 1;b->last_buf = 1;return ngx_http_output_filter(r, &out);
}//
以下详细讲解一下这段代码:
1. 头文件与宏定义
#include <ngx_http.h>    // Nginx HTTP模块核心头文件
#include <ngx_core.h>    // Nginx核心功能头文件(内存管理、字符串等)
#include <arpa/inet.h>   // 网络地址转换函数(如inet_ntop)
#include <netinet/in.h>  // 网络地址结构(如struct in_addr)
#include <stdio.h>       // 标准输入输出(如snprintf)#define ENABLE_RBTREE   1  // 宏开关:1表示使用红黑树存储统计数据,0表示使用数组
- 作用:引入 Nginx 核心库、网络相关库,通过宏控制存储方式(红黑树 / 数组)。
2. 统计数据结构体与存储容器
/* 统计数据结构体:记录IP地址和请求次数 */
typedef struct {int count;                  // 请求次数struct in_addr addr;        // IP地址(IPv4,4字节)
} ngx_pv_table_t;ngx_pv_table_t pv_table[256];   // 数组存储(仅当ENABLE_RBTREE=0时使用)
- 说明:
ngx_pv_table_t用于存储单个 IP 的统计信息。pv_table是长度为 256 的数组,通过 IP 地址的最后一个字节(0-255)作为索引(可能冲突)。3. 红黑树相关实现(当 ENABLE_RBTREE=1 时)
3.1 红黑树与哨兵节点
static ngx_rbtree_t ngx_pv_rbtree;          // 红黑树实例
static ngx_rbtree_node_t ngx_pv_sentinel;    // 哨兵节点(用于标记树的边界)
- 红黑树:Nginx 内置的平衡二叉树结构,用于高效存储和查找 IP 统计数据(插入、查找时间复杂度 O (logN))。
- 哨兵节点:所有叶子节点的子节点指向哨兵,避免 NULL 指针判断,简化代码。
3.2 红黑树插入函数
void ngx_rbtree_insert_count_value(ngx_rbtree_node_t *temp, ngx_rbtree_node_t *node, ngx_rbtree_node_t *sentinel) {ngx_rbtree_node_t  **p;for (;;) {if (node->key < temp->key) {        // 新节点键值更小,插入左子树p = &temp->left;} else if (node->key > temp->key) { // 新节点键值更大,插入右子树p = &temp->right;} else {                            // 键值已存在,直接返回(不重复插入)return;}if (*p == sentinel) {  // 找到插入位置(当前子节点是哨兵)break;}temp = *p;  // 继续向下遍历}*p = node;               // 插入新节点node->parent = temp;     // 设置父节点node->left = sentinel;   // 左子节点指向哨兵node->right = sentinel;  // 右子节点指向哨兵ngx_rbt_red(node);       // 新节点默认红色(红黑树规则)
}
- 功能:将新节点插入红黑树,确保键(IP 地址)唯一。
- 关键逻辑:根据键值大小遍历树,找到插入位置后设置父子关系,新节点初始化为红色(红黑树插入规则)。
3.3 红黑树搜索函数
ngx_rbtree_node_t *ngx_rbtree_count_search(ngx_rbtree_t *rbtree, ngx_rbtree_key_t key) {ngx_rbtree_node_t *temp = rbtree->root;  // 从根节点开始搜索for (;;) {if (key < temp->key) {        // 目标键更小,搜索左子树temp = temp->left;} else if (key > temp->key) { // 目标键更大,搜索右子树temp = temp->right;} else {                      // 找到匹配键,返回当前节点return temp;}if (temp == &ngx_pv_sentinel) {  // 遇到哨兵,说明无匹配return NULL;}}
}
- 功能:根据键(IP 地址)搜索红黑树,返回对应节点(若存在)。
- 关键逻辑:从根节点开始,根据键值大小递归搜索左右子树,直到找到匹配或遇到哨兵。
3.4 红黑树遍历函数
void ngx_rbtree_count_traversal(ngx_rbtree_t *T, ngx_rbtree_node_t *node, char *html) {if (node != &ngx_pv_sentinel) {       // 非哨兵节点递归遍历ngx_rbtree_count_traversal(T, node->left, html);  // 左子树// 将当前节点的IP和计数写入HTMLchar str[INET_ADDRSTRLEN] = {0};char buffer[128] = {0};snprintf(buffer, 128, "req from : %s, count : %d <br/>",inet_ntop(AF_INET, &node->key, str, sizeof(str)), node->data);strcat(html, buffer);ngx_rbtree_count_traversal(T, node->right, html);  // 右子树}
}
- 功能:中序遍历红黑树(左 - 根 - 右),将每个节点的 IP 和计数追加到 HTML 字符串中。
- 关键逻辑:递归遍历左右子树,使用
inet_ntop将 IP 地址(node->key)转换为点分十进制字符串,拼接统计信息到 HTML。4. Nginx 模块核心结构
4.1 配置指令定义
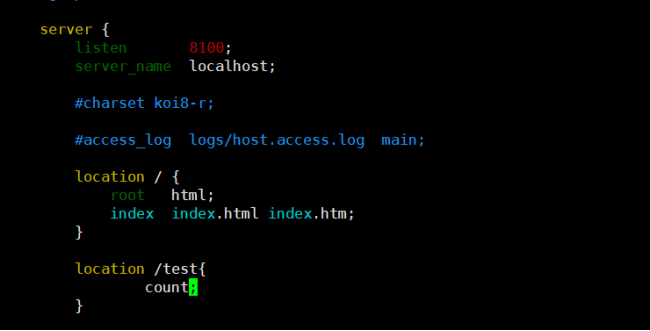
static ngx_command_t ngx_http_handler_count_cmds[] = {{ngx_string("count"),               // 配置指令名称:`count`NGX_HTTP_LOC_CONF | NGX_CONF_NOARGS, // 作用域:location块;无参数ngx_http_handler_count_set,         // 指令解析回调函数NGX_HTTP_LOC_CONF_OFFSET,            // 配置存储偏移量(无需自定义)0,                                   // 无额外标志NULL                                 // 无额外配置数据},ngx_null_command  // 指令数组结束标记
};
- 作用:定义 Nginx 配置指令
count,当在location块中使用该指令时,触发ngx_http_handler_count_set函数。4.2 模块上下文
static ngx_http_module_t ngx_http_handler_count_ctx = {NULL,  // preconfiguration(配置解析前回调)NULL,  // postconfiguration(配置解析后回调)NULL,  // create main configuration(创建主配置)NULL,  // init main configuration(初始化主配置)NULL,  // create server configuration(创建server配置)NULL,  // merge server configuration(合并server配置)NULL,  // create location configuration(创建location配置)NULL   // merge location configuration(合并location配置)
};
- 说明:Nginx 模块上下文,用于注册配置相关的回调函数。当前模块未使用这些回调,故全部置空。
4.3 模块主结构体
ngx_module_t ngx_http_handler_count_module = {NGX_MODULE_V1,                // 模块版本(固定)&ngx_http_handler_count_ctx,  // 模块上下文ngx_http_handler_count_cmds,  // 配置指令数组NGX_HTTP_MODULE,              // 模块类型(HTTP模块)NULL, NULL, NULL, NULL,       // 其他生命周期回调(未使用)NULL, NULL, NULL, NULL,       // 其他生命周期回调(未使用)NGX_MODULE_V1_PADDING         // 填充字段(保持结构对齐)
};
- 作用:向 Nginx 注册模块,声明模块类型、上下文和配置指令。
5. 配置指令处理函数
char *ngx_http_handler_count_set(ngx_conf_t *cf, ngx_command_t *cmd, void *conf) {
#if ENABLE_RBTREEngx_rbtree_init(&ngx_pv_rbtree, &ngx_pv_sentinel, ngx_rbtree_insert_count_value);  // 初始化红黑树
#endif// 获取当前location的核心配置ngx_http_core_loc_conf_t *corecf = ngx_http_conf_get_module_loc_conf(cf, ngx_http_core_module);corecf->handler = ngx_http_handler_count_handler;  // 设置请求处理函数为ngx_http_handler_count_handlerreturn NGX_CONF_OK;  // 配置解析成功
}
- 功能:当 Nginx 解析到
count指令时,初始化红黑树(若启用),并将当前location的请求处理函数设置为ngx_http_handler_count_handler。- 关键操作:
ngx_rbtree_init初始化红黑树(指定插入函数和哨兵);corecf->handler绑定请求处理入口。6. HTML 生成函数
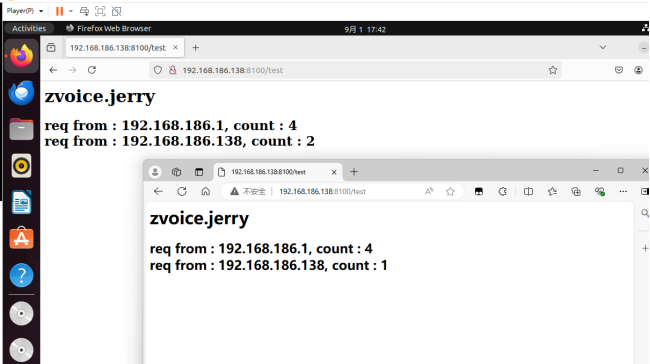
static int ngx_http_encode_page(char *html) {sprintf(html, "<h1>zvoice.jerry</h1>");  // 标题strcat(html, "<h2>");                     // 子标题开始#if ENABLE_RBTREE// 遍历红黑树,拼接统计数据ngx_rbtree_count_traversal(&ngx_pv_rbtree, ngx_pv_rbtree.root, html);
#else// 遍历数组pv_table,拼接统计数据for (int i = 0; i < 256; i++) {if (pv_table[i].count != 0) {  // 仅处理有计数的条目char str[INET_ADDRSTRLEN] = {0};char buffer[128] = {0};snprintf(buffer, 128, "req from : %s, count : %d <br/>",inet_ntop(AF_INET, &pv_table[i].addr, str, sizeof(str)), pv_table[i].count);strcat(html, buffer);}}
#endifstrcat(html, "</h2>");  // 子标题结束return 0;
}
- 功能:生成包含统计结果的 HTML 字符串。根据
ENABLE_RBTREE选择遍历红黑树或数组。- 注意:
strcat可能存在缓冲区溢出风险(HTML 缓冲区固定为 1024 字节)。7. 请求处理核心函数
ngx_int_t ngx_http_handler_count_handler(ngx_http_request_t *r) {u_char html[1024] = {0};  // HTML响应缓冲区(固定1024字节)int len = sizeof(html);// 获取客户端IP地址(IPv4)struct sockaddr_in *client_addr = (struct sockaddr_in *)r->connection->sockaddr;#if ENABLE_RBTREE// 红黑树模式:查找或插入IP统计ngx_rbtree_key_t key = (ngx_rbtree_key_t)client_addr->sin_addr.s_addr;  // IP地址作为键(32位无符号整数)ngx_rbtree_node_t *node = ngx_rbtree_count_search(&ngx_pv_rbtree, key);  // 搜索是否存在该IPif (!node) {  // 未找到,插入新节点node = ngx_pcalloc(r->pool, sizeof(ngx_rbtree_node_t));  // 从Nginx内存池分配节点node->key = key;node->data = 1;  // 初始计数为1ngx_rbtree_insert(&ngx_pv_rbtree, node);  // 插入红黑树} else {  // 已存在,计数+1node->data++;}#else// 数组模式:通过IP最后一个字节作为索引(可能冲突)int idx = client_addr->sin_addr.s_addr >> 24;  // 右移24位,取最后一个字节(0-255)pv_table[idx].count++;                         // 计数+1memcpy(&pv_table[idx].addr, &client_addr->sin_addr, sizeof(client_addr->sin_addr));  // 存储IP地址
#endifngx_http_encode_page((char *)html);  // 生成HTML// 设置HTTP响应头r->headers_out.status = NGX_HTTP_OK;  // 状态码200ngx_str_set(&r->headers_out.content_type, "text/html");  // 内容类型为HTML// 发送响应头if (ngx_http_send_header(r) == NGX_ERROR) {return NGX_ERROR;}// 构造响应体(使用Nginx缓冲区链)ngx_buf_t *b = ngx_pcalloc(r->pool, sizeof(ngx_buf_t));ngx_chain_t out;out.buf = b;out.next = NULL;  // 单缓冲区链b->pos = html;              // 缓冲区起始位置b->last = html + len;       // 缓冲区结束位置(注意:可能超出实际内容长度)b->memory = 1;              // 标记为内存缓冲区(可安全读取)b->last_buf = 1;            // 标记为最后一个缓冲区// 发送响应体return ngx_http_output_filter(r, &out);
}
- 功能:处理每个 HTTP 请求,统计客户端 IP 的请求次数,生成并返回 HTML 响应。
- 关键逻辑:
- 获取客户端 IP:通过
r->connection->sockaddr获取客户端地址(IPv4)。- 统计逻辑:
- 红黑树模式:以 IP 地址的 32 位整数作为键,搜索或插入节点,更新计数。
- 数组模式:取 IP 地址的最后一个字节(右移 24 位)作为索引,直接更新数组中的计数。
- 响应构造:生成 HTML 后,设置 HTTP 状态码、内容类型,通过 Nginx 的缓冲区链发送响应头和体。
2. config:
ngx_addon_name=ngx_http_handler_count_module
HTTP_FILTER_MODULES="$HTTP_FILTER_MODULES ngx_http_handler_count_module"
NGX_ADDON_SRCS="$NGX_ADDON_SRCS $ngx_addon_dir/ngx_http_handler_count_module.c"
3. 具体操作步骤
##同前面
./configure --prefix=/usr/local/nginx --with-http_realip_module --with-http_addition_module --with-http_ssl_module --with-http_gzip_static_module --with-http_secure_link_module --with-http_stub_status_module --with-stream --with-pcre=/home/jerry/snap/nginx/pcre-8.45 --with-zlib=/home/jerry/snap/nginx/zlib-1.2.13 --with-openssl=/home/jerry/snap/nginx/openssl-1.1.1s --add-module=/usr/local/nginx/ngx_code_test/ngx_http_handler_count_module- 使用的nginx.conf中,加上count选项:
2. 不同ip地址请求时的区别:
0voice · GitHub