Android ART运行时无缝替换Dalvik虚拟机的过程分析
目录
一,概述
二,dex文件优化
一,概述
Android 4.4发布了一个ART运行时,准备用来替换掉之前一直使用的Dalvik虚拟机,希望籍此解决饱受诟病的性能问题。老罗不打算分析ART的实现原理,只是很有兴趣知道ART是如何无缝替换掉原来的Dalvik虚拟机的。毕竟在原来的系统中,大量的代码都是运行在Dalvik虚拟机里面的。开始觉得这个替换工作是挺复杂的,但是分析了相关代码之后,发现思路是很清晰的。本文就详细分析这个无缝的替换过程。
我们知道,Dalvik虚拟机实则也算是一个Java虚拟机,只不过它执行的不是class文件,而是dex文件。因此,ART运行时最理想的方式也是实现为一个Java虚拟机的形式,这样就可以很容易地将Dalvik虚拟机替换掉。注意,我们这里说实现为Java虚拟机的形式,实际上是指提供一套完全与Java虚拟机兼容的接口。例如,Dalvik虚拟机在接口上与Java虚拟机是一致的,但是它的内部可以是完全不一样的东西。
实际上,ART运行时就是真的和Dalvik虚拟机一样,实现了一套完全兼容Java虚拟机的接口
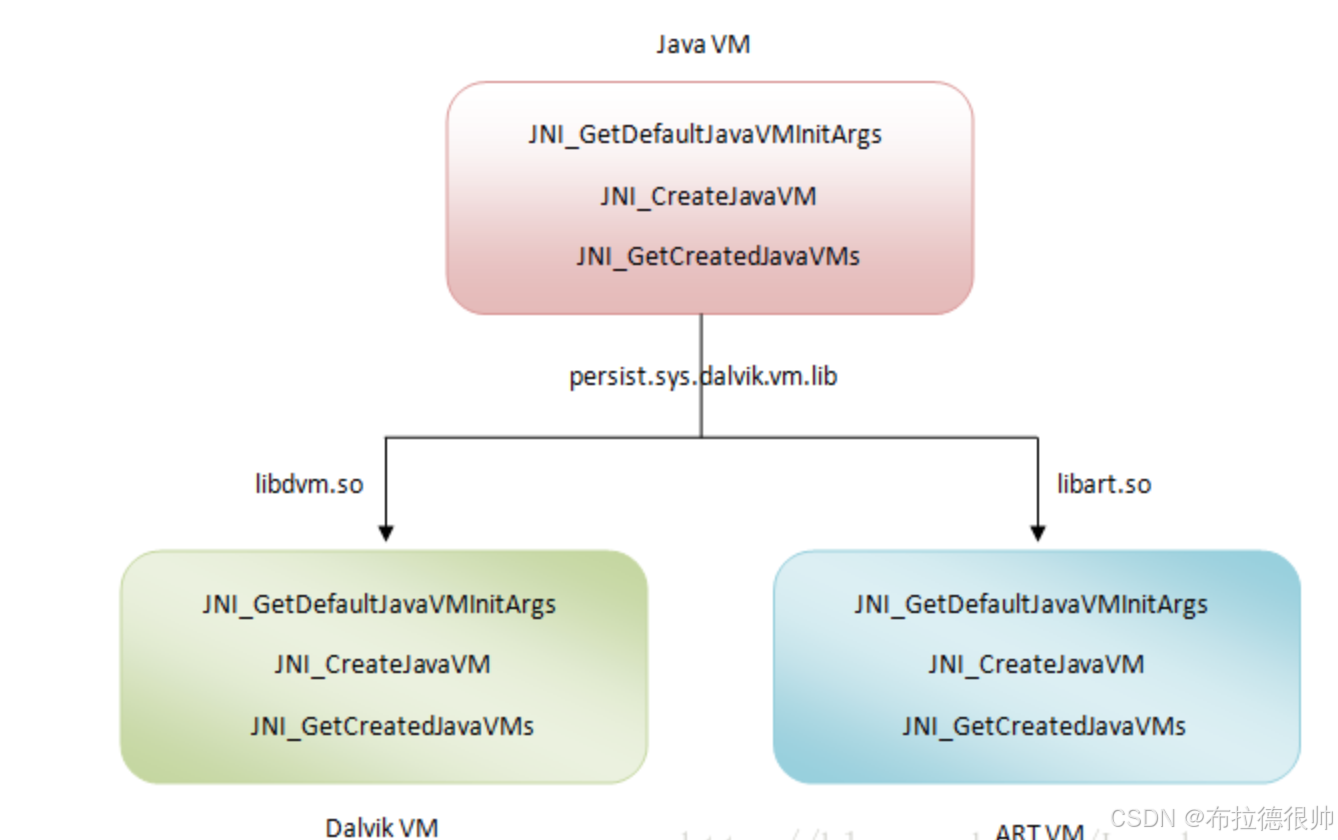
图1 Java虚拟机、Dalvik虚拟机和ART运行时的关系
从图1可以知道,Dalvik虚拟机和ART虚拟机都实现了三个用来抽象Java虚拟机的接口:
- JNI_GetDefaultJavaVMInitArgs -- 获取虚拟机的默认初始化参数
- JNI_CreateJavaVM -- 在进程中创建虚拟机实例
- JNI_GetCreatedJavaVMs -- 获取进程中创建的虚拟机实例
在Android系统中,Davik虚拟机实现在libdvm.so中,ART虚拟机实现在libart.so中。也就是说,libdvm.so和libart.so导出了JNI_GetDefaultJavaVMInitArgs、JNI_CreateJavaVM和JNI_GetCreatedJavaVMs这三个接口,供外界调用。
此外,Android系统还提供了一个系统属性persist.sys.dalvik.vm.lib,它的值要么等于libdvm.so,要么等于libart.so。当等于libdvm.so时,就表示当前用的是Dalvik虚拟机,而当等于libart.so时,就表示当前用的是ART虚拟机。
以上描述的Dalvik虚拟机和ART虚拟机的共同之处,当然它们之间最显著还是不同之处。不同的地方就在于,Dalvik虚拟机执行的是dex字节码,ART虚拟机执行的是本地机器码。这意味着Dalvik虚拟机包含有一个解释器,用来执行dex字节码,具体可以参考Dalvik虚拟机简要介绍和学习计划这个系列的文章。当然,Android从2.2开始,也包含有JIT(Just-In-Time),用来在运行时动态地将执行频率很高的dex字节码翻译成本地机器码,然后再执行。通过JIT,就可以有效地提高Dalvik虚拟机的执行效率。但是,将dex字节码翻译成本地机器码是发生在应用程序的运行过程中的,并且应用程序每一次重新运行的时候,都要做重做这个翻译工作的。因此,即使用采用了JIT,Dalvik虚拟机的总体性能还是不能与直接执行本地机器码的ART虚拟机相比。
那么,ART虚拟机执行的本地机器码是从哪里来的呢?Android的运行时从Dalvik虚拟机替换成ART虚拟机,并不要求开发者要将重新将自己的应用直接编译成目标机器码。也就是说,开发者开发出的应用程序经过编译和打包之后,仍然是一个包含dex字节码的APK文件。既然应用程序包含的仍然是dex字节码,而ART虚拟机需要的是本地机器码,这就必然要有一个翻译的过程。这个翻译的过程当然不能发生应用程序运行的时候,否则的话就和Dalvik虚拟机的JIT一样了。在计算机的世界里,与JIT相对的是AOT。AOT进Ahead-Of-Time的简称,它发生在程序运行之前。我们用静态语言(例如C/C++)来开发应用程序的时候,编译器直接就把它们翻译成目标机器码。这种静态语言的编译方式也是AOT的一种。但是前面我们提到,ART虚拟机并不要求开发者将自己的应用直接编译成目标机器码。这样,将应用的dex字节码翻译成本地机器码的最恰当AOT时机就发生在应用安装的时候。
我们知道,没有ART虚拟机之前,应用在安装的过程,其实也会执行一次“翻译”的过程。只不过这个“翻译”的过程是将dex字节码进行优化,也就是由dex文件生成odex文件。这个过程由安装服务PackageManagerService请求守护进程installd来执行的。从这个角度来说,在应用安装的过程中将dex字节码翻译成本地机器码对原来的应用安装流程基本上就不会产生什么影响。
有了以上的背景知识之后,我们接下来就从两个角度来了解ART虚拟机是如何做到无缝替换Dalvik虚拟机的:
- ART虚拟机的启动过程;
- Dex字节码翻译成本地机器码的过程。
我们知道,Android系统在启动的时候,会创建一个Zygote进程,充当应用程序进程孵化器。Zygote进程在启动的过程中,又会创建一个Dalvik虚拟机。Zygote进程是通过复制自己来创建新的应用程序进程的。这意味着Zygote进程会将自己的Dalvik虚拟机复制给应用程序进程。通过这种方式就可以大大地提高应用程序的启动速度,因为这种方式避免了每一个应用程序进程在启动的时候都要去创建一个Dalvik。事实上,Zygote进程通过自我复制的方式来创建应用程序进程,省去的不仅仅是应用程序进程创建Dalvik虚拟机的时间,还能省去应用程序进程加载各种系统库和系统资源的时间,因为它们在Zygote进程中已经加载过了,并且也会连同Dalvik虚拟机一起复制到应用程序进程中去
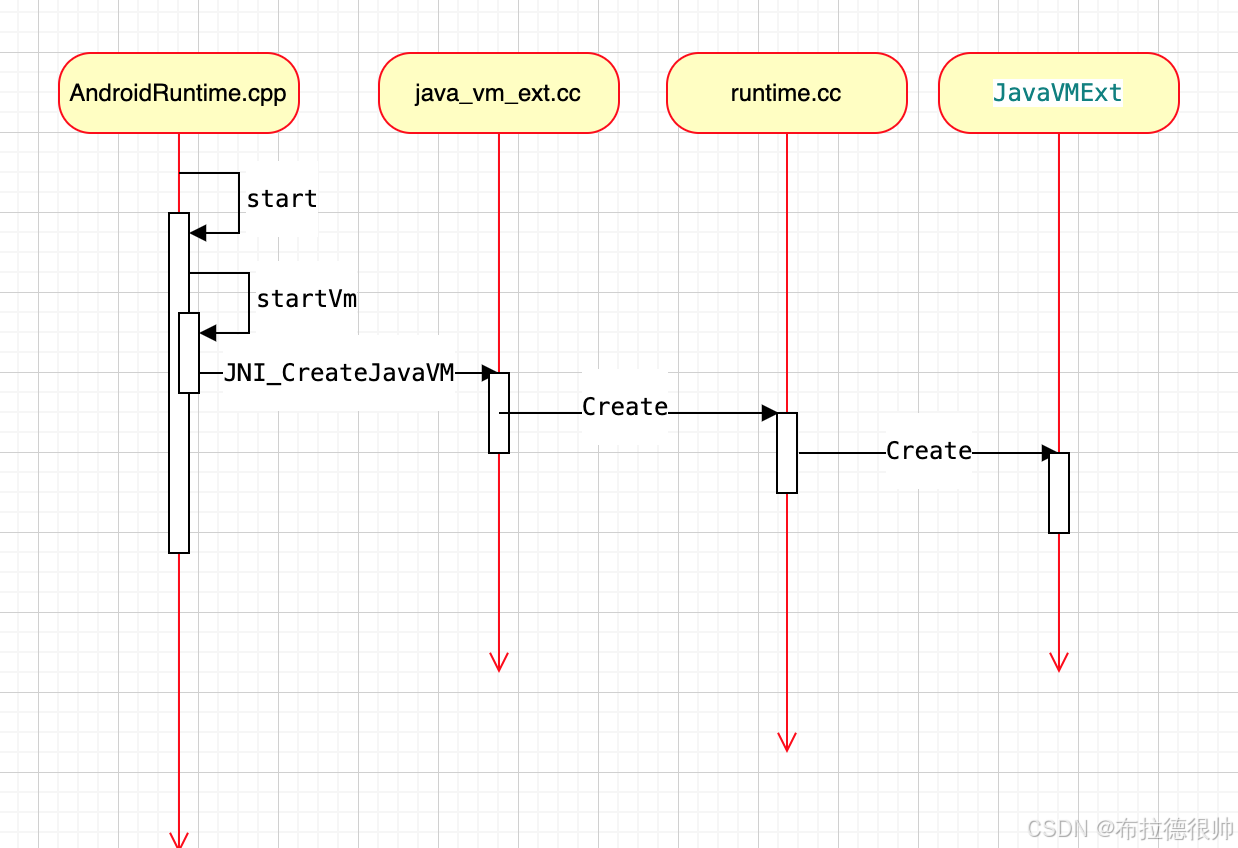
Zygote进程中的Dalvik虚拟机是从AndroidRuntime::start这个函数开始创建的。因此,接下来我们就看看这个函数的实现:
void AndroidRuntime::start(const char* className, const Vector<String8>& options, bool zygote)
{ALOGD(">>>>>> START %s uid %d <<<<<<\n",className != NULL ? className : "(unknown)", getuid());static const String8 startSystemServer("start-system-server");/** 'startSystemServer == true' means runtime is obsolete and not run from* init.rc anymore, so we print out the boot start event here.*/for (size_t i = 0; i < options.size(); ++i) {if (options[i] == startSystemServer) {/* track our progress through the boot sequence */const int LOG_BOOT_PROGRESS_START = 3000;LOG_EVENT_LONG(LOG_BOOT_PROGRESS_START,  ns2ms(systemTime(SYSTEM_TIME_MONOTONIC)));}}const char* rootDir = getenv("ANDROID_ROOT");if (rootDir == NULL) {rootDir = "/system";if (!hasDir("/system")) {LOG_FATAL("No root directory specified, and /android does not exist.");return;}setenv("ANDROID_ROOT", rootDir, 1);}//const char* kernelHack = getenv("LD_ASSUME_KERNEL");//ALOGD("Found LD_ASSUME_KERNEL='%s'\n", kernelHack);/* start the virtual machine */JniInvocation jni_invocation;jni_invocation.Init(NULL);JNIEnv* env;if (startVm(&mJavaVM, &env, zygote) != 0) {return;}onVmCreated(env);/** Register android functions.*/if (startReg(env) < 0) {ALOGE("Unable to register all android natives\n");return;}/** We want to call main() with a String array with arguments in it.* At present we have two arguments, the class name and an option string.* Create an array to hold them.*/jclass stringClass;jobjectArray strArray;jstring classNameStr;stringClass = env->FindClass("java/lang/String");assert(stringClass != NULL);strArray = env->NewObjectArray(options.size() + 1, stringClass, NULL);assert(strArray != NULL);classNameStr = env->NewStringUTF(className);assert(classNameStr != NULL);env->SetObjectArrayElement(strArray, 0, classNameStr);for (size_t i = 0; i < options.size(); ++i) {jstring optionsStr = env->NewStringUTF(options.itemAt(i).string());assert(optionsStr != NULL);env->SetObjectArrayElement(strArray, i + 1, optionsStr);}/** Start VM.  This thread becomes the main thread of the VM, and will* not return until the VM exits.*/char* slashClassName = toSlashClassName(className != NULL ? className : "");jclass startClass = env->FindClass(slashClassName);
这个函数定义在文件/Volumes/aosp/android-8.1.0_r52/frameworks/base/core/jni/AndroidRuntime.cpp中。
AndroidRuntime类的成员函数start最主要是做了以下三件事情:
- 创建一个JniInvocation实例,并且调用它的成员函数init来初始化JNI环境;
- 调用AndroidRuntime类的成员函数startVm来创建一个虚拟机及其对应的JNI接口,即创建一个JavaVM接口和一个JNIEnv接口;
- 有了上述的JavaVM接口和JNIEnv接口之后,就可以在Zygote进程中加载指定的class了。
其中,第1件事情和第2件事情又是最关键的。因此,接下来我们继续分析它们所对应的函数的实现。
JniInvocation类的成员函数init的实现如下所示
class JniInvocation {public:JniInvocation();~JniInvocation();// Initialize JNI invocation API. library should specifiy a valid// shared library for opening via dlopen providing a JNI invocation// implementation, or null to allow defaulting via// persist.sys.dalvik.vm.lib.bool Init(const char* library);// Exposes which library is actually loaded from the given name. The// buffer of size PROPERTY_VALUE_MAX will be used to load the system// property for the default library, if necessary. If no buffer is// provided, the fallback value will be used.static const char* GetLibrary(const char* library, char* buffer);private:bool FindSymbol(void** pointer, const char* symbol);static JniInvocation& GetJniInvocation();jint JNI_GetDefaultJavaVMInitArgs(void* vmargs);jint JNI_CreateJavaVM(JavaVM** p_vm, JNIEnv** p_env, void* vm_args);jint JNI_GetCreatedJavaVMs(JavaVM** vms, jsize size, jsize* vm_count);static JniInvocation* jni_invocation_;void* handle_;jint (*JNI_GetDefaultJavaVMInitArgs_)(void*);jint (*JNI_CreateJavaVM_)(JavaVM**, JNIEnv**, void*);jint (*JNI_GetCreatedJavaVMs_)(JavaVM**, jsize, jsize*);friend jint JNI_GetDefaultJavaVMInitArgs(void* vm_args);friend jint JNI_CreateJavaVM(JavaVM** p_vm, JNIEnv** p_env, void* vm_args);friend jint JNI_GetCreatedJavaVMs(JavaVM** vms, jsize size, jsize* vm_count);
};
JniInvocation类的成员函数init所做的事情很简单。它首先是读取系统属性persist.sys.dalvik.vm.lib的值
无论加载的是哪一个so,都要求它导出JNI_GetDefaultJavaVMInitArgs、JNI_CreateJavaVM和JNI_GetCreatedJavaVMs这三个接口,并且分别保存在JniInvocation类的三个成员变量JNI_GetDefaultJavaVMInitArgs_、JNI_CreateJavaVM_和JNI_GetCreatedJavaVMs_中。这三个接口也就是前面我们提到的用来抽象Java虚拟机的三个接口。
从这里就可以看出,JniInvocation类的成员函数init实际上就是根据系统属性persist.sys.dalvik.vm.lib来初始化Dalvik虚拟机或者ART虚拟机环境。
这个函数定义在文件libnativehelper/JniInvocation.cpp中。
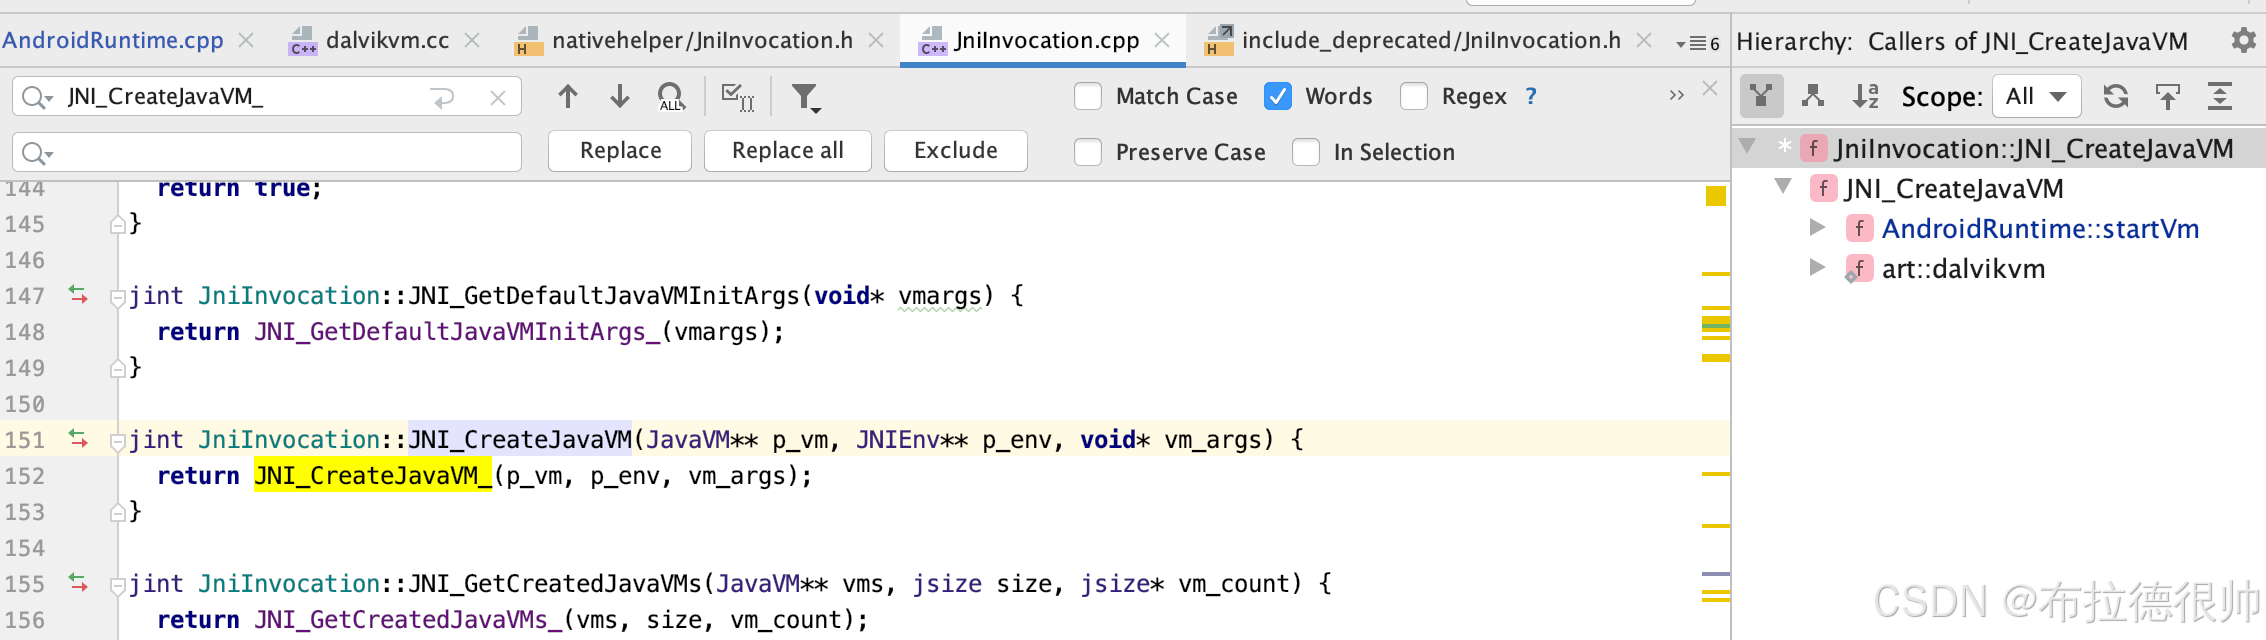
JniInvocation类的成员变量JNI_CreateJavaVM_指向的就是前面所加载的libdvm.so或者libart.so所导出的函数JNI_CreateJavaVM,因此,JniInvocation类的成员函数JNI_CreateJavaVM返回的JavaVM接口指向的要么是Dalvik虚拟机,要么是ART虚拟机。
通过上面的分析,我们就很容易知道,Android系统通过将ART运行时抽象成一个Java虚拟机,以及通过系统属性persist.sys.dalvik.vm.lib和一个适配层JniInvocation,就可以无缝地将Dalvik虚拟机替换为ART运行时。这个替换过程设计非常巧妙,因为涉及到的代码修改是非常少的。
二,dex文件优化
以上就是ART虚拟机的启动过程,接下来我们再分析应用程序在安装过程中将dex字节码翻译为本地机器码的过程。
Android系统通过PackageManagerService来安装APK,在安装的过程,PackageManagerService会通过另外一个类Installer的成员函数dexopt来对APK里面的dex字节码进行优化:
public void dexopt(String apkPath, int uid, @Nullable String pkgName, String instructionSet,int dexoptNeeded, @Nullable String outputPath, int dexFlags,String compilerFilter, @Nullable String volumeUuid, @Nullable String sharedLibraries,@Nullable String seInfo, boolean downgrade)throws InstallerException {assertValidInstructionSet(instructionSet);if (!checkBeforeRemote()) return;try {mInstalld.dexopt(apkPath, uid, pkgName, instructionSet, dexoptNeeded, outputPath,dexFlags, compilerFilter, volumeUuid, sharedLibraries, seInfo, downgrade);} catch (Exception e) {throw InstallerException.from(e);}}Installer通过socket向守护进程installd发送一个dexopt请求,这个请求是由installd里面的函数dexopt来处理的
frameworks/native/cmds/installd/InstalldNativeService.cpp
binder::Status InstalldNativeService::dexopt(const std::string& apkPath, int32_t uid,const std::unique_ptr<std::string>& packageName, const std::string& instructionSet,int32_t dexoptNeeded, const std::unique_ptr<std::string>& outputPath, int32_t dexFlags,const std::string& compilerFilter, const std::unique_ptr<std::string>& uuid,const std::unique_ptr<std::string>& classLoaderContext,const std::unique_ptr<std::string>& seInfo, bool downgrade) {ENFORCE_UID(AID_SYSTEM);CHECK_ARGUMENT_UUID(uuid);if (packageName && *packageName != "*") {CHECK_ARGUMENT_PACKAGE_NAME(*packageName);}std::lock_guard<std::recursive_mutex> lock(mLock);const char* apk_path = apkPath.c_str();const char* pkgname = packageName ? packageName->c_str() : "*";const char* instruction_set = instructionSet.c_str();const char* oat_dir = outputPath ? outputPath->c_str() : nullptr;const char* compiler_filter = compilerFilter.c_str();const char* volume_uuid = uuid ? uuid->c_str() : nullptr;const char* class_loader_context = classLoaderContext ? classLoaderContext->c_str() : nullptr;const char* se_info = seInfo ? seInfo->c_str() : nullptr;int res = android::installd::dexopt(apk_path, uid, pkgname, instruction_set, dexoptNeeded,oat_dir, dexFlags, compiler_filter, volume_uuid, class_loader_context, se_info,downgrade);return res ? error(res, "Failed to dexopt") : ok();
}
/Volumes/aosp/android-8.1.0_r52/frameworks/native/cmds/installd/dexopt.cpp
int dexopt(const char* dex_path, uid_t uid, const char* pkgname, const char* instruction_set,int dexopt_needed, const char* oat_dir, int dexopt_flags, const char* compiler_filter,const char* volume_uuid, const char* class_loader_context, const char* se_info,bool downgrade) {CHECK(pkgname != nullptr);CHECK(pkgname[0] != 0);if ((dexopt_flags & ~DEXOPT_MASK) != 0) {LOG_FATAL("dexopt flags contains unknown fields\n");}if (!validate_dex_path_size(dex_path)) {return -1;}if (class_loader_context != nullptr && strlen(class_loader_context) > PKG_PATH_MAX) {LOG(ERROR) << "Class loader context exceeds the allowed size: " << class_loader_context;return -1;}bool is_public = (dexopt_flags & DEXOPT_PUBLIC) != 0;bool debuggable = (dexopt_flags & DEXOPT_DEBUGGABLE) != 0;bool boot_complete = (dexopt_flags & DEXOPT_BOOTCOMPLETE) != 0;bool profile_guided = (dexopt_flags & DEXOPT_PROFILE_GUIDED) != 0;bool is_secondary_dex = (dexopt_flags & DEXOPT_SECONDARY_DEX) != 0;// Check if we're dealing with a secondary dex file and if we need to compile it.std::string oat_dir_str;std::string dex_real_path;if (is_secondary_dex) {if (process_secondary_dex_dexopt(dex_path, pkgname, dexopt_flags, volume_uuid, uid,instruction_set, compiler_filter, &is_public, &dexopt_needed, &oat_dir_str,&dex_real_path,downgrade)) {oat_dir = oat_dir_str.c_str();dex_path = dex_real_path.c_str();if (dexopt_needed == NO_DEXOPT_NEEDED) {return 0;  // Nothing to do, report success.}} else {return -1;  // We had an error, logged in the process method.}} else {// Currently these flags are only use for secondary dex files.// Verify that they are not set for primary apks.CHECK((dexopt_flags & DEXOPT_STORAGE_CE) == 0);CHECK((dexopt_flags & DEXOPT_STORAGE_DE) == 0);}// Open the input file.unique_fd input_fd(open(dex_path, O_RDONLY, 0));if (input_fd.get() < 0) {ALOGE("installd cannot open '%s' for input during dexopt\n", dex_path);return -1;}// Create the output OAT file.char out_oat_path[PKG_PATH_MAX];Dex2oatFileWrapper out_oat_fd = open_oat_out_file(dex_path, oat_dir, is_public, uid,instruction_set, is_secondary_dex, out_oat_path);if (out_oat_fd.get() < 0) {return -1;}// Open vdex files.Dex2oatFileWrapper in_vdex_fd;Dex2oatFileWrapper out_vdex_fd;if (!open_vdex_files(dex_path, out_oat_path, dexopt_needed, instruction_set, is_public, uid,is_secondary_dex, profile_guided, &in_vdex_fd, &out_vdex_fd)) {return -1;}// Ensure that the oat dir and the compiler artifacts of secondary dex files have the correct// selinux context (we generate them on the fly during the dexopt invocation and they don't// fully inherit their parent context).// Note that for primary apk the oat files are created before, in a separate installd// call which also does the restorecon. TODO(calin): unify the paths.if (is_secondary_dex) {if (selinux_android_restorecon_pkgdir(oat_dir, se_info, uid,SELINUX_ANDROID_RESTORECON_RECURSE)) {LOG(ERROR) << "Failed to restorecon " << oat_dir;return -1;}}// Create a swap file if necessary.unique_fd swap_fd = maybe_open_dexopt_swap_file(out_oat_path);// Create the app image file if needed.Dex2oatFileWrapper image_fd =maybe_open_app_image(out_oat_path, profile_guided, is_public, uid, is_secondary_dex);// Open the reference profile if needed.Dex2oatFileWrapper reference_profile_fd = maybe_open_reference_profile(pkgname, dex_path, profile_guided, is_public, uid, is_secondary_dex);ALOGV("DexInv: --- BEGIN '%s' ---\n", dex_path);pid_t pid = fork();if (pid == 0) {/* child -- drop privileges before continuing */drop_capabilities(uid);SetDex2OatScheduling(boot_complete);if (flock(out_oat_fd.get(), LOCK_EX | LOCK_NB) != 0) {ALOGE("flock(%s) failed: %s\n", out_oat_path, strerror(errno));_exit(67);}run_dex2oat(input_fd.get(),out_oat_fd.get(),in_vdex_fd.get(),out_vdex_fd.get(),image_fd.get(),dex_path,out_oat_path,swap_fd.get(),instruction_set,compiler_filter,debuggable,boot_complete,reference_profile_fd.get(),class_loader_context);_exit(68);   /* only get here on exec failure */} else {int res = wait_child(pid);if (res == 0) {ALOGV("DexInv: --- END '%s' (success) ---\n", dex_path);} else {ALOGE("DexInv: --- END '%s' --- status=0x%04x, process failed\n", dex_path, res);return res;}}update_out_oat_access_times(dex_path, out_oat_path);// We've been successful, don't delete output.out_oat_fd.SetCleanup(false);out_vdex_fd.SetCleanup(false);image_fd.SetCleanup(false);reference_profile_fd.SetCleanup(false);return 0;
}
函数dexopt首先是读取系统属性persist.sys.dalvik.vm.lib的值,接着在/data/dalvik-cache目录中创建一个odex文件。这个odex文件就是作为dex文件优化后的输出文件。再接下来,函数dexopt通过fork来创建一个子进程,那么该子进程就会调用函数run_dexopt来将dex文件优化成odex文件。另一方面
这两个函数定义在文件frameworks/native/cmds/installd/commands.c中。
这从里就可以看出,函数run_dexopt通过调用/system/bin/dexopt来对dex字节码进行优化,而函数run_dex2oat通过调用/system/bin/dex2oat来将dex字节码翻译成本地机器码。注意,无论是对dex字节码进行优化,还是将dex字节码翻译成本地机器码,最终得到的结果都是保存在相同名称的一个odex文件里面的,但是前者对应的是一个dey文件(表示这是一个优化过的dex),后者对应的是一个oat文件(实际上是一个自定义的elf文件,里面包含的都是本地机器指令)。通过这种方式,原来任何通过绝对路径引用了该odex文件的代码就都不需要修改了。
通过上面的分析,我们就很容易知道,只需要将dex文件的优化过程替换成dex文件翻译成本地机器码的过程,就可以轻松地在应用安装过程,无缝地将Dalvik虚拟机替换成ART运行时。
最后,还有一个地方需要注意的是,应用程序的安装发生在两个时机,第一个时机是系统启动的时候,第二个时机系统启动完成后用户自行安装的时候。在第一个时机中,系统除了会对/system/app和/data/app目录下的所有APK进行dex字节码到本地机器码的翻译之外,还会对/system/framework目录下的APK或者JAR文件,以及这些APK所引用的外部JAR,进行dex字节码到本地机器码的翻译。这样就可以保证除了应用之外,系统中使用Java来开发的系统服务,也会统一地从dex字节码翻译成本地机器码。也就是说,将Android系统中的Dalvik虚拟机替换成ART运行时之后,系统中的代码都是由ART运行时来执行的了,这时候就不会对Dalvik虚拟机产生任何的依赖。
至此,我们就分析完成ART运行时无缝替换Dalvik虚拟机的过程了