(六——下)RestAPI 毛子(Http resilience/Refit/游标分页/异步大文件上传)
文章目录
- 项目地址
- 一、Refit
- 1.1 安装需要的包
- 1.2 创建接口IGitHubApi
- 1.3 创建RefitGitHubService
- 1. 实现接口
- 2. 注册服务
- 1.4 修改使用方法
- 二、Http resilience
- 2.1 安装所需要的包
- 2.2 创建resilience pipeline简单版
- 2.3 创建全局的resilience处理
- 1. 创建清理全局ResilienceHandler
- 2. 添加全局resilience
- 3. 添加自定义的resilience策略
- 4. 使用自定义策略
- 三、游标分页
- 3.1 创建所需要的DTOs
- 1. 创建游标分页的请求参数
- 2. 创建CollectionResponse
- 3. 添加游标编码和解码的DTO
- 3.2 创建游标查询的Controller
- 1. 传入带游标的query
- 2. 对query里的游标解码查询
- 3. 数据查询逻辑
- 2.3 测试
- 四、异步大文件上传
- 4.1 创建Entities
- 1. 修改之前的Entry实体
- 2. EntryImportJob
- 3. 数据库迁移
- 4.2 创建DTOs
- 4.3 创建ProcessEntryImportJob
项目地址
- 教程作者:
- 教程地址:
- 代码仓库地址:
- 所用到的框架和插件:
dbt
airflow
一、Refit
可以发起Http请求用于替换我们自己手动写的获取githup外部app服务的方法
1.1 安装需要的包

1.2 创建接口IGitHubApi
- 用 Refit 自动帮你生成访问 GitHub API 的客户端
namespace DevHabit.Api.Services;//每次调用这个接口的时候,自动给 HTTP 请求带上这两个头
[Headers("User-Agent: DevHabit/1.0", "Accept: application/vnd.github+json")]
public interface IGitHubApi
{[Get("/user")] //GET 请求,访问的是 GitHub API 的 /user 路径Task<ApiResponse<GitHubUserProfileDto>> GetUserProfile([Authorize(scheme: "Bearer")] string accessToken, //自动添加jwt Token在请求头中CancellationToken cancellationToken = default);[Get("/users/{username}/events")] //GET 请求,访问的是 GitHub API 的 /users/{username}/events 路径Task<ApiResponse<IReadOnlyList<GitHubEventDto>>> GetUserEvents(string username,[Authorize(scheme: "Bearer")] string accessToken, // accessToken自动插到请求头里(带身份认证)int page = 1,[AliasAs("per_page")] int perPage = 100, //告诉RefitGitHub API 要求参数名是 per_page(不是 C# 里的驼峰 PerPageCancellationToken cancellationToken = default);
}
1.3 创建RefitGitHubService
1. 实现接口
- 实现接口方法的地方
using System.Net.Http.Headers;
using DevHabit.Api.DTOs.GitHub;
using Newtonsoft.Json;
using Refit;namespace DevHabit.Api.Services;public sealed class RefitGitHubService(IGitHubApi gitHubApi, ILogger<GitHubService> logger)
{public async Task<GitHubUserProfileDto?> GetUserProfileAsync(string accessToken,CancellationToken cancellationToken = default){ArgumentException.ThrowIfNullOrEmpty(accessToken);ApiResponse<GitHubUserProfileDto> response = await gitHubApi.GetUserProfile(accessToken, cancellationToken);if (!response.IsSuccessStatusCode){logger.LogWarning("Failed to get user profile from GitHub. Status code: {StatusCode}", response.StatusCode);return null;}return response.Content;}public async Task<IReadOnlyList<GitHubEventDto>?> GetUserEventsAsync(string username,string accessToken,int page = 1,int perPage = 100,CancellationToken cancellationToken = default){ArgumentException.ThrowIfNullOrEmpty(accessToken);ArgumentException.ThrowIfNullOrEmpty(username);ApiResponse<IReadOnlyList<GitHubEventDto>> response =await gitHubApi.GetUserEvents(username,accessToken,page,perPage,cancellationToken);if (!response.IsSuccessStatusCode){logger.LogWarning("Failed to get user events from GitHub. Status code: {StatusCode}", response.StatusCode);return null;}return response.Content;}
}
2. 注册服务
- 注册该服务在DependencyInjection

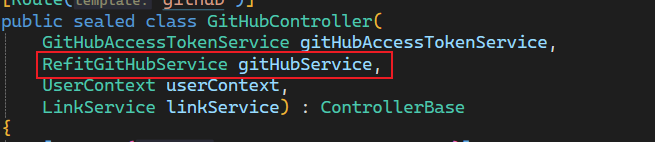
1.4 修改使用方法
- 替换之前使用githubService方法的Controller
二、Http resilience
- 请求上面接口,有时候会出现问题,我们需要处理请求api接口的问题
2.1 安装所需要的包

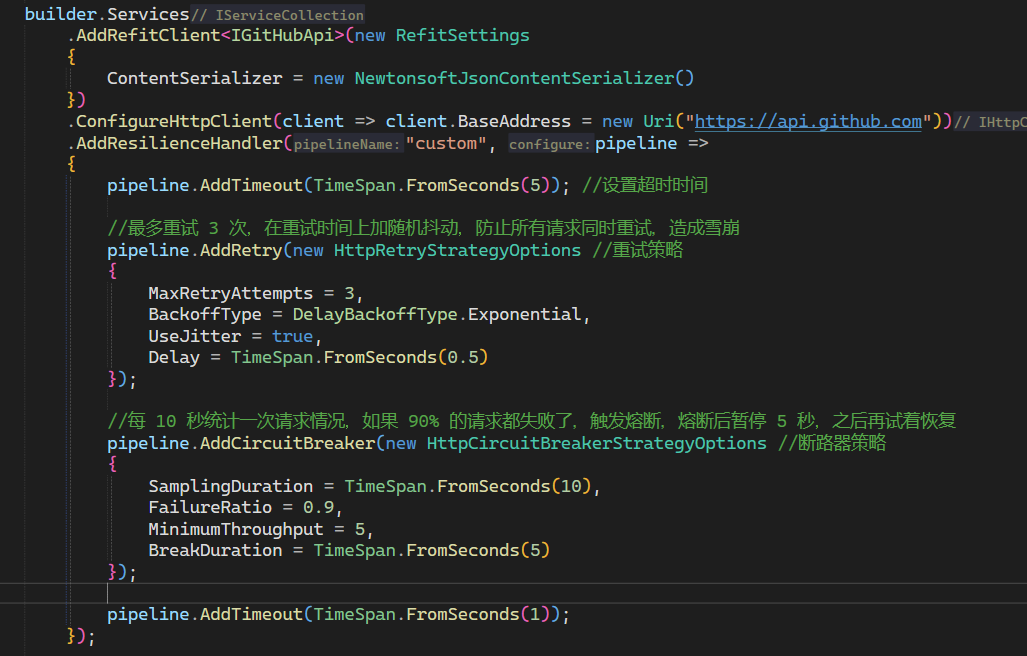
2.2 创建resilience pipeline简单版
- 直接给需要使用的地方添加,这里我们使用refit获取第三方github的api数据,所以在该服务后面添加
2.3 创建全局的resilience处理
1. 创建清理全局ResilienceHandler
- 如果我们配置了全局resilience,但是部分服务又想执行自己的熔断措施,就需要先清理当前全局的措施,在添加自己的
namespace DevHabit.Api.Extensions;
public static class ResilienceHttpClientBuilderExtensions
{public static IHttpClientBuilder InternalRemoveAllResilienceHandlers(this IHttpClientBuilder builder){builder.ConfigureAdditionalHttpMessageHandlers(static (handlers, _) =>{for (int i = handlers.Count - 1; i >= 0; i--){if (handlers[i] is ResilienceHandler){handlers.RemoveAt(i);}}});return builder;}
}
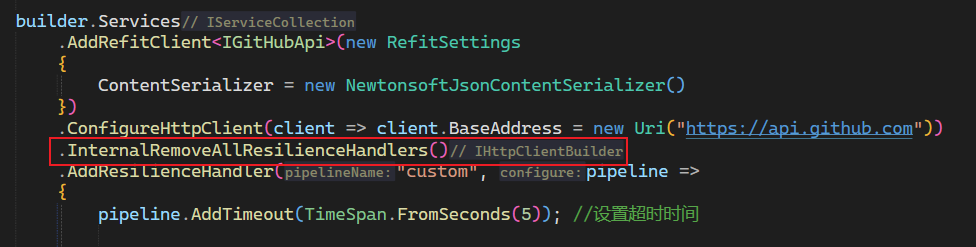
- 使用: 在需要清除的服务,先清除
2. 添加全局resilience
- 直接在服务里使用微软的包即可

3. 添加自定义的resilience策略
- 如果上面的包里的方法不够使用,我们可以添加自己的策略;
- 创建自己的测试策略:在 HttpClient 发送每一个请求前,强制延迟 10 秒再发送。
 namespace DevHabit.Api.Services;public sealed class DelayHandler : DelegatingHandler
{protected override async Task<HttpResponseMessage> SendAsync(HttpRequestMessage request,CancellationToken cancellationToken){await Task.Delay(10000, cancellationToken);return await base.SendAsync(request, cancellationToken);}
}
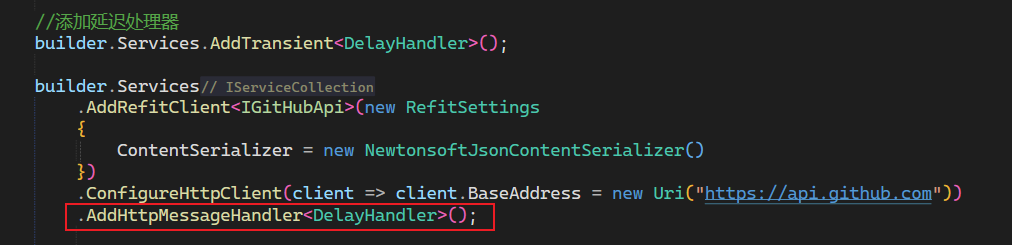
4. 使用自定义策略
三、游标分页
3.1 创建所需要的DTOs
1. 创建游标分页的请求参数
- Curor主要是一个index用来记录上一页的位置
namespace DevHabit.Api.DTOs.Entries;
public sealed record EntriesCursorQueryParameters : AcceptHeaderDto
{public string? Cursor { get; init; }public string? Fields { get; init; }public string? HabitId { get; init; }public DateOnly? FromDate { get; init; }public DateOnly? ToDate { get; init; }public EntrySource? Source { get; init; }public bool? IsArchived { get; init; }public int Limit { get; init; } = 10;
}
2. 创建CollectionResponse
- 该实体用来表示表示含有items和links的实体
namespace DevHabit.Api.DTOs.Common;
public sealed class CollectionResponse<T> : ICollectionResponse<T>, ILinksResponse
{public List<T> Items { get; init; }public List<LinkDto> Links { get; set; }
}
- 实例化该结构:

3. 添加游标编码和解码的DTO
- 将最后一条数据的Id和时间进行base64的编码和解码,防止数据泄密
namespace DevHabit.Api.DTOs.Entries;
public sealed record EntryCursorDto(string Id, DateOnly Date)
{//将一个游标(ID 和时间)编码为字符串,前端分页请求时可用public static string Encode(string id, DateOnly date){var cursor = new EntryCursorDto(id, date); // 创建一个游标对象string json = JsonSerializer.Serialize(cursor); // 序列化为 JSON 字符串return Base64UrlEncoder.Encode(Encoding.UTF8.GetBytes(json)); // 转成 Base64,避免 JSON 暴露或格式错误}public static EntryCursorDto Decode(string? cursor){if (string.IsNullOrWhiteSpace(cursor)){return null;}try{string json = Base64UrlEncoder.Decode(cursor); //解码 Base64 字符串return JsonSerializer.Deserialize<EntryCursorDto>(json); // 反序列化回游标对象}catch{return null;}}
}
3.2 创建游标查询的Controller
流程梳理:
1. 传入带游标的query
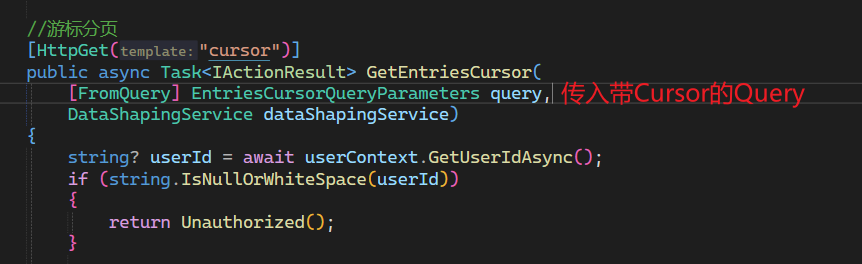
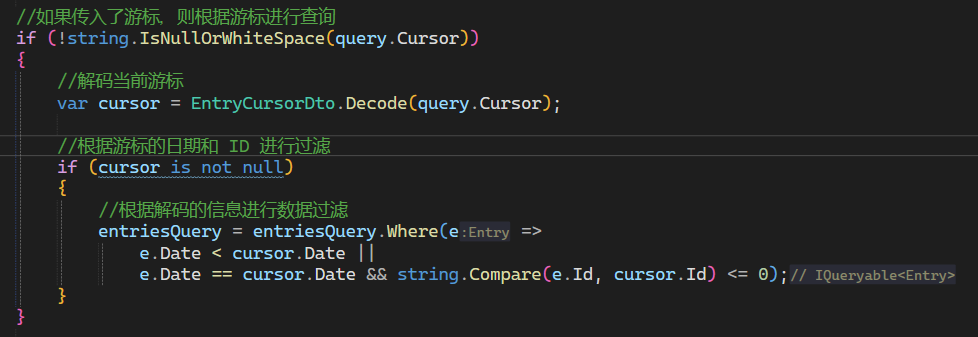
2. 对query里的游标解码查询
- 如果携带了游标,对游标进行解码,并且根据游标的信息查询数据
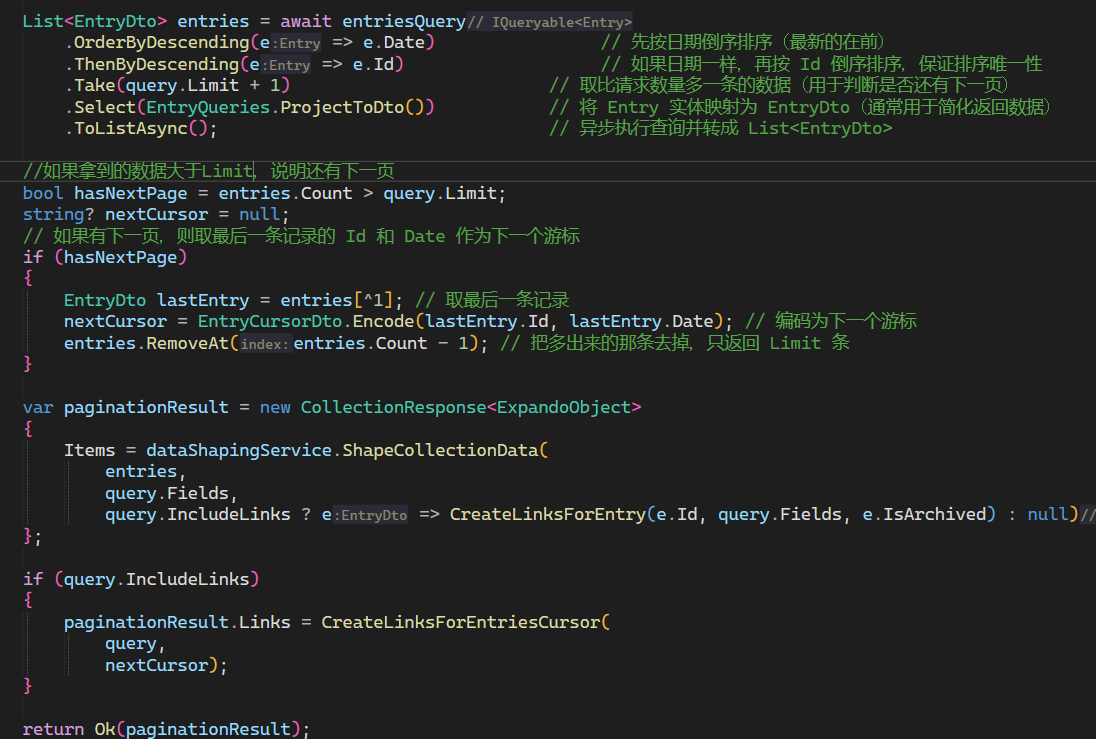
3. 数据查询逻辑
- 获取比Limit多的数据11条
- 如果数据大于10条,说明还有下一页
- 将最后一条数据的id和Date,编码为下一个游标
- 去除掉多余的+1的数据,保证每次10条
- 将数据返回给前端
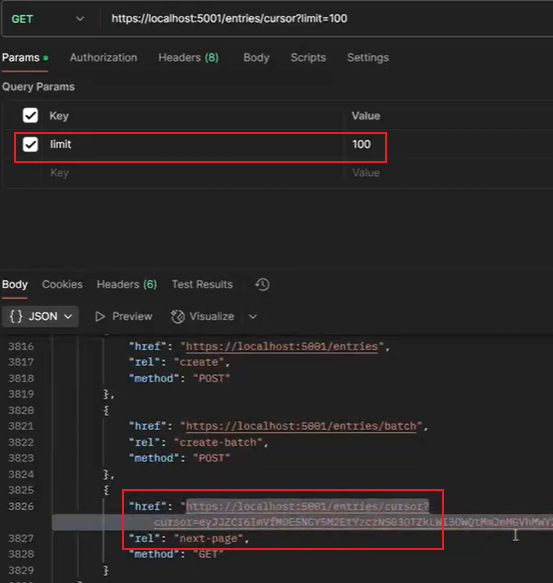
2.3 测试
- 当我们发起一个需要100条数据的请求,如果还有下一页的数据,将会得到有next-page的links
四、异步大文件上传
客户端发出请求后,服务器不会马上返回最终结果,而是告诉你正在处理中,让你稍后再来查询最终结果。
- 实现功能:前端上传页面不需要在上传文件页面等待,可以随时离开该页面;上传的文件会显示状态
4.1 创建Entities
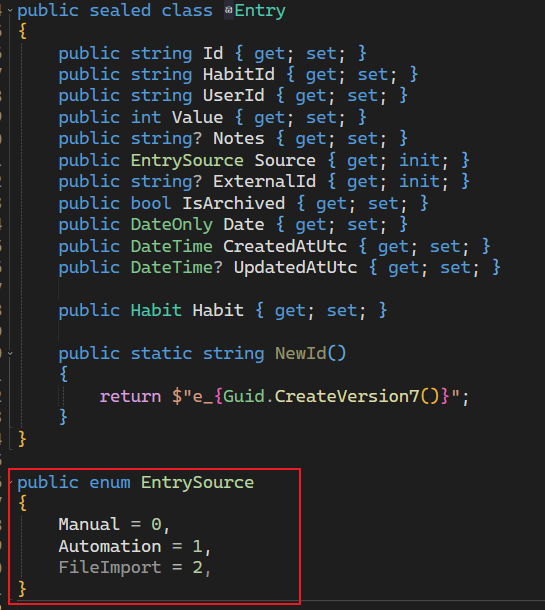
1. 修改之前的Entry实体
- 给Entry添加一个来源信息
EntrySource
2. EntryImportJob
- CSV实体
public sealed class EntryImportJob
{public string Id { get; set; }public string UserId { get; set; } // User who uploaded the filepublic EntryImportStatus Status { get; set; } // Status of the import jobpublic string FileName { get; set; } public byte[] FileContent { get; set; } //上传的文件内容(二进制数组,byte[])public int TotalRecords { get; set; } // Total number of records in the filepublic int ProcessedRecords { get; set; } // Number of records processed so farpublic int SuccessfulRecords { get; set; } // Number of records successfully importedpublic int FailedRecords { get; set; } // Number of records that failed to importpublic List<string> Errors { get; set; } = []; // List of errors encountered during importpublic DateTime CreatedAtUtc { get; set; } //   Creation time of the jobpublic DateTime? CompletedAtUtc { get; set; } // Completion time of the job (if applicable)public static string NewId(){return $"ei_{Guid.CreateVersion7()}";}
}public enum EntryImportStatus
{Pending,Processing,Completed,Failed
}
3. 数据库迁移
- 创建表的Configuration
- 添加表到数据库上下文
- 执行迁移
4.2 创建DTOs

- 转换字段
public sealed class CsvEntryRecord
{[Name("habit_id")]public required string HabitId { get; init; } //CSV 文件里叫 "habit_id" 的列,绑定到 HabitId 这个属性。[Name("date")]public required DateOnly Date { get; init; } //CSV 文件里叫 "date" 的列,绑定到 Date 这个属性。[Name("notes")]public string? Notes { get; init; } //CSV 文件里叫 "notes" 的列,绑定到 Notes 这个属性。
}
4.3 创建ProcessEntryImportJob
- 这是真正处理csv的地方
public sealed class ProcessEntryImportJob(ApplicationDbContext dbContext,ILogger<ProcessEntryImportJob> logger) : IJob //实现Quartz的IJob接口
{//Quartz会调用这个 Executepublic async Task Execute(IJobExecutionContext context){//1.IJobExecutionContext里获取importJobIdstring importJobId = context.MergedJobDataMap.GetString("importJobId")!;//2.从数据库查找对应的导入任务记录EntryImportJob? importJob = await dbContext.EntryImportJobs.FirstOrDefaultAsync(j => j.Id == importJobId);if (importJob is null){logger.LogError("Import job {ImportJobId} not found", importJobId);return;}try{//3. 找到了,就把状态改为 Processing,更改数据库字段importJob.Status = EntryImportStatus.Processing;await dbContext.SaveChangesAsync();using var memoryStream = new MemoryStream(importJob.FileContent);using var reader = new StreamReader(memoryStream);using var csv = new CsvReader(reader, CultureInfo.InvariantCulture);//4.一次性全部加载到内存了(如果文件大,这里有优化空间)var records = csv.GetRecords<CsvEntryRecord>().ToList();//5.获取总条数,并更新到数据库importJob.TotalRecords = records.Count;await dbContext.SaveChangesAsync();foreach (CsvEntryRecord record in records){try{// Validate that the habit exists and belongs to the userHabit? habit = await dbContext.Habits.FirstOrDefaultAsync(h => h.Id == record.HabitId && h.UserId == importJob.UserId);if (habit is null){throw new InvalidOperationException($"Habit with ID '{record.HabitId}' does not exist or does not belong to the user");}var entry = new Entry{Id = Entry.NewId(),UserId = importJob.UserId,HabitId = record.HabitId,Value = habit.Target.Value,Date = record.Date,Notes = record.Notes,Source = EntrySource.FileImport,CreatedAtUtc = DateTime.UtcNow};dbContext.Entries.Add(entry);importJob.SuccessfulRecords++;}catch (Exception ex){importJob.FailedRecords++;importJob.Errors.Add($"Error processing record: {ex.Message}");if (importJob.Errors.Count >= 100){importJob.Errors.Add("Too many errors, stopping error collection...");break;}}finally{importJob.ProcessedRecords++;}// Save progress periodicallyif (importJob.ProcessedRecords % 100 == 0){await dbContext.SaveChangesAsync();}}// Final saveimportJob.Status = EntryImportStatus.Completed;importJob.CompletedAtUtc = DateTime.UtcNow;await dbContext.SaveChangesAsync();}catch (Exception ex){logger.LogError(ex, "Error processing import job {ImportJobId}", importJobId);importJob.Status = EntryImportStatus.Failed;importJob.Errors.Add($"Fatal error: {ex.Message}");importJob.CompletedAtUtc = DateTime.UtcNow;await dbContext.SaveChangesAsync();}}
}
- 存在问题:
- 数据读取在内存中
- 数据是一条条写入的