基于MyBatis的银行转账系统开发实战:从环境搭建到动态代理实现
目标:
-
掌握mybatis在web应用中怎么用
-
mybatis三大对象的作用域和生命周期
-
ThreadLocal原理及使用
-
巩固MVC架构模式
-
为学习MyBatis的接口代理机制做准备
实现功能:
-
银行账户转账
使用技术:
-
HTML + Servlet + MyBatis
WEB应用的名称:
-
bank
一、需求描述

二、数据库表的设计和准备数据
create table t_act
(id bigint not null,actno varchar(255) null,balance decimal(15,2) null,constraint t_act_pkprimary key (id)
);
三、实现步骤
第一步:环境搭建
-
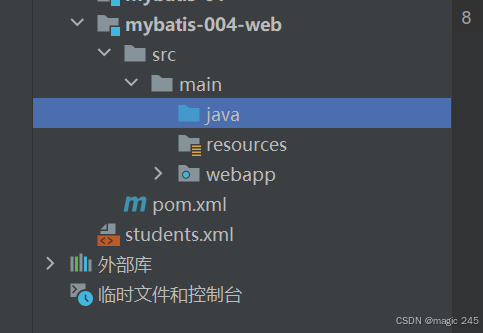
IDEA中创建Maven WEB应用(mybatis-004-web)
-
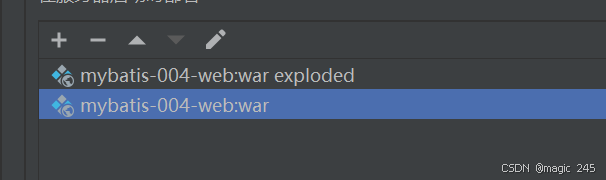
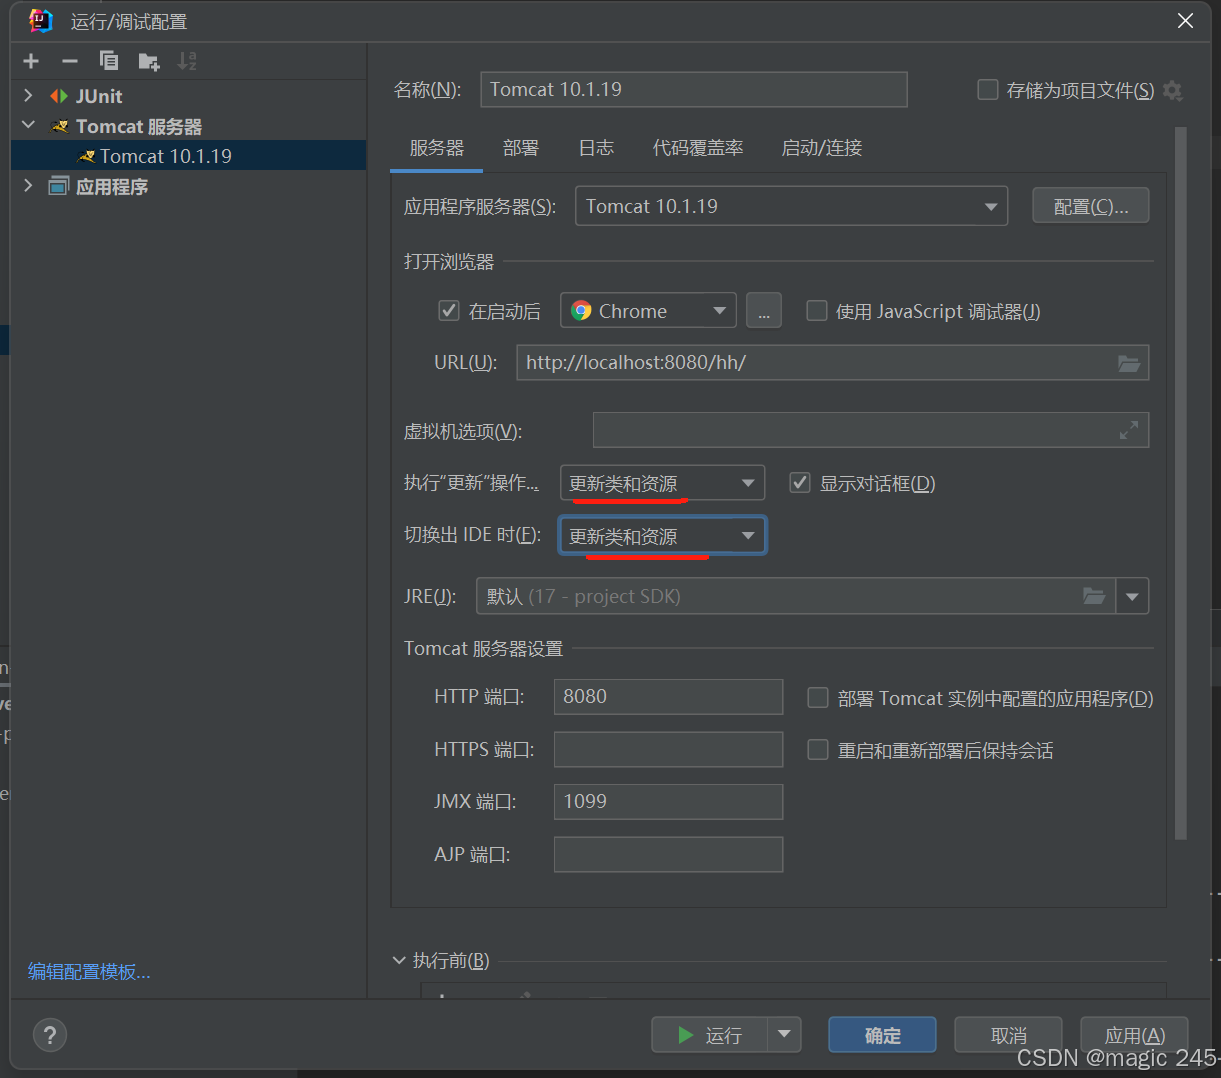
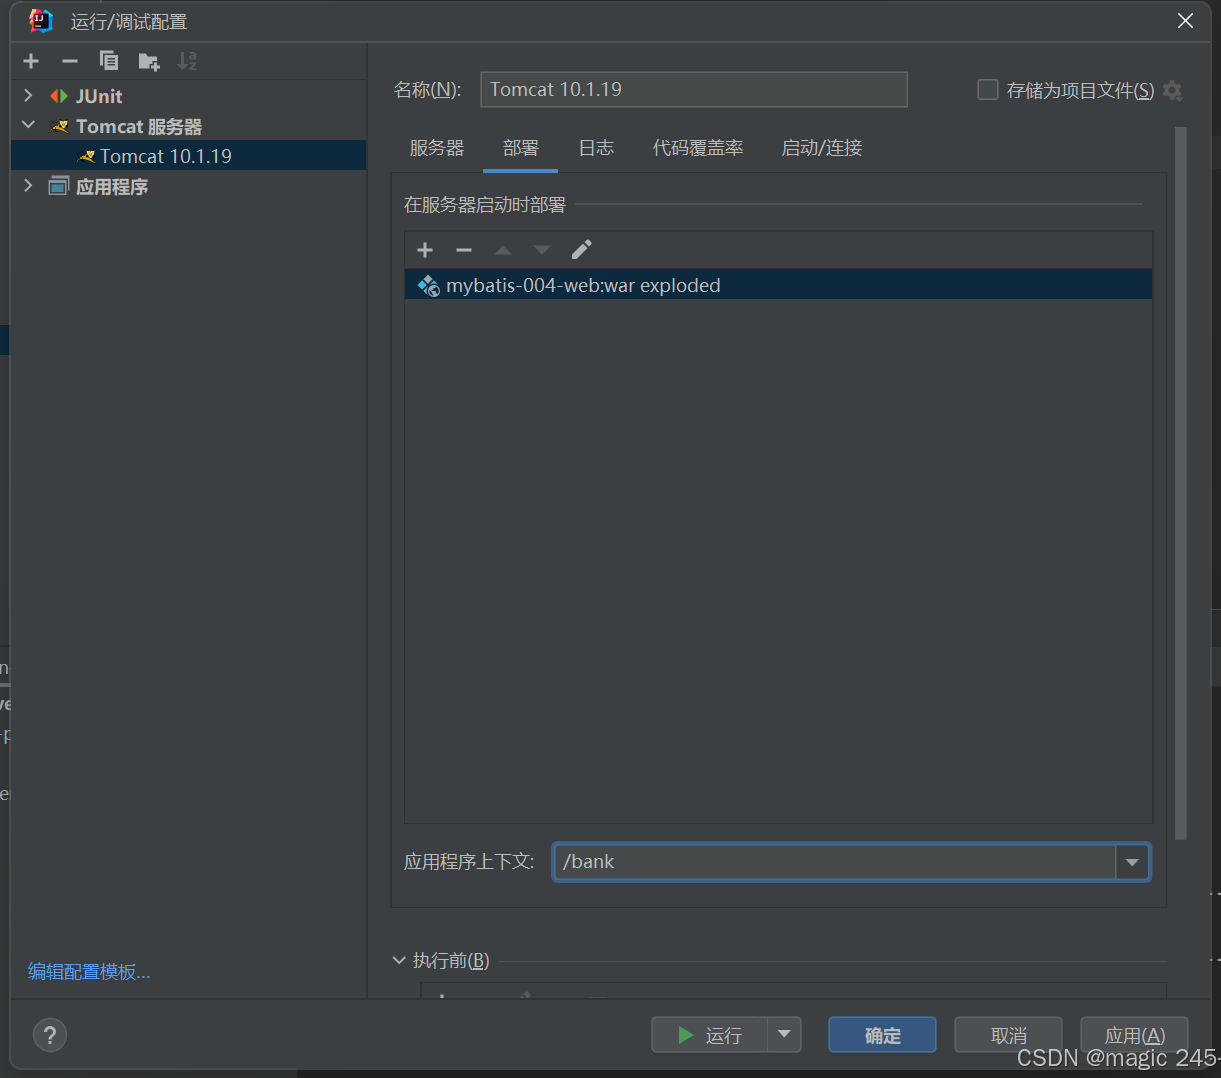
IDEA配置Tomcat,这里Tomcat使用10+版本。并部署应用到tomcat。
这2个有什么区别?
- 文件结构:
war exploded是展开式的 WAR 包,它以目录结构形式存在,其中的文件(如.class 文件、资源文件等)是直接可见、可编辑的;而war是压缩打包后的文件,所有内容被压缩在一个文件里。 - 部署和更新:
war exploded在开发阶段便于快速部署和热更新,修改文件后无需重新打包即可生效;war包部署时,每次修改内容后通常需重新打包再部署到服务器 。 - 应用场景:
war exploded更适合开发调试阶段,能提高开发效率;war包常用于生产环境部署,便于传输和管理,且占用空间相对较小。
-
默认创建的maven web应用没有java和resources目录,包括两种解决方案
-
第一种:自己手动加上。
-
-
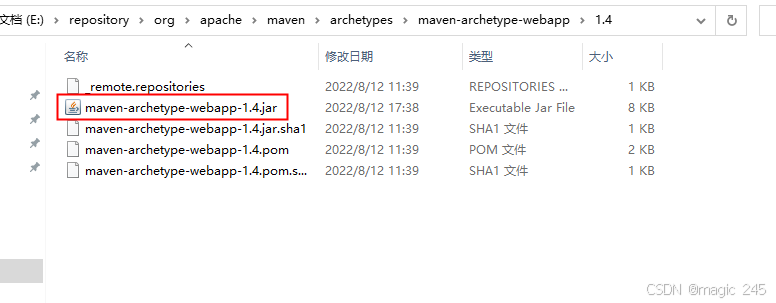
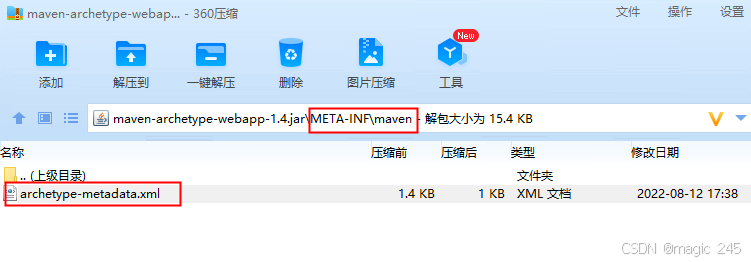
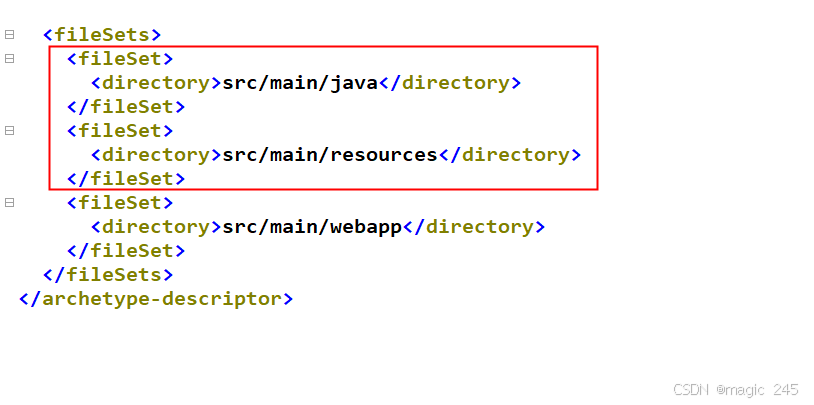
第二种:修改maven-archetype-webapp-1.4.jar中的配置文件
-
web.xml文件的版本较低,可以从tomcat10的样例文件中复制,然后修改

改为false是支持配置文件,同时支持注解
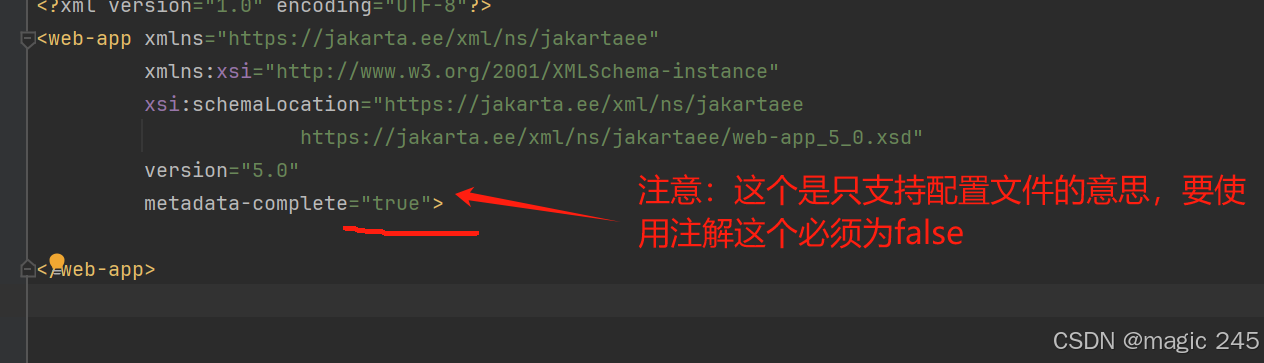
<?xml version="1.0" encoding="UTF-8"?>
<web-app xmlns="https://jakarta.ee/xml/ns/jakartaee"xmlns:xsi="http://www.w3.org/2001/XMLSchema-instance"xsi:schemaLocation="https://jakarta.ee/xml/ns/jakartaeehttps://jakarta.ee/xml/ns/jakartaee/web-app_5_0.xsd"version="5.0"metadata-complete="true"></web-app>-
删除index.jsp文件,因为我们这个项目不使用JSP。只使用html。
-
确定pom.xml文件中的打包方式是war包。
-
引入相关依赖
-
编译器版本修改为17
-
引入的依赖包括:mybatis,mysql驱动,junit,logback,servlet。
-
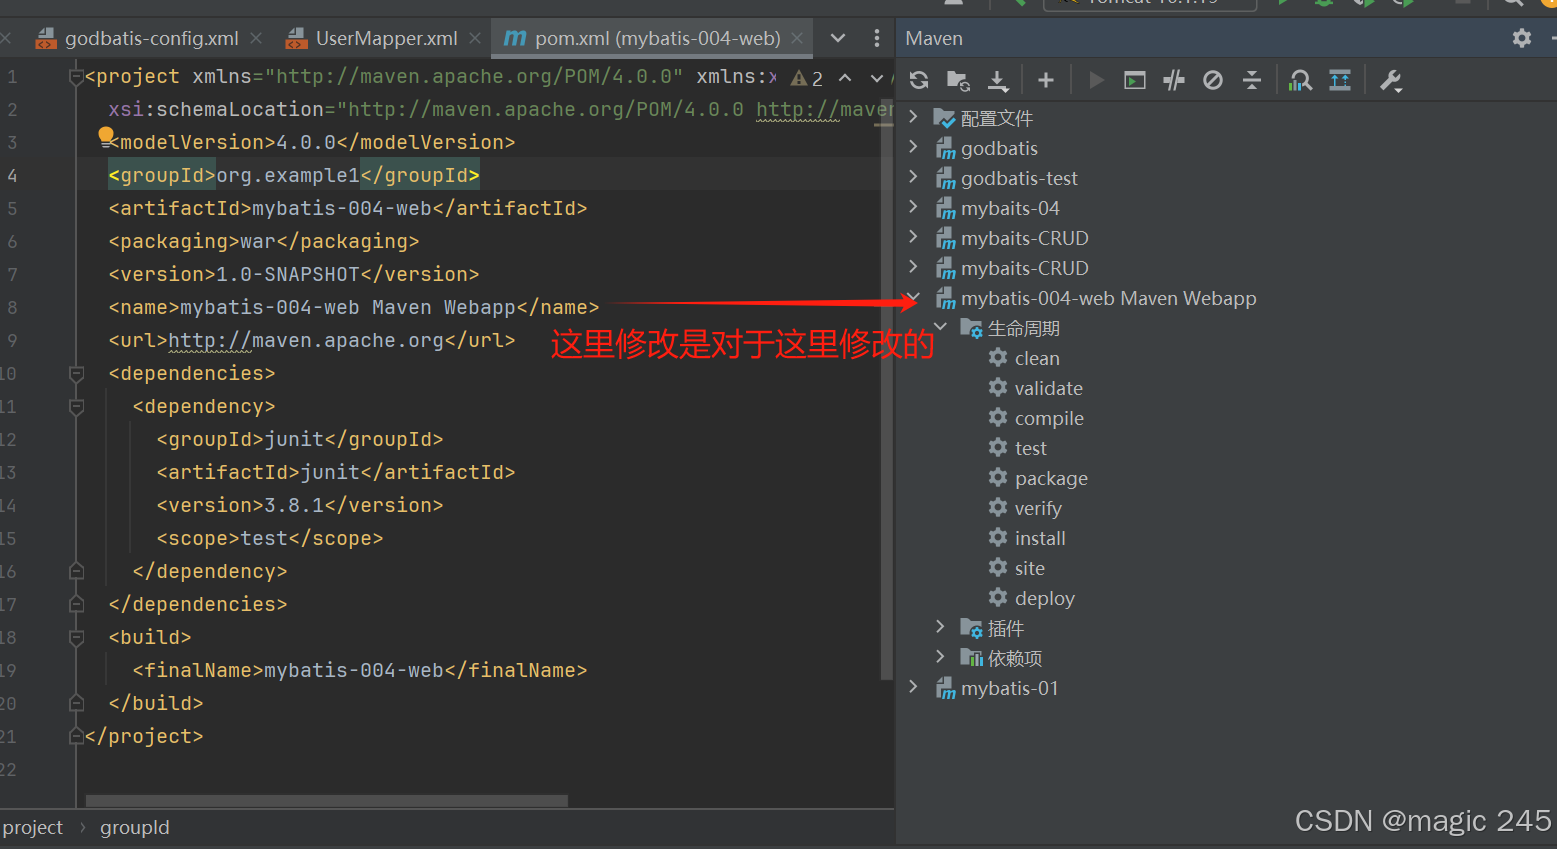
<project xmlns="http://maven.apache.org/POM/4.0.0" xmlns:xsi="http://www.w3.org/2001/XMLSchema-instance"xsi:schemaLocation="http://maven.apache.org/POM/4.0.0 http://maven.apache.org/maven-v4_0_0.xsd"><modelVersion>4.0.0</modelVersion><groupId>org.example1</groupId><artifactId>mybatis-004-web</artifactId><packaging>war</packaging><version>1.0-SNAPSHOT</version><name>mybatis-004-web Maven Webapp</name><url>http://maven.apache.org</url><dependencies><!--mybatis依赖--><dependency><groupId>org.mybatis</groupId><artifactId>mybatis</artifactId><version>3.5.10</version></dependency><!--mysql驱动依赖--><dependency><groupId>mysql</groupId><artifactId>mysql-connector-java</artifactId><version>8.0.30</version></dependency><!--junit依赖--><dependency><groupId>junit</groupId><artifactId>junit</artifactId><version>4.13.2</version><scope>test</scope></dependency><!--logback依赖--><dependency><groupId>ch.qos.logback</groupId><artifactId>logback-classic</artifactId><version>1.2.11</version></dependency><!--servlet依赖--><dependency><groupId>jakarta.servlet</groupId><artifactId>jakarta.servlet-api</artifactId><version>5.0.0</version><scope>provided</scope></dependency></dependencies><build><finalName>mybatis-004-web</finalName></build>
</project>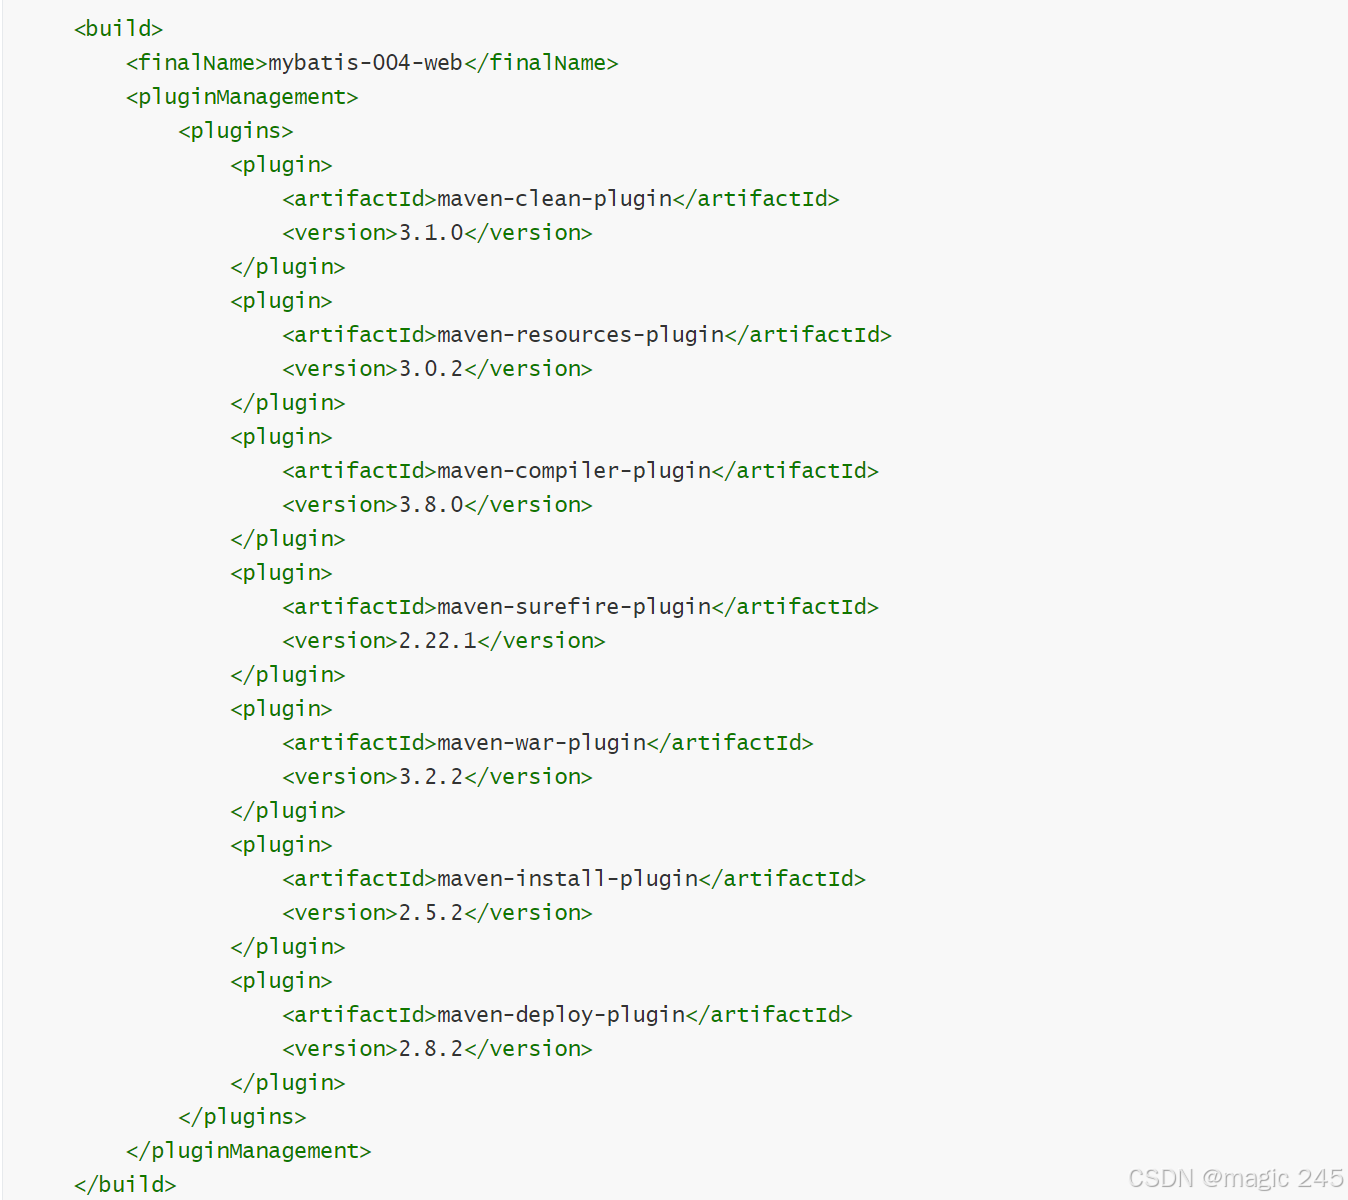
这些是干什么用的
这段代码是 Maven 项目配置文件(pom.xml)中的 <build> 部分,主要用于定义项目构建过程的配置和插件管理。以下是各部分的作用:
1. <finalName>
xml
<finalName>mybatis-004-web</finalName>
- 作用:指定项目打包后的文件名(不带扩展名)。
- 示例:若打包为 WAR 文件,最终会生成
mybatis-004-web.war。 - 默认行为:若不配置,Maven 会使用
artifactId-version作为文件名(如mybatis-004-web-1.0-SNAPSHOT.war)。
2. <pluginManagement>
xml
<pluginManagement><plugins><!-- 各种插件配置 --></plugins>
</pluginManagement>
- 作用:统一管理插件的版本和配置,但不会直接执行,需要在子模块中显式引用才会生效。
- 目的:避免多个子模块中重复配置相同插件,确保版本一致性。
3. 各插件的作用
(1)maven-clean-plugin
xml
<plugin><artifactId>maven-clean-plugin</artifactId><version>3.1.0</version>
</plugin>
- 作用:清理项目生成的临时文件(如
target目录)。 - 常用命令:
mvn clean。
(2)maven-resources-plugin
xml
<plugin><artifactId>maven-resources-plugin</artifactId><version>3.0.2</version>
</plugin>
- 作用:复制项目资源文件(如
src/main/resources下的配置文件)到输出目录。
(3)maven-compiler-plugin
xml
<plugin><artifactId>maven-compiler-plugin</artifactId><version>3.8.0</version>
</plugin>
- 作用:编译 Java 源代码(
src/main/java)为字节码(.class文件)。 - 常见配置:可指定 Java 版本(如
<source>11</source>和<target>11</target>)。
(4)maven-surefire-plugin
xml
<plugin><artifactId>maven-surefire-plugin</artifactId><version>2.22.1</version>
</plugin>
- 作用:运行单元测试(
src/test/java下的测试类)。 - 常用命令:
mvn test。
(5)maven-war-plugin
xml
<plugin><artifactId>maven-war-plugin</artifactId><version>3.2.2</version>
</plugin>
- 作用:将 Web 项目打包为 WAR 文件,用于部署到 Tomcat 等容器。
- 默认配置:会自动包含
src/main/webapp下的 Web 资源。
(6)maven-install-plugin
xml
<plugin><artifactId>maven-install-plugin</artifactId><version>2.5.2</version>
</plugin>
- 作用:将项目打包后的文件安装到本地 Maven 仓库(
~/.m2/repository),供其他本地项目依赖。 - 常用命令:
mvn install。
(7)maven-deploy-plugin
xml
<plugin><artifactId>maven-deploy-plugin</artifactId><version>2.8.2</version>
</plugin>
- 作用:将项目部署到远程 Maven 仓库(如 Nexus),供团队共享。
- 常用命令:
mvn deploy(需配置仓库地址和权限)。
-
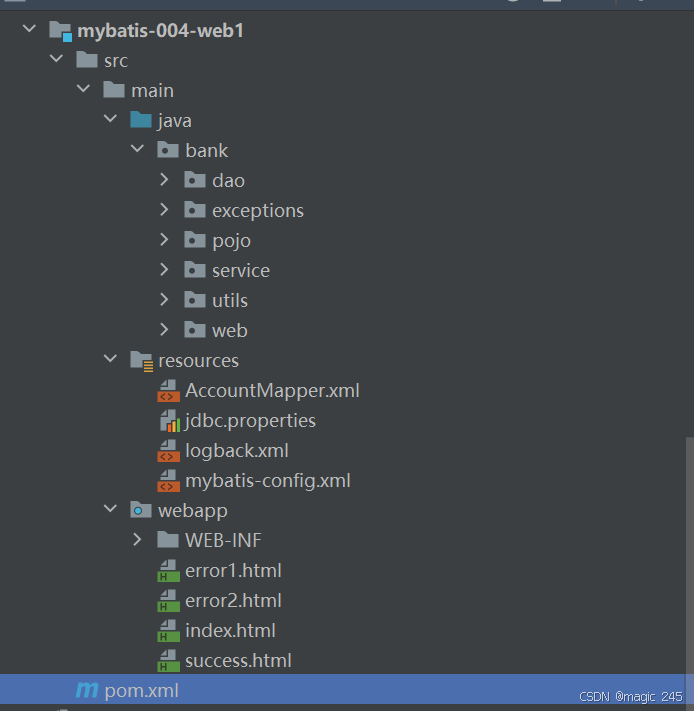
引入相关配置文件,放到resources目录下(全部放到类的根路径下)
-
mybatis-config.xml
-
AccountMapper.xml
-
logback.xml
-
jdbc.properties
-
jdbc.driver=com.mysql.cj.jdbc.Driver
jdbc.url=jdbc:mysql://localhost:3306/jdbc
jdbc.username=root
jdbc.password=abc123
<?xml version="1.0" encoding="UTF-8" ?>
<!DOCTYPE configurationPUBLIC "-//mybatis.org//DTD Config 3.0//EN""http://mybatis.org/dtd/mybatis-3-config.dtd">
<configuration><properties resource="jdbc.properties"/><environments default="dev"><environment id="dev"><transactionManager type="JDBC"/><dataSource type="POOLED"><property name="driver" value="${jdbc.driver}"/><property name="url" value="${jdbc.url}"/><property name="username" value="${jdbc.username}"/><property name="password" value="${jdbc.password}"/></dataSource></environment></environments><mappers><!--一定要注意这里的路径哦!!!--><mapper resource="AccountMapper.xml"/></mappers>
</configuration><?xml version="1.0" encoding="UTF-8" ?>
<!DOCTYPE mapperPUBLIC "-//mybatis.org//DTD Mapper 3.0//EN""http://mybatis.org/dtd/mybatis-3-mapper.dtd"><mapper namespace="account"></mapper>第二步:前端页面index.html
<!DOCTYPE html>
<html lang="en">
<head><meta charset="UTF-8"><title>银行账户转账</title>
</head>
<body>
<!--/bank是应用的根,部署web应用到tomcat的时候一定要注意这个名字-->
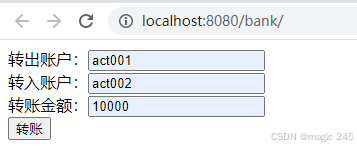
<form action="/bank/transfer" method="post">转出账户:<input type="text" name="fromActno"/><br>转入账户:<input type="text" name="toActno"/><br>转账金额:<input type="text" name="money"/><br><input type="submit" value="转账"/>
</form>
</body>
</html>第三步:创建pojo包、service包、dao包、web包、utils包
第四步:定义pojo类:Account
package bank.pojo;/*** 账户类,封装账户数据。*/
public class Account {private Long id;private String actno;private Double balance;@Overridepublic String toString() {return "Account{" +"id=" + id +", actno='" + actno + '\'' +", balance=" + balance +'}';}public Long getId() {return id;}public void setId(Long id) {this.id = id;}public String getActno() {return actno;}public void setActno(String actno) {this.actno = actno;}public Double getBalance() {return balance;}public void setBalance(Double balance) {this.balance = balance;}public Account(Long id, String actno, Double balance) {this.id = id;this.actno = actno;this.balance = balance;}public Account() {}
}
第五步:编写AccountDao接口,以及AccountDaoImpl实现类
分析dao中至少要提供几个方法,才能完成转账:
-
转账前需要查询余额是否充足:selectByActno
-
转账时要更新账户:update
package bank.dao;import bank.pojo.Account;/*** 账户的DAO对象。负责t_act表中数据的CRUD.* 强调一下:DAO对象中的任何一个方法和业务不挂钩。没有任何业务逻辑在里面。* DAO中的方法就是做CRUD的。所以方法名大部分是:insertXXX deleteXXX updateXXX selectXXX*/
public interface AccountDao {/*** 根据账号查询账户信息。* @param actno 账号* @return 账户信息*/Account selectByActno(String actno);/*** 更新账户信息* @param act  被更新的账户对象* @return 1表示更新成功,其他值表示失败。*/int updateByActno(Account act);}
package bank.dao.impl;import bank.dao.AccountDao;
import bank.pojo.Account;
import bank.utils.SqlSessionUtil;
import org.apache.ibatis.session.SqlSession;public class AccountDaoImpl implements AccountDao {@Overridepublic Account selectByActno(String actno) {SqlSession sqlSession = SqlSessionUtil.openSession();Account act = (Account)sqlSession.selectOne("selectByActno", actno);sqlSession.close();return act;}@Overridepublic int update(Account act) {SqlSession sqlSession = SqlSessionUtil.openSession();int count = sqlSession.update("update", act);sqlSession.commit();sqlSession.close();return count;}
}第六步:AccountDaoImpl中编写了mybatis代码,需要编写SQL映射文件了
<?xml version="1.0" encoding="UTF-8" ?>
<!DOCTYPE mapperPUBLIC "-//mybatis.org//DTD Mapper 3.0//EN""http://mybatis.org/dtd/mybatis-3-mapper.dtd"><!--sqlMapper.xml文件的编写者,提供者是谁?使用你mybatis框架的java程序员负责提供的。-->
<!--要想使用这种机制:namespace必须是dao接口的全限定名称。-->
<mapper namespace="bank.dao.AccountDao"><!--要想使用这种机制:id必须是dao接口的方法名。--><select id="selectByActno" resultType="bank.pojo.Account">select * from t_act where actno = #{actno}</select><update id="updateByActno">update t_act set balance = #{balance} where actno = #{actno}</update></mapper>
第七步:编写AccountService接口以及AccountServiceImpl
package bank.exceptions;/*** 余额不足异常。*/
public class MoneyNotEnoughException extends Exception {public MoneyNotEnoughException(){}public MoneyNotEnoughException(String msg){super(msg);}
}
package bank.exceptions;/*** 转账异常*/
public class TransferException extends Exception{public TransferException(){}public TransferException(String msg){}
}
import bank.exceptions.MoneyNotEnoughException;
import bank.exceptions.TransferException;/*** 注意:业务类当中的业务方法的名字在起名的时候,最好见名知意,能够体现出具体的业务是做什么的。* 账户业务类*/
public interface AccountService {/*** 账户转账业务。* @param fromActno 转出账号* @param toActno 转入账号* @param money 转账金额*/void transfer(String fromActno, String toActno, double money) throws MoneyNotEnoughException, TransferException;}
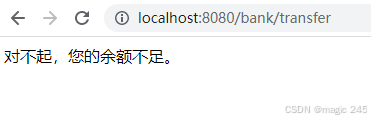
public class AccountServiceImpl implements AccountService {private AccountDao accountDao = new AccountDaoImpl();@Overridepublic void transfer(String fromActno, String toActno, double money) throws MoneyNotEnoughException, AppException {// 查询转出账户的余额Account fromAct = accountDao.selectByActno(fromActno);if (fromAct.getBalance() < money) {throw new MoneyNotEnoughException("对不起,您的余额不足。");}try {// 程序如果执行到这里说明余额充足// 修改账户余额Account toAct = accountDao.selectByActno(toActno);fromAct.setBalance(fromAct.getBalance() - money);toAct.setBalance(toAct.getBalance() + money);// 更新数据库accountDao.update(fromAct);accountDao.update(toAct);} catch (Exception e) {throw new AppException("转账失败,未知原因!");}}
}
SQLSessionUtil类
import java.io.IOException;/*** MyBatis工具类*/
public class SqlSessionUtil {// 工具类的构造方法一般都是私有化的。// 工具类中所有的方法都是静态的,直接采用类名即可调用。不需要new对象。// 为了防止new对象,构造方法私有化。private SqlSessionUtil(){}private static SqlSessionFactory sqlSessionFactory;// 类加载时执行// SqlSessionUtil工具类在进行第一次加载的时候,解析mybatis-config.xml文件。创建SqlSessionFactory对象。static {try {sqlSessionFactory = new SqlSessionFactoryBuilder().build(Resources.getResourceAsStream("mybatis-config.xml"));} catch (IOException e) {throw new RuntimeException(e);}}/*** 获取会话对象。* @return 会话对象*/public static SqlSession openSession(){return sqlSessionFactory.openSession();}}
第八步:编写AccountController(Web)
package bank.web;import bank.exceptions.MoneyNotEnoughException;
import bank.exceptions.TransferException;
import bank.service.AccountService;
import bank.service.impl.AccountServiceImpl;
import jakarta.servlet.ServletException;
import jakarta.servlet.annotation.WebServlet;
import jakarta.servlet.http.HttpServlet;
import jakarta.servlet.http.HttpServletRequest;
import jakarta.servlet.http.HttpServletResponse;import java.io.IOException;@WebServlet("/transfer")
public class AccountServlet extends HttpServlet {// 为了让这个对象在其他方法中也可以用。声明为实例变量。private AccountService accountService = new AccountServiceImpl();@Overrideprotected void doPost(HttpServletRequest request, HttpServletResponse response)throws ServletException, IOException {// 获取表单数据String fromActno = request.getParameter("fromActno");String toActno = request.getParameter("toActno");double money = Double.parseDouble(request.getParameter("money"));try {// 调用service的转账方法完成转账。(调业务层)accountService.transfer(fromActno, toActno, money);// 程序能够走到这里,表示转账一定成功了。// 调用View完成展示结果。response.sendRedirect(request.getContextPath() + "/success.html");} catch (MoneyNotEnoughException e) {response.sendRedirect(request.getContextPath() + "/error1.html");} catch (TransferException e) {response.sendRedirect(request.getContextPath() + "/error2.html");} catch (Exception e){response.sendRedirect(request.getContextPath() + "/error2.html");}}}
4.MyBatis对象作用域以及事务问题
⑴MyBatis核心对象的作用域
SqlSessionFactoryBuilder
这个类可以被实例化、使用和丢弃,一旦创建了 SqlSessionFactory,就不再需要它了。 因此 SqlSessionFactoryBuilder 实例的最佳作用域是方法作用域(也就是局部方法变量)。 你可以重用 SqlSessionFactoryBuilder 来创建多个 SqlSessionFactory 实例,但最好还是不要一直保留着它,以保证所有的 XML 解析资源可以被释放给更重要的事情。
SqlSessionFactory
SqlSessionFactory 一旦被创建就应该在应用的运行期间一直存在,没有任何理由丢弃它或重新创建另一个实例。 使用 SqlSessionFactory 的最佳实践是在应用运行期间不要重复创建多次,多次重建 SqlSessionFactory 被视为一种代码“坏习惯”。因此 SqlSessionFactory 的最佳作用域是应用作用域。 有很多方法可以做到,最简单的就是使用单例模式或者静态单例模式。
SqlSession
每个线程都应该有它自己的 SqlSession 实例。SqlSession 的实例不是线程安全的,因此是不能被共享的,所以它的最佳的作用域是请求或方法作用域。 绝对不能将 SqlSession 实例的引用放在一个类的静态域,甚至一个类的实例变量也不行。 也绝不能将 SqlSession 实例的引用放在任何类型的托管作用域中,比如 Servlet 框架中的 HttpSession。 如果你现在正在使用一种 Web 框架,考虑将 SqlSession 放在一个和 HTTP 请求相似的作用域中。 换句话说,每次收到 HTTP 请求,就可以打开一个 SqlSession,返回一个响应后,就关闭它。 这个关闭操作很重要,为了确保每次都能执行关闭操作,你应该把这个关闭操作放到 finally 块中。 下面的示例就是一个确保 SqlSession 关闭的标准模式:
try (SqlSession session = sqlSessionFactory.openSession()) {// 你的应用逻辑代码
}
⑵.事务问题
在之前的转账业务中,更新了两个账户,我们需要保证它们的同时成功或同时失败,这个时候就需要使用事务机制,在transfer方法开始执行时开启事务,直到两个更新都成功之后,再提交事务,我们尝试将transfer方法进行如下修改:
public class AccountServiceImpl implements AccountService {private AccountDao accountDao = new AccountDaoImpl();@Overridepublic void transfer(String fromActno, String toActno, double money) throws MoneyNotEnoughException, AppException {// 查询转出账户的余额Account fromAct = accountDao.selectByActno(fromActno);if (fromAct.getBalance() < money) {throw new MoneyNotEnoughException("对不起,您的余额不足。");}try {// 程序如果执行到这里说明余额充足// 修改账户余额Account toAct = accountDao.selectByActno(toActno);fromAct.setBalance(fromAct.getBalance() - money);toAct.setBalance(toAct.getBalance() + money);// 更新数据库(添加事务)SqlSession sqlSession = SqlSessionUtil.openSession();accountDao.update(fromAct);// 模拟异常String s = null;s.toString();accountDao.update(toAct);sqlSession.commit();sqlSession.close();} catch (Exception e) {throw new AppException("转账失败,未知原因!");}}
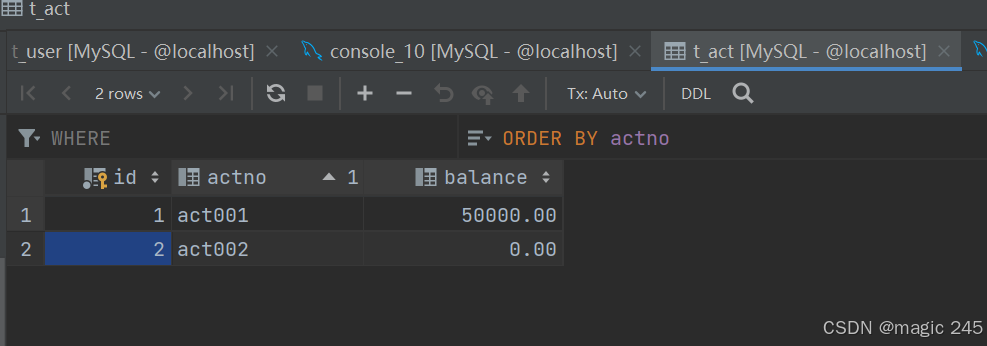
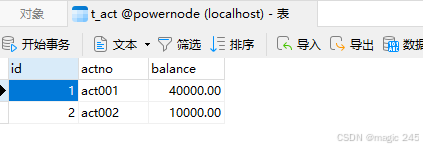
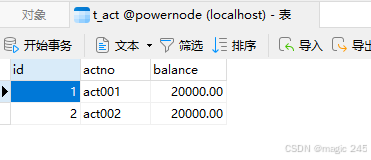
}运行前注意看数据库表中当前的数据:
执行程序:

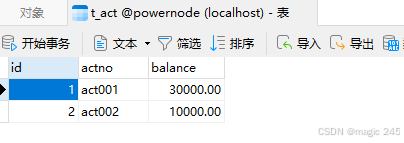
再次查看数据库表中的数据:

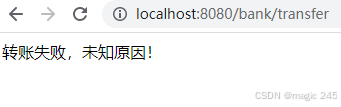
傻眼了吧!!!事务出问题了,转账失败了,钱仍然是少了1万。这是什么原因呢?主要是因为service和dao中使用的SqlSession对象不是同一个。 怎么办?为了保证service和dao中使用的SqlSession对象是同一个,可以将SqlSession对象存放到ThreadLocal当中。修改SqlSessionUtil工具类:
public class SqlSessionUtil {private static SqlSessionFactory sqlSessionFactory;/*** 类加载时初始化sqlSessionFactory对象*/static {try {SqlSessionFactoryBuilder sqlSessionFactoryBuilder = new SqlSessionFactoryBuilder();sqlSessionFactory = sqlSessionFactoryBuilder.build(Resources.getResourceAsStream("mybatis-config.xml"));} catch (Exception e) {e.printStackTrace();}}private static ThreadLocal<SqlSession> local = new ThreadLocal<>();/*** 每调用一次openSession()可获取一个新的会话,该会话支持自动提交。** @return 新的会话对象*/public static SqlSession openSession() {SqlSession sqlSession = local.get();if (sqlSession == null) {sqlSession = sqlSessionFactory.openSession();local.set(sqlSession);}return sqlSession;}/*** 关闭SqlSession对象* @param sqlSession*/public static void close(SqlSession sqlSession){if (sqlSession != null) {sqlSession.close();}local.remove();}
}
修改dao中的方法:AccountDaoImpl中所有方法中的提交commit和关闭close代码全部删除。
public class AccountDaoImpl implements AccountDao {@Overridepublic Account selectByActno(String actno) {SqlSession sqlSession = SqlSessionUtil.openSession();Account act = (Account)sqlSession.selectOne("account.selectByActno", actno);return act;}@Overridepublic int update(Account act) {SqlSession sqlSession = SqlSessionUtil.openSession();int count = sqlSession.update("account.update", act);return count;}
}
修改service中的方法:
public class AccountServiceImpl implements AccountService {private AccountDao accountDao = new AccountDaoImpl();@Overridepublic void transfer(String fromActno, String toActno, double money) throws MoneyNotEnoughException, AppException {// 查询转出账户的余额Account fromAct = accountDao.selectByActno(fromActno);if (fromAct.getBalance() < money) {throw new MoneyNotEnoughException("对不起,您的余额不足。");}try {// 程序如果执行到这里说明余额充足// 修改账户余额Account toAct = accountDao.selectByActno(toActno);fromAct.setBalance(fromAct.getBalance() - money);toAct.setBalance(toAct.getBalance() + money);// 更新数据库(添加事务)SqlSession sqlSession = SqlSessionUtil.openSession();accountDao.update(fromAct);// 模拟异常String s = null;s.toString();accountDao.update(toAct);sqlSession.commit();SqlSessionUtil.close(sqlSession);  // 只修改了这一行代码。} catch (Exception e) {throw new AppException("转账失败,未知原因!");}}
}
当前数据库表中的数据:
再次运行程序:

查看数据库表:没有问题。

再测试转账成功:


如果余额不足呢:

账户的余额依然正常:
5.分析当前程序存在的问题
我们来看一下DaoImpl的代码
public class AccountDaoImpl implements AccountDao {@Overridepublic Account selectByActno(String actno) {SqlSession sqlSession = SqlSessionUtil.openSession();Account act = (Account)sqlSession.selectOne("account.selectByActno", actno);return act;}@Overridepublic int update(Account act) {SqlSession sqlSession = SqlSessionUtil.openSession();int count = sqlSession.update("account.update", act);return count;}
}我们不难发现,这个dao实现类中的方法代码很固定,基本上就是一行代码,通过SqlSession对象调用insert、delete、update、select等方法,这个类中的方法没有任何业务逻辑,既然是这样,这个类我们能不能动态的生成,以后可以不写这个类吗?答案:可以。
二、使用javassist生成类
来自百度百科:
Javassist是一个开源的分析、编辑和创建Java字节码的类库。是由东京工业大学的数学和计算机科学系的 Shigeru Chiba (千叶 滋)所创建的。它已加入了开放源代码JBoss 应用服务器项目,通过使用Javassist对字节码操作为JBoss实现动态"AOP"框架。
1.Javassist的使用
我们要使用javassist,首先要引入它的依赖
<dependency><groupId>org.javassist</groupId><artifactId>javassist</artifactId><version>3.29.1-GA</version>
</dependency>
样例代码:
public class JavassistTest {public static void main(String[] args) throws Exception {// 获取类池ClassPool pool = ClassPool.getDefault();// 创建类CtClass ctClass = pool.makeClass("com.powernode.javassist.Test");// 创建方法// 1.返回值类型 2.方法名 3.形式参数列表 4.所属类CtMethod ctMethod = new CtMethod(CtClass.voidType, "execute", new CtClass[]{}, ctClass);// 设置方法的修饰符列表ctMethod.setModifiers(Modifier.PUBLIC);// 设置方法体ctMethod.setBody("{System.out.println(\"hello world\");}");// 给类添加方法ctClass.addMethod(ctMethod);// 调用方法Class<?> aClass = ctClass.toClass();Object o = aClass.newInstance();Method method = aClass.getDeclaredMethod("execute");method.invoke(o);}
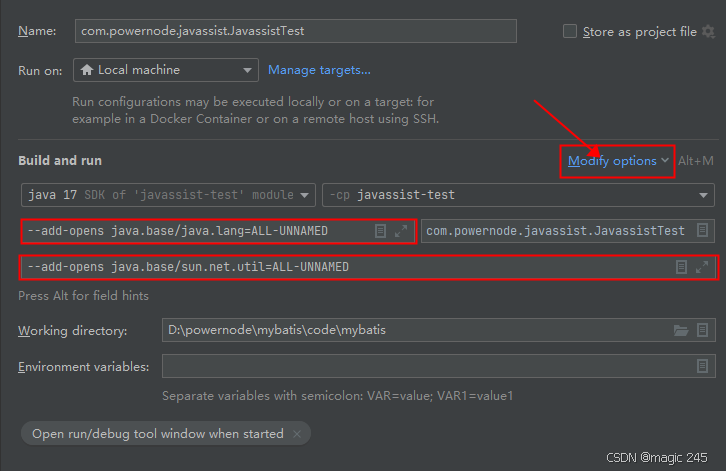
}运行要注意:加两个参数,要不然会有异常。
-
--add-opens java.base/java.lang=ALL-UNNAMED
-
--add-opens java.base/sun.net.util=ALL-UNNAMED

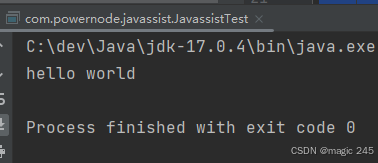
运行结果:
2.使用Javassist生成DaoImpl类
使用Javassist动态生成DaoImpl类
/*** 使用javassist库动态生成dao接口的实现类**/
public class GenerateDaoByJavassist {/*** 根据dao接口生成dao接口的代理对象** @param sqlSession   sql会话* @param daoInterface dao接口* @return dao接口代理对象*/public static Object getMapper(SqlSession sqlSession, Class daoInterface) {ClassPool pool = ClassPool.getDefault();// 生成代理类CtClass ctClass = pool.makeClass(daoInterface.getPackageName() + ".impl." + daoInterface.getSimpleName() + "Impl");// 接口CtClass ctInterface = pool.makeClass(daoInterface.getName());// 代理类实现接口ctClass.addInterface(ctInterface);// 获取所有的方法Method[] methods = daoInterface.getDeclaredMethods();Arrays.stream(methods).forEach(method -> {// 拼接方法的签名StringBuilder methodStr = new StringBuilder();String returnTypeName = method.getReturnType().getName();methodStr.append(returnTypeName);methodStr.append(" ");String methodName = method.getName();methodStr.append(methodName);methodStr.append("(");Class<?>[] parameterTypes = method.getParameterTypes();for (int i = 0; i < parameterTypes.length; i++) {methodStr.append(parameterTypes[i].getName());methodStr.append(" arg");methodStr.append(i);if (i != parameterTypes.length - 1) {methodStr.append(",");}}methodStr.append("){");// 方法体当中的代码怎么写?// 获取sqlId(这里非常重要:因为这行代码导致以后namespace必须是接口的全限定接口名,sqlId必须是接口中方法的方法名。)String sqlId = daoInterface.getName() + "." + methodName;// 获取SqlCommondTypeString sqlCommondTypeName = sqlSession.getConfiguration().getMappedStatement(sqlId).getSqlCommandType().name();if ("SELECT".equals(sqlCommondTypeName)) {methodStr.append("org.apache.ibatis.session.SqlSession sqlSession = com.powernode.bank.utils.SqlSessionUtil.openSession();");methodStr.append("Object obj = sqlSession.selectOne(\"" + sqlId + "\", arg0);");methodStr.append("return (" + returnTypeName + ")obj;");} else if ("UPDATE".equals(sqlCommondTypeName)) {methodStr.append("org.apache.ibatis.session.SqlSession sqlSession = com.powernode.bank.utils.SqlSessionUtil.openSession();");methodStr.append("int count = sqlSession.update(\"" + sqlId + "\", arg0);");methodStr.append("return count;");}methodStr.append("}");System.out.println(methodStr);try {// 创建CtMethod对象CtMethod ctMethod = CtMethod.make(methodStr.toString(), ctClass);ctMethod.setModifiers(Modifier.PUBLIC);// 将方法添加到类ctClass.addMethod(ctMethod);} catch (CannotCompileException e) {throw new RuntimeException(e);}});try {// 创建代理对象Class<?> aClass = ctClass.toClass();Constructor<?> defaultCon = aClass.getDeclaredConstructor();Object o = defaultCon.newInstance();return o;} catch (Exception e) {throw new RuntimeException(e);}}
}