Ascend上开发自定义算子接入PyTorch有几种实现方式?
答案
首先回答问题,从官网资料看,当前有3种方式,分别是:
- 基于OpPlugin算子适配开发
- 基于C++ extensions算子适配开发 - 单算子API调用适配
- 基于C++ extensions算子适配开发 - kernel直调算子适配
1 基于OpPlugin算子适配开发
首先,从测试脚本,看其调用方式:
import torch
import torch_npu
from torch_npu.testing.testcase import TestCase, run_teststorch.npu.config.allow_internal_format = False
torch.npu.set_compile_mode(jit_compile=False)class TestCustomAdd(TestCase):def test_add_custom(self):length = [8, 2048]x = torch.rand(length, device='cpu', dtype=torch.float16)y = torch.rand(length, device='cpu', dtype=torch.float16)print(x, '\n', y)output = torch_npu.npu_add_custom(x.npu(), y.npu()).cpu()print(output)self.assertRtolEqual(output, x + y)if __name__ == "__main__":run_tests()
这里可以看到,其调用方式:torch_npu.npu_add_custom(x.npu(), y.npu()).cpu()。
PyTorch官方提供的native_functions.yaml文件定义了PyTorch Native Functions的具体算子定义和分发细节,定义则通过.cpp文件实现。OpPlugin仓库与原生类似,使用yaml文件定义了NPU适配的算子,算子具体适配则存放在.cpp文件中。
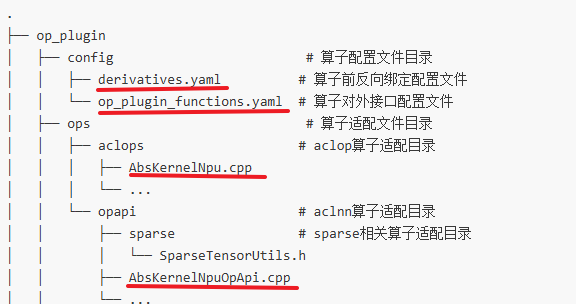
需要关注的是,如上4个文件。
步骤一般是:算子yaml配置(op_plugin_functions.yaml/derivatives.yaml) -> 算子适配实现(AbsKernelNpuOpApi.cpp/AbsKernelNpu.cpp)
具体样例步骤,可参见:基于OpPlugin算子适配开发
该实现方式的特点是,实现了正向和方向的yaml配置,并通过源码编译安装的形式使用。这种方式是最古老的
2 基于C++ extensions算子适配开发 - 单算子API调用适配
基于C++ extensions方式,通过torch_npu来调用单算子API的适配开发过程。
先看调用方式:
class TestCustomAdd(TestCase):def test_add_custom(self):x_cpu = torch.randn([8, 2048], dtype=torch.float16)y_cpu = torch.randn([8, 2048], dtype=torch.float16)x_npu, y_npu = copy.deepcopy(x_cpu).npu(), copy.deepcopy(y_cpu).npu()x_cpu.requires_grad = Truey_cpu.requires_grad = Truex_npu.requires_grad = Truey_npu.requires_grad = True# calculate on npuoutput = custom_ops.add_custom(x_npu, y_npu)output.backward(output)# calculate on cpucpuout = torch.add(x_cpu, y_cpu)cpuout.backward(cpuout)# compare resultself.assertRtolEqual(output, cpuout)self.assertRtolEqual(x_npu.grad, x_cpu.grad)self.assertRtolEqual(y_npu.grad, y_cpu.grad)
这里可以看到,其调用方式:custom_ops.add_custom(x_npu, y_npu)。custom_ops是python侧算子包的名字。
具体参考:https://gitee.com/ascend/samples/blob/master/operator/ascendc/0_introduction/1_add_frameworklaunch/CppExtensionInvocation/test/test_add_custom.py
另外,注意到其正向的实现:
// 前向实现
at::Tensor add_custom_impl_npu(const at::Tensor& self, const at::Tensor& other) {// 创建输出内存at::Tensor result = at::empty_like(self);// 调用aclnn接口计算EXEC_NPU_CMD(aclnnAddCustom, self, other, result);return result;
}
这中间,调用了异步执行宏定义:EXEC_NPU_CMD
该方式的特点是,通过标准的cpp_extention的方式实现torch算子的添加,使用到TORCH_LIBRARY、TORCH_LIBRARY_IMPL、PYBIND11_MODULE等接口
另外,这种方式下,也提供了图模式(NPU上图模式)相关的调用方式,如下图:
# 注意: meta_outputs形参名为固定写法,若写错会影响ge节点的输出dtype与shape推导
@register_fx_node_ge_converter(torch.ops.myops.add_custom.default)
def convert_npu_add_custom(x: Tensor, y: Tensor, z: Tensor = None, meta_outputs: Any = None):return torchair.ge.custom_op("AddCustom",inputs={"x": x, "y": y,},outputs=['z'])class TestTorchCompileCustomAdd(TestCase):def test_add_custom(self):x = torch.randn([8, 2048], device='npu', dtype=torch.float16)y = torch.randn([8, 2048], device='npu', dtype=torch.float16)from torchair.configs.compiler_config import CompilerConfigconfig = CompilerConfig()npu_backend = torchair.get_npu_backend(compiler_config=config)class Module(torch.nn.Module):def __init__(self):super().__init__()def forward(self, x, y):result = custom_ops.add_custom(x, y)return resultmod = torch.compile(Module().npu(), backend=npu_backend)output = mod(x, y)self.assertRtolEqual(output, (x + y))
具体请参考:https://gitee.com/ascend/samples/blob/master/operator/ascendc/0_introduction/1_add_frameworklaunch/CppExtensionInvocation/test/test_add_custom_graph.py
3 基于C++ extensions算子适配开发 - kernel直调算子适配
支持Ascend C实现自定义算子Kernel,并集成在PyTorch框架,通过PyTorch的API实现算子调用。
先看调用方式:
class TestCustomAdd(TestCase):def test_add_custom_ops(self):length = [8, 2048]x = torch.rand(length, device='cpu', dtype=torch.float16)y = torch.rand(length, device='cpu', dtype=torch.float16)x_npu = x.npu()y_npu = y.npu()output = torch.ops.npu.my_add(x_npu, y_npu)cpuout = torch.add(x, y)self.assertRtolEqual(output, cpuout)
可以看到,这里的调用方式是torch.ops.npu.my_add
通过调用样例可知,该方式的使用需要通过安装wheel包的形式完成
#LINK下载样例代码
git clone https://gitee.com/ascend/op-plugin.git
cd op-plugin
git checkout master
# 进入代码目录
cd examples/cpp_extension# 完成算子适配,具体可参考适配开发# 执行如下命令编译并安装wheel包
python setup.py bdist_wheel
cd dist
pip install *.whl
该方式的特点是,直接通过AscendC实现算子后,通过安装wheel包就可以在pytorch的工程中使用起来。