【Spring Boot 源码学习】深入 ConfigurableEnvironment 的初始化过程
《Spring Boot 源码学习系列》

深入 ConfigurableEnvironment 的初始化过程
- 一、引言
- 二、配置环境的初始化
- 2.1 源码总览
- 2.2 prepareEnvironment 方法
- 2.2.1 获取或创建可配置环境
- 2.2.2 配置环境并设置参数
- 2.2.3 将配置属性源附加到环境中
- 2.2.4 触发环境准备事件
- 2.2.5 将DefaultProperties移至环境末尾
- 2.2.6 绑定环境到SpringApplication中
- 2.2.7 按需转换环境(非自定义时)
- 2.3 忽略信息配置
- 三、总结
一、引言
上篇博文,Huazie 向大家详细介绍了 ConfigurableEnvironment 及其父接口的功能和方法,它的主要作用是提供当前运行环境的公共接口,比如 配置文件(profiles) 及 各类属性和变量(properties) 的设置、添加、读取、合并等功能。
有了这些基础知识,我们就可以更好地了解接下来的配置环境的初始化过程。
二、配置环境的初始化
注意: 以下涉及 Spring Boot 源码 均来自版本 2.7.9,其他版本有所出入,可自行查看源码。
2.1 源码总览
在 SpringApplication 的 run 方法中,准备好 ApplicationArguments 参数之后,便开始通过 prepareEnvironment 方法对配置环境 ConfigurableEnvironment 进行初始化操作。
完成了 ConfigurableEnvironment 的初始化操作之后,再通过 configureIgnoreBeanInfo 方法来设置忽略信息配置。
public ConfigurableApplicationContext run(String... args) {// 。。。try {ApplicationArguments applicationArguments = new DefaultApplicationArguments(args);ConfigurableEnvironment environment = prepareEnvironment(listeners, bootstrapContext, applicationArguments);configureIgnoreBeanInfo(environment);// 。。。} catch (Throwable ex) {handleRunFailure(context, ex, listeners);throw new IllegalStateException(ex);}
}
2.2 prepareEnvironment 方法
先查看 prepareEnvironment 方法,源码如下:
private ConfigurableEnvironment prepareEnvironment(SpringApplicationRunListeners listeners,DefaultBootstrapContext bootstrapContext, ApplicationArguments applicationArguments) {ConfigurableEnvironment environment = getOrCreateEnvironment();configureEnvironment(environment, applicationArguments.getSourceArgs());ConfigurationPropertySources.attach(environment);listeners.environmentPrepared(bootstrapContext, environment);DefaultPropertiesPropertySource.moveToEnd(environment);Assert.state(!environment.containsProperty("spring.main.environment-prefix"),"Environment prefix cannot be set via properties.");bindToSpringApplication(environment);if (!this.isCustomEnvironment) {EnvironmentConverter environmentConverter = new EnvironmentConverter(getClassLoader());environment = environmentConverter.convertEnvironmentIfNecessary(environment, deduceEnvironmentClass());}ConfigurationPropertySources.attach(environment);return environment;}
通过阅读上述源码,我们先对上述环境准备工作大致做个总结,如下:
- 获取或创建可配置环境;
- 配置环境并设置参数;
- 将配置属性源附加到环境中;
- 触发环境准备事件;
- 绑定环境到SpringApplication中;
- 按需转换环境(非自定义时);
- 将配置属性源附加到环境中【同第3步】;
- 返回可配置环境。
2.2.1 获取或创建可配置环境
ConfigurableEnvironment environment = getOrCreateEnvironment();
这里通过 getOrCreateEnvironment 方法来获取或创建可配置环境对象,下面进入该方法查看一下其源码:
private ConfigurableEnvironment getOrCreateEnvironment() {if (this.environment != null) {return this.environment;}ConfigurableEnvironment environment = this.applicationContextFactory.createEnvironment(this.webApplicationType);if (environment == null && this.applicationContextFactory != ApplicationContextFactory.DEFAULT) {environment = ApplicationContextFactory.DEFAULT.createEnvironment(this.webApplicationType);}return (environment != null) ? environment : new ApplicationEnvironment();}
这里也不复杂,大致总结下:
- 首先,方法检查
environment【可通过SpringApplication##setEnvironment方法设置】是否为null,如果不为空,则直接返回这个已存在的ConfigurableEnvironment实例; - 接着,通过
applicationContextFactory【可通过SpringApplication##setApplicationContextFactory方法设置,默认为ApplicationContextFactory.DEFAULT】 来创建一个新的ConfigurableEnvironment实例; - 然后,如果通过自定义的
applicationContextFactory无法获取环境实例,并且当前的applicationContextFactory不是默认的(ApplicationContextFactory.DEFAULT),则使用ApplicationContextFactory.DEFAULT来创建环境。 - 最后,经过上述处理,
environment如果还是为空,则创建ApplicationEnvironment返回;否则,直接返回;
一般来讲,我们通常使用都是 ApplicationContextFactory.DEFAULT 来创建环境。
@FunctionalInterface
public interface ApplicationContextFactory {ApplicationContextFactory DEFAULT = new DefaultApplicationContextFactory();//......
}
继续查看 DefaultApplicationContextFactory,如下:
class DefaultApplicationContextFactory implements ApplicationContextFactory {//......@Overridepublic ConfigurableEnvironment createEnvironment(WebApplicationType webApplicationType) {return getFromSpringFactories(webApplicationType, ApplicationContextFactory::createEnvironment, null);}private <T> T getFromSpringFactories(WebApplicationType webApplicationType,BiFunction<ApplicationContextFactory, WebApplicationType, T> action, Supplier<T> defaultResult) {for (ApplicationContextFactory candidate : SpringFactoriesLoader.loadFactories(ApplicationContextFactory.class,getClass().getClassLoader())) {T result = action.apply(candidate, webApplicationType);if (result != null) {return result;}}return (defaultResult != null) ? defaultResult.get() : null;}}
这里我们主要分析 getFromSpringFactories 方法;
先来看看它的参数:
WebApplicationType webApplicationType:标识当前 Web 应用的类型(如 SERVLET, REACTIVE 等)。该参数用于根据不同类型的 Web 应用选择适合的ApplicationContextFactory。BiFunction<ApplicationContextFactory, WebApplicationType, T> action:函数式接口BiFunction,它定义了如何将ApplicationContextFactory和WebApplicationType映射到一个结果T。Supplier<T> defaultResult:函数式接口Supplier,它提供一个默认值生成器,用于生成一个默认值。
接着简单分析一下它的代码逻辑:
- 首先,使用
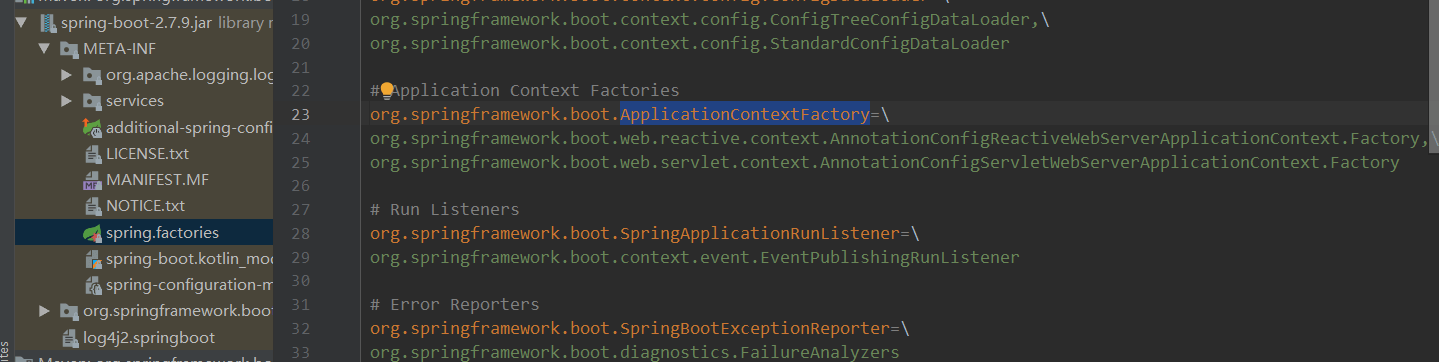
SpringFactoriesLoader.loadFactories(ApplicationContextFactory.class, getClass().getClassLoader())加载所有实现了ApplicationContextFactory接口的工厂类【这个加载过程会查找类路径下所有META-INF/spring.factories文件中配置的对应工厂类实现】。
-
接着,遍历候选的
ApplicationContextFactory实例,针对每一个工厂类,使用传入的BiFunction(具体就是ApplicationContextFactory::createEnvironment,即调用工厂类的createEnvironment方法)去尝试获取一个类型为T的结果对象。只要在遍历过程中得到的结果对象不为null,就立即返回该结果。 -
最后,如果遍历完所有工厂类都没有得到非
null的结果对象,那么会判断是否提供了默认结果(即defaultResult是否为null),如果提供了就通过调用defaultResult.get()来获取并返回默认结果,否则返回null。
总结:
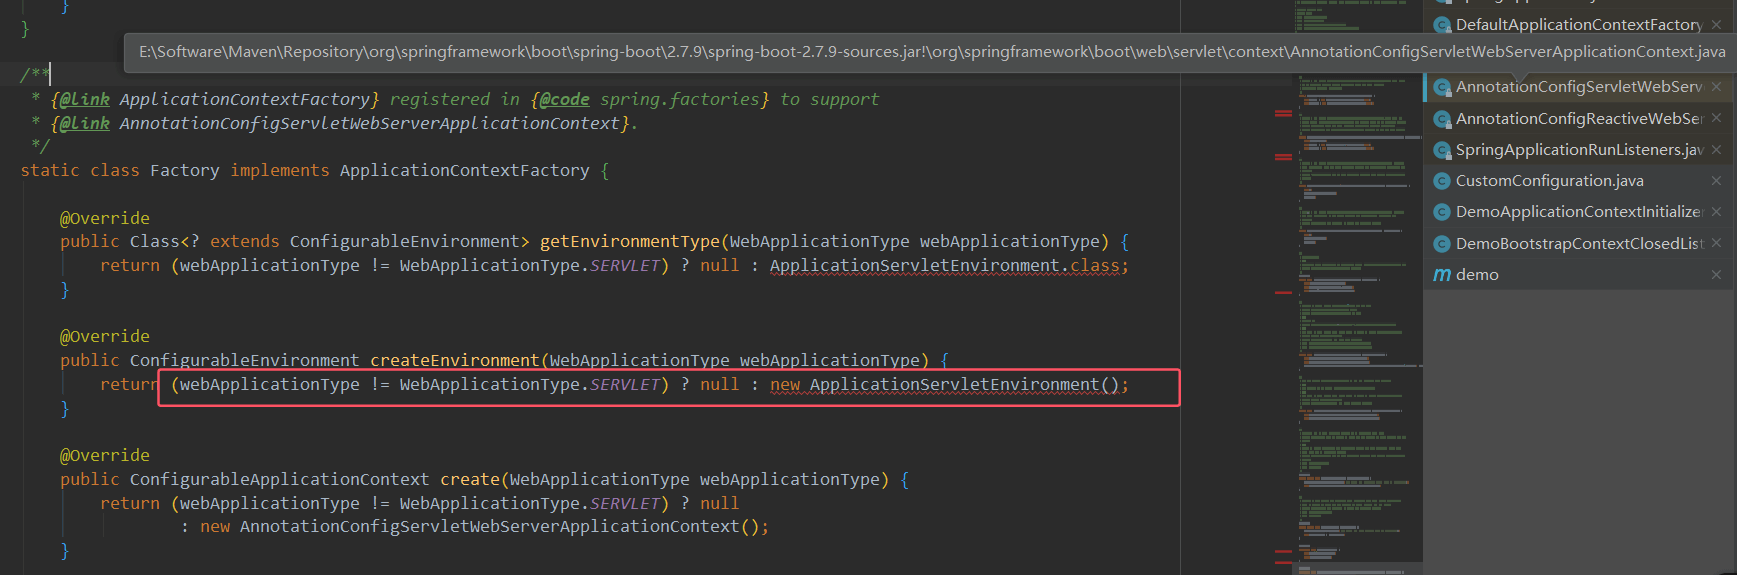
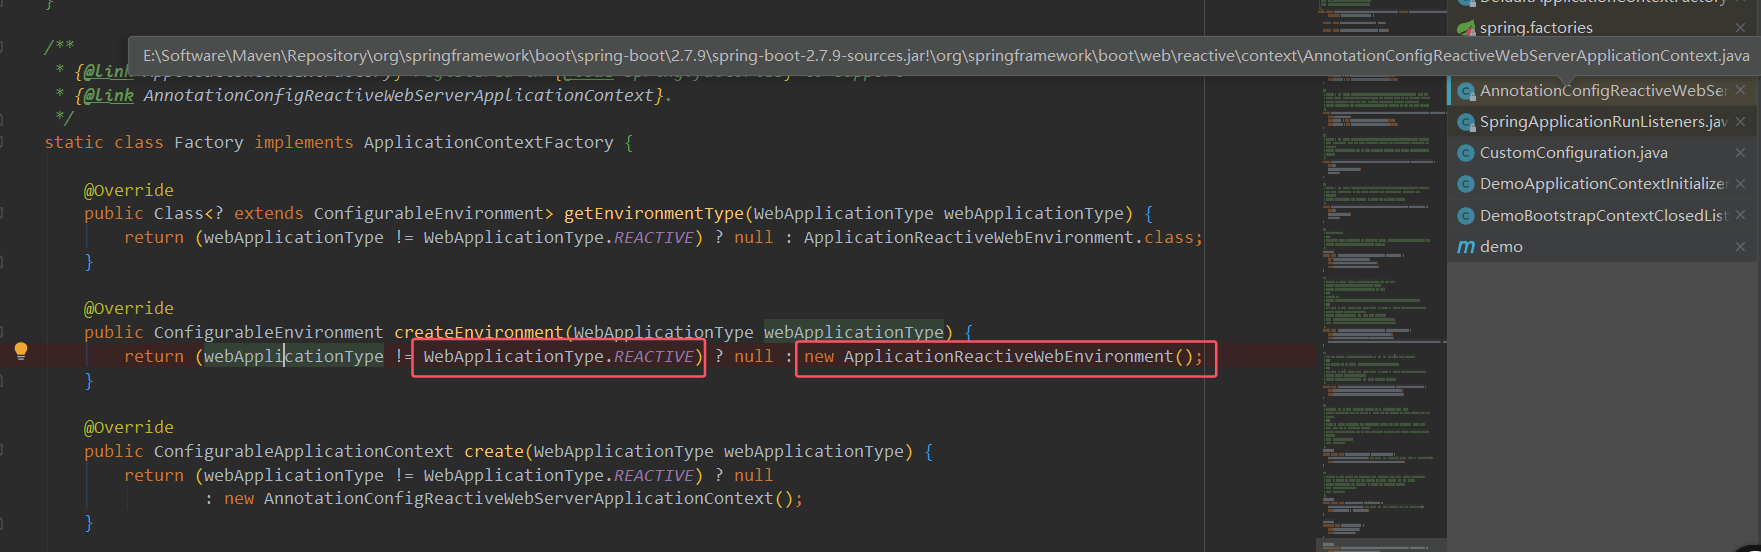
- 如果是 Servlet Web 环境,则创建
ApplicationServletEnvironment; - 如果是 Reactive Web 环境,则创建
ApplicationReactiveWebEnvironment; - 如果是 非 Web 环境,则创建
ApplicationEnvironment;
2.2.2 配置环境并设置参数
configureEnvironment(environment, applicationArguments.getSourceArgs());
在获取可配置环境对象之后,这里通过 configureEnvironment 方法来配置环境并设置参数,查看其源码如下:
protected void configureEnvironment(ConfigurableEnvironment environment, String[] args) {// addConversionService = true:需要设置转换服务if (this.addConversionService) {environment.setConversionService(new ApplicationConversionService());}configurePropertySources(environment, args);configureProfiles(environment, args);
}
上述内容主要包括【有关这一块的内容,后续专门来一篇讲解,这里简单总结下】:
- 设置转换服务。判断是否需要设置转换服务,如果需要,则新建转换服务实例,并对环境对象设置转换服务。
- 配置
PropertySources。添加、删除或重新排序任何该环境下的属性源。开发人员可以重写该方法,以实现对属性源更精细的控制。 - 配置
Profiles。虽然是空实现,但开发人员可以重写该方法,来自定义哪些配置文件应该被激活或默认激活。在配置文件处理过程中,可以通过spring.profiles.active属性激活其他配置文件。
2.2.3 将配置属性源附加到环境中
ConfigurationPropertySources.attach(environment); //。。。ConfigurationPropertySources.attach(environment);
return environment;
将 ConfigurationPropertySources 附加到指定环境中的第一位,并动态跟踪环境的添加或删除。
这块内容将会在介绍配置属性来源 ConfigurationPropertySources 详细讲解。
2.2.4 触发环境准备事件
listeners.environmentPrepared(bootstrapContext, environment);
前面章节已经讲过各种事件监听的内容,此处主要针对应用环境准备事件的监听【即 org.springframework.boot.context.event.ApplicationEnvironmentPreparedEvent】,读者朋友们可以自行查看,这里不再赘述了。
2.2.5 将DefaultProperties移至环境末尾
DefaultPropertiesPropertySource.moveToEnd(environment);public static final String NAME = "defaultProperties";public static void moveToEnd(ConfigurableEnvironment environment) {moveToEnd(environment.getPropertySources());
}public static void moveToEnd(MutablePropertySources propertySources) {PropertySource<?> propertySource = propertySources.remove(NAME);if (propertySource != null) {propertySources.addLast(propertySource);}
}
这里的主要功能是将名为 "defaultProperties" 的 PropertySource(属性源)移动到环境属性源列表的末尾,从而降低其优先级。这将意味着其他属性源(如配置文件、命令行参数等)中的同名属性会覆盖默认属性,确保外部配置能够生效。
2.2.6 绑定环境到SpringApplication中
bindToSpringApplication(environment);protected void bindToSpringApplication(ConfigurableEnvironment environment) {try {Binder.get(environment).bind("spring.main", Bindable.ofInstance(this));} catch (Exception ex) {throw new IllegalStateException("Cannot bind to SpringApplication", ex);}
}
上述代码将环境(ConfigurableEnvironment)中 spring.main 开头的配置属性绑定到当前 SpringApplication 实例的对应字段上,实现通过外部配置(如 application.yml)动态控制 SpringApplication 的启动行为。
Binder.get(environment) :从环境(Environment)中获取 Binder 工具类实例,用于类型安全的属性绑定。Binder 类是 Spring Boot 2.0 引入的强类型配置绑定工具。
bind() 方法 :将 spring.main.xxx 的配置值映射到 SpringApplication 的同名字段。例如:
spring.main.web-application-type=none:强制禁用 Web 环境。spring.main.lazy-initialization=true:启用懒加载模式。spring.main.banner-mode=off:关闭启动 Banner。
其他可配置字段,大家可以查看 官方文档 ,这里不赘诉了。
2.2.7 按需转换环境(非自定义时)
if (!this.isCustomEnvironment) {EnvironmentConverter environmentConverter = new EnvironmentConverter(getClassLoader());environment = environmentConverter.convertEnvironmentIfNecessary(environment, deduceEnvironmentClass());
}
当应用未使用自定义环境(!this.isCustomEnvironment)时,根据当前应用的实际类型(如 Web 应用、非 Web 应用),通过 EnvironmentConverter 将现有环境(environment)转换为适配当前应用类型的标准环境,确保环境配置与应用运行时需求一致。
EnvironmentConverter:Spring Boot 提供的工具类,用于根据应用类型自动适配环境。
deduceEnvironmentClass() :动态推断当前应用所需的环境类型(如 StandardEnvironment、StandardServletEnvironment)。
ConfigurableEnvironment convertEnvironmentIfNecessary(ConfigurableEnvironment environment,Class<? extends ConfigurableEnvironment> type) {if (type.equals(environment.getClass())) {return environment;}return convertEnvironment(environment, type);
}private ConfigurableEnvironment convertEnvironment(ConfigurableEnvironment environment,Class<? extends ConfigurableEnvironment> type) {ConfigurableEnvironment result = createEnvironment(type);result.setActiveProfiles(environment.getActiveProfiles());result.setConversionService(environment.getConversionService());copyPropertySources(environment, result);return result;
}
- 若当前
environment已经是targetEnvClass类型,直接返回原环境。 - 否则,创建新的
targetEnvClass实例,并将原环境中的属性源(PropertySources)拷贝到新环境中,确保配置不丢失。
通过上述的转换环境过程,Spring Boot 可以实现如下效果:
- 环境适配自动化 :避免手动配置环境,根据应用依赖自动选择合适的环境类型(如 Web 环境需支持
ServletContext参数)。 - 兼容性保障 :在应用类型变化时(如从 Web 改为非 Web),自动切换环境,避免因环境不匹配导致的配置加载错误。
- 平滑迁移 :转换时保留原有属性源,确保外部配置(如
application.properties)无缝迁移到新环境。
2.3 忽略信息配置
public static final String IGNORE_BEANINFO_PROPERTY_NAME = "spring.beaninfo.ignore";private void configureIgnoreBeanInfo(ConfigurableEnvironment environment) {if (System.getProperty(CachedIntrospectionResults.IGNORE_BEANINFO_PROPERTY_NAME) == null) {Boolean ignore = environment.getProperty(CachedIntrospectionResults.IGNORE_BEANINFO_PROPERTY_NAME,Boolean.class, Boolean.TRUE);System.setProperty(CachedIntrospectionResults.IGNORE_BEANINFO_PROPERTY_NAME, ignore.toString());}
}
上述代码根据 Spring 环境配置动态设置系统属性 "spring.beaninfo.ignore"。
spring.beaninfo.ignore :用于决定是否跳过 BeanInfo 类的扫描,如果设置为 true,则跳过。
典型的应用场景:
- 加速本地开发:在 IDE 中运行应用时,默认跳过
BeanInfo解析以减少启动时间。 - 解决类冲突:当类路径中存在错误的
BeanInfo实现时,强制忽略以避免出现ClassNotFoundException。 - 微服务优化:在容器化部署中,通过默认配置减少资源占用,提升启动效率。
三、总结
ConfigurableEnvironment 的初始化是 Spring Boot 应用启动的关键环节,本篇 Huazie 通过源码带大家深入分析了这一过程,相信大家对环境变量的初始化已经有了自己的初步了解。下篇 Huazie 将继续聚焦 Spring Boot 的启动过程,敬请期待!