ruoyi-vue(十二)——定时任务,缓存监控,服务监控以及系统接口
一 定时任务
1、 定时任务使用
1.1 概述
在实际项目开发中Web应用有一类不可缺少的,那就是定时任务。 定时任务的场景可以说非常广泛,比如某些视频网站,购买会员后,每天会给会员送成长值,每月会给会员送一些电影券; 比如在保证最终一致性的场景中,往往利用定时任务调度进行一些比对工作;比如一些定时需要生成的报表、邮件;比如一些需要定时清理数据的任务等。 所以我们提供方便友好的web界面,实现动态管理任务,可以达到动态控制定时任务启动、暂停、重启、删除、添加、修改等操作,极大地方便了开发过程。
1.2 使用流程
1.2.1 在后台代码中封装任务逻辑
在ruoyi-quartz模块package com.ruoyi.quartz.task下新建一个类CustomTask
后台添加定时任务处理类(支持Bean调用、Class类调用)
Bean调用示例:需要添加对应Bean注解@Component或@Service。
调用目标字符串:ryTask.ryParams(‘ry’)
Class类调用示例:添加类和方法指定包即可。
调用目标字符串:com.ruoyi.quartz.task.RyTask.ryParams(‘ry’)
package com.ruoyi.quartz.task;import org.springframework.stereotype.Service;@Service("getInfo")
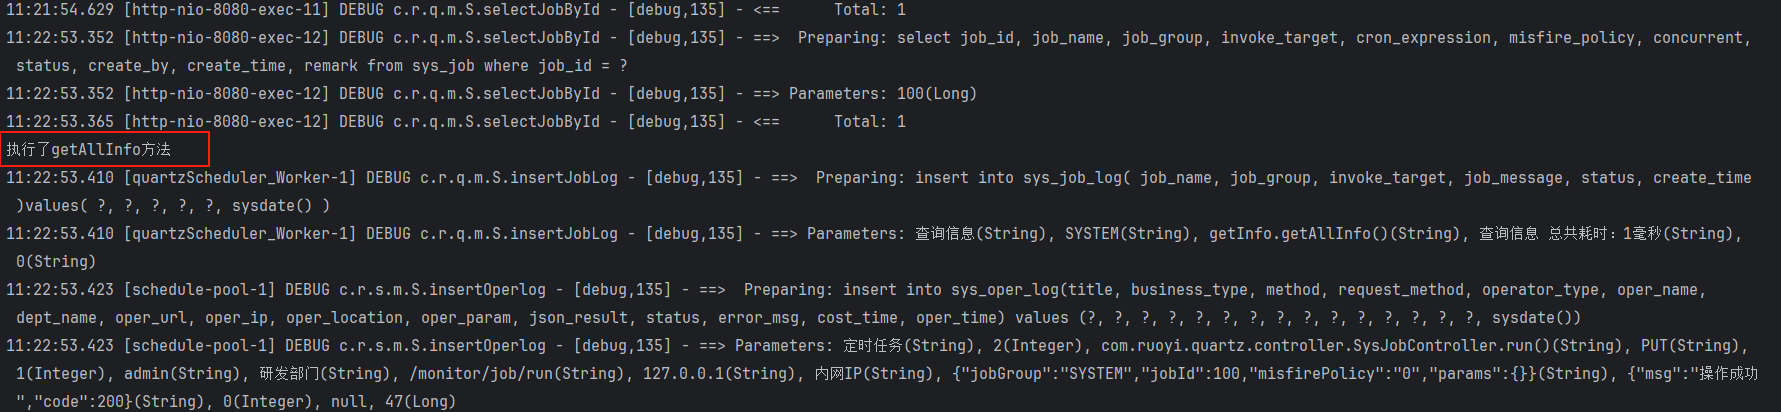
public class CustomTask {public void getAllInfo() {System.out.println("执行了getAllInfo方法");}public void getInfoById(String id) {System.out.println("执行了getInfoById方法,参数为:" + id);}public void deleteInfoBuId(String id) {System.out.println("执行了deleteInfoBuId方法,参数为:" + id);}
}
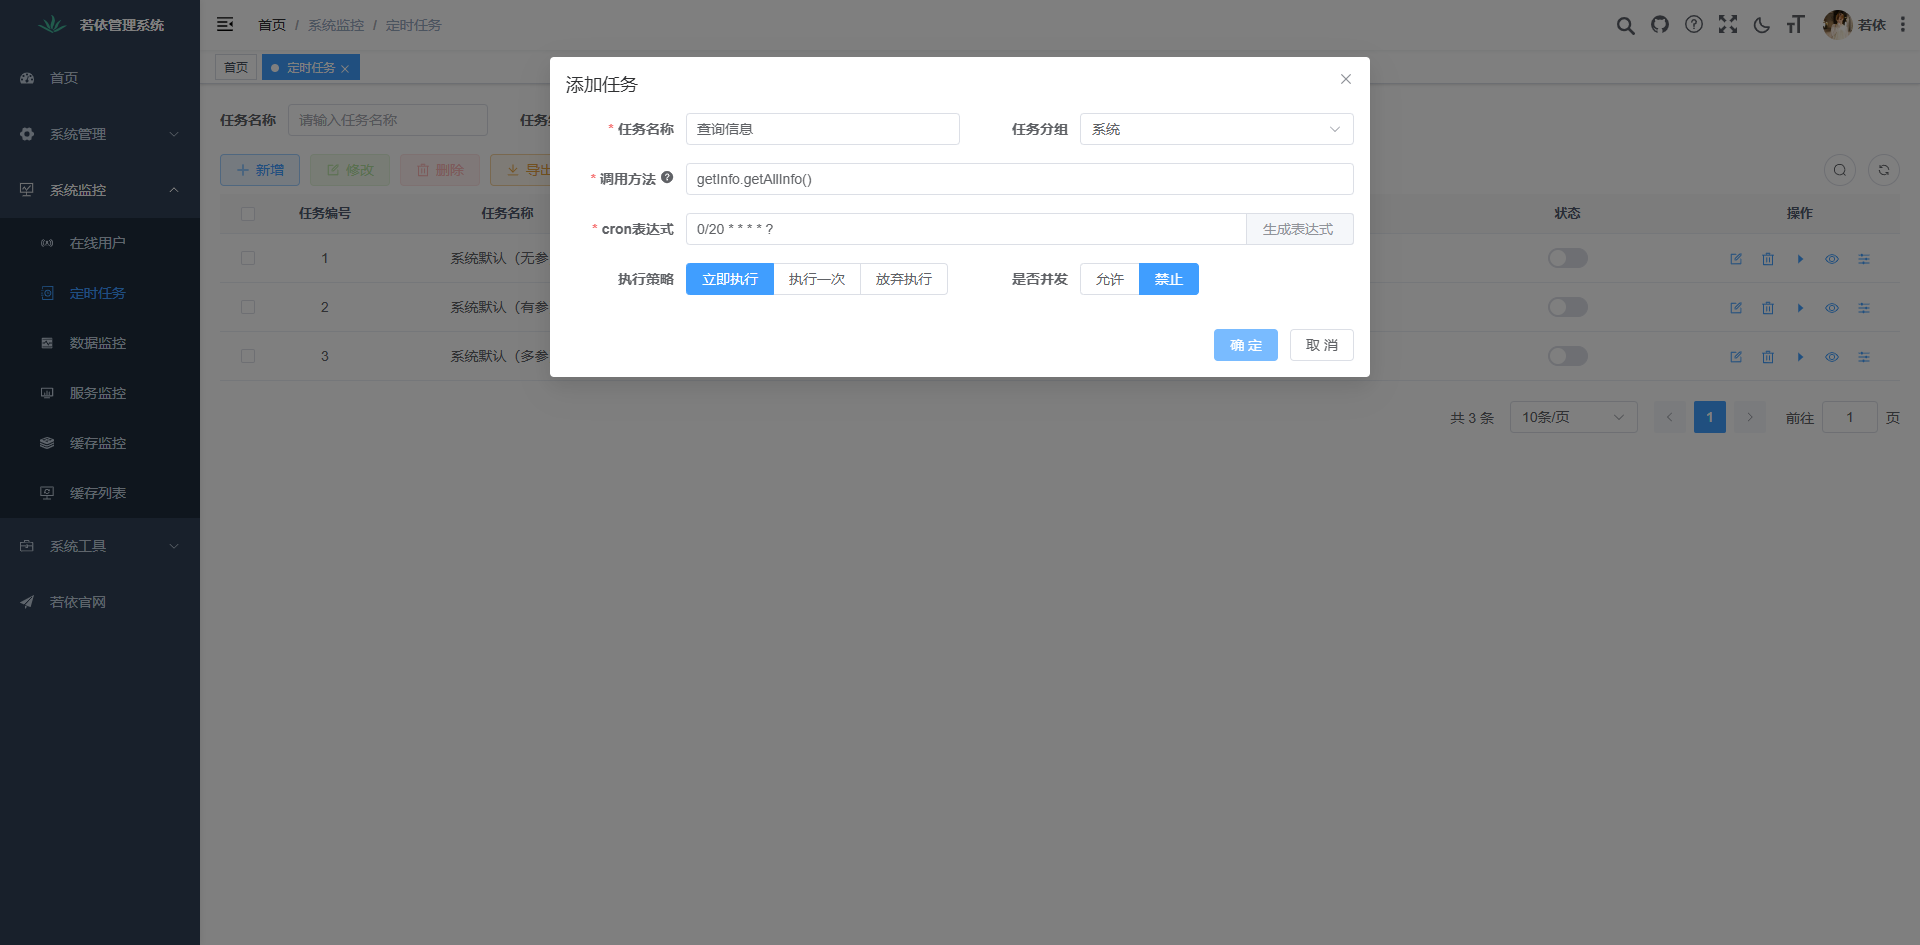
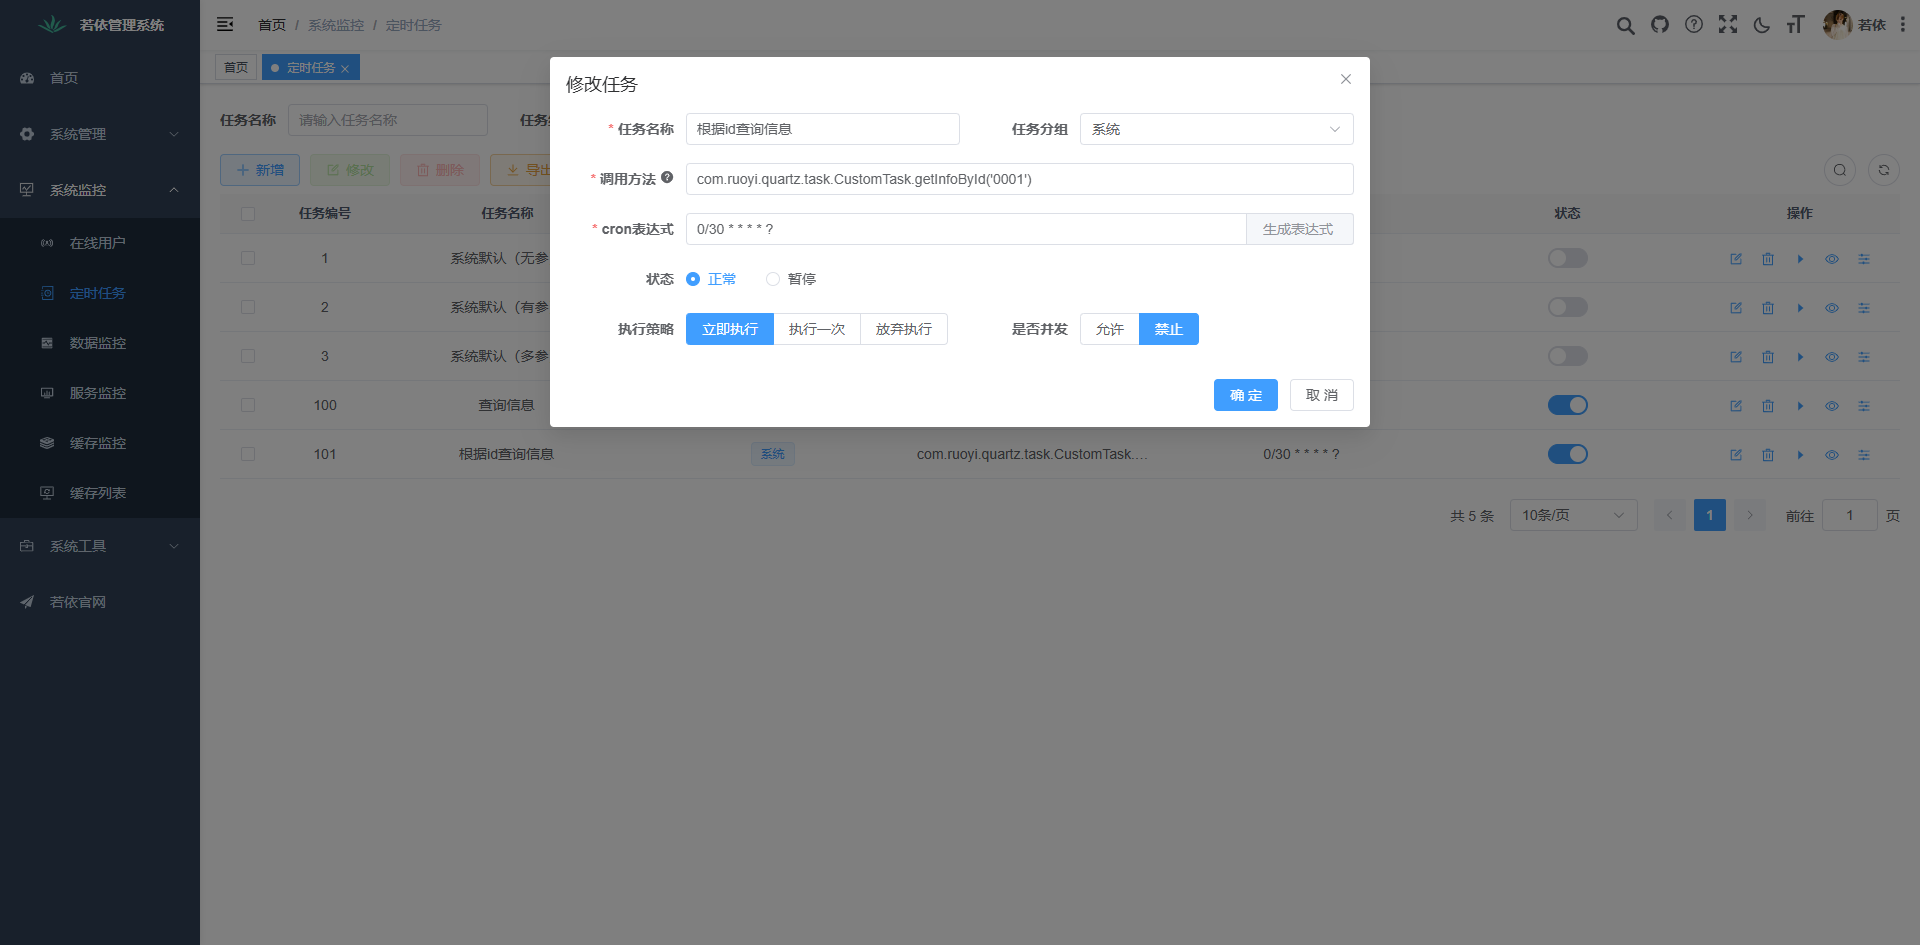
1.2.2 前端配置定时任务
任务名称:自定义,如:定时查询任务状态
任务分组:根据字典sys_job_group配置
调用目标字符串:设置后台任务方法名称参数
执行表达式:可查询官方cron表达式介绍
执行策略:定时任务自定义执行策略
立即执行(所有misfire的任务会马上执行)打个比方,如果9点misfire了,在10:15系统恢复之后,9点,10点的misfire会马上执行
执行一次(会合并部分的misfire,正常执行下一个周期的任务)假设9,10的任务都misfire了,系统在10:15分起来了。只会执行一次misfire,下次正点执行。
放弃执行(所有的misfire不管,执行下一个周期的任务)
并发执行:是否需要多个任务间同时执行
状态:是否启动定时任务
编辑好后点击执行一次并查看后端代码输出
将任务状态调整为启动并查看后端代码输出
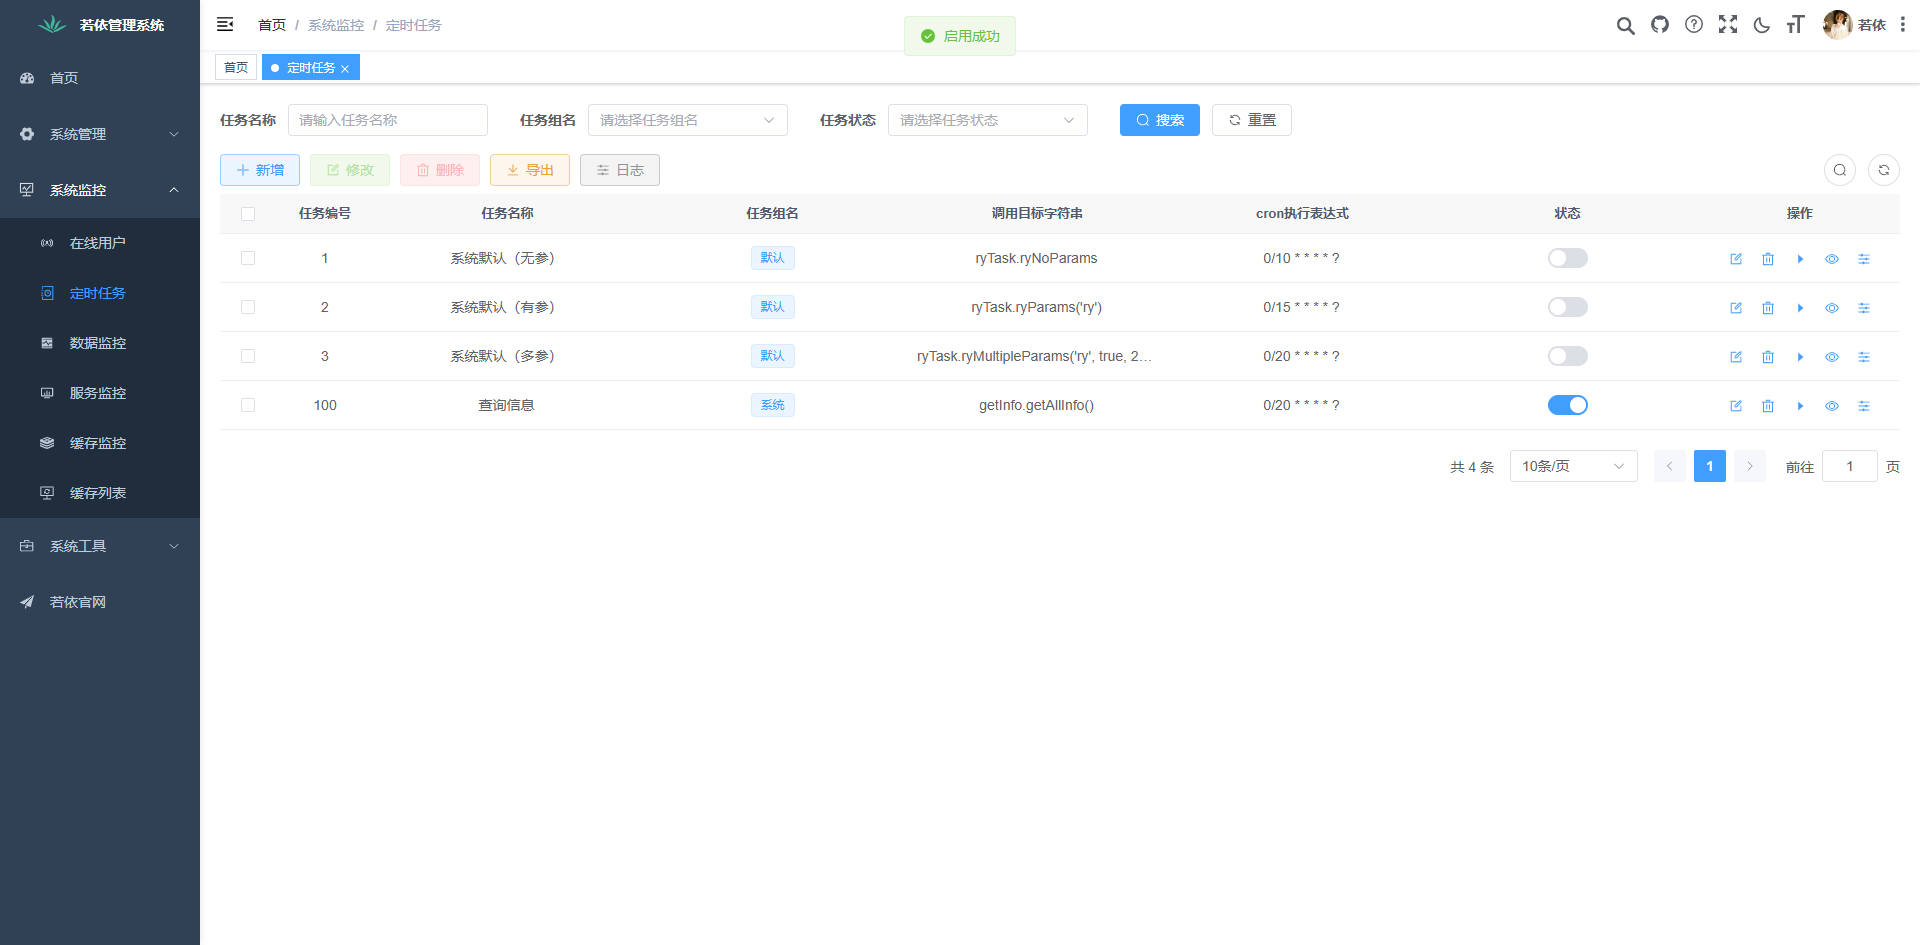
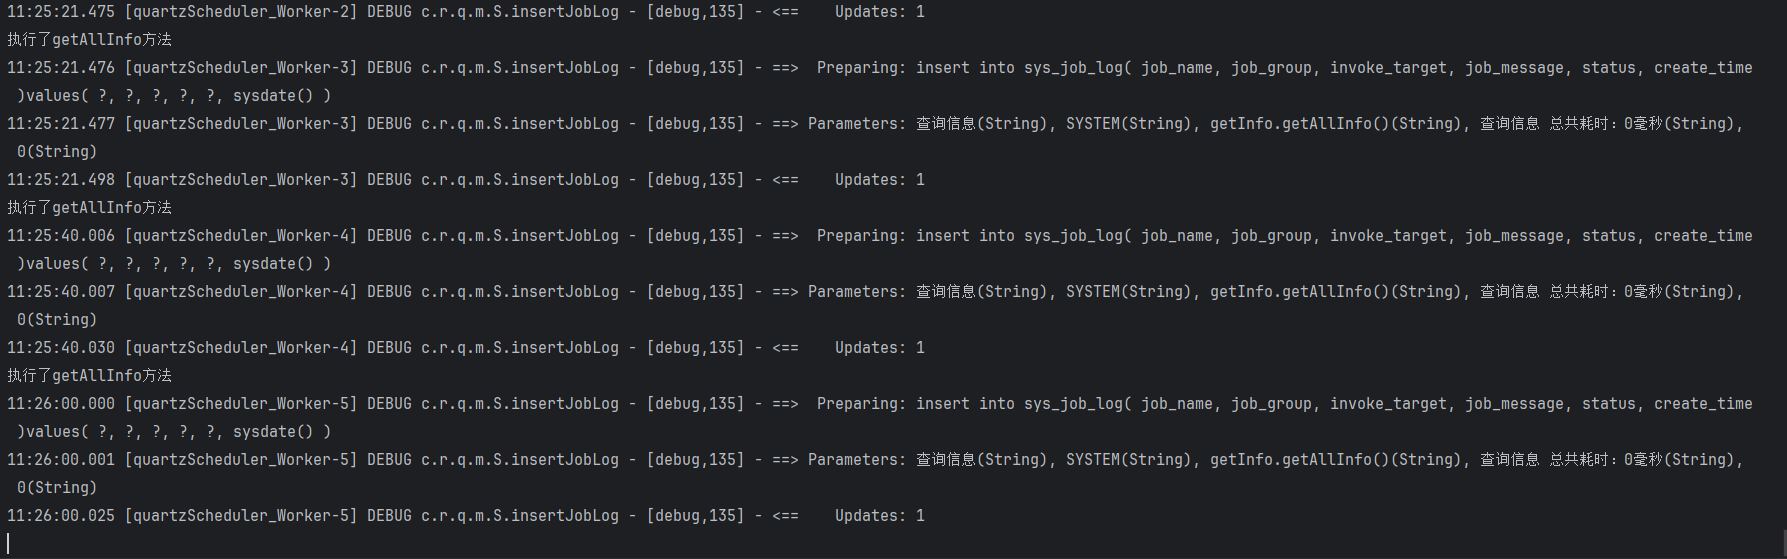
定时任务按照我们配置的cron表达式每20秒执行一次
配置带参数定时任务

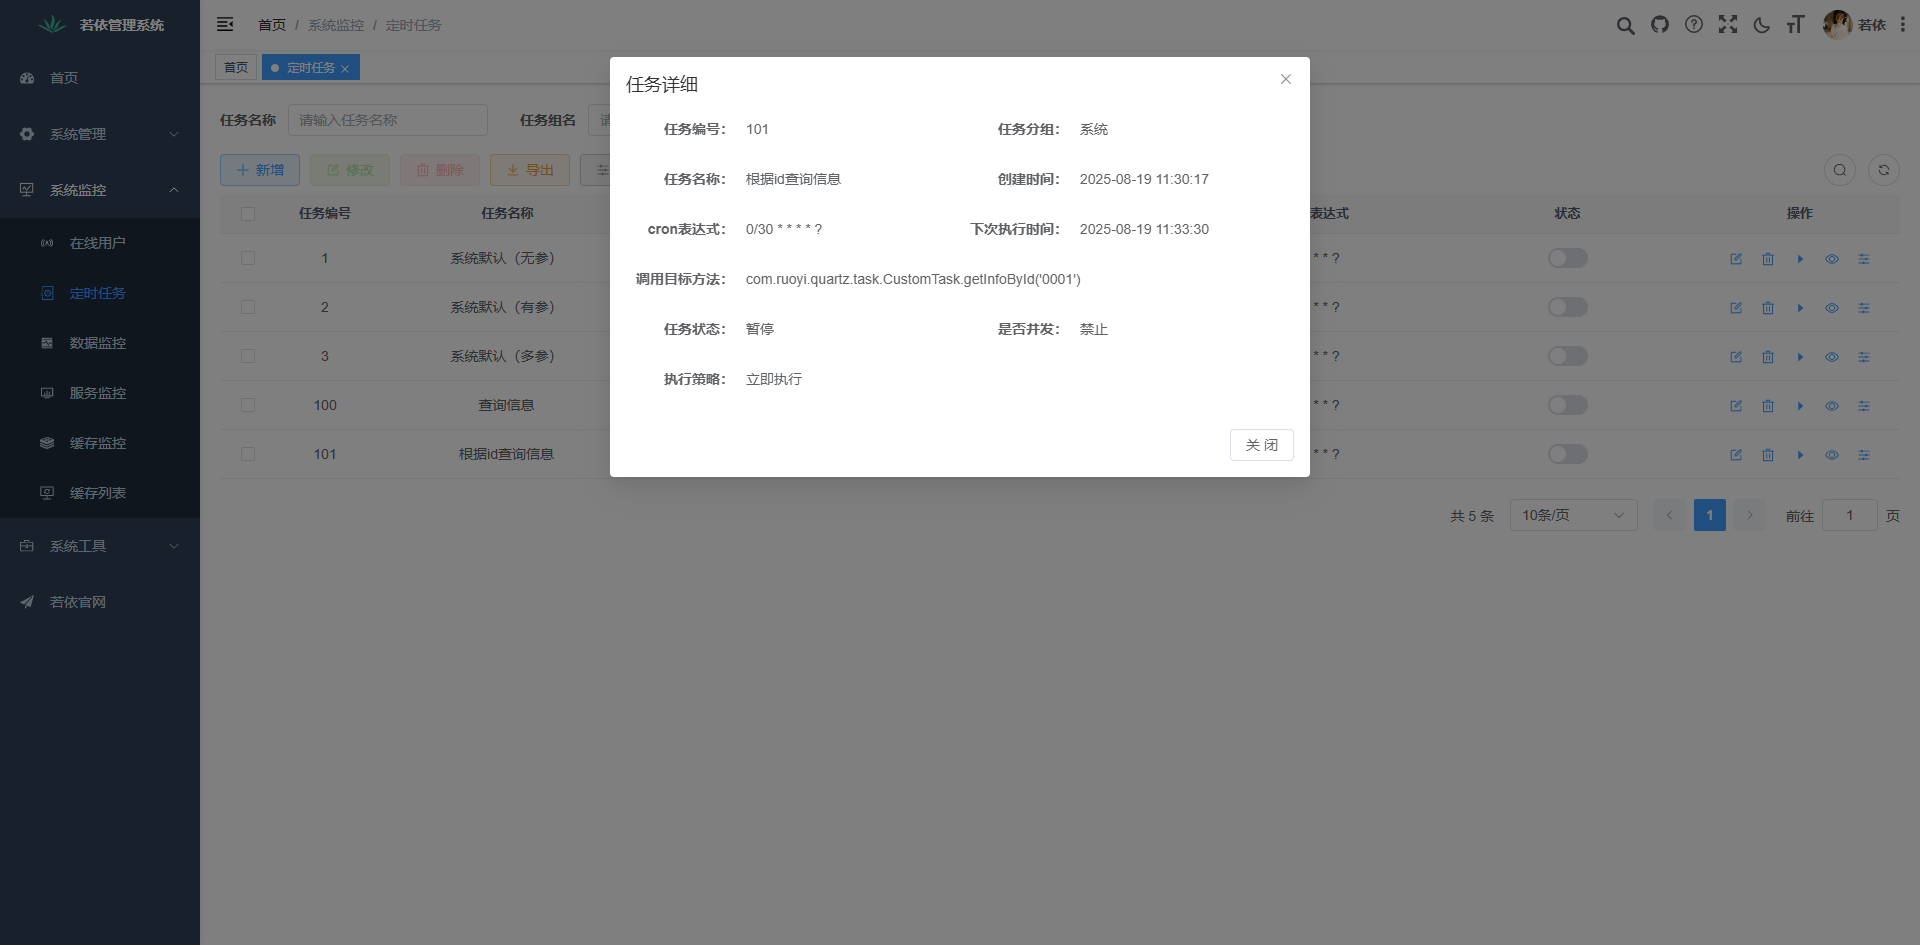
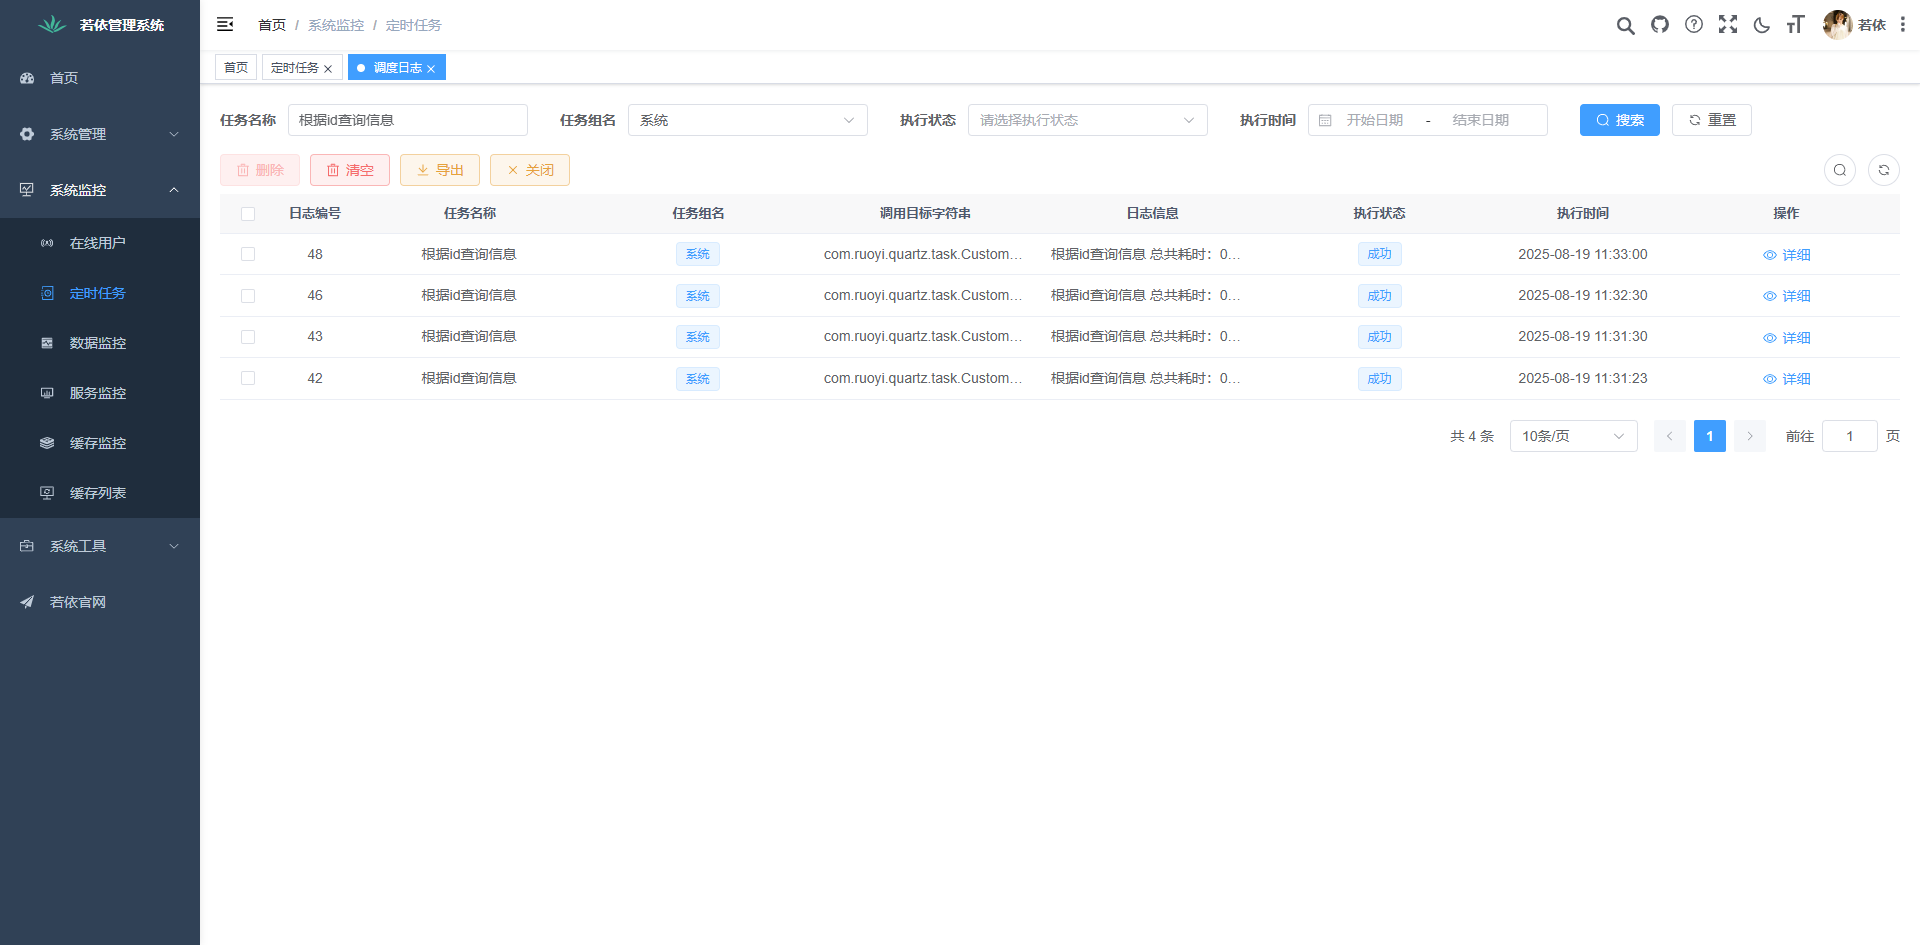
查看任务明细,日志
方法参数
字符串(需要单引号’'标识 如:ryTask.ryParams(’ry’))
布尔类型(需要true false标识 如:ryTask.ryParams(true))
长整型(需要L标识 如:ryTask.ryParams(2000L))
浮点型(需要D标识 如:ryTask.ryParams(316.50D))
整型(纯数字即可)
2、 定时任务核心代码了解
2.1 sql脚本
在项目根目录下的sql文件夹中有一个quartz.sql脚本,为Quartz作业调度库创建所需的数据表。
2.2 依赖
ruoyi-quartz模块加入Quartz依赖并去除原有数据池依赖(我们用的阿里云的Druid连接池)
<dependency><groupId>org.quartz-scheduler</groupId><artifactId>quartz</artifactId><exclusions><exclusion><groupId>com.mchange</groupId><artifactId>c3p0</artifactId></exclusion></exclusions>
</dependency>
2.3 定时任务配置
单机部署建议删除此类和qrtz数据库表,默认走内存会最高效
package com.ruoyi.quartz.config;import org.springframework.context.annotation.Bean;
import org.springframework.context.annotation.Configuration;
import org.springframework.scheduling.quartz.SchedulerFactoryBean;
import javax.sql.DataSource;
import java.util.Properties;/*** 定时任务配置(单机部署建议删除此类和qrtz数据库表,默认走内存会最高效)** @author ruoyi*/
@Configuration
public class ScheduleConfig
{@Beanpublic SchedulerFactoryBean schedulerFactoryBean(DataSource dataSource){SchedulerFactoryBean factory = new SchedulerFactoryBean();factory.setDataSource(dataSource);// quartz参数Properties prop = new Properties();// 实例名称(自定义字符串即可)prop.put("org.quartz.scheduler.instanceName", "RuoyiScheduler");// 实例id AUTO 自动生成prop.put("org.quartz.scheduler.instanceId", "AUTO");// 线程池配置prop.put("org.quartz.threadPool.class", "org.quartz.simpl.SimpleThreadPool");// 线程数prop.put("org.quartz.threadPool.threadCount", "20");// 优先级配置prop.put("org.quartz.threadPool.threadPriority", "5");// JobStore配置prop.put("org.quartz.jobStore.class", "org.springframework.scheduling.quartz.LocalDataSourceJobStore");// 集群配置prop.put("org.quartz.jobStore.isClustered", "true");prop.put("org.quartz.jobStore.clusterCheckinInterval", "15000");prop.put("org.quartz.jobStore.maxMisfiresToHandleAtATime", "10");prop.put("org.quartz.jobStore.txIsolationLevelSerializable", "true");// sqlserver 启用// prop.put("org.quartz.jobStore.selectWithLockSQL", "SELECT * FROM {0}LOCKS UPDLOCK WHERE LOCK_NAME = ?");// 任务失败临界值prop.put("org.quartz.jobStore.misfireThreshold", "12000");// 表名称前缀prop.put("org.quartz.jobStore.tablePrefix", "QRTZ_");factory.setQuartzProperties(prop);factory.setSchedulerName("RuoyiScheduler");// 延时启动factory.setStartupDelay(1);factory.setApplicationContextSchedulerContextKey("applicationContextKey");// 可选,QuartzScheduler// 启动时更新己存在的Job,这样就不用每次修改targetObject后删除qrtz_job_details表对应记录了factory.setOverwriteExistingJobs(true);// 设置自动启动,默认为truefactory.setAutoStartup(true);return factory;}
}
2.4 定时任务调度实现
ruoyi-quartz模块com.ruoyi.quartz.service.impl下的SysJobServiceImpl实现了定时任务调度的核心逻辑,控制层调用SysJobServiceImpl中的方法实现定时任务调度
package com.ruoyi.quartz.service.impl;import java.util.List;
import javax.annotation.PostConstruct;
import org.quartz.JobDataMap;
import org.quartz.JobKey;
import org.quartz.Scheduler;
import org.quartz.SchedulerException;
import org.springframework.beans.factory.annotation.Autowired;
import org.springframework.stereotype.Service;
import org.springframework.transaction.annotation.Transactional;
import com.ruoyi.common.constant.ScheduleConstants;
import com.ruoyi.common.exception.job.TaskException;
import com.ruoyi.quartz.domain.SysJob;
import com.ruoyi.quartz.mapper.SysJobMapper;
import com.ruoyi.quartz.service.ISysJobService;
import com.ruoyi.quartz.util.CronUtils;
import com.ruoyi.quartz.util.ScheduleUtils;/*** 定时任务调度信息 服务层* * @author ruoyi*/
@Servicepublic class SysJobServiceImpl implements ISysJobService
{@Autowiredprivate Scheduler scheduler;@Autowiredprivate SysJobMapper jobMapper;/*** 项目启动时,初始化定时器 主要是防止手动修改数据库导致未同步到定时任务处理(注:不能手动修改数据库ID和任务组名,否则会导致脏数据)* 项目启动时读取数据库中的任务信息*/@PostConstructpublic void init() throws SchedulerException, TaskException{scheduler.clear();List<SysJob> jobList = jobMapper.selectJobAll();for (SysJob job : jobList){ScheduleUtils.createScheduleJob(scheduler, job);}}/*** 获取quartz调度器的计划任务列表* * @param job 调度信息* @return*/@Overridepublic List<SysJob> selectJobList(SysJob job){return jobMapper.selectJobList(job);}/*** 通过调度任务ID查询调度信息* * @param jobId 调度任务ID* @return 调度任务对象信息*/@Overridepublic SysJob selectJobById(Long jobId){return jobMapper.selectJobById(jobId);}/*** 暂停任务* * @param job 调度信息*/@Override@Transactional(rollbackFor = Exception.class)public int pauseJob(SysJob job) throws SchedulerException{Long jobId = job.getJobId();String jobGroup = job.getJobGroup();job.setStatus(ScheduleConstants.Status.PAUSE.getValue());int rows = jobMapper.updateJob(job);if (rows > 0){scheduler.pauseJob(ScheduleUtils.getJobKey(jobId, jobGroup));}return rows;}/*** 恢复任务* * @param job 调度信息*/@Override@Transactional(rollbackFor = Exception.class)public int resumeJob(SysJob job) throws SchedulerException{Long jobId = job.getJobId();String jobGroup = job.getJobGroup();job.setStatus(ScheduleConstants.Status.NORMAL.getValue());int rows = jobMapper.updateJob(job);if (rows > 0){scheduler.resumeJob(ScheduleUtils.getJobKey(jobId, jobGroup));}return rows;}/*** 删除任务后,所对应的trigger也将被删除* * @param job 调度信息*/@Override@Transactional(rollbackFor = Exception.class)public int deleteJob(SysJob job) throws SchedulerException{Long jobId = job.getJobId();String jobGroup = job.getJobGroup();int rows = jobMapper.deleteJobById(jobId);if (rows > 0){scheduler.deleteJob(ScheduleUtils.getJobKey(jobId, jobGroup));}return rows;}/*** 批量删除调度信息* * @param jobIds 需要删除的任务ID* @return 结果*/@Override@Transactional(rollbackFor = Exception.class)public void deleteJobByIds(Long[] jobIds) throws SchedulerException{for (Long jobId : jobIds){SysJob job = jobMapper.selectJobById(jobId);deleteJob(job);}}/*** 任务调度状态修改* * @param job 调度信息*/@Override@Transactional(rollbackFor = Exception.class)public int changeStatus(SysJob job) throws SchedulerException{int rows = 0;String status = job.getStatus();if (ScheduleConstants.Status.NORMAL.getValue().equals(status)){rows = resumeJob(job);}else if (ScheduleConstants.Status.PAUSE.getValue().equals(status)){rows = pauseJob(job);}return rows;}/*** 立即运行任务* * @param job 调度信息*/@Override@Transactional(rollbackFor = Exception.class)public boolean run(SysJob job) throws SchedulerException{boolean result = false;Long jobId = job.getJobId();String jobGroup = job.getJobGroup();SysJob properties = selectJobById(job.getJobId());// 参数JobDataMap dataMap = new JobDataMap();dataMap.put(ScheduleConstants.TASK_PROPERTIES, properties);JobKey jobKey = ScheduleUtils.getJobKey(jobId, jobGroup);if (scheduler.checkExists(jobKey)){result = true;scheduler.triggerJob(jobKey, dataMap);}return result;}/*** 新增任务* * @param job 调度信息 调度信息*/@Override@Transactional(rollbackFor = Exception.class)public int insertJob(SysJob job) throws SchedulerException, TaskException{job.setStatus(ScheduleConstants.Status.PAUSE.getValue());int rows = jobMapper.insertJob(job);if (rows > 0){ScheduleUtils.createScheduleJob(scheduler, job);}return rows;}/*** 更新任务的时间表达式* * @param job 调度信息*/@Override@Transactional(rollbackFor = Exception.class)public int updateJob(SysJob job) throws SchedulerException, TaskException{SysJob properties = selectJobById(job.getJobId());int rows = jobMapper.updateJob(job);if (rows > 0){updateSchedulerJob(job, properties.getJobGroup());}return rows;}/*** 更新任务* * @param job 任务对象* @param jobGroup 任务组名*/public void updateSchedulerJob(SysJob job, String jobGroup) throws SchedulerException, TaskException{Long jobId = job.getJobId();// 判断是否存在JobKey jobKey = ScheduleUtils.getJobKey(jobId, jobGroup);if (scheduler.checkExists(jobKey)){// 防止创建时存在数据问题 先移除,然后在执行创建操作scheduler.deleteJob(jobKey);}ScheduleUtils.createScheduleJob(scheduler, job);}/*** 校验cron表达式是否有效* * @param cronExpression 表达式* @return 结果*/@Overridepublic boolean checkCronExpressionIsValid(String cronExpression){return CronUtils.isValid(cronExpression);}
}
工具类ScheduleUtils
package com.ruoyi.quartz.util;import org.quartz.CronScheduleBuilder;
import org.quartz.CronTrigger;
import org.quartz.Job;
import org.quartz.JobBuilder;
import org.quartz.JobDetail;
import org.quartz.JobKey;
import org.quartz.Scheduler;
import org.quartz.SchedulerException;
import org.quartz.TriggerBuilder;
import org.quartz.TriggerKey;
import com.ruoyi.common.constant.Constants;
import com.ruoyi.common.constant.ScheduleConstants;
import com.ruoyi.common.exception.job.TaskException;
import com.ruoyi.common.exception.job.TaskException.Code;
import com.ruoyi.common.utils.StringUtils;
import com.ruoyi.common.utils.spring.SpringUtils;
import com.ruoyi.quartz.domain.SysJob;/*** 定时任务工具类* * @author ruoyi**/
public class ScheduleUtils
{/*** 得到quartz任务类** @param sysJob 执行计划* @return 具体执行任务类*/private static Class<? extends Job> getQuartzJobClass(SysJob sysJob){// 根据concurrent属性判断任务是否允许并发boolean isConcurrent = "0".equals(sysJob.getConcurrent());return isConcurrent ? QuartzJobExecution.class : QuartzDisallowConcurrentExecution.class;}/*** 构建任务触发对象*/public static TriggerKey getTriggerKey(Long jobId, String jobGroup){return TriggerKey.triggerKey(ScheduleConstants.TASK_CLASS_NAME + jobId, jobGroup);}/*** 构建任务键对象*/public static JobKey getJobKey(Long jobId, String jobGroup){return JobKey.jobKey(ScheduleConstants.TASK_CLASS_NAME + jobId, jobGroup);}/*** 创建定时任务*/public static void createScheduleJob(Scheduler scheduler, SysJob job) throws SchedulerException, TaskException{// 获取具体执行类Class<? extends Job> jobClass = getQuartzJobClass(job);// 构建job信息Long jobId = job.getJobId();String jobGroup = job.getJobGroup();JobDetail jobDetail = JobBuilder.newJob(jobClass).withIdentity(getJobKey(jobId, jobGroup)).build();// 表达式调度构建器CronScheduleBuilder cronScheduleBuilder = CronScheduleBuilder.cronSchedule(job.getCronExpression());cronScheduleBuilder = handleCronScheduleMisfirePolicy(job, cronScheduleBuilder);// 按新的cronExpression表达式构建一个新的triggerCronTrigger trigger = TriggerBuilder.newTrigger().withIdentity(getTriggerKey(jobId, jobGroup)).withSchedule(cronScheduleBuilder).build();// 放入参数,运行时的方法可以获取jobDetail.getJobDataMap().put(ScheduleConstants.TASK_PROPERTIES, job);// 判断是否存在if (scheduler.checkExists(getJobKey(jobId, jobGroup))){// 防止创建时存在数据问题 先移除,然后在执行创建操作scheduler.deleteJob(getJobKey(jobId, jobGroup));}// 判断任务是否过期if (StringUtils.isNotNull(CronUtils.getNextExecution(job.getCronExpression()))){// 执行调度任务scheduler.scheduleJob(jobDetail, trigger);}// 暂停任务if (job.getStatus().equals(ScheduleConstants.Status.PAUSE.getValue())){scheduler.pauseJob(ScheduleUtils.getJobKey(jobId, jobGroup));}}/*** 设置定时任务策略*/public static CronScheduleBuilder handleCronScheduleMisfirePolicy(SysJob job, CronScheduleBuilder cb)throws TaskException{switch (job.getMisfirePolicy()){case ScheduleConstants.MISFIRE_DEFAULT:return cb;case ScheduleConstants.MISFIRE_IGNORE_MISFIRES:return cb.withMisfireHandlingInstructionIgnoreMisfires();case ScheduleConstants.MISFIRE_FIRE_AND_PROCEED:return cb.withMisfireHandlingInstructionFireAndProceed();case ScheduleConstants.MISFIRE_DO_NOTHING:return cb.withMisfireHandlingInstructionDoNothing();default:throw new TaskException("The task misfire policy '" + job.getMisfirePolicy()+ "' cannot be used in cron schedule tasks", Code.CONFIG_ERROR);}}/*** 检查包名是否为白名单配置* * @param invokeTarget 目标字符串* @return 结果*/public static boolean whiteList(String invokeTarget){String packageName = StringUtils.substringBefore(invokeTarget, "(");int count = StringUtils.countMatches(packageName, ".");if (count > 1){return StringUtils.startsWithAny(invokeTarget, Constants.JOB_WHITELIST_STR);}Object obj = SpringUtils.getBean(StringUtils.split(invokeTarget, ".")[0]);String beanPackageName = obj.getClass().getPackage().getName();return StringUtils.startsWithAny(beanPackageName, Constants.JOB_WHITELIST_STR)&& !StringUtils.startsWithAny(beanPackageName, Constants.JOB_ERROR_STR);}
}
二 服务监控
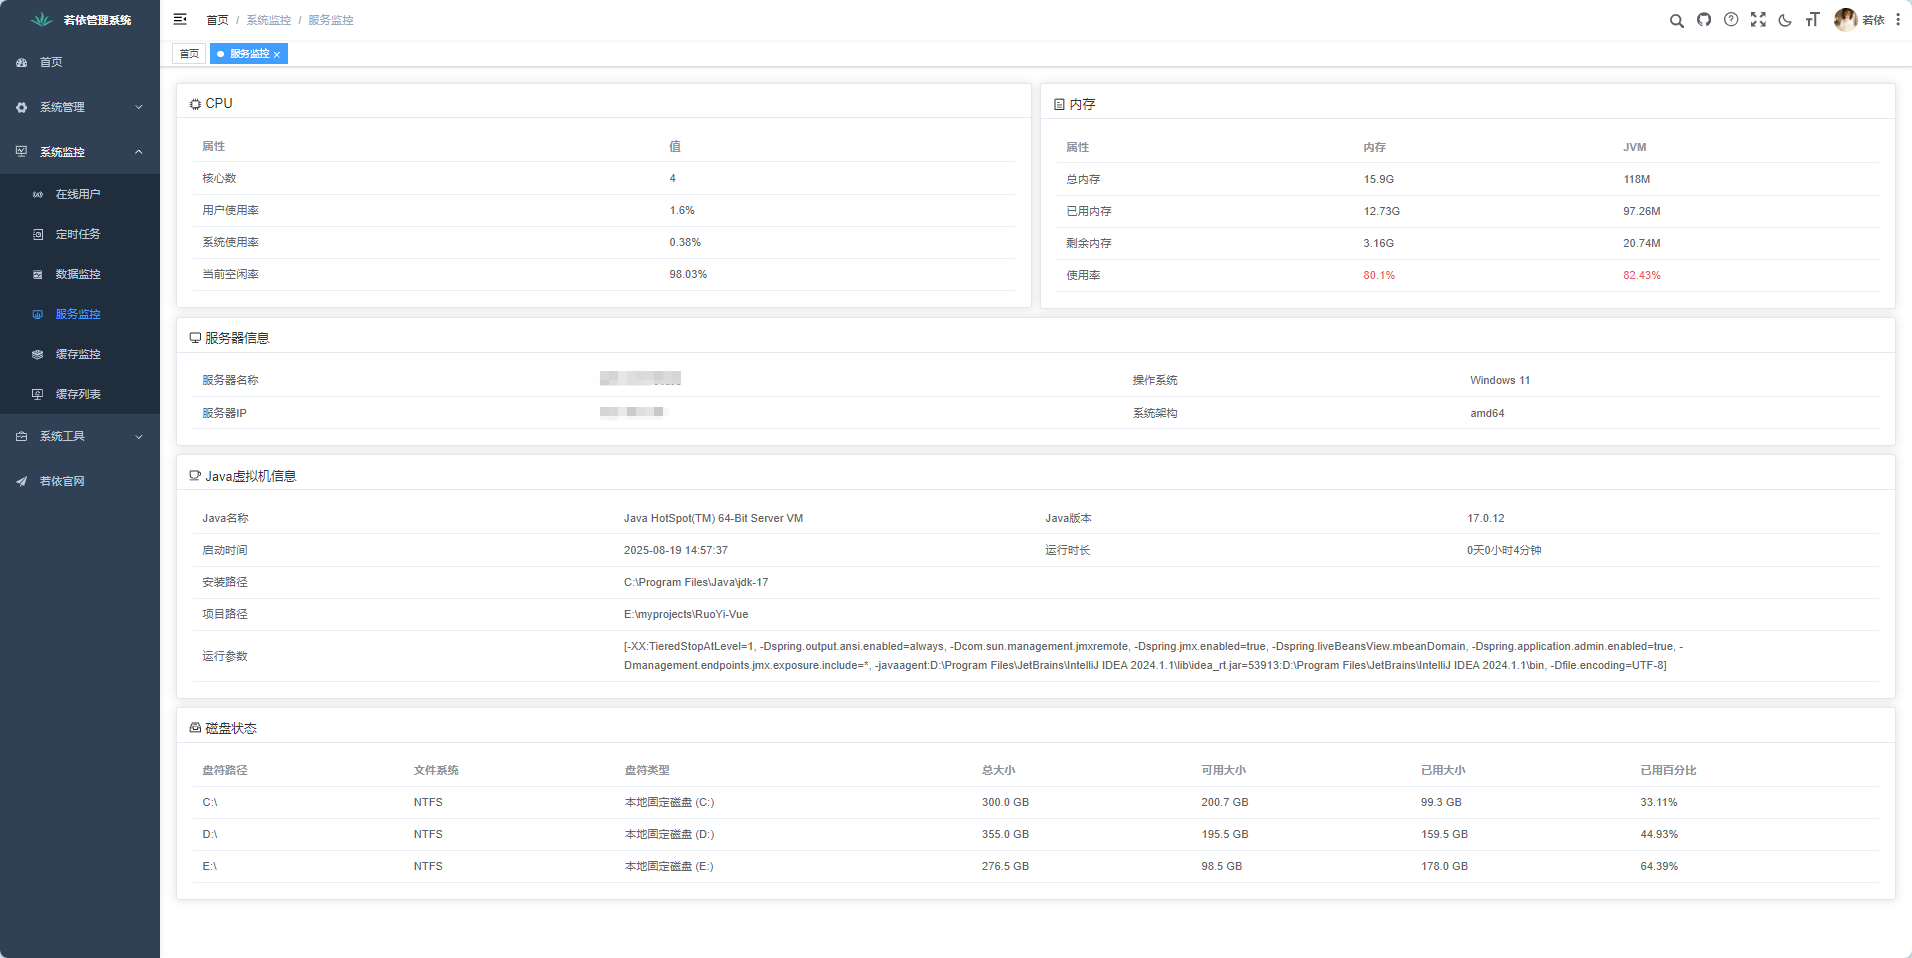
1、显示内容
服务监控页面展示服务器CPU,服务器信息,Java虚拟机以及磁盘状态信息
2、实现
2.1 依赖
ruoyi-framework模块下
<!-- 获取系统信息 -->
<dependency><groupId>com.github.oshi</groupId><artifactId>oshi-core</artifactId>
</dependency>
2.2 代码
接口
package com.ruoyi.web.controller.monitor;import org.springframework.security.access.prepost.PreAuthorize;
import org.springframework.web.bind.annotation.GetMapping;
import org.springframework.web.bind.annotation.RequestMapping;
import org.springframework.web.bind.annotation.RestController;
import com.ruoyi.common.core.domain.AjaxResult;
import com.ruoyi.framework.web.domain.Server;/*** 服务器监控* * @author ruoyi*/
@RestController
@RequestMapping("/monitor/server")
public class ServerController
{@PreAuthorize("@ss.hasPermi('monitor:server:list')")@GetMapping()public AjaxResult getInfo() throws Exception{Server server = new Server();server.copyTo();return AjaxResult.success(server);}
}
Server类
调用api获取服务信息并返回
package com.ruoyi.framework.web.domain;import java.net.UnknownHostException;
import java.util.LinkedList;
import java.util.List;
import java.util.Properties;
import com.ruoyi.common.utils.Arith;
import com.ruoyi.common.utils.ip.IpUtils;
import com.ruoyi.framework.web.domain.server.Cpu;
import com.ruoyi.framework.web.domain.server.Jvm;
import com.ruoyi.framework.web.domain.server.Mem;
import com.ruoyi.framework.web.domain.server.Sys;
import com.ruoyi.framework.web.domain.server.SysFile;
import oshi.SystemInfo;
import oshi.hardware.CentralProcessor;
import oshi.hardware.CentralProcessor.TickType;
import oshi.hardware.GlobalMemory;
import oshi.hardware.HardwareAbstractionLayer;
import oshi.software.os.FileSystem;
import oshi.software.os.OSFileStore;
import oshi.software.os.OperatingSystem;
import oshi.util.Util;/*** 服务器相关信息* * @author ruoyi*/
public class Server
{private static final int OSHI_WAIT_SECOND = 1000;/*** CPU相关信息*/private Cpu cpu = new Cpu();/*** 內存相关信息*/private Mem mem = new Mem();/*** JVM相关信息*/private Jvm jvm = new Jvm();/*** 服务器相关信息*/private Sys sys = new Sys();/*** 磁盘相关信息*/private List<SysFile> sysFiles = new LinkedList<SysFile>();public Cpu getCpu(){return cpu;}public void setCpu(Cpu cpu){this.cpu = cpu;}public Mem getMem(){return mem;}public void setMem(Mem mem){this.mem = mem;}public Jvm getJvm(){return jvm;}public void setJvm(Jvm jvm){this.jvm = jvm;}public Sys getSys(){return sys;}public void setSys(Sys sys){this.sys = sys;}public List<SysFile> getSysFiles(){return sysFiles;}public void setSysFiles(List<SysFile> sysFiles){this.sysFiles = sysFiles;}public void copyTo() throws Exception{SystemInfo si = new SystemInfo();HardwareAbstractionLayer hal = si.getHardware();setCpuInfo(hal.getProcessor());setMemInfo(hal.getMemory());setSysInfo();setJvmInfo();setSysFiles(si.getOperatingSystem());}/*** 设置CPU信息*/private void setCpuInfo(CentralProcessor processor){// CPU信息long[] prevTicks = processor.getSystemCpuLoadTicks();// 等待一秒再获取数据,否则可能会获取不到Util.sleep(OSHI_WAIT_SECOND);long[] ticks = processor.getSystemCpuLoadTicks();long nice = ticks[TickType.NICE.getIndex()] - prevTicks[TickType.NICE.getIndex()];long irq = ticks[TickType.IRQ.getIndex()] - prevTicks[TickType.IRQ.getIndex()];long softirq = ticks[TickType.SOFTIRQ.getIndex()] - prevTicks[TickType.SOFTIRQ.getIndex()];long steal = ticks[TickType.STEAL.getIndex()] - prevTicks[TickType.STEAL.getIndex()];long cSys = ticks[TickType.SYSTEM.getIndex()] - prevTicks[TickType.SYSTEM.getIndex()];long user = ticks[TickType.USER.getIndex()] - prevTicks[TickType.USER.getIndex()];long iowait = ticks[TickType.IOWAIT.getIndex()] - prevTicks[TickType.IOWAIT.getIndex()];long idle = ticks[TickType.IDLE.getIndex()] - prevTicks[TickType.IDLE.getIndex()];long totalCpu = user + nice + cSys + idle + iowait + irq + softirq + steal;cpu.setCpuNum(processor.getLogicalProcessorCount());cpu.setTotal(totalCpu);cpu.setSys(cSys);cpu.setUsed(user);cpu.setWait(iowait);cpu.setFree(idle);}/*** 设置内存信息*/private void setMemInfo(GlobalMemory memory){mem.setTotal(memory.getTotal());mem.setUsed(memory.getTotal() - memory.getAvailable());mem.setFree(memory.getAvailable());}/*** 设置服务器信息*/private void setSysInfo(){Properties props = System.getProperties();sys.setComputerName(IpUtils.getHostName());sys.setComputerIp(IpUtils.getHostIp());sys.setOsName(props.getProperty("os.name"));sys.setOsArch(props.getProperty("os.arch"));sys.setUserDir(props.getProperty("user.dir"));}/*** 设置Java虚拟机*/private void setJvmInfo() throws UnknownHostException{Properties props = System.getProperties();jvm.setTotal(Runtime.getRuntime().totalMemory());jvm.setMax(Runtime.getRuntime().maxMemory());jvm.setFree(Runtime.getRuntime().freeMemory());jvm.setVersion(props.getProperty("java.version"));jvm.setHome(props.getProperty("java.home"));}/*** 设置磁盘信息*/private void setSysFiles(OperatingSystem os){FileSystem fileSystem = os.getFileSystem();List<OSFileStore> fsArray = fileSystem.getFileStores();for (OSFileStore fs : fsArray){long free = fs.getUsableSpace();long total = fs.getTotalSpace();long used = total - free;SysFile sysFile = new SysFile();sysFile.setDirName(fs.getMount());sysFile.setSysTypeName(fs.getType());sysFile.setTypeName(fs.getName());sysFile.setTotal(convertFileSize(total));sysFile.setFree(convertFileSize(free));sysFile.setUsed(convertFileSize(used));sysFile.setUsage(Arith.mul(Arith.div(used, total, 4), 100));sysFiles.add(sysFile);}}/*** 字节转换* * @param size 字节大小* @return 转换后值*/public String convertFileSize(long size){long kb = 1024;long mb = kb * 1024;long gb = mb * 1024;if (size >= gb){return String.format("%.1f GB", (float) size / gb);}else if (size >= mb){float f = (float) size / mb;return String.format(f > 100 ? "%.0f MB" : "%.1f MB", f);}else if (size >= kb){float f = (float) size / kb;return String.format(f > 100 ? "%.0f KB" : "%.1f KB", f);}else{return String.format("%d B", size);}}
}
三 缓存监控,缓存列表
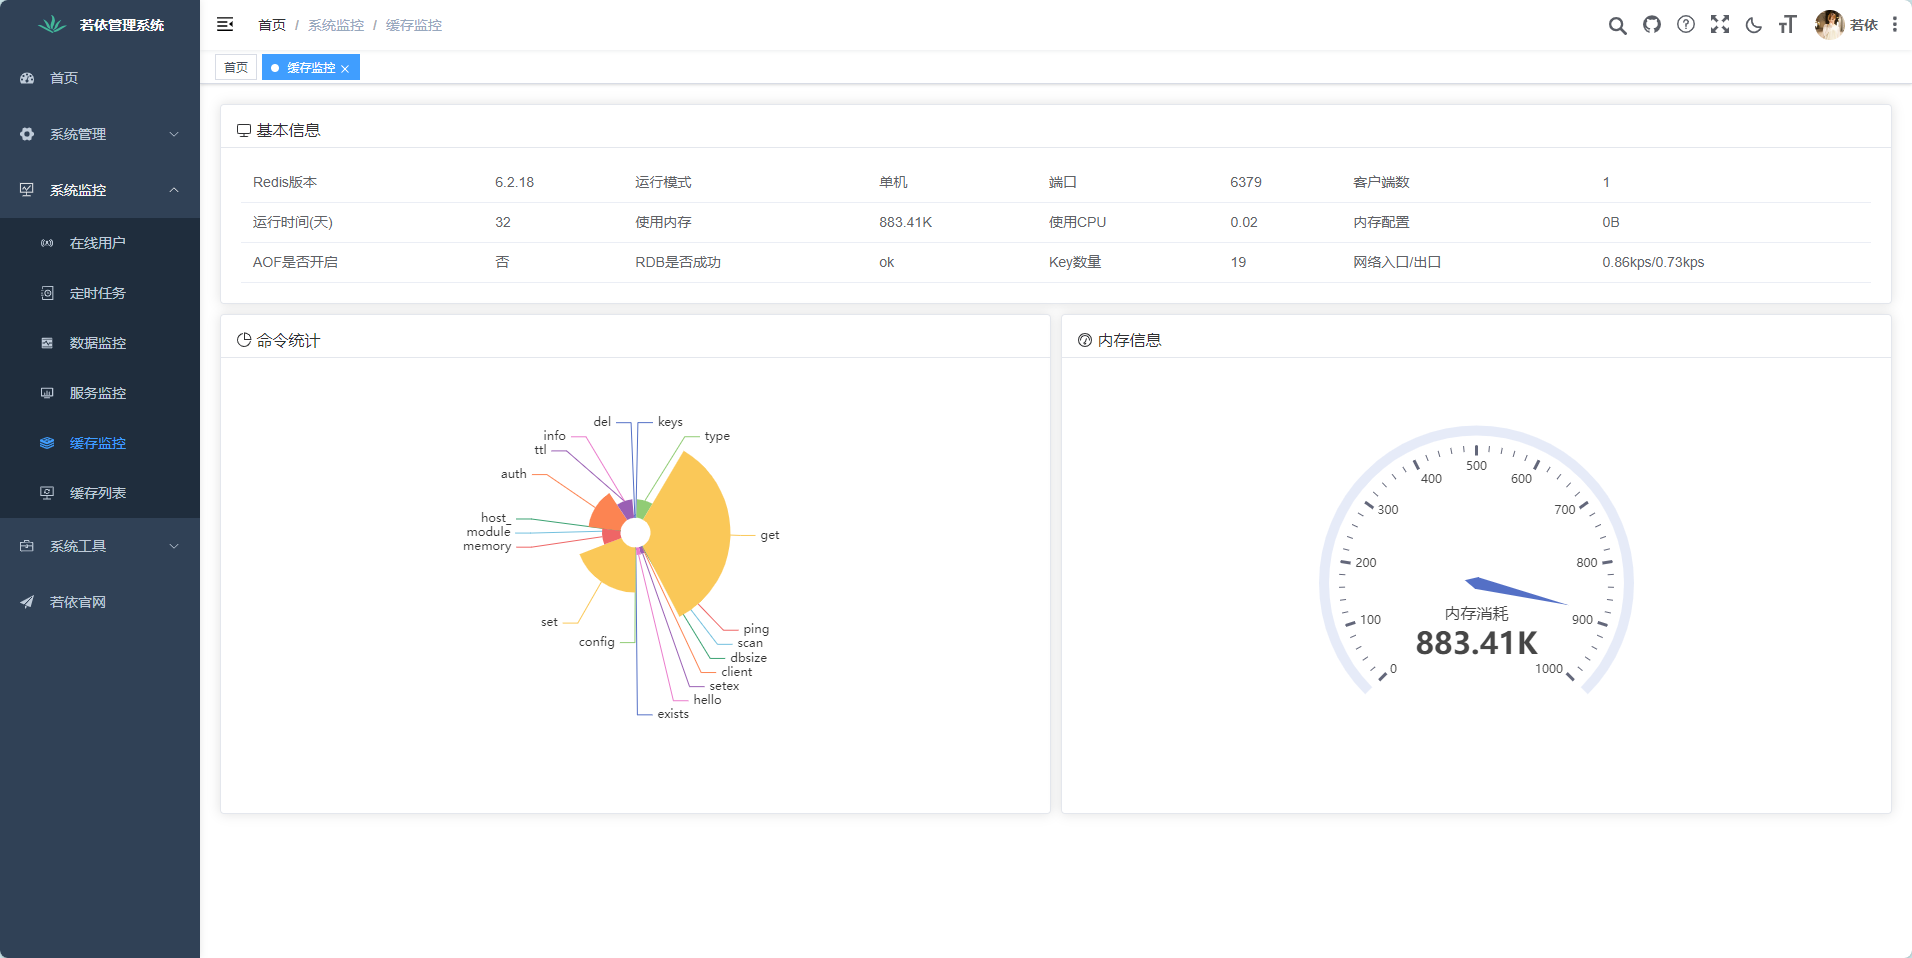
1、显示内容
展示Redis版本,运行模式,命令统计以及内存等信息
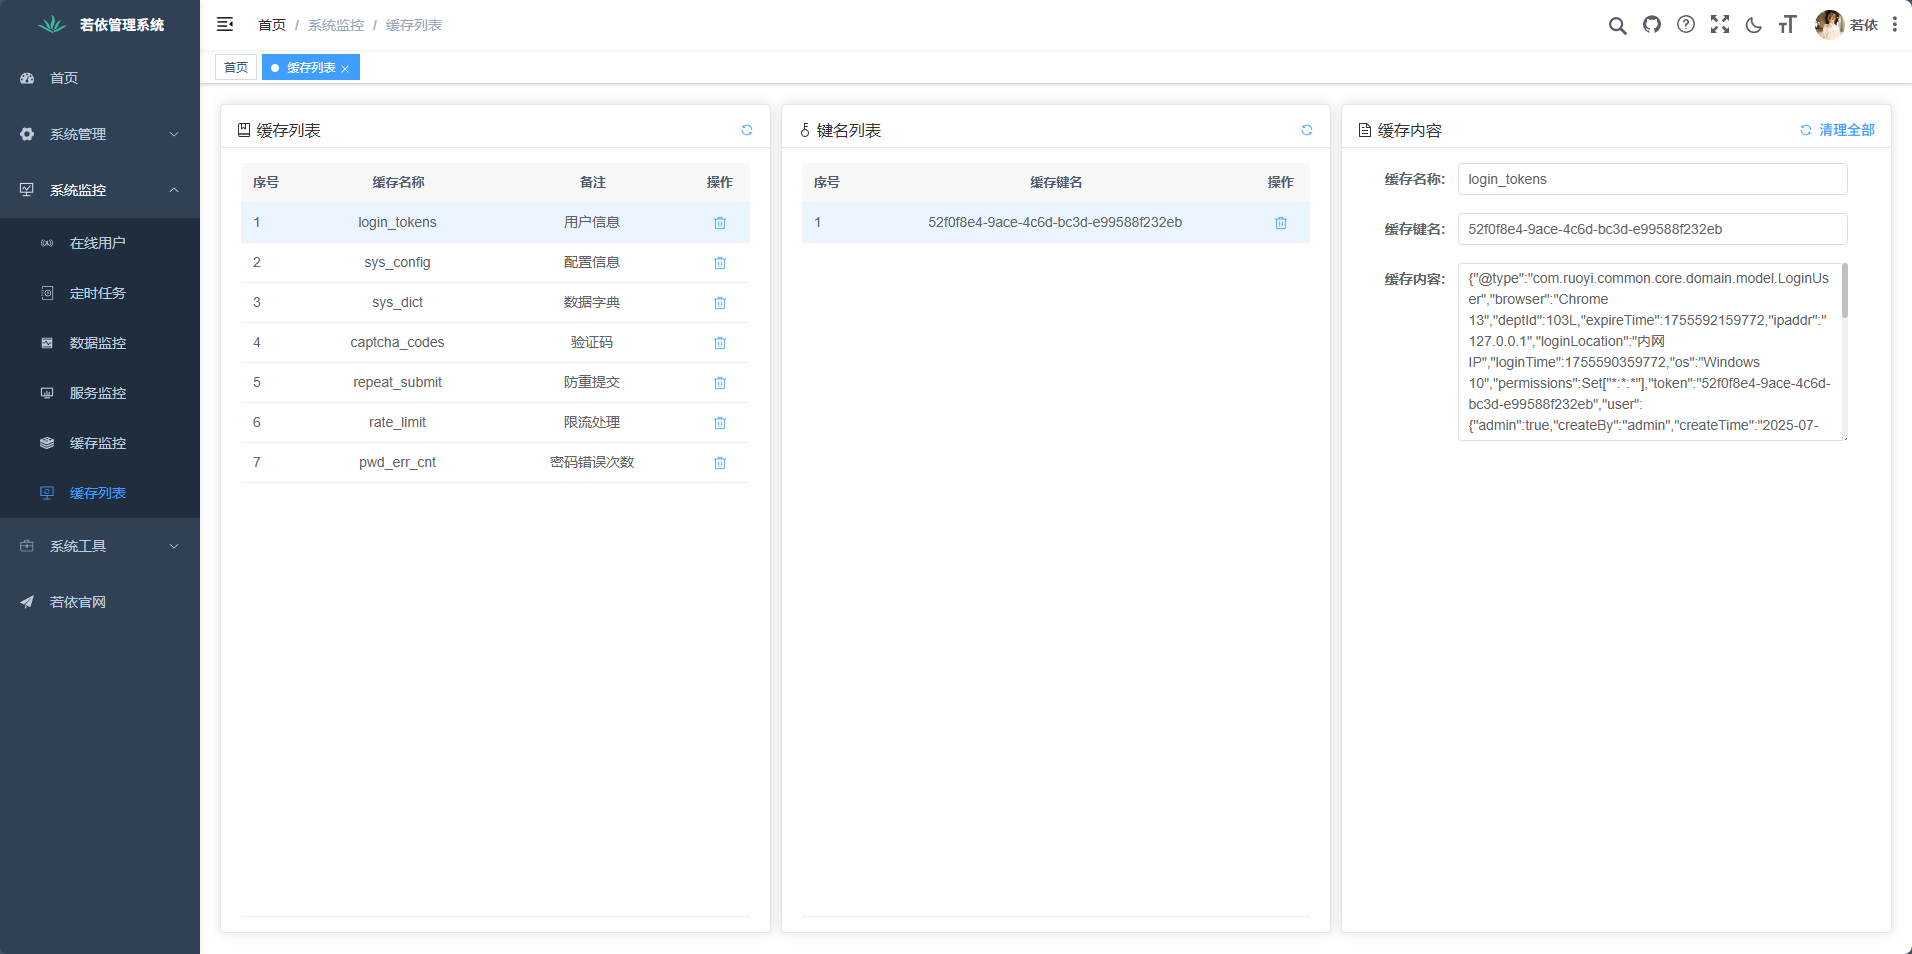
展示缓存列表,键名列表以及对应缓存内容等
2、实现
2.1 依赖
在ruoyi-common模块pom文件中
<!-- redis 缓存操作 -->
<dependency><groupId>org.springframework.boot</groupId><artifactId>spring-boot-starter-data-redis</artifactId>
</dependency>
模块依赖关系:ruoyi-admin -> ruoyi-framework -> ruoyi-system -> ruoyi-common
2.2 代码
接口
package com.ruoyi.web.controller.monitor;import java.util.ArrayList;
import java.util.Collection;
import java.util.HashMap;
import java.util.List;
import java.util.Map;
import java.util.Properties;
import java.util.Set;
import java.util.TreeSet;
import org.springframework.beans.factory.annotation.Autowired;
import org.springframework.data.redis.core.RedisCallback;
import org.springframework.data.redis.core.RedisTemplate;
import org.springframework.security.access.prepost.PreAuthorize;
import org.springframework.web.bind.annotation.DeleteMapping;
import org.springframework.web.bind.annotation.GetMapping;
import org.springframework.web.bind.annotation.PathVariable;
import org.springframework.web.bind.annotation.RequestMapping;
import org.springframework.web.bind.annotation.RestController;
import com.ruoyi.common.constant.CacheConstants;
import com.ruoyi.common.core.domain.AjaxResult;
import com.ruoyi.common.utils.StringUtils;
import com.ruoyi.system.domain.SysCache;/*** 缓存监控* * @author ruoyi*/
@RestController
@RequestMapping("/monitor/cache")
public class CacheController
{// 使用RedisTemplate来操作Redis@Autowiredprivate RedisTemplate<String, String> redisTemplate;// 初始化系统中使用的各种缓存类型,包括登录令牌、系统配置、数据字典等,用于前端展示 private final static List<SysCache> caches = new ArrayList<SysCache>();{caches.add(new SysCache(CacheConstants.LOGIN_TOKEN_KEY, "用户信息"));caches.add(new SysCache(CacheConstants.SYS_CONFIG_KEY, "配置信息"));caches.add(new SysCache(CacheConstants.SYS_DICT_KEY, "数据字典"));caches.add(new SysCache(CacheConstants.CAPTCHA_CODE_KEY, "验证码"));caches.add(new SysCache(CacheConstants.REPEAT_SUBMIT_KEY, "防重提交"));caches.add(new SysCache(CacheConstants.RATE_LIMIT_KEY, "限流处理"));caches.add(new SysCache(CacheConstants.PWD_ERR_CNT_KEY, "密码错误次数"));}/** 获取Redis基本信息* Redis服务器信息(info)* 命令统计信息(commandStats)* 数据库大小(dbSize) 并将这些信息格式化后返回给前端。*/@PreAuthorize("@ss.hasPermi('monitor:cache:list')")@GetMapping()public AjaxResult getInfo() throws Exception{Properties info = (Properties) redisTemplate.execute((RedisCallback<Object>) connection -> connection.info());Properties commandStats = (Properties) redisTemplate.execute((RedisCallback<Object>) connection -> connection.info("commandstats"));Object dbSize = redisTemplate.execute((RedisCallback<Object>) connection -> connection.dbSize());Map<String, Object> result = new HashMap<>(3);result.put("info", info);result.put("dbSize", dbSize);List<Map<String, String>> pieList = new ArrayList<>();commandStats.stringPropertyNames().forEach(key -> {Map<String, String> data = new HashMap<>(2);String property = commandStats.getProperty(key);data.put("name", StringUtils.removeStart(key, "cmdstat_"));data.put("value", StringUtils.substringBetween(property, "calls=", ",usec"));pieList.add(data);});result.put("commandStats", pieList);return AjaxResult.success(result);}// 获取缓存名称列表 @PreAuthorize("@ss.hasPermi('monitor:cache:list')")@GetMapping("/getNames")public AjaxResult cache(){return AjaxResult.success(caches);}// 获取指定缓存的所有键@PreAuthorize("@ss.hasPermi('monitor:cache:list')")@GetMapping("/getKeys/{cacheName}")public AjaxResult getCacheKeys(@PathVariable String cacheName){Set<String> cacheKeys = redisTemplate.keys(cacheName + "*");return AjaxResult.success(new TreeSet<>(cacheKeys));}// 获取特定缓存键的值,并封装成SysCache对象返回@PreAuthorize("@ss.hasPermi('monitor:cache:list')")@GetMapping("/getValue/{cacheName}/{cacheKey}")public AjaxResult getCacheValue(@PathVariable String cacheName, @PathVariable String cacheKey){String cacheValue = redisTemplate.opsForValue().get(cacheKey);SysCache sysCache = new SysCache(cacheName, cacheKey, cacheValue);return AjaxResult.success(sysCache);}// 清除指定缓存名称下的所有键,删除指定缓存名称前缀的所有键@PreAuthorize("@ss.hasPermi('monitor:cache:list')")@DeleteMapping("/clearCacheName/{cacheName}")public AjaxResult clearCacheName(@PathVariable String cacheName){Collection<String> cacheKeys = redisTemplate.keys(cacheName + "*");redisTemplate.delete(cacheKeys);return AjaxResult.success();}// 删除指定缓存键@PreAuthorize("@ss.hasPermi('monitor:cache:list')")@DeleteMapping("/clearCacheKey/{cacheKey}")public AjaxResult clearCacheKey(@PathVariable String cacheKey){redisTemplate.delete(cacheKey);return AjaxResult.success();}// 清空所有缓存,删除Redis中的所有键,即清空整个缓存数据库@PreAuthorize("@ss.hasPermi('monitor:cache:list')")@DeleteMapping("/clearCacheAll")public AjaxResult clearCacheAll(){Collection<String> cacheKeys = redisTemplate.keys("*");redisTemplate.delete(cacheKeys);return AjaxResult.success();}
}
四 系统接口
在现在的开发过程中还有很大一部分公司都是以口口相传的方式来进行前后端的联调,而接口文档很大一部分都只停留在了说说而已的地步,或者写了代码再写文档。 还有一点就是文档的修改,定义好的接口并不是一成不变的,可能在开发过程中文档修改不止一次的变化,这个时候就会很难受了。 只要不是强制性要求,没人会愿意写这东西,而且在写的过程中,一个字母的错误就会导致联调时候的很大麻烦,但是通过Swagger,我们可以省略了这一步,而且文档出错率近乎于零, 只要你在写代码的时候,稍加几个注解,文档自动生成。
这里使用前端使用Vue3,后端使用Spring Boot2的代码的话,系统接口进行接口测试会返回404,具体问题解析和解决办法可参考RuoYi-Vue3项目中Swagger接口测试404,端口问题解析排查
1、系统接口使用
1.1 身份认证
在系统接口中使用Swagger测试接口前要进行身份验证
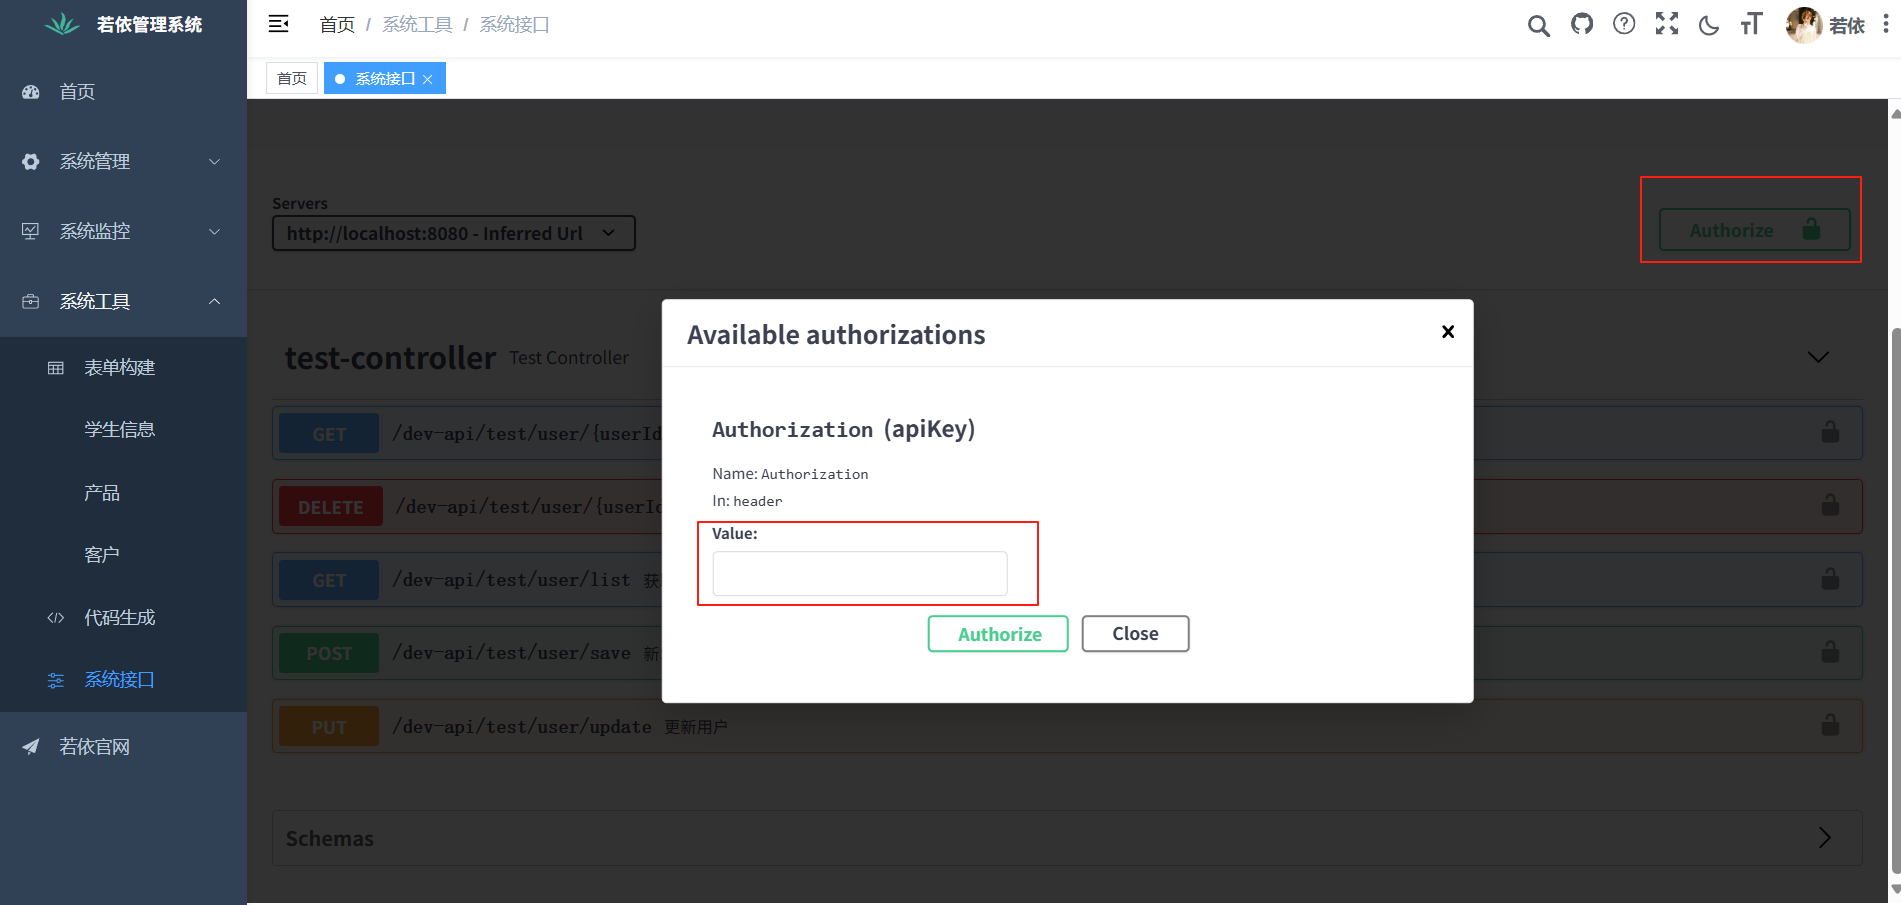
这里我直接从浏览器中复制当前的token
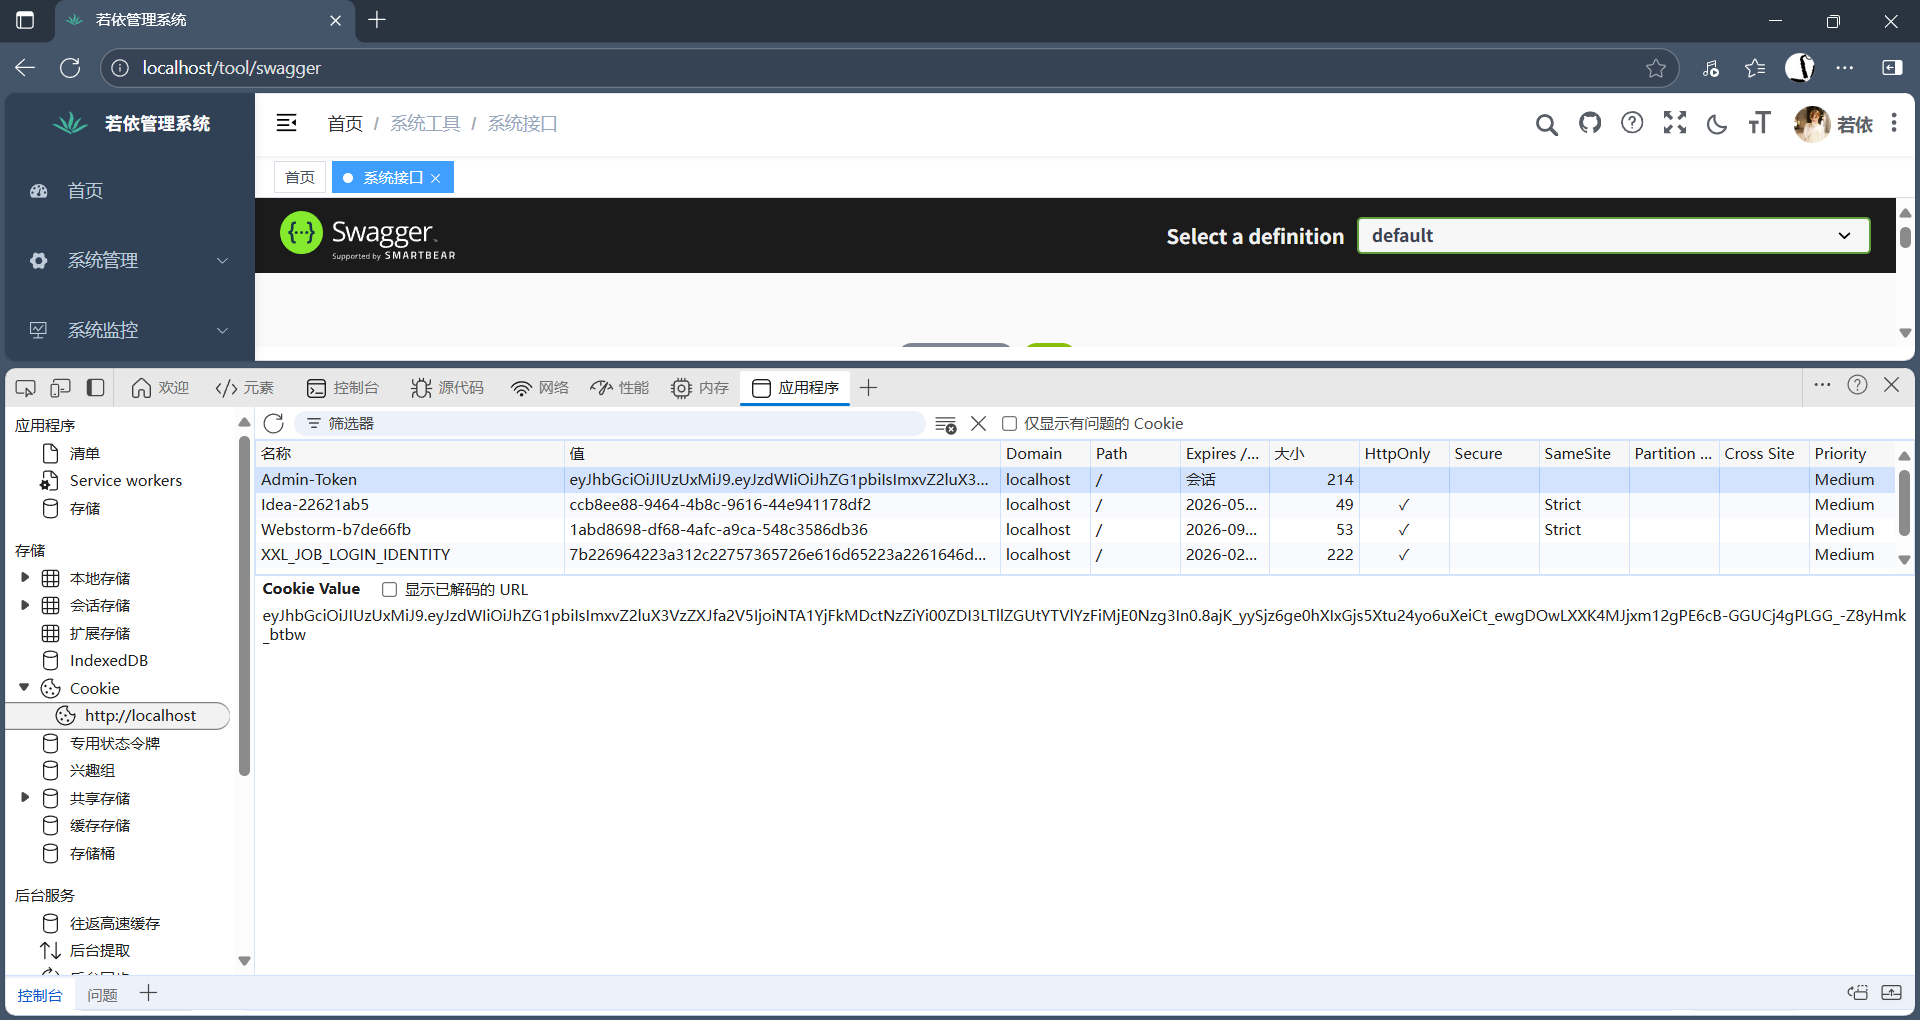
复制过来,点击认证
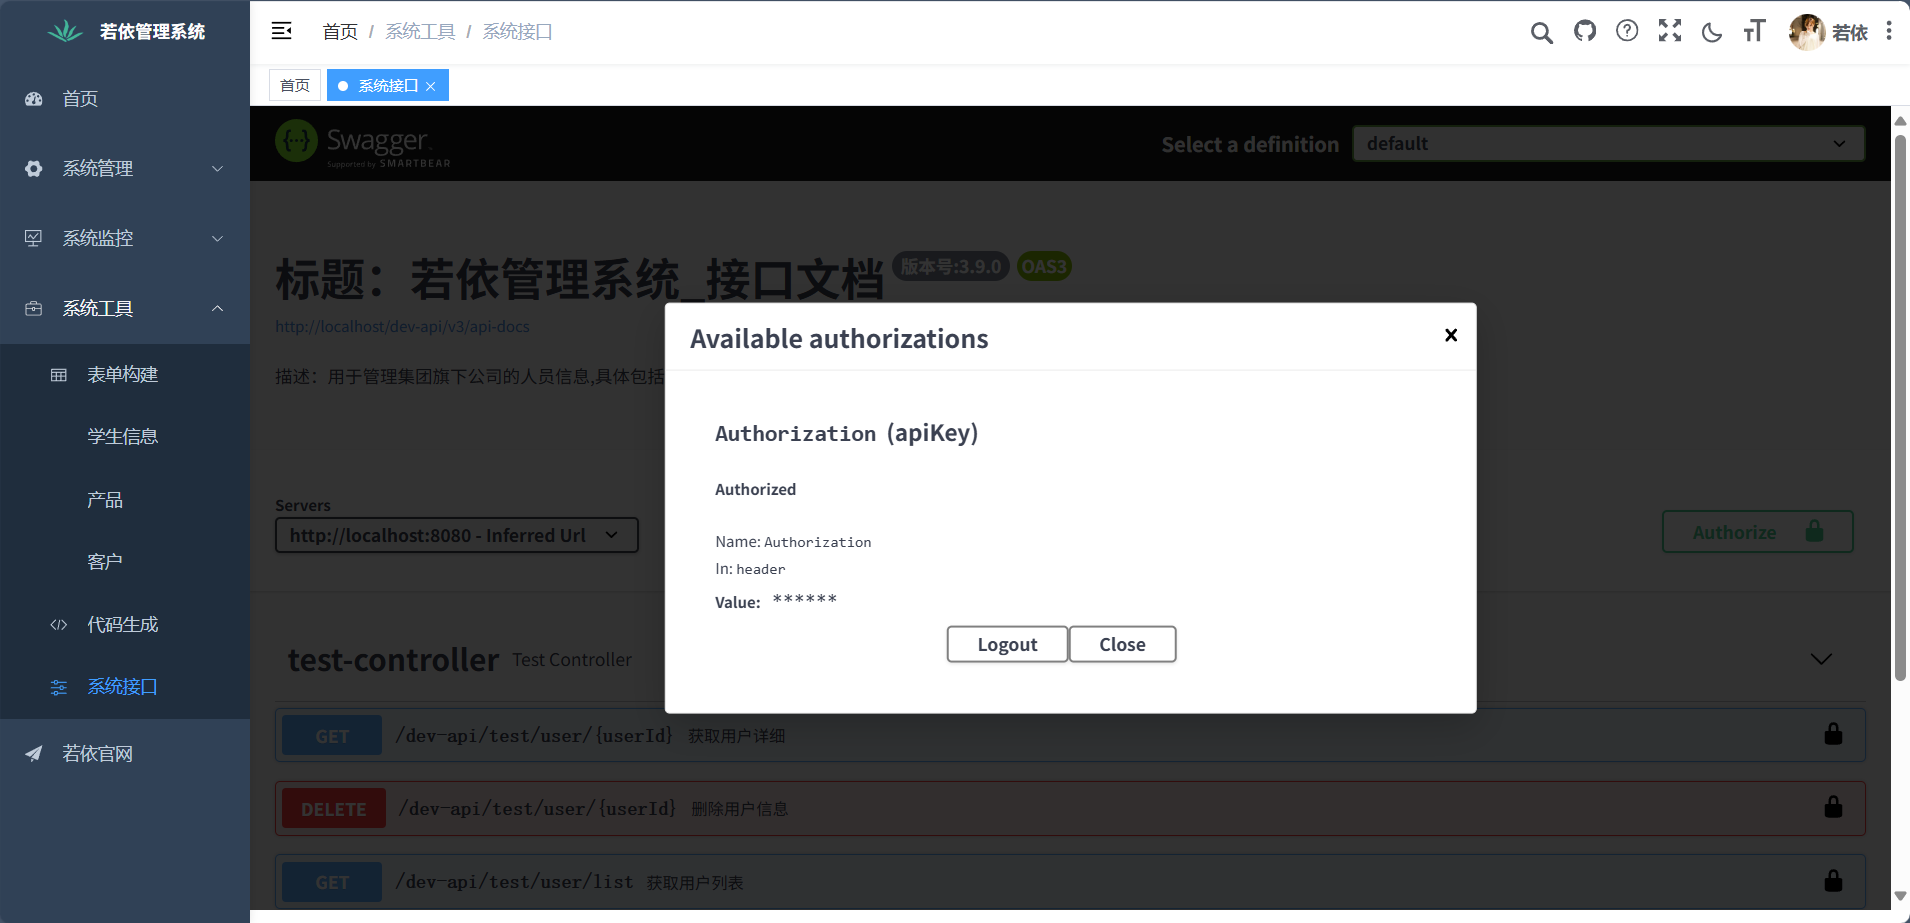
现在就可以进行接口测试了
2、系统接口实现
2.1 依赖
父项目pom文件中加入swagger依赖
<!-- Swagger3依赖 -->
<dependency><groupId>io.springfox</groupId><artifactId>springfox-boot-starter</artifactId><version>${swagger.version}</version><exclusions><exclusion><groupId>io.swagger</groupId><artifactId>swagger-models</artifactId></exclusion></exclusions>
</dependency>
swagger配置类SwaggerConfig
package com.ruoyi.web.core.config;import java.util.ArrayList;
import java.util.List;import org.springframework.beans.factory.annotation.Autowired;
import org.springframework.beans.factory.annotation.Value;
import org.springframework.context.annotation.Bean;
import org.springframework.context.annotation.Configuration;
import com.ruoyi.common.config.RuoYiConfig;
import io.swagger.annotations.ApiOperation;
import io.swagger.models.auth.In;
import springfox.documentation.builders.ApiInfoBuilder;
import springfox.documentation.builders.PathSelectors;
import springfox.documentation.builders.RequestHandlerSelectors;
import springfox.documentation.service.ApiInfo;
import springfox.documentation.service.ApiKey;
import springfox.documentation.service.AuthorizationScope;
import springfox.documentation.service.Contact;
import springfox.documentation.service.SecurityReference;
import springfox.documentation.service.SecurityScheme;
import springfox.documentation.spi.DocumentationType;
import springfox.documentation.spi.service.contexts.SecurityContext;
import springfox.documentation.spring.web.plugins.Docket;/*** Swagger2的接口配置* * @author ruoyi*/
@Configuration
public class SwaggerConfig
{/** 系统基础配置 */@Autowiredprivate RuoYiConfig ruoyiConfig;/** 是否开启swagger */@Value("${swagger.enabled}")private boolean enabled;/** 设置请求的统一前缀 */@Value("${swagger.pathMapping}")private String pathMapping;/*** 创建API*/@Beanpublic Docket createRestApi(){return new Docket(DocumentationType.OAS_30)// 是否启用Swagger.enable(enabled)// 用来创建该API的基本信息,展示在文档的页面中(自定义展示的信息).apiInfo(apiInfo())// 设置哪些接口暴露给Swagger展示.select()// 扫描所有有注解的api,用这种方式更灵活.apis(RequestHandlerSelectors.withMethodAnnotation(ApiOperation.class))// 扫描指定包中的swagger注解// .apis(RequestHandlerSelectors.basePackage("com.ruoyi.project.tool.swagger"))// 扫描所有 // .apis(RequestHandlerSelectors.any()).paths(PathSelectors.any()).build()/* 设置安全模式,swagger可以设置访问token */.securitySchemes(securitySchemes()).securityContexts(securityContexts()).pathMapping(pathMapping);}/*** 安全模式,这里指定token通过Authorization头请求头传递*/private List<SecurityScheme> securitySchemes(){List<SecurityScheme> apiKeyList = new ArrayList<SecurityScheme>();apiKeyList.add(new ApiKey("Authorization", "Authorization", In.HEADER.toValue()));return apiKeyList;}/*** 安全上下文*/private List<SecurityContext> securityContexts(){List<SecurityContext> securityContexts = new ArrayList<>();securityContexts.add(SecurityContext.builder().securityReferences(defaultAuth()).operationSelector(o -> o.requestMappingPattern().matches("/.*")).build());return securityContexts;}/*** 默认的安全上引用*/private List<SecurityReference> defaultAuth(){AuthorizationScope authorizationScope = new AuthorizationScope("global", "accessEverything");AuthorizationScope[] authorizationScopes = new AuthorizationScope[1];authorizationScopes[0] = authorizationScope;List<SecurityReference> securityReferences = new ArrayList<>();securityReferences.add(new SecurityReference("Authorization", authorizationScopes));return securityReferences;}/*** 添加摘要信息*/private ApiInfo apiInfo(){// 用ApiInfoBuilder进行定制return new ApiInfoBuilder()// 设置标题.title("标题:若依管理系统_接口文档")// 描述.description("描述:用于管理集团旗下公司的人员信息,具体包括XXX,XXX模块...")// 作者信息.contact(new Contact(ruoyiConfig.getName(), null, null))// 版本.version("版本号:" + ruoyiConfig.getVersion()).build();}
}
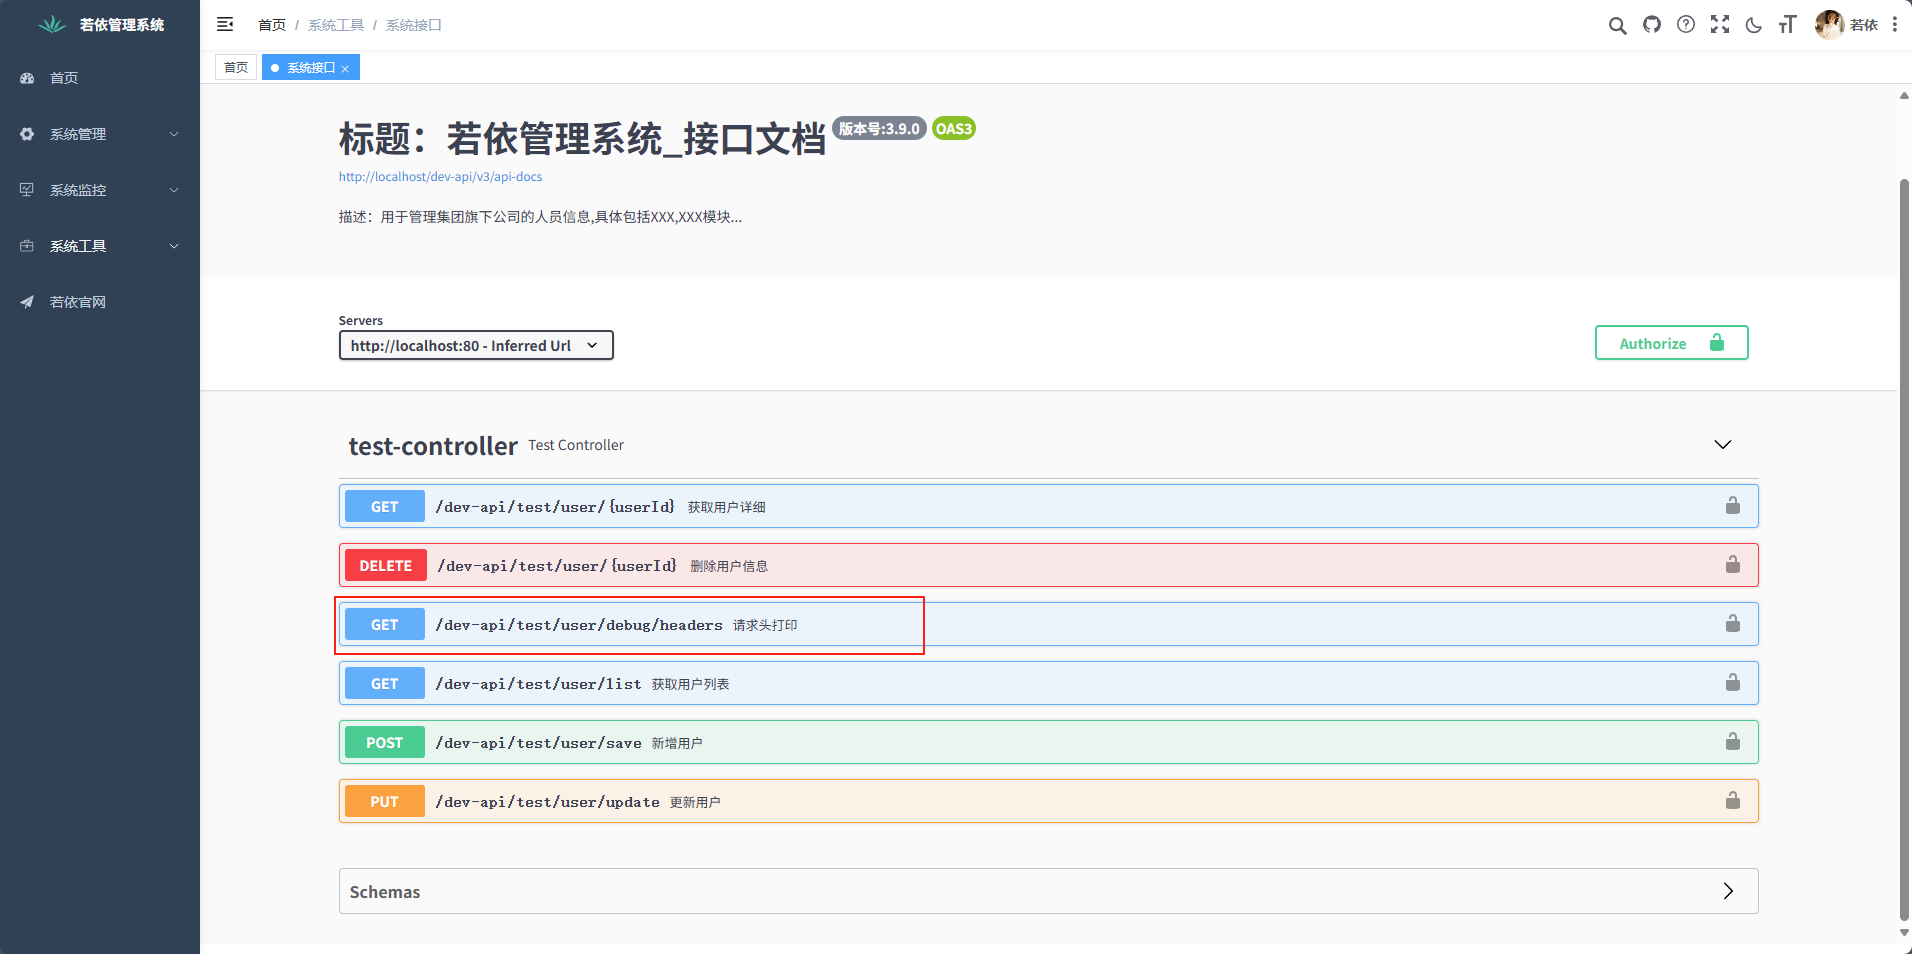
通过注解@ApiOperation来扫描方法,下面来看一下TestController中被扫描的方法,以及新增的方法
package com.ruoyi.web.controller.tool;import java.util.*;import org.springframework.web.bind.annotation.DeleteMapping;
import org.springframework.web.bind.annotation.GetMapping;
import org.springframework.web.bind.annotation.PathVariable;
import org.springframework.web.bind.annotation.PostMapping;
import org.springframework.web.bind.annotation.PutMapping;
import org.springframework.web.bind.annotation.RequestBody;
import org.springframework.web.bind.annotation.RequestMapping;
import org.springframework.web.bind.annotation.RestController;
import com.ruoyi.common.core.controller.BaseController;
import com.ruoyi.common.core.domain.R;
import com.ruoyi.common.utils.StringUtils;
import io.swagger.annotations.Api;
import io.swagger.annotations.ApiImplicitParam;
import io.swagger.annotations.ApiImplicitParams;
import io.swagger.annotations.ApiModel;
import io.swagger.annotations.ApiModelProperty;
import io.swagger.annotations.ApiOperation;import javax.servlet.http.HttpServletRequest;/*** swagger 用户测试方法* * @author ruoyi*/
@Api("用户信息管理")
@RestController
@RequestMapping("/test/user")
public class TestController extends BaseController
{private final static Map<Integer, UserEntity> users = new LinkedHashMap<Integer, UserEntity>();{users.put(1, new UserEntity(1, "admin", "admin123", "15888888888"));users.put(2, new UserEntity(2, "ry", "admin123", "15666666666"));}/*** 新增方法*/@ApiOperation("请求头打印")@GetMapping("/debug/headers")public Map<String, String> listAllHeaders(HttpServletRequest request) {Enumeration<String> headerNames = request.getHeaderNames();Map<String, String> headers = new HashMap<>();while (headerNames.hasMoreElements()) {String key = headerNames.nextElement();headers.put(key, request.getHeader(key));}return headers;}@ApiOperation("获取用户列表")@GetMapping("/list")public R<List<UserEntity>> userList(){List<UserEntity> userList = new ArrayList<UserEntity>(users.values());return R.ok(userList);}@ApiOperation("获取用户详细")@ApiImplicitParam(name = "userId", value = "用户ID", required = true, dataType = "int", paramType = "path", dataTypeClass = Integer.class)@GetMapping("/{userId}")public R<UserEntity> getUser(@PathVariable Integer userId){if (!users.isEmpty() && users.containsKey(userId)){return R.ok(users.get(userId));}else{return R.fail("用户不存在");}}@ApiOperation("新增用户")@ApiImplicitParams({@ApiImplicitParam(name = "userId", value = "用户id", dataType = "Integer", dataTypeClass = Integer.class),@ApiImplicitParam(name = "username", value = "用户名称", dataType = "String", dataTypeClass = String.class),@ApiImplicitParam(name = "password", value = "用户密码", dataType = "String", dataTypeClass = String.class),@ApiImplicitParam(name = "mobile", value = "用户手机", dataType = "String", dataTypeClass = String.class)})@PostMapping("/save")public R<String> save(UserEntity user){if (StringUtils.isNull(user) || StringUtils.isNull(user.getUserId())){return R.fail("用户ID不能为空");}users.put(user.getUserId(), user);return R.ok();}@ApiOperation("更新用户")@PutMapping("/update")public R<String> update(@RequestBody UserEntity user){if (StringUtils.isNull(user) || StringUtils.isNull(user.getUserId())){return R.fail("用户ID不能为空");}if (users.isEmpty() || !users.containsKey(user.getUserId())){return R.fail("用户不存在");}users.remove(user.getUserId());users.put(user.getUserId(), user);return R.ok();}@ApiOperation("删除用户信息")@ApiImplicitParam(name = "userId", value = "用户ID", required = true, dataType = "int", paramType = "path", dataTypeClass = Integer.class)@DeleteMapping("/{userId}")public R<String> delete(@PathVariable Integer userId){if (!users.isEmpty() && users.containsKey(userId)){users.remove(userId);return R.ok();}else{return R.fail("用户不存在");}}
}@ApiModel(value = "UserEntity", description = "用户实体")
class UserEntity
{@ApiModelProperty("用户ID")private Integer userId;@ApiModelProperty("用户名称")private String username;@ApiModelProperty("用户密码")private String password;@ApiModelProperty("用户手机")private String mobile;public UserEntity(){}public UserEntity(Integer userId, String username, String password, String mobile){this.userId = userId;this.username = username;this.password = password;this.mobile = mobile;}public Integer getUserId(){return userId;}public void setUserId(Integer userId){this.userId = userId;}public String getUsername(){return username;}public void setUsername(String username){this.username = username;}public String getPassword(){return password;}public void setPassword(String password){this.password = password;}public String getMobile(){return mobile;}public void setMobile(String mobile){this.mobile = mobile;}
}
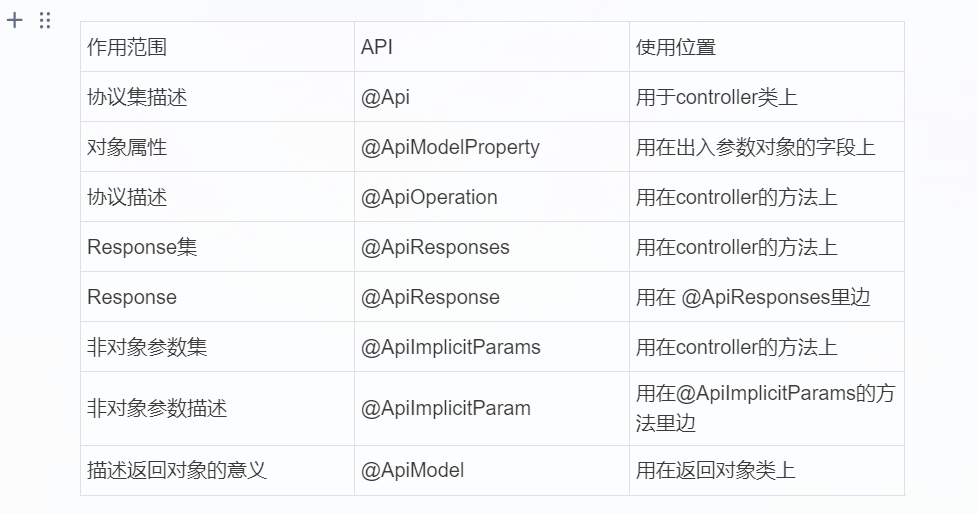
下面是注解的说明及使用,内容来自官方文档
API详细说明
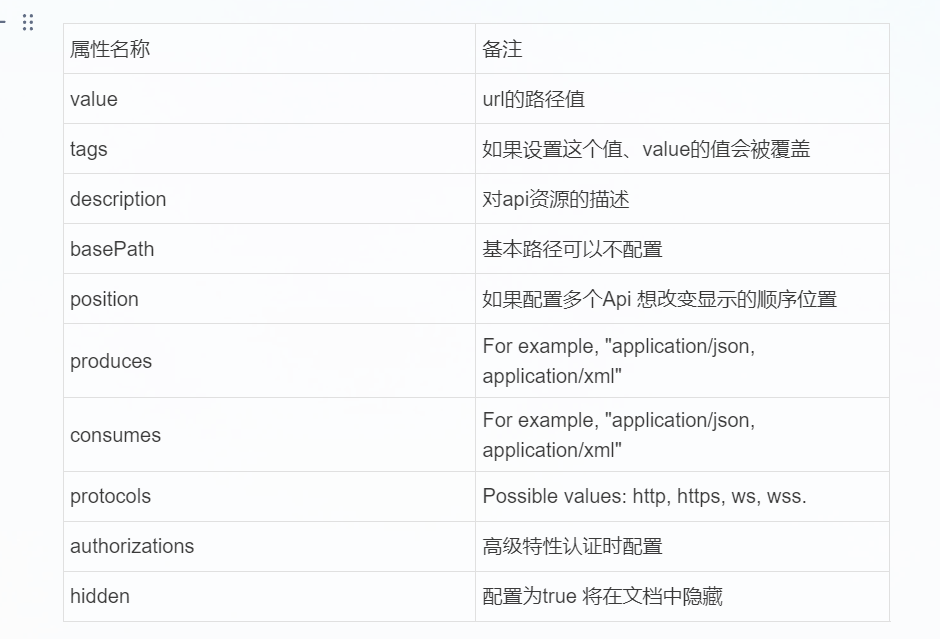
api标记,用在类上,说明该类的作用。可以标记一个Controller类做为Swagger文档资源,使用方式:
@Api(value = "/user", description = "用户管理")
与Controller注解并列使用。 属性配置:
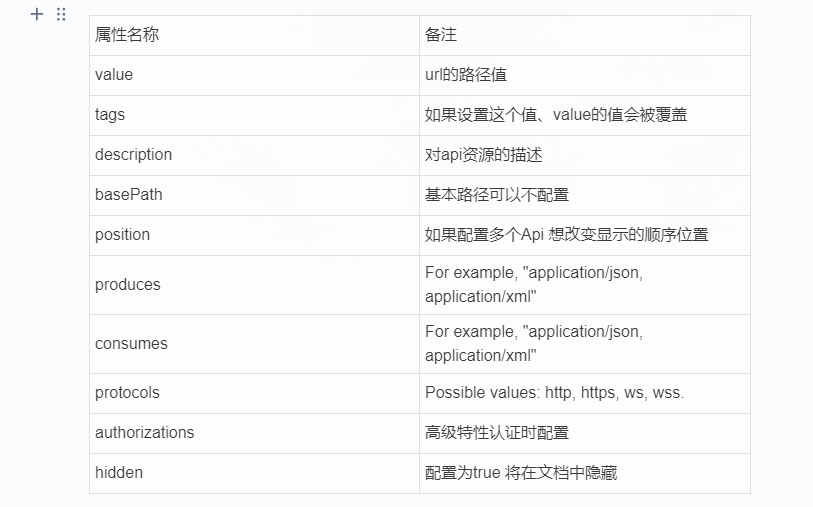
ApiOperation标记,用在方法上,说明方法的作用,每一个url资源的定义,使用方式:
@ApiOperation("获取用户信息")与Controller中的方法并列使用,属性配置:
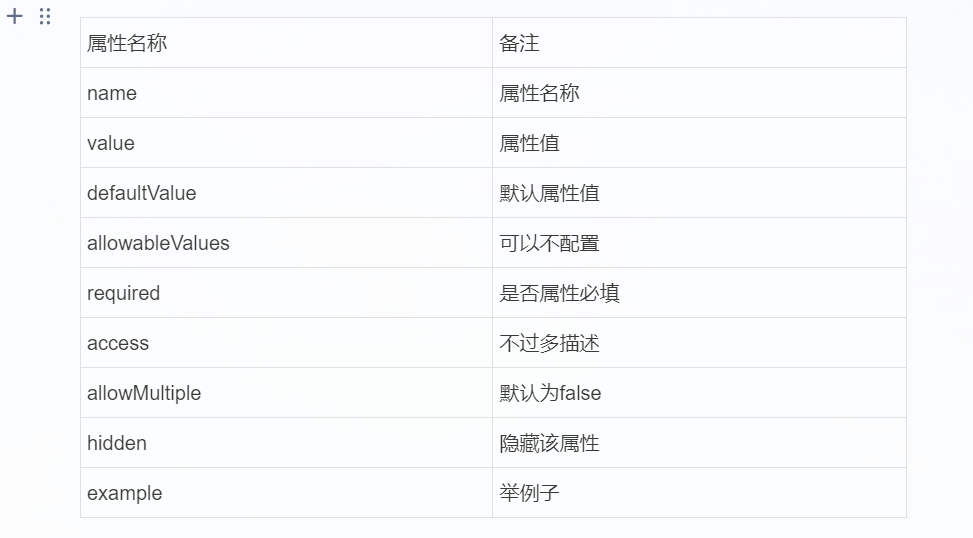
ApiParam标记,请求属性,使用方式:
public TableDataInfo list(@ApiParam(value = "查询用户列表", required = true)User user)
与Controller中的方法并列使用,属性配置:
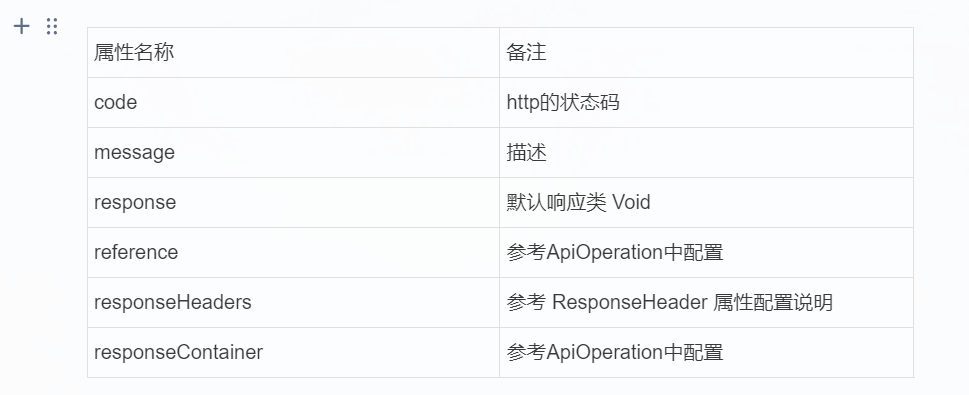
ApiResponse标记,响应配置,使用方式:
@ApiResponse(code = 400, message = "查询用户失败")
与Controller中的方法并列使用,属性配置:
ApiResponses标记,响应集配置,使用方式:
@ApiResponses({ @ApiResponse(code = 400, message = "无效的用户") })与Controller中的方法并列使用,属性配置:

ResponseHeader标记,响应头设置,使用方法
@ResponseHeader(name="head",description="响应头设计")与Controller中的方法并列使用,属性配置:
