配置单区域 OSPF
- 实验目的
- 实现单区域 OSPF 的配置。
- 描述 OSPF 在多路访问网络中邻居关系建立的过程。
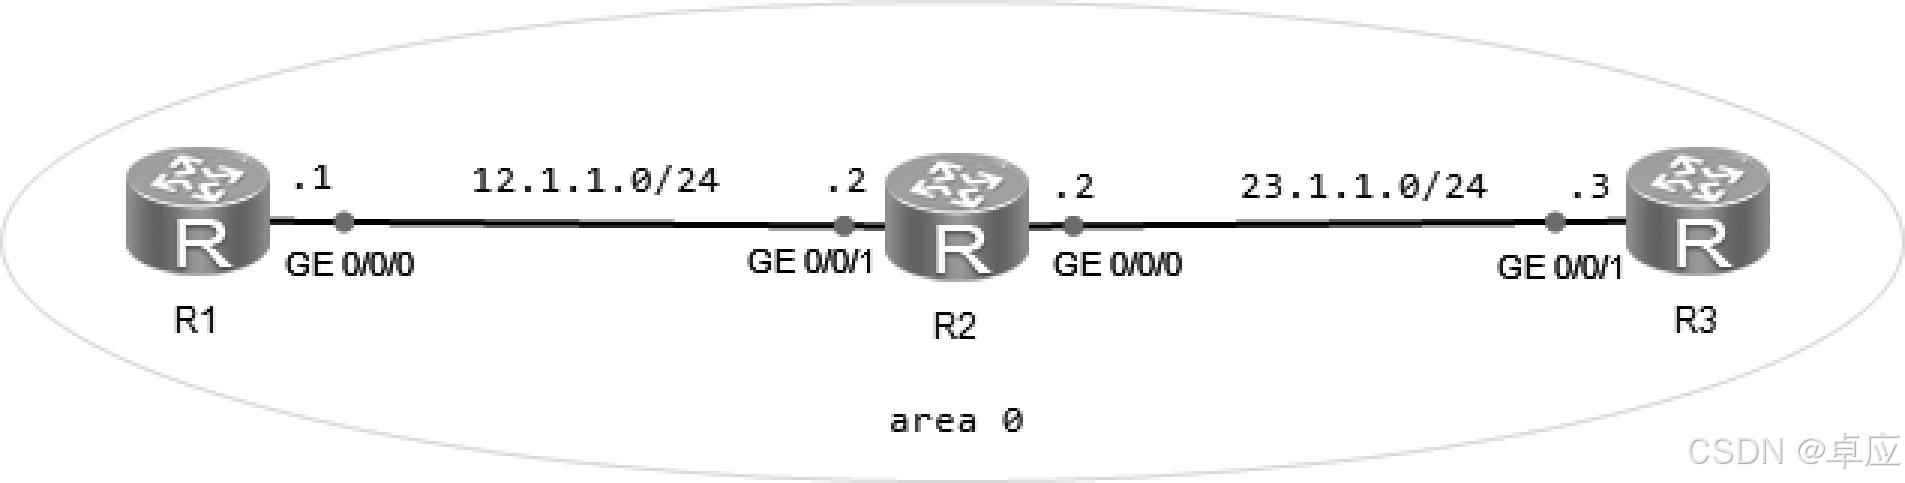
- 实验拓扑
配置单区域 OSPF 的实验拓扑如图 1-2 所示。
1 |
- 实验步骤
- 配置 IP 地址。
R1 的配置:
<Huawei>system-view
[Huawei]undo info-center enable [Huawei]sysname R1 [R1]interface g0/0/0
[R1-GigabitEthernet0/0/0]ip address 12.1.1.1 24 [R1-GigabitEthernet0/0/0]quit
[R1]interface LoopBack 0
[R1-LoopBack0]ip address 1.1.1.1 24 [R1-LoopBack0]quit
R2 的配置:
<Huawei>system-view [Huawei]undo info-center enable [Huawei]sysname R2 [R2]interface g0/0/1
[R2-GigabitEthernet0/0/1]ip address 12.1.1.2 24 [R2-GigabitEthernet0/0/1]quit
[R2]interface g0/0/0
[R2-GigabitEthernet0/0/0]ip address 23.1.1.2 24 [R2-GigabitEthernet0/0/0]quit
[R2]interface LoopBack 0
[R2-LoopBack0]ip address 2.2.2.2 24 [R2-LoopBack0]quit
R3 的配置:
<Huawei>system-view [Huawei]undo info-center enable [Huawei]sysname R3 [R3]interface g0/0/1
[R3-GigabitEthernet0/0/1]ip address 23.1.1.3 24 [R3-GigabitEthernet0/0/1]quit
[R3]interface LoopBack 0
[R3-LoopBack0]ip address 3.3.3.3 24
[R3-LoopBack0]quit
- 运行 OSPF。R1 的配置:
[R1]ospf router-id 1.1.1.1 // 启用 OSPF,设置它的 Router ID 1.1.1.1 [R1-ospf-1]area 0 // 区域 0
[R1-ospf-1-area-0.0.0.0]network 12.1.1.0 0.0.0.255// 宣告网络 12.1.1.0
[R1-ospf-1-area-0.0.0.0]network 1.1.1.0 0.0.0.255 // 宣告网络 1.1.1.0
[R1-ospf-1-area-0.0.0.0]quit
R2 的配置:
[R2]ospf router-id 2.2.2.2
[R2-ospf-1]area 0
[R2-ospf-1-area-0.0.0.0]network 12.1.1.0 0.0.0.255
[R2-ospf-1-area-0.0.0.0]network 23.1.1.0 0.0.0.255
[R2-ospf-1-area-0.0.0.0]network 2.2.2.0 0.0.0.255 [R2-ospf-1-area-0.0.0.0]quit
R3 的配置:
[R3]ospf router-id 3.3.3.3
[R3-ospf-1]area 0
[R3-ospf-1-area-0.0.0.0]network 23.1.1.0 0.0.0.255
᧢【技术要点】 OSPF的进程ID编号范围为1~65535,只在本地有效,不同路由器的进程ID可以不同。 |
᧢【技术要点】
|
[R3-ospf-1-area-0.0.0.0]network 3.3.3.0 0.0.0.255 [R3-ospf-1-area-0.0.0.0]quit
- 实验调试
- 在 R1 上查看当前设备所有激活的 OSPF 的接口信息。
<R1>display ospf interface all
OSPF Process 1 with Router ID 1.1.1.1 //OSPF 的进程为 1,Router ID 为 1.1.1.1 Interfaces
Area: 0.0.0.0 (MPLS TE not enabled) //OSPF 的区域为 0
Interface: 12.1.1.1 (GigabitEthernet0/0/0)
Cost: 1 State: DR Type: Broadcast MTU: 1500 Priority: 1
1 |
Backup Designated Router: 12.1.1.2 //BDR 为 12.1.1.2
Timers: Hello 10, Dead 40, Poll 120, Retransmit 5, Transmit Delay 1
Interface: 1.1.1.1 (LoopBack0)
Cost: 0 State: P-2-P Type: P2P MTU: 1500
Timers: Hello 10, Dead 40, Poll 120, Retransmit 5, Transmit Delay 1
- 在 R1 上查看当前设备的邻居状态。
<R1>display ospf peer
OSPF Process 1 with Router ID 1.1.1.1 Neighbors
Area 0.0.0.0 interface 12.1.1.1(GigabitEthernet0/0/0)'s neighbors Router ID: 2.2.2.2 Address: 12.1.1.2
State: Full Mode:Nbr is Master Priority: 1 // 邻居状态为Full,邻居为Master
DR: 12.1.1.1 BDR: 12.1.1.2 MTU: 0
Dead timer due in 34 sec Retrans timer interval: 5 Neighbor is up for 00:29:56 Authentication Sequence: [ 0 ]
- 在 R1 上查看当前设备的 LSDB。
<R1>display ospf lsdb
OSPF Process 1 with Router ID 1.1.1.1 Link State Database
Area: 0.0.0.0
Type | LinkState ID | AdvRouter | Age | Len | Sequence | Metric |
Router | 2.2.2.2 | 2.2.2.2 | 109 | 60 | 8000000A | 1 |
Router | 1.1.1.1 | 1.1.1.1 | 169 | 48 | 80000007 | 1 |
Router | 3.3.3.3 | 3.3.3.3 | 114 | 48 | 80000005 | 1 |
Network | 23.1.1.2 | 2.2.2.2 | 109 | 32 | 80000003 | 0 |
Network | 12.1.1.1 | 1.1.1.1 | 169 | 32 | 80000003 | 0 |
- 在 R1 上查看当前设备的 OSPF 路由表。
<R1>display ospf routing
OSPF Process 1 with Router ID 1.1.1.1 Routing Tables
Routing for Network
Destination | Cost | Type | NextHop | AdvRouter | Area |
1.1.1.1/32 | 0 | Stub | 1.1.1.1 | 1.1.1.1 | 0.0.0.0 |
12.1.1.0/24 | 1 | Transit | 12.1.1.1 | 1.1.1.1 | 0.0.0.0 |
2.2.2.2/32 | 1 | Stub | 12.1.1.2 | 2.2.2.2 | 0.0.0.0 |
3.3.3.3/32 | 2 | Stub | 12.1.1.2 | 3.3.3.3 | 0.0.0.0 |
23.1.1.0/24 | 2 | Transit | 12.1.1.2 | 2.2.2.2 | 0.0.0.0 |
Total Nets: 5 |
Intra Area: 5 Inter Area: 0 ASE: 0 NSSA: 0
- 在 R1 上开启以下命令,观察 OSPF 的状态机。
<R1>terminal debugging // 使能终端显示 Debug 信息功能
<R1>terminal monitor // 使能终端显示信息中心发送信息的功能
<R1>debugging ospf event // 用来查看 OSPF 协议工作过程中的所有事件
<R1>debugging ospf packet // 用来查看 OSPF 协议工作过程中的所有报文
<R1>system-view [R1]interface g0/0/0
[R1-GigabitEthernet0/0/0]shutdown [R1-GigabitEthernet0/0/0]quit [R1]interface g0/0/0
[R1-GigabitEthernet0/0/0]undo shutdown [R1-GigabitEthernet0/0/0]quit [R1]info-center enable
调试信息如下 :
Sep 2 2022 15:13:00-08:00 R1 %%01IFPDT/4/IF_STATE(l)
[0]:Interface GigabitEthernet0/0/0 has turned into UP state. [R1]
Sep 2 2022 15:13:00-08:00 R1 %%01IFNET/4/LINK_STATE(l)[1]:The line protocol IP on the interface GigabitEthernet0/0/0 has entered the UP state.
[R1]
Sep 2 2022 15:13:00.191.7-08:00 R1 RM/6/RMDEBUG:
FileID: 0xd017802c Line: 1295 Level: 0x20
OSPF 1: Intf 12.1.1.1 Rcv InterfaceUp State Down -> Waiting.
// 接入 UP 后,OSPF 从 Down 状态进入 Waiting 状态
[R1]
Sep 2 2022 15:13:00.191.8-08:00 R1 RM/6/RMDEBUG:
FileID: 0xd0178025 Line: 559 Level: 0x20
OSPF 1: SEND Packet. Interface: GigabitEthernet0/0/0 [R1]
Sep 2 2022 15:13:00.191.9-08:00 R1 RM/6/RMDEBUG: Source Address: 12.1.1.1 [R1]
Sep 2 2022 15:13:00.191.10-08:00 R1 RM/6/RMDEBUG: Destination Address: 224.0.0.5 [R1]
Sep 2 2022 15:13:00.191.11-08:00 R1 RM/6/RMDEBUG: Ver# 2, Type: 1 (Hello) [R1]
Sep 2 2022 15:13:00.191.12-08:00 R1 RM/6/RMDEBUG: Length: 44, Router: 1.1.1.1 [R1]
Sep 2 2022 15:13:00.191.13-08:00 R1 RM/6/RMDEBUG: Area: 0.0.0.0, Chksum: fa9c [R1]
Sep 2 2022 15:13:00.191.14-08:00 R1 RM/6/RMDEBUG: AuType: 00 [R1]
Sep 2 2022 15:13:00.191.15-08:00 R1 RM/6/RMDEBUG: Key(ascii): * * * * * * * * [R1]
Sep 2 2022 15:13:00.191.16-08:00 R1 RM/6/RMDEBUG: Net Mask: 255.255.255.0
[R1]
1 |
Sep 2 2022 15:13:00.191.18-08:00 R1 RM/6/RMDEBUG: Rtr Priority: 1, Dead Int: 40 [R1]
Sep 2 2022 15:13:00.191.19-08:00 R1 RM/6/RMDEBUG: DR: 0.0.0.0 [R1]
Sep 2 2022 15:13:00.191.20-08:00 R1 RM/6/RMDEBUG: BDR: 0.0.0.0 [R1]
Sep 2 2022 15:13:00.191.21-08:00 R1 RM/6/RMDEBUG: # Attached Neighbors: 0 [R1]
Sep 2 2022 15:13:00.191.22-08:00 R1 RM/6/RMDEBUG:
[R1]
Sep 2 2022 15:13:00.191.23-08:00 R1 RM/6/RMDEBUG:
FileID: 0xd017802c Line: 1409 Level: 0x20
OSPF 1 Send Hello Interface Up on 12.1.1.1 //R1 在接口上发送 Hello 包
[R1]
Sep 2 2022 15:13:00.641.1-08:00 R1 RM/6/RMDEBUG:
FileID: 0xd0178024 Line: 2236 Level: 0x20
OSPF 1: RECV Packet. Interface: GigabitEthernet0/0/0 [R1]
Sep 2 2022 15:13:00.641.2-08:00 R1 RM/6/RMDEBUG: Source Address: 12.1.1.2 [R1]
Sep 2 2022 15:13:00.641.3-08:00 R1 RM/6/RMDEBUG: Destination Address: 224.0.0.5 [R1]
Sep 2 2022 15:13:00-08:00 R1 %%01OSPF/4/NBR_CHANGE_E(l)[2]:Neighbor changes event: neighbor status changed. (ProcessId=256, NeighborAddress=2.1.1.12, NeighborEvent=HelloReceived, NeighborPreviousState=Down, NeighborCurrentState=Init)
// 邻居收到 Hello 包,状态从 Down 进入 Init
[R1]
Sep 2 2022 15:13:00.641.5-08:00 R1 RM/6/RMDEBUG: Ver# 2, Type: 1 (Hello) [R1]
Sep 2 2022 15:13:00.641.6-08:00 R1 RM/6/RMDEBUG: Length: 44, Router: 2.2.2.2 [R1]
Sep 2 2022 15:13:00.641.7-08:00 R1 RM/6/RMDEBUG: Area: 0.0.0.0, Chksum: f89a [R1]
Sep 2 2022 15:13:00.641.8-08:00 R1 RM/6/RMDEBUG: AuType: 00 [R1]
Sep 2 2022 15:13:00.641.9-08:00 R1 RM/6/RMDEBUG: Key(ascii): * * * * * * * * [R1]
Sep 2 2022 15:13:00.641.10-08:00 R1 RM/6/RMDEBUG: Net Mask: 255.255.255.0 [R1]
Sep 2 2022 15:13:00.641.11-08:00 R1 RM/6/RMDEBUG: Hello Int: 10, Option: _E_ [R1]
Sep 2 2022 15:13:00.641.12-08:00 R1 RM/6/RMDEBUG: Rtr Priority: 1, Dead Int: 40 [R1]
Sep 2 2022 15:13:00.641.13-08:00 R1 RM/6/RMDEBUG: DR: 0.0.0.0 [R1]
Sep 2 2022 15:13:00.641.14-08:00 R1 RM/6/RMDEBUG: BDR: 0.0.0.0 [R1]
Sep 2 2022 15:13:00.641.15-08:00 R1 RM/6/RMDEBUG: # Attached Neighbors: 0 [R1]
Sep 2 2022 15:13:00.641.16-08:00 R1 RM/6/RMDEBUG:
[R1]
Sep 2 2022 15:13:00.641.17-08:00 R1 RM/6/RMDEBUG:
FileID: 0xd017802d Line: 1136 Level: 0x20
OSPF 1: Nbr 12.1.1.2 Rcv HelloReceived State Down -> Init. [R1]
Sep 2 2022 15:13:10-08:00 R1 %%01OSPF/4/NBR_CHANGE_E(l)[3]:Neighbor changes event: neighbor status changed. (ProcessId=256, NeighborAddress=2.1.1.12, NeighborEvent=2WayReceived, NeighborPreviousState=Init, NeighborCurrentState=2Way)
// 邻居收到 Hello 包,并在 Hello 包中看到自己的 Router ID,状态从 Init 进入 2Way
[R1]
Sep 2 2022 15:13:39-08:00 R1 %%01OSPF/4/NBR_CHANGE_E(l)[4]:Neighbor changes event: neighbor status changed. (ProcessId=256, NeighborAddress=2.1.1.12, NeighborEvent=AdjOk?, NeighborPreviousState=2Way, NeighborCurrentState=ExStart)
// 发送 DD 报文,进入 ExStart 状态
[R1]
Sep 2 2022 15:13:44-08:00 R1 %%01OSPF/4/NBR_CHANGE_E(l)[5]:Neighbor changes event: neighbor status changed. (ProcessId=256, NeighborAddress=2.1.1.12, NeighborEvent=N egotiationDone,NeighborPreviousState=ExStart,NeighborCurrentState=Exchange)
// 交互 DD 报文并发送 LSR、LSU 进入 Exchange 状态
[R1]
Sep 2 2022 15:13:44-08:00 R1 %%01OSPF/4/NBR_CHANGE_E(l)[6]:Neighbor changes event: neighbor status changed. (ProcessId=256, NeighborAddress=2.1.1.12, NeighborEvent= ExchangeDone,NeighborPreviousState=Exchange,NeighborCurrentState=Loading)
// 交互完毕进入 Loading 状态
[R1]
Sep 2 2022 15:13:44-08:00 R1 %%01OSPF/4/NBR_CHANGE_E(l)[7]:Neighbor changes event: neighbor status changed. (ProcessId=256, NeighborAddress=2.1.1.12, NeighborEvent=LoadingDone, NeighborPreviousState=Loading, NeighborCurrentState=Full)
//LSA 同步完成进入 Full 状态
本文出自作者的《华为HCIP-Datacom认证实验指导》