nginx-下载功能-状态统计-访问控制
nginx-下载功能-状态统计-访问控制
- 一、利用nginx做网站提供下载功能
- 1. 进入nginx存放配置文件目录
- 2. 编辑nginx.conf文件,开启下载功能
- 3. 检查nginx.conf主配置文件是否正确
- 4. 重启nginx服务
- 5. 修改首页文件index.html
- 6. 访问首页
- 7. 去网页根目录下新建download目录
- 8. 访问download页面
- 二、状态统计
- 1. 添加路由配置
- 2. 重启nginx服务
- 3. 访问nginx
- 三、访问控制
- 1. 基于ip地址
- 2. 基于用户认证
一、利用nginx做网站提供下载功能
1. 进入nginx存放配置文件目录
[root@web-2 logs]# cd /usr/local/nginx1/conf/
[root@web-2 conf]# ls
fastcgi.conf fastcgi_params koi-utf mime.typesnginx.confscgi_params uwsgi_params win-utf
fastcgi.conf.default fastcgi_params.default koi-win mime.types.default nginx.conf.default scgi_params.default uwsgi_params.default
2. 编辑nginx.conf文件,开启下载功能
[root@web-2 conf]# vim nginx.confserver {listen 80;server_name www.feng.com;access_log logs/feng.com.access.log main;error_log logs/feng.com.error.log;location / {root html/feng.com;index index.html index.htm;autoindex on; #添加配置可以提供下载功能的指令}
3. 检查nginx.conf主配置文件是否正确
[root@web-2 conf]#
nginx -t
nginx: the configuration file /usr/local/nginx1/conf/nginx.conf syntax is ok
nginx: configuration file /usr/local/nginx1/conf/nginx.conf test is successful
4. 重启nginx服务
[root@web-2 conf]#
nginx -s reload
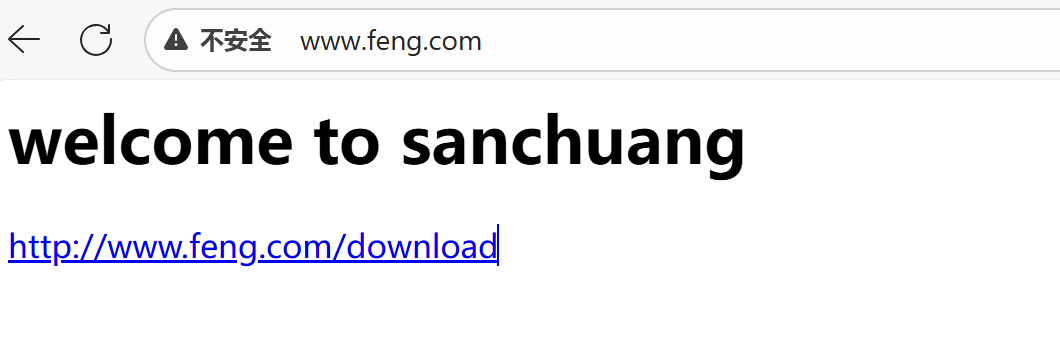
5. 修改首页文件index.html
[root@web-2 conf]# cd /usr/local/nginx1/html/feng.com/
[root@web-2 feng.com]# vim index.html
<html><head><title>sanchuang</title></head><body><p><h1>welcome to sanchuang</h1></p><p><a href="http://www.feng.com/download">http://www.feng.com/download</a></p></body>
</html>
修改网页,不需要去刷新nginx服务,只要刷新浏览器
6. 访问首页
- 在浏览器里去访问http://www.feng.com首页文件
- linux中访问 ->
curl
[root@web-2 feng.com]# curl  http://www.feng.com
<html><head><title>sanchuang</title></head><body><p><h1>welcome to sanchuang</h1></p><p><a href="http://www.feng.com/download">http://www.feng.com/download</a></p></body>
</html>
7. 去网页根目录下新建download目录
[root@web-2 feng.com]# cd /usr/local/nginx1/html/feng.com/
[root@web-2 feng.com]# mkdir download
[root@web-2 feng.com]# ls
404.html download index.html
在download目录下新建文件,提供下载测试使用
建议download目录下不要出现index.html,如果有的话,会自动显示index.html页面的内容
[root@web-2 feng.com]# cd download/
[root@web-2 download]# cp /boot . -r
[root@web-2 download]# touch feng.txt
[root@web-2 download]# touch zhang.txt
[root@web-2 download]# cp /etc/hosts .
[root@web-2 download]# ls
boot feng.txt hosts index.html.back index.html.back2 passwd zhang.txt
8. 访问download页面
点击即可下载

二、状态统计
状态统计功能,默认是没有开启的,需要在编译安装的时候,指定参数开启
--with-http_stub_status_module
1. 添加路由配置
[root@web-2 nginx1]# cd /usr/local/nginx1/conf/
[root@nginx-1 conf]# vim nginx.confserver {listen       80;server_name  localhost;location / {root   html;index  index.html index.htm;}#添加下面的路由配置location = /status {stub_status;}
2. 重启nginx服务
[root@nginx-1 conf]#
nginx -t
nginx: the configuration file /usr/local/nginx1/conf/nginx.conf syntax is ok
nginx: configuration file /usr/local/nginx1/conf/nginx.conf test is successful
[root@nginx-1 conf]#nginx -s reload
3. 访问nginx
可以使用ip地址或者域名,接上/status
http://192.168.100.157/status
得到如下状态信息
Active connections: 2
server accepts handled requests9 9 15
Reading: 0 Writing: 1 Waiting: 1
Active connections
当前活动的客户端连接数,包括Waiting连接数。accepts
接受的客户端连接总数。handled
已处理的连接总数。通常,参数值与accepts 除非达到某些资源限制(例如, worker_connections限制)相同。requests
客户端请求总数。Reading
nginx正在读取请求标头的当前连接数。 --》读取请求报文Writing
nginx正在将响应写回到客户端的当前连接数。 --》返回响应报文Waiting
当前等待请求的空闲客户端连接数 --》占着茅坑不拉屎的人的数量
三、访问控制
1. 基于ip地址
allow和deny指令将按其定义的顺序应用
deny
[root@nginx-1 conf]# vim nginx.conflocation = /status {stub_status;deny 192.168.100.1;}[root@nginx-1 conf]# nginx -t
nginx: the configuration file /usr/local/nginx1/conf/nginx.conf syntax is ok
nginx: configuration file /usr/local/nginx1/conf/nginx.conf test is successful
[root@nginx-1 conf]# nginx  -s reload
allow
[root@nginx-1 conf]# vim nginx.conflocation = /status {stub_status;allow 192.168.100.1;deny all;}[root@nginx-1 conf]# nginx  -t
nginx: the configuration file /usr/local/nginx1/conf/nginx.conf syntax is ok
nginx: configuration file /usr/local/nginx1/conf/nginx.conf test is successful
[root@nginx-1 conf]# nginx  -s reload
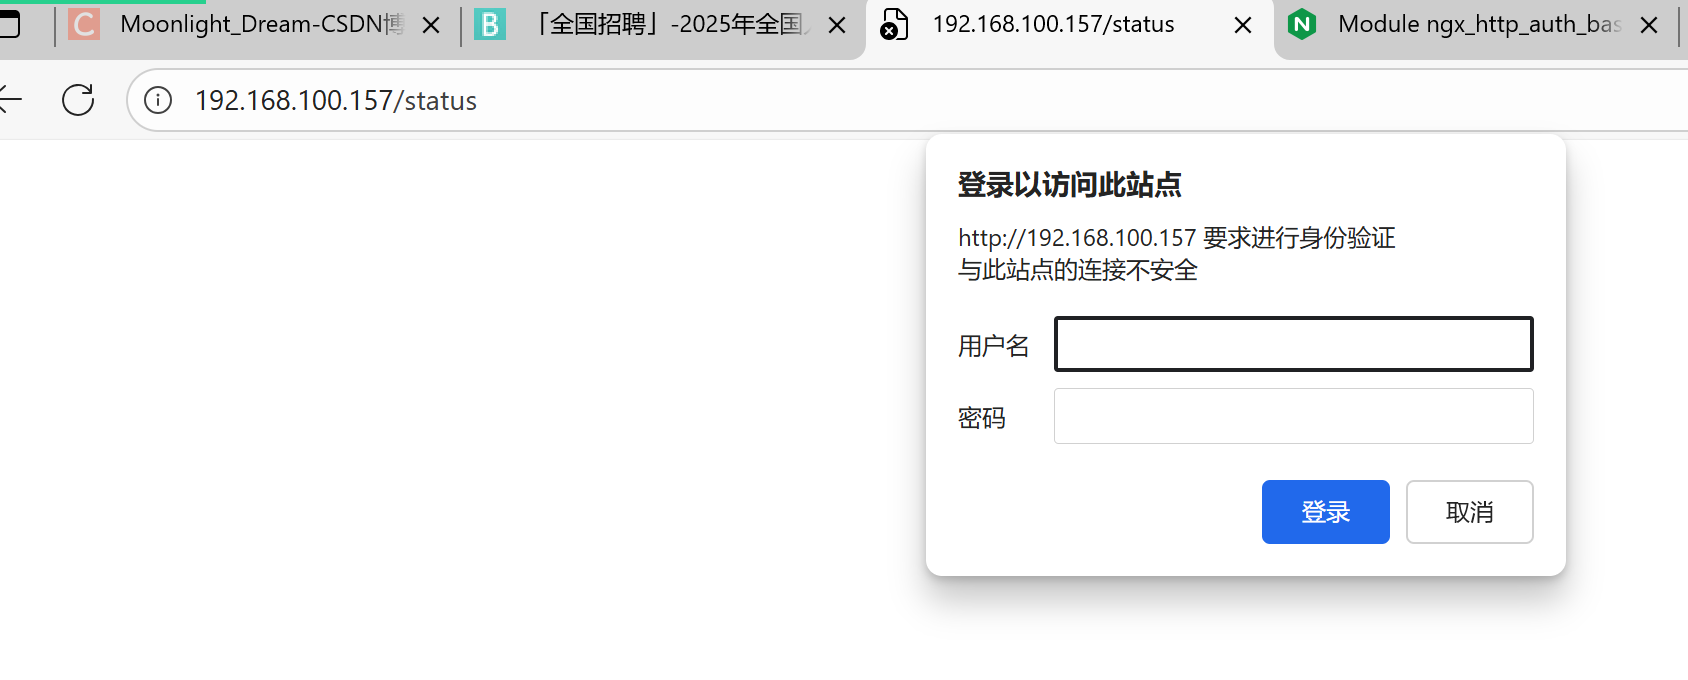
2. 基于用户认证
编辑配置文件,重启nginx服务
[root@nginx-1 conf]# vim nginx.conflocation = /status {stub_status;auth_basic "status auth";  #添加的配置auth_basic_user_file  htpasswd;  #添加的配置allow 192.168.100.1;deny all;}
[root@nginx-1 conf]# nginx  -t
nginx: the configuration file /usr/local/nginx1/conf/nginx.conf syntax is ok
nginx: configuration file /usr/local/nginx1/conf/nginx.conf test is successful
[root@nginx-1 conf]# nginx  -s reload
新建htpasswd文件
[root@nginx-1 conf]# yum install httpd-tools -y
[root@nginx-1 conf]# htpasswd -c /usr/local/nginx1/conf/htpasswd cali
New password:
Re-type new password:
Adding password for user cali
# 查看生成的用户名和密码文件内容
[root@nginx-1 conf]# cat htpasswd
cali:$apr1$6yRM3Suq$wf5MfqAMtRKFE9oxIPSsz/
访问验证是否生效,支持用户名和密码认证
使用浏览器去访问