Centos7.9安装Dante
1. 背景
公司的专线服务商时不时就换一下公网IP,造成我们频繁更换对外报备的IP白名单,每次走流程很麻烦,所以在IDC内搭建一个Dante服务,进行socks代理。
2. 参考
- Dante官网
3. 概念
Dante是一个免费的Socks服务器,实现了RFC 1928及相关标准。这是一款灵活的产品,可用于提供便捷且安全的网络连接
4. 环境
- 虚拟机 16C/32G/200G
- 操作系统 Centos 7.9
- 软件 Dante v1.4.4
5. 部署
5.1 下载
- 官网下载,当前稳定版本是1.4.4
cd /public/software
wget https://www.inet.no/dante/files/dante-1.4.4.tar.gz
5.2 安装
- 解压
cd /public/software
tar -zxvf dante-1.4.4.tar.gz && cd dante-1.4.4
- 创建目录
# 配置文件目录
mkdir -p /etc/danted
# 日志文件目录
mkdir -p /var/log/danted/
- 创建服务运行账号
useradd -r -s /bin/false xxxkkk
- 创建服务使用账号
- 创建服务使用账号组
groupadd proxy_group
- 创建服务使用账号
useradd -s /bin/false xuser
- 把服务使用账号添加到组
usermod -aG proxy_group xuser
- 查看组内账号
# 查看执行的命令
getent group proxy_group# 输出的结果
proxy_group:x:1003:xuser
- 编译
- 详细编译参数请见 ./configure --help
- 准备编译环境
sudo yum install pam-devel -y
- 编译安装,支持pam认证
# 编译命令,支持pam认证方式(本例未使用)./configure --with-pam# 输出结果
......Configure status:Client:            Enabled
Server:            Enabled
Preloading:        Enabled
Libwrap:           Disabled, tcpd.h missing
BSD Auth:          Disabled, usable bsd_auth.h not found
PAM:               Enabled   # 启用状态
GSSAPI:            Enabled
KRB5:              Enabled
SASL:              Not found/disabled
UPNP:              Not found/disabled
Compatability:     issetugid setproctitle strlcpy strvisModules:redirect:          Not found
bandwidth:         Not found
ldap:              Not found
pac:               Not found
- 安装
make && make install
# 验证安装包
/usr/local/sbin/sockd -vv | grep build:
# 输出结果,显示已有pam模块
build: gssapi mon-data mon-disconnect pam preload sess2
5.3 配置
- 拷贝配置文件
cp /public/software/dante-1.4.4/example/sockd.conf /etc/danted/
ln -s /etc/danted/sockd.conf /etc/
- 编辑sockd配置文件
参考官方文档 https://www.inet.no/dante/doc/1.4.x/sockd.conf.5.html
vim /etc/sockd.conf
# 修改了日志存储路径
# the server will log both via syslog, to stdout and to /var/log/sockd.log
logoutput: syslog stdout /var/log/danted/sockd.log
logoutput: stderr# 修改了监听的IP和端口
# The server will bind to the address 10.1.1.1, port 1080 and will only
# accept connections going to that address.
internal: 0.0.0.0 port = 10800
# Alternatively, the interface name can be used instead of the address.
#internal: eth0 port = 1080# 修改了出口使用的IP,也可以使用网卡
# all outgoing connections from the server will use the IP address
# 195.168.1.1
external: 192.168.15.12# 修改socks策略,使用username。
# methods for socks-rules.
# socksmethod: username none #rfc931
socksmethod:  username# 修改客户端策略
# methods for client-rules.
# clientmethod: none# 定义普通用户允许服务
# when doing something that can require privilege, it will use the
# userid "sockd".
#user.privileged: sockd
user.privileged: root# when running as usual, it will use the unprivileged userid of "sockd".
#user.unprivileged: sockd
user.unprivileged: xxxkkk# 修改允许连接的IP
# This is identical to above, but allows clients without a rfc931 (ident)
# too.  In practice this means the socks server will try to get a rfc931
# reply first (the above rule), if that fails, it tries this rule.
client  pass {from: 10.10.20.0/24 port 1-65535 to: 0.0.0.0/0log: error connect disconnect
}# drop everyone else as soon as we can and log the connect, they are not
# on our net and have no business connecting to us.  This is the default
# but if you give the rule yourself, you can specify details.
client block {from: 0.0.0.0/0 to: 0.0.0.0/0log: connect error
}# 修改允许socks连接的IP
# everyone from our internal network, 10.0.0.0/8 is allowed to use
# tcp and udp for everything else.
socks pass {from: 10.10.20.0/24 to: 0.0.0.0/0protocol: tcp udplog: error connect disconnectsocksmethod: username# 只有proxy_group组内账号可以连接group: proxy_group# user 关键字含义类似group
}# last line, block everyone else.  This is the default but if you provide
# one  yourself you can specify your own logging/actions
socks block {from: 0.0.0.0/0 to: 0.0.0.0/0log: connect error
}
5.4 测试
- 服务帮助命令详见 /usr/local/sbin/sockd --help
- 启动服务
/usr/local/sbin/sockd -f /etc/sockd.conf
- 查看服务
# 查看服务端口命令
netstat -nltp | grep sockd
# 命令输出结果
tcp        0      0 0.0.0.0:10800           0.0.0.0:*               LISTEN      25885/sockd
5.5 管理
- 创建danted.service文件
vim /etc/systemd/system/danted.service
[Unit]
Description=SOCKS (v4 and v5) proxy daemon (danted)
Documentation=man:danted(8) man:danted.conf(5)
After=network.target[Service]
Type=simple
PIDFile=/run/danted.pid
Environment="OPTIONS=-f /etc/sockd.conf"
EnvironmentFile=-/etc/danted/danted.conf
ExecStart=/usr/local/sbin/sockd $OPTIONS
Restart=always
#Restart=on-failure
RuntimeDirectory=danted[Install]
WantedBy=multi-user.target
- 加入systemd管理
- 加载配置文件
systemctl daemon-reload
- 设置开机自启动,并启动服务
systemctl enable danted && systemctl start danted
- 查看服务执行状态命令
systemctl status danted
- 命令输出结果
● danted.service - SOCKS (v4 and v5) proxy daemon (danted)Loaded: loaded (/etc/systemd/system/danted.service; enabled; vendor preset: disabled)Active: active (running) since 六 2025-08-16 15:54:31 CST; 9min agoDocs: man:danted(8)man:danted.conf(5)Main PID: 32481 (sockd)CGroup: /system.slice/danted.service├─32481 /usr/local/sbin/sockd -f /etc/sockd.conf├─32482 sockd: monitor-child├─32483 sockd: negotiate-child: 0/96├─32484 sockd: request-child: 0/1├─32485 sockd: request-child: 0/1├─32486 sockd: request-child: 0/1├─32487 sockd: request-child: 0/1├─32488 sockd: request-child: 0/1├─32489 sockd: request-child: 0/1├─32490 sockd: request-child: 0/1├─32491 sockd: request-child: 0/1├─32492 sockd: request-child: 0/1├─32493 sockd: request-child: 0/1├─32494 sockd: request-child: 0/1├─32495 sockd: request-child: 0/1├─32496 sockd: request-child: 0/1├─32497 sockd: request-child: 0/1├─32498 sockd: request-child: 0/1├─32499 sockd: request-child: 0/1└─32500 sockd: io-child: 0/32 (0 in progress)
5.6 日志
- 增加logrotate配置
vim /etc/logrotate.d/dantedlog
/var/log/danted/*.log
{dailyrotate 10compressdelaycompressmissingoknotifemptypostrotate/bin/kill -HUP `cat /var/run/sockd.pid 2> /dev/null` 2> /dev/null || trueendscript
}
- 测试日志轮转
logrotate -f /etc/logrotate.conf
- 查看日志轮转

6. 使用
6.1 客户端
-
danted开启了验证,所以需要使用代理客户端程序进行socks连接。
-
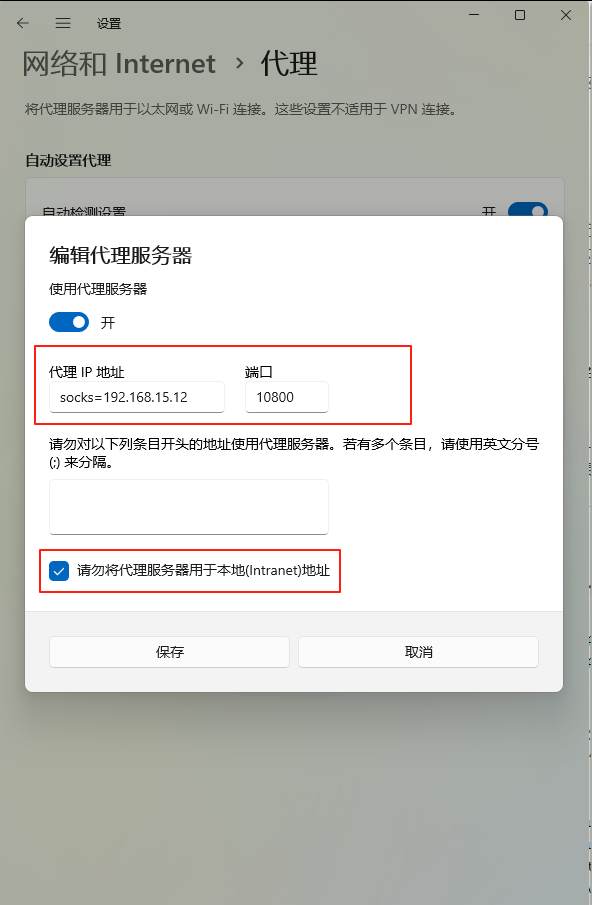
Windos系统自带“代理”仅支持socks v4(配置见下图),不支持socks v5的鉴权功能(本例开启了鉴权),而且仅能代理http、https、ftp。如果只代理http和https请考虑squid软件。
- Windos客户端连接(仅供参考,不适用本例)
注意:使用socks代理的写法,socks=192.168.15.12
- Windos客户端连接(仅供参考,不适用本例)
-
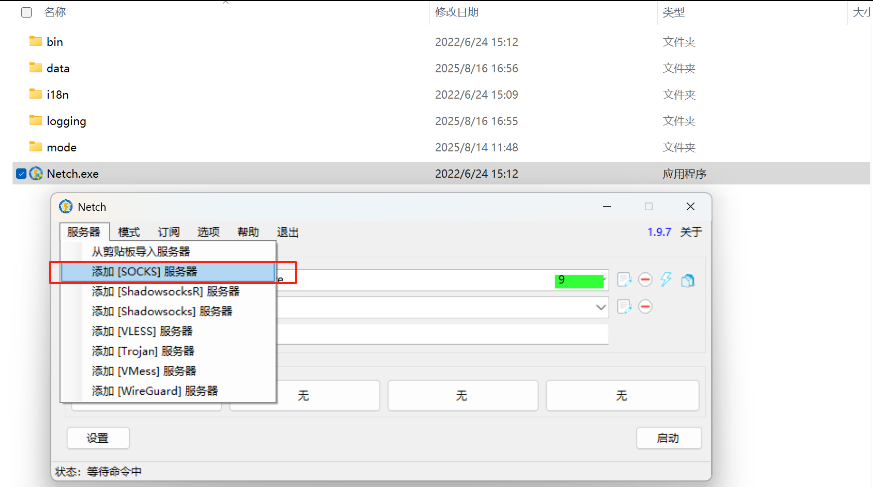
代理客户端软件
本例使用Netch软件说明(https://github.com/netchx/netch),版本v1.9.7 -
配置Netch
-
配置socks服务器
-
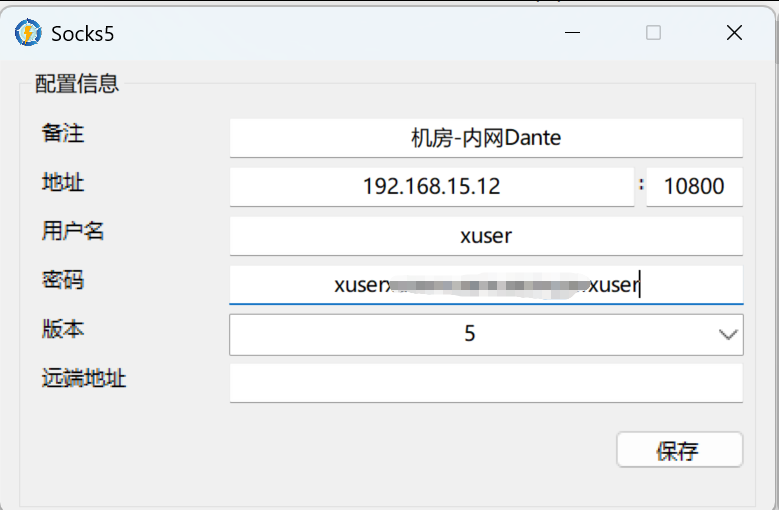
配置信息
- 地址 dante服务器IP和端口
- 用户名 账号(xuser已创建,且已添加至proxy_group组中)
- 密码 账号设置的密码
- 版本 5(socks v5)
-
模式
- 选择Bypass LAN(绕过局域网)
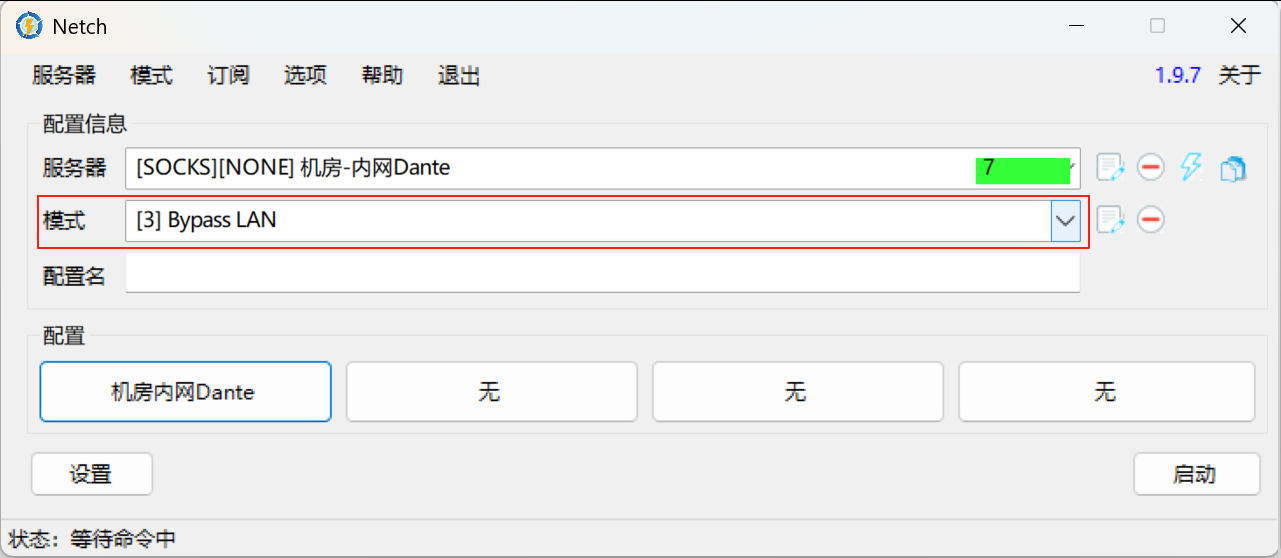
- 选择Bypass LAN(绕过局域网)
6.2 测试
1. 测试授权账号(xuser)
-
启动Netch

-
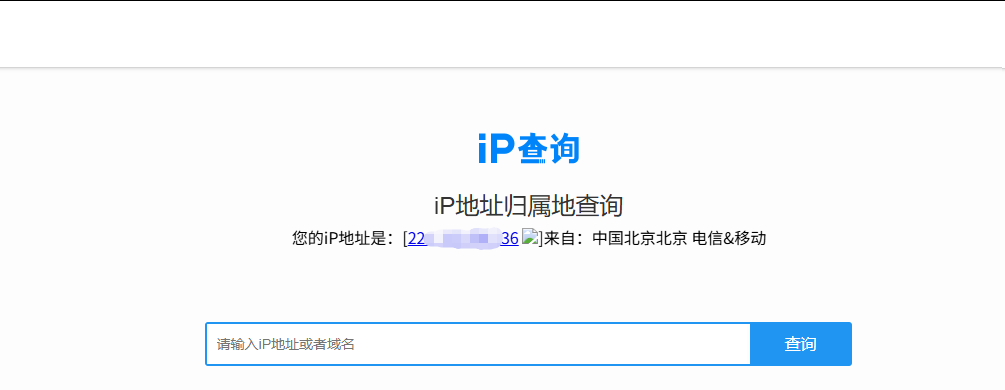
查看出口IP
出口IP已变更为代理出口IP(本例中192.168.15.12的互联网出口IP如下)
-
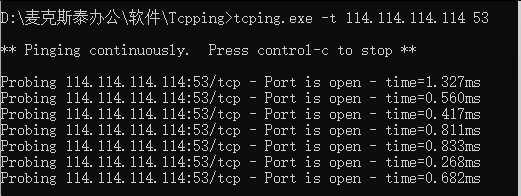
测试TCP代理
客户端使用tcping 测试 114.114.114.114 的53端口
-
查看dante服务端日志显示TCP代理连接

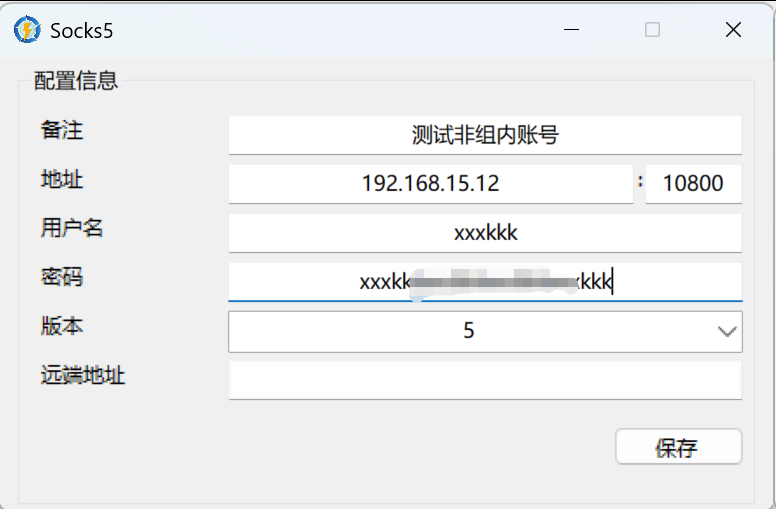
2. 测试非授权账号(xxxkkk)
本例中xxxkkk是dante服务器系统账号,但不是proxy_group组内授权账号。
-
配置使用xxxkkk账号
-
启用Netch
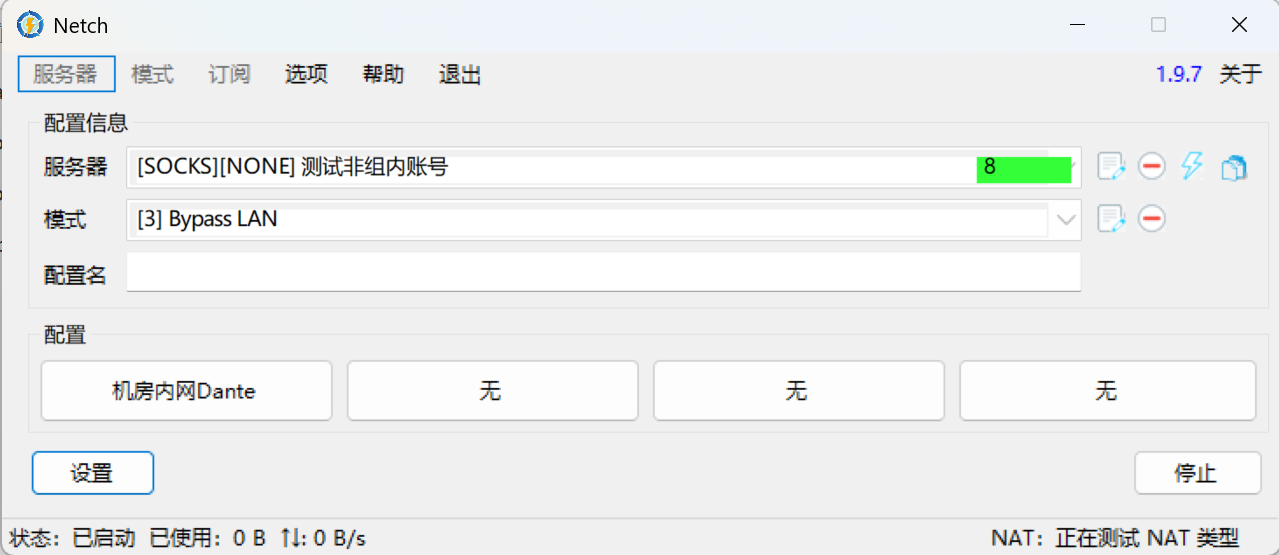
-
查看dante服务端日志显示拒绝代理连接
