ESP32 ESP-IDF Ubuntu平台工具链的标准设置
版本和环境信息如下:
PC平台: Windows 11 专业版
虚拟机运行平台:Oracle VM VirtualBox 7.1.6
Linux虚拟机: Ubuntu22.04
ESP32-S3开发环境: ESP-IDF 5.4
ESP32-S3开发板:DevKitC-1 WROOM-1乐鑫N16R8
淘宝链接:ESP32-S3-N16R8核心板DevKitC-1

ESP32-S3-WROOM-1 系列型号对比

第一步:安装准备
为了在 ESP32-S3 中使用 ESP-IDF,需要根据操作系统安装一些软件包。可以参考以下安装指南,安装Linux的系统上所有需要的软件包。
编译 ESP-IDF 需要以下软件包。请根据使用的 Linux 发行版本,选择合适的安装命令。
sudo apt-get install git wget flex bison gperf python3 python3-pip python3-venv cmake ninja-build ccache libffi-dev libssl-dev dfu-util libusb-1.0-0第二步:获取 ESP-IDF
在围绕 ESP32-S3 构建应用程序之前,请先获取乐鑫提供的软件库文件 ESP-IDF 仓库。
获取 ESP-IDF 的本地副本:打开终端,切换到要保存 ESP-IDF 的工作目录,使用 git clone 命令克隆远程仓库。针对不同操作系统的详细步骤,请见下文。
打开终端,运行以下命令:
mkdir -p ~/esp
cd ~/esp
git clone -b v5.4 --recursive https://github.com/espressif/esp-idf.git #Github 需要翻墙
git clone -b v5.4 --recursive https://gitee.com/EspressifSystems/esp-idf.git #Gitee 国内同步更新
ESP-IDF 将下载至 ~/esp/esp-idf。
第三步:设置工具
除了 ESP-IDF 本身,还需要为支持 ESP32-S3 的项目安装 ESP-IDF 使用的各种工具,比如编译器、调试器、Python 包等。
cd ~/esp/esp-idf
./install.sh esp32s3
上述命令仅仅为 ESP32-S3 安装所需工具。如果需要为多个目标芯片开发项目,则可以一次性指定多个目标,如下所示:
cd ~/esp/esp-idf
./install.sh esp32s3 esp32s2 esp32 esp32c3 esp32c6   #目前本人有这些开发板
第四步:设置环境变量
此时,刚刚安装的工具尚未添加至 PATH 环境变量,无法通过“命令窗口”使用这些工具。因此,必须设置一些环境变量。这可以通过 ESP-IDF 提供的另一个脚本进行设置。
请在需要运行 ESP-IDF 的终端窗口运行以下命令:
. $HOME/esp/esp-idf/export.sh
或者 ESP IDF目录下
. ./export.sh
如果需要经常运行 ESP-IDF,可以为执行 export.sh 创建一个别名,具体步骤如下:
- 复制并粘贴以下命令到 shell 配置文件中(
.profile、.bashrc、.zprofile等) - 通过重启终端窗口或运行
source [path to profile],如source ~/.bashrc来刷新配置文件。
alias get_idf='. $HOME/esp/esp-idf/export.sh'现在可以在任何终端窗口中运行 get_idf 来设置或刷新 ESP-IDF 环境。
第五步:开始使用 ESP-IDF
现在你已经具备了使用 ESP-IDF 的所有条件,接下来将介绍如何开始第一个工程。
开始创建工程
现在,可以准备开发 ESP32-S3 应用程序了。可以从 ESP-IDF 中 examples 目录下的 get-started/hello_world 工程开始。
将 get-started/hello_world 工程复制至本地的 ~/esp 目录下:
cd ~/esp
cp -r $IDF_PATH/examples/get-started/hello_world .
连接设备
现在,请将 ESP32-S3 开发板连接到 PC,并查看开发板使用的串口。
通常,串口在Linux操作系统下显示的名称为/dev/ttyUSB0
配置工程
请进入 hello_world 目录,设置 ESP32-S3 为目标芯片,然后运行工程配置工具 menuconfig。
cd ~/esp/hello_world
idf.py set-target esp32s3
idf.py menuconfig
打开一个新工程后,应首先使用 idf.py set-target esp32s3 设置“目标”芯片。注意,此操作将清除并初始化项目之前的编译和配置(如有)。也可以直接将“目标”配置为环境变量(此时可跳过该步骤)。更多信息,请见 选择目标芯片:set-target。
正确操作上述步骤后,系统将显示以下菜单:

选择ESP32-S3-WROOM-1 N6R8的相应配置参数
选择Serial flasher config的Flash size为16 MB


选择ESP PSRAM的Flash size为8 MB
选择Component config的ESP PSRAM


Mode (QUAD/OCT) of SPI RAM chip in use (Octal Mode PSRAM)


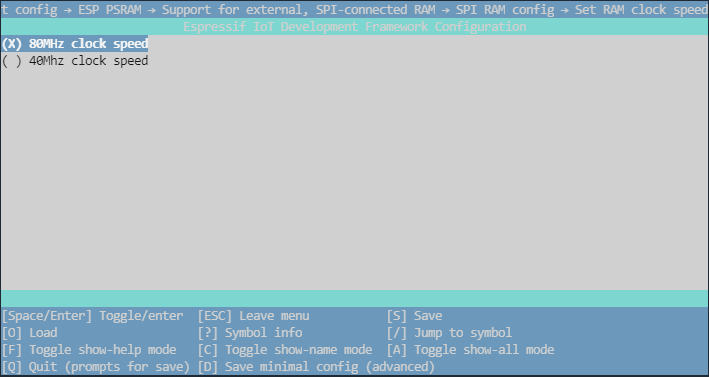
Set RAM clock speed (80Mhz clock speed)

CPU frequency (240 MHz)


设置完成后 SHIFT+Q保存退出。
编译工程
请使用以下命令,编译烧录工程:
idf.py build运行以上命令可以编译应用程序和所有 ESP-IDF 组件,接着生成引导加载程序、分区表和应用程序二进制文件。
Executing action: all (aliases: build)
Running ninja in directory /home/weston/esp/hello_world/build
Executing "ninja all"...
[0/1] Re-running CMake...
-- git rev-parse returned 'fatal: not a git repository (or any of the parent directories): .git'
-- Could not use 'git describe' to determine PROJECT_VER.
-- Building ESP-IDF components for target esp32s3
-- Project sdkconfig file /home/weston/esp/hello_world/sdkconfig
-- Compiler supported targets: xtensa-esp-elf
-- App "hello_world" version: 1... (more lines of build system output)[966/967] Generating binary image from built executable
esptool.py v4.7.0
Creating esp32s3 image...
Merged 2 ELF sections
Successfully created esp32s3 image.
Generated /home/weston/esp/hello_world/build/hello_world.bin
[967/967] cd /home/weston/esp/hello_world/build/esp-idf/esptool_py ...tition-table.bin /home/weston/esp/hello_world/build/hello_world.binhello_world.bin binary size 0x3ac80 bytes. Smallest app partition is 0x100000 bytes. 0xc5380 bytes (77%) free.Project build complete. To flash, run:idf.py flash
oridf.py -p PORT flash
orpython -m esptool --chip esp32s3 -b 460800 --before default_reset --after hard_reset write_flash --flash_mode dio --flash_size 16MB --flash_freq 80m 0x0 build/bootloader/bootloader.bin 0x8000 build/partition_table/partition-table.bin 0x10000 build/hello_world.bin
or from the "/home/weston/esp/hello_world/build" directorypython -m esptool --chip esp32s3 -b 460800 --before default_reset --after hard_reset write_flash "@flash_args"
如果一切正常,编译完成后将生成 .bin 文件。
烧录到设备
请运行以下命令,将刚刚生成的二进制文件烧录至 ESP32-S3 开发板:
idf.py -p /dev/ttyUSB0 flash/dev/ttyUSB0为 ESP32-S3 开发板的ubuntu下串口名称。如果 PORT 未经定义,idf.py 将尝试使用可用的串口自动连接。
常规操作
在烧录过程中,会看到类似如下的输出日志:
$ idf.py -p /dev/ttyUSB0 flash
或者
$ idf.py flashExecuting action: flash
Serial port /dev/ttyUSB0
Connecting....
Detecting chip type... ESP32-S3
Running ninja in directory /home/weston/esp/hello_world/build
Executing "ninja flash"...
[1/5] cd /home/weston/esp/hello_world/build/esp-idf/esptool_py && /...tition-table.bin /home/weston/esp/hello_world/build/hello_world.binhello_world.bin binary size 0x3ac80 bytes. Smallest app partition is 0x100000 bytes. 0xc5380 bytes (77%) free.
[1/1] cd /home/weston/esp/hello_world/build/bootloader/esp-idf/espt...er 0x0 /home/weston/esp/hello_world/build/bootloader/bootloader.binBootloader binary size 0x5250 bytes. 0x2db0 bytes (36%) free.
[2/3] cd /home/weston/esp/esp-idf/components/esptool_py && /usr/bin...home/weston/esp/esp-idf/components/esptool_py/run_serial_tool.cmakeesptool.py --chip esp32s3 -p /dev/ttyUSB0 -b 460800 --before=default_reset --after=hard_reset write_flash --flash_mode dio --flash_freq 80m --flash_size 16MB 0x0 bootloader/bootloader.bin 0x10000 hello_world.bin 0x8000 partition_table/partition-table.bin
esptool.py v4.7.0
Serial port /dev/ttyUSB0
Connecting....
Chip is ESP32-S3 (QFN56) (revision v0.1)
Features: WiFi, BLE, Embedded PSRAM 8MB (AP_3v3)
Crystal is 40MHz
MAC: 7c:df:a1:fc:70:c0
Uploading stub...
Running stub...
Stub running...
Changing baud rate to 460800
Changed.
Configuring flash size...
Flash will be erased from 0x00000000 to 0x00005fff...
Flash will be erased from 0x00010000 to 0x0004afff...
Flash will be erased from 0x00008000 to 0x00008fff...
Compressed 21072 bytes to 13055...
Writing at 0x00000000... (100 %)
Wrote 21072 bytes (13055 compressed) at 0x00000000 in 0.8 seconds (effective 207.2 kbit/s)...
Hash of data verified.
Compressed 240768 bytes to 128045...
Writing at 0x00045456... (100 %)
Wrote 240768 bytes (128045 compressed) at 0x00010000 in 5.0 seconds (effective 388.9 kbit/s)...
Hash of data verified.
Compressed 3072 bytes to 103...
Writing at 0x00008000... (100 %)
Wrote 3072 bytes (103 compressed) at 0x00008000 in 0.1 seconds (effective 439.1 kbit/s)...
Hash of data verified.Leaving...
Hard resetting via RTS pin...
Done
如果一切顺利,烧录完成后,开发板将会复位,应用程序 "hello_world" 开始运行。
监视输出
可以使用 idf.py -p PORT monitor 命令,监视 “hello_world” 工程的运行情况。注意,不要忘记将 PORT 替换为自己的串口名称。
运行该命令后,IDF 监视器 应用程序将启动::
$ idf.py -p /dev/ttyUSB0 monitor
或者
$ idf.py monitorExecuting action: monitor
Running idf_monitor in directory /home/weston/esp/hello_world
Executing "/home/weston/.espressif/python_env/idf5.2_py3.8_env/bin/python /home/weston/esp/esp-idf/tools/idf_monitor.py -p /dev/ttyUSB0 -b 115200 --toolchain-prefix xtensa-esp32s3-elf- --target esp32s3 --revision 0 /home/weston/esp/hello_world/build/hello_world.elf -m '/home/weston/.espressif/python_env/idf5.2_py3.8_env/bin/python' '/home/weston/esp/esp-idf/tools/idf.py' '-p' '/dev/ttyUSB0'"...
--- esp-idf-monitor 1.4.0 on /dev/ttyUSB0 115200 ---
--- Quit: Ctrl+] | Menu: Ctrl+T | Help: Ctrl+T followed by Ctrl+H ---
ESP-ROM:esp32s3-20210327
Build:Mar 27 2021
rst:0x1 (POWERON),boot:0x2a (SPI_FAST_FLASH_BOOT)
SPIWP:0xee
mode:DIO, clock div:1
load:0x3fce3810,len:0x178c
load:0x403c9700,len:0x4
load:0x403c9704,len:0xcbc
load:0x403cc700,len:0x2d9c
entry 0x403c9914
I (27) boot: ESP-IDF v5.2.2 2nd stage bootloader
I (27) boot: compile time Jul 20 2024 11:49:59
I (27) boot: Multicore bootloader
I (30) boot: chip revision: v0.1
I (34) boot.esp32s3: Boot SPI Speed : 80MHz
I (39) boot.esp32s3: SPI Mode       : DIO
I (43) boot.esp32s3: SPI Flash Size : 8MB
I (48) boot: Enabling RNG early entropy source...
I (53) boot: Partition Table:
I (57) boot: ## Label            Usage          Type ST Offset   Length
I (64) boot:  0 nvs              WiFi data        01 02 00009000 00006000
I (72) boot:  1 phy_init         RF data          01 01 0000f000 00001000
I (79) boot:  2 factory          factory app      00 00 00010000 00100000
I (87) boot: End of partition table
I (91) esp_image: segment 0: paddr=00010020 vaddr=3c020020 size=0b4d8h ( 46296) map
I (108) esp_image: segment 1: paddr=0001b500 vaddr=3fc93c00 size=02dc4h ( 11716) load
I (110) esp_image: segment 2: paddr=0001e2cc vaddr=40374000 size=01d4ch (  7500) load
I (118) esp_image: segment 3: paddr=00020020 vaddr=42000020 size=1ce70h (118384) map
I (146) esp_image: segment 4: paddr=0003ce98 vaddr=40375d4c size=0ddc0h ( 56768) load
I (165) boot: Loaded app from partition at offset 0x10000
I (165) boot: Disabling RNG early entropy source...
I (177) cpu_start: Multicore app
I (177) octal_psram: ECC is enabled
I (177) octal_psram: vendor id    : 0x0d (AP)
I (178) octal_psram: dev id       : 0x02 (generation 3)
I (184) octal_psram: density      : 0x03 (64 Mbit)
I (190) octal_psram: good-die     : 0x01 (Pass)
I (195) octal_psram: Latency      : 0x01 (Fixed)
I (200) octal_psram: VCC          : 0x01 (3V)
I (205) octal_psram: SRF          : 0x01 (Fast Refresh)
I (211) octal_psram: BurstType    : 0x00 ( Wrap)
I (217) octal_psram: BurstLen     : 0x03 (1024 Byte)
I (222) octal_psram: Readlatency  : 0x02 (10 cycles@Fixed)
I (228) octal_psram: DriveStrength: 0x00 (1/1)
I (234) MSPI Timing: PSRAM timing tuning index: 6
I (239) esp_psram: Found 8MB PSRAM device
I (244) esp_psram: Speed: 80MHz
I (714) esp_psram: SPI SRAM memory test OK
I (724) cpu_start: Pro cpu start user code
I (724) cpu_start: cpu freq: 240000000 Hz
I (724) cpu_start: Application information:
I (727) cpu_start: Project name:     hello_world
I (733) cpu_start: App version:      1
I (737) cpu_start: Compile time:     Jul 20 2024 11:49:55
I (743) cpu_start: ELF file SHA256:  2507c4390...
I (749) cpu_start: ESP-IDF:          v5.2.2
I (753) cpu_start: Min chip rev:     v0.0
I (758) cpu_start: Max chip rev:     v0.99
I (763) cpu_start: Chip rev:         v0.1
I (768) heap_init: Initializing. RAM available for dynamic allocation:
I (775) heap_init: At 3FC97308 len 00052408 (329 KiB): RAM
I (781) heap_init: At 3FCE9710 len 00005724 (21 KiB): RAM
I (787) heap_init: At 3FCF0000 len 00008000 (32 KiB): DRAM
I (793) heap_init: At 600FE010 len 00001FD8 (7 KiB): RTCRAM
I (800) esp_psram: Adding pool of 7680K of PSRAM memory to heap allocator
I (808) spi_flash: detected chip: generic
I (812) spi_flash: flash io: dio
I (816) sleep: Configure to isolate all GPIO pins in sleep state
I (823) sleep: Enable automatic switching of GPIO sleep configuration
I (830) main_task: Started on CPU0
I (840) esp_psram: Reserving pool of 32K of internal memory for DMA/internal allocations
I (840) main_task: Calling app_main()
Hello world!
This is esp32s3 chip with 2 CPU core(s), WiFi/BLE, silicon revision v0.1, 8MB external flash
Minimum free heap size: 8207072 bytes
Restarting in 10 seconds...
Restarting in 9 seconds...
Restarting in 8 seconds...
Restarting in 7 seconds...
Restarting in 6 seconds...
Restarting in 5 seconds...
Restarting in 4 seconds...
Restarting in 3 seconds...
Restarting in 2 seconds...
Restarting in 1 seconds...
Restarting in 0 seconds...
使用快捷键 Ctrl+],可退出 ESP-IDF 监视器。
也可以运行以下命令,一次性执行构建、烧录和监视过程:
idf.py -p <PORT> flash monitor第六步:常见问题
ubuntu虚拟机idf.py -p /dev/ttyUSB0 flash报错
Serial port ttyUSB0A fatal error occurred: Could not open ttyUSB0, the port is busy or doesn't exist.
([Errno 2] could not open port ttyUSB0: [Errno 2] No such file or directory: 'ttyUSB0')Hint: Check if the port is correct and ESP connectedCMake Error at run_serial_tool.cmake:66 (message):/home/weston/.espressif/python_env/idf5.2_py3.8_env/bin/python;;/home/weston/esp/esp-idf/components/esptool_py/esptool/esptool.py;--chip;esp32s3failed.FAILED: CMakeFiles/flash
解决方法
只有root用户和属于dialout组的用户会有读写权限
方法一:
该方法重启就会失效
sudo chmod -R 777 /dev/ttyUSB0
方法二
永久生效
sudo usermod -aG dialout user //user替换为自己的用户名