PyTorch + MLFlow 实战:从零构建可追踪的深度学习模型训练系统
本文通过使用 Kaggle 数据集训练情感分析模型的实例,详细演示了如何将 PyTorch 与 MLFlow 进行深度集成,实现完整的实验跟踪、模型记录和结果可复现性管理。文章将系统性地介绍训练代码的核心组件,展示指标和工件的记录方法,并提供 MLFlow UI 的详细界面截图。
无论您是初次接触 MLFlow 的开发者,还是正在寻求构建完整 PyTorch 实验跟踪系统的工程师,本文提供的实践案例都可以作为您项目开发的参考基础。
自定义数据集类的设计与实现
首先需要构建一个专门用于情感分析任务的自定义
TextDataset
类。该类继承自 PyTorch 的
Dataset
基类,负责处理原始文本数据的预处理和数值化转换。该数据集类的核心功能包括文本清洗和分词处理、基于词汇表的标记索引转换、序列长度的统一填充或截断处理,以及处理后输入数据与标签的配对返回。
具体实现代码如下:
class TextDataset(Dataset): def __init__(self, texts, labels, vocab_to_idx, max_length=128): self.texts = texts self.labels = labels self.vocab_to_idx = vocab_to_idx self.max_length = max_length def __len__(self): return len(self.texts) def __getitem__(self, idx): text = self.texts[idx] label = self.labels[idx] # 将文本转换为索引tokens = self.preprocess_text(text) indices = [self.vocab_to_idx.get(token, self.vocab_to_idx['<UNK>']) for token in tokens] # 填充或截断到 max_lengthif len(indices) < self.max_length: indices.extend([self.vocab_to_idx['<PAD>']] * (self.max_length - len(indices))) else: indices = indices[:self.max_length] return torch.tensor(indices, dtype=torch.long), torch.tensor(label, dtype=torch.long) def preprocess_text(self, text): # 简单的文本预处理text = text.lower() text = re.sub(r'[^a-zA-Z\s]', '', text) tokens = text.split() return tokens
词汇表构建与推理工具函数
为了确保模型训练和后续部署的一致性,需要建立一套完整的词汇表管理和文本预处理工具。这些工具函数的设计目标是提供从训练数据构建词汇表、将原始文本转换为模型输入格式,以及从 MLFlow 工件存储中加载保存的词汇表等功能。
build_vocabulary
函数通过扫描训练数据集构建标记到索引的映射字典,并可选择性地过滤低频词汇。
text_to_input
函数负责将原始文本字符串转换为填充后的标记索引张量,为推理阶段做好数据准备。
get_vocab_to_index
函数则实现了从 MLFlow 工件存储中加载词汇表的功能,这对于确保评估和部署阶段的可复现性至关重要。
def get_vocab_to_index(vocab_to_idx_uri): vocab_to_idx = mlflow.artifacts.load_dict(vocab_to_idx_uri) return vocab_to_idx def build_vocabulary(texts, min_freq=2): """从文本构建词汇表""" all_tokens = [] for text in texts: # 简单的预处理text = text.lower() text = re.sub(r'[^a-zA-Z\s]', '', text) tokens = text.split() all_tokens.extend(tokens) # 统计标记token_counts = Counter(all_tokens) # 创建词汇表vocab_to_idx = {'<PAD>': 0, '<UNK>': 1} idx = 2 for token, count in token_counts.items(): if count >= min_freq: vocab_to_idx[token] = idx idx += 1 return vocab_to_idx def text_to_input(text, vocab_to_idx): # 设备配置device = torch.device('cuda' if torch.cuda.is_available() else 'cpu') print(f"Using device: {device}") # 预处理文本text = text.lower() text = re.sub(r'[^a-zA-Z\s]', '', text) tokens = text.split() indices = [vocab_to_idx.get(token, vocab_to_idx['<UNK>']) for token in tokens] # 这个应该在这里传递..config = { "max_length": 128 } # 填充或截断if len(indices) < config['max_length']: indices.extend([vocab_to_idx['<PAD>']] * (config['max_length'] - len(indices))) else: indices = indices[:config['max_length']] input_data = [indices] return input_data
预训练 GloVe 嵌入的集成与应用
为了提升模型在小规模数据集上的性能表现,我们采用了预训练的 GloVe 词向量嵌入技术。GloVe 嵌入提供了从大规模文本语料库(如维基百科和 Common Crawl)中学习得到的丰富语义表示,能够为模型提供更好的初始化状态。
在这一模块中,实现了完整的 GloVe 嵌入处理流程,包括自动下载所需的 GloVe 文件、将嵌入数据加载到内存中,以及创建与模型词汇表对齐的嵌入矩阵。这种设计使得 LSTM 网络中的嵌入层能够从具有语义意义的向量表示开始训练,而不是依赖随机初始化。
def load_glove_embeddings(glove_path, embedding_dim=100): """从文件加载 GloVe 嵌入""" print(f"Loading GloVe embeddings from {glove_path}...") embeddings = {} # 处理 .txt 和 .gz 文件if glove_path.endswith('.gz'): file_obj = gzip.open(glove_path, 'rt', encoding='utf-8') else: file_obj = open(glove_path, 'r', encoding='utf-8') try: for line in file_obj: values = line.split() word = values[0] vector = np.asarray(values[1:], dtype='float32') if len(vector) == embedding_dim: # 确保维度正确embeddings[word] = vector finally: file_obj.close() print(f"Loaded {len(embeddings)} word vectors") return embeddings def create_embedding_matrix(vocab_to_idx, embeddings_dict, embedding_dim): """从预训练的嵌入创建嵌入矩阵""" vocab_size = len(vocab_to_idx) embedding_matrix = np.zeros((vocab_size, embedding_dim)) # 对于未知词,使用随机值进行初始化embedding_matrix = np.random.normal(scale=0.6, size=(vocab_size, embedding_dim)) found_count = 0 for word, idx in vocab_to_idx.items(): if word in embeddings_dict: embedding_matrix[idx] = embeddings_dict[word] found_count += 1 print(f"Found pre-trained vectors for {found_count}/{vocab_size} words ({found_count/vocab_size*100:.1f}%)") return embedding_matrix def download_glove_embeddings(embedding_dim=100): """如果 GloVe 嵌入不存在则下载""" glove_urls = { 50: "https://nlp.stanford.edu/data/glove.6B.zip", 100: "https://nlp.stanford.edu/data/glove.6B.zip", 200: "https://nlp.stanford.edu/data/glove.6B.zip", 300: "https://nlp.stanford.edu/data/glove.6B.zip" } if embedding_dim not in glove_urls: raise ValueError(f"Embedding dimension {embedding_dim} not available. Choose from {list(glove_urls.keys())}") filename = f"glove.6B.{embedding_dim}d.txt" zip_filename = "glove.6B.zip" if not os.path.exists(filename): print(f"Downloading GloVe {embedding_dim}d embeddings...") if not os.path.exists(zip_filename): urlretrieve(glove_urls[embedding_dim], zip_filename) print("Extracting embeddings...") with zipfile.ZipFile(zip_filename, 'r') as zip_ref: zip_ref.extract(filename) # 清理 zip 文件os.remove(zip_filename) return filename
基于 LSTM 的情感分类模型架构
本项目的核心模型是基于 PyTorch 构建的自定义 LSTM 情感分类网络。模型采用了现代深度学习的多项技术特性,包括预训练 GloVe 嵌入的集成、双向 LSTM 架构的应用、以及灵活的嵌入层训练策略控制。
模型的主要技术特点体现在以下几个方面:嵌入层支持预训练 GloVe 向量的加载,同时提供冻结或微调的选择;双向 LSTM 层能够捕获文本序列中的前向和后向上下文信息;Dropout 正则化技术用于防止模型过拟合;全连接层负责将 LSTM 输出映射到最终的情感分类预测结果。
class SentimentLSTM(nn.Module): def __init__(self, vocab_size, embedding_dim, hidden_dim, output_dim, n_layers=2, dropout=0.3, pretrained_embeddings=None, freeze_embeddings=False): super(SentimentLSTM, self).__init__() self.embedding = nn.Embedding(vocab_size, embedding_dim) if pretrained_embeddings is not None: print("Loading pre-trained embeddings...") self.embedding.weight.data.copy_(torch.from_numpy(pretrained_embeddings)) self.embedding.weight.requires_grad = not freeze_embeddings if freeze_embeddings: print("Embedding weights frozen") else: print("Embedding weights will be fine-tuned") self.lstm = nn.LSTM(embedding_dim, hidden_dim, n_layers, dropout=dropout, batch_first=True, bidirectional=True) self.dropout = nn.Dropout(dropout) self.fc = nn.Linear(hidden_dim * 2, output_dim) # *2 表示双向def forward(self, x): embedded = self.embedding(x) lstm_out, (hidden, cell) = self.lstm(embedded) # hidden: [num_layers * num_directions, batch, hidden_dim] # 取最后一层双向的隐藏状态hidden_cat = torch.cat((hidden[-2,:,:], hidden[-1,:,:]), dim=1) # [batch, hidden_dim*2] output = self.dropout(hidden_cat) output = self.fc(output) return output
MLFlow 实验跟踪与训练管理系统
main()
函数作为整个训练流程的核心控制器,负责协调数据加载、模型初始化、训练执行、性能评估等各个环节,同时通过 MLFlow 实现完整的实验跟踪和可复现性管理。
传统的训练逻辑在 MLFlow 的增强下获得了更加丰富的功能支持。系统能够自动记录带有时间戳和标签的运行信息,实现配置参数的自动化记录,将数据集作为输入进行登记,按训练周期记录损失和准确率等关键指标,保存性能最优的模型版本,并存储词汇表和模型签名等重要工件。
def main(): now = datetime.now() run_name = f"tracking run at: {now}" with mlflow.start_run(run_name=run_name): experiment_tags = { "project_name": "sentiment_analysis", } experiment_id = get_or_create_experiment( experiment_name="Sentiment Analysis with pytorch model", experiment_tags=experiment_tags ) mlflow.set_experiment(experiment_id=experiment_id) CONFIG = { 'embedding_dim': 100, 'hidden_dim': 256, 'n_layers': 2, 'dropout': 0.3, 'learning_rate': 0.01, 'batch_size': 32, 'epochs': 10, 'max_length': 128, 'min_freq': 2, 'use_pretrained_embeddings': True, 'freeze_embeddings': True, 'glove_path': None, } # ... [加载数据、预处理、构建词汇表、初始化模型等] ...mlflow.log_params(CONFIG) mlflow.log_dict(vocab_to_idx, "vocab_to_idx") train_dataset = mlflow.data.from_pandas(df=train_df, name="train_dataset") test_dataset = mlflow.data.from_pandas(df=test_df, name="test_dataset") mlflow.log_input(train_dataset, context="train_dataset") mlflow.log_input(test_dataset, context="test_dataset") for epoch in range(CONFIG['epochs']): train_loss, train_accuracy = train_model(...) test_loss, test_accuracy, _, _ = evaluate_model(...) mlflow.log_metric("train_loss", train_loss, step=epoch) mlflow.log_metric("train_accuracy", train_accuracy, step=epoch) mlflow.log_metric("test_loss", test_loss, step=epoch) mlflow.log_metric("test_accuracy", test_accuracy, step=epoch) if test_accuracy > best_accuracy: best_accuracy = test_accuracy torch.save({...}, 'best_sentiment_model.pth') mlflow.log_metric("best_accuracy", best_accuracy) log_model(...) # 记录带有输入示例和签名的模型mlflow.log_metric("final_test_accuracy", test_accuracy)
带输入签名的 PyTorch 模型记录机制
为了充分发挥 MLFlow 模型管理功能的优势,包括部署、验证和可复现性保障,我们需要实现带有输入示例和签名的模型记录机制。这种记录方式能够明确定义模型预期的输入和输出模式,为后续的模型部署和验证提供标准化的接口规范。
为此,我们开发了一个专用的工具函数
log_model()
,该函数负责记录训练完成的 PyTorch 模型、从原始文本转换而来的输入示例,以及自动推断的模型签名信息。
def log_model(model, vocab_to_index, vocab_size, max_length, device): from mlflow.models.signature import infer_signature sample_input, sample_output = generate_sample_input_output( model, vocab_to_index, vocab_size, max_length, device ) signature = infer_signature(sample_input, sample_output) mlflow.pytorch.log_model( model, artifact_path="model", input_example=sample_input, signature=signature )
该函数依赖于一个辅助函数,该函数使用真实的文本数据从模型生成样本输入输出对:
def generate_sample_input_output(model, vocab_to_index, vocab_size, max_length, device): import torch import numpy as np # 将样本文本转换为索引输入格式sample_input = np.array(tpp.text_to_input("This is the best movie ever", vocab_to_index)) sample_input_tensor = torch.from_numpy(sample_input).to(device) # 运行模型sample_output = model(sample_input_tensor) # 转换为 NumPy 以便 MLflow 记录sample_input = sample_input_tensor.cpu().numpy() sample_output = sample_output.detach().cpu().numpy() return sample_input, sample_output
通过这样的设计,MLFlow 不仅能够存储模型权重,还能够保存定义模型交互方式的元数据,从而使得在其他环境或 API 中可靠地加载和服务模型变得更加简便。
MLFlow 实验管理与组织策略
为了确保实验的有序组织和高效检索,我们实现了一个名为
get_or_create_experiment()
的辅助函数。该函数具备按名称检索现有 MLFlow 实验或创建新实验的能力,同时支持使用项目名称、应用领域或模型类型等元数据对实验进行标记。
这种设计确保了在 MLFlow UI 中,每个训练运行都能够在具有清晰名称的实验下进行跟踪管理。
def get_or_create_experiment(experiment_name: str, experiment_tags: dict) -> str: # 检查实验是否已存在experiment = mlflow.get_experiment_by_name(experiment_name) if experiment is not None: print(f"Using existing experiment: {experiment_name} (ID: {experiment.experiment_id})") return experiment.experiment_id else: # 创建一个新实验experiment_id = mlflow.create_experiment(name=experiment_name, tags=experiment_tags) print(f"Created new experiment: {experiment_name} (ID: {experiment_id})") return experiment_id
在训练脚本中的使用方式如下:
experiment_id = get_or_create_experiment( experiment_name="Sentiment Analysis with pytorch model", experiment_tags={"project_name": "sentiment_analysis"} ) mlflow.set_experiment(experiment_id=experiment_id)
单轮训练流程的实现
在训练实现方面,我们采用标准的 PyTorch 训练循环,按训练周期逐步处理数据。
train_model()
函数负责处理批次数据、前向和反向传播、损失计算以及优化器参数更新等核心训练逻辑。
从 MLFlow 跟踪的角度来看,该函数的重要价值在于返回每个训练周期的损失值和准确率指标,这些指标随后通过
mlflow.log_metric()
函数记录到 MLFlow 系统中。这种设计使得在 MLFlow UI 中跟踪不同运行的性能趋势变得简单高效。
def train_model(model, train_loader, criterion, optimizer, device): """训练模型一个周期""" model.train() total_loss = 0 correct = 0 total = 0 for batch_texts, batch_labels in train_loader: batch_texts, batch_labels = batch_texts.to(device), batch_labels.to(device) optimizer.zero_grad() outputs = model(batch_texts) loss = criterion(outputs, batch_labels) loss.backward() optimizer.step() total_loss += loss.item() _, predicted = torch.max(outputs.data, 1) total += batch_labels.size(0) correct += (predicted == batch_labels).sum().item() return total_loss / len(train_loader), correct / total
通过返回平均损失和准确率,该函数能够与训练循环中的 MLFlow 跟踪功能无缝集成:
mlflow.log_metric("train_loss", train_loss, step=epoch) mlflow.log_metric("train_accuracy", train_accuracy, step=epoch)
新文本情感预测功能
为了验证模型的实际应用效果,我们实现了一个专用的工具函数,用于加载训练完成的模型并对单个文本输入进行情感预测。该函数以直观的方式处理模型恢复、数据预处理和预测执行等流程:
def predict_sentiment(text, model_path='best_sentiment_model.pth'): # [ ... 参见上面的完整代码 ... ]
脚本执行与预测测试
为了整合所有功能模块,我们使用标准的
if __name__ == "__main__":
代码块来组织程序的执行流程。该代码块首先调用
main()
函数完成模型训练和记录,然后通过
predict_sentiment()
函数在几个示例文本上演示模型的预测能力:
if __name__ == "__main__": main() # 预测函数使用示例print("\nExample predictions:") example_texts = [ "I absolutely love this product!", "This is the worst thing ever.", "It's okay, nothing special." ] try: for text in example_texts: sentiment, confidence = predict_sentiment(text) print(f"Text: '{text}'") print(f"Predicted sentiment: {sentiment} (confidence: {confidence:.4f})") print() except FileNotFoundError: print("Model not found. Please run training first.")
这种设计使得在单次运行中完成模型重新训练并立即测试模型性能变得十分便捷。
系统运行输出结果如下:
 Using existing experiment: Sentiment Analysis with pytorch model (ID: 511091070605373857)
Using device: cuda
Loading datasets...
Training data: 27480 samples
Test data: 3534 samples
Sentiment distribution in training data:
sentiment
neutral     11117
positive     8582
negative     7781
Name: count, dtype: int64
Label mapping: {'negative': np.int64(0), 'neutral': np.int64(1), 'positive': np.int64(2)}
Building vocabulary...
Vocabulary size: 10096
Loading GloVe embeddings from glove.6B.100d.txt...
Loaded 400000 word vectors
Found pre-trained vectors for 9214/10096 words (91.3%)
Loading pre-trained embeddings...
Embedding weights frozen
Model initialized with 3321283 parameters  Starting training...
Epoch [1/10]
Train Loss: 0.8632, Train Acc: 0.6092
Test Loss: 0.7258, Test Acc: 0.6941
--------------------------------------------------
Using device: cuda
Epoch [2/10]
Train Loss: 0.7369, Train Acc: 0.6918
Test Loss: 0.6986, Test Acc: 0.7100
--------------------------------------------------
Using device: cuda
Epoch [3/10]
Train Loss: 0.7166, Train Acc: 0.7047
Test Loss: 0.6753, Test Acc: 0.7204
--------------------------------------------------
Using device: cuda
Epoch [4/10]
Train Loss: 0.7010, Train Acc: 0.7134
Test Loss: 0.6756, Test Acc: 0.7136
--------------------------------------------------
Epoch [5/10]
Train Loss: 0.6823, Train Acc: 0.7205
Test Loss: 0.6781, Test Acc: 0.7162
--------------------------------------------------
Epoch [6/10]
Train Loss: 0.6592, Train Acc: 0.7318
Test Loss: 0.6537, Test Acc: 0.7320
--------------------------------------------------
Using device: cuda
Epoch [7/10]
Train Loss: 0.6590, Train Acc: 0.7328
Test Loss: 0.6653, Test Acc: 0.7235
--------------------------------------------------
Epoch [8/10]
Train Loss: 0.6481, Train Acc: 0.7365
Test Loss: 0.6648, Test Acc: 0.7210
--------------------------------------------------
Epoch [9/10]
Train Loss: 0.6451, Train Acc: 0.7398
Test Loss: 0.6839, Test Acc: 0.7250
--------------------------------------------------
Epoch [10/10]
Train Loss: 0.6402, Train Acc: 0.7378
Test Loss: 0.6869, Test Acc: 0.7221
--------------------------------------------------  Final Evaluation:
Test Accuracy: 0.7221  Classification Report:  precision    recall  f1-score   support  negative       0.79      0.60      0.68      1001  neutral       0.63      0.83      0.72      1430  positive       0.86      0.70      0.77      1103  accuracy                           0.72      3534  macro avg       0.76      0.71      0.72      3534
weighted avg       0.75      0.72      0.72      3534  Confusion Matrix:
[[ 596  385   20]  [ 139 1187  104]  [  23  311  769]]  Best model saved as 'best_sentiment_model.pth' with accuracy: 0.7320  Example predictions:
Text: 'I absolutely love this product!'
Predicted sentiment: positive (confidence: 0.9444)  Text: 'This is the worst thing ever.'
Predicted sentiment: negative (confidence: 0.8948)  Text: 'It's okay, nothing special.'  Predicted sentiment: neutral (confidence: 0.7907)
模型性能评估与预测结果分析
经过 10 个训练周期,使用预训练 GloVe 嵌入的 LSTM 模型在 MLFlow 完整跟踪下的最终评估结果显示出良好的性能表现:
测试准确率达到了 72.21%,这在情感分析任务中属于较为理想的性能水平。
详细的分类报告显示:
precision recall f1-score support negative 0.79 0.60 0.68 1001 neutral 0.63 0.83 0.72 1430 positive 0.86 0.70 0.77 1103
从混淆矩阵的结果来看:
[[ 596 385 20] [ 139 1187 104] [ 23 311 769]]
模型在积极情感和中性情感的识别上表现较好,但在消极情感分类方面仍有改进空间。这种性能差异可能通过进一步的数据集平衡或超参数微调来改善。
样本预测结果
使用训练完成的模型进行的预测示例如下:
针对强烈积极情感表达 “I absolutely love this product!”,模型预测为积极情感,置信度为 0.9444。对于明确的消极情感表达 “This is the worst thing ever.”,模型预测为消极情感,置信度为 0.8948。对于相对中性的表达 “It’s okay, nothing special.”,模型预测为中性情感,置信度为 0.7907。
这些预测结果表明,模型不仅能够准确理解强烈的情感表达,还能够以合理的置信度处理中性或含糊的输入文本。
MLFlow 可视化界面展示
通过 MLFlow 记录的所有训练运行、指标和工件为实验历史提供了清晰、交互式的可视化界面。MLFlow 仪表板的功能包括跟踪运行列表和相关标签的管理、不同训练周期的损失和准确率等记录指标的展示、词汇表文件和模型文件等工件的存储管理,以及用于可复现性和部署的模型签名和输入示例的维护。
这些可视化功能极大地简化了运行比较、性能问题调试以及模型版本随时间变化的管理工作。
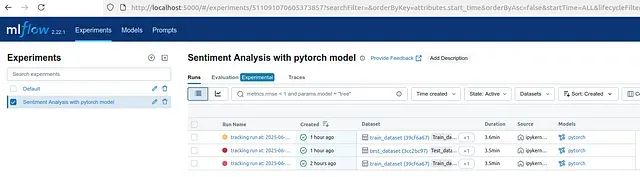
实验管理界面
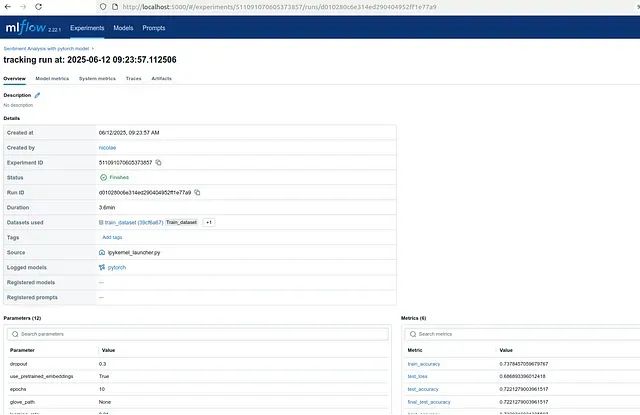
运行跟踪界面
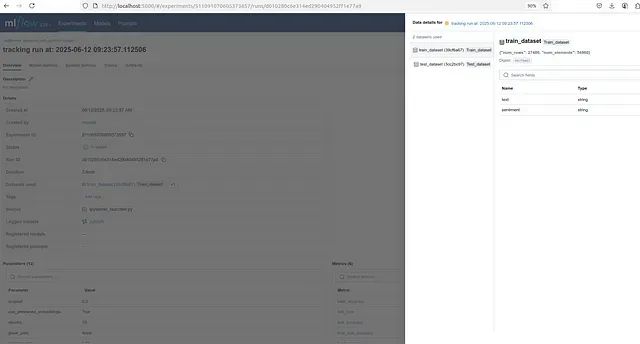
数据集管理界面
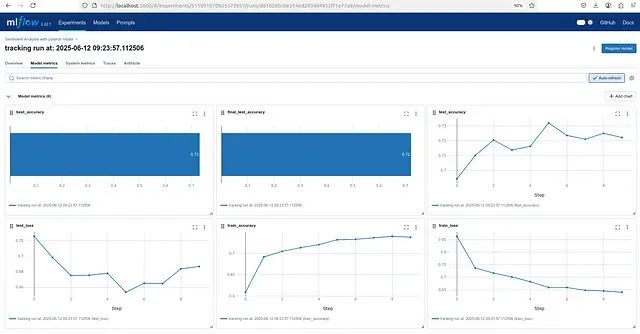
模型指标展示
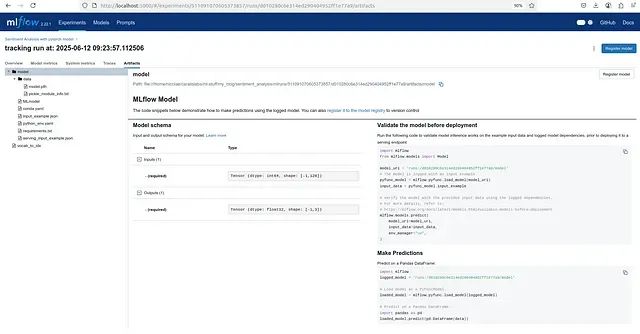
工件管理界面
模型部署验证界面
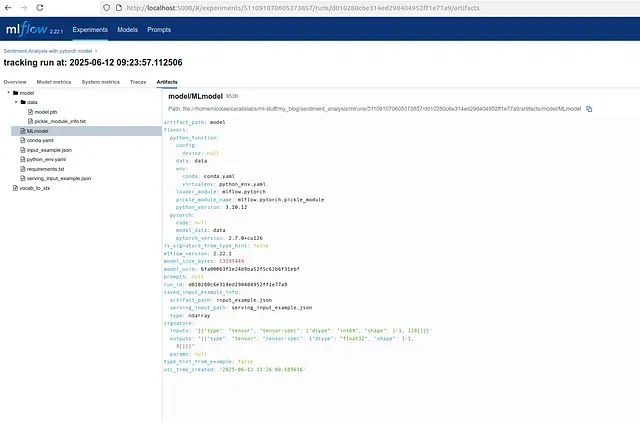
机器学习模型界面
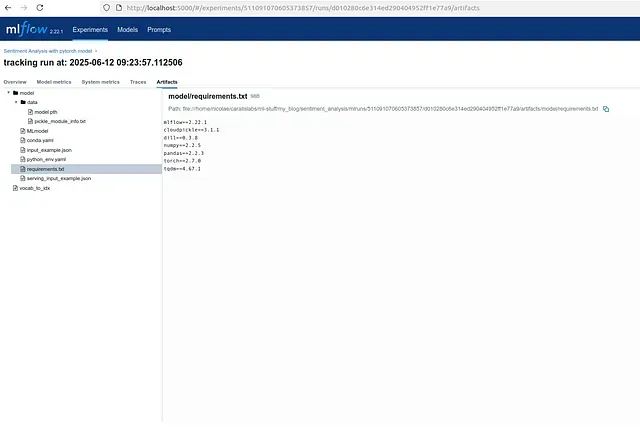
依赖需求界面
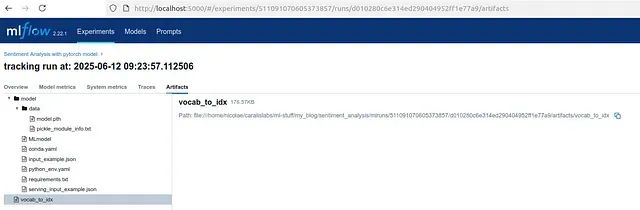
词汇表索引界面
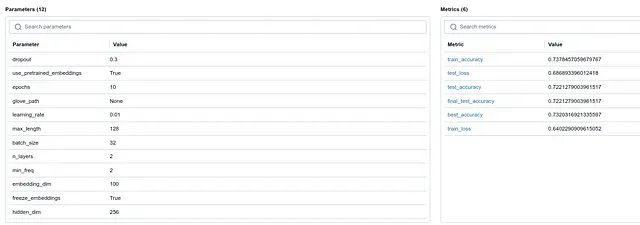
参数和指标界面
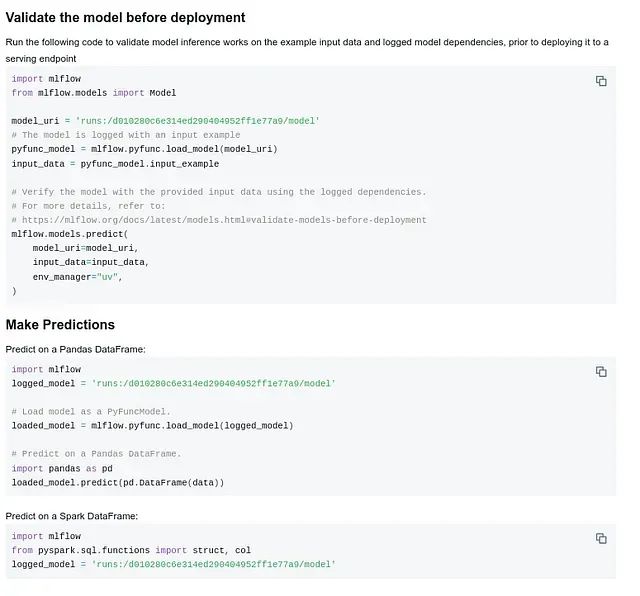
通过 MLFlow 的模型验证机制
在完成带有签名和输入示例的模型记录后,我们可以直接使用 MLFlow 的内置工具对模型进行验证,无需重新加载训练代码或重建处理流程。
用于模型验证的最小化代码实现如下:
 import mlflow
import text_preprocessing as tpp  model_uri = 'runs:/0b3750aeca70488691ec710d5c46df59/model'
vocab_to_idx_uri = 'file:///home/nicolae/caralislabs/ml-stuff/sentiment_analysis/mlruns/511091070605373857/0b3750aeca70488691ec710d5c46df59/artifacts/vocab_to_idx'  vocab_to_idx = tpp.get_vocab_to_index(vocab_to_idx_uri)  # 生成一个新的输入样本
# input_data = tpp.text_to_input('This is great!', vocab_to_idx)  # 使用从实验中获取的提供的输入样本
pyfunc_model = mlflow.pyfunc.load_model(model_uri)  input_data = pyfunc_model.input_example  output = mlflow.models.predict(  model_uri=model_uri,  input_data=input_data,  env_manager="uv",  )
验证过程的系统输出:
 Downloading artifacts: 100%  1/1 [00:00<00:00, 178.37it/s]
Downloading artifacts: 100%  8/8 [00:00<00:00, 922.10it/s]  2025/06/12 09:15:04 INFO mlflow.models.flavor_backend_registry: Selected backend for flavor 'python_function'
2025/06/12 09:15:04 INFO mlflow.utils.virtualenv: Environment /tmp/tmp8dtkni5k/envs/virtualenv_envs/mlflow-2a54fe3e81cfd1b2316d0e48d89d524b8fb37fa0 already exists
2025/06/12 09:15:04 INFO mlflow.utils.environment: === Running command '['bash', '-c', 'source /tmp/tmp8dtkni5k/envs/virtualenv_envs/mlflow-2a54fe3e81cfd1b2316d0e48d89d524b8fb37fa0/bin/activate && python -c ""']'
2025/06/12 09:15:05 INFO mlflow.utils.environment: === Running command '['bash', '-c', 'source /tmp/tmp8dtkni5k/envs/virtualenv_envs/mlflow-2a54fe3e81cfd1b2316d0e48d89d524b8fb37fa0/bin/activate && python /home/nicolae/caralislabs/ml-stuff/lib/python3.10/site-packages/mlflow/pyfunc/_mlflow_pyfunc_backend_predict.py --model-uri file:///home/nicolae/caralislabs/ml-stuff/sentiment_analysis/mlruns/511091070605373857/0b3750aeca70488691ec710d5c46df59/artifacts/model --content-type json --input-path /tmp/tmptaan1n9u/input.json']'  {"predictions": [[-2.263186454772949, -0.22630244493484497, 2.4065113067626953]]}
这种方法展示了如何使用
runs:/<run_id>/model
格式从特定运行中加载模型、检索相关的词汇表信息、获取训练期间记录的确切输入示例,以及在可复现环境中使用
mlflow.models.predict
进行预测。
这种设计对于在 CI/CD 工作流中复现预测结果、测试已部署的模型或构建验证流程等场景具有重要价值。
MLFlow 预测 API 输出结果解析
当使用 MLFlow 的
pyfunc
接口进行模型验证时,响应返回的是每个类别的原始输出 logits 值。例如:
{"predictions": [[-2.263, -0.226, 2.407]]}
这些数值对应于模型对三个情感类别的未归一化分数,按顺序分别代表消极情感、中性情感和积极情感。
要解释这些结果,我们可以应用 softmax 函数将 logits 转换为概率分布:
import torch logits = torch.tensor([-2.263, -0.226, 2.407]) probs = torch.softmax(logits, dim=0) predicted_class = torch.argmax(probs).item()
经过计算,我们得到:
Predicted class: 2 → positive Confidence: ~0.90
这一结果证实了记录的模型具有良好的功能性和可复现性,其行为与训练时的推理逻辑保持一致。通过 MLFlow 模型接口,我们实现了完全解耦的模型验证机制。
总结
本文通过一个完整的情感分析项目实例,详细展示了如何将 PyTorch 深度学习框架与 MLFlow 实验管理平台进行深度集成。我们系统性地介绍了从数据预处理、模型设计、训练执行到结果验证的完整流程,并重点阐述了 MLFlow 在实验跟踪、模型版本管理和结果可复现性方面的核心价值。
通过这个实践案例,读者可以掌握如何构建一个专业级的机器学习实验管理系统,为自己的深度学习项目提供可靠的技术支撑。
GitHub 地址:https://avoid.overfit.cn/post/6062927274a14e5187017fe5beb54a75
作者:nicolae caralicea