SAM分割一切-使用SAM自动生成对象掩码示例
使用 SAM 自动生成对象掩码
由于 SAM 可以有效地处理提示,因此可以通过对图像上的大量提示进行采样来生成整个图像的掩码。该方法用于生成数据集 SA-1B。
类 SamAutomaticMaskGenerator 实现此功能。它的工作原理是对图像上网格中的单点输入提示进行采样,SAM 可以从每个提示中预测多个掩码。然后,过滤蒙版的质量,并使用非极大值抑制进行重复数据删除。其他选项允许进一步提高蒙版的质量和数量,例如对图像的多个裁剪运行预测或对蒙版进行后处理以删除小的断开连接区域和孔洞。
from IPython.display import display, HTML
display(HTML(
"""
<a target="_blank" href="https://colab.research.google.com/github/facebookresearch/segment-anything/blob/main/notebooks/automatic_mask_generator_example.ipynb"><img src="https://colab.research.google.com/assets/colab-badge.svg" alt="Open In Colab"/>
</a>
"""
))
环境设置
如果使用 jupyter 在本地运行,请先安装 segment_anything 在您的环境中使用 存储库中的安装说明 。如果从 Google Colab 运行,请将 using_colab=True 并运行 cell。在 Colab 中,请务必在“Edit”->“Notebook Settings”->“Hardware accelerator”下选择“GPU”。
using_colab = False
if using_colab:import torchimport torchvisionprint("PyTorch version:", torch.__version__)print("Torchvision version:", torchvision.__version__)print("CUDA is available:", torch.cuda.is_available())import sys!{sys.executable} -m pip install opencv-python matplotlib!{sys.executable} -m pip install 'git+https://github.com/facebookresearch/segment-anything.git'!mkdir images!wget -P images https://raw.githubusercontent.com/facebookresearch/segment-anything/main/notebooks/images/dog.jpg!wget https://dl.fbaipublicfiles.com/segment_anything/sam_vit_h_4b8939.pth
设置
import numpy as np
import torch
import matplotlib.pyplot as plt
import cv2
def show_anns(anns):if len(anns) == 0:returnsorted_anns = sorted(anns, key=(lambda x: x['area']), reverse=True)ax = plt.gca()ax.set_autoscale_on(False)img = np.ones((sorted_anns[0]['segmentation'].shape[0], sorted_anns[0]['segmentation'].shape[1], 4))img[:,:,3] = 0for ann in sorted_anns:m = ann['segmentation']color_mask = np.concatenate([np.random.random(3), [0.35]])img[m] = color_maskax.imshow(img)
示例图片
image = cv2.imread('images/dog.jpg')
image = cv2.cvtColor(image, cv2.COLOR_BGR2RGB)
plt.figure(figsize=(20,20))
plt.imshow(image)
plt.axis('off')
plt.show()

自动蒙版生成
要运行自动掩码生成,请向 SamAutomaticMaskGenerator 类。将下面的路径设置为 SAM 检查点。建议在 CUDA 上运行并使用默认模型。
import sys
sys.path.append("..")
from segment_anything import sam_model_registry, SamAutomaticMaskGenerator, SamPredictorsam_checkpoint = "sam_vit_h_4b8939.pth"
model_type = "vit_h"device = "cuda"sam = sam_model_registry[model_type](checkpoint=sam_checkpoint)
sam.to(device=device)mask_generator = SamAutomaticMaskGenerator(sam)
要生成蒙版,只需运行 generate 在图像上
masks = mask_generator.generate(image)
掩码生成 返回掩码列表,其中每个掩码都是一个字典,其中包含有关掩码的各种数据。这些键是
segmentation :面具
area :蒙版的面积(以像素为单位)
bbox :XYWH 格式的蒙版的边界框
predicted_iou :模型自身对掩码质量的预测
point_coords :生成此蒙版的采样输入点
stability_score :掩模质量的另一种衡量标准
crop_box :用于以 XYWH 格式生成此蒙版的图像的裁剪
print(len(masks))
print(masks[0].keys())
dict_keys([‘细分’, ‘区域’, ‘bbox’, ‘predicted_iou’, ‘point_coords’, ‘stability_score’, ‘crop_box’])
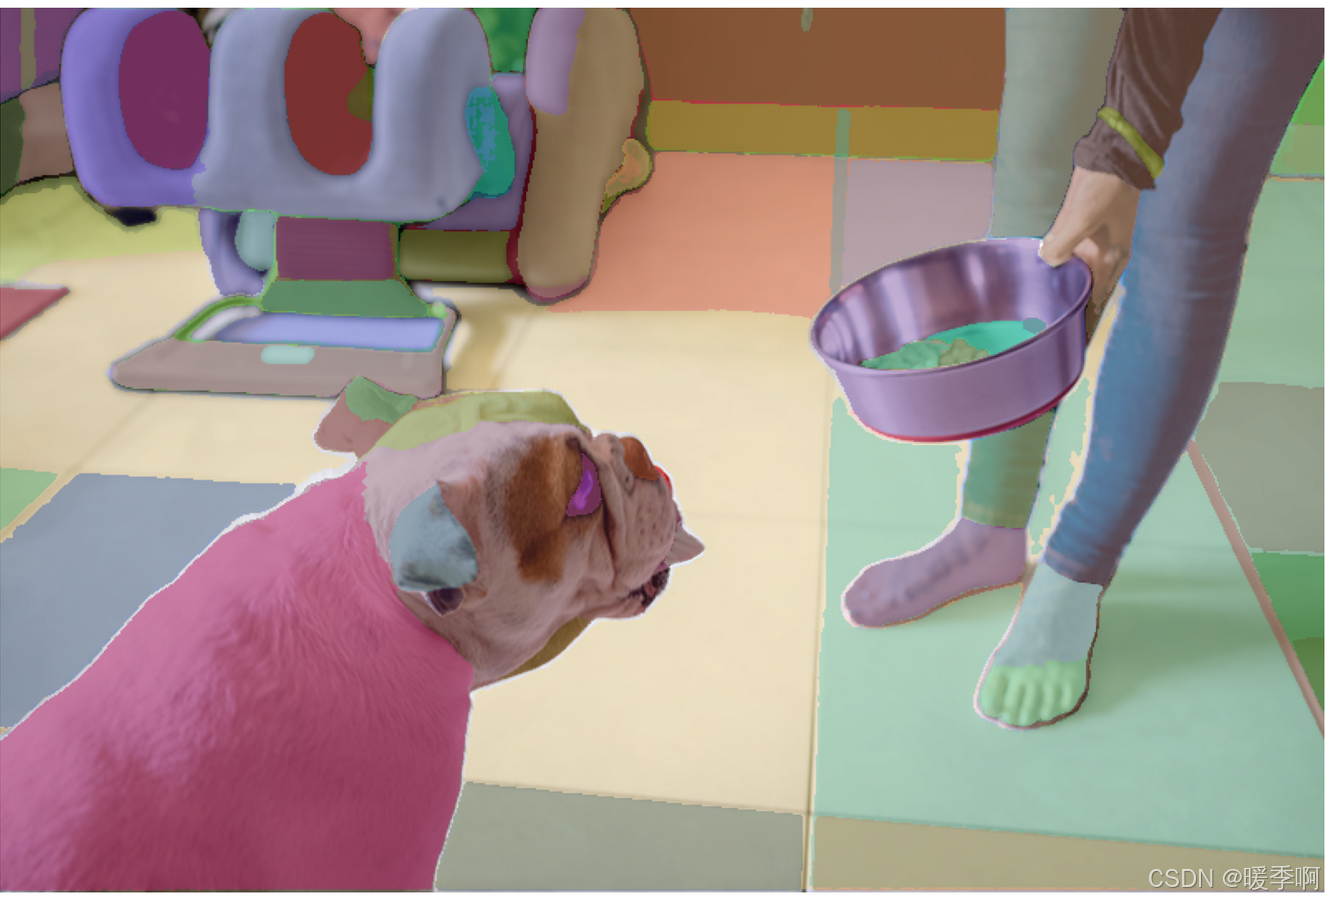
显示图像上叠加的所有蒙版。
plt.figure(figsize=(20,20))
plt.imshow(image)
show_anns(masks)
plt.axis('off')
plt.show()
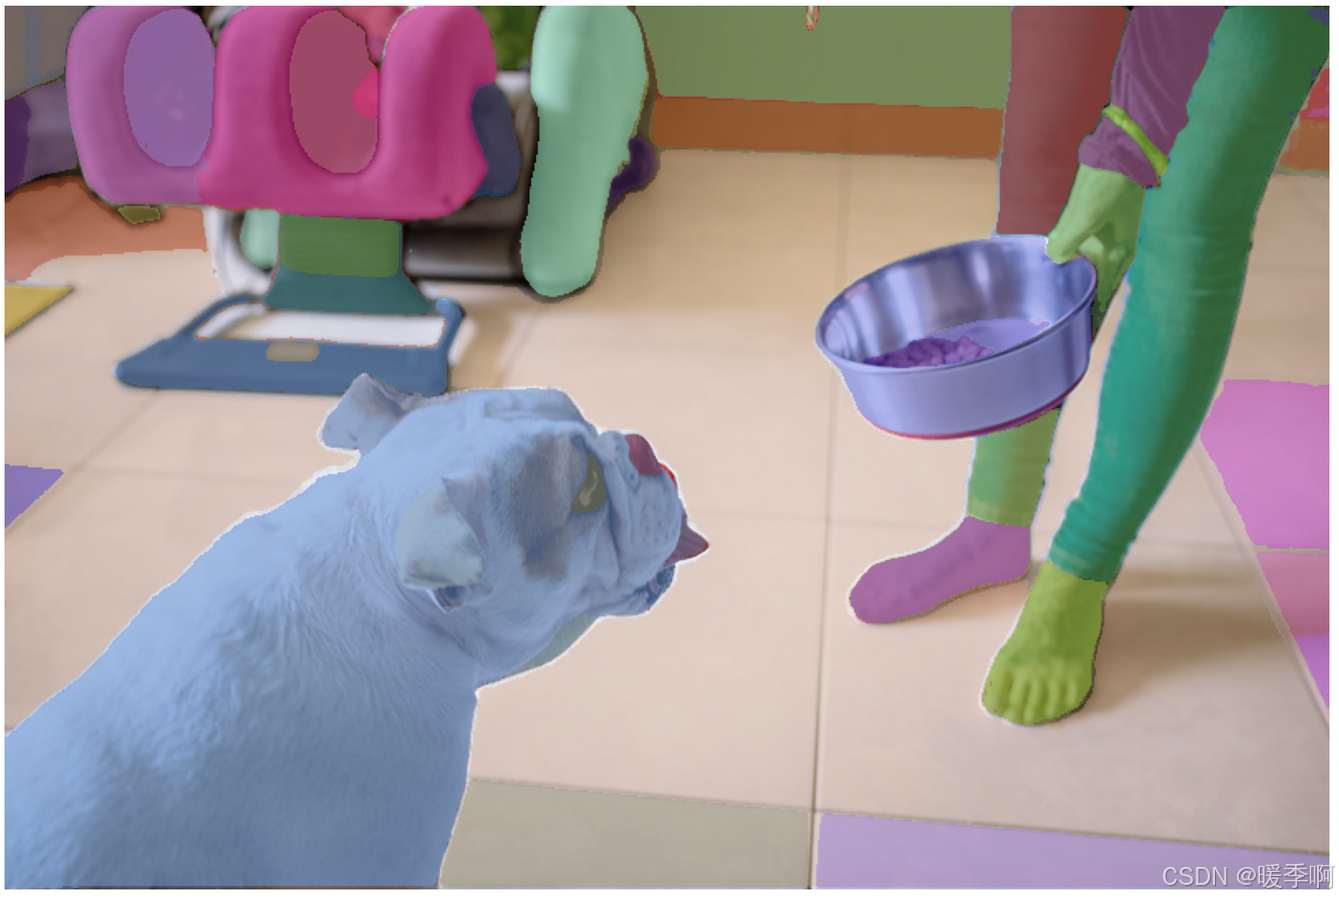
自动遮罩生成选项
自动蒙版生成中有几个可调参数,用于控制点的采样密度以及用于删除低质量或重复蒙版的阈值。此外,可以在图像裁剪上自动运行生成,以提高较小对象的性能,并且后处理可以删除杂散像素和孔洞。以下是对更多掩码进行采样的示例配置:
mask_generator_2 = SamAutomaticMaskGenerator(model=sam,points_per_side=32,pred_iou_thresh=0.86,stability_score_thresh=0.92,crop_n_layers=1,crop_n_points_downscale_factor=2,min_mask_region_area=100,  # Requires open-cv to run post-processing
)
masks2 = mask_generator_2.generate(image)
len(masks2)
90
plt.figure(figsize=(20,20))
plt.imshow(image)
show_anns(masks2)
plt.axis('off')
plt.show()