Masonry入门学习
Masonry
作用
轻量级布局框架,使用便捷的链式语法封装自动布局,简介明了,并且具有高可读性
在iOS开发中,如何布局UI是我们给用户良好体验的前提,在以往我们选择使用设置控件的frame来确定位置,简单的界面还好,但是对于复杂的界面如果再使用frame的话计算起来就很繁琐了,所以引入了自动布局(AutoLayout)来确定控件之间的位置,但是这种方式代码看起来太复杂了,可读性不高,如果想要了解的可以看笔者的这篇博客:AutoLayout自动布局
基本属性
//基本属性:
@property (nonatomic, strong, readonly) MASConstraint *left;
@property (nonatomic, strong, readonly) MASConstraint *top;
@property (nonatomic, strong, readonly) MASConstraint *right;
@property (nonatomic, strong, readonly) MASConstraint *bottom;
@property (nonatomic, strong, readonly) MASConstraint *leading;
@property (nonatomic, strong, readonly) MASConstraint *trailing;
@property (nonatomic, strong, readonly) MASConstraint *width;
@property (nonatomic, strong, readonly) MASConstraint *height;
@property (nonatomic, strong, readonly) MASConstraint *centerX;
@property (nonatomic, strong, readonly) MASConstraint *centerY;
@property (nonatomic, strong, readonly) MASConstraint *baseline;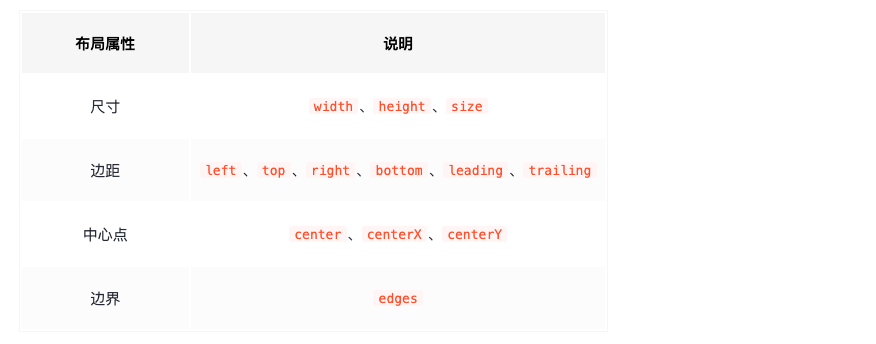
约束的使用
基础API
-
使用时经常需要加mas_前缀,如果不想可以在引用masonry文件前加上下面的内容
//定义这个常量,就可以不用在开发过程中使用mas_前缀
#define MAS_SHORTHAND
//可以让Masonry帮我们自动把基础数据类型的数据,自动装箱为对象类型
#define MAS_SHORTHAND_GLOBALS-
添加约束的三种方法
//添加新约束
- (NSArray *)mas_makeConstraints:(void(NS_NOESCAPE ^)(MASConstraintMaker *make))block;//更新约束,会覆盖之前的约束
- (NSArray *)mas_updateConstraints:(void(NS_NOESCAPE ^)(MASConstraintMaker *make))block;//完全移除旧约束,添加新约束
- (NSArray *)mas_remakeConstraints:(void(NS_NOESCAPE ^)(MASConstraintMaker *make))block;
Masonry是基于AutoLayout的实现计算视图的frame的
两种写法
-
mas_EqualTo():支持类型转换,支持复杂类型,是对equalTo的封装,使用的时候不需要指定约束边,默认取前面需要添加约束的边
-
equalTo:参数是对象类型,一般是视图对象活着mas_width、mas_height这样的坐标系对象
修饰语
Masonry为了让代码使用和阅读更容易理解,添加了and和with两个方法,只是将内部的self返回。
- (MASConstraint* )with {return self;
}
倍数
在Masonry中可以使用multipledBy设置一个视图的某个参数是另一视图某个参数的多少倍
make.size.equalTo(self.view).multipliedBy(0.8);insets
make.edges.equalTo(self.view).insets(UIEdgeInsetsMake(<#CGFloat top#>, <#CGFloat left#>, <#CGFloat bottom#>, <#CGFloat right#>));对应位置填入需要内嵌的便偏移量就行,不用区分正负
优先级
-
Priority可以指定具体的优先级(0 -- 1000)
-
priorityHigh:高优先级,值为750
-
priorityMedium:介于高和低之间(250 -- 750之间)
-
priorityLow:低优先级(值为250)
优先级写在链的最后
make.top.equalTo(self.view).with.priority(999);使用示例
#import "ViewController.h"
#import "Masonry.h"
@interface ViewController ()
@property (nonatomic, strong)UIView* parentView;
@property (nonatomic, strong)UIView* childView;
@end
@implementation ViewController
- (void)viewDidLoad {[super viewDidLoad];[self createView];[self createButton];
}
- (void)createButton {UIButton* button = [UIButton buttonWithType:UIButtonTypeRoundedRect];button.backgroundColor = [UIColor systemBlueColor];[button setTitleColor:[UIColor redColor] forState:UIControlStateNormal];[button setTitle:@"移动" forState:UIControlStateNormal];[self.view addSubview:button];[button mas_makeConstraints:^(MASConstraintMaker *make) {make.bottom.equalTo(self.view).offset(-200);make.left.equalTo(self.view).offset(100);make.width.height.mas_equalTo(60);}];[button addTarget:self action:@selector(pressButton) forControlEvents:UIControlEventTouchUpInside];;
}
- (void)pressButton {[self.parentView mas_remakeConstraints:^(MASConstraintMaker *make) {make.width.height.mas_equalTo(180);}];
}
- (void)createView {self.parentView = [[UIView alloc] init];self.parentView.backgroundColor = [UIColor yellowColor];[self.view addSubview:self.parentView];[self.parentView mas_makeConstraints:^(MASConstraintMaker *make) {make.top.equalTo(self.view).offset(40);make.left.equalTo(self.view).offset(40);make.height.width.mas_equalTo(300);}];self.childView = [[UIView alloc] init];self.childView.backgroundColor = [UIColor redColor];[self.parentView addSubview:self.childView];[self.childView mas_makeConstraints:^(MASConstraintMaker *make) {make.left.equalTo(self.parentView);make.top.equalTo(self.parentView);make.height.width.mas_equalTo(50);}];
}
@end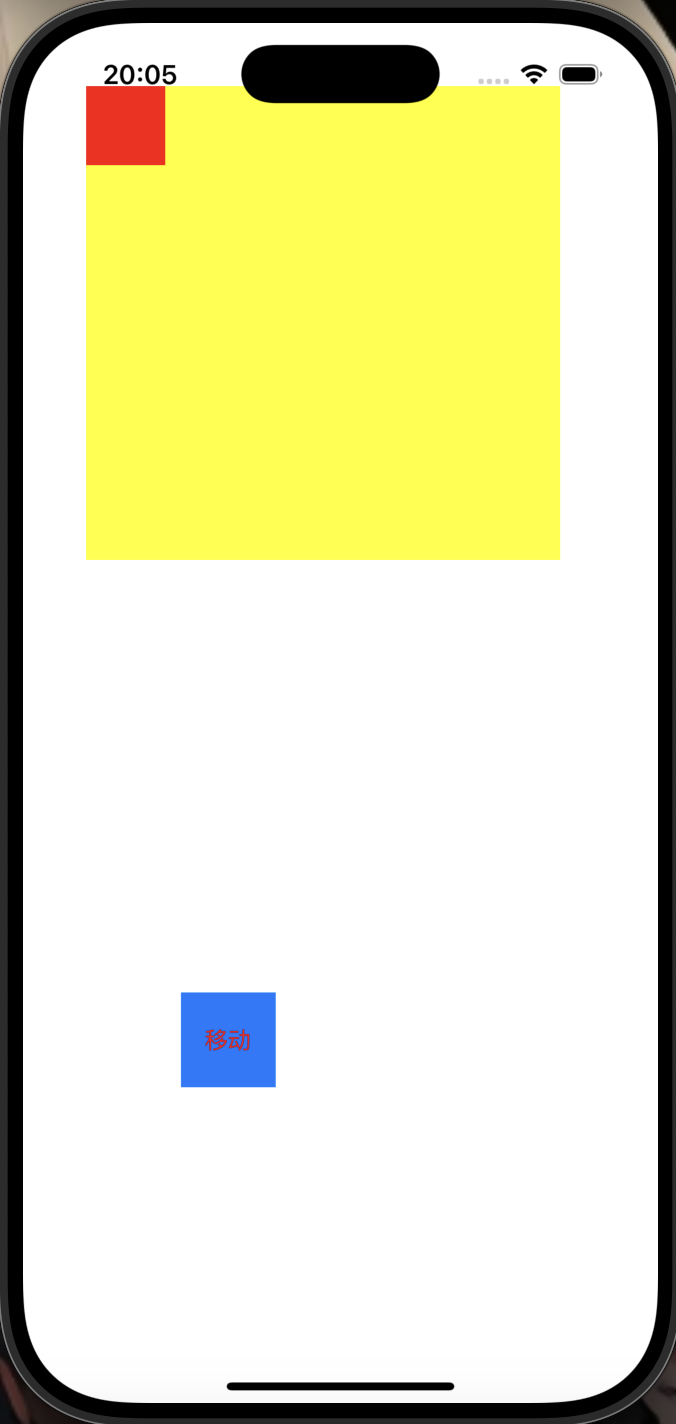
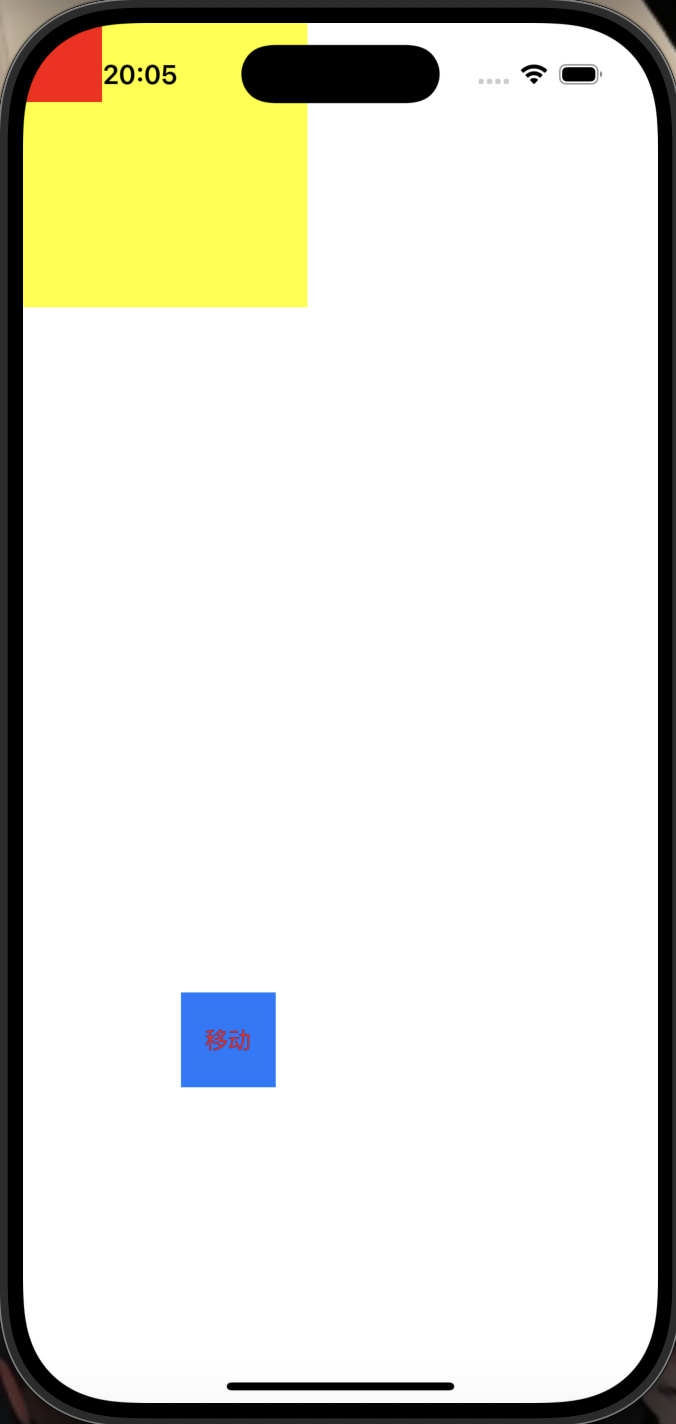
在这个demo里,我先使用了mas_make....方法为两个UIView添加了约束,在点击按钮后又使用mas_remake...方法更新了两个UIView的布局,通过上面的图片可以直观的看到效果
注意事项
-
在使用masonry前需要先将视图添加到对应的父视图上才行,否则程序会崩溃
-
注意使用mas_euqalTo和equalTo的区别
-
一个完整的约束需要包含位置、大小,缺一不可