KingbaseES主备读写分离集群安装教程
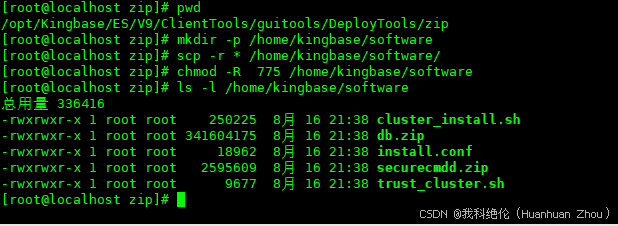
首先我们先要找数据库集群安装软件和脚本。这里我事先安装一台单机。
[root@localhost zip]# mkdir -p /home/kingbase/software
[root@localhost zip]# scp -r * /home/kingbase/software/  #安装软件和脚本在单机版本的/opt/Kingbase/ES/V9/ClientTools/guitools/DeployTools/zip路径下,可自行获取
[root@localhost zip]# chmod -R  775 /home/kingbase/software
[root@localhost zip]# ls -l /home/kingbase/software
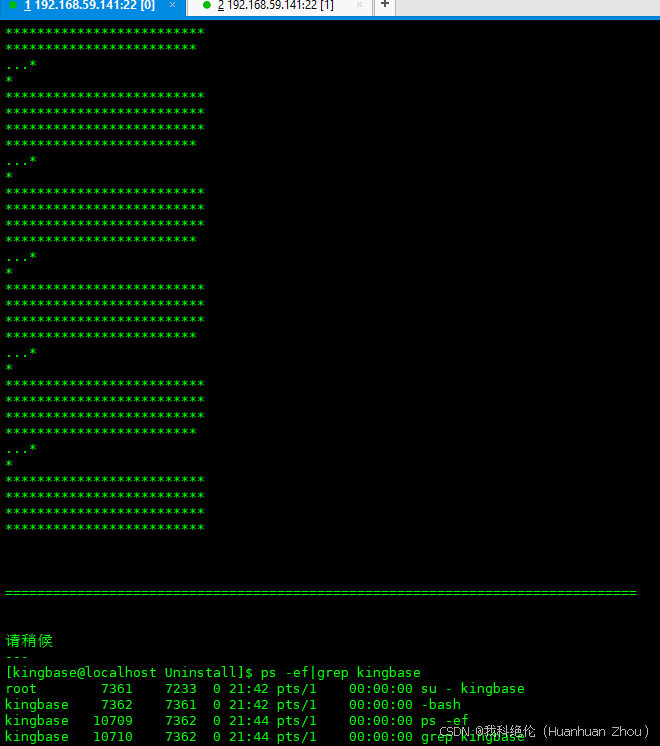
前提是必须卸载原安装的单机库。
[kingbase@localhost ~]$ cd /opt/Kingbase/ES/V9/Uninstall
[kingbase@localhost Uninstall]$ ./Uninstaller
安装集群
初始化两台机器,主节点需要安装单机版本的数据库,备节点什么都不需要。注意的是主节点找到集群软件和脚本后,要进行卸载。主备节点都关闭防火墙。
| 选项 | 值 | 操作系统 |
|---|---|---|
| 主节点IP | 192.168.59.141 | 麒麟V10 |
| 备节点IP | 192.168.59.142 | 麒麟V10 |
| 主备节点网卡名称 | ens33 | |
| VIP IP | 192.168.59.200 | |
| 网关 | 192.168.59.0 |
[root@localhost software]# vi install.conf
添加以下内容,并进行修改。
[install]
on_bmj=0
all_ip=(192.168.59.141 192.168.59.142)			#必须配置,所有集群节点的IPv4、IPv6或hostname,用但所有节点必须配置为相同的类型。
witness_ip=""
production_ip=()
local_disaster_recovery_ip=()
remote_disaster_recovery_ip=()
install_dir="/home/kingbase/cluster/install"			#必须配置,集群部署的路径。
zip_package="/home/kingbase/software/db.zip"            #必须配置,压缩包的路径。
license_type='default'
license_file=()
lac_host=''                                             #license_type为'LAC'时,必须配置,LAC服务端地址
lac_port=11234                                          #license_type为'LAC'时,必须配置,LAC服务端端口号
lac_type=''
activation_file=''
use_vcpu_limit=0                                        #license_type为'LAC'时,必须配置,0代表示例授权,1代表VCPU授权
db_user="system"
db_port="54321"
db_mode="oracle"
db_auth="scram-sha-256"
db_case_sensitive="yes"
db_checksums="yes"
archive_mode="always"
encoding="UTF8"
locale="zh_CN.UTF-8"
other_db_init_options=""
sync_security_guc="no"
tcp_keepalives_idle="2"
tcp_keepalives_interval="2"
tcp_keepalives_count="3"
tcp_user_timeout="9000"
connection_timeout="10"
wal_sender_timeout="30000"
wal_receiver_timeout="30000"
trusted_servers="192.168.59.0"			#必须配置,指定当前部署集群的信任网关,多个网关请用“,”分隔,不允许有空格。通过route -n查看网关地址
running_under_failure_trusted_servers='on'
use_exist_data=0
data_directory=""
waldir=''
virtual_ip="192.168.59.200"			#可选配置,部署集群所需VIP。只能配置IPv4,当all_ip配置为IPv6或hostname时, 不能配置此参数。
ignore_vip_failure='off'
net_device=(ens33)                #可选配置,若配置了[virtual_ip],则此参数必须配置,值为VIP所在网卡的网卡名称。
net_device_ip=(192.168.59.141 192.168.59.142)        #可选配置,若配置了[virtual_ip],则此参数必须配置,值为VIP所在网卡的集群节点物理IP地址。
ipaddr_path="/sbin"
arping_path=""
ping_path="/bin"
install_with_root=1
super_user="root"
execute_user="kingbase"
deploy_by_sshd=1
use_scmd=1
reconnect_attempts="10"
reconnect_interval="6"
recovery="standby"
ssh_port="22"
scmd_port="8890"
use_ssl=0
auto_cluster_recovery_level='1'
use_check_disk='off'
synchronous=''
sync_nodes=()
potential_nodes=()
async_nodes=()
sync_in_same_location=0
failover_need_server_alive='off'
[expand]
expand_type=""
primary_ip=""
expand_ip=""
node_id=""
sync_type=""
install_dir=""
zip_package=""
net_device=()
net_device_ip=()
license_type='default'
license_file=()
lac_host=''
lac_port=11234
lac_type=''
activation_file=''
use_vcpu_limit=0
deploy_by_sshd="1"
ssh_port="22"
scmd_port="8890"
[shrink]
shrink_type=""
primary_ip=""
shrink_ip=""
node_id=""
install_dir=""
ssh_port="22"
scmd_port="8890"
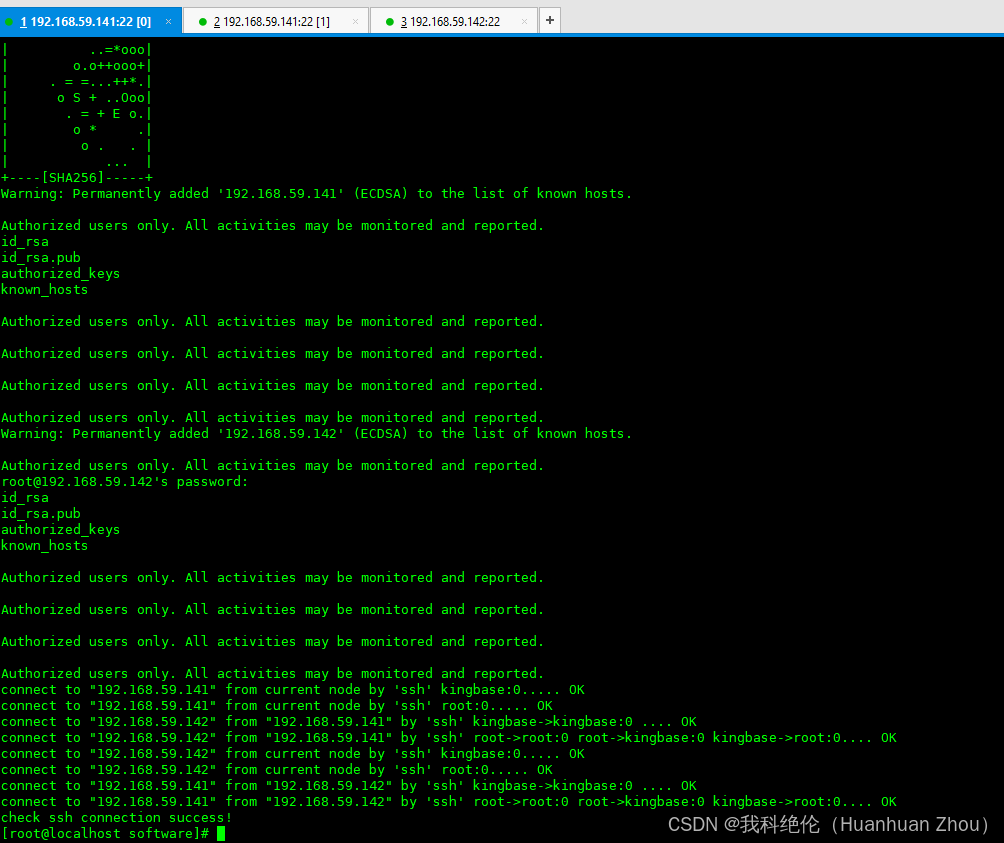
主节点执行免密脚本
[root@localhost software]# cd /home/kingbase/software/
[root@localhost software]# sh trust_cluster.sh
集群搭建
使用kingbase用户登录集群主节点执行
[kingbase@localhost ~]$ cd /home/kingbase/software/
[kingbase@localhost ~]$ sh cluster_install.sh
集群状态查看
在集群中任意一数据库节点,使用kingbase用户执行
[kingbase@localhost ~]$cd /home/kingbase/cluster/install/kingbase/bin
[kingbase@localhost ~]$./repmgr cluster show
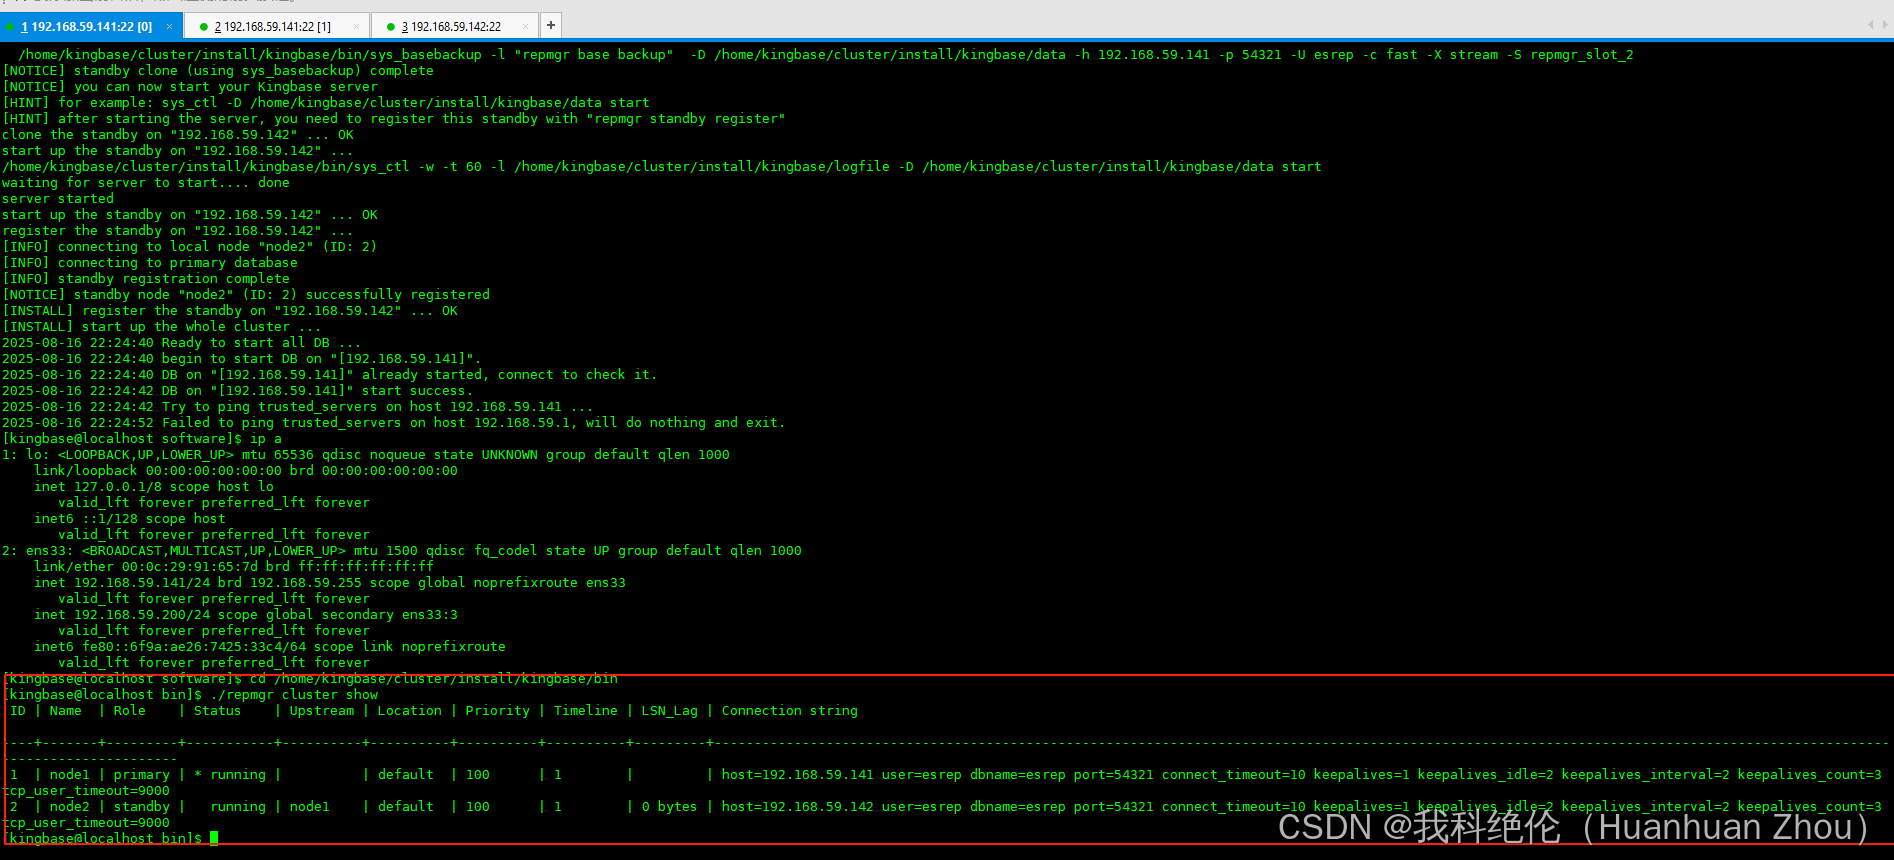
我这里网关地址配置有误,报错可以忽略。
主备切换演练
[kingbase@localhost ~]$ cd /home/kingbase/cluster/install/kingbase/bin
[kingbase@localhost bin]$ ./repmgr standby switchover --choose
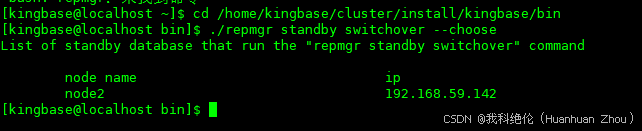
说明142可以升为主库。
[kingbase@localhost bin]$ ./repmgr standby switchover --siblings-follow
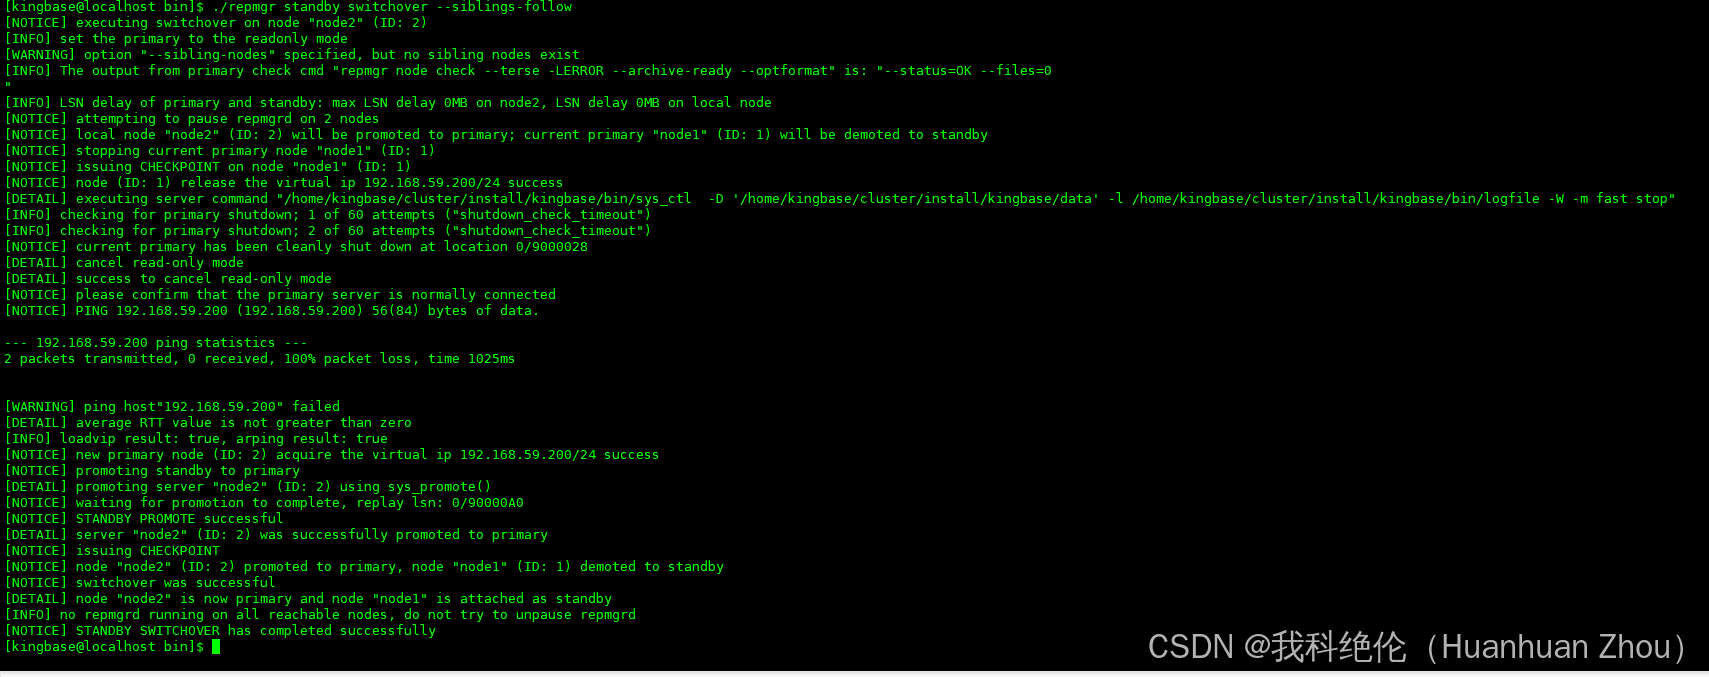
执行切主。
[kingbase@localhost bin]$ ./repmgr cluster show

这里我们看到切换成功了。
附录
因为刚开始两台机器之间没做免密,会有如下报错。
[RUNNING] check the sys_securecmdd is running or not…
[ERROR] the sys_securecmdd on “192.168.59.141:8890” is running, please stop it first.
[ERROR] the sys_securecmdd on “192.168.59.142:8890” is running, please stop it first.
解决方案是停掉进程,并删掉已经安装的路径文件。
[root@localhost ~]# systemctl status securecmdd
[root@localhost ~]# systemctl stop securecmdd
[root@localhost kingbase]# rm -rf /home/kingbase/cluster/install/kingbase
重新执行集群安装命令即可。
参考链接:https://docs.kingbase.com.cn/cn/KES-V9R1C10/availability/rwc/Database_Operation/Cluster_Operations#%E4%B8%BB%E5%A4%87%E5%88%87%E6%8D%A2