【unity游戏开发——编辑器扩展】EditorGUIUtility提供一些 EditorGUI 相关的其他辅助API
注意:考虑到编辑器扩展的内容比较多,我将编辑器扩展的内容分开,并全部整合放在【unity游戏开发——编辑器扩展】专栏里,感兴趣的小伙伴可以前往逐一查看学习。
文章目录
- 前言
- 一、资源加载
- 1、创建Editor Default Resources文件夹
- 2、随便导入一张图片进Editor Default Resources文件夹里
- 3、加载Editor Default Resources文件夹里的资源
- 二、搜索窗口
- 1、主要作用
- 2、打开搜索窗口
- 3、获取选择对象
- 4、事件相关
- 5、快捷选中对象
- 6、示例
- 三、窗口事件传递
- 1、介绍
- 2、示例
- 四、坐标转换
- 1、介绍
- 2、示例
- 五、指定区域使用对应鼠标指针
- 1、介绍
- 2、示例
- 六、绘制色板
- 1、介绍
- 2、示例
- 七、绘制曲线
- 1、介绍
- 2、示例
- 专栏推荐
- 完结
前言
EditorGUIUtility 是 EditorGUI 中的一个实用工具类,提供了一些 EditorGUI 相关的其他辅助API。
官方文档:EditorGUIUtility官方文档
一、资源加载
1、创建Editor Default Resources文件夹
Editor Default Resources 也是Unity当中的一个特殊文件夹,它的主要作用是放置提供给 EditorGUIUtility 加载的资源。想要使用 EditorGUIUtility 公共类来加载资源,我们需要将资源放置在 Editor Default Resources 文件夹中。

2、随便导入一张图片进Editor Default Resources文件夹里
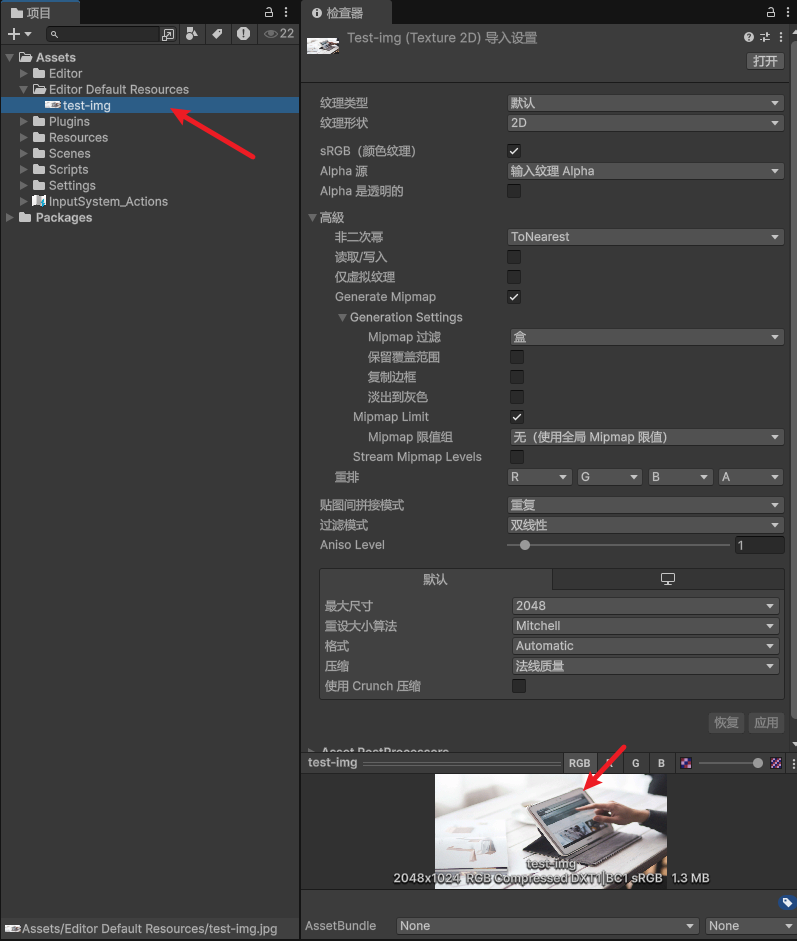
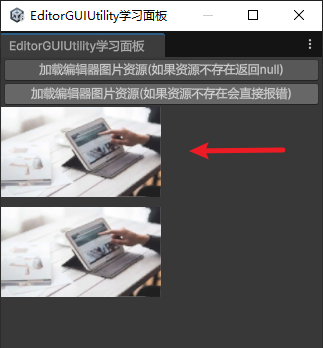
3、加载Editor Default Resources文件夹里的资源
注意事项:
- 只能加载
Assets/Editor Default Resources/文件夹下的资源 - 加载资源时,需要填写资源后缀名,否则加载失败
using UnityEditor;
using UnityEngine;public class EditorGUIUtilityWindow : EditorWindow
{private Texture img;private Texture img2;private Texture img3;[MenuItem("编辑器拓展/自定义窗口拓展/EditorGUIUtility绘制自定义窗口")]private static void OpenEditorGUIUtilityWindow(){EditorGUIUtilityWindow win = EditorWindow.GetWindow<EditorGUIUtilityWindow>("EditorGUIUtility学习面板");win.Show();}private void OnGUI(){//加载资源方式一(如果资源不存在返回null)if(GUILayout.Button("加载编辑器图片资源(如果资源不存在返回null)")) img = EditorGUIUtility.Load("test-img.jpg") as Texture;if (img != null) GUI.DrawTexture(new Rect(0, 50, 160, 90), img);//加载资源方式二(如果资源不存在会直接报错)if (GUILayout.Button("加载编辑器图片资源(如果资源不存在会直接报错)"))img2 = EditorGUIUtility.LoadRequired("test-img.jpg") as Texture;if (img2 != null)GUI.DrawTexture(new Rect(0, 150, 160, 90), img2);}
}
效果
二、搜索窗口
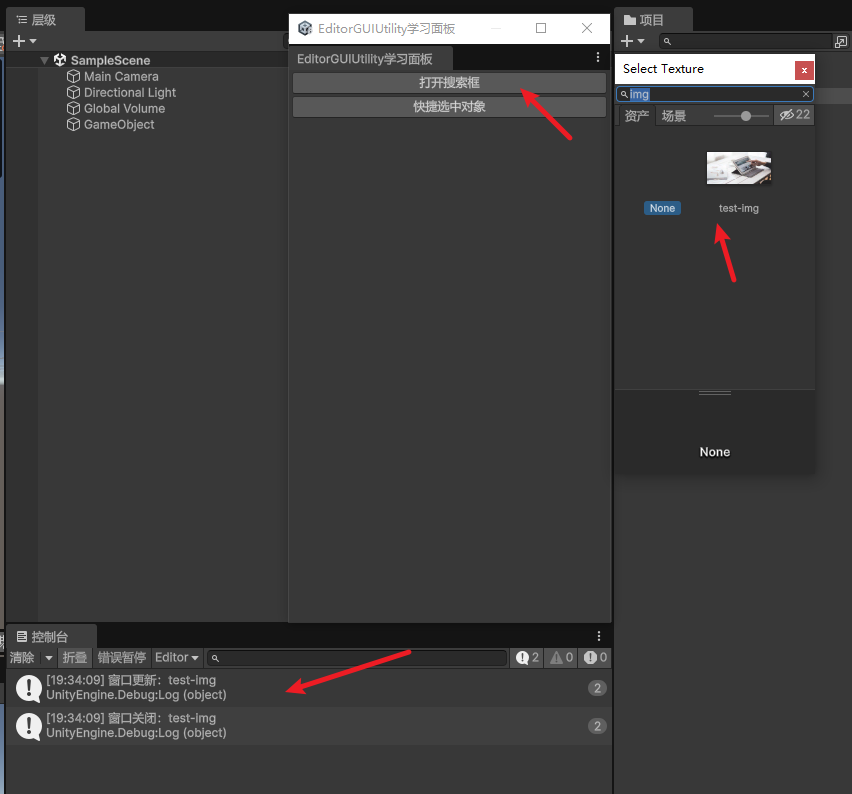
1、主要作用
弹出一个搜索窗口,用于选择所需资源。
2、打开搜索窗口
EditorGUIUtility.ShowObjectPicker<资源类型>(默认被选中的对象, 是否允许查找场景对象, "查找对象名称过滤", 0);
参数:
- 默认被选中的对象的引用
- 是否允许查找场景对象
- 查找对象名称过滤(默认搜索过滤,例如,”normal”表示文件名称中包含”normal”的对象会被搜索到)
- controlID,默认写0
3、获取选择对象
EditorGUIUtility.GetObjectPickerObject()
4、事件相关
弹出的搜索窗口会通过发送事件的形式通知开启它的窗口对象信息的变化。通过Event公共类可以获取其它窗口发送给自己的事件。
Event.current获取当前事件commandName获取事件命令的名字
事件:
ObjectSelectorUpdated:对象选择发生变化时发送ObjectSelectorClosed:对象选择窗口关闭时发送
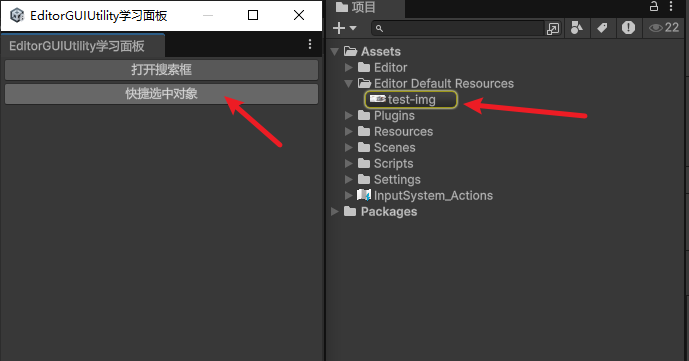
5、快捷选中对象
EditorGUIUtility.PingObject(想要提示选中的对象);
6、示例
using UnityEditor;
using UnityEngine;public class EditorGUIUtilityWindow : EditorWindow
{private Texture img;[MenuItem("编辑器拓展/自定义窗口拓展/EditorGUIUtility绘制自定义窗口")]private static void OpenEditorGUIUtilityWindow(){EditorGUIUtilityWindow win = EditorWindow.GetWindow<EditorGUIUtilityWindow>("EditorGUIUtility学习面板");win.Show();}private void OnGUI(){// 弹出一个搜索窗口,用于选择所需资源if (GUILayout.Button("打开搜索框")){EditorGUIUtility.ShowObjectPicker<Texture>(null, true, "img", 0);}if (Event.current.commandName == "ObjectSelectorUpdated"){// 当选择发生更新时img = EditorGUIUtility.GetObjectPickerObject() as Texture;if (img != null)Debug.Log("窗口更新:" + img.name);}else if (Event.current.commandName == "ObjectSelectorClosed"){// 当选择窗口关闭时img = EditorGUIUtility.GetObjectPickerObject() as Texture;if (img != null)Debug.Log("窗口关闭:" + img.name);}// 快捷选中对象if(GUILayout.Button("快捷选中对象")){if (img != null)EditorGUIUtility.PingObject(img);}}
}
效果
三、窗口事件传递
1、介绍
大概流程是:
- 在某窗口发送事件
Event e = EditorGUIUtility.CommandEvent(“事件名”); - 获取到另一个窗口win后,让该窗口调用win.SendEvent(e)
- 在另一个窗口中可以通过以下代码接受事件
Event.current.type == EventType.ExecuteCommand判断 是否有事件执行 - 使用
Event.current.commandName == “事件名”判断执行的是哪个事件
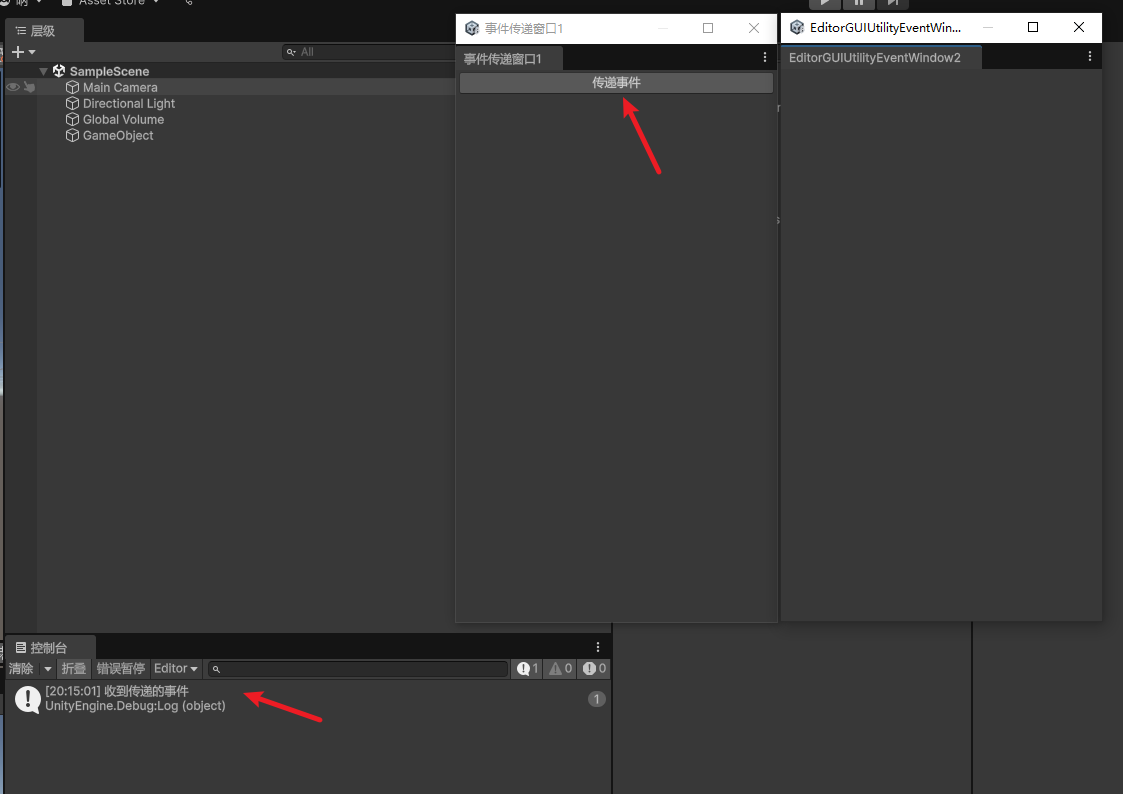
注意:在传递事件时,会自动将接受事件的窗口打开,不管对象是否有监听处理对应的内容,同时焦点也会移到接事件的窗口。
2、示例
using UnityEditor;
using UnityEngine;public class EditorGUIUtilityEventWindow1 : EditorWindow
{[MenuItem("编辑器拓展/自定义窗口拓展/事件传递窗口")]private static void OpenEditorGUIUtilityWindow(){EditorGUIUtilityEventWindow1 win = EditorWindow.GetWindow<EditorGUIUtilityEventWindow1>("事件传递窗口");win.Show();}private void OnGUI(){//窗口事件传递if (GUILayout.Button("传递事件")){//声明事件Event e = EditorGUIUtility.CommandEvent("传递事件名称");EditorGUIUtilityEventWindow2 win = EditorWindow.GetWindow<EditorGUIUtilityEventWindow2>();win.SendEvent(e);}}
}public class EditorGUIUtilityEventWindow2 : EditorWindow
{private void OnGUI(){if (Event.current.type == EventType.ExecuteCommand){if (Event.current.commandName == "传递事件名称"){Debug.Log("收到传递的事件");}}}
}
效果
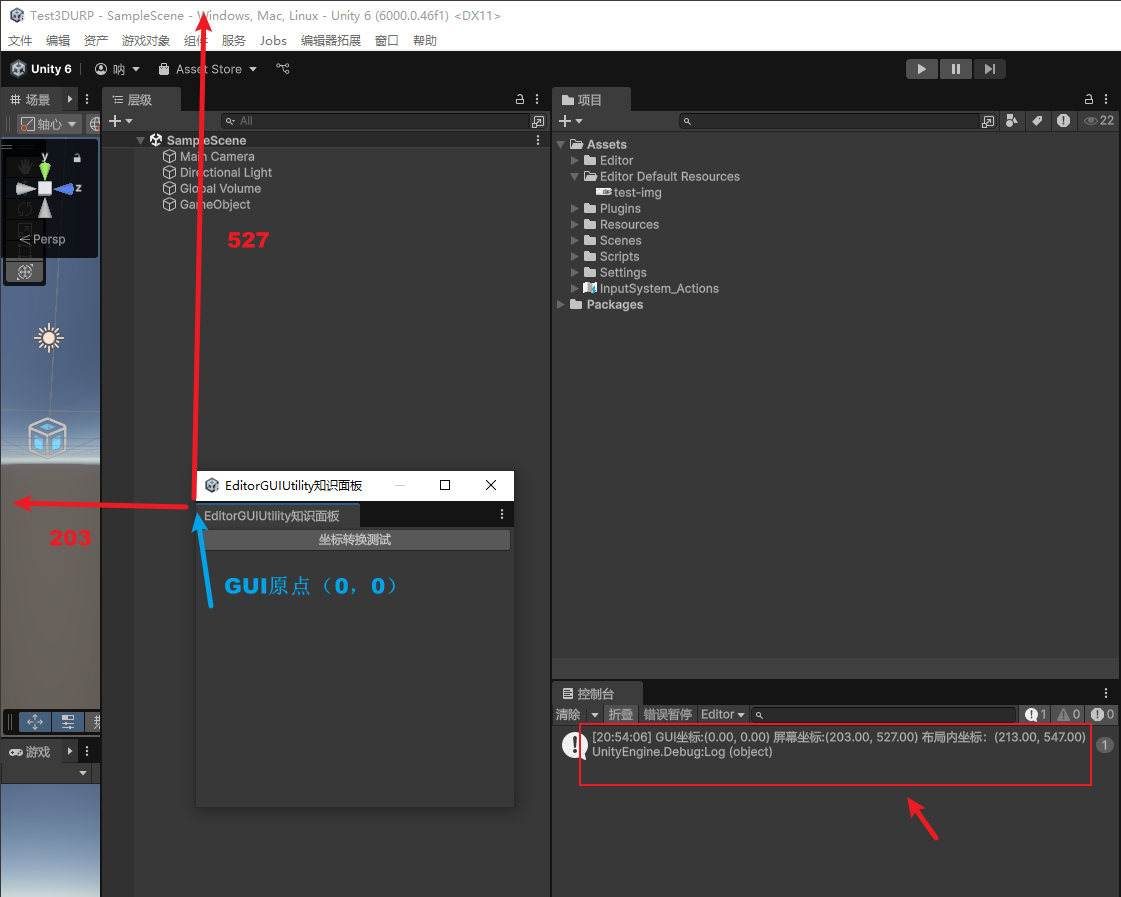
四、坐标转换
1、介绍
-
屏幕坐标系:原点为屏幕左上角
-
GUI坐标系:原点为当前窗口左上角
-
GUIToScreenPoint:将点从GUI位置转换为屏幕空间 -
GUIToScreenRect:将rect从GUI位置转换为屏幕空间 -
ScreenToGUIPoint:将点从屏幕空间转换为GUI位置 -
ScreenToGUIRect:将rect从屏幕空间转换为GUI位置
2、示例
using UnityEditor;
using UnityEngine;public class EditorGUIUtilityWindow : EditorWindow
{[MenuItem("编辑器拓展/自定义窗口拓展/EditorGUIUtility绘制自定义窗口")]private static void OpenEditorGUIUtilityWindow(){EditorGUIUtilityWindow win = EditorWindow.GetWindow<EditorGUIUtilityWindow>("EditorGUIUtility知识面板");win.Show();}private void OnGUI(){// 坐标转换测试按钮if (GUILayout.Button("坐标转换测试")){// 创建一个Vector2对象,表示GUI坐标Vector2 v = new Vector2(10, 10);// 将GUI坐标转换为屏幕坐标Vector2 screenPos = EditorGUIUtility.GUIToScreenPoint(v);// 在GUI中创建一个矩形区域GUI.BeginGroup(new Rect(10, 20, 100, 100));// 在布局内部进行坐标转换// 注意:如果包裹在布局相关函数中,位置转换会加上布局的偏移,比如这里就是加上new Vector2(10, 20),因为布局的偏移是10,20Vector2 screenPos2 = EditorGUIUtility.GUIToScreenPoint(v);// 结束矩形区域GUI.EndGroup();// 打印坐标信息Debug.Log("GUI坐标:" + v + " 屏幕坐标:" + screenPos + " 布局内坐标:" + screenPos2);}}
}
效果
五、指定区域使用对应鼠标指针
1、介绍
AddCursorRect(Rect position, MouseCursor mouse);
MouseCursor鼠标光标类型枚举
Arrow普通指针箭头Text文本文本光标ResizeVertical调整大小垂直调整大小箭头ResizeHorizontal调整大小水平调整大小箭头Link带有链接徽章的链接箭头SlideArrow滑动箭头带有小箭头的箭头,用于指示在数字字段处滑动ResizeUpRight调整大小向上向右调整窗口边缘的大小ResizeUpLeft窗口边缘为左MoveArrow带有移动符号的箭头旁边用于场景视图RotateArrow旁边有用于场景视图的旋转符号ScaleArrow旁边有用于场景视图的缩放符号ArrowPlus旁边带有加号的箭头ArrowMinus旁边带有减号的箭头Pan用拖动的手拖动光标进行平移Orbit用眼睛观察轨道的光标Zoom使用放大镜进行缩放的光标FPS带眼睛的光标和用于FPS导航的样式化箭头键CustomCursor当前用户定义的光标SplitResizeUpDown向上-向下调整窗口拆分器的大小箭头SplitResizeLeftRight窗口拆分器的左-右调整大小箭头
2、示例
using UnityEditor;
using UnityEngine;public class EditorGUIUtilityWindow : EditorWindow
{[MenuItem("编辑器拓展/自定义窗口拓展/EditorGUIUtility绘制自定义窗口")]private static void OpenEditorGUIUtilityWindow(){EditorGUIUtilityWindow win = EditorWindow.GetWindow<EditorGUIUtilityWindow>("EditorGUIUtility知识面板");win.Show();}private void OnGUI(){//绘制一个红色矩形区域EditorGUI.DrawRect(new Rect(0, 180, 100, 100), Color.red);//指定区域使用特定的鼠标指针EditorGUIUtility.AddCursorRect(new Rect(0, 180, 100, 100), MouseCursor.Zoom);}
}
效果
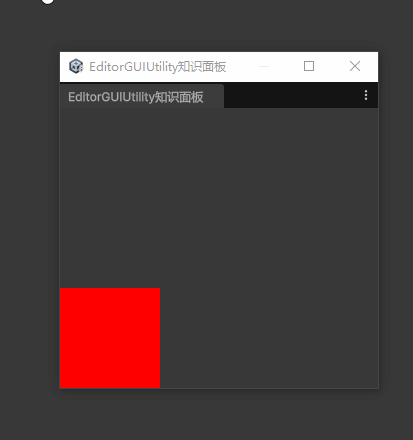
六、绘制色板
1、介绍
在指定区域绘制一个色板矩形
EditorGUIUtility.DrawColorSwatch(Rect 绘制色板的矩形, Color 颜色);
主要配合 EditorGUILayout.ColorField 颜色输入控件使用。
2、示例
using UnityEditor;
using UnityEngine;public class EditorGUIUtilityWindow : EditorWindow
{private Color color;[MenuItem("编辑器拓展/自定义窗口拓展/EditorGUIUtility绘制自定义窗口")]private static void OpenEditorGUIUtilityWindow(){EditorGUIUtilityWindow win = EditorWindow.GetWindow<EditorGUIUtilityWindow>("EditorGUIUtility知识面板");win.Show();}private void OnGUI(){// 一般配合选取颜色控件使用color = EditorGUILayout.ColorField(new GUIContent("选取颜色"), color, true, true, true);// 绘制色板EditorGUIUtility.DrawColorSwatch(new Rect(160, 30, 30, 30), Color.blue);EditorGUIUtility.DrawColorSwatch(new Rect(200, 30, 30, 30), Color.red);}
}
效果

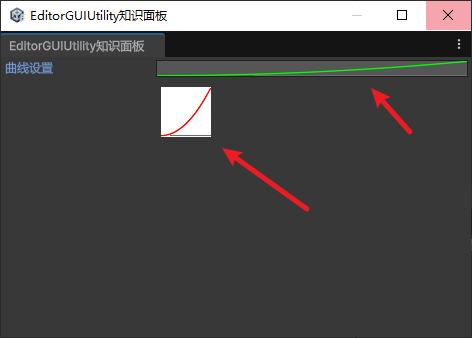
七、绘制曲线
1、介绍
在指定区域绘制显示曲线
EditorGUIUtility.DrawCurveSwatch(Rect 绘制曲线的范围, AnimationCurve 曲线, SerializedProperty 要绘制为SerializedProperty的曲线, Color 绘制曲线的颜色, Color 绘制背景的颜色);
2、示例
using UnityEditor;
using UnityEngine;public class EditorGUIUtilityWindow : EditorWindow
{private AnimationCurve curve = new AnimationCurve();[MenuItem("编辑器拓展/自定义窗口拓展/EditorGUIUtility绘制自定义窗口")]private static void OpenEditorGUIUtilityWindow(){EditorGUIUtilityWindow win = EditorWindow.GetWindow<EditorGUIUtilityWindow>("EditorGUIUtility知识面板");win.Show();}private void OnGUI(){// 配合 EditorGUILayout.CurveField 曲线输入控件显示当前显示的曲线curve = EditorGUILayout.CurveField("曲线设置", curve);// 绘制曲线EditorGUIUtility.DrawCurveSwatch(new Rect(160, 30, 50, 50), curve, null, Color.red, Color.white);}
}
效果
专栏推荐
| 地址 |
|---|
| 【unity游戏开发入门到精通——C#篇】 |
| 【unity游戏开发入门到精通——unity通用篇】 |
| 【unity游戏开发入门到精通——unity3D篇】 |
| 【unity游戏开发入门到精通——unity2D篇】 |
| 【unity实战】 |
| 【制作100个Unity游戏】 |
| 【推荐100个unity插件】 |
| 【实现100个unity特效】 |
| 【unity框架/工具集开发】 |
| 【unity游戏开发——模型篇】 |
| 【unity游戏开发——InputSystem】 |
| 【unity游戏开发——Animator动画】 |
| 【unity游戏开发——UGUI】 |
| 【unity游戏开发——联网篇】 |
| 【unity游戏开发——优化篇】 |
| 【unity游戏开发——shader篇】 |
| 【unity游戏开发——编辑器扩展】 |
完结
好了,我是向宇,博客地址:https://xiangyu.blog.csdn.net,如果学习过程中遇到任何问题,也欢迎你评论私信找我。
赠人玫瑰,手有余香!如果文章内容对你有所帮助,请不要吝啬你的点赞评论和关注,你的每一次支持都是我不断创作的最大动力。当然如果你发现了文章中存在错误或者有更好的解决方法,也欢迎评论私信告诉我哦!