大模型部署
一、api调用
可以选择多种平台,如deepseek、openAI、qwen等等,这里以deepseek示例。
1.1安装api接口调用工具
调用工具postman,自行安装下载。Postman: The World's Leading API Platform | Sign Up for Free
1.2申请api调用权限
下载好api调用工具后,可以在deepseek开发平台开始申请api权限DeepSeek
(1)查看接口文档,准备api_key;
(2)创建api_key;
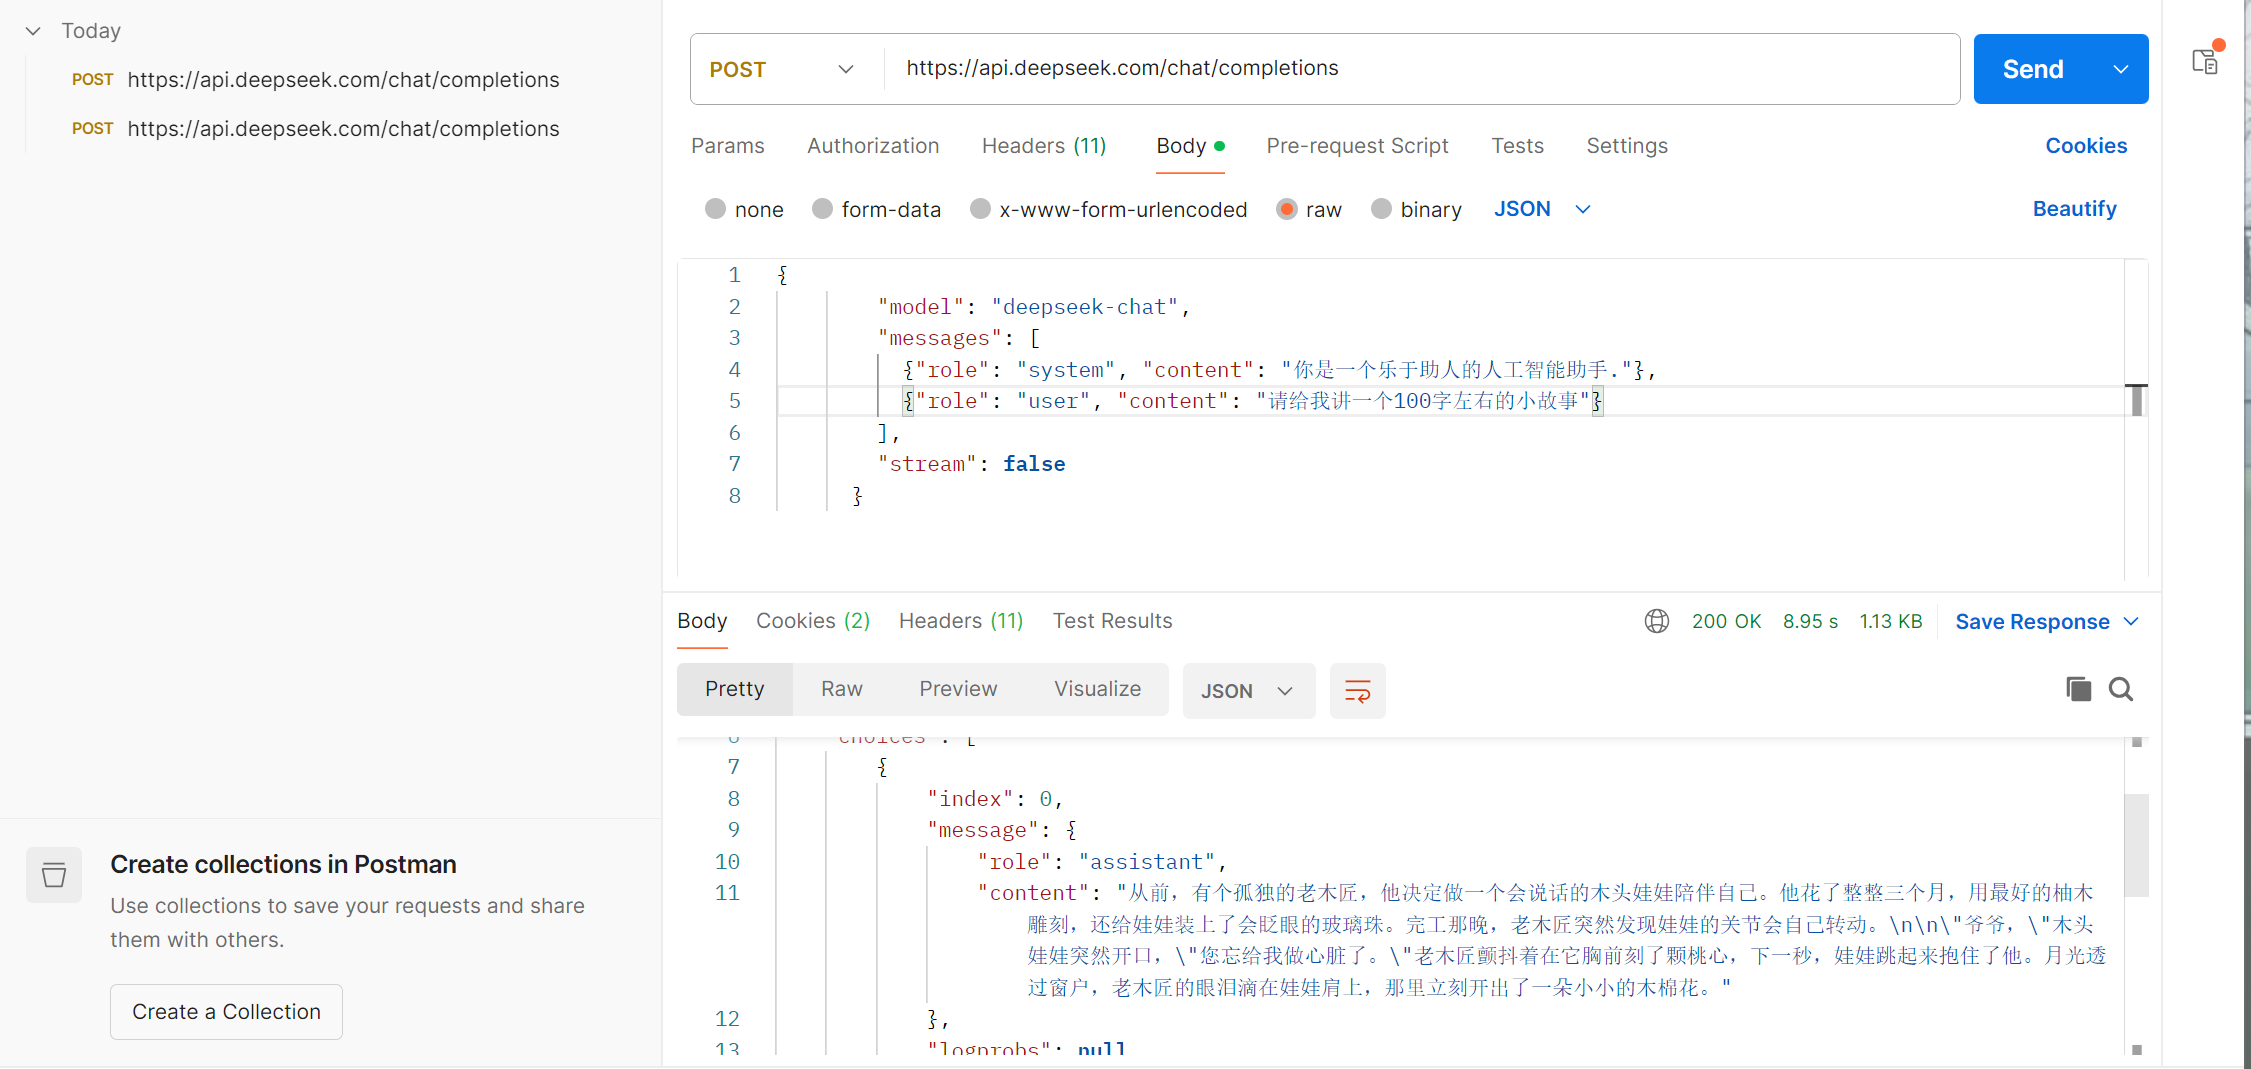
(3)开始调用:利用postman:就用curl的代码:
curl https://api.deepseek.com/chat/completions \-H "Content-Type: application/json" \-H "Authorization: Bearer <DeepSeek API Key>" \-d '{"model": "deepseek-chat","messages": [{"role": "system", "content": "You are a helpful assistant."},{"role": "user", "content": "Hello!"}],"stream": false}'将http地址复制到地址栏中,将-H后面的键值对放到headers中,-d后面的内容放入body处。
1.3发送申请,查看结果
点击send,状态码为200即可正常运行。
1.4python执行
直接复制代码,将api_key填入相应位置即可。stream:是否采用流式输出。
# Please install OpenAI SDK first: `pip3 install openai`from openai import OpenAIclient = OpenAI(api_key="<DeepSeek API Key>", base_url="https://api.deepseek.com")response = client.chat.completions.create(model="deepseek-chat",messages=[{"role": "system", "content": "You are a helpful assistant"},{"role": "user", "content": "Hello"},],stream=False
)print(response.choices[0].message.content)
二、魔搭本地部署
下载模型,可以在多个平台下载,这里以魔搭为例。ModelScope - 模型列表页
2.1挑选模型
挑选合适的模型,要参考自己的电脑容量,别下的太大,电脑放不下。这里以qwen3-0.6B为例,六亿的参数量。通义千问3-0.6B
注意:B----十亿。
2.2下载模型
点击下载模型后,有指令代码出现,跟着文档一一操作即可:
(1)在自己的虚拟环境中装魔搭库:pip install modelscope
(2)下载模型到指定的目录中:modelscope download --model Qwen/Qwen3-0.6B README.md --local_dir ./model
(3)下载完成即可应用,但这里还要额外下载一个accelerate库:
pip install accelerate -i https://mirrors.aliyun.com/pypi/simple/
注意:accelerate 库主要是为了解决 多设备训练 / 推理 的复杂性,它帮你屏蔽掉底层的分布式、混合精度、设备管理细节。
2.3代码应用
示例代码在每一个模型的模型介绍中都有,可以直接搬过来做测试:
from modelscope import AutoModelForCausalLM, AutoTokenizermodel_name = "Qwen/Qwen3-0.6B"# load the tokenizer and the model
tokenizer = AutoTokenizer.from_pretrained(model_name)
model = AutoModelForCausalLM.from_pretrained(model_name,torch_dtype="auto",device_map="auto"
)# prepare the model input
prompt = "Give me a short introduction to large language model."
messages = [{"role": "user", "content": prompt}
]
text = tokenizer.apply_chat_template(messages,tokenize=False,add_generation_prompt=True,enable_thinking=True # Switches between thinking and non-thinking modes. Default is True.
)
model_inputs = tokenizer([text], return_tensors="pt").to(model.device)# conduct text completion
generated_ids = model.generate(**model_inputs,max_new_tokens=32768
)
output_ids = generated_ids[0][len(model_inputs.input_ids[0]):].tolist() # parsing thinking content
try:# rindex finding 151668 (</think>)index = len(output_ids) - output_ids[::-1].index(151668)
except ValueError:index = 0thinking_content = tokenizer.decode(output_ids[:index], skip_special_tokens=True).strip("\n")
content = tokenizer.decode(output_ids[index:], skip_special_tokens=True).strip("\n")print("thinking content:", thinking_content)
print("content:", content)
(1)如果没下模型,就可以用model_name,什么都不修改;
(2)如果已经将模型加载到了自己指定的目录中,就把model_name = model_path,model_path自己导入os库获取相对位置。
2.4结果展示

三、huggingface本地部署
一样的挑选模型,下载模型,官方文档都有操作步骤
import os
os.environ["HF_ENDPOINT"] = "https://hf-mirror.com"  # 设置huggingface镜像源from transformers import AutoModelForCausalLM, AutoTokenizermodel_name = "Qwen/Qwen3-0.6B"
model_path = os.path.relpath(os.path.join(os.path.dirname(__file__), 'model_cache'))# load the tokenizer and the model
tokenizer = AutoTokenizer.from_pretrained(model_name, cache_dir=model_path)
model = AutoModelForCausalLM.from_pretrained(model_name,torch_dtype="auto",device_map="auto"
)# prepare the model input
prompt = "Give me a short introduction to large language model."
messages = [{"role": "user", "content": prompt}
]
text = tokenizer.apply_chat_template(messages,tokenize=False,add_generation_prompt=True,enable_thinking=True # Switches between thinking and non-thinking modes. Default is True.
)
model_inputs = tokenizer([text], return_tensors="pt").to(model.device)# conduct text completion
generated_ids = model.generate(**model_inputs,max_new_tokens=32768
)
output_ids = generated_ids[0][len(model_inputs.input_ids[0]):].tolist() # parsing thinking content
try:# rindex finding 151668 (</think>)index = len(output_ids) - output_ids[::-1].index(151668)
except ValueError:index = 0thinking_content = tokenizer.decode(output_ids[:index], skip_special_tokens=True).strip("\n")
content = tokenizer.decode(output_ids[index:], skip_special_tokens=True).strip("\n")print("推理内容:", thinking_content)
print("生成内容:", content)
四、ollama本地部署
(1)下载ollama软件;
(2)在powershell中输入模型下载指令:ollama run deepseek-r1:1.5b
(3)postman可视化:
1.请求改为post,地址写http://localhost:11434/api/chat
2.heads写键值对
3.body写询问内容
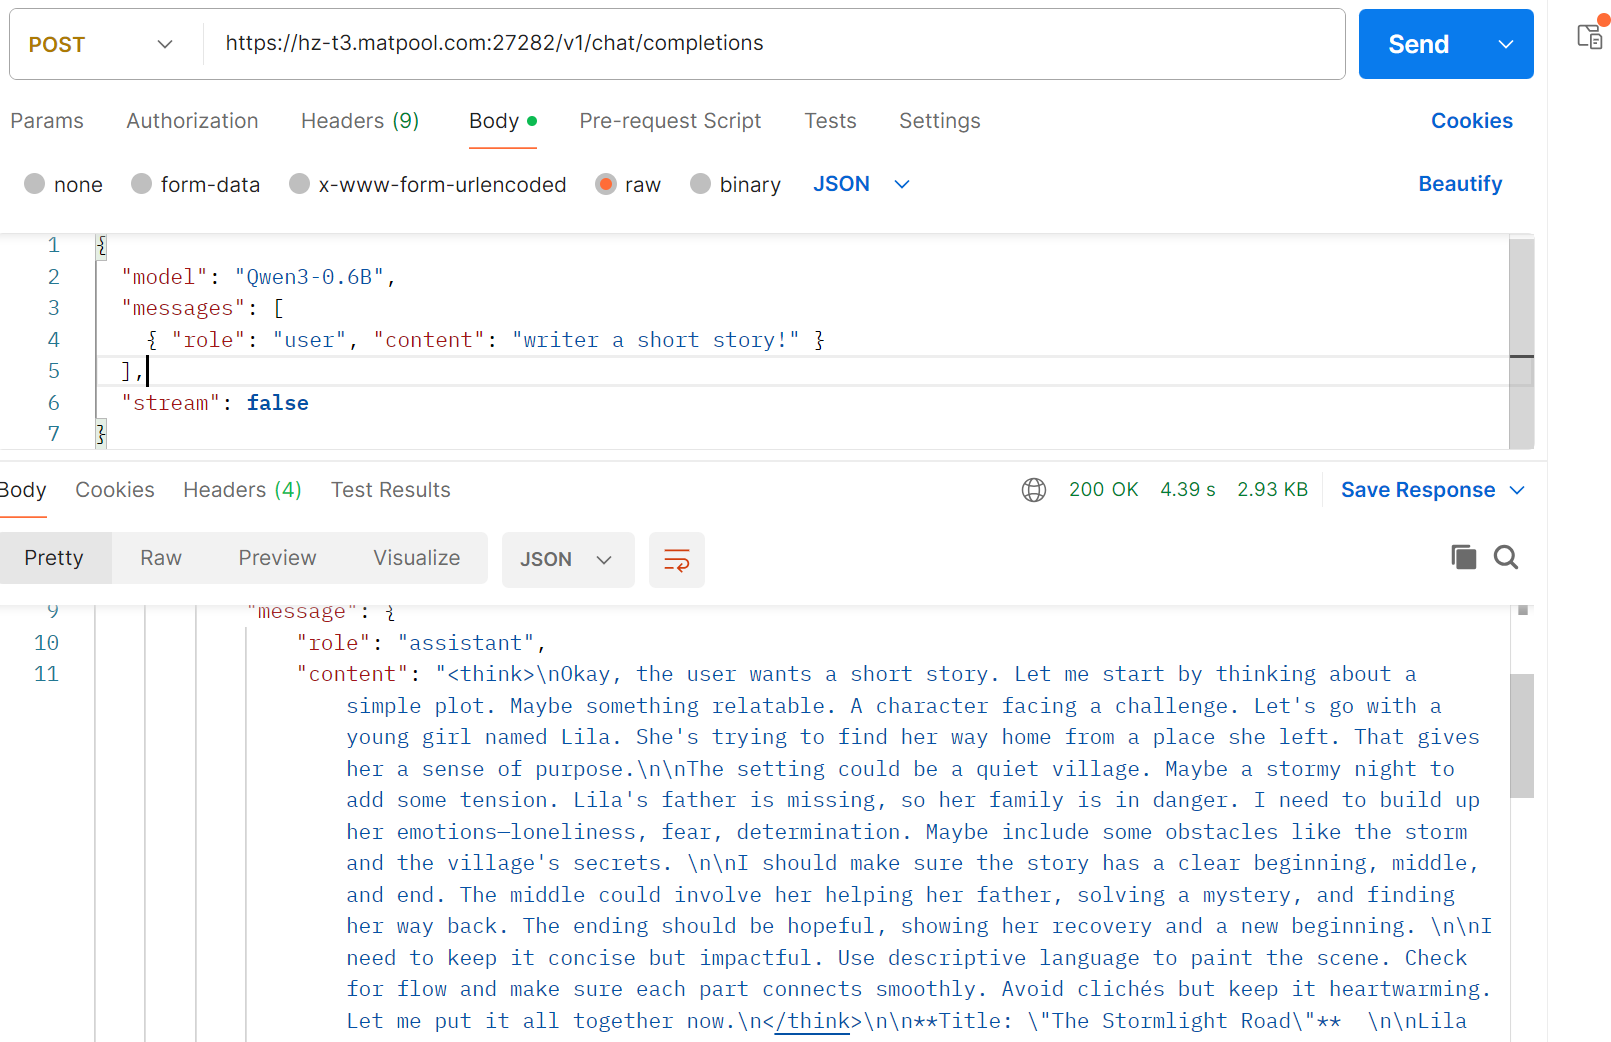
(4)用python代码实现ollama的本地部署
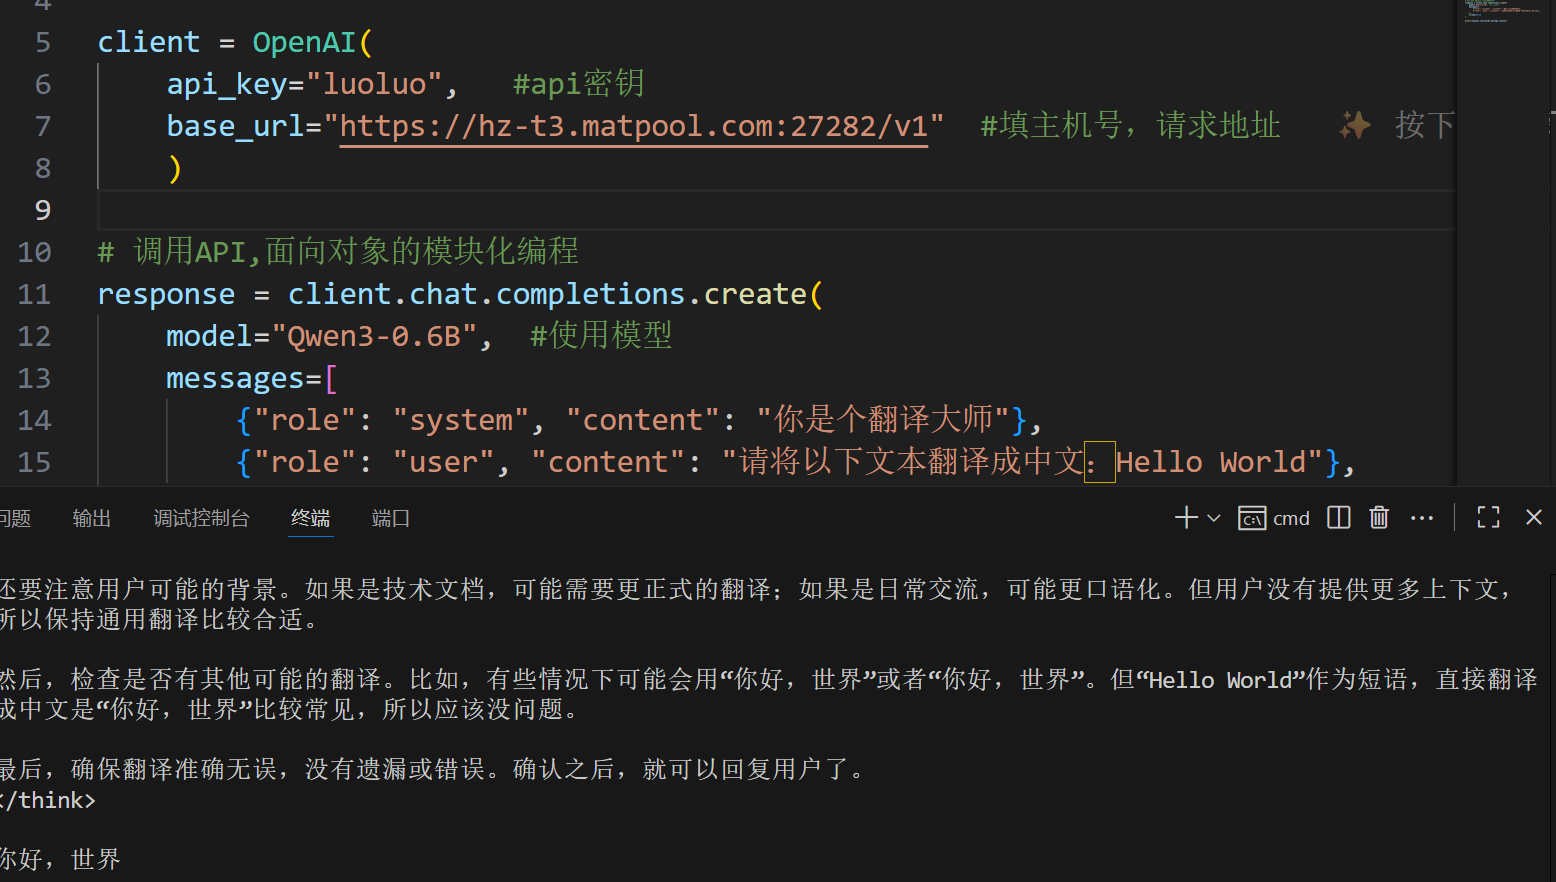
# Please install OpenAI SDK first: `pip install openai`from openai import OpenAIclient = OpenAI(api_key="",   #api密钥base_url="http://localhost:11434/v1"  #请求地址)# 调用API,面向对象的模块化编程
response = client.chat.completions.create(model="deepseek-r1:1.5b",  #使用模型messages=[{"role": "system", "content": "你是个翻译大师"},{"role": "user", "content": "请将以下文本翻译成中文:Hello World"},],stream=False
)print(response.choices[0].message.content)
五、虚拟系统
WSL 全称是 Windows Subsystem for Linux,中文叫 Windows 的 Linux 子系统。
5.1下载子系统
指令1:wsl --install
指令2:wsl --update --web-download
如果指令1,安装不了再试试指令2
5.2基本配置(自行设置)
Create a default Unix user account:自行设置
wsl --user root
sudo passwd root
sudo passwd xxx(xxx是密码)
5.3查看安装版本
wsl -l -v
确保版本2:
NAME STATE VERSION
* Ubuntu Stopped 2
如果*显示的位置不是Ubuntu旁边,wsl --setdefault Ubuntu,然后在此查看版本信息,输入指令 wsl -l -v
5.4启动Ubuntu
只需要输入wsl即可
注意:返回根目录操作:cd ~ ,清屏:clear ,退出:exit
5.5子系统中配置基础环境
(1)更新软件包:
sudo apt update
sudo apt upgrade -y
(2)更新python:
sudo apt upgrade python3 python3-pip
(3)验证安装:
python3 --version
pip3 --version
使用 python 和 pip 命令来调用 Python3,可以设置别名,这样以后在命令行输入 python 就是 Python3 了:
echo "alias python=python3" >> ~/.bashrc
echo "alias pip=pip3" >> ~/.bashrc
source ~/.bashrc
5.6安装虚拟环境
下载:wget https://repo.anaconda.com/miniconda/Miniconda3-latest-Linux-x86_64.sh
安装:bash Miniconda3-latest-Linux-x86_64.sh
安装后,让修改生效:source ~/.bashrc
六、启动vllm模型
6.1创建虚拟环境
conda create -n vllm1 python==3.12
6.2下载
pip install vllm -i https://mirrors.aliyun.com/pypi/simple/
6.3启动vllm模型
GPU利用指令启动:
python3 -m vllm.entrypoints.openai.api_server \--model /mnt/f/huggingface/Qwen3-0.6B \--host 0.0.0.0 \--port 8008 \--gpu-memory-utilization 0.66 \--max-model-len 24000 \--quantization int8如果是CPU的电脑只能在云服务器上启动vllm,因为vllm模型是基于GPU设定的
在跑算力之前,将自己的模型压缩到服务器上,然后进行后续操作:
跑算力指令
(1)cd /mnt
(2)pip install vllm -i Simple Index
(3)unzip model.zip
(4)启动指令:
python3 -m vllm.entrypoints.openai.api_server \--model Qwen3-0.6B \--host 0.0.0.0 \--port 8888#注意:这里的端口号8888需要自行查看(5)查看是否有窗口专用情况:lsof -i:8888
(6)如果有东西显示出来,释放操作:sudo kill -9 pid (这个pid会在查看的时候显示出来)
(7)释放后再检查一下:lsof -i:8888 ,如果什么都没有,就差不多成功了
(8)再次启动:
python3 -m vllm.entrypoints.openai.api_server --model Qwen3-0.6B --host 0.0.0.0 --port 8888(9)在虚拟机里面的浏览器测试:localhost:端口号/docs,有反应就成功,一般都能成功
(10)返回Windows窗口,点击打开jupyter后,有反应就成功了,将网址复制下来!
6.4利用测试工具和python代码测试
测试工具:postman
将复制的网站放到测试工具和python代码当中:
七、docker + vLLM
7.1基本配置
(1)setting-resources-把路径修改一下,如果C盘够大也不用修改;
(2)setting-resources-file sharing-先点击浏览,选择文件之后,再点+;
(3)setting-docker engine:将代码复制进去,使用国内镜像源。
{"builder": {"gc": {"defaultKeepStorage": "20GB","enabled": true}},"experimental": false,"registry-mirrors": ["https://hub-mirror.c.163.com","https://mirror.ccs.tencentyun.com","https://registry.docker-cn.com","https://docker.mirrors.ustc.edu.cn"]
}
7.2加载镜像源
cpu:
docker run -it -p 8000:8000 -v D:\huggingface:/data/huggingface \vllm/vllm-openai --model /data/huggingface/Qwen3-0.6B --max-model-len 4096gpu:
docker run -it --gpus all `-p 8000:8000 `-v F:\huggingface:/data/huggingface `vllm/vllm-openai `--model /data/huggingface/Qwen3-0.6B `--max-model-len 36000 `--gpu-memory-utilization 0.8 `7.3查看docker中是否存在容器
点进去看就知道了
7.4再次输入命令,查看是否启动
末尾出现绿色字体就差不多成功了。