基于YOLOv的目标检测训练数据构建方法研究—图像采集、标注、划分与增强一体化流程设计
在目标检测任务中,高质量的训练数据是模型性能提升的关键。本文围绕
YOLOv系列模型,系统性地研究了目标检测训练数据的构建方法,提出了一套从图像采集、标注、数据集划分到数据增强的一体化流程设计 。通过多源图像采集策略确保样本多样性,结合LabelImg工具完成VOC格式标注,并采用标准化方式将XML标签转换为YOLOv所需的TXT格式。在数据集划分阶段,按照8:1:1的比例将数据划分为训练集、验证集和测试集,以提高模型泛化能力。同时引入多种数据增强手段,包括Gamma变换、滤波操作、缩放、翻转和任意角度旋转,进一步提升了模型对光照变化、尺度差异和目标方向变化的鲁棒性。实验表明,该数据构建方法不仅有效解决了小样本训练中的过拟合问题,还显著提高了模型在实际场景下的识别精度与稳定性,为YOLOv系列模型的训练提供了可靠的数据支持。
1.🌟收集数据集:高质量图像样本获取与多源融合策略
构建目标检测模型训练数据的第一步是获取具有代表性的图像样本,确保模型在实际部署中具备良好的泛化能力。
1.1 🔍 数据来源建议
- 公开数据集:如 COCO、PASCAL VOC、Open Images、VisDrone(根据任务选择)
- 网络爬取图像:使用工具(如 Google Images、Bing Image Downloader)采集特定类别的图像
- 自建数据采集:通过摄像头、无人机、监控设备等拍摄真实场景图像
- 视频帧提取:从相关视频中抽帧获取多样化的连续样本
1.2 ⚙️ 数据质量控制要点
| 要素 | 说明 |
|---|---|
| 分辨率 | 建议统一为 640×640 或以上 |
| 光照条件 | 包含白天、夜晚、低光、反光等多种光照环境 |
| 角度多样性 | 不同视角、角度和姿态的目标图像 |
| 拍摄设备 | 多种设备采集以增强泛化性(如手机、相机、监控) |
| 样本筛选 | 剔除模糊、重复、低质量图像 |
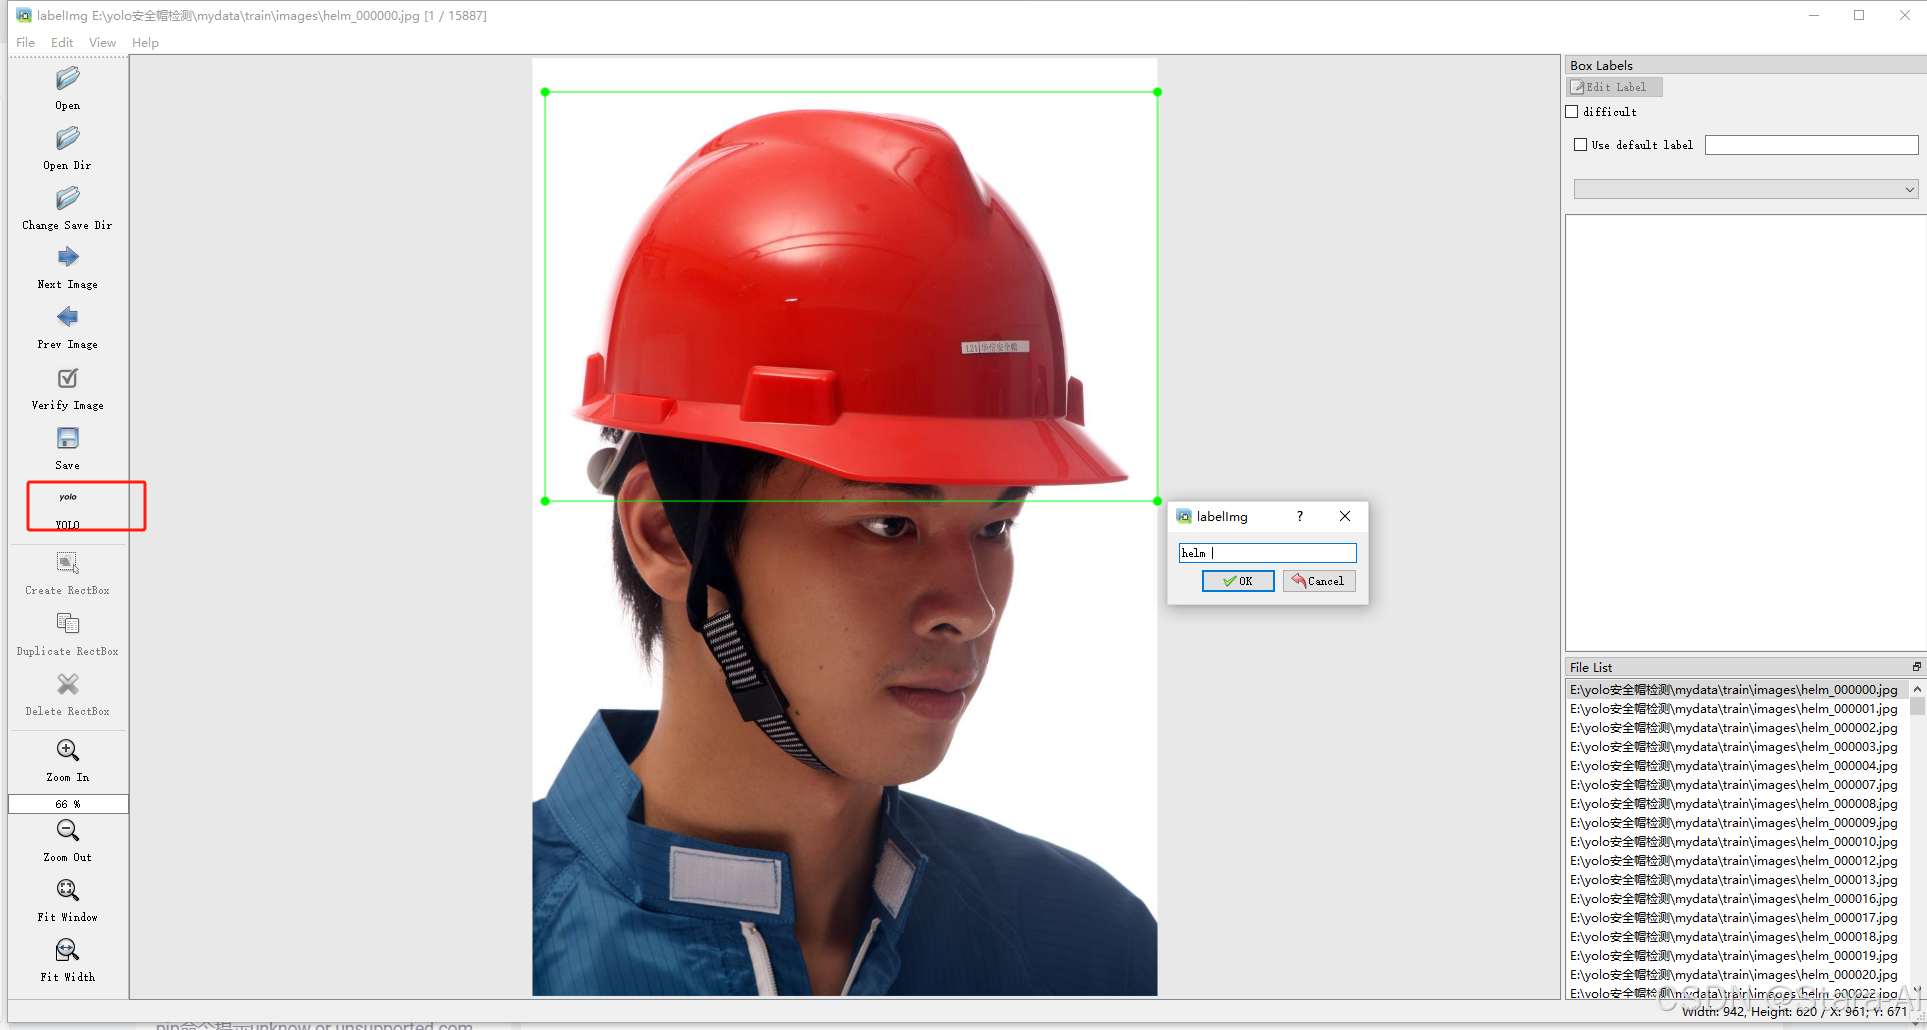
2.🌟标注数据集:YOLO格式标注规范与标签一致性管理
将原始图像中的目标用边界框进行标注,并转换为 YOLOv 所需的归一化坐标格式,形成可用于模型训练的
.txt标签文件。
2.1 🛠️ 常用标注工具推荐
| 工具 | 特点 |
|---|---|
| LabelImg | 开源、轻量、支持 YOLO 格式输出 |
| CVAT | 支持多人协作、在线标注平台 |
| LabelMe | 支持多边形标注,适用于非矩形目标 |
| Roboflow Annotate | 在线标注工具,集成数据增强功能 |
| Make Sense | 界面友好、完全免费的在线图像标注工具,非常适合用于目标检测、实例分割等任务的数据 |
2.2 📄 YOLO 格式标签文件结构
每个 .txt 文件对应一张图像,内容如下:
<class_id> <x_center> <y_center> <width> <height>
其中:
class_id: 类别编号(从0开始)x_center, y_center: 边界框中心点坐标(相对于图像宽高的归一化值)width, height: 边界框的宽度和高度(同样为归一化值)
示例:
0 0.45 0.32 0.15 0.20
1 0.78 0.63 0.10 0.12
2.3 🧩 标注流程步骤
- 创建类别列表:定义你的检测类别,如
person,car,drone等; - 批量标注图像:使用 LabelImg 或 CVAT 对每张图像进行目标框选;
- 导出为 YOLO 格式:确保生成
.txt文件并保存为(x_center, y_center, width, height)归一化格式; - 标签一致性校验:检查是否出现误标、漏标或类别错位问题;
- 版本控制与备份:定期保存标注结果,防止数据丢失;


3.🌟划分数据集:训练/验证/测试集标准化比例设计
将标注后的数据集划分为训练集、验证集和测试集,以便于后续模型训练与性能评估。
3.1 🔢 常见划分比例推荐
| 阶段 | 推荐比例 | 用途 |
|---|---|---|
| 训练集(train) | 70% - 80% | 模型参数学习 |
| 验证集(valid) | 10% - 15% | 超参数调优与模型选择 |
| 测试集(test) | 10% - 15% | 最终性能评估 |
3.2 📜 划分逻辑说明(Python 示例脚本片段)
import os
import random
import shutildef copy_files(src_dir, dst_dir, filenames, extension):os.makedirs(dst_dir, exist_ok=True)missing_files = 0for filename in filenames:src_path = os.path.join(src_dir, filename + extension)dst_path = os.path.join(dst_dir, filename + extension)# Check if the file exists before copyingif os.path.exists(src_path):shutil.copy(src_path, dst_path)else:print(f"Warning: File not found for {filename}")missing_files += 1return missing_filesdef split_and_copy_dataset(image_dir, label_dir, output_dir, train_ratio=0.8, valid_ratio=0.11, test_ratio=0.1):# 获取所有图像文件的文件名(不包括文件扩展名)image_filenames = [os.path.splitext(f)[0] for f in os.listdir(image_dir)]# 随机打乱文件名列表random.shuffle(image_filenames)# 计算训练集、验证集和测试集的数量total_count = len(image_filenames)train_count = int(total_count * train_ratio)valid_count = int(total_count * valid_ratio)test_count = total_count - train_count - valid_count# 定义输出文件夹路径train_image_dir = os.path.join(output_dir, 'train', 'images')train_label_dir = os.path.join(output_dir, 'train', 'labels')valid_image_dir = os.path.join(output_dir, 'valid', 'images')valid_label_dir = os.path.join(output_dir, 'valid', 'labels')test_image_dir = os.path.join(output_dir, 'test', 'images')test_label_dir = os.path.join(output_dir, 'test', 'labels')# 复制图像和标签文件到对应的文件夹train_missing_files = copy_files(image_dir, train_image_dir, image_filenames[:train_count], '.jpg')train_missing_files += copy_files(label_dir, train_label_dir, image_filenames[:train_count], '.txt')valid_missing_files = copy_files(image_dir, valid_image_dir, image_filenames[train_count:train_count + valid_count],'.jpg')valid_missing_files += copy_files(label_dir, valid_label_dir,image_filenames[train_count:train_count + valid_count], '.txt')test_missing_files = copy_files(image_dir, test_image_dir, image_filenames[train_count + valid_count:], '.jpg')test_missing_files += copy_files(label_dir, test_label_dir, image_filenames[train_count + valid_count:], '.txt')# Print the count of each datasetprint(f"Train dataset count: {train_count}, Missing files: {train_missing_files}")print(f"Validation dataset count: {valid_count}, Missing files: {valid_missing_files}")print(f"Test dataset count: {test_count}, Missing files: {test_missing_files}")# 使用例子
image_dir = 'datasets/coco128/images/train2017'
label_dir = 'datasets/coco128/labels/train2017'
output_dir = './my_dataset'
split_and_copy_dataset(image_dir, label_dir, output_dir)
3.3 🧱 文件目录结构建议
my_dataset/└── train└── images (folder including all training images)└── labels (folder including all training labels)└── test└── images (folder including all testing images)└── labels (folder including all testing labels)└── valid└── images (folder including all testing images)└── labels (folder including all testing labels)
4.🌟基于数据增强的方法(自动生成图片和xml文件)
小样本目标检测方法主要基于传统的经典成熟的目标检测方法,借鉴小样本学习框架,构建针对目标检测的小样本解决方案。现有的方法主要为:
(1)基于度量学习(metric learning)的方法
(2)基于数据增强的方法
(3)基于模型结构的方法
(4)基于微调(fine-tune)的方法
(5)基于元学习的方法
(6)基于集成的方法
数据增强(也叫数据扩增)的目的是为了扩充数据和提升模型的泛化能力。有效的数据扩充不仅能扩充训练样本数量,还能增加训练样本的多样性,一方面可避免过拟合,另一方面又会带来模型性能的提升。
数据增强(DataAugmentation)是一种使用少量数据通过先验知识产生更多的相似生成数据来扩展训练数据集的方法。数据增强方法常用于解决现实业务中的小样本问题。
数据增强几种常用方法有:图像水平/竖直翻转、随机抠取、尺度变换和旋转。其中尺度变换(scaling)、旋转(rotating)等方法用来增加卷积卷积神经网络对物体尺度和方向上的鲁棒性。
小样本学习主要问题是样本量过少,从而导致样本多样性不足以刻画完整样本分布,可以通过样本增强来提升样本多样性;基于数据增强的方法是利用辅助数据集或者辅助信息增强目标数据集中进行数据扩充
或特征增强,使模型能更好拟合。数据扩充可以是无标签或者合成带标签数据;特征增强是在原样本的特征空间中添加便于分类的特征,增加特征多样性;
4.1 ✅Gamma 变化增强(Gamma Correction)
# -*- coding: utf-8 -*-
import cv2
import numpy as np
import xml.etree.ElementTree as ET
import os
from skimage import exposurexmlpath = './VOC2007/Annotations/'
imgpath = './VOC2007/JPEGImages/'
hist_imgpath = './VOC2007/gammma/'
hist_xmlpath = './xmlgammma/'for i in os.listdir(imgpath):a, b = os.path.splitext(i)img = cv2.imread(imgpath + a + '.jpg', 0)w = img.shape[1]h = img.shape[0]img2 = np.zeros([h, w], img.dtype)aa = 1.1gg = 5img1 = cv2.addWeighted(img, aa, img2, 1 - aa, gg)# img1 = exposure.adjust_gamma(img,0.9)# img1= exposure.adjust_log(img)   #对数调整cv2.imwrite(hist_imgpath + a + '_gamma' + str(1) + '_' + str(9) + '.jpg', img1)tree = ET.parse(xmlpath + a + '.xml')root = tree.getroot()for file1 in root.findall('filename'):# filename=str(file1.find('filename').text)file1.text = str(a + '_gamma' + str(1) + '_' + str(9) + '.jpg')tree.write(hist_xmlpath + a + '_gamma' + str(1) + '_' + str(9) + '.xml')print(str(a) + '.xml has been gamma  ')
4.2 ✅滤波类增强(GaussianBlur、medianBlur、blur)
# -*- coding: utf-8 -*-
import cv2
import numpy as np
import xml.etree.ElementTree as ET
import os
from skimage import exposurexmlpath = './Annotations/'
imgpath = './JPEGImages/'
blur_imgpath = './motionblur/'
blur_xmlpath = './xmlmotion/'for i in os.listdir(imgpath):a, b = os.path.splitext(i)img = cv2.imread(imgpath + a + '.jpg', 1)# img1 = cv2.bilateralFilter(img,15,15,2,4)img1 = cv2.blur(img, (3, 3));# img1 = cv2.GaussianBlur(img,(3,3),3); #(9,9),5and3# img1 = cv2.medianBlur(img,3);cv2.imwrite(blur_imgpath + a + '_blur_' + str(3) + '.jpg', img1)tree = ET.parse(xmlpath + a + '.xml')root = tree.getroot()for file1 in root.findall('filename'):# filename=str(file1.find('filename').text)file1.text = str(a + '_blur_' + str(3) + '.jpg')tree.write(blur_xmlpath + a + '_blur_' + str(3) + '.xml')print(str(a) + '.xml has been gamma  ')
4.3 ✅缩放类增强(Scaling)
# -*- coding: utf-8 -*-
import cv2
import math
import numpy as np
import xml.etree.ElementTree as ET
import osxmlpath = './Annotations/'
imgpath = './JPEGImages/'
resize_imgpath = './resize/'
rotated_xmlpath = './resizexml/'
for i in os.listdir(imgpath):a, b = os.path.splitext(i)  # 分离出文件名aimg = cv2.imread(imgpath + a + '.jpg')w = img.shape[1]h = img.shape[0]scale_h = 0.98scale_w = 0.98resize_img = cv2.resize(img, (int(w * scale_w), int(h * scale_h)), interpolation=cv2.INTER_CUBIC)cv2.imwrite(resize_imgpath + a + '_' + str(98) + '.jpg', resize_img)# print str(i) + ' has been rotated for '+ st12°'tree = ET.parse(xmlpath + a + '.xml')root = tree.getroot()for file1 in root.findall('filename'):# filename=str(file1.find('filename').text)file1.text = str(a + '_' + str(98) + '.jpg')for box in root.iter('bndbox'):xmin = float(box.find('xmin').text)ymin = float(box.find('ymin').text)xmax = float(box.find('xmax').text)ymax = float(box.find('ymax').text)x = int(xmin * scale_h)y = int(ymin * scale_w)x1 = int(xmax * scale_h)y1 = int(ymax * scale_w)cv2.rectangle(resize_img, (x, y), (x1, y1), [0, 0, 255], 2)  # 可在该步骤测试新画的框位置是否正确# cv2.imshow('xmlbnd',rotated_img)# cv2.waitKey(200)box.find('xmin').text = str(x)box.find('ymin').text = str(y)box.find('xmax').text = str(x1)box.find('ymax').text = str(y1)# cv2.imwrite("E:/test/VOC07/3/" + a + "_" + str(1000) +".jpg",resize_img)tree.write(rotated_xmlpath + a + '_' + str(98) + '.xml')print(str(a) + '.xml has been rotated for ' + str(98))
4.4 ✅翻转类增强(Flipping)
# -*- coding: utf-8 -*-
import cv2
import math
import numpy as np
import xml.etree.ElementTree as ET
import osdef GetUDFlipLoc(h, xmin, ymin, xmax, ymax):H = hNewXmin = xminNewYmin = H - ymaxNewXmax = xmaxNewYmax = H - yminreturn NewXmin, NewYmin, NewXmax, NewYmaxxmlpath = './Annotations/'
imgpath = './JPEGImages/'
rotated_imgpath = './motionblur/'
rotated_xmlpath = './xmlmotion/'for i in os.listdir(imgpath):a, b = os.path.splitext(i)# img = cv2.imread(imgpath + a + '.jpg',0)img = cv2.imread(imgpath + a + '.bmp')w = img.shape[1]h = img.shape[0]UDFlipIm = cv2.flip(img, 1)cv2.imwrite(rotated_imgpath + a + '_flip' + '.bmp', UDFlipIm)tree = ET.parse(xmlpath + a + '.xml')root = tree.getroot()for file1 in root.findall('filename'):# filename=str(file1.find('filename').text)file1.text = str(a + '_flip' + '.bmp')for box in root.iter('bndbox'):xmin = int(box.find('xmin').text)ymin = int(box.find('ymin').text)xmax = int(box.find('xmax').text)ymax = int(box.find('ymax').text)NewXmin, NewYmin, NewXmax, NewYmax = GetUDFlipLoc(h, xmin, ymin, xmax, ymax)box.find('xmin').text = str(NewXmin)box.find('ymin').text = str(NewYmin)box.find('xmax').text = str(NewXmax)box.find('ymax').text = str(NewYmax)# cv2.imwrite("E:/test/VOC07/3/" + a + "_" + str(angle) +".jpg",rotated_img)tree.write(rotated_xmlpath + a + '_flip' + '.xml')print(str(a) + '.xml has been flip for ' + '_flip' + '°')
4.5 ✅任意角度旋转增强(Arbitrary Angle Rotation)
# -*- coding: utf-8 -*-
import cv2
import math
import numpy as np
import xml.etree.ElementTree as ET
import osdef rotate_image(src, angle, scale=1):w = src.shape[1]h = src.shape[0]# 角度变弧度rangle = np.deg2rad(angle)  # angle in radians# now calculate new image width and heightnw = (abs(np.sin(rangle) * h) + abs(np.cos(rangle) * w)) * scalenh = (abs(np.cos(rangle) * h) + abs(np.sin(rangle) * w)) * scale# ask OpenCV for the rotation matrixrot_mat = cv2.getRotationMatrix2D((nw * 0.5, nh * 0.5), angle, scale)# calculate the move from the old center to the new center combined# with the rotationrot_move = np.dot(rot_mat, np.array([(nw - w) * 0.5, (nh - h) * 0.5, 0]))# the move only affects the translation, so update the translation# part of the transformrot_mat[0, 2] += rot_move[0]rot_mat[1, 2] += rot_move[1]dst = cv2.warpAffine(src, rot_mat, (int(math.ceil(nw)), int(math.ceil(nh))), flags=cv2.INTER_LANCZOS4)# 仿射变换return dst# 对应修改xml文件
def rotate_xml(src, xmin, ymin, xmax, ymax, angle, scale=1.):w = src.shape[1]h = src.shape[0]rangle = np.deg2rad(angle)  # angle in radians# now calculate new image width and height# 获取旋转后图像的长和宽nw = (abs(np.sin(rangle) * h) + abs(np.cos(rangle) * w)) * scalenh = (abs(np.cos(rangle) * h) + abs(np.sin(rangle) * w)) * scale# ask OpenCV for the rotation matrixrot_mat = cv2.getRotationMatrix2D((nw * 0.5, nh * 0.5), angle, scale)# calculate the move from the old center to the new center combined# with the rotationrot_move = np.dot(rot_mat, np.array([(nw - w) * 0.5, (nh - h) * 0.5, 0]))# the move only affects the translation, so update the translation# part of the transformrot_mat[0, 2] += rot_move[0]rot_mat[1, 2] += rot_move[1]  # rot_mat是最终的旋转矩阵# point1 = np.dot(rot_mat, np.array([xmin, ymin, 1]))          #这种新画出的框大一圈# point2 = np.dot(rot_mat, np.array([xmax, ymin, 1]))# point3 = np.dot(rot_mat, np.array([xmax, ymax, 1]))# point4 = np.dot(rot_mat, np.array([xmin, ymax, 1]))point1 = np.dot(rot_mat, np.array([(xmin + xmax) / 2, ymin, 1]))  # 获取原始矩形的四个中点,然后将这四个点转换到旋转后的坐标系下point2 = np.dot(rot_mat, np.array([xmax, (ymin + ymax) / 2, 1]))point3 = np.dot(rot_mat, np.array([(xmin + xmax) / 2, ymax, 1]))point4 = np.dot(rot_mat, np.array([xmin, (ymin + ymax) / 2, 1]))concat = np.vstack((point1, point2, point3, point4))  # 合并np.array# 改变array类型concat = concat.astype(np.int32)rx, ry, rw, rh = cv2.boundingRect(concat)  # rx,ry,为新的外接框左上角坐标,rw为框宽度,rh为高度,新的xmax=rx+rw,新的ymax=ry+rhreturn rx, ry, rw, rh# 使图像旋转60,90,120,150,210,240,300度xmlpath = './Annotations/'
imgpath = './JPEGImages/'
rotated_imgpath = './rotate/'
rotated_xmlpath = './rotatexml/'
# for angle in (90,270):
for angle in (5, 10):for i in os.listdir(imgpath):a, b = os.path.splitext(i)  # 分离出文件名a# img = cv2.imread(imgpath + a + '.jpg',0)img = cv2.imread(imgpath + a + '.jpg')rotated_img = rotate_image(img, angle)cv2.imwrite(rotated_imgpath + a + '_' + str(angle) + '.jpg', rotated_img)# print str(i) + ' has been rotated for '+ str(angle)+'°'tree = ET.parse(xmlpath + a + '.xml')root = tree.getroot()for file1 in root.findall('filename'):# filename=str(file1.find('filename').text)file1.text = str(a + '_' + str(angle) + '.jpg')for box in root.iter('bndbox'):xmin = float(box.find('xmin').text)ymin = float(box.find('ymin').text)xmax = float(box.find('xmax').text)ymax = float(box.find('ymax').text)x, y, w, h = rotate_xml(img, xmin, ymin, xmax, ymax, angle)cv2.rectangle(rotated_img, (x, y), (x + w, y + h), [0, 0, 255], 2)  # 可在该步骤测试新画的框位置是否正确# cv2.imshow('xmlbnd',rotated_img)# cv2.waitKey(200)box.find('xmin').text = str(x)box.find('ymin').text = str(y)box.find('xmax').text = str(x + w)box.find('ymax').text = str(y + h)# cv2.imwrite("E:/test/VOC07/3/" + a + "_" + str(angle) +".jpg",rotated_img)tree.write(rotated_xmlpath + a + '_' + str(angle) + '.xml')print(str(a) + '.xml has been rotated for ' + str(angle) + '°')
5.🌟 标签转化(将VOC XML标注转换为YOLO格式)
- 查看路径放置脚本
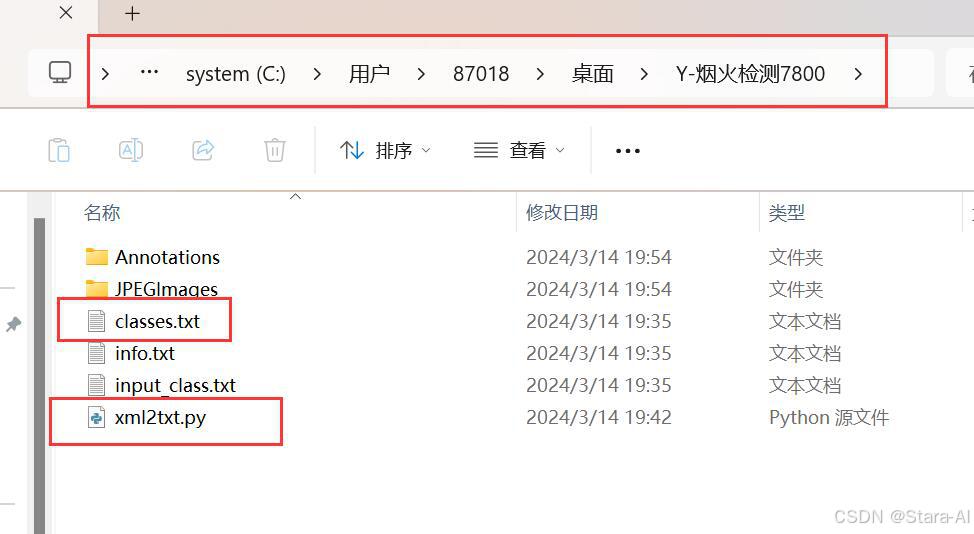
2. 查看数据集分类名
3. 执行脚本
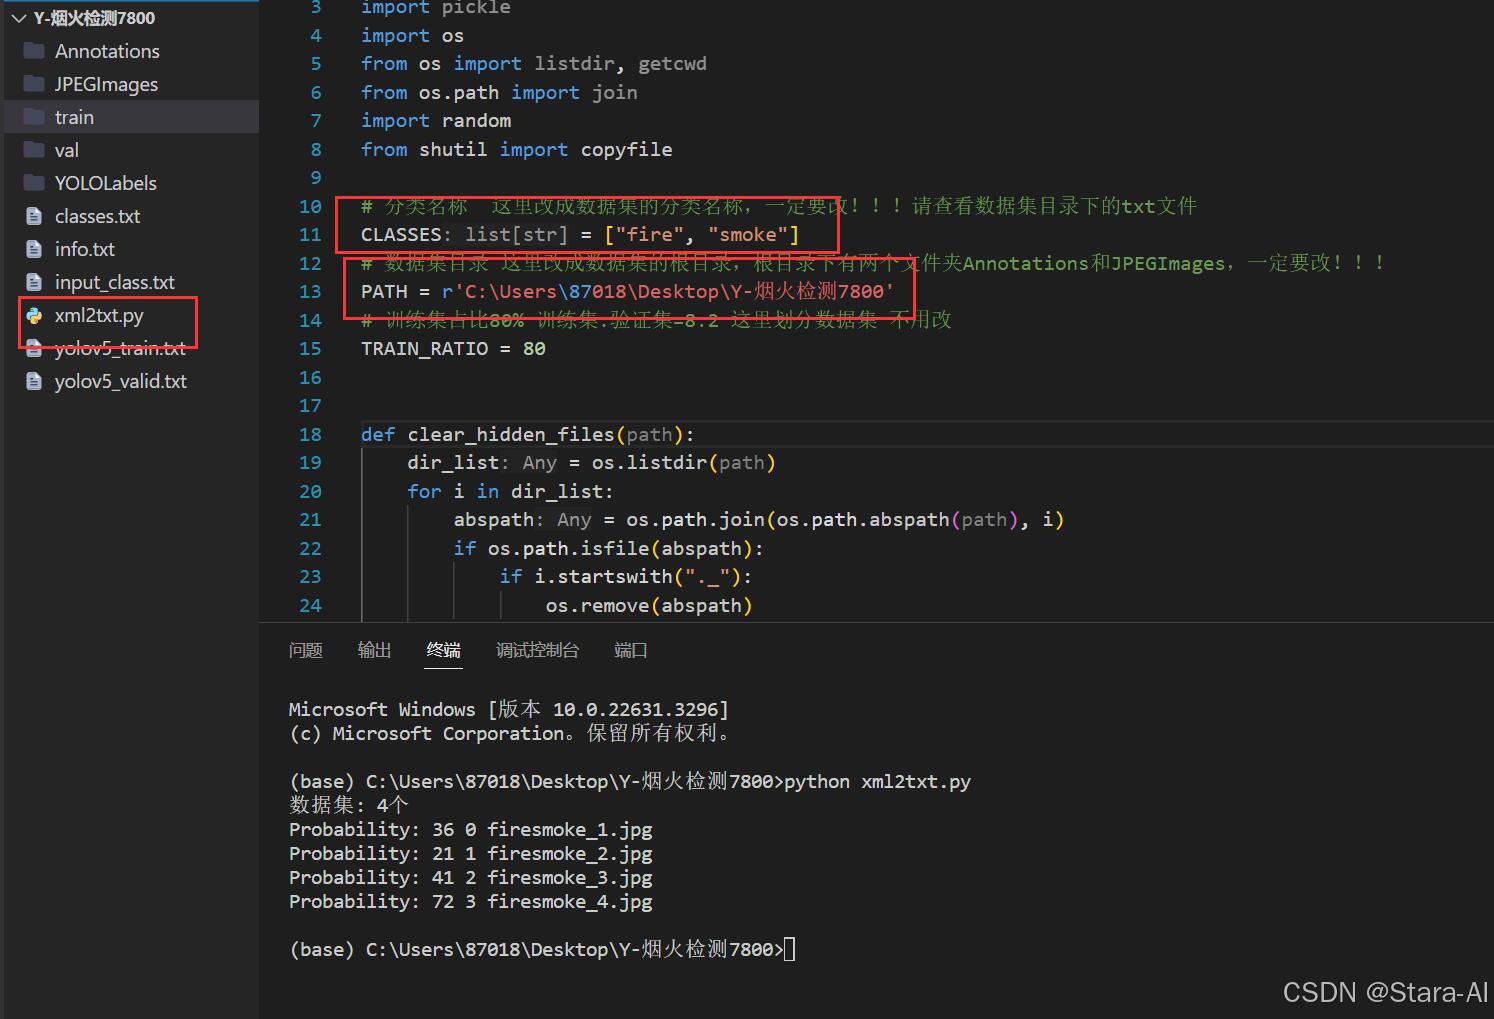
# xml2txt.pyimport xml.etree.ElementTree as ET
import os
from os import listdir, getcwd
from os.path import join
import random
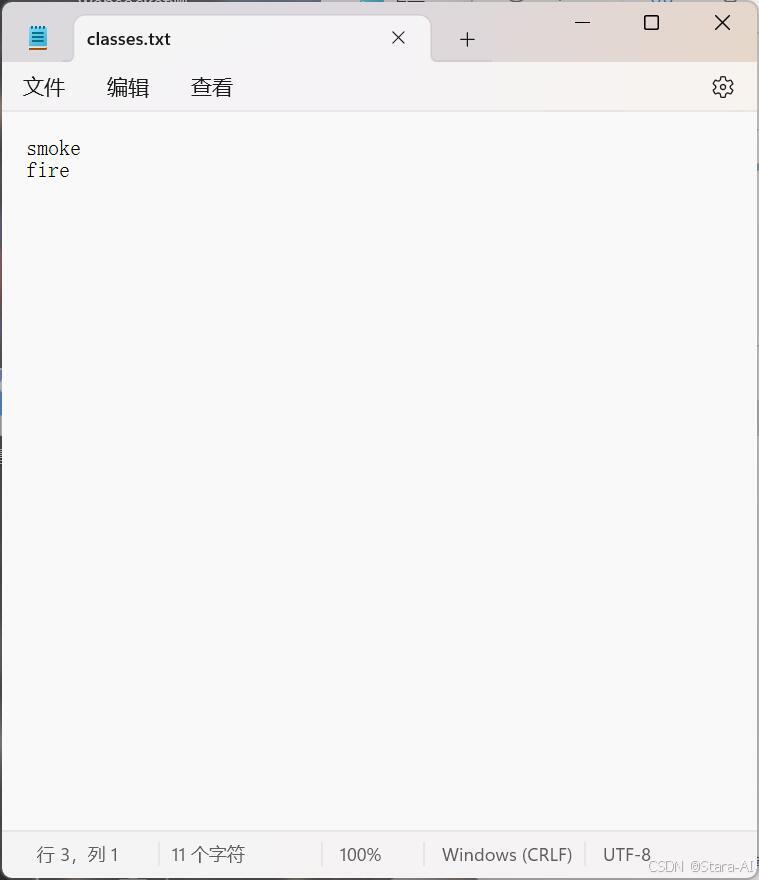
from shutil import copyfile# 分类名称 这里改成数据集的分类名称,一定要改!!!请查看数据集目录下的txt文件
CLASSES = ["fire", "smoke"]
# 数据集目录 这里改成数据集的根目录,根目录下有两个文件夹Annotations和JPEGImages,一定要改!!!
PATH = r'C:\Users\87018\Desktop\Y-烟火检测7800'
# 训练集占比80% 训练集:验证集:测试集=8:1:1 这里划分数据集 不用改
TRAIN_RATIO = 80
VALID_RATIO = 10
TEST_RATIO = 10def clear_hidden_files(path):dir_list = os.listdir(path)for i in dir_list:abspath = os.path.join(os.path.abspath(path), i)if os.path.isfile(abspath):if i.startswith("._"):os.remove(abspath)else:clear_hidden_files(abspath)def convert(size, box):dw = 1. / size[0]dh = 1. / size[1]x = (box[0] + box[1]) / 2.0y = (box[2] + box[3]) / 2.0w = box[1] - box[0]h = box[3] - box[2]x = x * dww = w * dwy = y * dhh = h * dhreturn (x, y, w, h)def convert_annotation(image_id):in_file = open(os.path.join(PATH, 'Annotations', f'{image_id}.xml'), encoding='utf-8')out_file = open(os.path.join(PATH, 'YOLOLabels', f'{image_id}.txt'), 'w', encoding='utf-8')tree = ET.parse(in_file)root = tree.getroot()size = root.find('size')w = int(size.find('width').text)h = int(size.find('height').text)difficult = 0for obj in root.iter('object'):if obj.find('difficult'):difficult = obj.find('difficult').textcls = obj.find('name').textif cls not in CLASSES or int(difficult) == 1:continuecls_id = CLASSES.index(cls)xmlbox = obj.find('bndbox')b = (float(xmlbox.find('xmin').text), float(xmlbox.find('xmax').text), float(xmlbox.find('ymin').text),float(xmlbox.find('ymax').text))bb = convert((w, h), b)out_file.write(f"{cls_id} " + " ".join([str(a) for a in bb]) + '\n')in_file.close()out_file.close()wd = os.getcwd()
work_space_dir = os.path.join(wd, PATH)annotation_dir = os.path.join(work_space_dir, "Annotations/")
if not os.path.isdir(annotation_dir):os.mkdir(annotation_dir)
clear_hidden_files(annotation_dir)image_dir = os.path.join(work_space_dir, "JPEGImages/")
if not os.path.isdir(image_dir):os.mkdir(image_dir)
clear_hidden_files(image_dir)yolo_labels_dir = os.path.join(work_space_dir, "YOLOLabels/")
if not os.path.isdir(yolo_labels_dir):os.mkdir(yolo_labels_dir)
clear_hidden_files(yolo_labels_dir)yolov5_train_dir = os.path.join(work_space_dir, "train/")
if not os.path.isdir(yolov5_train_dir):os.mkdir(yolov5_train_dir)
clear_hidden_files(yolov5_train_dir)yolov5_images_train_dir = os.path.join(yolov5_train_dir, "images/")
if not os.path.isdir(yolov5_images_train_dir):os.mkdir(yolov5_images_train_dir)
clear_hidden_files(yolov5_images_train_dir)yolov5_labels_train_dir = os.path.join(yolov5_train_dir, "labels/")
if not os.path.isdir(yolov5_labels_train_dir):os.mkdir(yolov5_labels_train_dir)
clear_hidden_files(yolov5_labels_train_dir)yolov5_valid_dir = os.path.join(work_space_dir, "val/")
if not os.path.isdir(yolov5_valid_dir):os.mkdir(yolov5_valid_dir)
clear_hidden_files(yolov5_valid_dir)yolov5_images_valid_dir = os.path.join(yolov5_valid_dir, "images/")
if not os.path.isdir(yolov5_images_valid_dir):os.mkdir(yolov5_images_valid_dir)
clear_hidden_files(yolov5_images_valid_dir)yolov5_labels_valid_dir = os.path.join(yolov5_valid_dir, "labels/")
if not os.path.isdir(yolov5_labels_valid_dir):os.mkdir(yolov5_labels_valid_dir)
clear_hidden_files(yolov5_labels_valid_dir)yolov5_test_dir = os.path.join(work_space_dir, "test/")
if not os.path.isdir(yolov5_test_dir):os.mkdir(yolov5_test_dir)
clear_hidden_files(yolov5_test_dir)yolov5_images_test_dir = os.path.join(yolov5_test_dir, "images/")
if not os.path.isdir(yolov5_images_test_dir):os.mkdir(yolov5_images_test_dir)
clear_hidden_files(yolov5_images_test_dir)yolov5_labels_test_dir = os.path.join(yolov5_test_dir, "labels/")
if not os.path.isdir(yolov5_labels_test_dir):os.mkdir(yolov5_labels_test_dir)
clear_hidden_files(yolov5_labels_test_dir)train_file = open(os.path.join(wd, "yolov5_train.txt"), 'w', encoding='utf-8')
valid_file = open(os.path.join(wd, "yolov5_valid.txt"), 'w', encoding='utf-8')
test_file = open(os.path.join(wd, "yolov5_test.txt"), 'w', encoding='utf-8')list_imgs = os.listdir(image_dir) # list image files
print("数据集: %d个" % len(list_imgs))for i in range(0, len(list_imgs)):path = os.path.join(image_dir, list_imgs[i])if os.path.isfile(path):image_path = image_dir + list_imgs[i](nameWithoutExtention, extention) = os.path.splitext(os.path.basename(image_path))annotation_name = nameWithoutExtention + '.xml'annotation_path = os.path.join(annotation_dir, annotation_name)label_name = nameWithoutExtention + '.txt'label_path = os.path.join(yolo_labels_dir, label_name)prob = random.randint(1, 100)print("Probability: %d" % prob, i, list_imgs[i])if os.path.exists(annotation_path):if prob < TRAIN_RATIO:# train datasettrain_file.write(image_path + '\n')convert_annotation(nameWithoutExtention) # convert labelcopyfile(image_path, yolov5_images_train_dir + list_imgs[i])copyfile(label_path, yolov5_labels_train_dir + label_name)elif prob < TRAIN_RATIO + VALID_RATIO:# validation datasetvalid_file.write(image_path + '\n')convert_annotation(nameWithoutExtention) # convert labelcopyfile(image_path, yolov5_images_valid_dir + list_imgs[i])copyfile(label_path, yolov5_labels_valid_dir + label_name)else:# test datasettest_file.write(image_path + '\n')convert_annotation(nameWithoutExtention) # convert labelcopyfile(image_path, yolov5_images_test_dir + list_imgs[i])copyfile(label_path, yolov5_labels_test_dir + label_name)train_file.close()
valid_file.close()
test_file.close()本文系统梳理并实现了基于 YOLOv 的目标检测训练数据构建全流程,涵盖了图像采集、标注、划分与增强等关键环节。通过对数据集进行标准化处理与增强优化,有效提升了模型对复杂场景的适应能力。本研究构建的数据集结构清晰、格式统一,能够直接适配 YOLOv8 等主流目标检测框架,具有良好的可扩展性和工程实用性。未来将进一步探索自动标注、多模态数据融合以及更高效的增强策略,以提升数据集质量与模型训练效率,推动目标检测技术在工业、安防、遥感等领域的广泛应用。