改造thinkphp6的命令行工具和分批次导出大量数据
文章目录
- 基本用法
- 传入参数
- addArgument
- addOption
- 参数提示
- 导出数据示例
- 准备工作
- 执行导出
基本用法
在thinkphp6框架中,自带了命令行工具,通过配置 config/console.php ,添加自定义的命令:
return ['commands' => [//...//新增的自定义命令...'ExportCustomerData' => 'app\command\export\ExportCustomerData',],
];
然后在框架的app\command\export目录下新增ExportCustomerData.php文件:
<?phpnamespace app\command\export;use think\console\Input;
use think\console\Output;class ExportCustomerData extends Command
{protected function configure(){$this->setName('ExportCustomerData')->setDescription('客户数据导出');}protected function execute(Input $input, Output $output){echo "导出客户数据脚本开始执行...\n";}
}
然后,在项目根目录下执行 php think ExportCustomerData 即可运行此任务:

传入参数
addArgument
接下来,通过传入一些自定义参数,来定制化这个脚本。修改代码如下:
class ExportCustomerData extends Command
{protected function configure(){$this->setName('ExportCustomerData')->addArgument('operate', Argument::REQUIRED, '操作类型: export/merge')->addArgument('customer_id', Argument::OPTIONAL, '客户ID')->setDescription('客户数据导出');}protected function execute(Input $input, Output $output){$args = $input->getArguments();P($args); //备注:P()方法:自定义的一个打印数据的方法:print_r()的简写。$operate = $input->getArgument('operate');$customer_id = $input->getArgument('customer_id');P('operate: ' . $operate);P('customer_id: ' . $customer_id);echo "导出客户数据脚本开始执行...\n";}
}
这样,运行任务的时候就可以自定义两个参数了,一个是必传参数,另一个是非必传参数。
执行 php think ExportCustomerData export 123

addOption
上面通过addArgument 形式传入的参数,使用getArgument()方法会按照传入顺序依次获取,有的时候我们希望能按照自定义的参数名称获取,需要改为 addOption,写法如下:
class ExportCustomerData extends Command
{protected function configure(){$this->setName('ExportCustomerData')->addArgument('operate', Argument::REQUIRED, '操作类型: export/merge')->addOption('customer_id', null,Argument::OPTIONAL, '客户ID')->addOption('customer_name', null,Argument::OPTIONAL, '客户姓名')->setDescription('客户数据导出');}protected function execute(Input $input, Output $output){$options = $input->getOptions();P($options);$customer_id = $input->getOption('customer_id');$customer_name = $input->getOption('customer_name');P('customer_id: ' . $customer_id);P('customer_name: ' . $customer_name);echo "导出客户数据脚本开始执行...\n";}
}
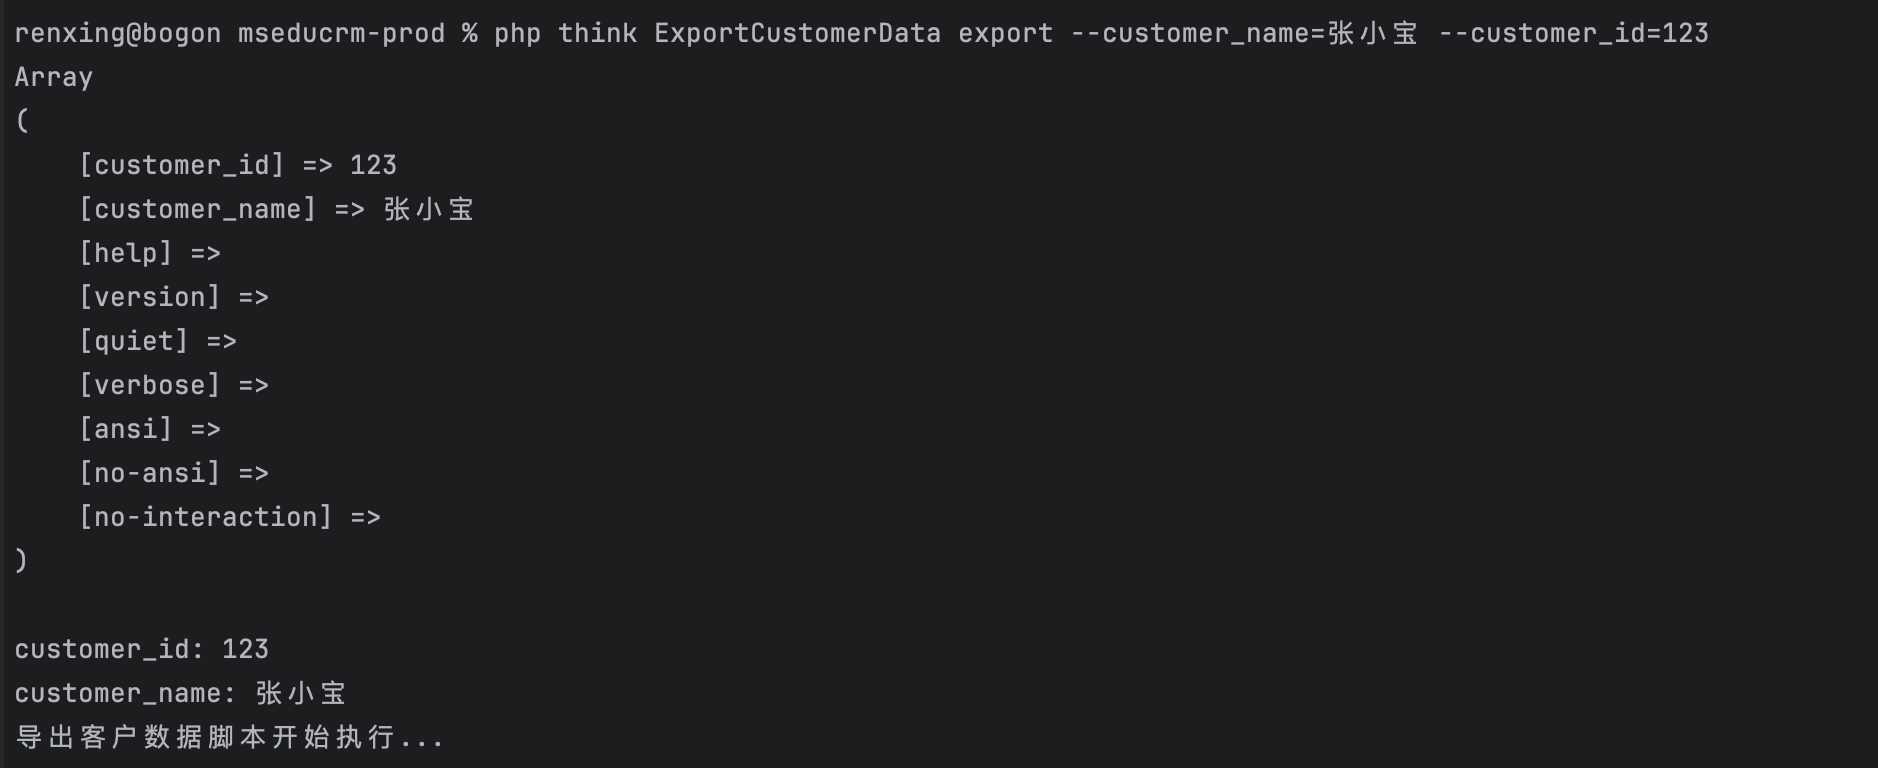
这样的写法,运行的时候可以不用按照顺序传参,自定义参数名称和参数值。
执行:php think ExportCustomerData export --customer_name=张小宝 --customer_id=123
参数提示
接下来,定制化一些工具,我想在执行每个任务的时候,友好的提示我具体应该传递哪些参数,以及参数的说明。由于所有的命令行代码都是继承自vendor/topthink/framework/src/think/console/Command.php,现在我们添加一个中间类,用来覆写父类的一些方法。
新增 app/command/BaseCommand.php ,继承 think\console\Command,然后写入如下内容:
<?phpnamespace app\command;use think\console\Command;
use think\console\Input;
use think\console\input\Argument;class BaseCommand extends Command
{private $description = ''; //任务描述private $argumentsData = []; //命令行参数数组argumentsprivate $optionsData = []; //命令行参数数组optionspublic function __construct(){try {//继承父类的构造函数parent::__construct();} catch (\Exception|\Error $e) {ApiReturn::retError($e);}}/*** 覆盖父类addArgument方法,增加自定义逻辑* @param string $name* @param int|null $mode* @param string $description* @param $default* @return BaseCommand*/public function addArgument(string $name, int $mode = null, string $description = '', $default = null){$this->argumentsData[] = ['name' => $name,'mode' => $mode,'description' => $description,];return parent::addArgument($name, $mode, $description, $default);}/*** 覆盖父类addOption方法,增加自定义逻辑* @param string $name* @param string|null $shortcut* @param int|null $mode* @param string $description* @param $default* @return BaseCommand*/public function addOption(string $name, ?string $shortcut = NULL, ?int $mode = NULL, string $description = '', $default = NULL){$this->optionsData[] = ['name' => $name,'mode' => $mode,'description' => $description,];return parent::addOption($name, $shortcut, $mode, $description, $default);}/*** 覆盖父类setDescription方法,增加自定义逻辑* @param string $description* @return BaseCommand*/public function setDescription(string $description){$this->description = $description;return parent::setDescription($description);}/*** 输出 addArgument 自定义的参数,用于执行的时候在命令行提示* @return void*/protected function outputArgumentNotice(){$argv = $_SERVER["argv"];if (count($argv) > 1) {$str = "";$str .= "---------------------------------------------------- \n";$str .= "任务描述: " . $this->description . " \n";foreach ($this->argumentsData as $k => $v) {$num = $k + 1;$mode_text = $v['mode'] == 1 ? '必传参数' : '可选参数';$str .= "参数{$num}: {$v['name']} | {$mode_text} | {$v['description']} \n";}foreach ($this->optionsData as $k => $v) {$str .= "option参数: --{$v['name']}=xxx | {$v['description']} \n";}$str .= "---------------------------------------------------- \n";echo $str;}}}
在这个类文件中覆盖了父类的addArgument和addOption方法,并且自定义了一个outputArgumentNotice方法,用来输出自定义的参数说明。
然后,在我们的任务文件中,改为继承BaseCommand类,并且添加 $this->outputArgumentNotice();就可以每次运行的时候输出参数说明。
<?phpnamespace app\command\export;use app\command\BaseCommand;
use think\console\Input;
use think\console\input\Argument;
use think\console\Output;class ExportCustomerData extends BaseCommand //改为继承BaseCommand类
{protected function configure(){$this->setName('ExportCustomerData')->addArgument('operate', Argument::REQUIRED, '操作类型: export/merge')->addOption('customer_id', null,Argument::OPTIONAL, '客户ID')->addOption('customer_name', null,Argument::OPTIONAL, '客户姓名')->setDescription('客户数据导出');$this->outputArgumentNotice(); //输出参数说明}
}
运行效果:
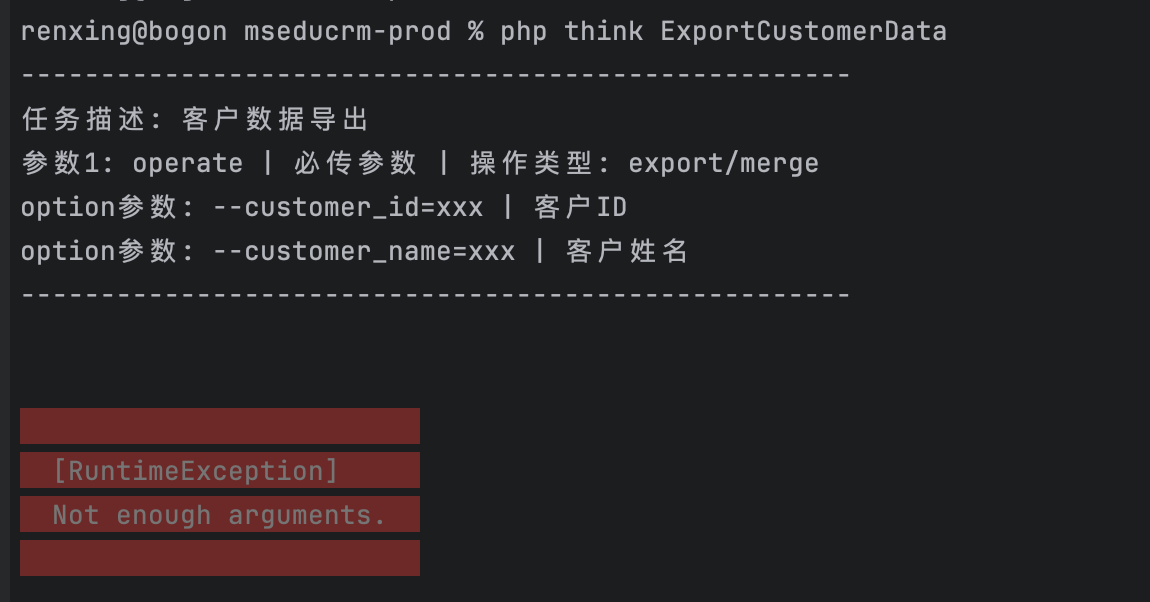
这样一来,执行这个任务的时候,就可以清晰的看到应该传递哪些参数了。
导出数据示例
接下来,从实际业务出发, 假设我要导出大量的客户数据,并且脚本执行时间较长,通过分批次循环导出多个Excel文件,然后使用工具对导出的多个文件合并,实现大文件耗时较长的导出操作。
准备工作
由于数据量较大,需要先查询出总数,然后自定义拆分的批次,计算每一批次导出的数据id的范围。
先封装基本的业务代码块,这里根据传入的operate参数判断执行哪一类操作prepare/export/merge,当前需要进行准备工作,还需要传入一个batch_size的参数,用来计算把这批数据拆分为多少批次处理。
代码改动如下:
class ExportCustomerData extends BaseCommand
{protected $task_name = 'ExportCustomer';protected $task_desc = '客户数据导出';protected function configure(){$this->setName($this->task_name)->addArgument('operate', Argument::REQUIRED, '操作类型: prepare/export/merge')->addOption('batch_size', null, Argument::OPTIONAL, '分批次导出拆分的批次,用于计算start_data_id和end_data_id;比如:计划分为3批导出,就传3')->setDescription($this->task_desc);$this->outputArgumentNotice();}protected function execute(Input $input, Output $output){$operate = $input->getArgument('operate');if ($operate == 'prepare') {  //准备工作$this->executePrepare($input, $output);} elseif ($operate == 'export') {  //导出$this->executeExport($input, $output);} elseif ($operate == 'merge') {  //合并$this->executeMerge($input, $output);} else {P("operate参数传值错误,请查看使用说明");exit;}}// 准备工作protected function executePrepare(Input $input, Output $output){}
}
然后在 executePrepare 这个方法块中,计算start_data_id(起始的数据id)和end_data_id(结束的数据id) ,需要注意:数据表中的自增ID有可能不是连续的。
protected function executePrepare(Input $input, Output $output)
{$batch_size = $input->getOption('batch_size');$base_where = [['type', '<>', 3],];if (empty($batch_size)) {P('现在要开始计算start_data_id(起始的数据id)和end_data_id(结束的数据id),需要手动传入 "--batch_size=xxx(拆分的批次)" 用来计算这两个参数');exit;}//计算批次$total_count = Customer::where($base_where)->count();$batch_limit = ceil($total_count / $batch_size);P("数据总数{$total_count},分为{$batch_size}批次处理,每批次处理{$batch_limit}条数据");$batch_data_ids = []; //获取分批次的每一批次的id$last_id = 0; // 上一批次最后的 id,作为下一批次的起始点$check_sql = [];$check_batch_count = [];$loop_index = 1;do {// 查询当前批次的数据 id(跳过 type = 3)$data_ids = Customer::where($base_where)->where([['id', '>', $last_id], // 大于上一批次的最后一个 id])->order('id', 'asc')->limit($batch_limit)->column('id');// 打印当前 SQL 调试(可选)// P(Customer::getLastSql());if (!empty($data_ids)) {$min_id = $data_ids[0];$max_id = end($data_ids);$batch_data_ids[] = implode(',', [$min_id, $max_id]);$_item_check_count = Customer::where($base_where)->where([['id', '>=', $min_id],['id', '<=', $max_id],])->count();$check_batch_count[] = $_item_check_count;$check_sql[] = "[第{$loop_index}批次]" . Customer::sql() . "; 总数:{$_item_check_count}";$loop_index++;$last_id = $max_id; // 更新 last_id 为当前批次最大 id} else {$last_id = 0; // 结束循环}} while (!empty($data_ids));$_check_all_count = Customer::where($base_where)->count();$check_sql[] = "[查询总数]" . Customer::sql() . "; 总数:{$_check_all_count}";P("根据目前导出数据的情况,每批次处理{$batch_limit}条数据,已计算的批次如下:\n" . implode(' | ', $batch_data_ids));P("验证结果的SQL如下,请执行验证一下总数是否正确:");P(implode("\n", $check_sql));P("[验证结果] 所有批次的总数相加的结果:" . array_sum($check_batch_count) . "; 和验证的总数 {$_check_all_count} 是否相等?");var_dump(array_sum($check_batch_count) == $_check_all_count);exit;
}
以上方法不必再赘述讲解,现在我准备分为5批次分别执行,先来运行一下看看效果:
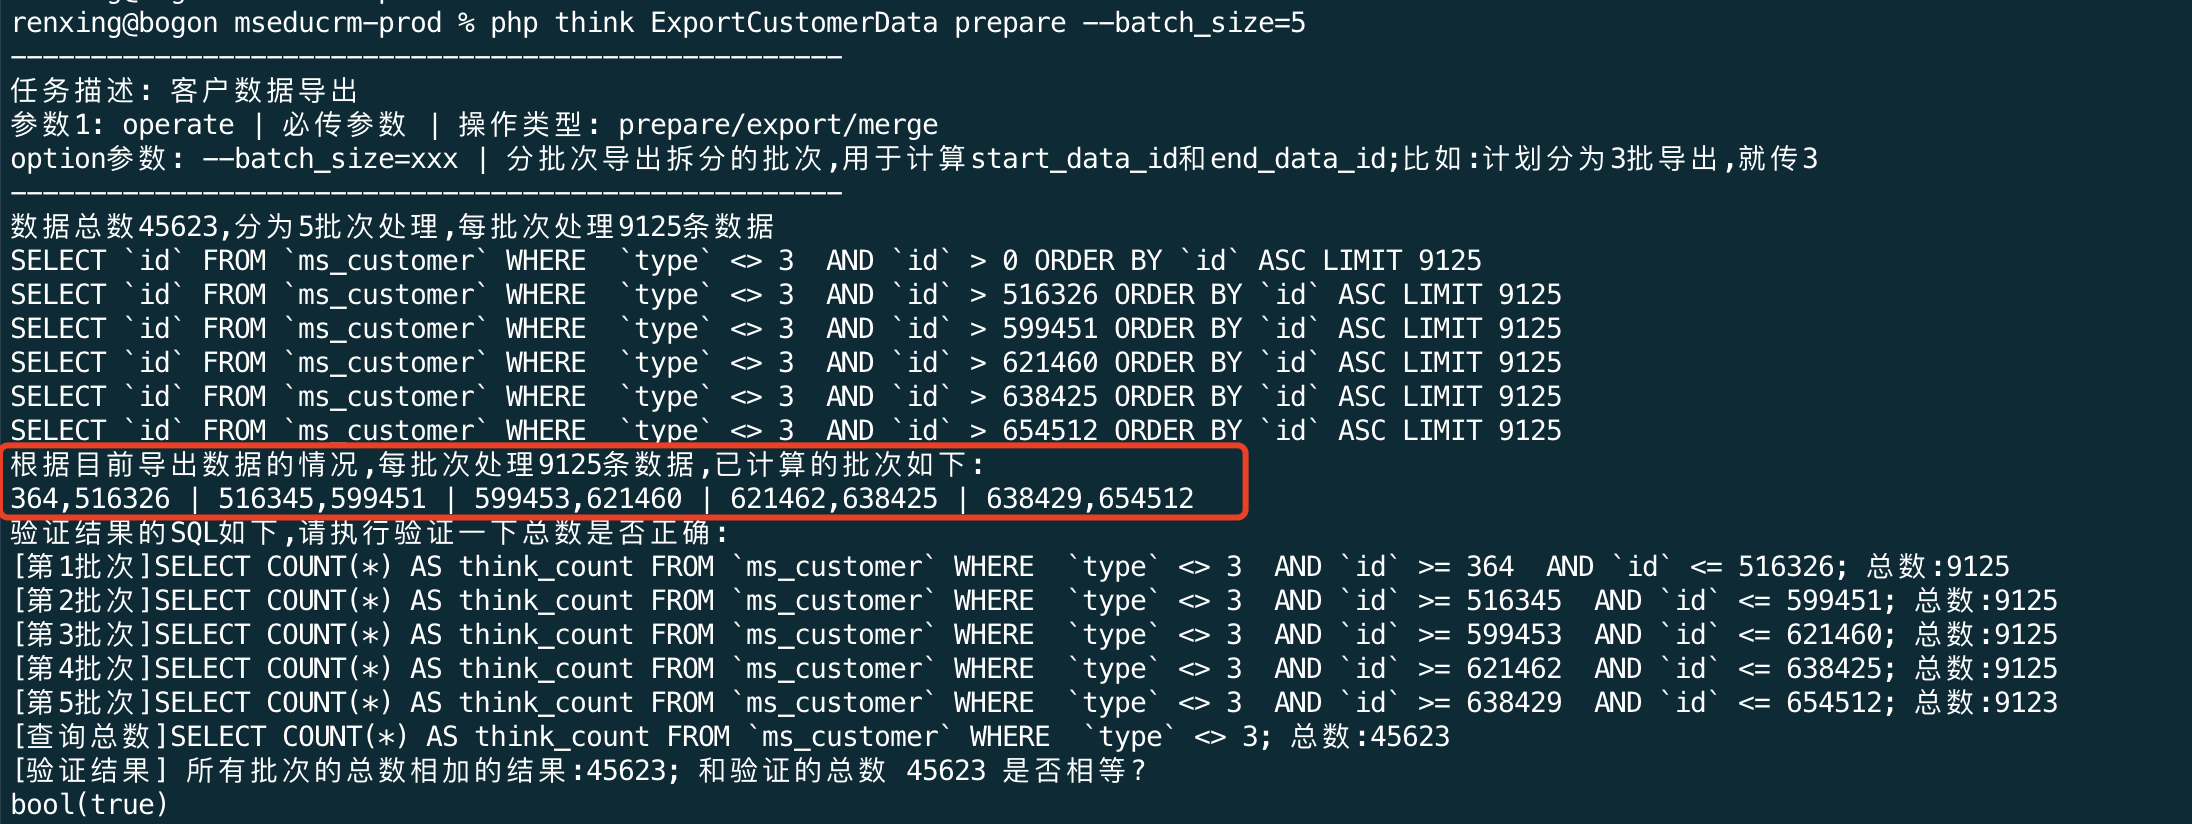
现在,已经得出了计算的批次如下:364,516326 | 516345,599451 | 599453,621460 | 621462,638425 | 638429,654512
也就是说,我可以启动5个进程,分别开始导出这些id区间的数据了,它们可以并发执行,能够节省导出的时间。但仍需注意服务器和数据库的配置能否扛得住这些批次同时执行。
执行导出
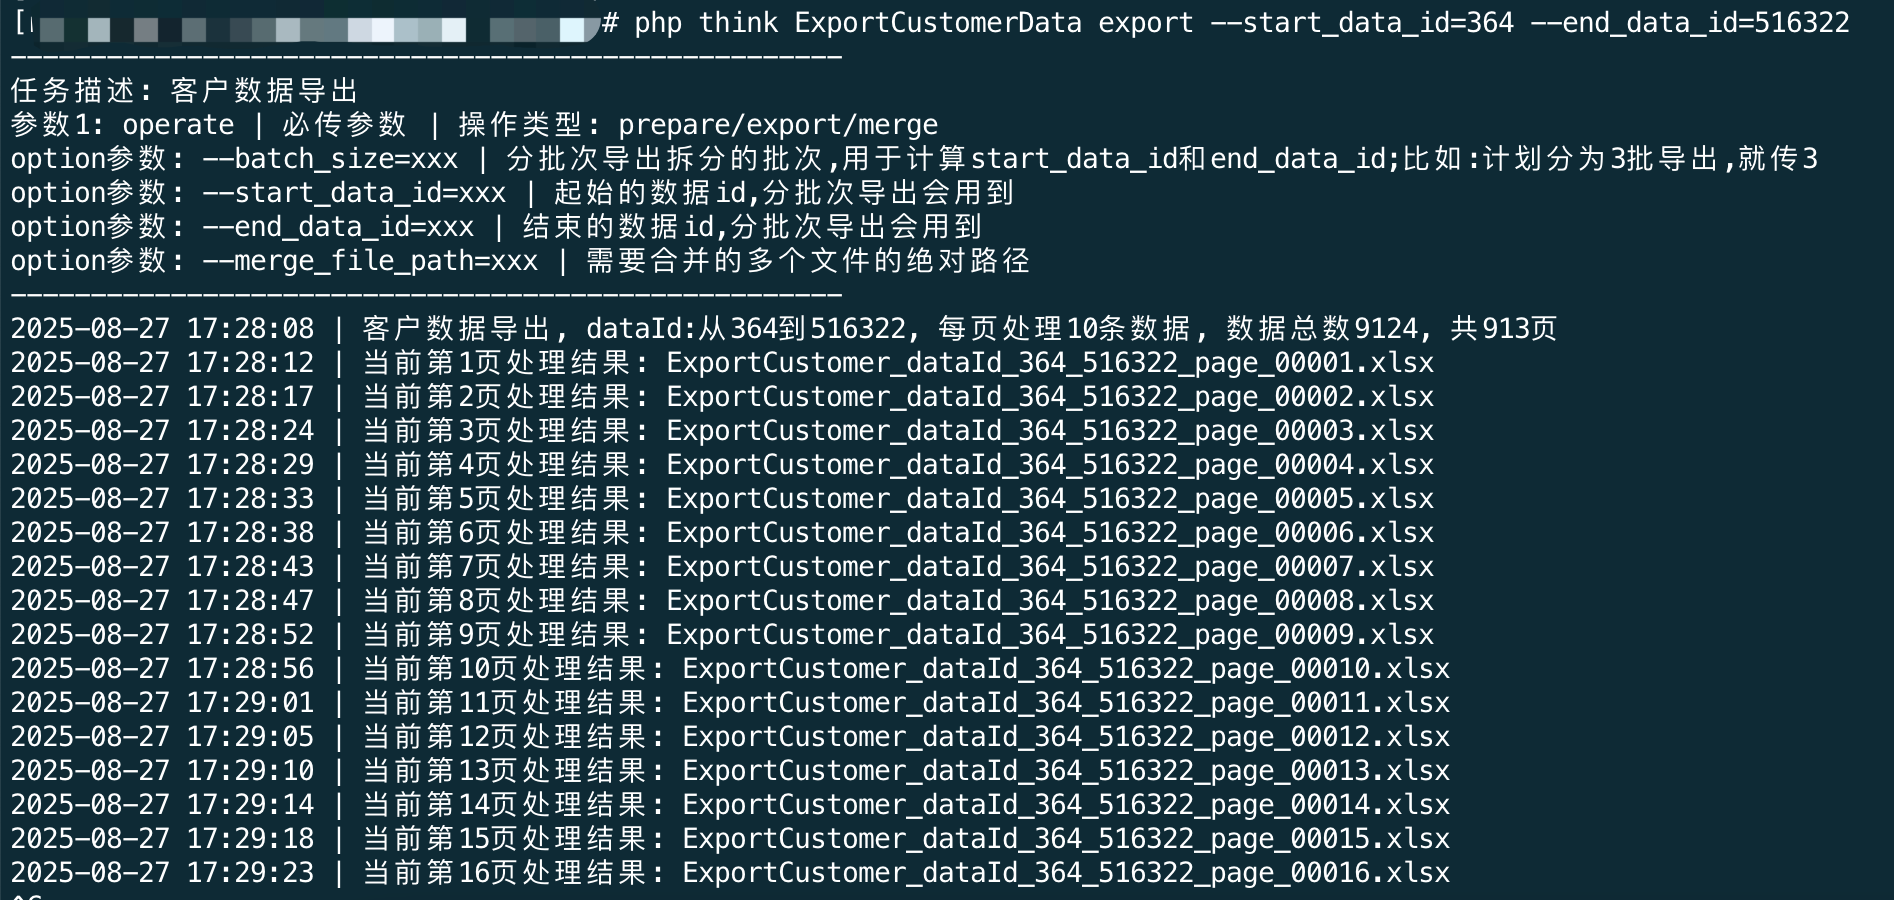
接下来,编写executeExport的方法块,实现循环分页查询数据并导出到多个Excel文件。代码如下:
// 执行导出逻辑
protected function executeExport(Input $input, Output $output)
{$start_data_id = $input->getOption('start_data_id');$end_data_id = $input->getOption('end_data_id');if (empty($start_data_id) || empty($end_data_id)) {P('分批次导出,需要手动传入 "--start_data_id=xxx(起始的数据id)" 和 "--end_data_id=xxx(结束的数据id)" ');exit;}$this->start_data_id = $start_data_id;$this->end_data_id = $end_data_id;$this->time = date("Ymd_His", time());$notice_staff_qw_uid = Staff::where(['id' => $this->staff_id])->value('qywx_userid');try {//获取总数,计算总页数$page_size = 10; //每页处理多少条数据,为了方便调试,这里先写的小一点,生产环境下可以改为100或者更大值$count = 999999; //这里改为你的查询逻辑 todo$total_page = ceil($count / $page_size);$prefix_msg = $this->task_desc . ", dataId:从{$this->start_data_id}到{$this->end_data_id}, 每页处理{$page_size}条数据, 数据总数{$count}, 共{$total_page}页 ";P(echoDate() . ' | ' . $prefix_msg);//发送企微消息$notice_size = 5; //每隔多少页给企微发送一次进度提醒,为了方便调试,这里先写的小一点,生产环境下可以改为50或者更大值QwMessage::init()->sendMarkDown($notice_staff_qw_uid, echoDate() . '| ' . $prefix_msg . "; 接下来,每隔{$notice_size}页会发送一次企微通知进度.");//分页,循环处理数据$first_page = 1; //从第几页开始for ($page = $first_page; $page <= $total_page; $page++) {try {$res = $this->_handleDataList($page, $page_size);//$notice_msg = echoDate() . ' | ' . $prefix_msg . " | 当前第{$page}页处理结果: " . $res;$notice_msg = echoDate() . " | 当前第{$page}页处理结果: " . $res;} catch (\Exception $for_e) {//循环内当前页的异常情况处理MyLog::writeExceptionLog($for_e, "{$this->task_name}_dataId_{$this->start_data_id}_{$this->end_data_id}_page_{$page}");$notice_msg = echoDate() . ' | ' . $prefix_msg . " | 当前第{$page}页处理结果出现异常: " . $for_e->getMessage();QwMessage::init()->sendMarkDown($notice_staff_qw_uid, $notice_msg);}//每一页处理完后打印结果,并根据$notice_size判断是否发送企微进度P($notice_msg);if ($page % $notice_size == 0) {QwMessage::init()->sendMarkDown($notice_staff_qw_uid, $notice_msg);}sleep(3);}$notice_msg = echoDate() . ' | ' . $prefix_msg . " | 全部导出完成";QwMessage::init()->sendMarkDown($notice_staff_qw_uid, $notice_msg);} catch (\Exception $e) {//整体异常情况处理$notice_msg = echoDate() . ' | ' . $this->task_desc . ": 出现异常,已终止,详情请查看log.异常信息:" . $e->getMessage();QwMessage::init()->sendMarkDown($notice_staff_qw_uid, $notice_msg);MyLog::printExceptionLogAndExit($e);}
}
运行效果:
同时收到的企业微信的消息提醒:
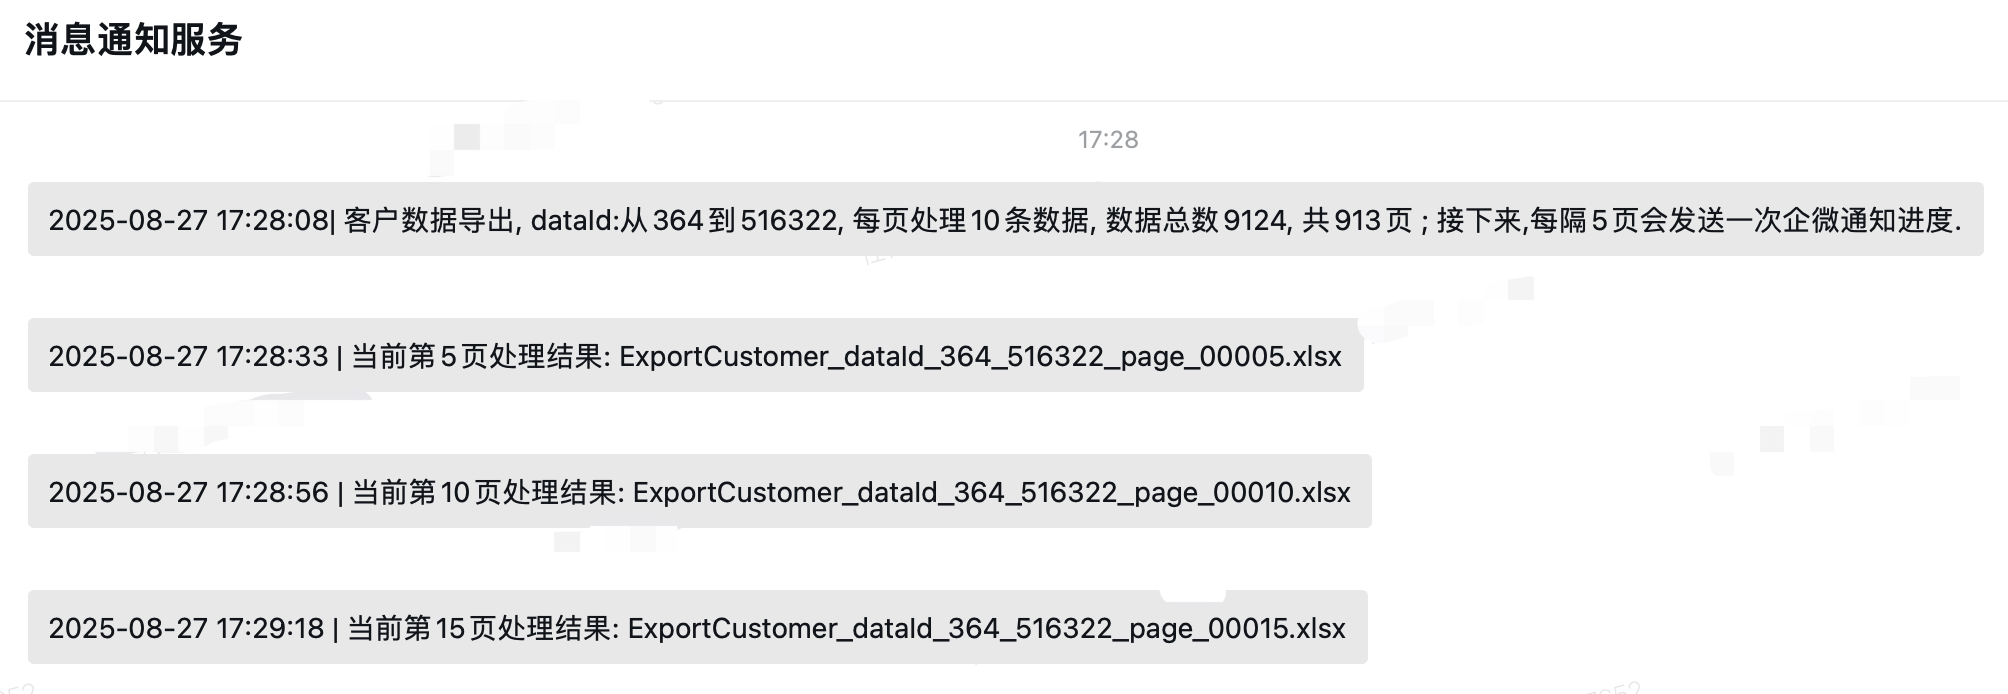
其实,也可以不用这么麻烦,如果有消息队列的话,根据查询出来的总数,分批次写入到消息队列中,也可以实现并发执行。这里只是分享一种解决问题的思路,在不引入消息队列的情况下,实现分批次导出大量耗时长的数据。
后续,再将导出的多个小文件合并成一个完成的Excel文件即可。这部分我之前使用Go语言实现了这个功能,感兴趣的话,可以参考这里:使用Go语言的gorm框架查询数据库并分页导出到Excel实例_go语言 gorm 输出列表-CSDN博客
以上代码源文件我放到了我的gitee仓库里面,可以参考:
https://gitee.com/rxbook/rx-php-box/blob/master/app/command/export/ExportCustomerData.php