使用tensorRT8部署yolov8/11目标检测模型(1)
本文基于实际项目的使用经验,优化了原本的代码的文件结构,使得最新的部署代码可以更加方便的嵌入到不同的项目,同时优化的代码也变得更加鲁棒。由于不同项目使用的部署框架的版本不一致,本文使用tensorRT8的接口完成yolov8和yolo11的目标检测模型部署任务。
实现部署的技术路线是:
pt-->onnx-->engine
本文的部署代码主要实现yolo检测系列模型的图像预处理工作,使用tensorRT8推理框架实现图像数据的接收,处理和输出的整个过程。
YOLOv8模型的数据输入格式[n,c,h,w];模型输出格式[n,num_class+4,num_anchors];
n:输入检测图像的个数;
num_anchors:三个尺度特诊图的特征点的个数,比如输入的图像大小是640*640,yolov8模型分为三个尺度的特征图分别降采样为原本图像的1/8、1/16、1/32,对应的特征图的大小为80*80,40*40,20*20,num_anchors数量就是此时的80*80+40*40+20*20=8400;当然,如果模型的输入的尺寸变小,这个数据也会对应变小;
num_class+4:分别表示检测目标的中心点坐标宽高(x,y,w,h)+检测的类别的个数。
高维度数据在计算机中间也是线性存储的,为了模型后处理代码取数据更加高效,这里需要转换模型的输出头数据结构,即[n,num_class+4,num_anchors]-->[n,num_anchors,num_class+4];
这里使用onnx.helper修改模型的输出类型结构,代码如下:
import onnx
import onnx.helper as helper
import sys
import osdef main():if len(sys.argv) < 2:print("Usage:\n python v8trans.py yolov8n.onnx")return 1file = sys.argv[1]if not os.path.exists(file):print(f"Not exist path: {file}")return 1prefix, suffix = os.path.splitext(file)dst = prefix + ".transd" + suffixmodel = onnx.load(file)node  = model.graph.node[-1]old_output = node.output[0]node.output[0] = "pre_transpose"for specout in model.graph.output:if specout.name == old_output:shape0 = specout.type.tensor_type.shape.dim[0]shape1 = specout.type.tensor_type.shape.dim[1]shape2 = specout.type.tensor_type.shape.dim[2]new_out = helper.make_tensor_value_info(specout.name,specout.type.tensor_type.elem_type,[0, 0, 0])new_out.type.tensor_type.shape.dim[0].CopyFrom(shape0)new_out.type.tensor_type.shape.dim[2].CopyFrom(shape1)new_out.type.tensor_type.shape.dim[1].CopyFrom(shape2)specout.CopyFrom(new_out)model.graph.node.append(helper.make_node("Transpose", ["pre_transpose"], [old_output], perm=[0, 2, 1]))print(f"Model save to {dst}")onnx.save(model, dst)return 0if __name__ == "__main__":sys.exit(main())
该代码实现模型的输出头数据维度的转换,新增加一个trans的模型算子,可以在tensorRT中间加速这个数据转化,提升性能。
对于模型的优化推理,在不改变原始检测模型架构的情况下。增加推理速度的最有效的方法就是改变图像的输入尺寸。正常模型的检测推理都是方形的输入,根据实际的业务需求,可以调整模型的输入大小为矩形(需要注意矩形的边长都必须是32的整数倍),对应于模型的输出大小也发生变化,后处理过程需要编列的数量随之变化。
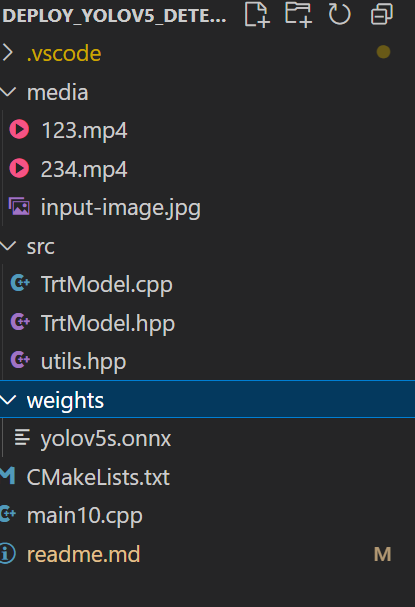
话不多说,直接上代码,部署代码分为三个文件utils.hpp文件、Trtmodel.hpp文件Trtmodel.cpp文件。
文件夹的组织如下:

utils.hpp代码如下,单独在utils.hpp文件中定义检测目标的数据信息更加方便在其他项目直接使用;
#ifndef UTILS_HPP
#define UTILS_HPP#include <opencv2/opencv.hpp>
#include <cuda_runtime.h>
#include <cassert>
#include <iostream>
#include <memory>#ifndef CUDA_CHECK
#define CUDA_CHECK(call)                                                                  \do {                                                                                  \cudaError_t err__ = (call);                                                       \if (err__ != cudaSuccess) {                                                       \std::cerr << "CUDA error [" << static_cast<int>(err__) << "] "                \<< cudaGetErrorString(err__) << " at " << __FILE__                  \<< ":" << __LINE__ << std::endl;                                    \assert(false);                                                                \}                                                                                 \} while (0)
#endif// 管理 TensorRT/NV 对象:调用 p->destroy()
template<typename T>
inline std::shared_ptr<T> make_nvshared(T* ptr){return std::shared_ptr<T>(ptr, [](T* p){ if(p) p->destroy(); });
}/*-------------------------- YOLOV5_DETECT --------------------------*/
struct detectRes {int label { -1 };float confidence { 0.f };cv::Rect box {};cv::Scalar box_color {};
};
/*-------------------------- END YOLOV5_DETECT ----------------------*/#endif // UTILS_HPP
把检测推理的代码封装一个类,重点在于图像预处理,后处理,使用tensorRT推理框架的数据流动的数据内存处理。
模型推理的类头TrtModel.hpp文件的定义如下:
#ifndef TRTMODEL_HPP
#define TRTMODEL_HPP#include <NvInfer.h>
#include <NvOnnxParser.h>
#include "logger.h"
#include "common.h"
#include <fstream>
#include <iostream>
#include <vector>
#include <string>
#include <random>
#include <cuda_runtime_api.h>
#include <unordered_map>#include "utils.hpp"
// #include "TrtLogger.hpp"class TrtModel
{
public:TrtModel(std::string onnxfilepath, bool fp16); ~TrtModel(); /*使用默认析构函数*/std::vector<detectRes> detect_postprocess(cv::Mat& frame); void det_drawResult(cv::Mat& image, const std::vector<detectRes>& outputs);private:bool genEngine(); 