Linux之Ansible自动化运维(二)
一、ansible Playbook应用
由于服务器数量很多,配置信息比较多,因此可以利用Ansible Playbook编写任务自动化与流程化脚本
Playbook 由一个或多个play组成的列表,play的主要功能Ansible中Task定义好的角色,指定剧本对应的服务器组
二、Ansible实战演练
yaml语法特点
Ansible Playbook可以收集命令、可以创建多个任务集,Playbook采用YAML语法结构
YAML语言特性:可读性强、脚本语言交互性好、实现语言的数据类型、信息模型、易于实现,可扩展性强
ansible-playbook组件
Target 						定义playbook的远程主机组;
Variable 					    定义playbook使用的变量;
Task  						定义远程主机上执行的任务列表;
Handler 					    定义task执行完成以后需要调用的任务,例如配置文件被改动,则启动handler任务重启相关联的服务。
ansible批量创建用户
- hosts: allremote_user: roottasks:- name: create useruser: name={{item}} state=presentwith_items:- halo1- halo2- halo3- halo4
nginx之v1版本中play-book剧本
使用了taget模块、task模块构建
## 创建剧本文件
touch install_nginx.yaml ## 编写剧本
#!/bin/bash
#2025年8月20日10:14:06
# auto install nginx web
# by author www.hxd666.com
- hosts: 192.168.101.7remote_user: roottasks:- name: download_nginxshell: wget -c http://nginx.org//download/nginx-1.26.1.tar.gz -P /usr/src/- name: extract nginx softwareshell: cd /usr/src/;tar -xzf nginx.1.26.1.tar.gz- name: install gcc and pcre-develyum: name=gcc,pcre-devel,zlib-devel state=install- name: install nginxshell: cd /usr/src/nginx.1.26.1/;./confirgure;make;make install- name: start nginxshell: /usr/local/nginx/sbin/nginx## 启动剧本
[root@localhost ~]# ansible-playbook install_nginx.yaml
nginx之v2版本中play-book剧本
优化了版本v1模块,如涉及到了版本handler模块处理,判断了是否已经安装nginx模块
notify模块前写执行条件,后面写执行哪些模块,并指明顺序,而handler模块后面写task模块任务板块内容
- hosts: 192.168.101.7remote_user: roottasks:- name: nginx server installfile: path=/usr/local/nginx state=directorynotify:- download_nginx- extract nginx- install tools- install_nginx- start nginxhandlers:- name: download_nginxshell: wget "http://nginx.org/download/nginx-1.26.1.tar.gz" -P /usr/src- name: extract nginxshell: cd /usr/src;tar -zxf nginx-1.26.1.tar.gz- name: install toolsyum: name=pcre,pcre-devel,zlib-devel state=installed- name: install_nginxshell: cd /usr/src/nginx-1.26.1; ./configure;make;make install- name: start nginxshell: /usr/local/nginx/sbin/nginx
nginx之v3版本中play-book剧本
引入变量简化书写,易于观察(vars模块)
- hosts: allremote_user: rootvars:NGX_SOFT: nginx-1.26.1.tar.gzNGX_DIR: /usr/local/nginxtasks:- name: install nginx_toolsyum: name=gcc,pcre-devel,zlib-devel- name: check nginxfile: path={{ NGX_DIR }} state=directorynotify:- download nginx- extract nginx- install nginx- start nginxhandlers:- name: download nginxshell: wget http://nginx.org/download/{{ NGX_SOFT }} -P /usr/src- name: extract nginxshell: cd /usr/src;tar -zxf {{ NGX_SOFT }};- name: install nginxshell: cd /usr/src/nginx-1.26.1;./configure; make; make install;- name: start nginxshell: "{{ NGX_DIR }}/sbin/nginx"
nginx之v4版本中play-book剧本
自定义template.yaml模块,根据设置ansible主机端口管理远程机器
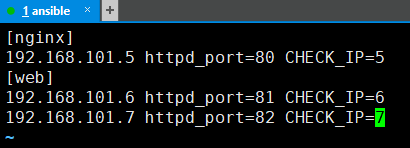
## 根据远程的ansible设置端口
[nginx]
192.168.101.5 httpd_port=80
[web]
192.168.101.6 httpd_port=81
192.168.101.7 httpd_port=82## 设置模版nginx文件,修改模版配置文件中的内容
listen {{httpd_port}}## 在ansible添加templete模块进行远程控制
template: src=/data/sh/nginx.bak dest=/usr/local/nginx/conf/nginx.conf
三、ansible配置文件和优化
ansible默认的配置文件为/etc/ansible/ansible.cfg,那么咱们下面来详细聊聊ansible各项参数,包括用户、模块路径、配置优化等
ansible配置文件
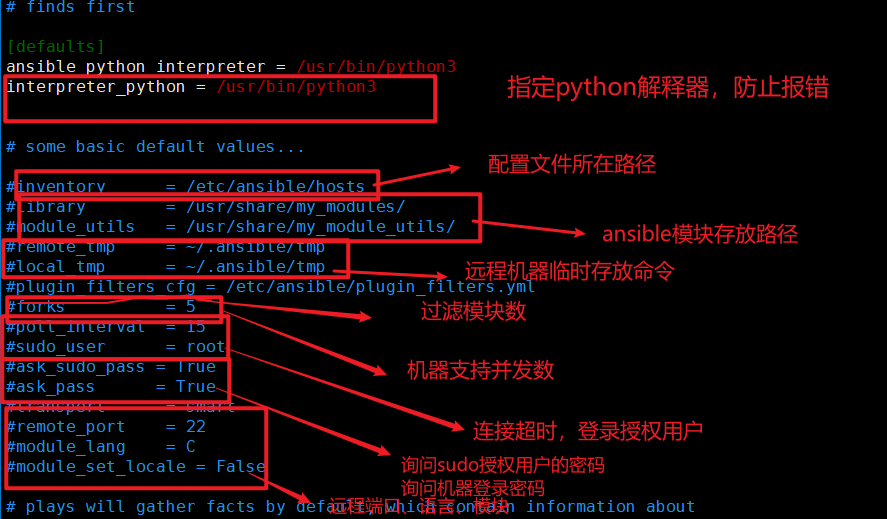
下面来看一下defaults默认配置端常见参数
[defaults] 通用默认配置段;
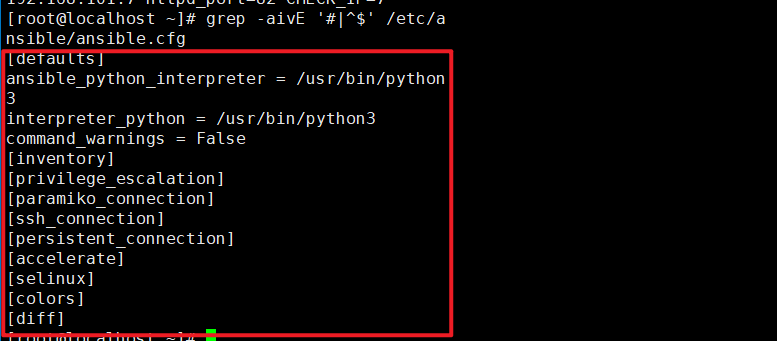
inventory = /etc/ansible/hosts 被控端IP或者DNS列表;
library = /usr/share/my_modules/ Ansible默认搜寻模块的位置;
host_key_checking = False 不检查远程主机的公钥和密钥
#sudo_exe = sudo sudo远程执行命令;
#sudo_flags = -H 传递sudo之外的参数;
timeout = 10 SSH超时时间;
remote_user = root 远程登陆用户名;

log_path = /var/log/ansible.log 日志文件存放路径;
module_name = shell Ansible命令执行默认的模块;
#executable = /bin/bash 执行的Shell环境,用户Shell模块;
#system_warnings = False 禁用系统运行ansible潜在问题警告;
#command_warnings = False command模块Ansible默认发出警告;
nocolor = 0 输出带上颜色区别,开启/关闭:0/1;
pipelining = True 开启pipe SSH通道优化;
ansible性能优化
ansible在企业环境中,随着被管理 的服务器越来越多,ansible的执行效率会越来越慢,可以通过优化openssh协议提高,提高后台管理的效率
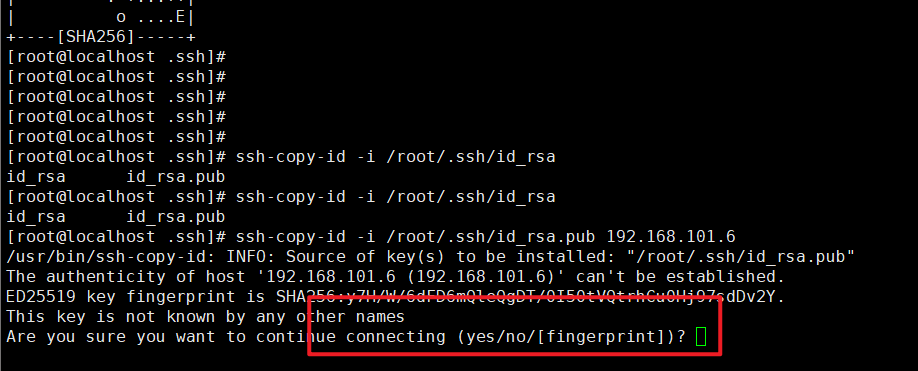
Anisble SSH关闭密钥检测
ssh 远程登录客户端,会检查客户端主机的公钥,并将公钥的情况记录在~/.ssh/know_hosts文件中,若openssh公钥不同,openssh会发出警告,而当openssh 公钥相同,则会提示输出密码
## 关闭ssh检查
host_key_checking = False
OpenSSH连接优化
使用OpenSSH服务时,默认SShd配置文件UseDNS=yes状态,该选项会导致SSH服务根据客户端的IP进行DNS PTR反向解析,得到客户端主机名,然后将根据取到的主机名进行正向DNS解析,从而验证该IP是否与原始IP一致。
sed  -i  '/^GSSAPI/s/yes/no/g;/UseDNS/d;/Protocol/aUseDNS no'
/etc/ssh/sshd_config
/etc/init.d/sshd restart
SSH pipelineing加速Ansible
SSH pipelining默认是关闭的,关闭是为了兼容不同sudo问题,主要是requiretty选项(使用sudo操作必须将其禁止)
sed -i '/^pipelining/s/False/True/g' /etc/ansible/ansible.cfgAnsible Facts缓存优化
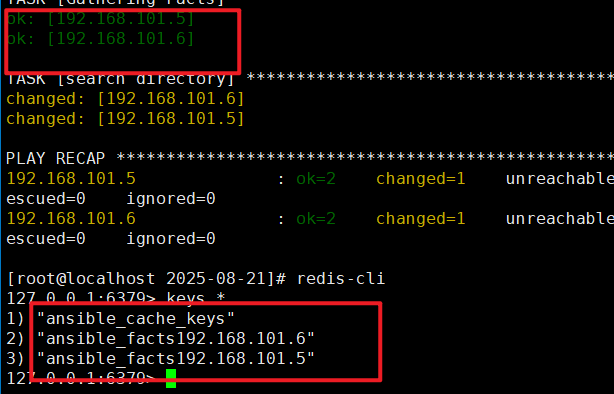
Ansible-playbook在执行过程中,默认会执行Gather facts,如果不需要获取fact基础数据(客户端IP、掩码、Mac、主机名信息),关闭之后可以加快ansible-play-book效率
gather_facts: noFacts信息可以作为Ansible Play-book变量信息进行引用,当然可以的话我们也可以考虑使用Redis存放Facts信息
- 安装Redis和Python-Redis服务中间价
## 1.部署Redis服务
wget  	http://download.redis.io/releases/redis-2.8.13.tar.gz tar  -zxf redis-2.8.13.tar.gzcd redis-2.8.13make PREFIX=/usr/local/redis  installcp redis.conf /usr/local/redis/export PATH=/usr/local/redis/bin:$PATH
source /etc/profile## 启动
nohup /usr/local/redis/bin/redis-server  /usr/local/redis/redis.conf  &## 2.安装Python-Redis模块
yum -y install python-redis- Ansible整合Redis配置
在ansible.cfg的defaults段加如下代码,如果admin有密码,则开启admin密码行
gathering = smart
fact_caching = redis
fact_caching_timeout = 86400
fact_caching_connection = localhost:6379
#fact_caching_connection = localhost:6379:0:admin
ControlPersist SSH优化(要求centos6以上高版本ssh)
ControlPersist即持久化Socket,即一次验证多次通信,并且只需要修改ssh客户端配置即可
ansible以root身份登录客户端,在机器的/root/.ssh/config(低版本用yum升级openssh)文件中加入如下代码
Host * ## 表示适用于所有主机Compression yes ## SSH连接压缩数据流ServerAliveInterval 60 ## 客户端发送心跳包时间ServerAliveCountMax 5 ## 客户端发送心跳包间隔时间ControlMaster auto ## 启用连接复用,减少断开次数ControlPath ~/.ssh/%r@%h-%p ## 开启复用的文件路径ControlPersist 4h ## 复用的持续时间