两种方法实现,本地部署Qwen-Image,并开放API服务

Qwen-Image刚开源不久,相信很多小伙伴都想把模型部署到本地进行体验,以及进一步开放API服务,用到自动程序或者智能体中去。这里介绍两个方法实现Qwen-Image的本地部署和API服务启动,分别是基于Diffusers和ComfyUI。
写在前面:由于我之前部署的都是文本生成模型,这是第一次部署图像生成模型。对于文本生成模型,如gpt-oss,常用的部署框架vllm就内置了API服务,可以很便捷地启动API,参考三步完成,A100本地vLLM部署gpt-oss,并启动远程可访问api。而Diffusers和ComfyUI都不能像vllm那样便捷的开放API服务,需要借助FastAPI进行封装,特此记录一下。
注意:Qwen-Image模型本身对prompt的安全没有审核机制。也就是说一些负面的生成指令也能完成生成,包括黄暴政歧视等。无论这是你想要的还是你想避免的,都需要注意到这一点。
ComfyUI部署API服务
ComfyUI官方已经支持Qwen-Image。对于想用webUI启动,研究qwen-image的workflow的小伙伴,可以参考这位老哥的帖子。ComfyUI本身是个基于节点的图形化工作流工具,我这里主要介绍怎么启动API服务。为了完整性,下面给出环境安装命令:
conda create -n comfyui python=3.12 -y
conda activate comfyui
git clone https://github.com/comfyanonymous/ComfyUI.git
cd ComfyUI && pip install -i https://mirrors.ustc.edu.cn/pypi/simple/ -r requirements.txt
下载模型参数,这里从魔塔下载:
# 下载模型文件
modelscope download --model Comfy-Org/Qwen-Image_ComfyUI split_files/diffusion_models/qwen_image_fp8_e4m3fn.safetensors \
--local_dir ComfyUI/models/diffusion_models/# 下载Text Encoder模型
modelscope download --model Comfy-Org/Qwen-Image_ComfyUI split_files/text_encoders/qwen_2.5_vl_7b_fp8_scaled.safetensors \
--local_dir ComfyUI/models/text_encoders/# 下载VAE模型
modelscope download --model Comfy-Org/Qwen-Image_ComfyUI split_files/vae/qwen_image_vae.safetensors --local_dir ComfyUI/models/vae/
启动ComfyUI服务:
CUDA_VISIBLE_DEVICES=2 python ComfyUI/main.py  --listen 0.0.0.0 --port 8188
CUDA_VISIBLE_DEVICES=2 nohup python ComfyUI/main.py --listen 127.0.0.1 > qwen_image_output.log 2>&1 &
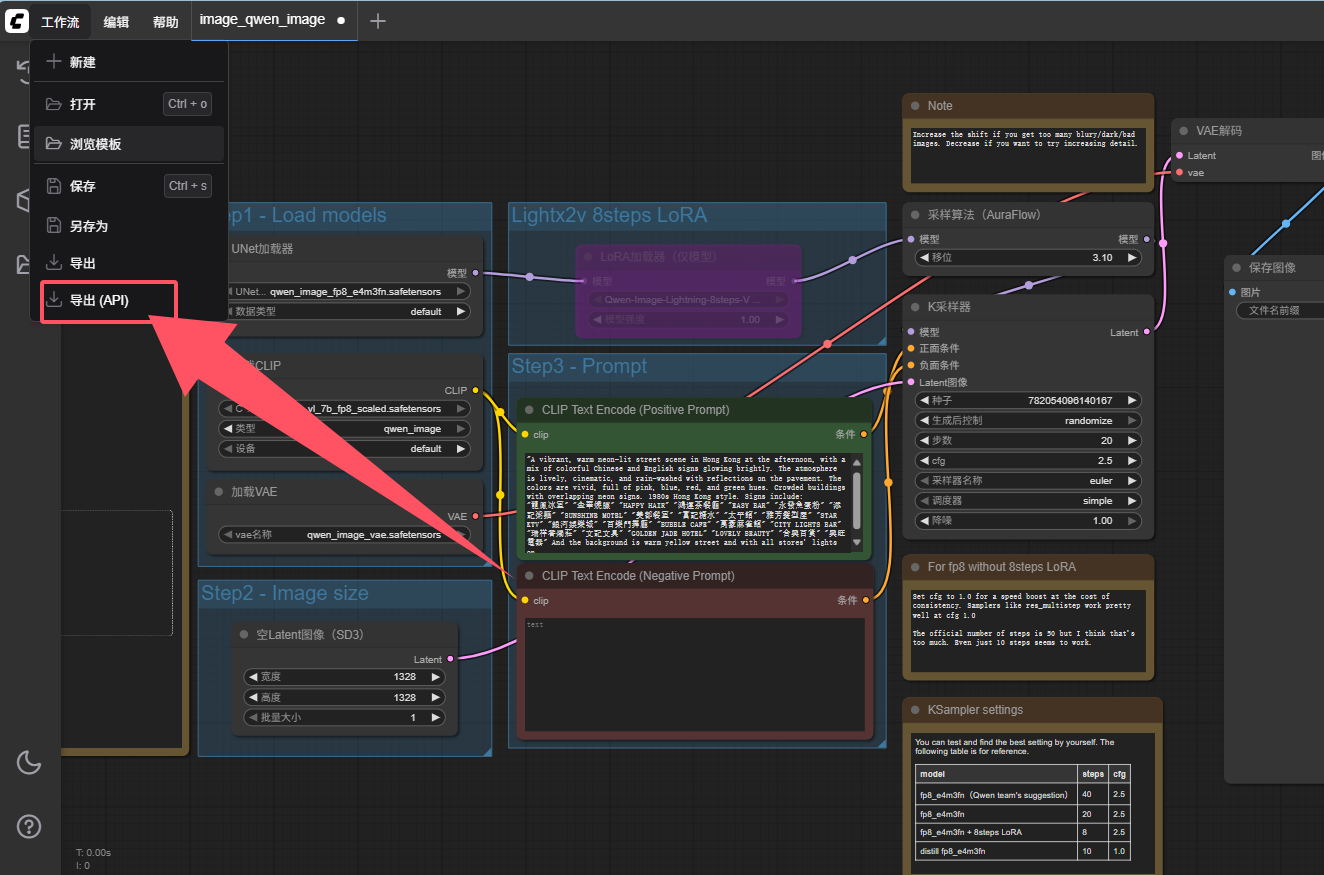
第一行是前台运行,第二行是后台运行,避免终端关闭导致服务被终止,选一个就行。到此位置,你就可以在8188端口打开webUI界面了。即使你是只想启动API,这一步也是必要的。打开webui,这一步之前可以参考上面老哥知乎的教程。你需要在webui导出api要用的工作流配置json文件(这个跟前面你导入到webui的那个json是不一样的),如下操作:
OK,现在可以启动API服务了,使用下面的python脚本,对comfyui的api进行FastAPI封装。这里最好将comfyui的服务设置为只能本机访问,开放FastAPI为远程访问即可。在上面的ComfyUI服务基础上,使用下面的脚本做FastAPI封装,将脚本命名为serve_fastapi.py:
from fastapi import FastAPI
from pydantic import BaseModel
import requests
import copy
import json
import os
import urllib.parse
import time
from fastapi import HTTPException, Header
import base64
API_KEY = "12345"# ---------------- 配置 ----------------
COMFYUI_API_URL = "http://127.0.0.1:8188"  # ComfyUI API 地址
WORKFLOW_FILE = "image_qwen_image_api.json"  # 从webui保存的workflow 文件
OUTPUT_DIR = "output_images"
POLL_INTERVAL = 1  # 秒os.makedirs(OUTPUT_DIR, exist_ok=True)# ---------------- 读取 workflow ----------------
with open(WORKFLOW_FILE, "r", encoding="utf-8") as f:base_workflow = json.load(f)# ---------------- 请求体定义 ----------------
class GenerateRequest(BaseModel):positive: strnegative: str = ""height: int = 512  # -1 表示随机width: int = 512# ---------------- FastAPI 实例 ----------------
app = FastAPI(title="ComfyUI API Server")# ---------------- 生成接口 ----------------
@app.post("/generate")
def generate(req: GenerateRequest, x_api_key: str = Header(None)):if x_api_key != API_KEY:raise HTTPException(status_code=401, detail="Invalid API Key")workflow = copy.deepcopy(base_workflow)# 替换 workflow 中的 prompt 和 seedworkflow["6"]["inputs"]["text"] = req.positiveworkflow["7"]["inputs"]["text"] = req.negative  workflow["58"]["inputs"]["width"] = req.widthworkflow["58"]["inputs"]["height"] = req.height# 提交任务到 ComfyUI APIresp = requests.post(f"{COMFYUI_API_URL}/prompt", json={"prompt": workflow})resp.raise_for_status()prompt_id = resp.json()["prompt_id"]images_base64 = []while True:history = requests.get(f"{COMFYUI_API_URL}/history/{prompt_id}").json()if prompt_id in history:outputs = history[prompt_id].get("outputs", {})for node_id, output_data in outputs.items():if "images" in output_data:for img in output_data["images"]:filename = img["filename"]subfolder = img.get("subfolder", "")filetype = img.get("type", "png")img_url = (f"{COMFYUI_API_URL}/view"f"?filename={urllib.parse.quote(filename)}"f"&subfolder={urllib.parse.quote(subfolder)}"f"&type={urllib.parse.quote(filetype)}")img_data = requests.get(img_url).content# 转成 base64 字符串img_b64 = base64.b64encode(img_data).decode("utf-8")images_base64.append(img_b64)if images_base64:breaktime.sleep(POLL_INTERVAL)return {"prompt_id": prompt_id, "images": images_base64}
这里封装的api设置了api-key,并将生成图像的以base64格式返回。其中workflow["6"]["inputs"]["text"] = req.positive即将workflow里面的一些值,开放给api,用户可以自定义。这里的workflow内容可以去看前面保存的json文件。在该py文件的目录下,使用下面的命令启动FastAPI:
uvicorn serve_fastapi:app --host 0.0.0.0 --port 9000
nohup uvicorn serve_fastapi:app --host 0.0.0.0 --port 9000 > fast_api_output.log 2>&1 &
显示Uvicorn running on http://0.0.0.0:9000代表启动成功。下面给出访问API的python示例:
import requests
import base64
from PIL import Image
from io import BytesIOheaders = {"x-api-key": "12345"}
resp = requests.post("http://127.0.0.1:9000/generate",headers=headers,json={"positive": "A cyberpunk cityscape at night, neon lights","negative": "blurry","height": 512,"width": 768}
)data = resp.json()
img_data = base64.b64decode(data["images"][0])
img = Image.open(BytesIO(img_data))
img.save("base_result.png")
print("Saved to result.png")
这里将base64返回的图像转化,并保存为png。至此,基于ComfyUI的API服务全流程完成。
Diffusers部署API服务
部署方式基于这里的官方教程,支持多GPU部署。但官方给的是网页服务,我们将其调整为API服务,同样用FastAPI进行封装。先上环境安装命令,官方没给torch之类的命令,下面版本亲测可用:
conda create -n qwen_image python=3.12 -y
git clone https://github.com/huggingface/diffusers.git
cd diffusers && pip install .
pip install torch==2.4.1+cu121 torchvision==0.19.1+cu121 torchaudio==2.4.1 --extra-index-url https://download.pytorch.org/whl/cu121
pip install --upgrade transformers
pip install accelerate uvicorn fastapi pydantic
环境完成之后,可以用官方的quick-start验证一下。当然在此之前,你需要将模型下载到本地。下面的脚本是从官方的网页服务改过来的,将Gradio改成FastAPI版本。注意官方给的使用外部工具对用户 的prompt进行了优化,我这里将其注释了,因为涉及到其他API的调用:
import numpy as np
import random
import os
import time
import threading
import queue
from multiprocessing import Process, Queue, Event
import atexit
import signal
from io import BytesIO
import base64
from pydantic import BaseModel
from fastapi import FastAPI
from PIL import Imageimport torch
import torch.multiprocessing as mp
mp.set_start_method('spawn', force=True)from diffusers import DiffusionPipeline
# from tools.prompt_utils import rewrite  # 你的 prompt 优化工具# ----------------- 配置 -----------------
model_repo_id = "/mnt/models/Qwen-Image" # 下载模型的存放路径
MAX_SEED = np.iinfo(np.int32).maxNUM_GPUS_TO_USE = int(os.environ.get("NUM_GPUS_TO_USE", torch.cuda.device_count()))
TASK_QUEUE_SIZE = int(os.environ.get("TASK_QUEUE_SIZE", 100))
TASK_TIMEOUT = int(os.environ.get("TASK_TIMEOUT", 300))print(f"Config: Using {NUM_GPUS_TO_USE} GPUs, queue size {TASK_QUEUE_SIZE}, timeout {TASK_TIMEOUT} seconds")# ----------------- GPU Worker -----------------
class GPUWorker:def __init__(self, gpu_id, model_repo_id, task_queue, result_queue, stop_event):self.gpu_id = gpu_idself.model_repo_id = model_repo_idself.task_queue = task_queueself.result_queue = result_queueself.stop_event = stop_eventself.device = f"cuda:{gpu_id}"self.pipe = Nonedef initialize_model(self):try:torch.cuda.set_device(self.gpu_id)torch_dtype = torch.bfloat16 if torch.cuda.is_available() else torch.float32self.pipe = DiffusionPipeline.from_pretrained(self.model_repo_id, torch_dtype=torch_dtype)self.pipe = self.pipe.to(self.device)print(f"GPU {self.gpu_id} model initialized successfully")return Trueexcept Exception as e:print(f"GPU {self.gpu_id} model initialization failed: {e}")return Falsedef process_task(self, task):try:task_id = task['task_id']generator = torch.Generator(device=self.device).manual_seed(task['seed'])with torch.cuda.device(self.gpu_id):image = self.pipe(prompt=task['prompt'],negative_prompt=task['negative_prompt'],true_cfg_scale=task['guidance_scale'],num_inference_steps=task['num_inference_steps'],width=task['width'],height=task['height'],generator=generator).images[0]return {'task_id': task_id, 'image': image, 'success': True, 'gpu_id': self.gpu_id}except Exception as e:return {'task_id': task_id, 'success': False, 'error': str(e), 'gpu_id': self.gpu_id}def run(self):if not self.initialize_model():returnprint(f"GPU {self.gpu_id} worker starting")while not self.stop_event.is_set():try:task = self.task_queue.get(timeout=1)if task is None:breakresult = self.process_task(task)self.result_queue.put(result)except queue.Empty:continueexcept Exception as e:print(f"GPU {self.gpu_id} worker exception: {e}")print(f"GPU {self.gpu_id} worker stopping")def gpu_worker_process(gpu_id, model_repo_id, task_queue, result_queue, stop_event):worker = GPUWorker(gpu_id, model_repo_id, task_queue, result_queue, stop_event)worker.run()# ----------------- 多 GPU 管理 -----------------
class MultiGPUManager:def __init__(self, model_repo_id, num_gpus=None, task_queue_size=100):self.model_repo_id = model_repo_idself.num_gpus = num_gpus or torch.cuda.device_count()self.task_queue = Queue(maxsize=task_queue_size)self.result_queue = Queue()self.stop_event = Event()self.worker_processes = []self.task_counter = 0self.pending_tasks = {}def start_workers(self):for gpu_id in range(self.num_gpus):process = Process(target=gpu_worker_process,args=(gpu_id, self.model_repo_id, self.task_queue,self.result_queue, self.stop_event))process.start()self.worker_processes.append(process)threading.Thread(target=self._process_results, daemon=True).start()print(f"All {self.num_gpus} GPU workers have started")def _process_results(self):while not self.stop_event.is_set():try:result = self.result_queue.get(timeout=1)task_id = result['task_id']if task_id in self.pending_tasks:self.pending_tasks[task_id]['result'] = resultself.pending_tasks[task_id]['event'].set()except queue.Empty:continuedef submit_task(self, prompt, negative_prompt="", seed=42, width=1664, height=928,guidance_scale=4, num_inference_steps=50, timeout=300):task_id = f"task_{self.task_counter}_{time.time()}"self.task_counter += 1task = {'task_id': task_id, 'prompt': prompt, 'negative_prompt': negative_prompt,'seed': seed, 'width': width, 'height': height,'guidance_scale': guidance_scale, 'num_inference_steps': num_inference_steps}result_event = threading.Event()self.pending_tasks[task_id] = {'event': result_event, 'result': None}self.task_queue.put(task, timeout=10)start_time = time.time()while not result_event.is_set():if result_event.wait(timeout=2):breakif time.time() - start_time > timeout:del self.pending_tasks[task_id]return {'success': False, 'error': 'Task timeout'}result = self.pending_tasks[task_id]['result']del self.pending_tasks[task_id]return resultdef stop(self):print("Stopping Multi-GPU Manager...")self.stop_event.set()for _ in range(self.num_gpus):self.task_queue.put(None)for process in self.worker_processes:process.join(timeout=5)if process.is_alive():process.terminate()print("Multi-GPU Manager stopped")gpu_manager = None
def initialize_gpu_manager():global gpu_managerif gpu_manager is None:gpu_manager = MultiGPUManager(model_repo_id, num_gpus=NUM_GPUS_TO_USE, task_queue_size=TASK_QUEUE_SIZE)gpu_manager.start_workers()print("GPU Manager initialized successfully")# ----------------- 推理接口 -----------------
def get_image_size(aspect_ratio):if aspect_ratio == "1:1": return 1328, 1328elif aspect_ratio == "16:9": return 1664, 928elif aspect_ratio == "9:16": return 928, 1664elif aspect_ratio == "4:3": return 1472, 1140elif aspect_ratio == "3:4": return 1140, 1472return 1328, 1328def infer(prompt, negative_prompt="", seed=42, randomize_seed=False,aspect_ratio="16:9", guidance_scale=5, num_inference_steps=50):global gpu_managerif gpu_manager is None:initialize_gpu_manager()if randomize_seed:seed = random.randint(0, MAX_SEED)width, height = get_image_size(aspect_ratio)# prompt = rewrite(prompt)result = gpu_manager.submit_task(prompt, negative_prompt, seed, width, height,guidance_scale, num_inference_steps, timeout=TASK_TIMEOUT)return result['image'], seed if result['success'] else (None, seed)# ----------------- FastAPI -----------------
app = FastAPI()class InferenceRequest(BaseModel):prompt: strnegative_prompt: str = ""seed: int = 42randomize_seed: bool = Falseaspect_ratio: str = "16:9"guidance_scale: float = 5.0num_inference_steps: int = 50@app.post("/generate")
def generate_image(req: InferenceRequest):image, seed = infer(req.prompt, req.negative_prompt, req.seed, req.randomize_seed,req.aspect_ratio, req.guidance_scale, req.num_inference_steps)if image is None:return {"success": False, "error": "Generation failed"}buffer = BytesIO()image.save(buffer, format="PNG")img_str = base64.b64encode(buffer.getvalue()).decode()return {"success": True, "seed": seed, "image_base64": img_str}# ----------------- 退出清理 -----------------
def cleanup():if gpu_manager:gpu_manager.stop()
atexit.register(cleanup)
signal.signal(signal.SIGINT, lambda s, f: cleanup())
signal.signal(signal.SIGTERM, lambda s, f: cleanup())if __name__ == "__main__":import uvicornuvicorn.run(app, host="0.0.0.0", port=8800)
上面文件保存为server.py,使用下面命令将服务启动起来:
CUDA_VISIBLE_DEVICES=2,3 python server.py
CUDA_VISIBLE_DEVICES=2,3 nohup python server.py > qwen_image_output.log 2>&1 &
出现Uvicorn running on http://0.0.0.0:8800表明服务启动成功。下面给出一个API访问脚本:
import requests
import base64
from PIL import Image
from io import BytesIOurl = "http://localhost:8800/generate"
payload = {"prompt": "A cute dog wearing sunglasses","negative_prompt": "","seed": 123,"randomize_seed": False,"aspect_ratio": "16:9","guidance_scale": 5.0, # 提示词引导强度# 数值越高 → 模型更严格遵循 prompt 描述,但可能导致画面失真或不自然# 数值较低 → 模型更自由生成,可能偏离 prompt 描述,但画面更自然。"num_inference_steps": 20 # 扩散模型的推理步数# 步数越多 → 图像质量越高、细节更丰富,但生成时间更长# 步数过少 → 生成速度快,但可能模糊或细节不足
}res = requests.post(url, json=payload)
data = res.json()if data["success"]:img_data = base64.b64decode(data["image_base64"])img = Image.open(BytesIO(img_data))img.save("result.png")print("Saved to result.png")
else:print("Generation failed:", data)
同样是base64返回,保存为图像。首次调用发起之后,模型才会被加载,所以第一次调用比较慢。