华为深度学习面试手撕题:手写nn.Conv2d()函数
题目
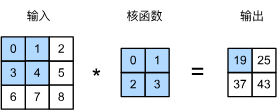
只允许利用numpy包,实现Pytorch二维卷积函数nn.Conv2d()
解答
此代码考察二维卷积的概念,详见:
6.2. 图像卷积 — 动手学深度学习 2.0.0 documentation
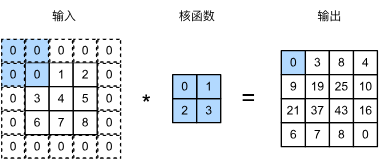
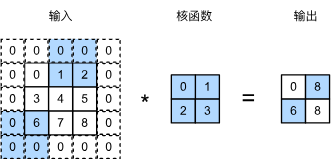
6.3. 填充和步幅 — 动手学深度学习 2.0.0 documentation
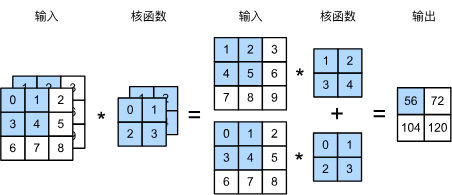
6.4. 多输入多输出通道 — 动手学深度学习 2.0.0 documentation
代码实现:
import numpy as np
import torch
import torch.nn as nndef conv2d(input, weight, bias=None, stride=1, padding=0):"""实现二维卷积操作参数:input:  输入数据, 形状为 (batch_size, in_channels, height, width)weight: 卷积核, 形状为 (out_channels, in_channels, kernel_h, kernel_w)bias:   偏置项, 形状为 (out_channels,)stride: 步长, 可以是整数或元组 (stride_h, stride_w)padding: 填充, 可以是整数或元组 (pad_h, pad_w)返回:输出特征图, 形状为 (batch_size, out_channels, out_h, out_w)"""# 解析步长和填充参数if isinstance(stride, int):stride_h = stride_w = strideelse:stride_h, stride_w = strideif isinstance(padding, int):pad_h = pad_w = paddingelse:pad_h, pad_w = padding# 获取输入尺寸batch_size, in_channels, in_h, in_w = input.shapeout_channels, _, kernel_h, kernel_w = weight.shape# 计算输出尺寸out_h = (in_h + 2 * pad_h - kernel_h) // stride_h + 1out_w = (in_w + 2 * pad_w - kernel_w) // stride_w + 1# 添加填充if pad_h > 0 or pad_w > 0:# 使用零填充padded_input = np.pad(input, ((0, 0), (0, 0), (pad_h, pad_h), (pad_w, pad_w)),mode='constant')else:padded_input = input# 初始化输出数组output = np.zeros((batch_size, out_channels, out_h, out_w))# 执行卷积操作for b in range(batch_size):for c_out in range(out_channels):for h_out in range(out_h):for w_out in range(out_w):# 计算输入窗口位置h_start = h_out * stride_hw_start = w_out * stride_wh_end = h_start + kernel_hw_end = w_start + kernel_w# 提取输入窗口window = padded_input[b, :, h_start:h_end, w_start:w_end]# 计算点积 (卷积操作)conv_val = np.sum(window * weight[c_out])# 添加偏置if bias is not None:conv_val += bias[c_out]# 存储结果output[b, c_out, h_out, w_out] = conv_valreturn outputimport torch
import torch.nn as nnif __name__ == "__main__":# 创建测试数据np.random.seed(42)# 输入数据: (batch_size=2, in_channels=3, height=5, width=5)input_data = np.random.randn(2, 3, 5, 5).astype(np.float32)# 卷积核: (out_channels=2, in_channels=3, kernel_h=3, kernel_w=3)weights = np.random.randn(2, 3, 3, 3).astype(np.float32)# 偏置: (out_channels=2)bias = np.array([0.5, -0.5], dtype=np.float32)# 转换为 PyTorch 张量input_torch = torch.tensor(input_data)weights_torch = torch.tensor(weights)bias_torch = torch.tensor(bias)# 测试1: 无填充, 步长=1print("测试1: 无填充, 步长=1")output1 = conv2d(input_data, weights, bias, stride=1, padding=0)# 创建 PyTorch 卷积层conv1_nn = nn.Conv2d(in_channels=3, out_channels=2, kernel_size=3, stride=1, padding=0, bias=True)# 设置权重和偏置with torch.no_grad():conv1_nn.weight.data = weights_torchconv1_nn.bias.data = bias_torch# 计算 PyTorch 输出output1_nn = conv1_nn(input_torch).detach().numpy()# 比较结果print("自定义实现与PyTorch输出是否一致:", np.allclose(output1, output1_nn, atol=1e-6))print(f"输出形状: {output1.shape}")print("自定义实现输出 (第一个样本的第一个通道前2x2):")print(output1[0, 0, :2, :2])print("PyTorch输出 (第一个样本的第一个通道前2x2):")print(output1_nn[0, 0, :2, :2])# 测试2: 填充=1, 步长=1print("\n测试2: 填充=1, 步长=1")output2 = conv2d(input_data, weights, bias, stride=1, padding=1)# 创建 PyTorch 卷积层conv2_nn = nn.Conv2d(in_channels=3, out_channels=2, kernel_size=3, stride=1, padding=1, bias=True)with torch.no_grad():conv2_nn.weight.data = weights_torchconv2_nn.bias.data = bias_torchoutput2_nn = conv2_nn(input_torch).detach().numpy()print("自定义实现与PyTorch输出是否一致:", np.allclose(output2, output2_nn, atol=1e-6))print(f"输出形状: {output2.shape}")print("自定义实现输出 (第一个样本的第一个通道前2x2):")print(output2[0, 0, :2, :2])print("PyTorch输出 (第一个样本的第一个通道前2x2):")print(output2_nn[0, 0, :2, :2])# 测试3: 无填充, 步长=2print("\n测试3: 无填充, 步长=2")output3 = conv2d(input_data, weights, bias, stride=2, padding=0)# 创建 PyTorch 卷积层conv3_nn = nn.Conv2d(in_channels=3, out_channels=2, kernel_size=3, stride=2, padding=0, bias=True)with torch.no_grad():conv3_nn.weight.data = weights_torchconv3_nn.bias.data = bias_torchoutput3_nn = conv3_nn(input_torch).detach().numpy()print("自定义实现与PyTorch输出是否一致:", np.allclose(output3, output3_nn, atol=1e-6))print(f"输出形状: {output3.shape}")print("自定义实现输出 (第一个样本的第一个通道):")print(output3[0, 0])print("PyTorch输出 (第一个样本的第一个通道):")print(output3_nn[0, 0])# 测试4: 无偏置print("\n测试4: 无偏置")output4 = conv2d(input_data, weights, None, stride=1, padding=0)# 创建 PyTorch 卷积层conv4_nn = nn.Conv2d(in_channels=3, out_channels=2, kernel_size=3, stride=1, padding=0, bias=False)with torch.no_grad():conv4_nn.weight.data = weights_torchoutput4_nn = conv4_nn(input_torch).detach().numpy()print("自定义实现与PyTorch输出是否一致:", np.allclose(output4, output4_nn, atol=1e-6))print("自定义实现输出 (第一个样本的第一个通道前2x2):")print(output4[0, 0, :2, :2])print("PyTorch输出 (第一个样本的第一个通道前2x2):")print(output4_nn[0, 0, :2, :2])'''
测试1: 无填充, 步长=1
自定义实现与PyTorch输出是否一致: True
输出形状: (2, 2, 3, 3)
自定义实现输出 (第一个样本的第一个通道前2x2):
[[-6.4546895  -2.49435902][-6.27663374  3.31103873]]
PyTorch输出 (第一个样本的第一个通道前2x2):
[[-6.4546895 -2.4943593][-6.276634   3.3110385]]测试2: 填充=1, 步长=1
自定义实现与PyTorch输出是否一致: True
输出形状: (2, 2, 5, 5)
自定义实现输出 (第一个样本的第一个通道前2x2):
[[ 1.17402518  1.28695214][-0.09722954 -6.4546895 ]]
PyTorch输出 (第一个样本的第一个通道前2x2):
[[ 1.1740253   1.2869523 ][-0.09722958 -6.4546895 ]]测试3: 无填充, 步长=2
自定义实现与PyTorch输出是否一致: True
输出形状: (2, 2, 2, 2)
自定义实现输出 (第一个样本的第一个通道):
[[-6.4546895   1.38441801][ 3.1934371  -1.1537782 ]]
PyTorch输出 (第一个样本的第一个通道):
[[-6.4546895  1.3844179][ 3.1934366 -1.1537789]]测试4: 无偏置
自定义实现与PyTorch输出是否一致: True
自定义实现输出 (第一个样本的第一个通道前2x2):
[[-6.9546895  -2.99435902][-6.77663374  2.81103873]]
PyTorch输出 (第一个样本的第一个通道前2x2):
[[-6.9546895 -2.9943593][-6.776634   2.811039 ]]
'''