k8s总结
一、k8s部署
K8S 集群创建方式有3种:
centainerd
默认情况下,K8S在创建集群时使用的方式
docker
Docker使用的普记录最高,虽然K8S在1.24版本后已经费力了kubelet对docker的支持,但时可以借助cri-docker方式来实现集群创建
cri-o
CRI-O的方式是Kubernetes创建容器最直接的一种方式,在创建集群的时候,需要借助于cri-o插件的方式来实现Kubernetes集群的创建。
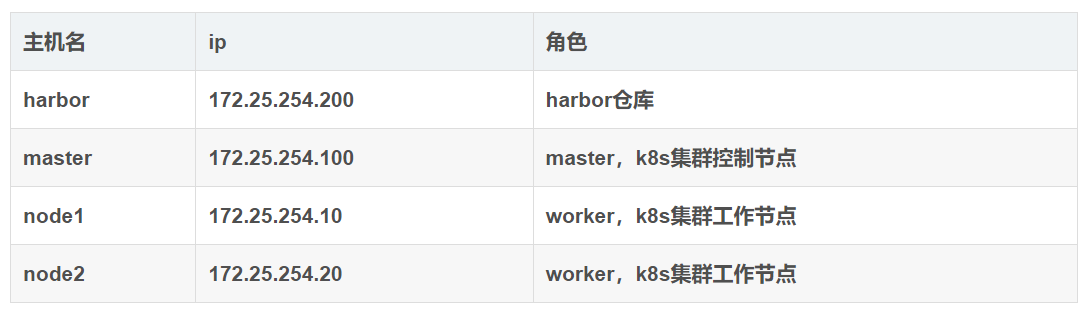
k8s 环境部署说明
K8S中文官网:https://kubernetes.io/zh-cn/
集群环境初始化
禁用swap和本地解析,安装docker
###禁用swap和本地解析
]# systemctl mask swap.target
]# swapoff -a
]# vim /etc/fstab
...
#/dev/mapper/rhel-swap none swap defaults 0 0
]# systemctl daemon-reload
]# vim /etc/hosts
127.0.0.1 localhost localhost.localdomain localhost4 localhost4.localdomain4
::1 localhost localhost.localdomain localhost6 localhost6.localdomain6
172.25.254.200 reg.timinglee.org
172.25.254.100 master
172.25.254.10 node1
172.25.254.20 node2
安装docker
]# ls
anaconda-ks.cfg docker.tar.gz
]# tar zxf docker.tar.gz
]# dnf install *.rpm -y
]# vim /lib/systemd/system/docker.service
...
ExecStart=/usr/bin/dockerd -H fd:// --containerd=/run/containerd/containerd.sock --iptables=true
]# systemctl enable --now docker.service
所有阶段复制harbor仓库中的证书并启动docker
[root@harbor ~]# ls
anaconda-ks.cfg docker-ce-rootless-extras-27.1.2-1.el9.x86_64.rpm
containerd.io-1.7.20-3.1.el9.x86_64.rpm docker-compose-plugin-2.29.1-1.el9.x86_64.rpm
docker-buildx-plugin-0.16.2-1.el9.x86_64.rpm docker.tar.gz
docker-ce-27.1.2-1.el9.x86_64.rpm harbor-offline-installer-v2.5.4.tgz
docker-ce-cli-27.1.2-1.el9.x86_64.rpm packages.zip
[root@harbor ~]# tar zxf harbor-offline-installer-v2.5.4.tgz
[root@harbor ~]# mkdir -p /data/certs
[root@harbor ~]# openssl req -newkey rsa:4096 -nodes -sha256 -keyout /data/certs/timinglee.org.key -addext "subjectAltName = DNS:reg.timinglee.org" -x509 -days 365 -out /data/certs/timinglee.org.crt
[root@harbor ~]# for i in 100 20 10 ; do ssh -l root 172.25.254.$i mkdir -p /etc/docker/certs.d scp /data/certs/timinglee.org.crt root@172.25.254.$i:/etc/docker/certs.d/ca.crt; done
[root@harbor harbor]# cp harbor.yml.tmpl harbor.yml
[root@harbor harbor]# vim harbor.yml
...
hostname: reg.timinglee.org
...
certificate: /data/certs/timinglee.org.crt
private_key: /data/certs/timinglee.org.key
...
harbor_admin_password: lee
...
[root@harbor harbor]# ./install.sh --with-chartmuseum
master主机
[root@master mnt]# cd /etc/docker/
[root@master docker]# vim daemon.json
{
"registry-mirrors":["https://reg.timinglee.org"]
}
[root@master docker]# for i in 10 20 ; do scp daemon.json root@172.25.254.$i:/etc/docker/; done
[root@master docker]# for i in 100 10 20 ; do ssh root@172.25.254.$i mkdir /etc/docker/cert.d/reg.timinglee.org ; done
[root@master docker]# for i in 100 10 20 ; do ssh root@172.25.254.$i mv /etc/docker/certs.d/ca.crt /etc/docker/certs.d/reg.timinglee.org/ ; done
[root@master docker]# for i in 100 10 20 ; do ssh root@172.25.254.$i systemctl enable --now docker ; done
[root@master docker]# docker login reg.timinglee.org
安装K8S部署工具
[root@master ~]# ls
cri-dockerd-0.3.14-3.el8.x86_64.rpm k8s-1.30.tar.gz libcgroup-0.41-19.el8.x86_64.rpm
[root@master ~]# for i in 10 20 ; do scp * root@172.25.254.$i:/mnt; done
3台主机]# dnf install *.rpm -y
[root@master ~]# vim /lib/systemd/system/cri-docker.service
ExecStart=/usr/bin/cri-dockerd --container-runtime-endpoint fd:// --network-plugin=cni --pod-infra-container-image=reg.timinglee.org/k8s/pause:3.9
[root@master ~]# for i in 10 20; do scp /lib/systemd/system/cri-docker.service root@172.25.254.$i:/lib/systemd/system/cri-docker.service; done
3台主机]# systemctl enable --now cri-docker.service
3]# tar zxf k8s-1.30.tar.gz
3]# dnf install *.rpm -y
[root@master ~]# echo "source <(kubectl completion bash)" >> ~/.bashrc
[root@master ~]# source ~/.bashrc
[root@master ~]# docker images | awk '/google/{print $1":"$2}' | awk -F / '{system("docker tag "$0" reg.timinglee.org/k8s/"$3)}'
3]# systemctl enable --now kubelet.service
[root@master ~]# kubeadm init --pod-network-cidr=10.244.0.0/16 --image-repository reg.timinglee.org/k8s --kubernetes-version v1.30.0 --cri-socket=unix:///var/run/cri-dockerd.sock
[root@master ~]# echo "export KUBECONFIG=/etc/kubernetes/admin.conf" >> ~/.bash_profile
[root@master ~]# source ~/.bash_profile
2台node主机]# kubeadm join 172.25.254.100:6443 --token htjcwe.0pi0egukp6vyep1k --discovery-token-ca-cert-hash sha256:08cfe29d9adadd188bfcf41a2fa1d0465de91434a0f82ccf66a7ecf7d748519c --cri-socket=unix:///var/run/cri-dockerd.sock
网络插件flannel
[root@master ~]# docker load -i flannel-0.25.5.tag.gz
[root@master ~]# docker tag flannel/flannel:v0.25.5 reg.timinglee.org/flannel/flannel:v0.25.5
[root@master ~]# docker push reg.timinglee.org/flannel/flannel:v0.25.5
[root@master ~]# docker tag flannel/flannel-cni-plugin:v1.5.1-flannel1 reg.timinglee.org/flannel/flannel-cni-plugin:v1.5.1-flannel1
[root@master ~]# docker push reg.timinglee.org/flannel/flannel-cni-plugin:v1.5.1-flannel1
[root@master ~]# vim kube-flannel.yml
image: flannel/flannel-cni-plugin:v1.5.1-flannel1
image: flannel/flannel:v0.25.5
image: flannel/flannel-cni-plugin:v1.5.1-flannel1
[root@master ~]# kubectl apply -f kube-flannel.yml
[root@master ~]# kubectl get nodes
NAME STATUS ROLES AGE VERSION
master Ready control-plane 14m v1.30.0
node1 Ready <none> 11m v1.30.0
node2 Ready <none> 21s v1.30.0
harbor主机
[root@harbor ~]# unzip packages.zip
[root@harbor ~]# mkdir /etc/docker/certs.d/reg.timinglee.org/ -p
[root@harbor ~]# cp /data/certs/timinglee.org.crt /etc/docker/certs.d/reg.timinglee.org/ca.crt
[root@harbor ~]# systemctl restart docker.service
[root@harbor ~]# cd harbor/
[root@harbor harbor]# docker compose up -d
[root@harbor harbor]# docker login reg.timinglee.org
[root@harbor ~]# cd packages/
[root@harbor packages]# docker load -i nginx-latest.tar.gz
[root@harbor packages]# docker tag nginx:latest reg.timinglee.org/library/nginx:latest
[root@harbor harbor]# docker push reg.timinglee.org/library/nginx:latest
测试
[root@master ~]# kubectl create deployment webcluster --image nginx --replicas 2
二、pod管理
资源管理介绍
- 在kubernetes中,所有的内容都抽象为资源,用户需要通过操作资源来管理kubernetes。
- kubernetes的本质上就是一个集群系统,用户可以在集群中部署各种服务
- 所谓的部署服务,其实就是在kubernetes集群中运行一个个的容器,并将指定的程序跑在容器中。
- kubernetes的最小管理单元是pod而不是容器,只能将容器放在`Pod`中,
- kubernetes一般也不会直接管理Pod,而是通过`Pod控制器`来管理Pod的。
- Pod中服务的访问是由kubernetes提供的`Service`资源来实现。
- Pod中程序的数据需要持久化是由kubernetes提供的各种存储系统来实现
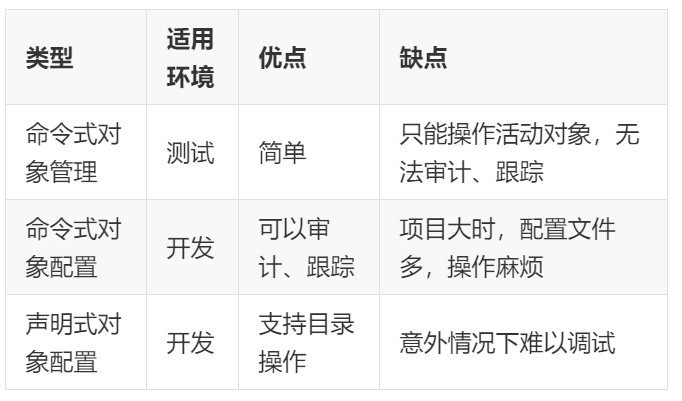
资源管理方式
- 命令式对象管理:直接使用命令去操作kubernetes资源
`kubectl run nginx-pod --image=nginx:latest --port=80`
- 命令式对象配置:通过命令配置和配置文件去操作kubernetes资源
`kubectl create/patch -f nginx-pod.yaml`
- 声明式对象配置:通过apply命令和配置文件去操作kubernetes资源
`kubectl apply -f nginx-pod.yaml`
kubectl的详细说明地址:https://kubernetes.io/docs/reference/generated/kubectl/kubectl-commands
创建自主式pod (生产不推荐)
优点:
灵活性高:
- 可以精确控制 Pod 的各种配置参数,包括容器的镜像、资源限制、环境变量、命令和参数等,满足特定的应用需求。
学习和调试方便:
- 对于学习 Kubernetes 的原理和机制非常有帮助,通过手动创建 Pod 可以深入了解 Pod 的结构和配置方式。在调试问题时,可以更直接地观察和调整 Pod 的设置。
适用于特殊场景:
- 在一些特殊情况下,如进行一次性任务、快速验证概念或在资源受限的环境中进行特定配置时,手动创建 Pod 可能是一种有效的方式。
缺点:
管理复杂:
- 如果需要管理大量的 Pod,手动创建和维护会变得非常繁琐和耗时。难以实现自动化的扩缩容、故障恢复等操作。
缺乏高级功能:
- 无法自动享受 Kubernetes 提供的高级功能,如自动部署、滚动更新、服务发现等。这可能导致应用的部署和管理效率低下。
可维护性差:
- 手动创建的 Pod 在更新应用版本或修改配置时需要手动干预,容易出现错误,并且难以保证一致性。相比之下,通过声明式配置或使用 Kubernetes 的部署工具可以更方便地进行应用的维护和更新
#查看所有pods
[root@k8s-master ~]# kubectl get pods
No resources found in default namespace.#建立一个名为timinglee的pod
[root@k8s-master ~]# kubectl run timinglee --image nginx
pod/timinglee created
[root@k8s-master ~]# kubectl get pods
NAME READY STATUS RESTARTS AGE
timinglee 1/1 Running 0 6s#显示pod的较为详细的信息
[root@k8s-master ~]# kubectl get pods -o wide
NAME READY STATUS RESTARTS AGE IP NODE NOMINATED NODE READINESS GATES
timinglee 1/1 Running 0 11s 10.244.1.17 k8s-node1.timinglee.org <none> <none>
利用控制器管理pod(推荐)
高可用性和可靠性:
- 自动故障恢复:如果一个 Pod 失败或被删除,控制器会自动创建新的 Pod 来维持期望的副本数量。确保应用始终处于可用状态,减少因单个 Pod 故障导致的服务中断。
- 健康检查和自愈:可以配置控制器对 Pod 进行健康检查(如存活探针和就绪探针)。如果 Pod 不健康,控制器会采取适当的行动,如重启 Pod 或删除并重新创建它,以保证应用的正常运行。
可扩展性:
- 轻松扩缩容:可以通过简单的命令或配置更改来增加或减少 Pod 的数量,以满足不同的工作负载需求。例如,在高流量期间可以快速扩展以处理更多请求,在低流量期间可以缩容以节省资源。
- 水平自动扩缩容(HPA):可以基于自定义指标(如 CPU 利用率、内存使用情况或应用特定的指标)自动调整 Pod 的数量,实现动态的资源分配和成本优化。
版本管理和更新:
- 滚动更新:对于 Deployment 等控制器,可以执行滚动更新来逐步替换旧版本的 Pod 为新版本,确保应用在更新过程中始终保持可用。可以控制更新的速率和策略,以减少对用户的影响。
- 回滚:如果更新出现问题,可以轻松回滚到上一个稳定版本,保证应用的稳定性和可靠性。
声明式配置:
- 简洁的配置方式:使用 YAML 或 JSON 格式的声明式配置文件来定义应用的部署需求。这种方式使得配置易于理解、维护和版本控制,同时也方便团队协作。
- 期望状态管理:只需要定义应用的期望状态(如副本数量、容器镜像等),控制器会自动调整实际状态与期望状态保持一致。无需手动管理每个 Pod 的创建和删除,提高了管理效率。
服务发现和负载均衡:
- 自动注册和发现:Kubernetes 中的服务(Service)可以自动发现由控制器管理的 Pod,并将流量路由到它们。这使得应用的服务发现和负载均衡变得简单和可靠,无需手动配置负载均衡器。
- 流量分发:可以根据不同的策略(如轮询、随机等)将请求分发到不同的 Pod,提高应用的性能和可用性。
多环境一致性:
- 一致的部署方式:在不同的环境(如开发、测试、生产)中,可以使用相同的控制器和配置来部署应用,确保应用在不同环境中的行为一致。这有助于减少部署差异和错误,提高开发和运维效率。
#建立控制器并自动运行pod
[root@k8s-master ~]# kubectl create deployment timinglee --image nginx
[root@k8s-master ~]# kubectl get pods
NAME READY STATUS RESTARTS AGE
timinglee-859fbf84d6-mrjvx 1/1 Running 0 37m#为timinglee扩容
[root@k8s-master ~]# kubectl scale deployment timinglee --replicas 6
deployment.apps/timinglee scaled
[root@k8s-master ~]# kubectl get pods
NAME READY STATUS RESTARTS AGE
timinglee-859fbf84d6-8rgkz 0/1 ContainerCreating 0 1s
timinglee-859fbf84d6-ddndl 0/1 ContainerCreating 0 1s
timinglee-859fbf84d6-m4r9l 0/1 ContainerCreating 0 1s
timinglee-859fbf84d6-mrjvx 1/1 Running 0 37m
timinglee-859fbf84d6-tsn97 1/1 Running 0 20s
timinglee-859fbf84d6-xgskk 0/1 ContainerCreating 0 1s#为timinglee缩容
root@k8s-master ~]# kubectl scale deployment timinglee --replicas 2
deployment.apps/timinglee scaled
[root@k8s-master ~]# kubectl get pods
NAME READY STATUS RESTARTS AGE
timinglee-859fbf84d6-mrjvx 1/1 Running 0 38m
timinglee-859fbf84d6-tsn97 1/1 Running 0 73s
应用版本的更新
#利用控制器建立pod
[root@k8s-master ~]# kubectl create deployment timinglee --image myapp:v1 --replicas 2
deployment.apps/timinglee created#暴漏端口
[root@k8s-master ~]# kubectl expose deployment timinglee --port 80 --target-port 80
service/timinglee exposed
[root@k8s-master ~]# kubectl get services
NAME TYPE CLUSTER-IP EXTERNAL-IP PORT(S) AGE
kubernetes ClusterIP 10.96.0.1 <none> 443/TCP 2d17h
timinglee ClusterIP 10.110.195.120 <none> 80/TCP 8s#访问服务
[root@k8s-master ~]# curl 10.110.195.120
Hello MyApp | Version: v1 | <a href="hostname.html">Pod Name</a>
[root@k8s-master ~]# curl 10.110.195.120
Hello MyApp | Version: v1 | <a href="hostname.html">Pod Name</a>
[root@k8s-master ~]# curl 10.110.195.120#产看历史版本
[root@k8s-master ~]# kubectl rollout history deployment timinglee
deployment.apps/timinglee
REVISION CHANGE-CAUSE
1 <none>#更新控制器镜像版本
[root@k8s-master ~]# kubectl set image deployments/timinglee myapp=myapp:v2
deployment.apps/timinglee image updated#查看历史版本
[root@k8s-master ~]# kubectl rollout history deployment timinglee
deployment.apps/timinglee
REVISION CHANGE-CAUSE
1 <none>
2 <none>#访问内容测试
[root@k8s-master ~]# curl 10.110.195.120
Hello MyApp | Version: v2 | <a href="hostname.html">Pod Name</a>
[root@k8s-master ~]# curl 10.110.195.120#版本回滚
[root@k8s-master ~]# kubectl rollout undo deployment timinglee --to-revision 1
deployment.apps/timinglee rolled back
[root@k8s-master ~]# curl 10.110.195.120
Hello MyApp | Version: v1 | <a href="hostname.html">Pod Name</a>
利用yaml文件部署应用
如何获得资源帮助
kubectl explain pod.spec.containers
运行简单的单个容器pod
[root@k8s-master ~]# kubectl run timinglee --image myapp:v1 --dry-run=client -o yaml > pod.yml
[root@k8s-master ~]# vim pod.yml
apiVersion: v1
kind: Pod
metadata:
labels:
run: timing #pod标签
name: timinglee #pod名称
spec:
containers:
- image: myapp:v1 #pod镜像
name: timinglee #容器名称
运行多个容器pod
#一个端口干扰示例:
[root@k8s-master ~]# vim pod.yml
apiVersion: v1
kind: Pod
metadata:
labels:
run: timing
name: timinglee
spec:
containers:
- image: nginx:latest
name: web1- image: nginx:latest
name: web2
[root@k8s-master ~]# kubectl apply -f pod.yml
pod/timinglee created[root@k8s-master ~]# kubectl get pods
NAME READY STATUS RESTARTS AGE
timinglee 1/2 Error 1 (14s ago) 18s#查看日志
[root@k8s-master ~]# kubectl logs timinglee web2
2024/08/31 12:43:20 [emerg] 1#1: bind() to [::]:80 failed (98: Address already in use)
nginx: [emerg] bind() to [::]:80 failed (98: Address already in use)
2024/08/31 12:43:20 [notice] 1#1: try again to bind() after 500ms
2024/08/31 12:43:20 [emerg] 1#1: still could not bind()
nginx: [emerg] still could not bind()
[root@k8s-master ~]# vim pod.yml
[root@k8s-master ~]# kubectl apply -f pod.yml
pod/timinglee created
apiVersion: v1
kind: Pod
metadata:
labels:
run: timing
name: timinglee
spec:
containers:
- image: nginx:latest
name: web1- image: busybox:latest
name: busybox
command: ["/bin/sh","-c","sleep 1000000"][root@k8s-master ~]# kubectl get pods
NAME READY STATUS RESTARTS AGE
timinglee 2/2 Running 0 19s
理解pod间的网络整合
[root@k8s-master ~]# vim pod.yml
apiVersion: v1
kind: Pod
metadata:
labels:
run: timinglee
name: test
spec:
containers:
- image: myapp:v1
name: myapp1- image: busyboxplus:latest
name: busyboxplus
command: ["/bin/sh","-c","sleep 1000000"]
[root@k8s-master ~]# kubectl apply -f pod.yml
pod/test created
[root@k8s-master ~]# kubectl get pods
NAME READY STATUS RESTARTS AGE
test 2/2 Running 0 8s
[root@k8s-master ~]# kubectl exec test -c busyboxplus -- curl -s localhost
Hello MyApp | Version: v1 | <a href="hostname.html">Pod Name</a>
端口映射
[root@k8s-master ~]# vim pod.yml
apiVersion: v1
kind: Pod
metadata:
labels:
run: timinglee
name: test
spec:
containers:
- image: myapp:v1
name: myapp1
ports:
- name: http
containerPort: 80
hostPort: 80
protocol: TCP#测试
[root@k8s-master ~]# kubectl apply -f pod.yml
pod/test created[root@k8s-master ~]# kubectl get pods -o wide
NAME READY STATUS RESTARTS AGE IP NODE NOMINATED NODE READINESS GATES
test 1/1 Running 0 12s 10.244.1.2 k8s-node1.timinglee.org <none> <none>
[root@k8s-master ~]# curl k8s-node1.timinglee.org
Hello MyApp | Version: v1 | <a href="hostname.html">Pod Name</a>
如何设定环境变量
[root@k8s-master ~]# vim pod.yml
apiVersion: v1
kind: Pod
metadata:
labels:
run: timinglee
name: test
spec:
containers:
- image: busybox:latest
name: busybox
command: ["/bin/sh","-c","echo $NAME;sleep 3000000"]
env:
- name: NAME
value: timinglee
[root@k8s-master ~]# kubectl apply -f pod.yml
pod/test created
[root@k8s-master ~]# kubectl logs pods/test busybox
timinglee
容器启动管理
[root@k8s-master ~]# vim pod.yml
apiVersion: v1
kind: Pod
metadata:
labels:
run: timinglee
name: test
spec:
restartPolicy: Always
containers:
- image: myapp:v1
name: myapp
[root@k8s-master ~]# kubectl apply -f pod.yml
pod/test created[root@k8s-master ~]# kubectl get pods -o wide
NAME READY STATUS RESTARTS AGE IP NODE NOMINATED NODE READINESS GATES
test 1/1 Running 0 6s 10.244.2.3 k8s-node2 <none> <none>[root@k8s-node2 ~]# docker rm -f ccac1d64ea81
选择运行节点
[root@k8s-master ~]# vim pod.yml
apiVersion: v1
kind: Pod
metadata:
labels:
run: timinglee
name: test
spec:
nodeSelector:
kubernetes.io/hostname: k8s-node1
restartPolicy: Always
containers:
- image: myapp:v1
name: myapp[root@k8s-master ~]# kubectl apply -f pod.yml
pod/test created[root@k8s-master ~]# kubectl get pods -o wide
NAME READY STATUS RESTARTS AGE IP NODE NOMINATED NODE READINESS GATES
test 1/1 Running 0 21s 10.244.1.5 k8s-node1 <none> <none>
共享宿主机网络
[root@k8s-master ~]# vim pod.yml
apiVersion: v1
kind: Pod
metadata:
labels:
run: timinglee
name: test
spec:
hostNetwork: true
restartPolicy: Always
containers:
- image: busybox:latest
name: busybox
command: ["/bin/sh","-c","sleep 100000"]
[root@k8s-master ~]# kubectl apply -f pod.yml
pod/test created
[root@k8s-master ~]# kubectl exec -it pods/test -c busybox -- /bin/sh
/ # ifconfig
cni0 Link encap:Ethernet HWaddr E6:D4:AA:81:12:B4
inet addr:10.244.2.1 Bcast:10.244.2.255 Mask:255.255.255.0
inet6 addr: fe80::e4d4:aaff:fe81:12b4/64 Scope:Link
UP BROADCAST RUNNING MULTICAST MTU:1450 Metric:1
RX packets:6259 errors:0 dropped:0 overruns:0 frame:0
TX packets:6495 errors:0 dropped:0 overruns:0 carrier:0
collisions:0 txqueuelen:1000
RX bytes:506704 (494.8 KiB) TX bytes:625439 (610.7 KiB)docker0 Link encap:Ethernet HWaddr 02:42:99:4A:30:DC
inet addr:172.17.0.1 Bcast:172.17.255.255 Mask:255.255.0.0
UP BROADCAST MULTICAST MTU:1500 Metric:1
RX packets:0 errors:0 dropped:0 overruns:0 frame:0
TX packets:0 errors:0 dropped:0 overruns:0 carrier:0
collisions:0 txqueuelen:0
RX bytes:0 (0.0 B) TX bytes:0 (0.0 B)eth0 Link encap:Ethernet HWaddr 00:0C:29:6A:A8:61
inet addr:172.25.254.20 Bcast:172.25.254.255 Mask:255.255.255.0
inet6 addr: fe80::8ff3:f39c:dc0c:1f0e/64 Scope:Link
UP BROADCAST RUNNING MULTICAST MTU:1500 Metric:1
RX packets:27858 errors:0 dropped:0 overruns:0 frame:0
TX packets:14454 errors:0 dropped:0 overruns:0 carrier:0
collisions:0 txqueuelen:1000
RX bytes:26591259 (25.3 MiB) TX bytes:1756895 (1.6 MiB)flannel.1 Link encap:Ethernet HWaddr EA:36:60:20:12:05
inet addr:10.244.2.0 Bcast:0.0.0.0 Mask:255.255.255.255
inet6 addr: fe80::e836:60ff:fe20:1205/64 Scope:Link
UP BROADCAST RUNNING MULTICAST MTU:1450 Metric:1
RX packets:0 errors:0 dropped:0 overruns:0 frame:0
TX packets:0 errors:0 dropped:40 overruns:0 carrier:0
collisions:0 txqueuelen:0
RX bytes:0 (0.0 B) TX bytes:0 (0.0 B)lo Link encap:Local Loopback
inet addr:127.0.0.1 Mask:255.0.0.0
inet6 addr: ::1/128 Scope:Host
UP LOOPBACK RUNNING MTU:65536 Metric:1
RX packets:163 errors:0 dropped:0 overruns:0 frame:0
TX packets:163 errors:0 dropped:0 overruns:0 carrier:0
collisions:0 txqueuelen:1000
RX bytes:13630 (13.3 KiB) TX bytes:13630 (13.3 KiB)veth9a516531 Link encap:Ethernet HWaddr 7A:92:08:90:DE:B2
inet6 addr: fe80::7892:8ff:fe90:deb2/64 Scope:Link
UP BROADCAST RUNNING MULTICAST MTU:1450 Metric:1
RX packets:6236 errors:0 dropped:0 overruns:0 frame:0
TX packets:6476 errors:0 dropped:0 overruns:0 carrier:0
collisions:0 txqueuelen:0
RX bytes:592532 (578.6 KiB) TX bytes:622765 (608.1 KiB)/ # exit
pod的生命周期
官方文档:Pod | Kubernetes
INIT 容器示例
[root@k8s-master ~]# vim pod.yml
apiVersion: v1
kind: Pod
metadata:
labels:
name: initpod
name: initpod
spec:
containers:
- image: myapp:v1
name: myapp
initContainers:
- name: init-myservice
image: busybox
command: ["sh","-c","until test -e /testfile;do echo wating for myservice; sleep 2;done"][root@k8s-master ~]# kubectl apply -f pod.yml
pod/initpod created
[root@k8s-master ~]# kubectl get pods
NAME READY STATUS RESTARTS AGE
initpod 0/1 Init:0/1 0 3s[root@k8s-master ~]# kubectl logs pods/initpod init-myservice
wating for myservice
wating for myservice
wating for myservice
wating for myservice
wating for myservice
wating for myservice
[root@k8s-master ~]# kubectl exec pods/initpod -c init-myservice -- /bin/sh -c "touch /testfile"[root@k8s-master ~]# kubectl get pods NAME READY STATUS RESTARTS AGE
initpod 1/1 Running 0 62s
探针实例
存活探针示例
[root@k8s-master ~]# vim pod.yml
apiVersion: v1
kind: Pod
metadata:
labels:
name: liveness
name: liveness
spec:
containers:
- image: myapp:v1
name: myapp
livenessProbe:
tcpSocket: #检测端口存在性
port: 8080
initialDelaySeconds: 3 #容器启动后要等待多少秒后就探针开始工作,默认是 0
periodSeconds: 1 #执行探测的时间间隔,默认为 10s
timeoutSeconds: 1 #探针执行检测请求后,等待响应的超时时间,默认为 1s
#测试:
[root@k8s-master ~]# kubectl apply -f pod.yml
pod/liveness created
[root@k8s-master ~]# kubectl get pods
NAME READY STATUS RESTARTS AGE
liveness 0/1 CrashLoopBackOff 2 (7s ago) 22s[root@k8s-master ~]# kubectl describe pods
Warning Unhealthy 1s (x9 over 13s) kubelet Liveness probe failed: dial tcp 10.244.2.6:8080: connect: connection refused
就绪探针示例
[root@k8s-master ~]# vim pod.yml
apiVersion: v1
kind: Pod
metadata:
labels:
name: readiness
name: readiness
spec:
containers:
- image: myapp:v1
name: myapp
readinessProbe:
httpGet:
path: /test.html
port: 80
initialDelaySeconds: 1
periodSeconds: 3
timeoutSeconds: 1
#测试:
[root@k8s-master ~]# kubectl expose pod readiness --port 80 --target-port 80[root@k8s-master ~]# kubectl get pods
NAME READY STATUS RESTARTS AGE
readiness 0/1 Running 0 5m25s[root@k8s-master ~]# kubectl describe pods readiness
Warning Unhealthy 26s (x66 over 5m43s) kubelet Readiness probe failed: HTTP probe failed with statuscode: 404[root@k8s-master ~]# kubectl describe services readiness
Name: readiness
Namespace: default
Labels: name=readiness
Annotations: <none>
Selector: name=readiness
Type: ClusterIP
IP Family Policy: SingleStack
IP Families: IPv4
IP: 10.100.171.244
IPs: 10.100.171.244
Port: <unset> 80/TCP
TargetPort: 80/TCP
Endpoints: #没有暴漏端口,就绪探针探测不满足暴漏条件
Session Affinity: None
Events: <none>kubectl exec pods/readiness -c myapp -- /bin/sh -c "echo test > /usr/share/nginx/html/test.html"
[root@k8s-master ~]# kubectl get pods
NAME READY STATUS RESTARTS AGE
readiness 1/1 Running 0 7m49s[root@k8s-master ~]# kubectl describe services readiness
Name: readiness
Namespace: default
Labels: name=readiness
Annotations: <none>
Selector: name=readiness
Type: ClusterIP
IP Family Policy: SingleStack
IP Families: IPv4
IP: 10.100.171.244
IPs: 10.100.171.244
Port: <unset> 80/TCP
TargetPort: 80/TCP
Endpoints: 10.244.2.8:80 #满组条件端口暴漏
Session Affinity: None
Events: <none>
三、控制器
什么是控制器
官方文档:
工作负载管理 | Kubernetes
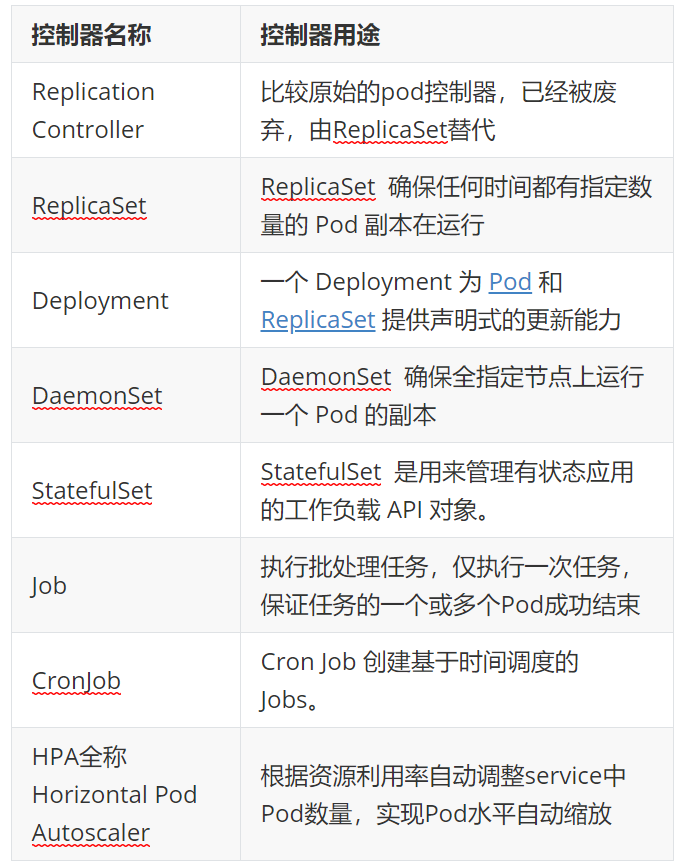
控制器常用类型
replicaset 示例
#生成yml文件
[root@k8s-master ~]# kubectl create deployment replicaset --image myapp:v1 --dry-run=client -o yaml > replicaset.yml[root@k8s-master ~]# vim replicaset.yml
apiVersion: apps/v1
kind: ReplicaSet
metadata:
name: replicaset #指定pod名称,一定小写,如果出现大写报错
spec:
replicas: 2 #指定维护pod数量为2
selector: #指定检测匹配方式
matchLabels: #指定匹配方式为匹配标签
app: myapp #指定匹配的标签为app=myapptemplate: #模板,当副本数量不足时,会根据下面的模板创建pod副本
metadata:
labels:
app: myapp
spec:
containers:
- image: myapp:v1
name: myapp[root@k8s-master ~]# kubectl apply -f replicaset.yml
replicaset.apps/replicaset created
[root@k8s-master ~]# kubectl get pods --show-labels
NAME READY STATUS RESTARTS AGE LABELS
replicaset-l4xnr 1/1 Running 0 96s app=myapp
replicaset-t2s5p 1/1 Running 0 96s app=myapp
#replicaset是通过标签匹配pod
[root@k8s-master ~]# kubectl label pod replicaset-l4xnr app=timinglee --overwrite
pod/replicaset-l4xnr labeled
[root@k8s-master ~]# kubectl get pods --show-labels
NAME READY STATUS RESTARTS AGE LABELS
replicaset-gd5fh 1/1 Running 0 2s app=myapp #新开启的pod
replicaset-l4xnr 1/1 Running 0 3m19s app=timinglee
replicaset-t2s5p 1/1 Running 0 3m19s app=myapp#恢复标签后
[root@k8s2 pod]# kubectl label pod replicaset-example-q2sq9 app-
[root@k8s2 pod]# kubectl get pod --show-labels
NAME READY STATUS RESTARTS AGE LABELS
replicaset-example-q2sq9 1/1 Running 0 3m14s app=nginx
replicaset-example-th24v 1/1 Running 0 3m14s app=nginx
replicaset-example-w7zpw 1/1 Running 0 3m14s app=nginx#replicaset自动控制副本数量,pod可以自愈
[root@k8s-master ~]# kubectl delete pods replicaset-t2s5p
pod "replicaset-t2s5p" deleted[root@k8s-master ~]# kubectl get pods --show-labels
NAME READY STATUS RESTARTS AGE LABELS
replicaset-l4xnr 1/1 Running 0 5m43s app=myapp
replicaset-nxmr9 1/1 Running 0 15s app=myapp
回收资源
[root@k8s2 pod]# kubectl delete -f rs-example.yml
deployment控制器示例
#生成yaml文件
[root@k8s-master ~]# kubectl create deployment deployment --image myapp:v1 --dry-run=client -o yaml > deployment.yml[root@k8s-master ~]# vim deployment.yml
apiVersion: apps/v1
kind: Deployment
metadata:
name: deployment
spec:
replicas: 4
selector:
matchLabels:
app: myapp
template:
metadata:
labels:
app: myapp
spec:
containers:
- image: myapp:v1
name: myapp
#建立pod
root@k8s-master ~]# kubectl apply -f deployment.yml
deployment.apps/deployment created#查看pod信息
[root@k8s-master ~]# kubectl get pods --show-labels
NAME READY STATUS RESTARTS AGE LABELS
deployment-5d886954d4-2ckqw 1/1 Running 0 23s app=myapp,pod-template-hash=5d886954d4
deployment-5d886954d4-m8gpd 1/1 Running 0 23s app=myapp,pod-template-hash=5d886954d4
deployment-5d886954d4-s7pws 1/1 Running 0 23s app=myapp,pod-template-hash=5d886954d4
deployment-5d886954d4-wqnvv 1/1 Running 0 23s app=myapp,pod-template-hash=5d886954d4
版本迭代
[root@k8s-master ~]# kubectl get pods -o wide
NAME READY STATUS RESTARTS AGE IP NODE NOMINATED NODE READINESS GATES
deployment-5d886954d4-2ckqw 1/1 Running 0 2m40s 10.244.2.14 k8s-node2 <none> <none>
deployment-5d886954d4-m8gpd 1/1 Running 0 2m40s 10.244.1.17 k8s-node1 <none> <none>
deployment-5d886954d4-s7pws 1/1 Running 0 2m40s 10.244.1.16 k8s-node1 <none> <none>
deployment-5d886954d4-wqnvv 1/1 Running 0 2m40s 10.244.2.15 k8s-node2 <none> <none>#pod运行容器版本为v1
[root@k8s-master ~]# curl 10.244.2.14
Hello MyApp | Version: v1 | <a href="hostname.html">Pod Name</a>[root@k8s-master ~]# kubectl describe deployments.apps deployment
Name: deployment
Namespace: default
CreationTimestamp: Sun, 01 Sep 2024 23:19:10 +0800
Labels: <none>
Annotations: deployment.kubernetes.io/revision: 1
Selector: app=myapp
Replicas: 4 desired | 4 updated | 4 total | 4 available | 0 unavailable
StrategyType: RollingUpdate
MinReadySeconds: 0
RollingUpdateStrategy: 25% max unavailable, 25% max surge #默认每次更新25%
#更新容器运行版本
[root@k8s-master ~]# vim deployment.yml
apiVersion: apps/v1
kind: Deployment
metadata:
name: deployment
spec:
minReadySeconds: 5 #最小就绪时间5秒
replicas: 4
selector:
matchLabels:
app: myapptemplate:
metadata:
labels:
app: myapp
spec:
containers:
- image: myapp:v2 #更新为版本2
name: myapp[root@k8s2 pod]# kubectl apply -f deployment-example.yaml
#更新过程
[root@k8s-master ~]# watch - n1 kubectl get pods -o wide
NAME READY STATUS RESTARTS AGE
deployment-5d886954d4-8kb28 1/1 Running 0 48s
deployment-5d886954d4-8s4h8 1/1 Running 0 49s
deployment-5d886954d4-rclkp 1/1 Running 0 50s
deployment-5d886954d4-tt2hz 1/1 Running 0 50s
deployment-7f4786db9c-g796x 0/1 Pending 0 0s#测试更新效果
[root@k8s-master ~]# kubectl get pods -o wide
NAME READY STATUS RESTARTS AGE IP NODE NOMINATED NODE READINESS GATES
deployment-7f4786db9c-967fk 1/1 Running 0 10s 10.244.1.26 k8s-node1 <none> <none>
deployment-7f4786db9c-cvb9k 1/1 Running 0 10s 10.244.2.24 k8s-node2 <none> <none>
deployment-7f4786db9c-kgss4 1/1 Running 0 9s 10.244.1.27 k8s-node1 <none> <none>
deployment-7f4786db9c-qts8c 1/1 Running 0 9s 10.244.2.25 k8s-node2 <none> <none>[root@k8s-master ~]# curl 10.244.1.26
Hello MyApp | Version: v2 | <a href="hostname.html">Pod Name</a>
版本回滚
[root@k8s-master ~]# vim deployment.yml
apiVersion: apps/v1
kind: Deployment
metadata:
name: deployment
spec:
replicas: 4
selector:
matchLabels:
app: myapptemplate:
metadata:
labels:
app: myapp
spec:
containers:
- image: myapp:v1 #回滚到之前版本
name: myapp
[root@k8s-master ~]# kubectl apply -f deployment.yml
deployment.apps/deployment configured#测试回滚效果
[root@k8s-master ~]# kubectl get pods -o wide
NAME READY STATUS RESTARTS AGE IP NODE NOMINATED NODE READINESS GATES
deployment-5d886954d4-dr74h 1/1 Running 0 8s 10.244.2.26 k8s-node2 <none> <none>
deployment-5d886954d4-thpf9 1/1 Running 0 7s 10.244.1.29 k8s-node1 <none> <none>
deployment-5d886954d4-vmwl9 1/1 Running 0 8s 10.244.1.28 k8s-node1 <none> <none>
deployment-5d886954d4-wprpd 1/1 Running 0 6s 10.244.2.27 k8s-node2 <none> <none>[root@k8s-master ~]# curl 10.244.2.26
Hello MyApp | Version: v1 | <a href="hostname.html">Pod Name</a>
滚动更新策略
[root@k8s-master ~]# vim deployment.yml
apiVersion: apps/v1
kind: Deployment
metadata:
name: deployment
spec:
minReadySeconds: 5 #最小就绪时间,指定pod每隔多久更新一次
replicas: 4
strategy: #指定更新策略
rollingUpdate:
maxSurge: 1 #比定义pod数量多几个
maxUnavailable: 0 #比定义pod个数少几个
selector:
matchLabels:
app: myapptemplate:
metadata:
labels:
app: myapp
spec:
containers:
- image: myapp:v1
name: myapp
[root@k8s2 pod]# kubectl apply -f deployment-example.yaml
daemonset控制器
daemonset功能
DaemonSet 确保全部(或者某些)节点上运行一个 Pod 的副本。当有节点加入集群时, 也会为他们新增一个 Pod ,当有节点从集群移除时,这些 Pod 也会被回收。删除 DaemonSet 将会删除它创建的所有 Pod
DaemonSet 的典型用法:
-
在每个节点上运行集群存储 DaemonSet,例如 glusterd、ceph。
-
在每个节点上运行日志收集 DaemonSet,例如 fluentd、logstash。
-
在每个节点上运行监控 DaemonSet,例如 Prometheus Node Exporter、zabbix agent等
-
一个简单的用法是在所有的节点上都启动一个 DaemonSet,将被作为每种类型的 daemon 使用
-
一个稍微复杂的用法是单独对每种 daemon 类型使用多个 DaemonSet,但具有不同的标志, 并且对不同硬件类型具有不同的内存、CPU 要求
[root@k8s2 pod]# cat daemonset-example.yml
apiVersion: apps/v1
kind: DaemonSet
metadata:
name: daemonset-example
spec:
selector:
matchLabels:
app: nginx
template:
metadata:
labels:
app: nginx
spec:
tolerations: #对于污点节点的容忍
- effect: NoSchedule
operator: Exists
containers:
- name: nginx
image: nginx[root@k8s-master ~]# kubectl get pods -o wide
NAME READY STATUS RESTARTS AGE IP NODE NOMINATED NODE READINESS GATES
daemonset-87h6s 1/1 Running 0 47s 10.244.0.8 k8s-master <none> <none>
daemonset-n4vs4 1/1 Running 0 47s 10.244.2.38 k8s-node2 <none> <none>
daemonset-vhxmq 1/1 Running 0 47s 10.244.1.40 k8s-node1 <none> <none>
#回收
[root@k8s2 pod]# kubectl delete -f daemonset-example.yml
job 控制器
[root@k8s2 pod]# vim job.yml
apiVersion: batch/v1
kind: Job
metadata:
name: pi
spec:
completions: 6 #一共完成任务数为6
parallelism: 2 #每次并行完成2个
template:
spec:
containers:
- name: pi
image: perl:5.34.0
command: ["perl", "-Mbignum=bpi", "-wle", "print bpi(2000)"] 计算Π的后2000位
restartPolicy: Never #关闭后不自动重启
backoffLimit: 4 #运行失败后尝试4重新运行[root@k8s2 pod]# kubectl apply -f job.yml
cronjob 控制器
[root@k8s2 pod]# vim cronjob.yml
apiVersion: batch/v1
kind: CronJob
metadata:
name: hello
spec:
schedule: "* * * * *"
jobTemplate:
spec:
template:
spec:
containers:
- name: hello
image: busybox
imagePullPolicy: IfNotPresent
command:
- /bin/sh
- -c
- date; echo Hello from the Kubernetes cluster
restartPolicy: OnFailure[root@k8s2 pod]# kubectl apply -f cronjob.yml
四、微服务
什么是微服务
用控制器来完成集群的工作负载,那么应用如何暴漏出去?需要通过微服务暴漏出去后才能被访问
-
Service是一组提供相同服务的Pod对外开放的接口。
-
借助Service,应用可以实现服务发现和负载均衡。
-
service默认只支持4层负载均衡能力,没有7层功能。(可以通过Ingress实现)
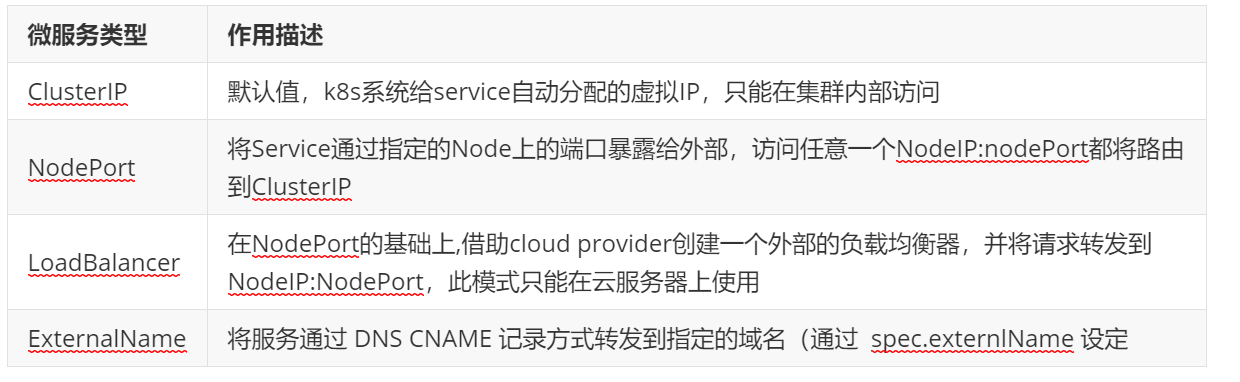
微服务的类型
ipvs模式
-
Service 是由 kube-proxy 组件,加上 iptables 来共同实现的
-
kube-proxy 通过 iptables 处理 Service 的过程,需要在宿主机上设置相当多的 iptables 规则,如果宿主机有大量的Pod,不断刷新iptables规则,会消耗大量的CPU资源
-
IPVS模式的service,可以使K8s集群支持更多量级的Pod
ipvs模式配置方式
1 在所有节点中安装ipvsadm
[root@k8s-所有节点 pod]yum install ipvsadm –y
修改master节点的代理配置
[root@k8s-master ~]# kubectl -n kube-system edit cm kube-proxy
metricsBindAddress: ""
mode: "ipvs" #设置kube-proxy使用ipvs模式
nftables:
3 重启pod,在pod运行时配置文件中采用默认配置,当改变配置文件后已经运行的pod状态不会变化,所以要重启pod
[root@k8s-master ~]# kubectl -n kube-system get pods | awk '/kube-proxy/{system("kubectl -n kube-system delete pods "$1)}'
[root@k8s-master ~]# ipvsadm -Ln
IP Virtual Server version 1.2.1 (size=4096)
Prot LocalAddress:Port Scheduler Flags
-> RemoteAddress:Port Forward Weight ActiveConn InActConn
TCP 10.96.0.1:443 rr
-> 172.25.254.100:6443 Masq 1 0 0
TCP 10.96.0.10:53 rr
-> 10.244.0.2:53 Masq 1 0 0
-> 10.244.0.3:53 Masq 1 0 0
TCP 10.96.0.10:9153 rr
-> 10.244.0.2:9153 Masq 1 0 0
-> 10.244.0.3:9153 Masq 1 0 0
TCP 10.97.59.25:80 rr
-> 10.244.1.17:80 Masq 1 0 0
-> 10.244.2.13:80 Masq 1 0 0
UDP 10.96.0.10:53 rr
-> 10.244.0.2:53 Masq 1 0 0
-> 10.244.0.3:53 Masq 1 0 0
微服务类型详解
clusterip
特点:
clusterip模式只能在集群内访问,并对集群内的pod提供健康检测和自动发现功能
示例:
[root@k8s2 service]# vim myapp.yml
---
apiVersion: v1
kind: Service
metadata:
labels:
app: timinglee
name: timinglee
spec:
ports:
- port: 80
protocol: TCP
targetPort: 80
selector:
app: timinglee
type: ClusterIP
service创建后集群DNS提供解析
[root@k8s-master ~]# dig timinglee.default.svc.cluster.local @10.96.0.10; <<>> DiG 9.16.23-RH <<>> timinglee.default.svc.cluster.local @10.96.0.10
;; global options: +cmd
;; Got answer:
;; WARNING: .local is reserved for Multicast DNS
;; You are currently testing what happens when an mDNS query is leaked to DNS
;; ->>HEADER<<- opcode: QUERY, status: NOERROR, id: 27827
;; flags: qr aa rd; QUERY: 1, ANSWER: 1, AUTHORITY: 0, ADDITIONAL: 1
;; WARNING: recursion requested but not available;; OPT PSEUDOSECTION:
; EDNS: version: 0, flags:; udp: 4096
; COOKIE: 057d9ff344fe9a3a (echoed)
;; QUESTION SECTION:
;timinglee.default.svc.cluster.local. IN A;; ANSWER SECTION:
timinglee.default.svc.cluster.local. 30 IN A 10.97.59.25;; Query time: 8 msec
;; SERVER: 10.96.0.10#53(10.96.0.10)
;; WHEN: Wed Sep 04 13:44:30 CST 2024
;; MSG SIZE rcvd: 127
ClusterIP中的特殊模式headless
[root@k8s-master ~]# vim timinglee.yaml
---
apiVersion: v1
kind: Service
metadata:
labels:
app: timinglee
name: timinglee
spec:
ports:
- port: 80
protocol: TCP
targetPort: 80
selector:
app: timinglee
type: ClusterIP
clusterIP: None
[root@k8s-master ~]# kubectl delete -f timinglee.yaml
[root@k8s-master ~]# kubectl apply -f timinglee.yaml
deployment.apps/timinglee created#测试
[root@k8s-master ~]# kubectl get services timinglee
NAME TYPE CLUSTER-IP EXTERNAL-IP PORT(S) AGE
timinglee ClusterIP None <none> 80/TCP 6s[root@k8s-master ~]# dig timinglee.default.svc.cluster.local @10.96.0.10
; <<>> DiG 9.16.23-RH <<>> timinglee.default.svc.cluster.local @10.96.0.10
;; global options: +cmd
;; Got answer:
;; WARNING: .local is reserved for Multicast DNS
;; You are currently testing what happens when an mDNS query is leaked to DNS
;; ->>HEADER<<- opcode: QUERY, status: NOERROR, id: 51527
;; flags: qr aa rd; QUERY: 1, ANSWER: 2, AUTHORITY: 0, ADDITIONAL: 1
;; WARNING: recursion requested but not available;; OPT PSEUDOSECTION:
; EDNS: version: 0, flags:; udp: 4096
; COOKIE: 81f9c97b3f28b3b9 (echoed)
;; QUESTION SECTION:
;timinglee.default.svc.cluster.local. IN A;; ANSWER SECTION:
timinglee.default.svc.cluster.local. 20 IN A 10.244.2.14 #直接解析到pod上
timinglee.default.svc.cluster.local. 20 IN A 10.244.1.18;; Query time: 0 msec
;; SERVER: 10.96.0.10#53(10.96.0.10)
;; WHEN: Wed Sep 04 13:58:23 CST 2024
;; MSG SIZE rcvd: 178
#开启一个busyboxplus的pod测试
[root@k8s-master ~]# kubectl run test --image busyboxplus -it
If you don't see a command prompt, try pressing enter.
/ # nslookup timinglee-service
Server: 10.96.0.10
Address 1: 10.96.0.10 kube-dns.kube-system.svc.cluster.localName: timinglee-service
Address 1: 10.244.2.16 10-244-2-16.timinglee-service.default.svc.cluster.local
Address 2: 10.244.2.17 10-244-2-17.timinglee-service.default.svc.cluster.local
Address 3: 10.244.1.22 10-244-1-22.timinglee-service.default.svc.cluster.local
Address 4: 10.244.1.21 10-244-1-21.timinglee-service.default.svc.cluster.local
/ # curl timinglee-service
Hello MyApp | Version: v1 | <a href="hostname.html">Pod Name</a>
/ # curl timinglee-service/hostname.html
timinglee-c56f584cf-b8t6m
nodeport
[root@k8s-master ~]# vim timinglee.yaml
---apiVersion: v1
kind: Service
metadata:
labels:
app: timinglee-service
name: timinglee-service
spec:
ports:
- port: 80
protocol: TCP
targetPort: 80
selector:
app: timinglee
type: NodePort[root@k8s-master ~]# kubectl apply -f timinglee.yaml
deployment.apps/timinglee created
service/timinglee-service created
[root@k8s-master ~]# kubectl get services timinglee-service
NAME TYPE CLUSTER-IP EXTERNAL-IP PORT(S) AGE
timinglee-service NodePort 10.98.60.22 <none> 80:31771/TCP 8nodeport在集群节点上绑定端口,一个端口对应一个服务
[root@k8s-master ~]# for i in {1..5}
> do
> curl 172.25.254.100:31771/hostname.html
> done
timinglee-c56f584cf-fjxdk
timinglee-c56f584cf-5m2z5
timinglee-c56f584cf-z2w4d
timinglee-c56f584cf-tt5g6
timinglee-c56f584cf-fjxdk
[root@k8s-master ~]# vim timinglee.yaml
apiVersion: v1
kind: Service
metadata:
labels:
app: timinglee-service
name: timinglee-service
spec:
ports:- port: 80
protocol: TCP
targetPort: 80
nodePort: 33333
selector:
app: timinglee
type: NodePort[root@k8s-master ~]# kubectl apply -f timinglee.yaml
deployment.apps/timinglee created
The Service "timinglee-service" is invalid: spec.ports[0].nodePort: Invalid value: 33333: provided port is not in the valid range. The range of valid ports is 30000-32767
如果需要使用这个范围以外的端口就需要特殊设定
[root@k8s-master ~]# vim /etc/kubernetes/manifests/kube-apiserver.yaml
- --service-node-port-range=30000-40000
loadbalancer
[root@k8s-master ~]# vim timinglee.yaml
---
apiVersion: v1
kind: Service
metadata:
labels:
app: timinglee-service
name: timinglee-service
spec:
ports:
- port: 80
protocol: TCP
targetPort: 80
selector:
app: timinglee
type: LoadBalancer[root@k8s2 service]# kubectl apply -f myapp.yml
默认无法分配外部访问IP
[root@k8s2 service]# kubectl get svc
NAME TYPE CLUSTER-IP EXTERNAL-IP PORT(S) AGE
kubernetes ClusterIP 10.96.0.1 <none> 443/TCP 4d1h
myapp LoadBalancer 10.107.23.134 <pending> 80:32537/TCP 4sLoadBalancer模式适用云平台,裸金属环境需要安装metallb提供支持
metalLB
官网:Installation :: MetalLB, bare metal load-balancer for Kubernetes
externalname
[root@k8s-master ~]# vim timinglee.yaml
---
apiVersion: v1
kind: Service
metadata:
labels:
app: timinglee-service
name: timinglee-service
spec:
selector:
app: timinglee
type: ExternalName
externalName: www.timinglee.org
[root@k8s-master ~]# kubectl apply -f timinglee.yaml[root@k8s-master ~]# kubectl get services timinglee-service
NAME TYPE CLUSTER-IP EXTERNAL-IP PORT(S) AGE
timinglee-service ExternalName <none> www.timinglee.org <none> 2m58s
Ingress-nginx
官网:
https://kubernetes.github.io/ingress-nginx/deploy/#bare-metal-clusters
部署ingress
下载部署文件
[root@k8s-master ~]# wget https://raw.githubusercontent.com/kubernetes/ingress-nginx/controller-v1.11.2/deploy/static/provider/baremetal/deploy.yaml
上传ingress所需镜像到harbor
[root@k8s-master ~]# docker tag registry.k8s.io/ingress-nginx/controller:v1.11.2@sha256:d5f8217feeac4887cb1ed21f27c2674e58be06bd8f5184cacea2a69abaf78dce reg.timinglee.org/ingress-nginx/controller:v1.11.2
[root@k8s-master ~]# docker tag registry.k8s.io/ingress-nginx/kube-webhook-certgen:v1.4.3@sha256:a320a50cc91bd15fd2d6fa6de58bd98c1bd64b9a6f926ce23a600d87043455a3 reg.timinglee.org/ingress-nginx/kube-webhook-certgen:v1.4.3
[root@k8s-master ~]# docker push reg.timinglee.org/ingress-nginx/controller:v1.11.2
[root@k8s-master ~]# docker push reg.timinglee.org/ingress-nginx/kube-webhook-certgen:v1.4.3
安装ingress
[root@k8s-master ~]# vim deploy.yaml
445 image: ingress-nginx/controller:v1.11.2
546 image: ingress-nginx/kube-webhook-certgen:v1.4.3
599 image: ingress-nginx/kube-webhook-certgen:v1.4.3[root@k8s-master ~]# kubectl -n ingress-nginx get pods
NAME READY STATUS RESTARTS AGE
ingress-nginx-admission-create-ggqm6 0/1 Completed 0 82s
ingress-nginx-admission-patch-q4wp2 0/1 Completed 0 82s
ingress-nginx-controller-bb7d8f97c-g2h4p 1/1 Running 0 82s
[root@k8s-master ~]# kubectl -n ingress-nginx get svc
NAME TYPE CLUSTER-IP EXTERNAL-IP PORT(S) AGE
ingress-nginx-controller NodePort 10.103.33.148 <none> 80:34512/TCP,443:34727/TCP 108s
ingress-nginx-controller-admission ClusterIP 10.103.183.64 <none> 443/TCP 108s
#修改微服务为loadbalancer
[root@k8s-master ~]# kubectl -n ingress-nginx edit svc ingress-nginx-controller
49 type: LoadBalancer[root@k8s-master ~]# kubectl -n ingress-nginx get services
NAME TYPE CLUSTER-IP EXTERNAL-IP PORT(S) AGE
ingress-nginx-controller LoadBalancer 10.103.33.148 172.25.254.50 80:34512/TCP,443:34727/TCP 4m43s
ingress-nginx-controller-admission ClusterIP 10.103.183.64 <none> 443/TCP 4m43s
测试ingress
#生成yaml文件
[root@k8s-master ~]# kubectl create ingress webcluster --rule '*/=timinglee-svc:80' --dry-run=client -o yaml > timinglee-ingress.yml[root@k8s-master ~]# vim timinglee-ingress.yml
aapiVersion: networking.k8s.io/v1
kind: Ingress
metadata:
name: test-ingress
spec:
ingressClassName: nginx
rules:
- http:
paths:
- backend:
service:
name: timinglee-svc
port:
number: 80
path: /
pathType: Prefix
#Exact(精确匹配),ImplementationSpecific(特定实现),Prefix(前缀匹配),Regular expression(正则表达式匹配)
#建立ingress控制器
[root@k8s-master ~]# kubectl apply -f timinglee-ingress.yml
ingress.networking.k8s.io/webserver created[root@k8s-master ~]# kubectl get ingress
NAME CLASS HOSTS ADDRESS PORTS AGE
test-ingress nginx * 172.25.254.10 80 8m30s
[root@reg ~]# for n in {1..5}; do curl 172.25.254.50/hostname.html; done
timinglee-c56f584cf-8jhn6
timinglee-c56f584cf-8cwfm
timinglee-c56f584cf-8jhn6
timinglee-c56f584cf-8cwfm
timinglee-c56f584cf-8jhn6
基于路径的访问
[root@k8s-master app]# kubectl create deployment myapp-v1 --image myapp:v1 --dry-run=client -o yaml > myapp-v1.yaml
[root@k8s-master app]# kubectl create deployment myapp-v2 --image myapp:v2 --dry-run=client -o yaml > myapp-v2.yaml
[root@k8s-master app]# vim myapp-v1.yaml
apiVersion: apps/v1
kind: Deployment
metadata:
labels:
app: myapp-v1
name: myapp-v1
spec:
replicas: 1
selector:
matchLabels:
app: myapp-v1
strategy: {}
template:
metadata:
labels:
app: myapp-v1
spec:
containers:
- image: myapp:v1
name: myapp---
apiVersion: v1
kind: Service
metadata:
labels:
app: myapp-v1
name: myapp-v1
spec:
ports:
- port: 80
protocol: TCP
targetPort: 80
selector:
app: myapp-v1
[root@k8s-master app]# vim myapp-v2.yaml
apiVersion: apps/v1
kind: Deployment
metadata:
labels:
app: myapp-v2
name: myapp-v2
spec:
replicas: 1
selector:
matchLabels:
app: myapp-v2
template:
metadata:
labels:
app: myapp-v2
spec:
containers:
- image: myapp:v2
name: myapp
---
apiVersion: v1
kind: Service
metadata:
labels:
app: myapp-v2
name: myapp-v2
spec:
ports:
- port: 80
protocol: TCP
targetPort: 80
selector:
app: myapp-v2[root@k8s-master app]# kubectl expose deployment myapp-v1 --port 80 --target-port 80 --dry-run=client -o yaml >> myapp-v1.yaml
[root@k8s-master app]# kubectl expose deployment myapp-v2 --port 80 --target-port 80 --dry-run=client -o yaml >> myapp-v1.yaml
[root@k8s-master app]# kubectl get services
NAME TYPE CLUSTER-IP EXTERNAL-IP PORT(S) AGE
kubernetes ClusterIP 10.96.0.1 <none> 443/TCP 29h
myapp-v1 ClusterIP 10.104.84.65 <none> 80/TCP 13s
myapp-v2 ClusterIP 10.105.246.219 <none> 80/TCP 7s
建立ingress的yaml
[root@k8s-master app]# vim ingress1.yml
apiVersion: networking.k8s.io/v1
kind: Ingress
metadata:
annotations:
nginx.ingress.kubernetes.io/rewrite-target: / #访问路径后加任何内容都被定向到/
name: ingress1
spec:
ingressClassName: nginx
rules:
- host: www.timinglee.org
http:
paths:
- backend:
service:
name: myapp-v1
port:
number: 80
path: /v1
pathType: Prefix- backend:
service:
name: myapp-v2
port:
number: 80
path: /v2
pathType: Prefix#测试:
[root@reg ~]# echo 172.25.254.50 www.timinglee.org >> /etc/hosts[root@reg ~]# curl www.timinglee.org/v1
Hello MyApp | Version: v1 | <a href="hostname.html">Pod Name</a>
[root@reg ~]# curl www.timinglee.org/v2
Hello MyApp | Version: v2 | <a href="hostname.html">Pod Name</a>
#nginx.ingress.kubernetes.io/rewrite-target: / 的功能实现
[root@reg ~]# curl www.timinglee.org/v2/aaaa
Hello MyApp | Version: v2 | <a href="hostname.html">Pod Name</a>
基于域名的访问
#在测试主机中设定解析
[root@reg ~]# vim /etc/hosts
127.0.0.1 localhost localhost.localdomain localhost4 localhost4.localdomain4
::1 localhost localhost.localdomain localhost6 localhost6.localdomain6
172.25.254.250 reg.timinglee.org
172.25.254.50 www.timinglee.org myappv1.timinglee.org myappv2.timinglee.org# 建立基于域名的yml文件
[root@k8s-master app]# vim ingress2.yml
apiVersion: networking.k8s.io/v1
kind: Ingress
metadata:
annotations:
nginx.ingress.kubernetes.io/rewrite-target: /
name: ingress2
spec:
ingressClassName: nginx
rules:
- host: myappv1.timinglee.org
http:
paths:
- backend:
service:
name: myapp-v1
port:
number: 80
path: /
pathType: Prefix
- host: myappv2.timinglee.org
http:
paths:
- backend:
service:
name: myapp-v2
port:
number: 80
path: /
pathType: Prefix
#利用文件建立ingress
[root@k8s-master app]# kubectl apply -f ingress2.yml
ingress.networking.k8s.io/ingress2 created[root@k8s-master app]# kubectl describe ingress ingress2
Name: ingress2
Labels: <none>
Namespace: default
Address:
Ingress Class: nginx
Default backend: <default>
Rules:
Host Path Backends
---- ---- --------
myappv1.timinglee.org
/ myapp-v1:80 (10.244.2.31:80)
myappv2.timinglee.org
/ myapp-v2:80 (10.244.2.32:80)
Annotations: nginx.ingress.kubernetes.io/rewrite-target: /
Events:
Type Reason Age From Message
---- ------ ---- ---- -------
Normal Sync 21s nginx-ingress-controller Scheduled for sync
#在测试主机中测试
[root@reg ~]# curl www.timinglee.org/v1
Hello MyApp | Version: v1 | <a href="hostname.html">Pod Name</a>
[root@reg ~]# curl www.timinglee.org/v2
Hello MyApp | Version: v2 | <a href="hostname.html">Pod Name</a>
建立tls加密
#建立证书
[root@k8s-master app]# openssl req -newkey rsa:2048 -nodes -keyout tls.key -x509 -days 365 -subj "/CN=nginxsvc/O=nginxsvc" -out tls.crt#建立加密资源类型secret
[root@k8s-master app]# kubectl create secret tls web-tls-secret --key tls.key --cert tls.crt
secret/web-tls-secret created
[root@k8s-master app]# kubectl get secrets
NAME TYPE DATA AGE
web-tls-secret kubernetes.io/tls 2 6s#建立ingress3基于tls认证的yml文件
[root@k8s-master app]# vim ingress3.yml
apiVersion: networking.k8s.io/v1
kind: Ingress
metadata:
annotations:
nginx.ingress.kubernetes.io/rewrite-target: /
name: ingress3
spec:
tls:
- hosts:
- myapp-tls.timinglee.org
secretName: web-tls-secret
ingressClassName: nginx
rules:
- host: myapp-tls.timinglee.org
http:
paths:
- backend:
service:
name: myapp-v1
port:
number: 80
path: /
pathType: Prefix
#测试
[root@reg ~]# curl -k https://myapp-tls.timinglee.org
Hello MyApp | Version: v1 | <a href="hostname.html">Pod Name</a>
Canary金丝雀发布
金丝雀发布(Canary Release)也称为灰度发布,是一种软件发布策略。
主要目的是在将新版本的软件全面推广到生产环境之前,先在一小部分用户或服务器上进行测试和验证,以降低因新版本引入重大问题而对整个系统造成的影响。
是一种Pod的发布方式。金丝雀发布采取先添加、再删除的方式,保证Pod的总量不低于期望值。并且在更新部分Pod后,暂停更新,当确认新Pod版本运行正常后再进行其他版本的Pod的更新。
Canary发布方式
基于header(http包头)灰度
#建立版本1的ingress
[root@k8s-master app]# vim ingress7.yml
apiVersion: networking.k8s.io/v1
kind: Ingress
metadata:
annotations:
name: myapp-v1-ingress
spec:
ingressClassName: nginx
rules:
- host: myapp.timinglee.org
http:
paths:
- backend:
service:
name: myapp-v1
port:
number: 80
path: /
pathType: Prefix
[root@k8s-master app]# kubectl describe ingress myapp-v1-ingress
Name: myapp-v1-ingress
Labels: <none>
Namespace: default
Address: 172.25.254.10
Ingress Class: nginx
Default backend: <default>
Rules:
Host Path Backends
---- ---- --------
myapp.timinglee.org
/ myapp-v1:80 (10.244.2.31:80)
Annotations: <none>
Events:
Type Reason Age From Message
---- ------ ---- ---- -------
Normal Sync 44s (x2 over 73s) nginx-ingress-controller Scheduled for sync
#建立基于header的ingress
[root@k8s-master app]# vim ingress8.yml
apiVersion: networking.k8s.io/v1
kind: Ingress
metadata:
annotations:
nginx.ingress.kubernetes.io/canary: "true"
nginx.ingress.kubernetes.io/canary-by-header: “version”
nginx.ingress.kubernetes.io/canary-by-header-value: ”2“
name: myapp-v2-ingress
spec:
ingressClassName: nginx
rules:
- host: myapp.timinglee.org
http:
paths:
- backend:
service:
name: myapp-v2
port:
number: 80
path: /
pathType: Prefix
[root@k8s-master app]# kubectl apply -f ingress8.yml
ingress.networking.k8s.io/myapp-v2-ingress created
[root@k8s-master app]# kubectl describe ingress myapp-v2-ingress
Name: myapp-v2-ingress
Labels: <none>
Namespace: default
Address:
Ingress Class: nginx
Default backend: <default>
Rules:
Host Path Backends
---- ---- --------
myapp.timinglee.org
/ myapp-v2:80 (10.244.2.32:80)
Annotations: nginx.ingress.kubernetes.io/canary: true
nginx.ingress.kubernetes.io/canary-by-header: version
nginx.ingress.kubernetes.io/canary-by-header-value: 2
Events:
Type Reason Age From Message
---- ------ ---- ---- -------
Normal Sync 21s nginx-ingress-controller Scheduled for sync#测试:
[root@reg ~]# curl myapp.timinglee.org
Hello MyApp | Version: v1 | <a href="hostname.html">Pod Name</a>
[root@reg ~]# curl -H "version: 2" myapp.timinglee.org
Hello MyApp | Version: v2 | <a href="hostname.html">Pod Name</a>
基于权重的灰度发布
#基于权重的灰度发布
[root@k8s-master app]# vim ingress8.yml
apiVersion: networking.k8s.io/v1
kind: Ingress
metadata:
annotations:
nginx.ingress.kubernetes.io/canary: "true"
nginx.ingress.kubernetes.io/canary-weight: "10" #更改权重值
nginx.ingress.kubernetes.io/canary-weight-total: "100"
name: myapp-v2-ingress
spec:
ingressClassName: nginx
rules:
- host: myapp.timinglee.org
http:
paths:
- backend:
service:
name: myapp-v2
port:
number: 80
path: /
pathType: Prefix[root@k8s-master app]# kubectl apply -f ingress8.yml
ingress.networking.k8s.io/myapp-v2-ingress created#测试:
[root@reg ~]# vim check_ingress.sh
#!/bin/bash
v1=0
v2=0for (( i=0; i<100; i++))
do
response=`curl -s myapp.timinglee.org |grep -c v1`v1=`expr $v1 + $response`
v2=`expr $v2 + 1 - $response`done
echo "v1:$v1, v2:$v2"[root@reg ~]# sh check_ingress.sh
v1:90, v2:10#更改完毕权重后继续测试可观察变化
五、集群储存
configmap
configmap的功能
-
configMap用于保存配置数据,以键值对形式存储。
-
configMap 资源提供了向 Pod 注入配置数据的方法。
-
镜像和配置文件解耦,以便实现镜像的可移植性和可复用性。
-
etcd限制了文件大小不能超过1M
configmap创建方式
字面值创建
[root@k8s-master ~]# kubectl create cm lee-config --from-literal fname=timing --from-literal name=lee
configmap/lee-config created[root@k8s-master ~]# kubectl describe cm lee-config
Name: lee-config
Namespace: default
Labels: <none>
Annotations: <none>Data #键值信息显示
====
fname:
----
timing
lname:
----
leeBinaryData
====Events: <none>
通过文件创建
[root@k8s-master ~]# cat /etc/resolv.conf
# Generated by NetworkManager
nameserver 114.114.114.114[root@k8s-master ~]# kubectl create cm lee2-config --from-file /etc/resolv.conf
configmap/lee2-config created
[root@k8s-master ~]# kubectl describe cm lee2-config
Name: lee2-config
Namespace: default
Labels: <none>
Annotations: <none>Data
====
resolv.conf:
----
# Generated by NetworkManager
nameserver 114.114.114.114
BinaryData
====Events: <none>
通过目录创建
[root@k8s-master ~]# mkdir leeconfig
[root@k8s-master ~]# cp /etc/fstab /etc/rc.d/rc.local leeconfig/
[root@k8s-master ~]# kubectl create cm lee3-config --from-file leeconfig/
configmap/lee3-config created
[root@k8s-master ~]# kubectl describe cm lee3-config
Name: lee3-config
Namespace: default
Labels: <none>
Annotations: <none>Data
====
fstab:
----#
# /etc/fstab
# Created by anaconda on Fri Jul 26 13:04:22 2024
#
# Accessible filesystems, by reference, are maintained under '/dev/disk/'.
# See man pages fstab(5), findfs(8), mount(8) and/or blkid(8) for more info.
#
# After editing this file, run 'systemctl daemon-reload' to update systemd
# units generated from this file.
#
UUID=6577c44f-9c1c-44f9-af56-6d6b505fcfa8 / xfs defaults 0 0
UUID=eec689b4-73d5-4f47-b999-9a585bb6da1d /boot xfs defaults 0 0
UUID=ED00-0E42 /boot/efi vfat umask=0077,shortname=winnt 0 2
#UUID=be2f2006-6072-4c77-83d4-f2ff5e237f9f none swap defaults 0 0rc.local:
----
#!/bin/bash
# THIS FILE IS ADDED FOR COMPATIBILITY PURPOSES
#
# It is highly advisable to create own systemd services or udev rules
# to run scripts during boot instead of using this file.
#
# In contrast to previous versions due to parallel execution during boot
# this script will NOT be run after all other services.
#
# Please note that you must run 'chmod +x /etc/rc.d/rc.local' to ensure
# that this script will be executed during boot.touch /var/lock/subsys/local
mount /dev/cdrom /rhel9
BinaryData
====Events: <none>
通过yaml文件创建
[root@k8s-master ~]# kubectl create cm lee4-config --from-literal db_host=172.25.254.100 --from-literal db_port=3306 --dry-run=client -o yaml > lee-config.yaml
[root@k8s-master ~]# vim lee-config.yaml
apiVersion: v1
kind: ConfigMap
metadata:
name: lee4-config
data:
db_host: ”172.25.254.100“
db_port: "3306"[root@k8s-master ~]# kubectl describe cm lee4-config
Name: lee4-config
Namespace: default
Labels: <none>
Annotations: <none>Data
====
db_host:
----
172.25.254.100
db_port:
----
3306BinaryData
====Events: <none>
configmap的使用方式
使用configmap填充环境变量
#讲cm中的内容映射为指定变量
[root@k8s-master ~]# vim testpod1.yml
apiVersion: v1
kind: Pod
metadata:
labels:
run: testpod
name: testpod
spec:
containers:
- image: busyboxplus:latest
name: testpod
command:
- /bin/sh
- -c
- env
env:
- name: key1
valueFrom:
configMapKeyRef:
name: lee4-config
key: db_host
- name: key2
valueFrom:
configMapKeyRef:
name: lee4-config
key: db_port
restartPolicy: Never[root@k8s-master ~]# kubectl apply -f testpod.yml
pod/testpod created[root@k8s-master ~]# kubectl logs pods/testpod
KUBERNETES_PORT=tcp://10.96.0.1:443
KUBERNETES_SERVICE_PORT=443
MYAPP_V1_SERVICE_HOST=10.104.84.65
HOSTNAME=testpod
SHLVL=1
MYAPP_V2_SERVICE_HOST=10.105.246.219
HOME=/
MYAPP_V1_PORT=tcp://10.104.84.65:80
MYAPP_V1_SERVICE_PORT=80
MYAPP_V2_SERVICE_PORT=80
MYAPP_V2_PORT=tcp://10.105.246.219:80
MYAPP_V1_PORT_80_TCP_ADDR=10.104.84.65
MYAPP_V2_PORT_80_TCP_ADDR=10.105.246.219
KUBERNETES_PORT_443_TCP_ADDR=10.96.0.1
MYAPP_V1_PORT_80_TCP_PORT=80
MYAPP_V2_PORT_80_TCP_PORT=80
MYAPP_V1_PORT_80_TCP_PROTO=tcp
PATH=/usr/local/sbin:/usr/local/bin:/usr/sbin:/usr/bin:/sbin:/bin
MYAPP_V2_PORT_80_TCP_PROTO=tcp
KUBERNETES_PORT_443_TCP_PORT=443
KUBERNETES_PORT_443_TCP_PROTO=tcp
key1=172.25.254.100
key2=3306
MYAPP_V1_PORT_80_TCP=tcp://10.104.84.65:80
MYAPP_V2_PORT_80_TCP=tcp://10.105.246.219:80
KUBERNETES_PORT_443_TCP=tcp://10.96.0.1:443
KUBERNETES_SERVICE_PORT_HTTPS=443
PWD=/
KUBERNETES_SERVICE_HOST=10.96.0.1
#把cm中的值直接映射为变量
[root@k8s-master ~]# vim testpod2.yml
apiVersion: v1
kind: Pod
metadata:
labels:
run: testpod
name: testpod
spec:
containers:
- image: busyboxplus:latest
name: testpod
command:
- /bin/sh
- -c
- env
envFrom:
- configMapRef:
name: lee4-config
restartPolicy: Never#查看日志
[root@k8s-master ~]# kubectl logs pods/testpod
KUBERNETES_PORT=tcp://10.96.0.1:443
KUBERNETES_SERVICE_PORT=443
MYAPP_V1_SERVICE_HOST=10.104.84.65
HOSTNAME=testpod
SHLVL=1
MYAPP_V2_SERVICE_HOST=10.105.246.219
HOME=/
db_port=3306
MYAPP_V1_SERVICE_PORT=80
MYAPP_V1_PORT=tcp://10.104.84.65:80
MYAPP_V2_SERVICE_PORT=80
MYAPP_V2_PORT=tcp://10.105.246.219:80
MYAPP_V1_PORT_80_TCP_ADDR=10.104.84.65
MYAPP_V2_PORT_80_TCP_ADDR=10.105.246.219
KUBERNETES_PORT_443_TCP_ADDR=10.96.0.1
MYAPP_V1_PORT_80_TCP_PORT=80
age=18
MYAPP_V2_PORT_80_TCP_PORT=80
MYAPP_V1_PORT_80_TCP_PROTO=tcp
PATH=/usr/local/sbin:/usr/local/bin:/usr/sbin:/usr/bin:/sbin:/bin
KUBERNETES_PORT_443_TCP_PORT=443
MYAPP_V2_PORT_80_TCP_PROTO=tcp
KUBERNETES_PORT_443_TCP_PROTO=tcp
MYAPP_V1_PORT_80_TCP=tcp://10.104.84.65:80
MYAPP_V2_PORT_80_TCP=tcp://10.105.246.219:80
KUBERNETES_SERVICE_PORT_HTTPS=443
KUBERNETES_PORT_443_TCP=tcp://10.96.0.1:443
name=lee
PWD=/
KUBERNETES_SERVICE_HOST=10.96.0.1
db_host=172.25.254.100
#在pod命令行中使用变量
[root@k8s-master ~]# vim testpod3.yml
apiVersion: v1
kind: Pod
metadata:
labels:
run: testpod
name: testpod
spec:
containers:
- image: busyboxplus:latest
name: testpod
command:
- /bin/sh
- -c
- echo ${db_host} ${db_port} #变量调用需
envFrom:
- configMapRef:
name: lee4-config
restartPolicy: Never#查看日志
[root@k8s-master ~]# kubectl logs pods/testpod
172.25.254.100 3306
通过数据卷使用configmap
[root@k8s-master ~]# vim testpod4.yml
apiVersion: v1
kind: Pod
metadata:
labels:
run: testpod
name: testpod
spec:
containers:
- image: busyboxplus:latest
name: testpod
command:
- /bin/sh
- -c
- cat /config/db_host
volumeMounts: #调用卷策略
- name: config-volume #卷名称
mountPath: /config
volumes: #声明卷的配置
- name: config-volume #卷名称
configMap:
name: lee4-config
restartPolicy: Never#查看日志
[root@k8s-master ~]# kubectl logs testpod
172.25.254.100
利用configMap填充pod的配置文件
#建立配置文件模板
[root@k8s-master ~]# vim nginx.conf
server {
listen 8000;
server_name _;
root /usr/share/nginx/html;
index index.html;
}#利用模板生成cm
root@k8s-master ~]# kubectl create cm nginx-conf --from-file nginx.conf
configmap/nginx-conf created
[root@k8s-master ~]# kubectl describe cm nginx-conf
Name: nginx-conf
Namespace: default
Labels: <none>
Annotations: <none>Data
====
nginx.conf:
----
server {
listen 8000;
server_name _;
root /usr/share/nginx/html;
index index.html;
}
BinaryData
====Events: <none>
#建立nginx控制器文件
[root@k8s-master ~]# kubectl create deployment nginx --image nginx:latest --replicas 1 --dry-run=client -o yaml > nginx.yml#设定nginx.yml中的卷
[root@k8s-master ~]# vim nginx.yml
[root@k8s-master ~]# cat nginx.
cat: nginx.: 没有那个文件或目录
[root@k8s-master ~]# cat nginx.yml
apiVersion: apps/v1
kind: Deployment
metadata:
labels:
app: nginx
name: nginx
spec:
replicas: 1
selector:
matchLabels:
app: nginx
template:
metadata:
labels:
app: nginx
spec:
containers:
- image: nginx:latest
name: nginx
volumeMounts:
- name: config-volume
mountPath: /etc/nginx/conf.dvolumes:
- name: config-volume
configMap:
name: nginx-conf
#测试
[root@k8s-master ~]# kubectl get pods -o wide
NAME READY STATUS RESTARTS AGE IP NODE NOMINATED NODE READINESS GATES
nginx-8487c65cfc-cz5hd 1/1 Running 0 3m7s 10.244.2.38 k8s-node2 <none> <none>
[root@k8s-master ~]# curl 10.244.2.38:8000
通过热更新cm修改配置
[root@k8s-master ~]# kubectl edit cm nginx-conf
apiVersion: v1
data:
nginx.conf: |
server {
listen 8080; #端口改为8080
server_name _;
root /usr/share/nginx/html;
index index.html;
}
kind: ConfigMap
metadata:
creationTimestamp: "2024-09-07T02:49:20Z"
name: nginx-conf
namespace: default
resourceVersion: "153055"
uid: 20bee584-2dab-4bd5-9bcb-78318404fa7a#查看配置文件
[root@k8s-master ~]# kubectl exec pods/nginx-8487c65cfc-cz5hd -- cat /etc/nginx/conf.d/nginx.conf
server {
listen 8080;
server_name _;
root /usr/share/nginx/html;
index index.html;
}
[root@k8s-master ~]# kubectl delete pods nginx-8487c65cfc-cz5hd
pod "nginx-8487c65cfc-cz5hd" deleted[root@k8s-master ~]# curl 10.244.2.41:8080
secrets配置管理
secrets的功能介绍
-
Secret 对象类型用来保存敏感信息,例如密码、OAuth 令牌和 ssh key。
-
敏感信息放在 secret 中比放在 Pod 的定义或者容器镜像中来说更加安全和灵活
-
Pod 可以用两种方式使用 secret:
-
作为 volume 中的文件被挂载到 pod 中的一个或者多个容器里。
-
当 kubelet 为 pod 拉取镜像时使用。
-
-
Secret的类型:
-
Service Account:Kubernetes 自动创建包含访问 API 凭据的 secret,并自动修改 pod 以使用此类型的 secret。
-
Opaque:使用base64编码存储信息,可以通过base64 --decode解码获得原始数据,因此安全性弱。
-
kubernetes.io/dockerconfigjson:用于存储docker registry的认证信息
-
secrets的创建
从文件创建
[root@k8s-master secrets]# echo -n timinglee > username.txt
[root@k8s-master secrets]# echo -n lee > password.txt
root@k8s-master secrets]# kubectl create secret generic userlist --from-file username.txt --from-file password.txt
secret/userlist created
[root@k8s-master secrets]# kubectl get secrets userlist -o yaml
apiVersion: v1
data:
password.txt: bGVl
username.txt: dGltaW5nbGVl
kind: Secret
metadata:
creationTimestamp: "2024-09-07T07:30:42Z"
name: userlist
namespace: default
resourceVersion: "177216"
uid: 9d76250c-c16b-4520-b6f2-cc6a8ad25594
type: Opaque
编写yaml文件
[root@k8s-master secrets]# echo -n timinglee | base64
dGltaW5nbGVl
[root@k8s-master secrets]# echo -n lee | base64
bGVl[root@k8s-master secrets]# kubectl create secret generic userlist --dry-run=client -o yaml > userlist.yml
[root@k8s-master secrets]# vim userlist.yml
apiVersion: v1
kind: Secret
metadata:
creationTimestamp: null
name: userlist
type: Opaque
data:
username: dGltaW5nbGVl
password: bGVl[root@k8s-master secrets]# kubectl apply -f userlist.yml
secret/userlist created[root@k8s-master secrets]# kubectl describe secrets userlist
Name: userlist
Namespace: default
Labels: <none>
Annotations: <none>Type: Opaque
Data
====
password: 3 bytes
username: 9 byte
volumes配置管理
kubernets支持的卷的类型
官网:卷 | Kubernetes
k8s支持的卷的类型如下:
-
awsElasticBlockStore 、azureDisk、azureFile、cephfs、cinder、configMap、csi
-
downwardAPI、emptyDir、fc (fibre channel)、flexVolume、flocker
-
gcePersistentDisk、gitRepo (deprecated)、glusterfs、hostPath、iscsi、local、
-
nfs、persistentVolumeClaim、projected、portworxVolume、quobyte、rbd
-
scaleIO、secret、storageos、vsphereVolume
emptyDir卷
当Pod指定到某个节点上时,首先创建的是一个emptyDir卷,并且只要 Pod 在该节点上运行,卷就一直存在。卷最初是空的。 尽管 Pod 中的容器挂载 emptyDir 卷的路径可能相同也可能不同,但是这些容器都可以读写 emptyDir 卷中相同的文件。 当 Pod 因为某些原因被从节点上删除时,emptyDir 卷中的数据也会永久删除
[root@k8s-master volumes]# vim pod1.yml
apiVersion: v1
kind: Pod
metadata:
name: vol1
spec:
containers:
- image: busyboxplus:latest
name: vm1
command:
- /bin/sh
- -c
- sleep 30000000
volumeMounts:
- mountPath: /cache
name: cache-vol
- image: nginx:latest
name: vm2
volumeMounts:
- mountPath: /usr/share/nginx/html
name: cache-vol
volumes:
- name: cache-vol
emptyDir:
medium: Memory
sizeLimit: 100Mi[root@k8s-master volumes]# kubectl apply -f pod1.yml
#查看pod中卷的使用情况
[root@k8s-master volumes]# kubectl describe pods vol1#测试效果
[root@k8s-master volumes]# kubectl exec -it pods/vol1 -c vm1 -- /bin/sh
/ # cd /cache/
/cache # ls
/cache # curl localhost
<html>
<head><title>403 Forbidden</title></head>
<body>
<center><h1>403 Forbidden</h1></center>
<hr><center>nginx/1.27.1</center>
</body>
</html>
hostpath卷
功能:
hostPath 卷能将主机节点文件系统上的文件或目录挂载到您的 Pod 中,不会因为pod关闭而被删除
[root@k8s-master volumes]# vim pod2.yml
apiVersion: v1
kind: Pod
metadata:
name: vol1
spec:
containers:
- image: nginx:latest
name: vm1
volumeMounts:
- mountPath: /usr/share/nginx/html
name: cache-vol
volumes:
- name: cache-vol
hostPath:
path: /data
type: DirectoryOrCreate #当/data目录不存在时自动建立#测试:
[root@k8s-master volumes]# kubectl apply -f pod2.yml
pod/vol1 created
[root@k8s-master volumes]# kubectl get pods -o wide
NAME READY STATUS RESTARTS AGE IP NODE NOMINATED NODE READINESS GATES
vol1 1/1 Running 0 10s 10.244.2.48 k8s-node2 <none> <none>[root@k8s-master volumes]# curl 10.244.2.48
<html>
<head><title>403 Forbidden</title></head>
<body>
<center><h1>403 Forbidden</h1></center>
<hr><center>nginx/1.27.1</center>
</body>
</html>
nfs卷
NFS 卷允许将一个现有的 NFS 服务器上的目录挂载到 Kubernetes 中的 Pod 中。这对于在多个 Pod 之间共享数据或持久化存储数据非常有用
例如,如果有多个容器需要访问相同的数据集,或者需要将容器中的数据持久保存到外部存储,NFS 卷可以提供一种方便的解决方案。
#部署nfs主机
[root@reg ~]# dnf install nfs-utils -y
[root@reg ~]# systemctl enable --now nfs-server.service[root@reg ~]# vim /etc/exports
/nfsdata *(rw,sync,no_root_squash)[root@reg ~]# exportfs -rv
exporting *:/nfsdata[root@reg ~]# showmount -e
Export list for reg.timinglee.org:
/nfsdata *#在k8s所有节点中安装nfs-utils
[root@k8s-master & node1 & node2 ~]# dnf install nfs-utils -y
[root@k8s-master volumes]# vim pod3.yml
apiVersion: v1
kind: Pod
metadata:
name: vol1
spec:
containers:
- image: nginx:latest
name: vm1
volumeMounts:
- mountPath: /usr/share/nginx/html
name: cache-vol
volumes:
- name: cache-vol
nfs:
server: 172.25.254.250
path: /nfsdata[root@k8s-master volumes]# kubectl apply -f pod3.yml
pod/vol1 created#测试
[root@k8s-master volumes]# kubectl get pods -o wide
NAME READY STATUS RESTARTS AGE IP NODE NOMINATED NODE READINESS GATES
vol1 1/1 Running 0 100s 10.244.2.50 k8s-node2 <none> <none>
[root@k8s-master volumes]# curl 10.244.2.50
<html>
<head><title>403 Forbidden</title></head>
<body>
<center><h1>403 Forbidden</h1></center>
<hr><center>nginx/1.27.1</center>
</body>
</html>
静态持久卷pv与静态持久卷声明pvc
静态pv实例
#在nfs主机中建立实验目录
[root@reg ~]# mkdir /nfsdata/pv{1..3}#编写创建pv的yml文件,pv是集群资源,不在任何namespace中
[root@k8s-master pvc]# vim pv.yml
apiVersion: v1
kind: PersistentVolume
metadata:
name: pv1
spec:
capacity:
storage: 5Gi
volumeMode: Filesystem
accessModes:
- ReadWriteOnce
persistentVolumeReclaimPolicy: Retain
storageClassName: nfs
nfs:
path: /n
fsdata/pv1
server: 172.25.254.250---
apiVersion: v1
kind: PersistentVolume
metadata:
name: pv2
spec:
capacity:
storage: 15Gi
volumeMode: Filesystem
accessModes:
- ReadWriteMany
persistentVolumeReclaimPolicy: Retain
storageClassName: nfs
nfs:
path: /nfsdata/pv2
server: 172.25.254.250
---
apiVersion: v1
kind: PersistentVolume
metadata:
name: pv3
spec:
capacity:
storage: 25Gi
volumeMode: Filesystem
accessModes:
- ReadOnlyMany
persistentVolumeReclaimPolicy: Retain
storageClassName: nfs
nfs:
path: /nfsdata/pv3
server: 172.25.254.250[root@k8s-master pvc]# kubectl get pv
NAME CAPACITY ACCESS MODES RECLAIM POLICY STATUS CLAIM STORAGECLASS VOLUMEATTRIBUTESCLASS REASON AGE
pv1 5Gi RWO Retain Available nfs <unset> 4m50s
pv2 15Gi RWX Retain Available nfs <unset> 4m50s
pv3 25Gi ROX Retain Available nfs <unset> 4m50s#建立pvc,pvc是pv使用的申请,需要保证和pod在一个namesapce中
[root@k8s-master pvc]# vim pvc.ym
apiVersion: v1
kind: PersistentVolumeClaim
metadata:
name: pvc1
spec:
storageClassName: nfs
accessModes:
- ReadWriteOnce
resources:
requests:
storage: 1Gi---
apiVersion: v1
kind: PersistentVolumeClaim
metadata:
name: pvc2
spec:
storageClassName: nfs
accessModes:
- ReadWriteMany
resources:
requests:
storage: 10Gi---
apiVersion: v1
kind: PersistentVolumeClaim
metadata:
name: pvc3
spec:
storageClassName: nfs
accessModes:
- ReadOnlyMany
resources:
requests:
storage: 15Gi
[root@k8s-master pvc]# kubectl get pvc
NAME STATUS VOLUME CAPACITY ACCESS MODES STORAGECLASS VOLUMEATTRIBUTESCLASS AGE
pvc1 Bound pv1 5Gi RWO nfs <unset> 5s
pvc2 Bound pv2 15Gi RWX nfs <unset> 4s
pvc3 Bound pv3 25Gi ROX nfs <unset> 4s#在其他namespace中无法应用
[root@k8s-master pvc]# kubectl -n kube-system get pvc
No resources found in kube-system namespace.
在pod中使用pvc
[root@k8s-master pvc]# vim pod.yml
apiVersion: v1
kind: Pod
metadata:
name: timinglee
spec:
containers:
- image: nginx
name: nginx
volumeMounts:
- mountPath: /usr/share/nginx/html
name: vol1
volumes:
- name: vol1
persistentVolumeClaim:
claimName: pvc1[root@k8s-master pvc]# kubectl get pods -o wide
NAME READY STATUS RESTARTS AGE IP NODE NOMINATED NODE READINESS GATES
timinglee 1/1 Running 0 83s 10.244.2.54 k8s-node2 <none> <none>
[root@k8s-master pvc]# kubectl exec -it pods/timinglee -- /bin/bash
root@timinglee:/# curl localhost
<html>
<head><title>403 Forbidden</title></head>
<body>
<center><h1>403 Forbidden</h1></center>
<hr><center>nginx/1.27.1</center>
</body>
</html>
存储类storageclass
官网: https://github.com/kubernetes-sigs/nfs-subdir-external-provisioner
StorageClass的属性
属性说明:存储类 | Kubernetes
存储分配器NFS Client Provisioner
源码地址:https://github.com/kubernetes-sigs/nfs-subdir-external-provisioner
部署NFS Client Provisioner
创建sa并授权
[root@k8s-master storageclass]# vim rbac.yml
apiVersion: v1
kind: Namespace
metadata:
name: nfs-client-provisioner
---
apiVersion: v1
kind: ServiceAccount
metadata:
name: nfs-client-provisioner
namespace: nfs-client-provisioner
---
kind: ClusterRole
apiVersion: rbac.authorization.k8s.io/v1
metadata:
name: nfs-client-provisioner-runner
rules:
- apiGroups: [""]
resources: ["nodes"]
verbs: ["get", "list", "watch"]
- apiGroups: [""]
resources: ["persistentvolumes"]
verbs: ["get", "list", "watch", "create", "delete"]
- apiGroups: [""]
resources: ["persistentvolumeclaims"]
verbs: ["get", "list", "watch", "update"]
- apiGroups: ["storage.k8s.io"]
resources: ["storageclasses"]
verbs: ["get", "list", "watch"]
- apiGroups: [""]
resources: ["events"]
verbs: ["create", "update", "patch"]
---
kind: ClusterRoleBinding
apiVersion: rbac.authorization.k8s.io/v1
metadata:
name: run-nfs-client-provisioner
subjects:
- kind: ServiceAccount
name: nfs-client-provisioner
namespace: nfs-client-provisioner
roleRef:
kind: ClusterRole
name: nfs-client-provisioner-runner
apiGroup: rbac.authorization.k8s.io
---
kind: Role
apiVersion: rbac.authorization.k8s.io/v1
metadata:
name: leader-locking-nfs-client-provisioner
namespace: nfs-client-provisioner
rules:
- apiGroups: [""]
resources: ["endpoints"]
verbs: ["get", "list", "watch", "create", "update", "patch"]
---
kind: RoleBinding
apiVersion: rbac.authorization.k8s.io/v1
metadata:
name: leader-locking-nfs-client-provisioner
namespace: nfs-client-provisioner
subjects:
- kind: ServiceAccount
name: nfs-client-provisioner
namespace: nfs-client-provisioner
roleRef:
kind: Role
name: leader-locking-nfs-client-provisioner
apiGroup: rbac.authorization.k8s.io
#查看rbac信息
[root@k8s-master storageclass]# kubectl apply -f rbac.yml
namespace/nfs-client-provisioner created
serviceaccount/nfs-client-provisioner created
clusterrole.rbac.authorization.k8s.io/nfs-client-provisioner-runner created
clusterrolebinding.rbac.authorization.k8s.io/run-nfs-client-provisioner created
role.rbac.authorization.k8s.io/leader-locking-nfs-client-provisioner created
rolebinding.rbac.authorization.k8s.io/leader-locking-nfs-client-provisioner created
[root@k8s-master storageclass]# kubectl -n nfs-client-provisioner get sa
NAME SECRETS AGE
default 0 14s
nfs-client-provisioner 0 14s
部署应用
[root@k8s-master storageclass]# vim deployment.yml
apiVersion: apps/v1
kind: Deployment
metadata:
name: nfs-client-provisioner
labels:
app: nfs-client-provisioner
namespace: nfs-client-provisioner
spec:
replicas: 1
strategy:
type: Recreate
selector:
matchLabels:
app: nfs-client-provisioner
template:
metadata:
labels:
app: nfs-client-provisioner
spec:
serviceAccountName: nfs-client-provisioner
containers:
- name: nfs-client-provisioner
image: sig-storage/nfs-subdir-external-provisioner:v4.0.2
volumeMounts:
- name: nfs-client-root
mountPath: /persistentvolumes
env:
- name: PROVISIONER_NAME
value: k8s-sigs.io/nfs-subdir-external-provisioner
- name: NFS_SERVER
value: 172.25.254.250
- name: NFS_PATH
value: /nfsdata
volumes:
- name: nfs-client-root
nfs:
server: 172.25.254.250
path: /nfsdata
[root@k8s-master storageclass]# kubectl -n nfs-client-provisioner get deployments.apps nfs-client-provisioner
NAME READY UP-TO-DATE AVAILABLE AGE
nfs-client-provisioner 1/1 1 1 86s
创建存储类
[root@k8s-master storageclass]# vim class.yaml
apiVersion: storage.k8s.io/v1
kind: StorageClass
metadata:
name: nfs-client
provisioner: k8s-sigs.io/nfs-subdir-external-provisioner
parameters:
archiveOnDelete: "false"
[root@k8s-master storageclass]# kubectl apply -f class.yaml
storageclass.storage.k8s.io/nfs-client created
[root@k8s-master storageclass]# kubectl get storageclasses.storage.k8s.io
NAME PROVISIONER RECLAIMPOLICY VOLUMEBINDINGMODE ALLOWVOLUMEEXPANSION AGE
nfs-client k8s-sigs.io/nfs-subdir-external-provisioner Delete Immediate false 9s
创建pvc
[root@k8s-master storageclass]# vim pvc.yml
kind: PersistentVolumeClaim
apiVersion: v1
metadata:
name: test-claim
spec:
storageClassName: nfs-client
accessModes:
- ReadWriteMany
resources:
requests:
storage: 1G
[root@k8s-master storageclass]# kubectl apply -f pvc.yml
persistentvolumeclaim/test-claim created[root@k8s-master storageclass]# kubectl get pvc
NAME STATUS VOLUME CAPACITY ACCESS MODES STORAGECLASS VOLUMEATTRIBUTESCLASS AGE
test-claim Bound pvc-7782a006-381a-440a-addb-e9d659b8fe0b 1Gi RWX nfs-client <unset> 21m
创建测试pod
[root@k8s-master storageclass]# vim pod.yml
kind: Pod
apiVersion: v1
metadata:
name: test-pod
spec:
containers:
- name: test-pod
image: busybox
command:
- "/bin/sh"
args:
- "-c"
- "touch /mnt/SUCCESS && exit 0 || exit 1"
volumeMounts:
- name: nfs-pvc
mountPath: "/mnt"
restartPolicy: "Never"
volumes:
- name: nfs-pvc
persistentVolumeClaim:
claimName: test-claim[root@k8s-master storageclass]# kubectl apply -f pod.yml
[root@reg ~]# ls /data/default-test-claim-pvc-b1aef9cc-4be9-4d2a-8c5e-0fe7716247e2/
SUCCESS
设置默认存储类
#一次性指定多个pvc
[root@k8s-master pvc]# vim pvc.yml
apiVersion: v1
kind: PersistentVolumeClaim
metadata:
name: pvc1
spec:
storageClassName: nfs-client
accessModes:
- ReadWriteOnce
resources:
requests:
storage: 1Gi---
apiVersion: v1
kind: PersistentVolumeClaim
metadata:
name: pvc2
spec:
storageClassName: nfs-client
accessModes:
- ReadWriteMany
resources:
requests:
storage: 10Gi---
apiVersion: v1
kind: PersistentVolumeClaim
metadata:
name: pvc3
spec:
storageClassName: nfs-client
accessModes:
- ReadOnlyMany
resources:
requests:
storage: 15Giroot@k8s-master pvc]# kubectl apply -f pvc.yml
persistentvolumeclaim/pvc1 created
persistentvolumeclaim/pvc2 created
persistentvolumeclaim/pvc3 created
[root@k8s-master pvc]# kubectl get pvc
NAME STATUS VOLUME CAPACITY ACCESS MODES STORAGECLASS VOLUMEATTRIBUTESCLASS AGE
pvc1 Bound pvc-25a3c8c5-2797-4240-9270-5c51caa211b8 1Gi RWO nfs-client <unset> 4s
pvc2 Bound pvc-c7f34d1c-c8d3-4e7f-b255-e29297865353 10Gi RWX nfs-client <unset> 4s
pvc3 Bound pvc-5f1086ad-2999-487d-88d2-7104e3e9b221 15Gi ROX nfs-client <unset> 4s
test-claim Bound pvc-b1aef9cc-4be9-4d2a-8c5e-0fe7716247e2 1Gi RWX nfs-client <unset> 9m9s
设定默认存储类
[root@k8s-master storageclass]# kubectl edit sc nfs-client
apiVersion: storage.k8s.io/v1
kind: StorageClass
metadata:
annotations:
kubectl.kubernetes.io/last-applied-configuration: |
{"apiVersion":"storage.k8s.io/v1","kind":"StorageClass","metadata":{"annotations":{},"name":"nfs-client"},"parameters":{"archiveOnDelete":"false"},"provisioner":"k8s-sigs.io/nfs-subdir-external-provisioner"}
storageclass.kubernetes.io/is-default-class: "true" #设定默认存储类
creationTimestamp: "2024-09-07T13:49:10Z"
name: nfs-client
resourceVersion: "218198"
uid: 9eb1e144-3051-4f16-bdec-30c472358028
parameters:
archiveOnDelete: "false"
provisioner: k8s-sigs.io/nfs-subdir-external-provisioner
reclaimPolicy: Delete
volumeBindingMode: Immediate#测试,未指定storageClassName参数
[root@k8s-master storageclass]# vim pvc.yml
kind: PersistentVolumeClaim
apiVersion: v1
metadata:
name: test-claim
spec:
accessModes:
- ReadWriteMany
resources:
requests:
storage: 1Gi[root@k8s-master storageclass]# kubectl apply -f pvc.yml
persistentvolumeclaim/test-claim created
[root@k8s-master storageclass]# kubectl get pvc
NAME STATUS VOLUME CAPACITY ACCESS MODES STORAGECLASS VOLUMEATTRIBUTESCLASS AGE
test-claim Bound pvc-b96c6983-5a4f-440d-99ec-45c99637f9b5 1Gi RWX nfs-client <unset> 7s
statefulset控制器
#建立无头服务
[root@k8s-master statefulset]# vim headless.yml
apiVersion: v1
kind: Service
metadata:
name: nginx-svc
labels:
app: nginx
spec:
ports:
- port: 80
name: web
clusterIP: None
selector:
app: nginx
[root@k8s-master statefulset]# kubectl apply -f headless.yml
#建立statefulset
[root@k8s-master statefulset]# vim statefulset.yml
apiVersion: apps/v1
kind: StatefulSet
metadata:
name: web
spec:
serviceName: "nginx-svc"
replicas: 3
selector:
matchLabels:
app: nginx
template:
metadata:
labels:
app: nginx
spec:
containers:
- name: nginx
image: nginx
volumeMounts:
- name: www
mountPath: /usr/share/nginx/htmlvolumeClaimTemplates:
- metadata:
name: www
spec:
storageClassName: nfs-client
accessModes:
- ReadWriteOnce
resources:
requests:
storage: 1Gi
[root@k8s-master statefulset]# kubectl apply -f statefulset.yml
statefulset.apps/web configured
root@k8s-master statefulset]# kubectl get pods
NAME READY STATUS RESTARTS AGE
web-0 1/1 Running 0 3m26s
web-1 1/1 Running 0 3m22s
web-2 1/1 Running 0 3m18s
[root@reg nfsdata]# ls /nfsdata/
default-test-claim-pvc-34b3d968-6c2b-42f9-bbc3-d7a7a02dcbac
default-www-web-0-pvc-0390b736-477b-4263-9373-a53d20cc8f9f
default-www-web-1-pvc-a5ff1a7b-fea5-4e77-afd4-cdccedbc278c
default-www-web-2-pvc-83eff88b-4ae1-4a8a-b042-8899677ae854
测试
#为每个pod建立index.html文件
[root@reg nfsdata]# echo web-0 > default-www-web-0-pvc-0390b736-477b-4263-9373-a53d20cc8f9f/index.html
[root@reg nfsdata]# echo web-1 > default-www-web-1-pvc-a5ff1a7b-fea5-4e77-afd4-cdccedbc278c/index.html
[root@reg nfsdata]# echo web-2 > default-www-web-2-pvc-83eff88b-4ae1-4a8a-b042-8899677ae854/index.html#建立测试pod访问web-0~2
[root@k8s-master statefulset]# kubectl run -it testpod --image busyboxplus
/ # curl web-0.nginx-svc
web-0
/ # curl web-1.nginx-svc
web-1
/ # curl web-2.nginx-svc
web-2#删掉重新建立statefulset
[root@k8s-master statefulset]# kubectl delete -f statefulset.yml
statefulset.apps "web" deleted
[root@k8s-master statefulset]# kubectl apply -f statefulset.yml
statefulset.apps/web created#访问依然不变
[root@k8s-master statefulset]# kubectl attach testpod -c testpod -i -t
If you don't see a command prompt, try pressing enter.
/ # cu
curl cut
/ # curl web-0.nginx-svc
web-0
/ # curl web-1.nginx-svc
web-1
/ # curl web-2.nginx-svc
web-2
statefulset的弹缩
用命令改变副本数
$ kubectl scale statefulsets <stateful-set-name> --replicas=<new-replicas>
通过编辑配置改变副本数
$ kubectl edit statefulsets.apps <stateful-set-name>
statefulset有序回收
[root@k8s-master statefulset]# kubectl scale statefulset web --replicas 0
statefulset.apps/web scaled
[root@k8s-master statefulset]# kubectl delete -f statefulset.yml
statefulset.apps "web" deleted
[root@k8s-master statefulset]# kubectl delete pvc --all
persistentvolumeclaim "test-claim" deleted
persistentvolumeclaim "www-web-0" deleted
persistentvolumeclaim "www-web-1" deleted
persistentvolumeclaim "www-web-2" deleted
persistentvolumeclaim "www-web-3" deleted
persistentvolumeclaim "www-web-4" deleted
persistentvolumeclaim "www-web-5" deleted
[root@k8s2 statefulset]# kubectl scale statefulsets web --replicas=0[root@k8s2 statefulset]# kubectl delete -f statefulset.yaml
[root@k8s2 mysql]# kubectl delete pvc --all
六、集群网络及调度
k8s通信整体架构
-
k8s通过CNI接口接入其他插件来实现网络通讯。目前比较流行的插件有flannel,calico等
-
CNI插件存放位置:# cat /etc/cni/net.d/10-flannel.conflist
-
插件使用的解决方案如下
-
虚拟网桥,虚拟网卡,多个容器共用一个虚拟网卡进行通信。
-
多路复用:MacVLAN,多个容器共用一个物理网卡进行通信。
-
硬件交换:SR-LOV,一个物理网卡可以虚拟出多个接口,这个性能最好。
-
-
容器间通信:
-
同一个pod内的多个容器间的通信,通过lo即可实现pod之间的通信
-
同一节点的pod之间通过cni网桥转发数据包。
-
不同节点的pod之间的通信需要网络插件支持
-
-
pod和service通信: 通过iptables或ipvs实现通信,ipvs取代不了iptables,因为ipvs只能做负载均衡,而做不了nat转换
-
pod和外网通信:iptables的MASQUERADE
-
Service与集群外部客户端的通信;(ingress、nodeport、loadbalancer)
flannel网络插件
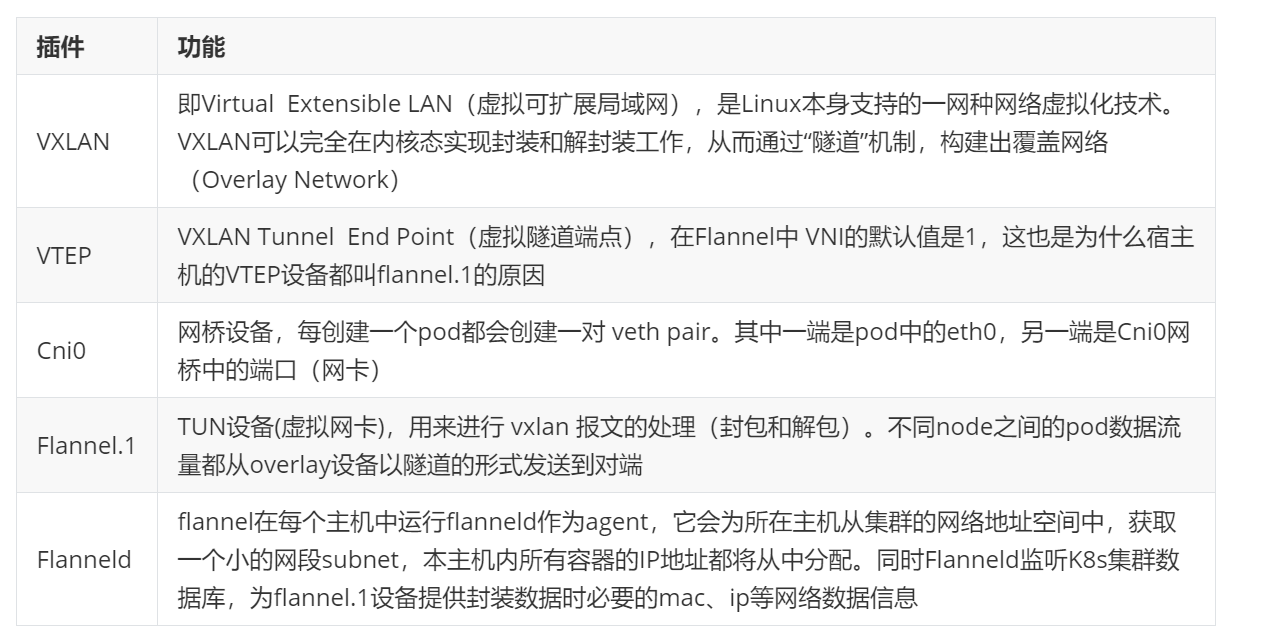
#默认网络通信路由
[root@k8s-master ~]# ip r
default via 172.25.254.2 dev eth0 proto static metric 100
10.244.0.0/24 dev cni0 proto kernel scope link src 10.244.0.1
10.244.1.0/24 via 10.244.1.0 dev flannel.1 onlink
10.244.2.0/24 via 10.244.2.0 dev flannel.1 onlink
172.17.0.0/16 dev docker0 proto kernel scope link src 172.17.0.1 linkdown
172.25.254.0/24 dev eth0 proto kernel scope link src 172.25.254.100 metric 100#桥接转发数据库
[root@k8s-master ~]# bridge fdb
01:00:5e:00:00:01 dev eth0 self permanent
33:33:00:00:00:01 dev eth0 self permanent
01:00:5e:00:00:fb dev eth0 self permanent
33:33:ff:65:cb:fa dev eth0 self permanent
33:33:00:00:00:fb dev eth0 self permanent
33:33:00:00:00:01 dev docker0 self permanent
01:00:5e:00:00:6a dev docker0 self permanent
33:33:00:00:00:6a dev docker0 self permanent
01:00:5e:00:00:01 dev docker0 self permanent
01:00:5e:00:00:fb dev docker0 self permanent
02:42:76:94:aa:bc dev docker0 vlan 1 master docker0 permanent
02:42:76:94:aa:bc dev docker0 master docker0 permanent
33:33:00:00:00:01 dev kube-ipvs0 self permanent
82:14:17:b1:1d:d0 dev flannel.1 dst 172.25.254.20 self permanent
22:7f:e7:fd:33:77 dev flannel.1 dst 172.25.254.10 self permanent
33:33:00:00:00:01 dev cni0 self permanent
01:00:5e:00:00:6a dev cni0 self permanent
33:33:00:00:00:6a dev cni0 self permanent
01:00:5e:00:00:01 dev cni0 self permanent
33:33:ff:aa:13:2f dev cni0 self permanent
01:00:5e:00:00:fb dev cni0 self permanent
33:33:00:00:00:fb dev cni0 self permanent
0e:49:e3:aa:13:2f dev cni0 vlan 1 master cni0 permanent
0e:49:e3:aa:13:2f dev cni0 master cni0 permanent
7a:1c:2d:5d:0e:9e dev vethf29f1523 master cni0
5e:4e:96:a0:eb:db dev vethf29f1523 vlan 1 master cni0 permanent
5e:4e:96:a0:eb:db dev vethf29f1523 master cni0 permanent
33:33:00:00:00:01 dev vethf29f1523 self permanent
01:00:5e:00:00:01 dev vethf29f1523 self permanent
33:33:ff:a0:eb:db dev vethf29f1523 self permanent
33:33:00:00:00:fb dev vethf29f1523 self permanent
b2:f9:14:9f:71:29 dev veth18ece01e master cni0
3a:05:06:21:bf:7f dev veth18ece01e vlan 1 master cni0 permanent
3a:05:06:21:bf:7f dev veth18ece01e master cni0 permanent
33:33:00:00:00:01 dev veth18ece01e self permanent
01:00:5e:00:00:01 dev veth18ece01e self permanent
33:33:ff:21:bf:7f dev veth18ece01e self permanent
33:33:00:00:00:fb dev veth18ece01e self permanent#arp列表
[root@k8s-master ~]# arp -n
Address HWtype HWaddress Flags Mask Iface
10.244.0.2 ether 7a:1c:2d:5d:0e:9e C cni0
172.25.254.1 ether 00:50:56:c0:00:08 C eth0
10.244.2.0 ether 82:14:17:b1:1d:d0 CM flannel.1
10.244.1.0 ether 22:7f:e7:fd:33:77 CM flannel.1
172.25.254.20 ether 00:0c:29:6a:a8:61 C eth0
172.25.254.10 ether 00:0c:29:ea:52:cb C eth0
10.244.0.3 ether b2:f9:14:9f:71:29 C cni0
172.25.254.2 ether 00:50:56:fc:e0:b9 C eth0
lannel支持的后端模式
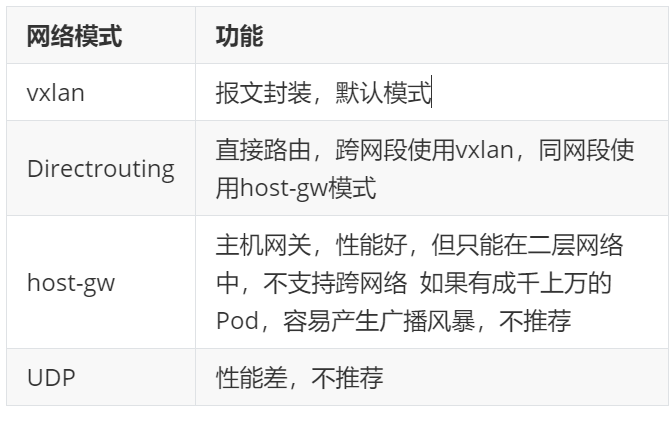
更改flannel的默认模式
[root@k8s-master ~]# kubectl -n kube-flannel edit cm kube-flannel-cfg
apiVersion: v1
data:
cni-conf.json: |
{
"name": "cbr0",
"cniVersion": "0.3.1",
"plugins": [
{
"type": "flannel",
"delegate": {
"hairpinMode": true,
"isDefaultGateway": true
}
},
{
"type": "portmap",
"capabilities": {
"portMappings": true
}
}
]
}
net-conf.json: |
{
"Network": "10.244.0.0/16",
"EnableNFTables": false,
"Backend": {
"Type": "host-gw" #更改内容
}
}
#重启pod
[root@k8s-master ~]# kubectl -n kube-flannel delete pod --all
pod "kube-flannel-ds-bk8wp" deleted
pod "kube-flannel-ds-mmftf" deleted
pod "kube-flannel-ds-tmfdn" deleted[root@k8s-master ~]# ip r
default via 172.25.254.2 dev eth0 proto static metric 100
10.244.0.0/24 dev cni0 proto kernel scope link src 10.244.0.1
10.244.1.0/24 via 172.25.254.10 dev eth0
10.244.2.0/24 via 172.25.254.20 dev eth0
172.17.0.0/16 dev docker0 proto kernel scope link src 172.17.0.1 linkdown
172.25.254.0/24 dev eth0 proto kernel scope link src 172.25.254.100 metric 100
calico网络插件
官网:
Installing on on-premises deployments | Calico Documentation
k8s调度(Scheduling)
常用调度方法
nodename
-
nodeName 是节点选择约束的最简单方法,但一般不推荐
-
如果 nodeName 在 PodSpec 中指定了,则它优先于其他的节点选择方法
-
使用 nodeName 来选择节点的一些限制
-
如果指定的节点不存在。
-
如果指定的节点没有资源来容纳 pod,则pod 调度失败。
-
云环境中的节点名称并非总是可预测或稳定的
-
#建立pod文件
[[root@k8s-master scheduler]# kubectl run testpod --image myapp:v1 --dry-run=client -o yaml > pod1.yml#设置调度
[root@k8s-master scheduler]# vim pod1.yml
apiVersion: v1
kind: Pod
metadata:
labels:
run: testpod
name: testpod
spec:
nodeName: k8s-node2
containers:
- image: myapp:v1
name: testpod#建立pod
[root@k8s-master scheduler]# kubectl apply -f pod1.yml
pod/testpod created[root@k8s-master scheduler]# kubectl get pods -o wide
NAME READY STATUS RESTARTS AGE IP NODE NOMINATED NODE READINESS GATES
testpod 1/1 Running 0 18s 10.244.169.130 k8s-node2 <none> <none>
Nodeselector(通过标签控制节点)
#查看节点标签
[root@k8s-master scheduler]# kubectl get nodes --show-labels
NAME STATUS ROLES AGE VERSION LABELS
k8s-master Ready control-plane 5d3h v1.30.0 beta.kubernetes.io/arch=amd64,beta.kubernetes.io/os=linux,kubernetes.io/arch=amd64,kubernetes.io/hostname=k8s-master,kubernetes.io/os=linux,node-role.kubernetes.io/control-plane=,node.kubernetes.io/exclude-from-external-load-balancers=
k8s-node1 Ready <none> 5d3h v1.30.0 beta.kubernetes.io/arch=amd64,beta.kubernetes.io/os=linux,kubernetes.io/arch=amd64,kubernetes.io/hostname=k8s-node1,kubernetes.io/os=linux
k8s-node2 Ready <none> 5d3h v1.30.0 beta.kubernetes.io/arch=amd64,beta.kubernetes.io/os=linux,kubernetes.io/arch=amd64,kubernetes.io/hostname=k8s-node2,kubernetes.io/os=linux
#设定节点标签
[root@k8s-master scheduler]# kubectl label nodes k8s-node1 lab=timinglee
node/k8s-node1 labeled
[root@k8s-master scheduler]# kubectl get nodes k8s-node1 --show-labels
NAME STATUS ROLES AGE VERSION LABELS
k8s-node1 Ready <none> 5d3h v1.30.0 beta.kubernetes.io/arch=amd64,beta.kubernetes.io/os=linux,kubernetes.io/arch=amd64,kubernetes.io/hostname=k8s-node1,kubernetes.io/os=linux,lab=timinglee#调度设置
[root@k8s-master scheduler]# vim pod2.yml
apiVersion: v1
kind: Pod
metadata:
labels:
run: testpod
name: testpod
spec:
nodeSelector:
lab: timinglee
containers:
- image: myapp:v1
name: testpod[root@k8s-master scheduler]# kubectl apply -f pod2.yml
pod/testpod created
[root@k8s-master scheduler]# kubectl get pods -o wide
NAME READY STATUS RESTARTS AGE IP NODE NOMINATED NODE READINESS GATES
testpod 1/1 Running 0 4s 10.244.36.65 k8s-node1 <none> <none>
affinity(亲和性)
官方文档 :
将 Pod 指派给节点 | Kubernetes
nodeAffinity节点亲和
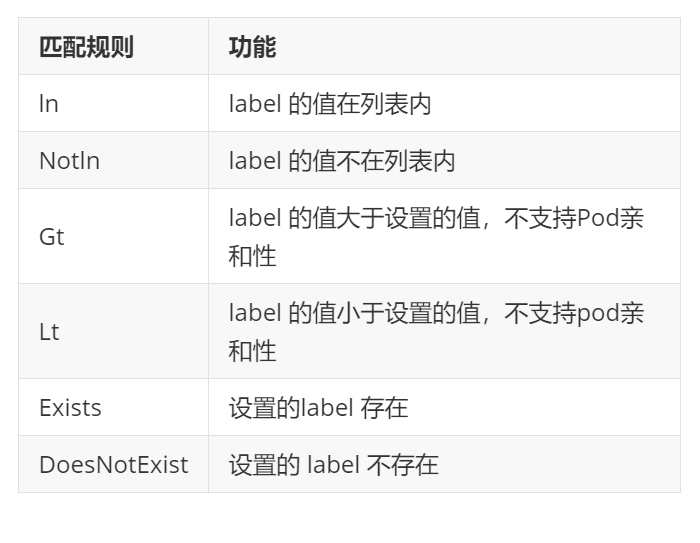
#示例1
[root@k8s-master scheduler]# vim pod3.yml
apiVersion: v1
kind: Pod
metadata:
name: node-affinity
spec:
containers:
- name: nginx
image: nginx
affinity:
nodeAffinity:
requiredDuringSchedulingIgnoredDuringExecution:
nodeSelectorTerms:
- matchExpressions:
- key: disk
operator: In | NotIn #两个结果相反
values:
- ssd
Podaffinity(pod的亲和)
[root@k8s-master scheduler]# vim example4.yml
apiVersion: apps/v1
kind: Deployment
metadata:
name: nginx-deployment
labels:
app: nginx
spec:
replicas: 3
selector:
matchLabels:
app: nginx
template:
metadata:
labels:
app: nginx
spec:
containers:
- name: nginx
image: nginx
affinity:
podAffinity:
requiredDuringSchedulingIgnoredDuringExecution:
- labelSelector:
matchExpressions:
- key: app
operator: In
values:
- nginx
topologyKey: "kubernetes.io/hostname"[root@k8s-master scheduler]# kubectl get pods -o wide
NAME READY STATUS RESTARTS AGE IP NODE NOMINATED NODE READINESS GATES
nginx-deployment-658496fff-d58bk 1/1 Running 0 39s 10.244.169.133 k8s-node2 <none> <none>
nginx-deployment-658496fff-g25nq 1/1 Running 0 39s 10.244.169.134 k8s-node2 <none> <none>
nginx-deployment-658496fff-vnlxz 1/1 Running 0 39s 10.244.169.135 k8s-node2 <none> <none>
Podantiaffinity(pod反亲和)
[root@k8s-master scheduler]# vim example5.yml
apiVersion: apps/v1
kind: Deployment
metadata:
name: nginx-deployment
labels:
app: nginx
spec:
replicas: 3
selector:
matchLabels:
app: nginx
template:
metadata:
labels:
app: nginx
spec:
containers:
- name: nginx
image: nginx
affinity:
podAntiAffinity: #反亲和
requiredDuringSchedulingIgnoredDuringExecution:
- labelSelector:
matchExpressions:
- key: app
operator: In
values:
- nginx
topologyKey: "kubernetes.io/hostname"[root@k8s-master scheduler]# kubectl get pods -o wide
NAME READY STATUS RESTARTS AGE IP NODE NOMINATED NODE READINESS GATES
nginx-deployment-5f5fc7b8b9-hs9kz 1/1 Running 0 6s 10.244.169.136 k8s-node2 <none> <none>
nginx-deployment-5f5fc7b8b9-ktzsh 0/1 Pending 0 6s <none> <none> <none> <none>
nginx-deployment-5f5fc7b8b9-txdt9 1/1 Running 0 6s 10.244.36.67 k8s-node1 <none> <none>
Taints(污点模式,禁止调度)
#建立控制器并运行
[root@k8s-master scheduler]# vim example6.yml
apiVersion: apps/v1
kind: Deployment
metadata:
labels:
app: web
name: web
spec:
replicas: 2
selector:
matchLabels:
app: web
template:
metadata:
labels:
app: web
spec:
containers:
- image: nginx
name: nginx[root@k8s-master scheduler]# kubectl apply -f example6.yml
deployment.apps/web createdroot@k8s-master scheduler]# kubectl get pod -o wide
NAME READY STATUS RESTARTS AGE IP NODE NOMINATED NODE READINESS GATES
web-7c56dcdb9b-9wwdg 1/1 Running 0 25s 10.244.36.68 k8s-node1 <none> <none>
web-7c56dcdb9b-qsx6w 1/1 Running 0 25s 10.244.169.137 k8s-node2 <none> <none>#设定污点为NoSchedule
[root@k8s-master scheduler]# kubectl taint node k8s-node1 name=lee:NoSchedule
node/k8s-node1 tainted
[root@k8s-master scheduler]# kubectl describe nodes k8s-node1 | grep Tain
Taints: name=lee:NoSchedule#控制器增加pod
[root@k8s-master scheduler]# kubectl get pod -o wide
NAME READY STATUS RESTARTS AGE IP NODE NOMINATED NODE READINESS GATES
web-7c56dcdb9b-4l759 1/1 Running 0 6s 10.244.169.140 k8s-node2 <none> <none>
web-7c56dcdb9b-9wwdg 1/1 Running 0 6m35s 10.244.36.68 k8s-node1 <none> <none>
web-7c56dcdb9b-bqd75 1/1 Running 0 6s 10.244.169.141 k8s-node2 <none> <none>
web-7c56dcdb9b-m8kx8 1/1 Running 0 6s 10.244.169.138 k8s-node2 <none> <none>
web-7c56dcdb9b-qsx6w 1/1 Running 0 6m35s 10.244.169.137 k8s-node2 <none> <none>
web-7c56dcdb9b-rhft4 1/1 Running 0 6s 10.244.169.139 k8s-node2 <none> <none>
#设定污点为NoExecute
[root@k8s-master scheduler]# kubectl taint node k8s-node1 name=lee:NoExecute
node/k8s-node1 tainted
[root@k8s-master scheduler]# kubectl describe nodes k8s-node1 | grep Tain
Taints: name=lee:NoExecute[root@k8s-master scheduler]# kubectl get pod -o wide
NAME READY STATUS RESTARTS AGE IP NODE NOMINATED NODE READINESS GATES
web-7c56dcdb9b-4l759 1/1 Running 0 108s 10.244.169.140 k8s-node2 <none> <none>
web-7c56dcdb9b-bqd75 1/1 Running 0 108s 10.244.169.141 k8s-node2 <none> <none>
web-7c56dcdb9b-m8kx8 1/1 Running 0 108s 10.244.169.138 k8s-node2 <none> <none>
web-7c56dcdb9b-mhkhl 0/1 ContainerCreating 0 14s <none> k8s-node2 <none> <none>
web-7c56dcdb9b-qsx6w 1/1 Running 0 8m17s 10.244.169.137 k8s-node2 <none> <none>
web-7c56dcdb9b-rhft4 1/1 Running 0 108s 10.244.169.139 k8s-node2 <none> <none>
#删除污点
[root@k8s-master scheduler]# kubectl taint node k8s-node1 name-
node/k8s-node1 untainted
[root@k8s-master scheduler]#
[root@k8s-master scheduler]# kubectl describe nodes k8s-node1 | grep Tain
Taints: <none>
tolerations(污点容忍)
#设定节点污点
[root@k8s-master scheduler]# kubectl taint node k8s-node1 name=lee:NoExecute
node/k8s-node1 tainted
[root@k8s-master scheduler]# kubectl taint node k8s-node2 nodetype=bad:NoSchedule
node/k8s-node2 tainted
[root@k8s-master scheduler]# vim example7.yml
apiVersion: apps/v1
kind: Deployment
metadata:
labels:
app: web
name: web
spec:
replicas: 6
selector:
matchLabels:
app: web
template:
metadata:
labels:
app: web
spec:
containers:
- image: nginx
name: nginx
tolerations: #容忍所有污点
- operator: Exists
tolerations: #容忍effect为Noschedule的污点
- operator: Exists
effect: NoSchedule
tolerations: #容忍指定kv的NoSchedule污点
- key: nodetype
value: bad
effect: NoSchedule
七、集群认证
kubernetes API 访问控制
Authentication(认证)
-
认证方式现共有8种,可以启用一种或多种认证方式,只要有一种认证方式通过,就不再进行其它方式的认证。通常启用X509 Client Certs和Service Accout Tokens两种认证方式。
-
Kubernetes集群有两类用户:由Kubernetes管理的Service Accounts (服务账户)和(Users Accounts) 普通账户。k8s中账号的概念不是我们理解的账号,它并不真的存在,它只是形式上存在。
Authorization(授权)
-
必须经过认证阶段,才到授权请求,根据所有授权策略匹配请求资源属性,决定允许或拒绝请求。授权方式现共有6种,AlwaysDeny、AlwaysAllow、ABAC、RBAC、Webhook、Node。默认集群强制开启RBAC。
Admission Control(准入控制)
-
用于拦截请求的一种方式,运行在认证、授权之后,是权限认证链上的最后一环,对请求API资源对象进行修改和校验。
UserAccount与ServiceAccount
- 用户账户是针对人而言的。 服务账户是针对运行在 pod 中的进程而言的。
- 用户账户是全局性的。 其名称在集群各 namespace 中都是全局唯一的,未来的用户资源不会做 namespace 隔离, 服务账户是 namespace 隔离的。
- 集群的用户账户可能会从企业数据库进行同步,其创建需要特殊权限,并且涉及到复杂的业务流程。 服务账户创建的目的是为了更轻量,允许集群用户为了具体的任务创建服务账户 ( 即权限最小化原则 )。
ServiceAccount示例
建立名字为admin的ServiceAccount
[root@k8s-master ~]# kubectl create sa timinglee
serviceaccount/timinglee created
[root@k8s-master ~]# kubectl describe sa timinglee
Name: timinglee
Namespace: default
Labels: <none>
Annotations: <none>
Image pull secrets: <none>
Mountable secrets: <none>
Tokens: <none>
Events: <none>
建立secrets
[root@k8s-master ~]# kubectl create secret docker-registry docker-login --docker-username admin --docker-password lee --docker-server reg.timinglee.org --docker-email lee@timinglee.org
secret/docker-login created
[root@k8s-master ~]# kubectl describe secrets docker-login
Name: docker-login
Namespace: default
Labels: <none>
Annotations: <none>Type: kubernetes.io/dockerconfigjson
Data
====
.dockerconfigjson: 119 bytes
将secrets注入到sa中
[root@k8s-master ~]# kubectl edit sa timinglee
apiVersion: v1
imagePullSecrets:
- name: docker-login
kind: ServiceAccount
metadata:
creationTimestamp: "2024-09-08T15:44:04Z"
name: timinglee
namespace: default
resourceVersion: "262259"
uid: 7645a831-9ad1-4ae8-a8a1-aca7b267ea2d[root@k8s-master ~]# kubectl describe sa timinglee
Name: timinglee
Namespace: default
Labels: <none>
Annotations: <none>
Image pull secrets: docker-login
Mountable secrets: <none>
Tokens: <none>
Events: <none>
建立私有仓库并且利用pod访问私有仓库
[root@k8s-master auth]# vim example1.yml
[root@k8s-master auth]# kubectl apply -f example1.yml
pod/testpod created
[root@k8s-master auth]# kubectl describe pod testpod
Warning Failed 5s kubelet Failed to pull image "reg.timinglee.org/lee/nginx:latest": Error response from daemon: unauthorized: unauthorized to access repository: lee/nginx, action: pull: unauthorized to access repository: lee/nginx, action: pull
Warning Failed 5s kubelet Error: ErrImagePull
Normal BackOff 3s (x2 over 4s) kubelet Back-off pulling image "reg.timinglee.org/lee/nginx:latest"
Warning Failed 3s (x2 over 4s) kubelet Error: ImagePullBackOff
pod绑定sa
[root@k8s-master auth]# vim example1.yml
apiVersion: v1
kind: Pod
metadata:
name: testpod
spec:
serviceAccountName: timinglee
containers:
- image: reg.timinglee.org/lee/nginx:latest
name: testpod[root@k8s-master auth]# kubectl apply -f example1.yml
pod/testpod created
[root@k8s-master auth]# kubectl get pods
NAME READY STATUS RESTARTS AGE
testpod 1/1 Running 0 2s
认证(在k8s中建立认证用户)
创建UserAccount
#建立证书
[root@k8s-master auth]# cd /etc/kubernetes/pki/
[root@k8s-master pki]# openssl genrsa -out timinglee.key 2048
[root@k8s-master pki]# openssl req -new -key timinglee.key -out timinglee.csr -subj "/CN=timinglee"
[root@k8s-master pki]# openssl x509 -req -in timinglee.csr -CA ca.crt -CAkey ca.key -CAcreateserial -out timinglee.crt -days 365
Certificate request self-signature ok[root@k8s-master pki]# openssl x509 -in timinglee.crt -text -noout
Certificate:
Data:
Version: 1 (0x0)
Serial Number:
76:06:6c:a7:36:53:b9:3f:5a:6a:93:3a:f2:e8:82:96:27:57:8e:58
Signature Algorithm: sha256WithRSAEncryption
Issuer: CN = kubernetes
Validity
Not Before: Sep 8 15:59:55 2024 GMT
Not After : Sep 8 15:59:55 2025 GMT
Subject: CN = timinglee
Subject Public Key Info:
Public Key Algorithm: rsaEncryption
Public-Key: (2048 bit)
Modulus:
00:a6:6d:be:5d:7f:4c:bf:36:96:dc:4e:1b:24:64:
f7:4b:57:d3:45:ad:e8:b5:07:e7:78:2b:9e:6e:53:
2f:16:ff:00:f4:c8:41:2c:89:3d:86:7c:1b:16:08:
2e:2c:bc:2c:1e:df:60:f0:80:60:f9:79:49:91:1d:
9f:47:16:9a:d1:86:c7:4f:02:55:27:12:93:b7:f4:
07:fe:13:64:fd:78:32:8d:12:d5:c2:0f:be:67:65:
f2:56:e4:d1:f6:fe:f6:d5:7c:2d:1d:c8:90:2a:ac:
3f:62:85:9f:4a:9d:85:73:33:26:5d:0f:4a:a9:14:
12:d4:fb:b3:b9:73:d0:a3:be:58:41:cb:a0:62:3e:
1b:44:ef:61:b5:7f:4a:92:5b:e3:71:77:99:b4:ea:
4d:27:80:14:e9:95:4c:d5:62:56:d6:54:7b:f7:c2:
ea:0e:47:b2:19:75:59:22:00:bd:ea:83:6b:cd:12:
46:7a:4a:79:83:ee:bc:59:6f:af:8e:1a:fd:aa:b4:
bd:84:4d:76:38:e3:1d:ea:56:b5:1e:07:f5:39:ef:
56:57:a2:3d:91:c0:3f:38:ce:36:5d:c7:fe:5e:0f:
53:75:5a:f0:6e:37:71:4b:90:03:2f:2e:11:bb:a1:
a1:5b:dc:89:b8:19:79:0a:ee:e9:b5:30:7d:16:44:
4a:53
Exponent: 65537 (0x10001)
Signature Algorithm: sha256WithRSAEncryption
Signature Value:
62:db:0b:58:a9:59:57:91:7e:de:9e:bb:20:2f:24:fe:b7:7f:
33:aa:d5:74:0e:f9:96:ce:1b:a9:65:08:7f:22:6b:45:ee:58:
68:d8:26:44:33:5e:45:e1:82:b2:5c:99:41:6b:1e:fa:e8:1a:
a2:f1:8f:44:22:e1:d6:58:5f:4c:28:3d:e0:78:21:ea:aa:85:
08:a5:c8:b3:34:19:d3:c7:e2:fe:a2:a4:f5:68:18:53:5f:ff:
7d:35:22:3c:97:3d:4e:ad:62:5f:bb:4d:88:fb:67:f4:d5:2d:
81:c8:2c:6c:5e:0e:e2:2c:f5:e9:07:34:16:01:e2:bf:1f:cd:
6a:66:db:b6:7b:92:df:13:a1:d0:58:d8:4d:68:96:66:e3:00:
6e:ce:11:99:36:9c:b3:b5:81:bf:d1:5b:d7:f2:08:5e:7d:ea:
97:fe:b3:80:d6:27:1c:89:e6:f2:f3:03:fc:dc:de:83:5e:24:
af:46:a6:2a:8e:b1:34:67:51:2b:19:eb:4c:78:12:ac:00:4e:
58:5e:fd:6b:4c:ce:73:dd:b3:91:73:4a:d6:6f:2c:86:25:f0:
6a:fb:96:66:b3:39:a4:b0:d9:46:c2:fc:6b:06:b2:90:9c:13:
e1:02:8b:6f:6e:ab:cf:e3:21:7e:a9:76:c1:38:15:eb:e6:2d:
a5:6f:e5:ab
#建立k8s中的用户
[root@k8s-master pki]# kubectl config set-credentials timinglee --client-certificate /etc/kubernetes/pki/timinglee.crt --client-key /etc/kubernetes/pki/timinglee.key --embed-certs=true
User "timinglee" set.[root@k8s-master pki]# kubectl config view
apiVersion: v1
clusters:
- cluster:
certificate-authority-data: DATA+OMITTED
server: https://172.25.254.100:6443
name: kubernetes
contexts:
- context:
cluster: kubernetes
user: kubernetes-admin
name: kubernetes-admin@kubernetes
current-context: kubernetes-admin@kubernetes
kind: Config
preferences: {}
users:
- name: kubernetes-admin
user:
client-certificate-data: DATA+OMITTED
client-key-data: DATA+OMITTED
- name: timinglee
user:
client-certificate-data: DATA+OMITTED
client-key-data: DATA+OMITTED#为用户创建集群的安全上下文
root@k8s-master pki]# kubectl config set-context timinglee@kubernetes --cluster kubernetes --user timinglee
Context "timinglee@kubernetes" created.#切换用户,用户在集群中只有用户身份没有授权
[root@k8s-master ~]# kubectl config use-context timinglee@kubernetes
Switched to context "timinglee@kubernetes".
[root@k8s-master ~]# kubectl get pods
Error from server (Forbidden): pods is forbidden: User "timinglee" cannot list resource "pods" in API group "" in the namespace "default"#切换会集群管理
[root@k8s-master ~]# kubectl config use-context kubernetes-admin@kubernetes
Switched to context "kubernetes-admin@kubernetes".#如果需要删除用户
[root@k8s-master pki]# kubectl config delete-user timinglee
deleted user timinglee from /etc/kubernetes/admin.conf
RBAC(Role Based Access Control)
基于角色访问控制授权
-
允许管理员通过Kubernetes API动态配置授权策略。RBAC就是用户通过角色与权限进行关联。
-
RBAC只有授权,没有拒绝授权,所以只需要定义允许该用户做什么即可
-
RBAC的三个基本概念
-
Subject:被作用者,它表示k8s中的三类主体, user, group, serviceAccount
-
-
Role:角色,它其实是一组规则,定义了一组对 Kubernetes API 对象的操作权限。
-
RoleBinding:定义了“被作用者”和“角色”的绑定关系
-
RBAC包括四种类型:Role、ClusterRole、RoleBinding、ClusterRoleBinding
-
Role 和 ClusterRole
-
Role是一系列的权限的集合,Role只能授予单个namespace 中资源的访问权限。
-
-
ClusterRole 跟 Role 类似,但是可以在集群中全局使用。
-
Kubernetes 还提供了四个预先定义好的 ClusterRole 来供用户直接使用
-
cluster-amdin、admin、edit、view
role授权实施
#生成role的yaml文件
[root@k8s-master rbac]# kubectl create role myrole --dry-run=client --verb=get --resource pods -o yaml > myrole.yml#更改文件内容
[root@k8s-master rbac]# vim myrole.yml
apiVersion: rbac.authorization.k8s.io/v1
kind: Role
metadata:
creationTimestamp: null
name: myrole
rules:
- apiGroups:
- ""
resources:
- pods
verbs:
- get
- watch
- list
- create
- update
- path
- delete#创建role
[root@k8s-master rbac]# kubectl apply -f myrole.yml
[root@k8s-master rbac]# kubectl describe role myrole
Name: myrole
Labels: <none>
Annotations: <none>
PolicyRule:
Resources Non-Resource URLs Resource Names Verbs
--------- ----------------- -------------- -----
pods [] [] [get watch list create update path delete]
#建立角色绑定
[root@k8s-master rbac]# kubectl create rolebinding timinglee --role myrole --namespace default --user timinglee --dry-run=client -o yaml > rolebinding-myrole.yml[root@k8s-master rbac]# vim rolebinding-myrole.yml
apiVersion: rbac.authorization.k8s.io/v1
kind: RoleBinding
metadata:
name: timinglee
namespace: default #角色绑定必须指定namespace
roleRef:
apiGroup: rbac.authorization.k8s.io
kind: Role
name: myrole
subjects:
- apiGroup: rbac.authorization.k8s.io
kind: User
name: timinglee
[root@k8s-master rbac]# kubectl apply -f rolebinding-myrole.yml
rolebinding.rbac.authorization.k8s.io/timinglee created
[root@k8s-master rbac]# kubectl get rolebindings.rbac.authorization.k8s.io timinglee
NAME ROLE AGE
timinglee Role/myrole 9s
#切换用户测试授权
[root@k8s-master rbac]# kubectl config use-context timinglee@kubernetes
Switched to context "timinglee@kubernetes".[root@k8s-master rbac]# kubectl get pods
No resources found in default namespace.
[root@k8s-master rbac]# kubectl get svc #只针对pod进行了授权,所以svc依然不能操作
Error from server (Forbidden): services is forbidden: User "timinglee" cannot list resource "services" in API group "" in the namespace "default"#切换回管理员
[root@k8s-master rbac]# kubectl config use-context kubernetes-admin@kubernetes
Switched to context "kubernetes-admin@kubernetes".
clusterrole授权实施
#建立集群角色
[root@k8s-master rbac]# kubectl create clusterrole myclusterrole --resource=deployment --verb get --dry-run=client -o yaml > myclusterrole.yml
[root@k8s-master rbac]# vim myclusterrole.yml
apiVersion: rbac.authorization.k8s.io/v1
kind: ClusterRole
metadata:
name: myclusterrole
rules:
- apiGroups:
- apps
resources:
- deployments
verbs:
- get
- list
- watch
- create
- update
- path
- delete
- apiGroups:
- ""
resources:
- pods
verbs:
- get
- list
- watch
- create
- update
- path
- delete[root@k8s-master rbac]# kubectl describe clusterrole myclusterrole
Name: myclusterrole
Labels: <none>
Annotations: <none>
PolicyRule:
Resources Non-Resource URLs Resource Names Verbs
--------- ----------------- -------------- -----
deployments.apps [] [] [get list watch create update path delete]
pods.apps [] [] [get list watch create update path delete]#建立集群角色绑定
[root@k8s-master rbac]# kubectl create clusterrolebinding clusterrolebind-myclusterrole --clusterrole myclusterrole --user timinglee --dry-run=client -o yaml > clusterrolebind-myclusterrole.yml
[root@k8s-master rbac]# vim clusterrolebind-myclusterrole.yml
apiVersion: rbac.authorization.k8s.io/v1
kind: ClusterRoleBinding
metadata:
name: clusterrolebind-myclusterrole
roleRef:
apiGroup: rbac.authorization.k8s.io
kind: ClusterRole
name: myclusterrole
subjects:
- apiGroup: rbac.authorization.k8s.io
kind: User
name: timinglee[root@k8s-master rbac]# kubectl describe clusterrolebindings.rbac.authorization.k8s.io clusterrolebind-myclusterrole
Name: clusterrolebind-myclusterrole
Labels: <none>
Annotations: <none>
Role:
Kind: ClusterRole
Name: myclusterrole
Subjects:
Kind Name Namespace
---- ---- ---------
User timinglee#测试:
[root@k8s-master rbac]# kubectl get pods -A
[root@k8s-master rbac]# kubectl get deployments.apps -A
[root@k8s-master rbac]# kubectl get svc -A
Error from server (Forbidden): services is forbidden: User "timinglee" cannot list resource "services" in API group "" at the cluster scope