linux系统--iptables实战案例
目录
iptables 防火墙
要求:
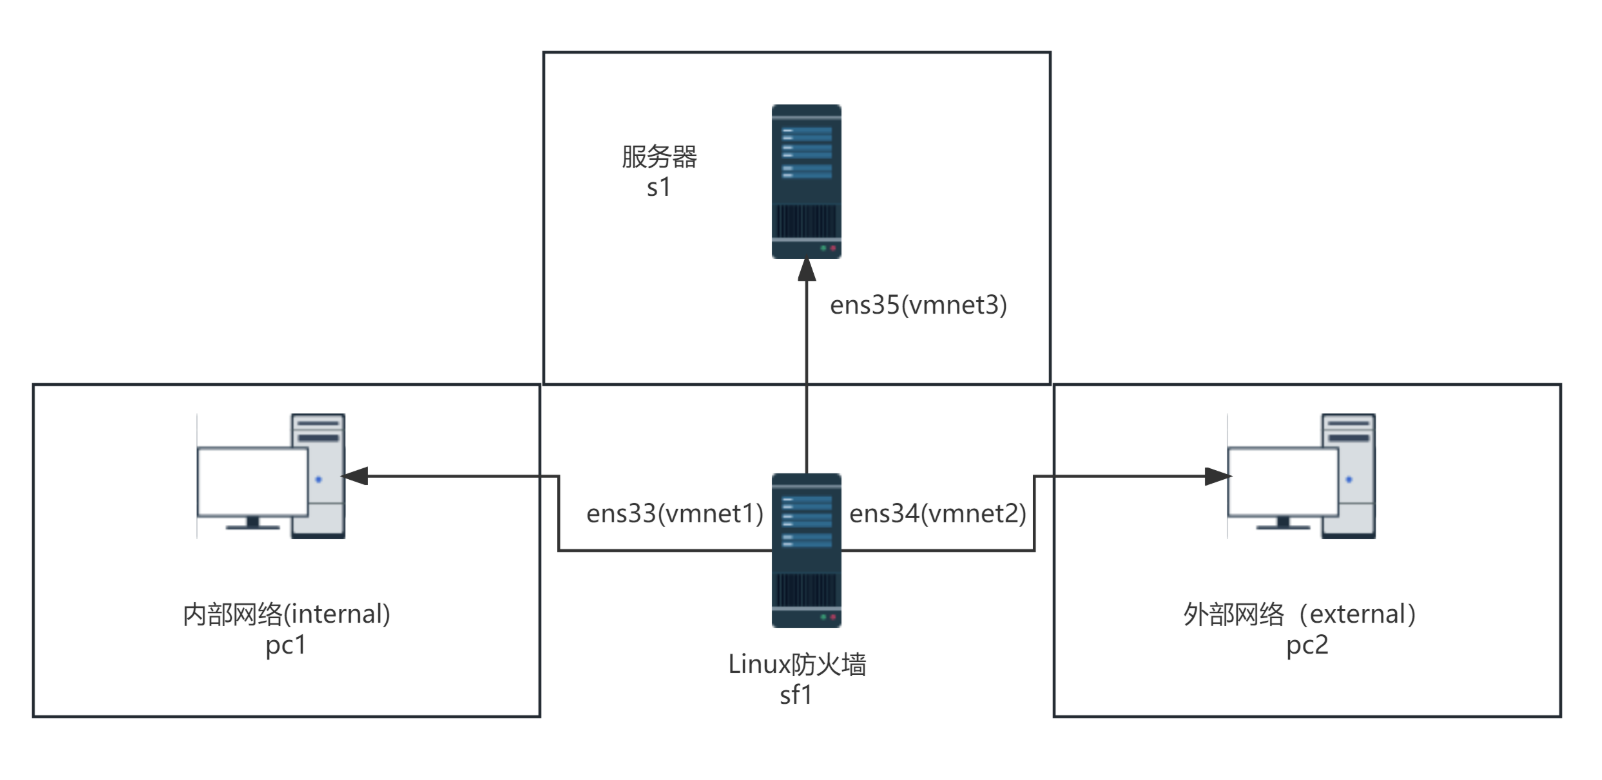
网络规划
实战案例
iptables 防火墙
要求:
-
内部网络中的pc1采用SNAT访问外部互联网,但是无法ping到内部网关。
-
内部网络服务器s1通过DNAT发布服务到互联网。
-
互联网主机pc2能够访问DMZ区域的服务器,但是不能够进行ping和ssh连接
网络规划
-
内部PC1位于内网区域,地址段为: 192.168.1.0/24,pc1地址为:192.168.1.1/24,网关地址为:192.168.1.254/24
-
服务器S1位于服务器区域,地址段为: 192.168.2.0/24,pc1地址为:192.168.2.1/24,网关地址为:192.168.2.254/24
-
PC2位于互联网区域,模拟外部互联网,地址段为:10.0.0.0/8,pc2地址为:10.0.0.1/8
-
Linux防火墙的三块网卡为别连接不同的网络区域,地址分别为 :ens33 192.168.1.254/24;ens34 10.0.0.100/8;ens35 192.168.2.254/24
###内部网络中的pc1采用SNAT访问外部互联网,但是无法ping到内部网关
实战案例
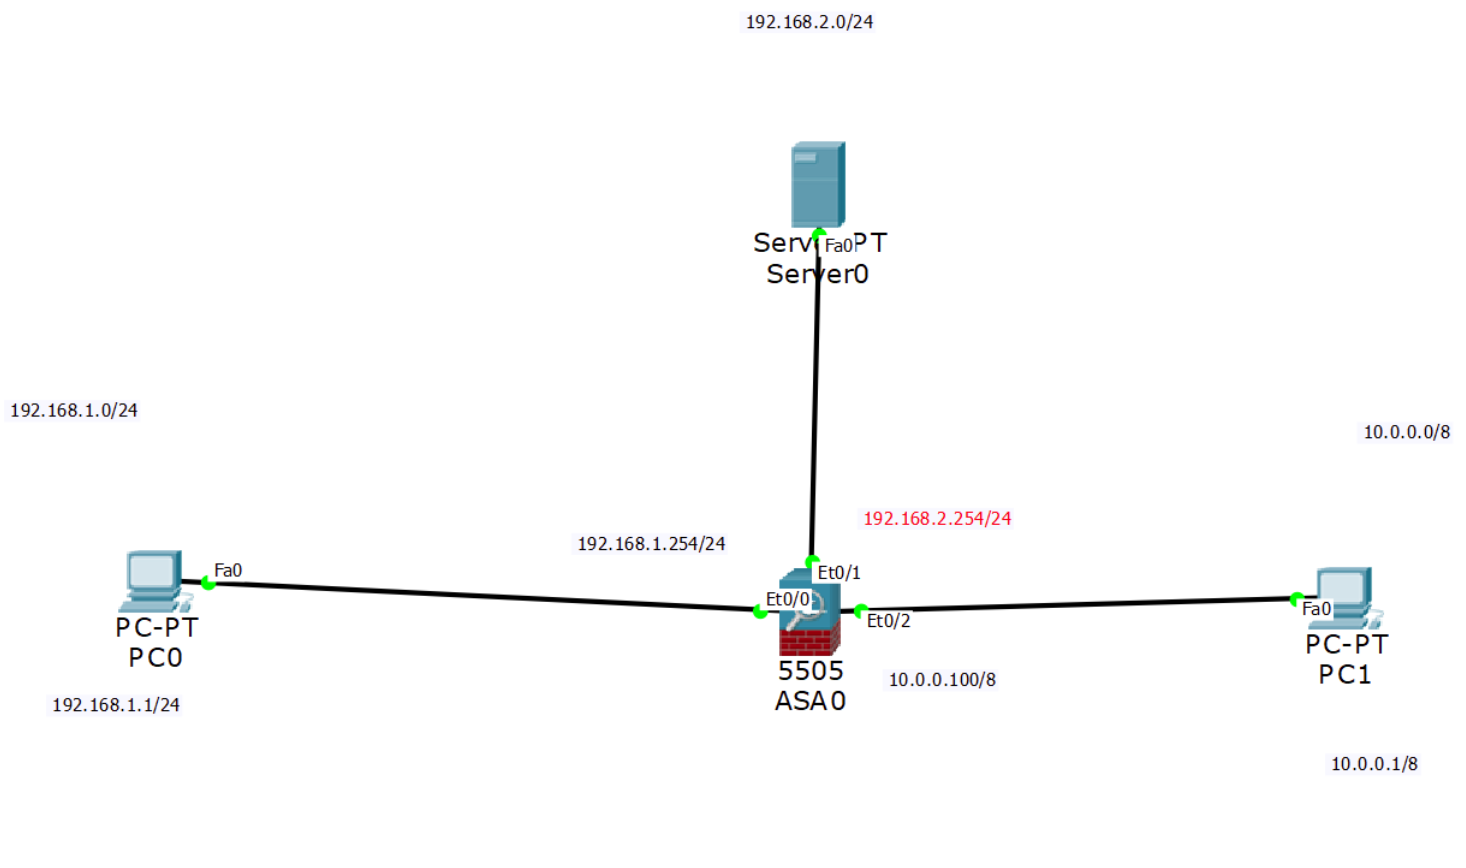
##根据下图分别给内网,服务器,外网,配网址ip,和网关,并外网服务器下载nginx服务。
###在iptables(防火墙)添加规则
[root@pc1 ~]# systemctl stop NetworkManager
[root@pc1 ~]# systemctl stop firewalld
[root@pc1 ~]# setenforce 0
[root@pc1 ~]# ifconfig ens160 192.168.1.1/24
[root@pc1 ~]# route add -net 0/0 gw 192.168.1.254/24[root@pc2 root]# cd /etc/yum.repos.d/
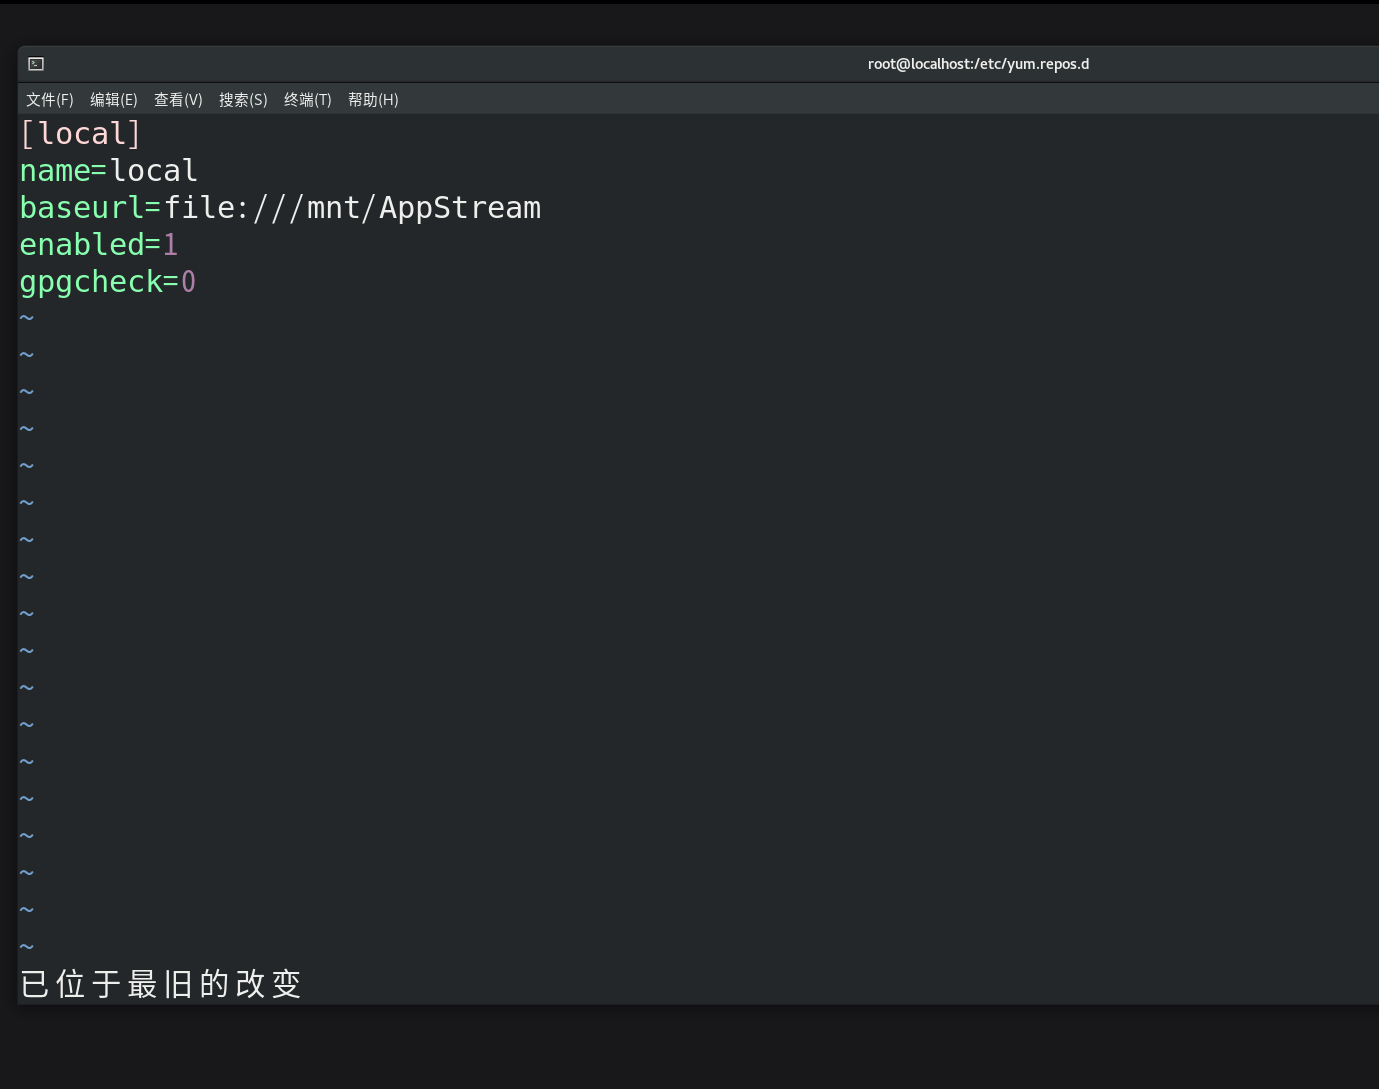
[root@pc2 yum.repos.d]# vim local.repo #尽量先归类好在vim
[root@pc2 yum.repos.d]# ls
local.repo Rocky-Extras.repo Rocky-PowerTools.repo
Rocky-AppStream.repo Rocky-HighAvailability.repo Rocky-ResilientStorage.repo
Rocky-BaseOS.repo Rocky-Media.repo Rocky-RT.repo
Rocky-Debuginfo.repo Rocky-NFV.repo Rocky-Sources.repo
Rocky-Devel.repo Rocky-Plus.repo
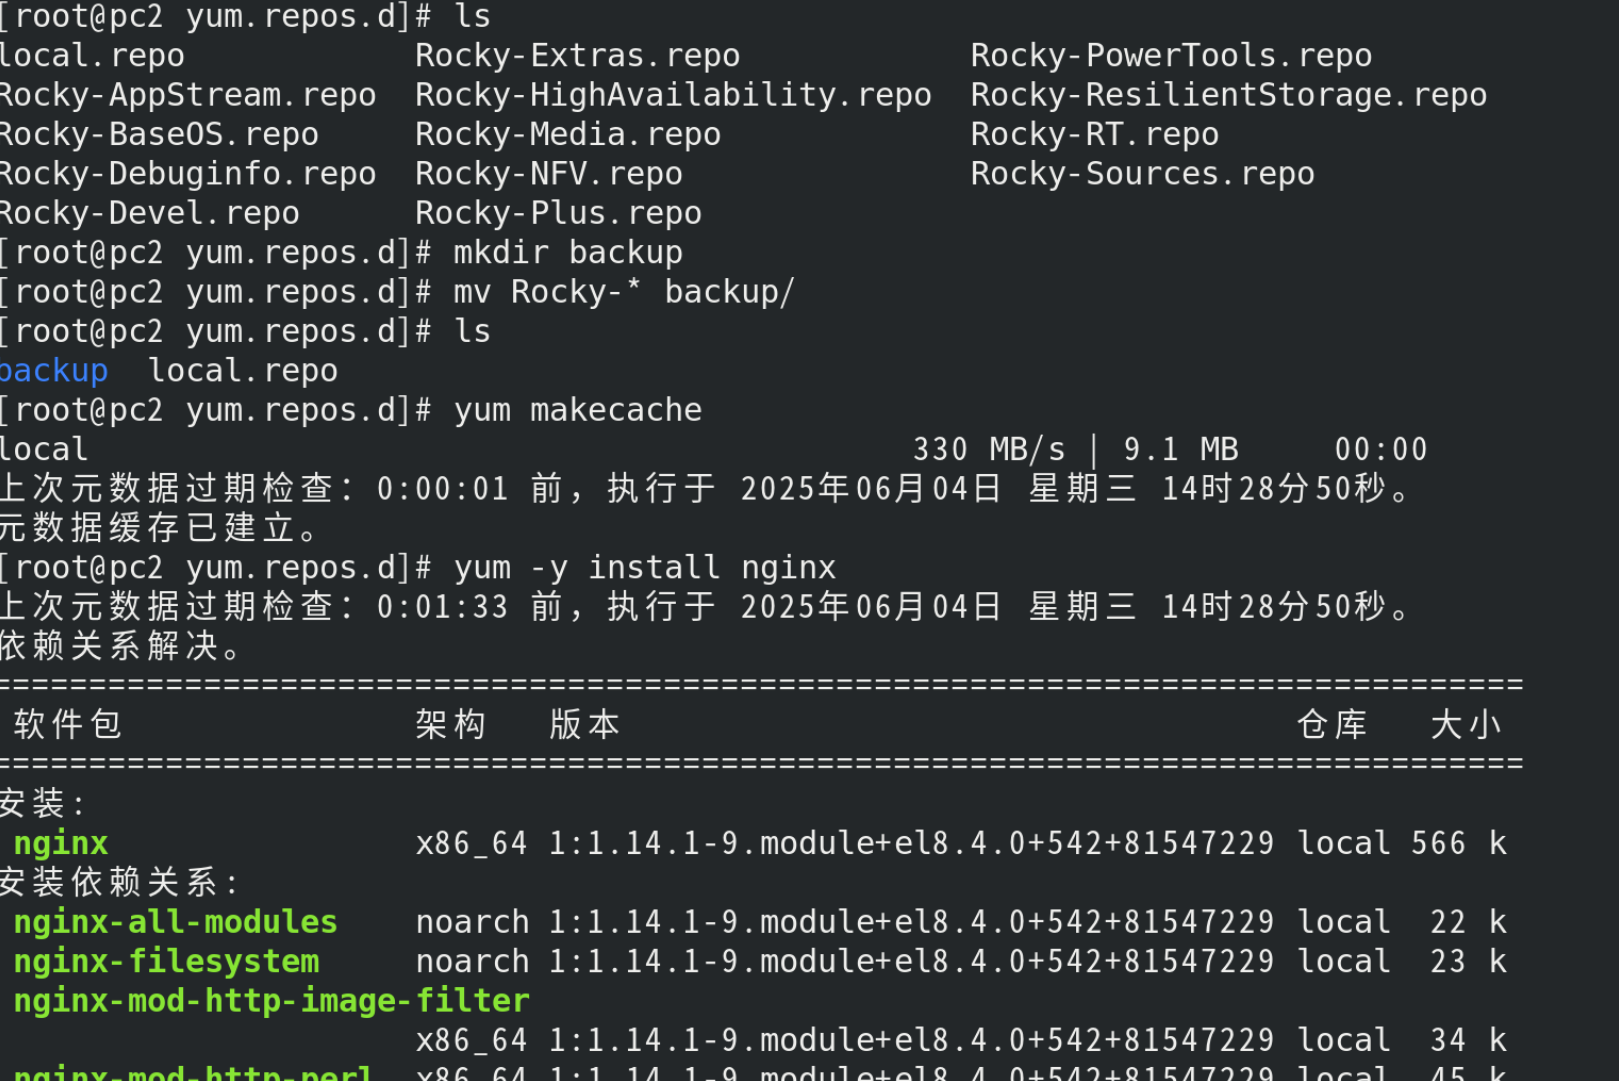
[root@pc2 yum.repos.d]# mkdir backup
[root@pc2 yum.repos.d]# mv Rocky-* backup/
[root@pc2 yum.repos.d]# ls
backup local.repo
[root@pc2 yum.repos.d]# yum clean all
0 个文件已删除
[root@pc2 yum.repos.d]# yum makecache
local 330 MB/s | 9.1 MB 00:00
上次元数据过期检查:0:00:01 前,执行于 2025年06月04日 星期三 14时28分50秒。
元数据缓存已建立。
[root@pc2 yum.repos.d]# yum -y install nginx
上次元数据过期检查:0:01:33 前,执行于 2025年06月04日 星期三 14时28分50秒。
依赖关系解决。
================================================================================软件包 架构 版本 仓库 大小
================================================================================
安装:nginx x86_64 1:1.14.1-9.module+el8.4.0+542+81547229 local 566 k
安装依赖关系:nginx-all-modules noarch 1:1.14.1-9.module+el8.4.0+542+81547229 local 22 knginx-filesystem noarch 1:1.14.1-9.module+el8.4.0+542+81547229 local 23 knginx-mod-http-image-filterx86_64 1:1.14.1-9.module+el8.4.0+542+81547229 local 34 knginx-mod-http-perl x86_64 1:1.14.1-9.module+el8.4.0+542+81547229 local 45 knginx-mod-http-xslt-filterx86_64 1:1.14.1-9.module+el8.4.0+542+81547229 local 32 knginx-mod-mail x86_64 1:1.14.1-9.module+el8.4.0+542+81547229 local 63 knginx-mod-stream x86_64 1:1.14.1-9.module+el8.4.0+542+81547229 local 84 k
启用模块流:nginx 1.14 事务概要
================================================================================
安装 8 软件包总计:870 k
安装大小:2.0 M
下载软件包:
运行事务检查
事务检查成功。
运行事务测试
事务测试成功。
运行事务准备中 : 1/1 运行脚本: nginx-filesystem-1:1.14.1-9.module+el8.4.0+542+81547229.noarc 1/8 安装 : nginx-filesystem-1:1.14.1-9.module+el8.4.0+542+81547229.noarc 1/8 安装 : nginx-mod-http-image-filter-1:1.14.1-9.module+el8.4.0+542+815 2/8 运行脚本: nginx-mod-http-image-filter-1:1.14.1-9.module+el8.4.0+542+815 2/8 安装 : nginx-mod-http-perl-1:1.14.1-9.module+el8.4.0+542+81547229.x8 3/8 运行脚本: nginx-mod-http-perl-1:1.14.1-9.module+el8.4.0+542+81547229.x8 3/8 安装 : nginx-mod-http-xslt-filter-1:1.14.1-9.module+el8.4.0+542+8154 4/8 运行脚本: nginx-mod-http-xslt-filter-1:1.14.1-9.module+el8.4.0+542+8154 4/8 安装 : nginx-mod-mail-1:1.14.1-9.module+el8.4.0+542+81547229.x86_64 5/8 运行脚本: nginx-mod-mail-1:1.14.1-9.module+el8.4.0+542+81547229.x86_64 5/8 安装 : nginx-all-modules-1:1.14.1-9.module+el8.4.0+542+81547229.noar 6/8 安装 : nginx-1:1.14.1-9.module+el8.4.0+542+81547229.x86_64 7/8 运行脚本: nginx-1:1.14.1-9.module+el8.4.0+542+81547229.x86_64 7/8 安装 : nginx-mod-stream-1:1.14.1-9.module+el8.4.0+542+81547229.x86_6 8/8 运行脚本: nginx-mod-stream-1:1.14.1-9.module+el8.4.0+542+81547229.x86_6 8/8 验证 : nginx-1:1.14.1-9.module+el8.4.0+542+81547229.x86_64 1/8 验证 : nginx-all-modules-1:1.14.1-9.module+el8.4.0+542+81547229.noar 2/8 验证 : nginx-filesystem-1:1.14.1-9.module+el8.4.0+542+81547229.noarc 3/8 验证 : nginx-mod-http-image-filter-1:1.14.1-9.module+el8.4.0+542+815 4/8 验证 : nginx-mod-http-perl-1:1.14.1-9.module+el8.4.0+542+81547229.x8 5/8 验证 : nginx-mod-http-xslt-filter-1:1.14.1-9.module+el8.4.0+542+8154 6/8 验证 : nginx-mod-mail-1:1.14.1-9.module+el8.4.0+542+81547229.x86_64 7/8 验证 : nginx-mod-stream-1:1.14.1-9.module+el8.4.0+542+81547229.x86_6 8/8 已安装:nginx-1:1.14.1-9.module+el8.4.0+542+81547229.x86_64 nginx-all-modules-1:1.14.1-9.module+el8.4.0+542+81547229.noarch nginx-filesystem-1:1.14.1-9.module+el8.4.0+542+81547229.noarch nginx-mod-http-image-filter-1:1.14.1-9.module+el8.4.0+542+81547229.x86_64 nginx-mod-http-perl-1:1.14.1-9.module+el8.4.0+542+81547229.x86_64 nginx-mod-http-xslt-filter-1:1.14.1-9.module+el8.4.0+542+81547229.x86_64 nginx-mod-mail-1:1.14.1-9.module+el8.4.0+542+81547229.x86_64 nginx-mod-stream-1:1.14.1-9.module+el8.4.0+542+81547229.x86_64 完毕!
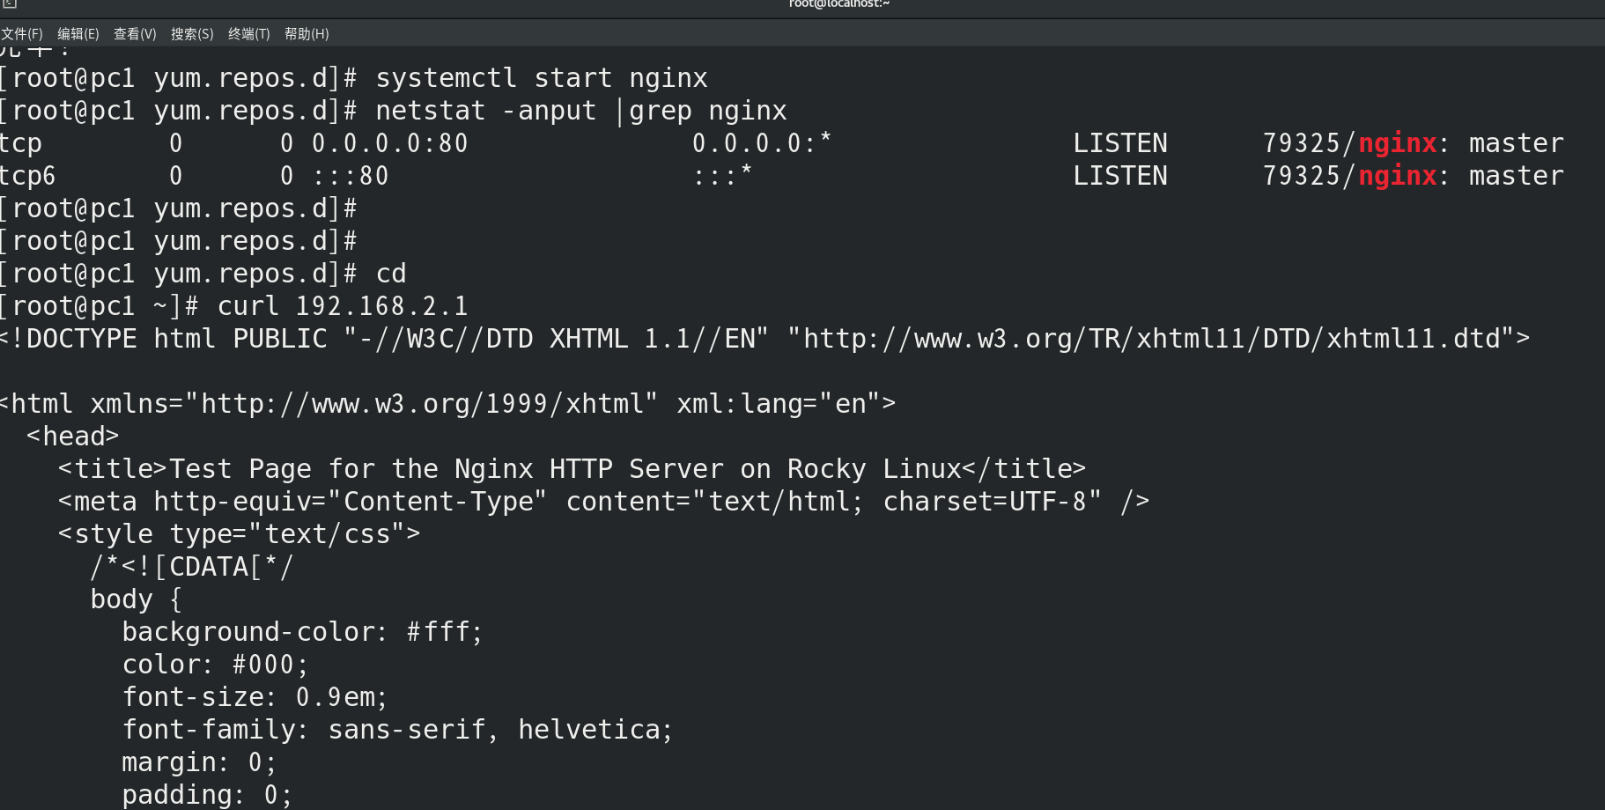
[root@pc1 yum.repos.d]# systemctl start nginx #启用服务
[root@pc1 yum.repos.d]# netstat -anput | grep nginx
tcp 0 0 0.0.0.0:80 0.0.0.0:* LISTEN 71660/nginx: master
tcp6 0 0 :::80 :::* LISTEN 71660/nginx: master #切换到iptables防火墙
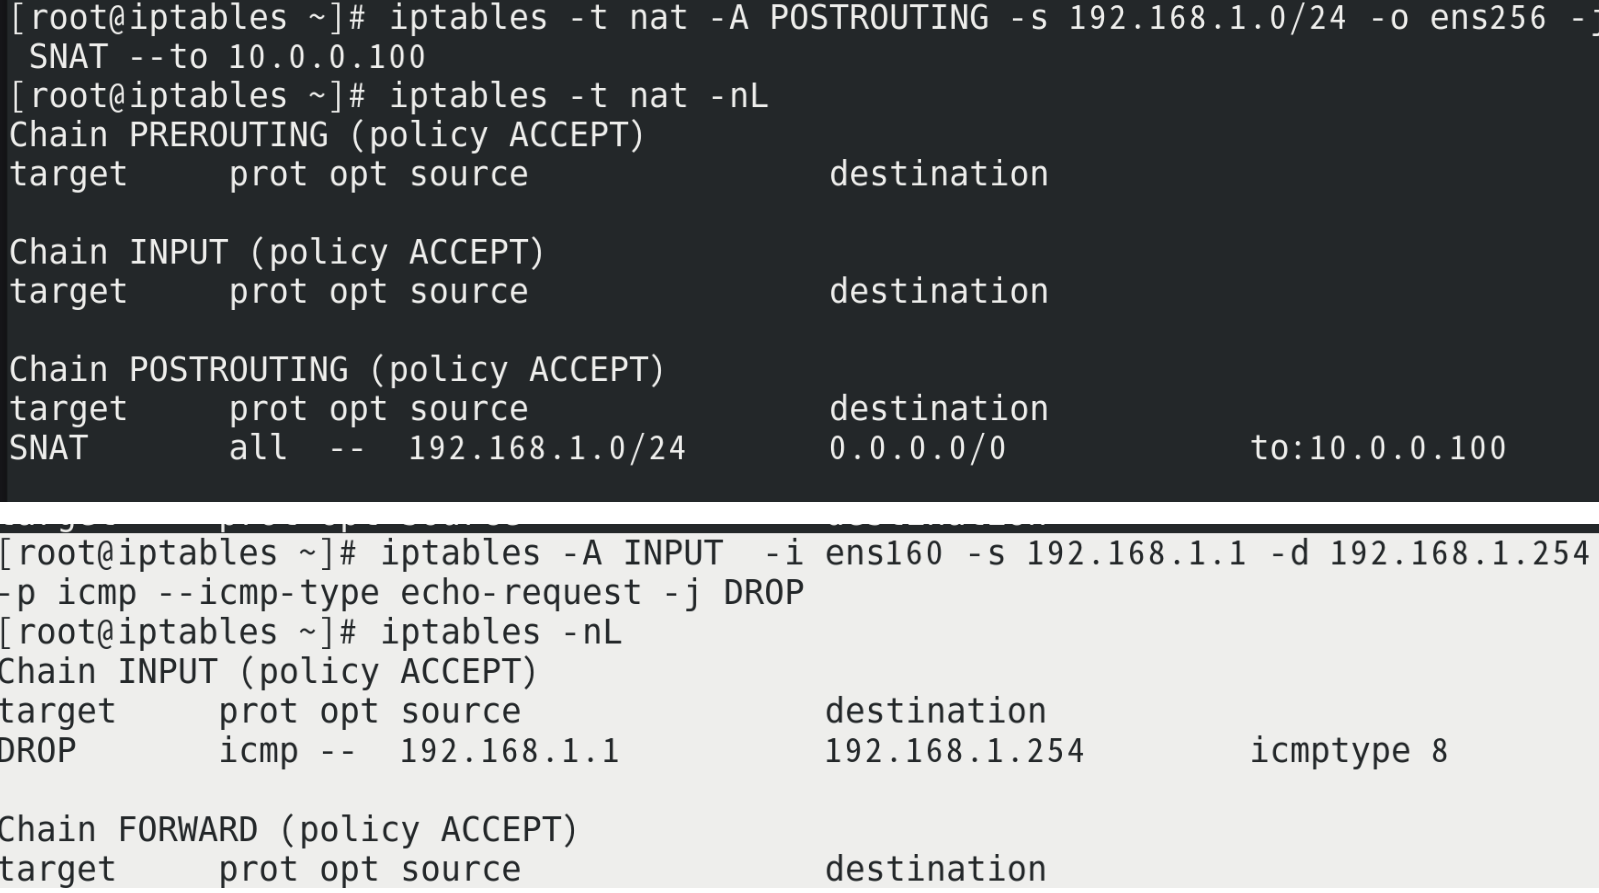
[root@iptables ~]# iptables -t nat -A POSTROUTING -s 192.168.1.0/24 -o ens256 -j SNAT --to 10.0.0.100
[root@iptables ~]# iptables -t nat -nL #让内网能访问外网
Chain PREROUTING (policy ACCEPT)
target prot opt source destination Chain INPUT (policy ACCEPT)
target prot opt source destination Chain POSTROUTING (policy ACCEPT)
target prot opt source destination
SNAT all -- 192.168.1.0/24 0.0.0.0/0 to:10.0.0.100[root@iptables ~]# iptables -A INPUT -i ens160 -s 192.168.1.1 -d 192.168.1.254 -p icmp --icmp-type echo-request -j DROP #使内网无法ping到网关
[root@iptables ~]# iptables -nL
Chain INPUT (policy ACCEPT)
target prot opt source destination
DROP icmp -- 192.168.1.1 192.168.1.254 icmptype 8Chain FORWARD (policy ACCEPT)
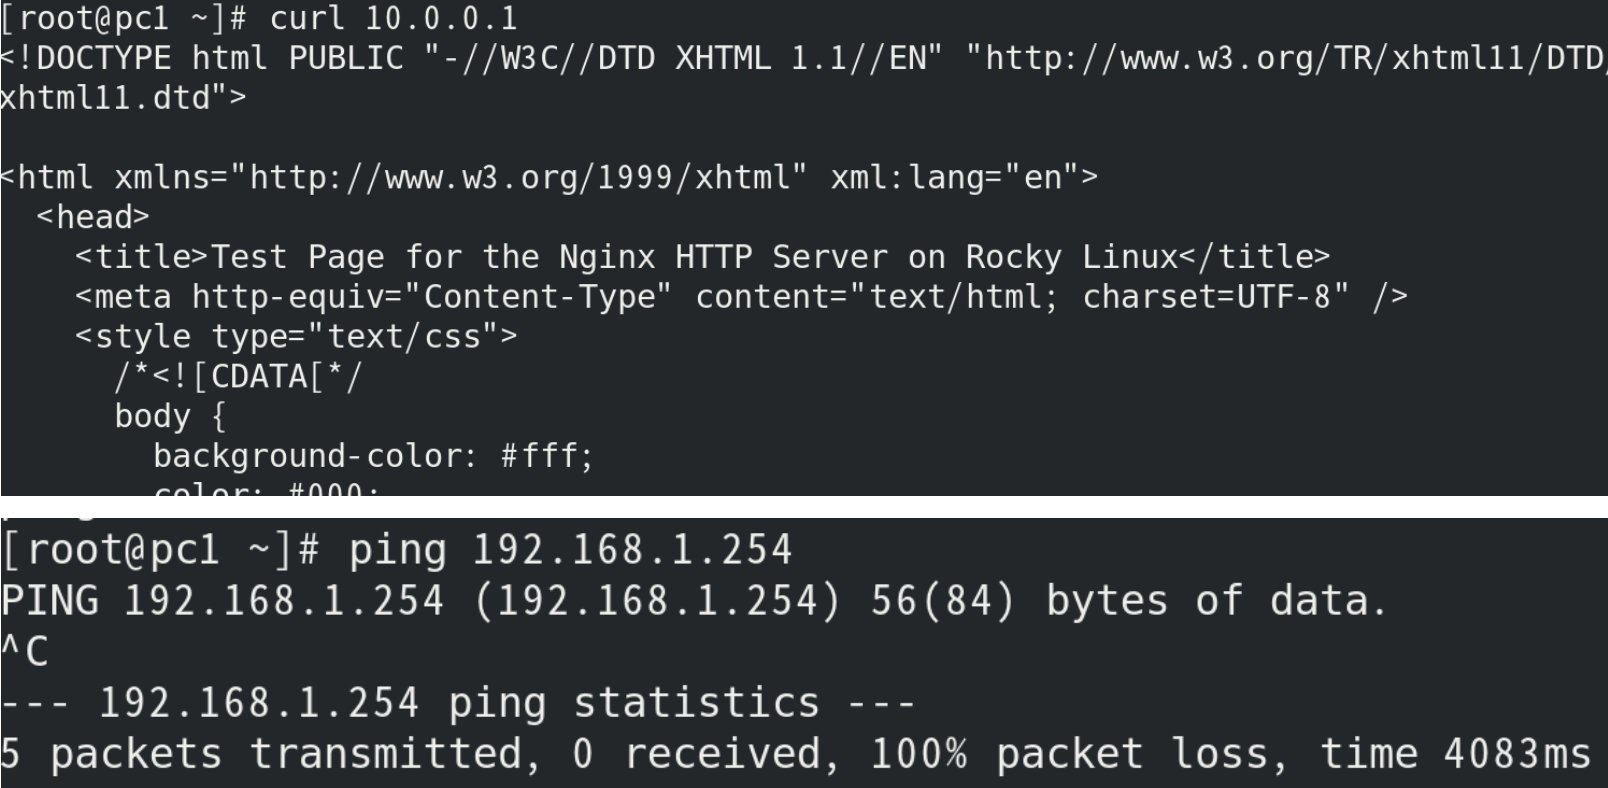
target prot opt source destination [root@pc1 ~]# curl 10.0.0.1 #内网可以访问外网
<!DOCTYPE html PUBLIC "-//W3C//DTD XHTML 1.1//EN" "http://www.w3.org/TR/xhtml11/DTD/xhtml11.dtd"><html xmlns="http://www.w3.org/1999/xhtml" xml:lang="en"><head><title>Test Page for the Nginx HTTP Server on Rocky Linux</title><meta http-equiv="Content-Type" content="text/html; charset=UTF-8" /><style type="text/css">/*<![CDATA[*/
##先关闭网络管理,关闭默认防火墙firewalld
[root@localhost ~]# systemctl stop NetworkManager [root@localhost ~]# systemctl stop firewalld
##,切换到Permissive模式
[root@localhost ~]# setenforce 0
##,设置Linux防火墙的三块网卡为别连接不同的网络区域,地址分别为 :ens33 192.168.1.254/24;ens34 10.0.0.100/8;ens35 192.168.2.254/24
临时配置网卡ifconfig ens网卡号 ip/子网掩码长度
配置网关route add -net 0/0 gw 网关/

[root@pc2 root]# cd /etc/yum.repos.d/ [root@pc2 yum.repos.d]# vim local.repo
[root@pc2 yum.repos.d]# mkdir backup [root@pc2 yum.repos.d]# mv Rocky-* backup/ [root@pc2 yum.repos.d]# ls backup local.repo [root@pc2 yum.repos.d]# yum clean all 0 个文件已删除 [root@pc2 yum.repos.d]# yum makecache
[root@pc2 yum.repos.d]# yum -y install nginx
[root@pc1 yum.repos.d]# systemctl start nginx #启用服务 [root@pc1 yum.repos.d]# netstat -anput | grep nginx tcp 0 0 0.0.0.0:80 0.0.0.0:* LISTEN 71660/nginx: master tcp6 0 0 :::80 :::* LISTEN 71660/nginx: master
#切换到iptables防火墙 [root@iptables ~]# iptables -t nat -A POSTROUTING -s 192.168.1.0/24 -o ens256 -j SNAT --to 10.0.0.100 [root@iptables ~]# iptables -t nat -nL #让内网能访问外网 Chain PREROUTING (policy ACCEPT) target prot opt source destination
Chain INPUT (policy ACCEPT) target prot opt source destination
Chain POSTROUTING (policy ACCEPT) target prot opt source destination SNAT all -- 192.168.1.0/24 0.0.0.0/0 to:10.0.0.100
[root@iptables ~]# iptables -A INPUT -i ens160 -s 192.168.1.1 -d 192.168.1.254 -p icmp --icmp-type echo-request -j DROP #使内网无法ping到网关 [root@iptables ~]# iptables -nL Chain INPUT (policy ACCEPT) target prot opt source destination DROP icmp -- 192.168.1.1 192.168.1.254 icmptype 8
Chain FORWARD (policy ACCEPT) target prot opt source destination
[root@pc1 ~]# curl 10.0.0.1 #内网可以访问外网
[root@pc1 ~]# ping 192.168.1.254 #不可以ping内部网关
[root@pc1 ~]# curl 10.0.0.1 #内网可以访问外网
-
内部网络服务器s1通过DNAT发布服务到互联网。
-
互联网主机pc2能够访问DMZ区域的服务器,但是不能够进行ping和ssh连接
##内部网络服务器s1通过DNAT发布服务到互联网
[root@iptables ~]# iptables -t nat -A PREROUTING -p tcp --dport 80 -j DNAT --to-destination 192.168.2.1:80
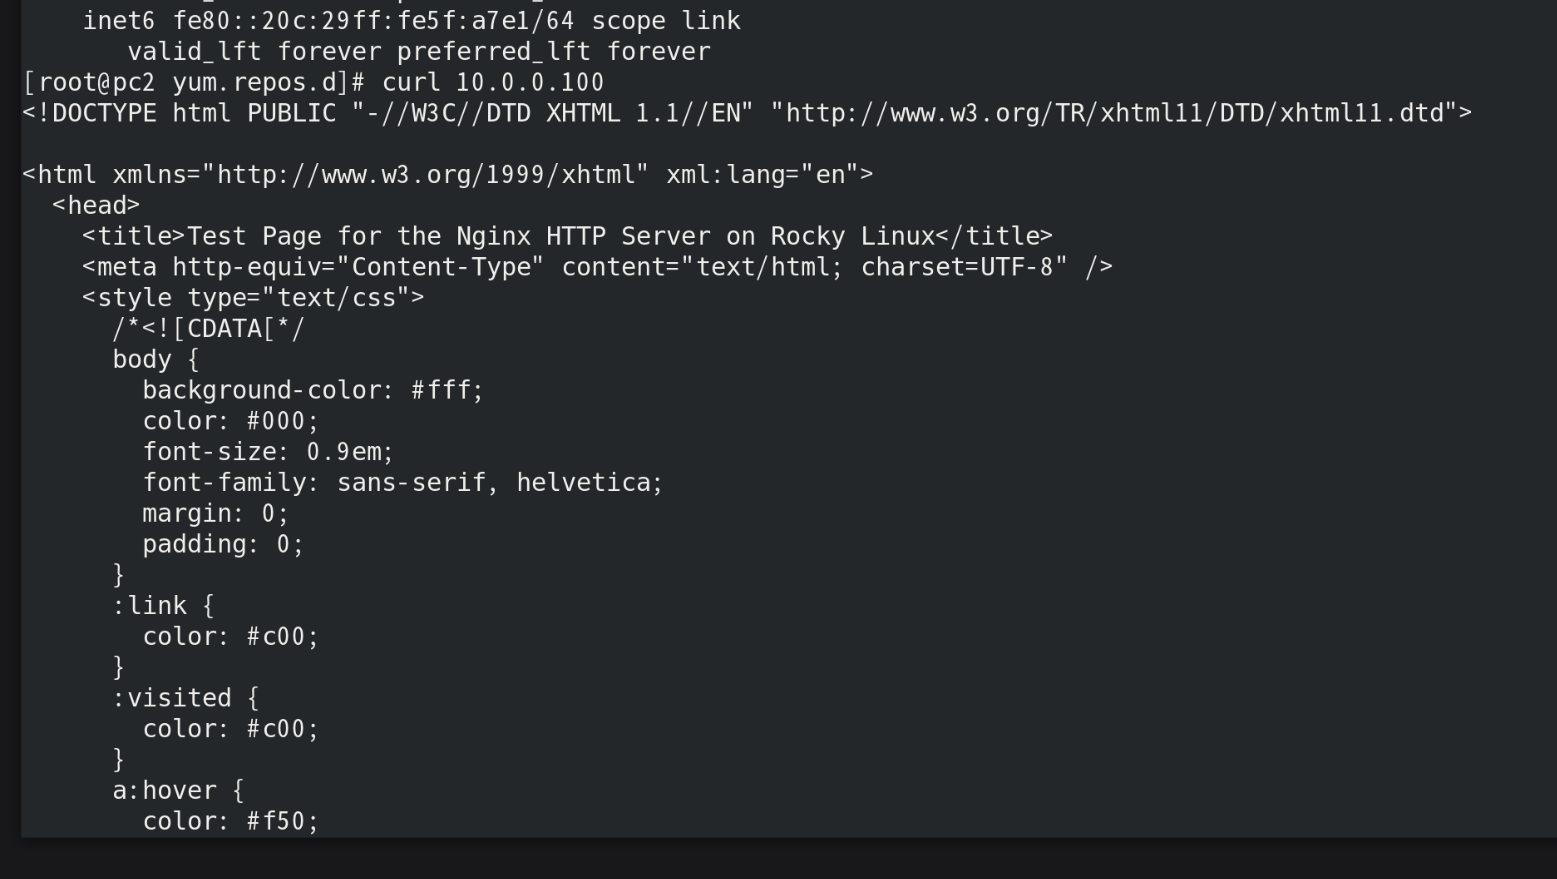
###使所有来访问s1服务器的都从端口80去找192.168.2.1[root@pc2 yum.repos.d]# curl 10.0.0.100 ###先下载好nginx服务,启用nginx服务,
<!DOCTYPE html PUBLIC "-//W3C//DTD XHTML 1.1//EN" "http://www.w3.org/TR/xhtml11/DTD/xhtml11.dtd"><html xmlns="http://www.w3.org/1999/xhtml" xml:lang="en"><head><title>Test Page for the Nginx HTTP Server on Rocky Linux</title><meta http-equiv="Content-Type" content="text/html; charset=UTF-8" /><style type="text/css">/*<![CDATA[*/body {background-color: #fff;color: #000;font-size: 0.9em;###互联网主机pc2能够访问DMZ区域的服务器,但是不能够进行ping和ssh连接##使pc2外网不能pings1服务器,
[root@iptables ~]# iptables -t filter -A INPUT -s 10.0.0.1 -d 192.168.2.1 -p icmp --icmp-type 8 -j DROP ###pc2不能与s1服务器进行ssh连接
[root@iptables ~]# iptables -A INPUT -p tcp -s 10.0.0.1 --dport 22 -j DROP
[root@iptables ~]# iptables -nL
Chain INPUT (policy ACCEPT)
target prot opt source destination
DROP icmp -- 10.0.0.1 192.168.2.1 icmptype 8
DROP tcp -- 10.0.0.1 0.0.0.0/0 tcp dpt:22
##内部网络服务器s1通过DNAT发布服务到互联网
[root@iptables ~]# iptables -t nat -A PREROUTING -p tcp --dport 80 -j DNAT --to-destination 192.168.2.1:80 ###使所有来访问s1服务器的都从端口80去找192.168.2.1

[root@pc2 yum.repos.d]# curl 10.0.0.100 ###先下载好nginx服务,启用nginx服务
###互联网主机pc2能够访问DMZ区域的服务器,但是不能够进行ping和ssh连接
[root@iptables ~]# iptables -t filter -A INPUT -s 10.0.0.1 -d 192.168.2.1 -p icmp --icmp-type 8 -j DROP
[root@iptables ~]# iptables -A INPUT -p tcp -s 10.0.0.1 --dport 22 -j DROP


