YOLO人体姿态估计Pytorch推理ONNX模型推理
人体关键点概述
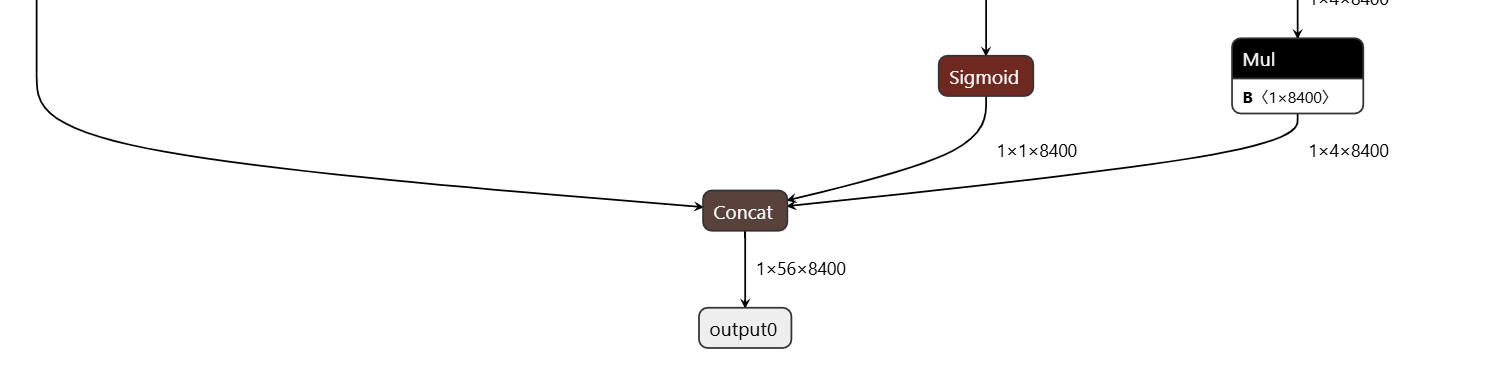
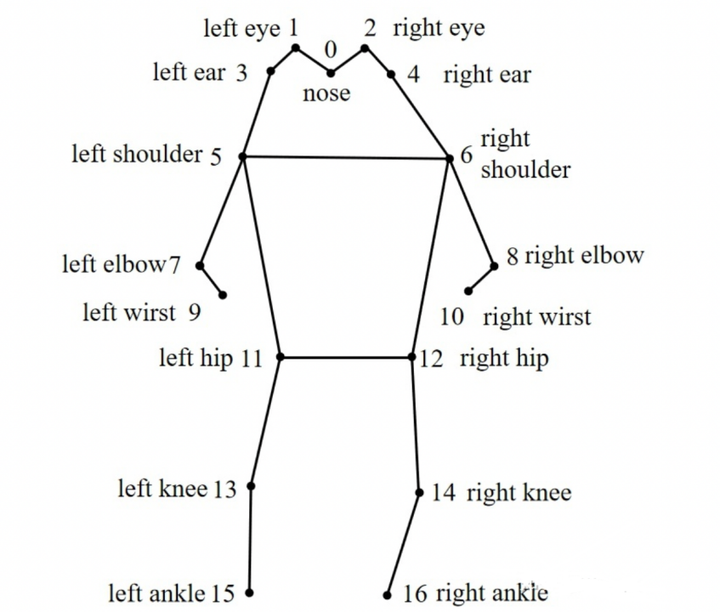
COCO数据集中人体各个关键点的位置序号如下:其共有17个关键点(0-16),我们将YOLO-pose模型转换为ONNX格式后,看到其最终输出的结果维度为(1,56,8400)其中,8400代表有8400个结果,56则为4 (xywh) +1(score,只有一个类别为人类)+17*3,这个3为(x,y,v),x 与 y 代表关键点的位置,而 v则代表是否可见,当v<0.5时认为其不可见。
ultralytics框架推理
直接使用ultralytics框架进行推理
from ultralytics import YOLO# Load a model
model = YOLO("yolo11n-pose.pt")  # load an official model
# Predict with the model
results = model("test.jpg")  # predict on an image# Access the results
for result in results:xy = result.keypoints.xy  # x and y coordinatesxyn = result.keypoints.xyn  # normalizedkpts = result.keypoints.data  # x, y, visibility (if available)result.save(filename="result.jpg")
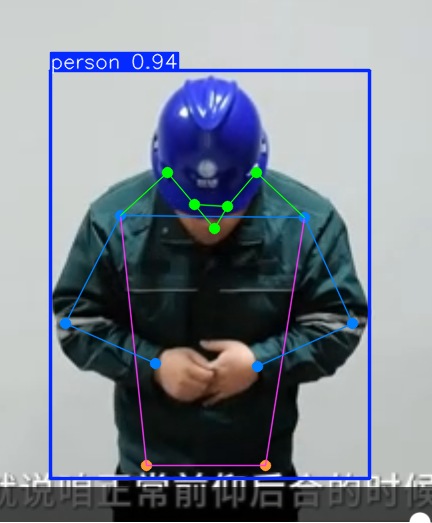
由于ultralytics框架推理时,其包含目标检测和深度估计,因此其不但会绘制人体各个关键点的连线,还会检测出目标。
ONNX模型推理
为了提示模型的可扩展性,我们可以将pt模型文件转换未onnx格式,这样方便我们在不同平台、使用不同编程语言开发,这里博主依旧是使用Python代码实现,但其相比于ultralytics框架推理,其不需要PyTorch等较大的深度学习框架。
首先将pt格式转换为onnx
from ultralytics import YOLO
# 加载一个模型,路径为 YOLO 模型的 .pt 文件
model = YOLO(r"yolo11n-pose.pt")
# 导出模型,设置多种参数
model.export(imgsz=640,format="onnx",opset=12
)随后便可以使用onnx进行推理了,其中,下面是解析输出结果的代码:
def postprocess(outputs, ratio, original_shape):"""后处理:解析输出,提取检测框、NMS、关键点"""h, w, _ = original_shapeoutput = outputs[0].squeeze(0) # shape: (56, 8400)# Step 2: 转置为 (8400, 56),每一行对应一个检测框outputs = output.transpose(1, 0) # shape: (8400, 56)# 分离 bbox、objectness、class_scores、keypointsboxes = outputs[:, :4] # [8400, 4] # [8400, 1]class_scores = outputs[:, 4:5] # [8400, 80]keypoints = outputs[:, 5:] # [8400, 51]# 计算每个检测框的总置信度:objectness × max_class_scorescores = class_scores # [8400, 1]scores = scores.flatten()# 筛选满足阈值的检测框valid_indices = np.where(scores >= CONF_THRESHOLD)[0]if len(valid_indices) == 0:return [], []boxes = boxes[valid_indices]scores = scores[valid_indices]keypoints = keypoints[valid_indices]
完整代码如下:
import cv2
import numpy as np
import onnxruntime as ort# ----------------------------
# 配置参数
# ----------------------------
INPUT_WIDTH = 640
INPUT_HEIGHT = 640
CONF_THRESHOLD = 0.7
KEYPOINT_VISIBILITY_THRESHOLD = 0.5# ----------------------------
# 关键点连接关系(适用于 COCO 17 个关键点)
# ----------------------------
SKELETON = [(0, 1), (0, 2),     # Nose -> Left/Right Eye(1, 3), (2, 4),     # Eye -> Ear(5, 6),             # Shoulder(5, 11), (11, 13), (13, 15),   # 左臂(6, 12), (12, 14), (14, 16),   # 右臂(11, 12),           # Hip(5, 7), (7, 9),     # 左手(6, 8), (8, 10),    # 右手(12, 14)
]COLORS = [(255, 0, 0), (0, 255, 0), (0, 0, 255),(255, 255, 0), (255, 0, 255), (0, 255, 255)]def preprocess(img):"""图像预处理:缩放并归一化"""h, w, _ = img.shapenew_w, new_h = INPUT_WIDTH, INPUT_HEIGHTratio = min(new_w / w, new_h / h)resized_img = cv2.resize(img, (int(w * ratio), int(h * ratio)), interpolation=cv2.INTER_LINEAR)padded_img = np.zeros((new_h, new_w, 3), dtype=np.uint8)padded_img[:int(h * ratio), :int(w * ratio)] = resized_img# 归一化并转换为 CHW 格式blob = padded_img.astype(np.float32) / 255.0blob = blob.transpose(2, 0, 1)[None]  # [1, 3, H, W]return blob, ratiodef xywh2xyxy(x):"""将 [x, y, w, h] 转换为 [x1, y1, x2, y2]"""y = np.copy(x)y[:, 0] = x[:, 0] - x[:, 2] / 2y[:, 1] = x[:, 1] - x[:, 3] / 2y[:, 2] = x[:, 0] + x[:, 2] / 2y[:, 3] = x[:, 1] + x[:, 3] / 2return ydef nms(boxes, scores, iou_threshold=0.45):"""NMS 实现"""if len(boxes) == 0:return []boxes = np.array(boxes)scores = np.array(scores)areas = (boxes[:, 2] - boxes[:, 0]) * (boxes[:, 3] - boxes[:, 1])order = scores.argsort()[::-1]keep = []while len(order) > 0:i = order[0]keep.append(i)xx1 = np.maximum(boxes[i, 0], boxes[order[1:], 0])yy1 = np.maximum(boxes[i, 1], boxes[order[1:], 1])xx2 = np.minimum(boxes[i, 2], boxes[order[1:], 2])yy2 = np.minimum(boxes[i, 3], boxes[order[1:], 3])w = np.maximum(0.0, xx2 - xx1)h = np.maximum(0.0, yy2 - yy1)inter = w * hovr = inter / (areas[i] + areas[order[1:]] - inter)inds = np.where(ovr <= iou_threshold)[0]order = order[inds + 1]return keepdef postprocess(outputs, ratio, original_shape):"""后处理:解析输出,提取检测框、NMS、关键点"""h, w, _ = original_shapeoutput = outputs[0].squeeze(0)  # shape: (56, 8400)# Step 2: 转置为 (8400, 56),每一行对应一个检测框outputs = output.transpose(1, 0)  # shape: (8400, 56)# 分离 bbox、objectness、class_scores、keypointsboxes = outputs[:, :4]                  # [8400, 4]          # [8400, 1]class_scores = outputs[:, 4:5]         # [8400, 80]keypoints = outputs[:, 5:]             # [8400, 51]# 计算每个检测框的总置信度:objectness × max_class_scorescores = class_scores  # [8400, 1]scores = scores.flatten()# 筛选满足阈值的检测框valid_indices = np.where(scores >= CONF_THRESHOLD)[0]if len(valid_indices) == 0:return [], []boxes = boxes[valid_indices]scores = scores[valid_indices]keypoints = keypoints[valid_indices]# 将 box 从 xywh 转换为 xyxyboxes_xyxy = xywh2xyxy(boxes)# 应用 NMSnms_indices = nms(boxes_xyxy, scores)# 取出最终保留的检测框和关键点final_boxes = boxes[nms_indices]final_keypoints = keypoints[nms_indices]# 调整坐标到原图大小bboxes = []keypoints_list = []for i in range(len(final_boxes)):cx, cy, cw, ch = final_boxes[i]# 先转换为 xyxy 格式,再根据 ratio 缩放回原图尺寸x_center = cx / ratioy_center = cy / ratiowidth = cw / ratioheight = ch / ratiox1 = int(x_center - width / 2)y1 = int(y_center - height / 2)x2 = int(x_center + width / 2)y2 = int(y_center + height / 2)bboxes.append([x1, y1, x2 - x1, y2 - y1])# 处理关键点kpts = final_keypoints[i].reshape(-1, 3)kp_list = []for j in range(kpts.shape[0]):px = int(kpts[j, 0] / ratio)     # x 坐标py = int(kpts[j, 1] / ratio)     # y 坐标vis = kpts[j, 2]                 # 可见性kp_list.append((px, py, vis))keypoints_list.append(kp_list)return bboxes, keypoints_listdef draw_results(img, bboxes, keypoints_list):"""在图像上绘制检测框和关键点"""for bbox in bboxes:x, y, w, h = bboxcv2.rectangle(img, (x, y), (x + w, y + h), (0, 255, 0), 2)for keypoints in keypoints_list:# 绘制关键点for (x, y, vis) in keypoints:if vis > KEYPOINT_VISIBILITY_THRESHOLD:cv2.circle(img, (int(x), int(y)), 5, (0, 255, 255), -1)# 绘制骨架连线for i1, i2 in SKELETON:p1 = keypoints[i1]p2 = keypoints[i2]if p1[2] > KEYPOINT_VISIBILITY_THRESHOLD and p2[2] > KEYPOINT_VISIBILITY_THRESHOLD:cv2.line(img, (int(p1[0]), int(p1[1])), (int(p2[0]), int(p2[1])), (255, 0, 0), 2)return img# ----------------------------
# 主程序
# ----------------------------
if __name__ == "__main__":model_path = "yolo11n-pose.onnx"image_path = "down_head.png"# 初始化 ONNX Runtimesession = ort.InferenceSession(model_path)input_name = session.get_inputs()[0].nameoutput_name = session.get_outputs()[0].name# 读取图像img = cv2.imread(image_path)original_shape = img.shape# 预处理blob, ratio = preprocess(img)# 推理outputs = session.run([output_name], {input_name: blob.astype(np.float32)})# 后处理bboxes, keypoints_list = postprocess(outputs, ratio, original_shape)# 绘图result_img = draw_results(img, bboxes, keypoints_list)# 显示或保存cv2.imshow("Pose Detection", result_img)cv2.waitKey(0)cv2.destroyAllWindows()