python训练营打卡第36天
作业:对之前的信贷项目,利用神经网络训练下,尝试用到目前的知识点让代码更加规范和美观。
# 导入相关库
import pandas as pd
import numpy as np
import matplotlib.pyplot as plt
from sklearn.model_selection import train_test_split
from sklearn.preprocessing import MinMaxScaler
import torch
import torch.nn as nn
import torch.optim as optim
import seaborn as sns
from sklearn.metrics import classification_report, confusion_matrix
import warnings
warnings.filterwarnings("ignore")
import time
from tqdm import tqdm# 设置GPU设备
device = torch.device("cuda:0" if torch.cuda.is_available() else "cpu")
print(f"Using device: {device}")# 读取数据
try:data = pd.read_csv(r"E:\shucai\data.csv")
except FileNotFoundError:print("请检查数据路径是否正确!")exit()# 数据预处理
data.drop(columns=['Id'], inplace=True) # 删除无用列# 分离连续特征与离散特征
continuous_features = data.select_dtypes(include=['float64', 'int64']).columns.tolist()
discrete_features = data.select_dtypes(exclude=['float64', 'int64']).columns.tolist()# 缺失值处理
for feature in continuous_features:if data[feature].isnull().sum() > 0:data[feature].fillna(data[feature].median(), inplace=True)for feature in discrete_features:if data[feature].isnull().sum() > 0:data[feature].fillna(data[feature].mode()[0], inplace=True)# 有序离散变量进行标签编码
mappings = {"Years in current job": {"10+ years": 10,"2 years": 2,"3 years": 3,"< 1 year": 0,"5 years": 5,"1 year": 1,"4 years": 4,"6 years": 6,"7 years": 7,"8 years": 8,"9 years": 9},"Home Ownership": {"Home Mortgage": 0,"Rent": 1,"Own Home": 2,"Have Mortgage": 3},"Term": {"Short Term": 0,"Long Term": 1}
}# 使用映射字典进行转换
for feature, mapping in mappings.items():if feature in data.columns:data[feature] = data[feature].map(mapping)# 对无序离散变量进行独热编码
data = pd.get_dummies(data, columns=['Purpose'])# 分离特征和标签
X = data.drop(['Credit Default'], axis=1)
y = data['Credit Default'] # 划分训练集和测试集
X_train, X_test, y_train, y_test = train_test_split(X, y, test_size=0.2, random_state=42) # 特征数据归一化处理
scaler = MinMaxScaler()
X_train = scaler.fit_transform(X_train)
X_test = scaler.transform(X_test) # 将数据转换为PyTorch张量并移至GPU
x_train = torch.FloatTensor(X_train).to(device)
y_train = torch.LongTensor(y_train.values).to(device)
x_test = torch.FloatTensor(X_test).to(device)
y_test = torch.LongTensor(y_test.values).to(device)# 动态获取输入特征数量
input_size = x_train.shape[1]# 定义MLP模型
class MLP(nn.Module):def __init__(self, input_size):super(MLP, self).__init__()self.fc1 = nn.Linear(input_size, 64) # 输入层到第一隐藏层self.relu = nn.ReLU() # 激活函数ReLUself.dropout = nn.Dropout(0.3) # 添加Dropout防止过拟合self.fc2 = nn.Linear(64, 32) # 第一隐藏层到第二隐藏层self.fc3 = nn.Linear(32, 2) # 第二隐藏层到输出层def forward(self, x):x = self.fc1(x)x = self.relu(x)x = self.dropout(x)x = self.fc2(x)x = self.relu(x)# 不在最后一个隐藏层后使用dropoutx = self.fc3(x)return x# 初始化模型
model = MLP(input_size).to(device)# 定义损失函数和优化器
criterion = nn.CrossEntropyLoss()
optimizer = optim.SGD(model.parameters(), lr=0.01)# 训练模型
num_epochs = 20000
losses = []
epochs = []
start_time = time.time()# 创建tqdm进度条
with tqdm(total=num_epochs, desc="训练进度", unit="epoch") as pbar:for epoch in range(num_epochs):# 前向传播outputs = model(x_train)loss = criterion(outputs, y_train)# 反向传播和优化optimizer.zero_grad()loss.backward()optimizer.step()# 记录损失值并更新进度条if (epoch + 1) % 200 == 0:losses.append(loss.item())epochs.append(epoch + 1)pbar.set_postfix({'Loss': f'{loss.item():.4f}'})# 让tqdm自动更新进度条pbar.update(1)time_all = time.time() - start_time
print(f'Training time: {time_all:.2f} seconds')# 可视化损失曲线
plt.figure(figsize=(10, 6))
plt.plot(epochs, losses, 'b-', linewidth=2)
plt.title('Training Loss Curve', fontsize=16)
plt.xlabel('Epochs', fontsize=14)
plt.ylabel('Loss', fontsize=14)
plt.grid(True, linestyle='--', alpha=0.5)
plt.show()# 模型评估
model.eval()
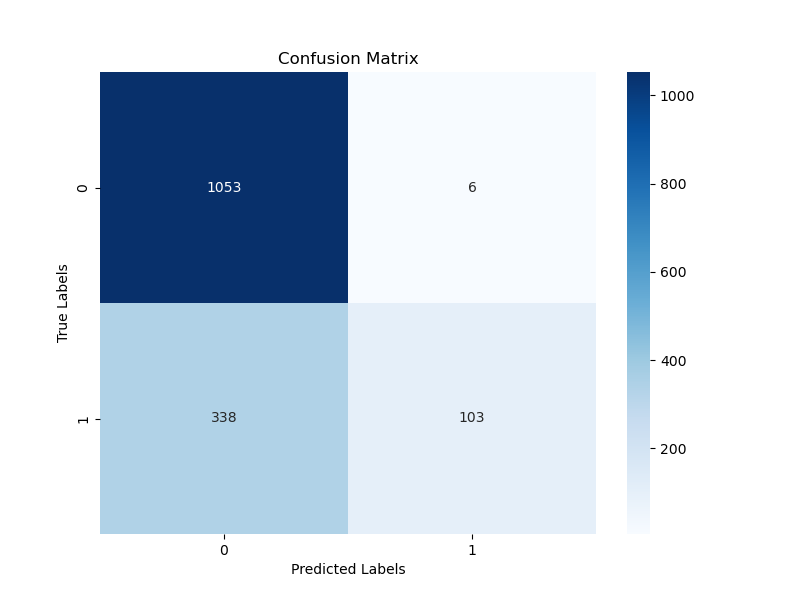
with torch.no_grad():outputs = model(x_test)_, predicted = torch.max(outputs.data, 1)# 计算准确率total = y_test.size(0)correct = (predicted == y_test).sum().item()accuracy = 100 * correct / totalprint(f'Accuracy on test set: {accuracy:.2f}%')# 计算更全面的评估指标y_test_cpu = y_test.cpu().numpy()predicted_cpu = predicted.cpu().numpy()print("\n分类报告:")print(classification_report(y_test_cpu, predicted_cpu))# 绘制混淆矩阵cm = confusion_matrix(y_test_cpu, predicted_cpu)plt.figure(figsize=(8, 6))sns.heatmap(cm, annot=True, fmt='d', cmap='Blues')plt.xlabel('Predicted Labels')plt.ylabel('True Labels')plt.title('Confusion Matrix')plt.show()输出结果:
Using device: cpu
训练进度: 100%|█████████████████████████████████████████████████████████████████████████████████| 20000/20000 [02:33<00:00, 130.58epoch/s, Loss=0.4633]
Training time: 153.17 seconds
Accuracy on test set: 77.07%分类报告:precision    recall  f1-score   support0       0.76      0.99      0.86      10591       0.94      0.23      0.37       441accuracy                           0.77      1500macro avg       0.85      0.61      0.62      1500
weighted avg       0.81      0.77      0.72      1500
@浙大疏锦行