AI学习笔记二十八:使用ESP32 CAM和YOLOV5实现目标检测
若该文为原创文章,转载请注明原文出处。
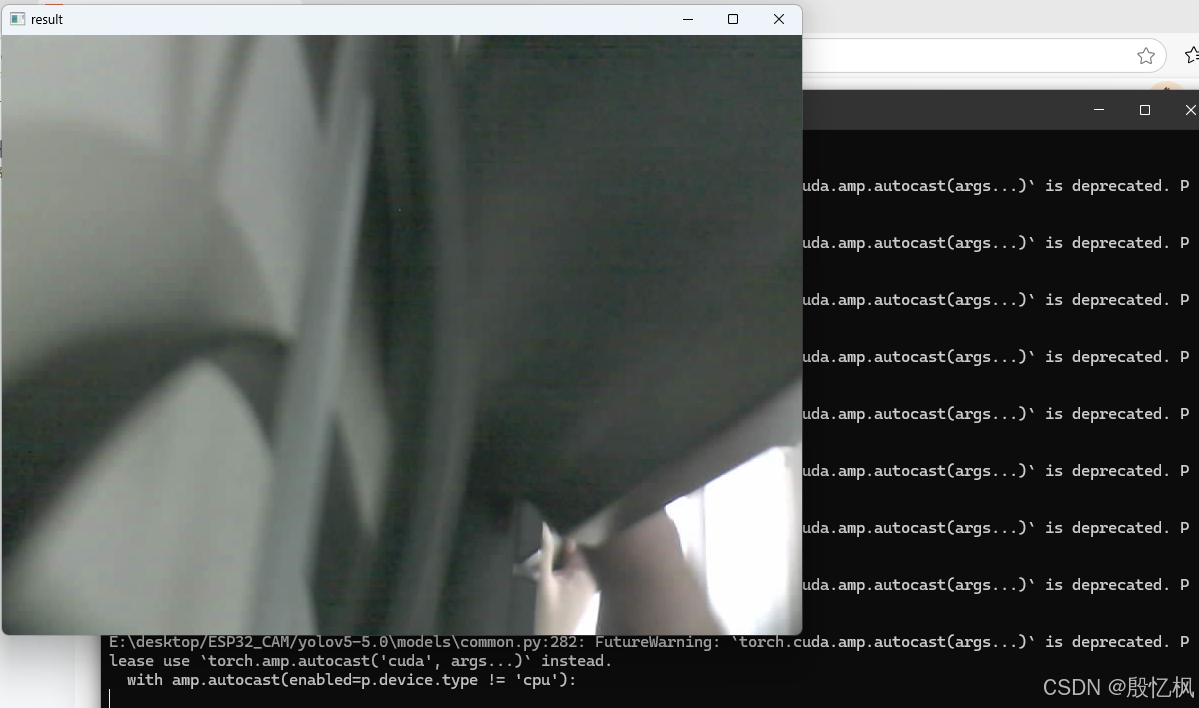
最近在研究使用APP如何显示ESP32 CAM的摄像头数据,看到有人实现把ESP32 CAM的数据流上传,通过YOLOV5来检测,实现拉流推理,这里复现一下。
一、环境
arduino配置esp32-cam开发环境
https://www.jianshu.com/p/c1a69a6772f3软件自行安装
二、程序
程序是基于esp32的例子上修改的
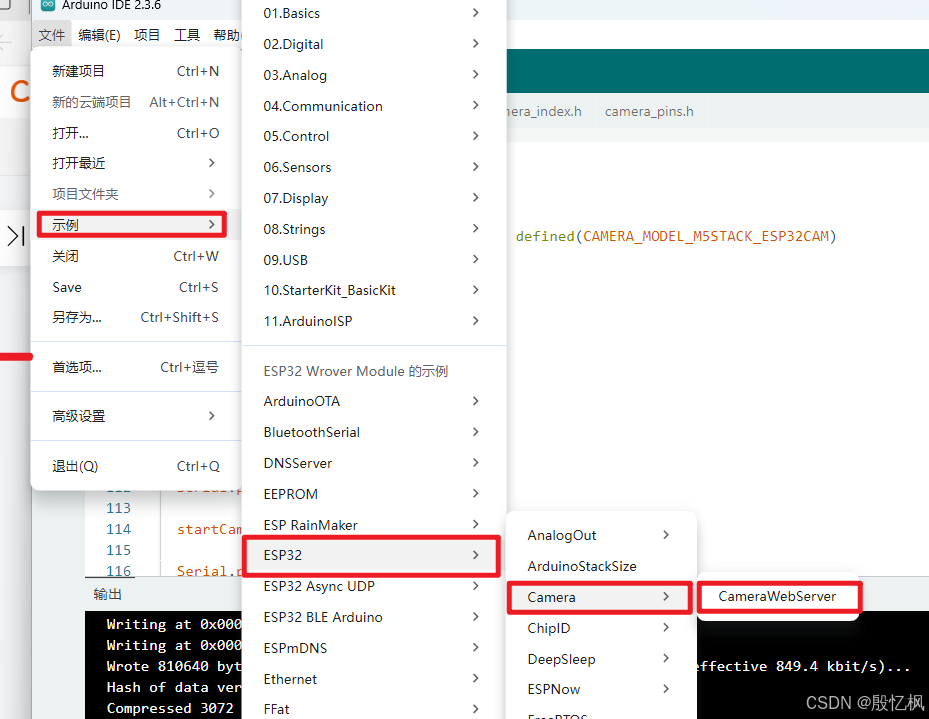
修改主要是几个地方
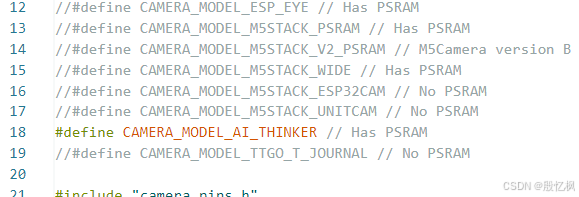
1、摄像头
根据自己的ESP32 CAM选择
2、WIFI

3、配置TCP端口
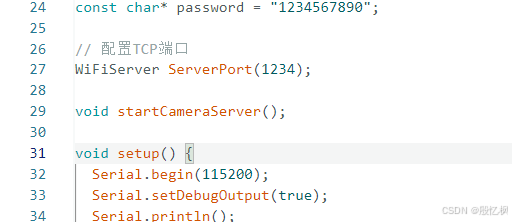
配置是为了YOLOV5拉流使用
4、源码
#include "esp_camera.h"
#include <WiFi.h>//
// WARNING!!! PSRAM IC required for UXGA resolution and high JPEG quality
//            Ensure ESP32 Wrover Module or other board with PSRAM is selected
//            Partial images will be transmitted if image exceeds buffer size
//// Select camera model
//#define CAMERA_MODEL_WROVER_KIT // Has PSRAM
//#define CAMERA_MODEL_ESP_EYE // Has PSRAM
//#define CAMERA_MODEL_M5STACK_PSRAM // Has PSRAM
//#define CAMERA_MODEL_M5STACK_V2_PSRAM // M5Camera version B Has PSRAM
//#define CAMERA_MODEL_M5STACK_WIDE // Has PSRAM
//#define CAMERA_MODEL_M5STACK_ESP32CAM // No PSRAM
//#define CAMERA_MODEL_M5STACK_UNITCAM // No PSRAM
#define CAMERA_MODEL_AI_THINKER // Has PSRAM
//#define CAMERA_MODEL_TTGO_T_JOURNAL // No PSRAM#include "camera_pins.h"const char* ssid = "yifeng";
const char* password = "1234567890";// 配置TCP端口
WiFiServer ServerPort(1234);void startCameraServer();void setup() {Serial.begin(115200);Serial.setDebugOutput(true);Serial.println();// 配置闪光灯pinMode(4, OUTPUT);// 关闭闪光灯digitalWrite(4, LOW);camera_config_t config;config.ledc_channel = LEDC_CHANNEL_0;config.ledc_timer = LEDC_TIMER_0;config.pin_d0 = Y2_GPIO_NUM;config.pin_d1 = Y3_GPIO_NUM;config.pin_d2 = Y4_GPIO_NUM;config.pin_d3 = Y5_GPIO_NUM;config.pin_d4 = Y6_GPIO_NUM;config.pin_d5 = Y7_GPIO_NUM;config.pin_d6 = Y8_GPIO_NUM;config.pin_d7 = Y9_GPIO_NUM;config.pin_xclk = XCLK_GPIO_NUM;config.pin_pclk = PCLK_GPIO_NUM;config.pin_vsync = VSYNC_GPIO_NUM;config.pin_href = HREF_GPIO_NUM;config.pin_sscb_sda = SIOD_GPIO_NUM;config.pin_sscb_scl = SIOC_GPIO_NUM;config.pin_pwdn = PWDN_GPIO_NUM;config.pin_reset = RESET_GPIO_NUM;config.xclk_freq_hz = 20000000;config.pixel_format = PIXFORMAT_JPEG;// if PSRAM IC present, init with UXGA resolution and higher JPEG quality//                      for larger pre-allocated frame buffer.if(psramFound()){config.frame_size = FRAMESIZE_UXGA;config.jpeg_quality = 10;config.fb_count = 2;} else {config.frame_size = FRAMESIZE_SVGA;config.jpeg_quality = 12;config.fb_count = 1;}#if defined(CAMERA_MODEL_ESP_EYE)pinMode(13, INPUT_PULLUP);pinMode(14, INPUT_PULLUP);
#endif// camera initesp_err_t err = esp_camera_init(&config);if (err != ESP_OK) {Serial.printf("Camera init failed with error 0x%x", err);return;}sensor_t * s = esp_camera_sensor_get();// initial sensors are flipped vertically and colors are a bit saturatedif (s->id.PID == OV3660_PID) {s->set_vflip(s, 1); // flip it backs->set_brightness(s, 1); // up the brightness just a bits->set_saturation(s, -2); // lower the saturation}// drop down frame size for higher initial frame rate//s->set_framesize(s, FRAMESIZE_QVGA);s->set_framesize(s, FRAMESIZE_SVGA);s->set_vflip(s, 1);s->set_hmirror(s, 1);#if defined(CAMERA_MODEL_M5STACK_WIDE) || defined(CAMERA_MODEL_M5STACK_ESP32CAM)s->set_vflip(s, 1);s->set_hmirror(s, 1);
#endifWiFi.begin(ssid, password);while (WiFi.status() != WL_CONNECTED) {delay(500);Serial.print(".");}Serial.println("");Serial.println("WiFi connected");startCameraServer();Serial.print("Camera Ready! Use 'http://");Serial.print(WiFi.localIP());Serial.println("' to connect");// 打开TCPServerPort.begin();
}void loop()
{unsigned char i = 200;// 等待客户端连接WiFiClient client = ServerPort.available();if (client) {Serial.println("New client connected");while (client.connected()) {// 检查是否有数据可供读取if (client.available()) {// 读取客户端发送的数据String data = client.readStringUntil('\n');Serial.print("Received data: ");Serial.println(data);// 发送响应到客户端String response = "Server received: " + data;client.println(response);}}// 断开与客户端的连接client.stop();Serial.println("Client disconnected");}}
三、YOLOV5环境安装
YOLOV5采用的是5.0版本,下载源码后安装
参考:AI学习笔记二:YOLOV5环境搭建及测试全过程_yolov5 测试-CSDN博客
测试代码:
import cv2
import torch
import numpy as np
import socket
camera_url = "http://192.168.50.2:81/stream"
send_msg = "found"
# 创建socket对象
socket_client = socket.socket()
# 连接到服务器
socket_client.connect(("192.168.50.2", 1234))
# 读取yolov5模型
model = torch.hub.load('E:/desktop/ESP32_CAM/yolov5-5.0/', 'custom','E:/desktop/ESP32_CAM/yolov5-5.0/yolov5s.pt', source='local')
# 设置模型
model.conf = 0.4cap = cv2.VideoCapture(camera_url)
while True:ret, frame = cap.read()frame = cv2.flip(frame, 1)img_cvt = cv2.cvtColor(frame, cv2.COLOR_BGR2RGB)results = model(img_cvt)# 打印得到的数据# print(str(results.pandas().xyxy[0].to_numpy()[:, -1]))  # tensor-to-numpyresults_ = results.pandas().xyxy[0].to_numpy()for result in results_:target = result[6]if target != "":#发送消息socket_client.send(send_msg.encode("UTF-8"))print(target)i = 0# 画图for box in results_:l, t, r, b = box[:4].astype('int')confidence = str(round(box[4] * 100, 2)) + "%"cls_name = box[6]cv2.rectangle(frame, (l, t), (r, b), (0, 200, 55), 2)cv2.putText(frame, cls_name + "-" + confidence, (l, t), cv2.FONT_ITALIC, 1, (200, 55, 0), 2)cv2.imshow("result", frame)if cv2.waitKey(10) & 0xFF == ord("q"):break
cap.release()
cv2.destroyAllWindows()
# 关闭连接
socket_client.close()
代码需要注意的是地址,根据板子的地址,自行修改
测试结果:
四、YOLOV11测试
import cv2
import torch
import numpy as np
import socket
import cv2
from ultralytics import YOLOcamera_url = "http://192.168.1.106:81/stream"
send_msg = "found"
# 创建socket对象
socket_client = socket.socket()
# 连接到服务器
socket_client.connect(("192.168.1.106", 1234))def predict(chosen_model, img, classes=[], conf=0.5):if classes:results = chosen_model.predict(img, classes=classes, conf=conf)else:results = chosen_model.predict(img, conf=conf)return resultsdef predict_and_detect(chosen_model, img, classes=[], conf=0.5, rectangle_thickness=2, text_thickness=1):results = predict(chosen_model, img, classes, conf=conf)for result in results:for box in result.boxes:cv2.rectangle(img, (int(box.xyxy[0][0]), int(box.xyxy[0][1])),(int(box.xyxy[0][2]), int(box.xyxy[0][3])), (255, 0, 0), rectangle_thickness)cv2.putText(img, f"{result.names[int(box.cls[0])]}",(int(box.xyxy[0][0]), int(box.xyxy[0][1]) - 10),cv2.FONT_HERSHEY_PLAIN, 1, (255, 0, 0), text_thickness)return img, results# defining function for creating a writer (for mp4 videos)
def create_video_writer(video_cap, output_filename):# grab the width, height, and fps of the frames in the video stream.frame_width = int(video_cap.get(cv2.CAP_PROP_FRAME_WIDTH))frame_height = int(video_cap.get(cv2.CAP_PROP_FRAME_HEIGHT))fps = int(video_cap.get(cv2.CAP_PROP_FPS))# initialize the FourCC and a video writer objectfourcc = cv2.VideoWriter_fourcc(*'MP4V')writer = cv2.VideoWriter(output_filename, fourcc, fps,(frame_width, frame_height))return writermodel = YOLO("G:/enpei_Project_Code/ESP32_CAM/yolo11s.pt")cap = cv2.VideoCapture(camera_url)
while True:success, img = cap.read()if not success:breakresult_img, _ = predict_and_detect(model, img, classes=[], conf=0.5)# 打印得到的数据# print(str(results.pandas().xyxy[0].to_numpy()[:, -1]))  # tensor-to-numpycv2.imshow("Image", result_img)if cv2.waitKey(10) & 0xFF == ord("q"):break
cap.release()
cv2.destroyAllWindows()
# 关闭连接
socket_client.close()
这个只是个demo测试,还是想实现如果使用APP显示。
如有侵权,或需要完整代码,请及时联系博主。