【开源解析】基于深度学习的双色球预测系统:从数据获取到可视化分析
基于深度学习的双色球预测系统:从数据获取到可视化分析

🌈 个人主页:创客白泽 - CSDN博客
🔥 系列专栏:🐍《Python开源项目实战》
💡 热爱不止于代码,热情源自每一个灵感闪现的夜晚。愿以开源之火,点亮前行之路。
👍 如果觉得这篇文章有帮助,欢迎您一键三连,分享给更多人哦


概述
在当今大数据和人工智能时代,机器学习技术已广泛应用于各个领域。本文将介绍一个基于PyQt5和TensorFlow开发的双色球预测系统,该系统集数据获取、深度学习模型训练、预测分析和可视化展示于一体。
本项目采用Python语言开发,主要技术栈包括:
- PyQt5:构建美观的图形用户界面
- TensorFlow/Keras:实现LSTM、GRU等深度学习模型
- Pandas/Numpy:数据处理与分析
- WebEngineView:现代化的结果展示方式
系统通过分析历史开奖数据,运用多种神经网络模型预测下一期可能的开奖号码,并提供直观的数据可视化功能。本文将从功能设计、实现原理、代码解析等多个维度详细介绍该系统。
功能特点
1. 数据获取模块
系统内置网络爬虫功能,能够自动从官方数据源获取最新的双色球开奖数据。主要特点包括:
- 自动处理网络请求和JSON数据解析
- 数据清洗和异常处理机制
- 本地CSV文件缓存
- 进度条实时显示获取进度
2. 预测分析模块
核心预测功能基于TensorFlow深度学习框架,提供三种预测策略:
- LSTM模型:长短期记忆网络,擅长捕捉时间序列中的长期依赖关系
- GRU模型:门控循环单元,比LSTM更轻量高效
- 混合模型:结合CNN、LSTM、GRU和注意力机制的多层次特征提取
3. 可视化分析模块
系统采用现代化的Web技术展示分析结果:
- 交互式HTML表格展示历史数据
- 动态气泡图展示号码频率分布
- 响应式设计适配不同屏幕尺寸
- 动画效果增强用户体验
4. 参数配置界面
用户友好的参数配置界面,可调整:
- 训练集比例(50%-95%)
- 训练轮次(50-1000)
- 批量大小(16-128)
- 回溯期数(5-30)
- 预测策略(LSTM/GRU/混合模型)
系统展示
主界面截图
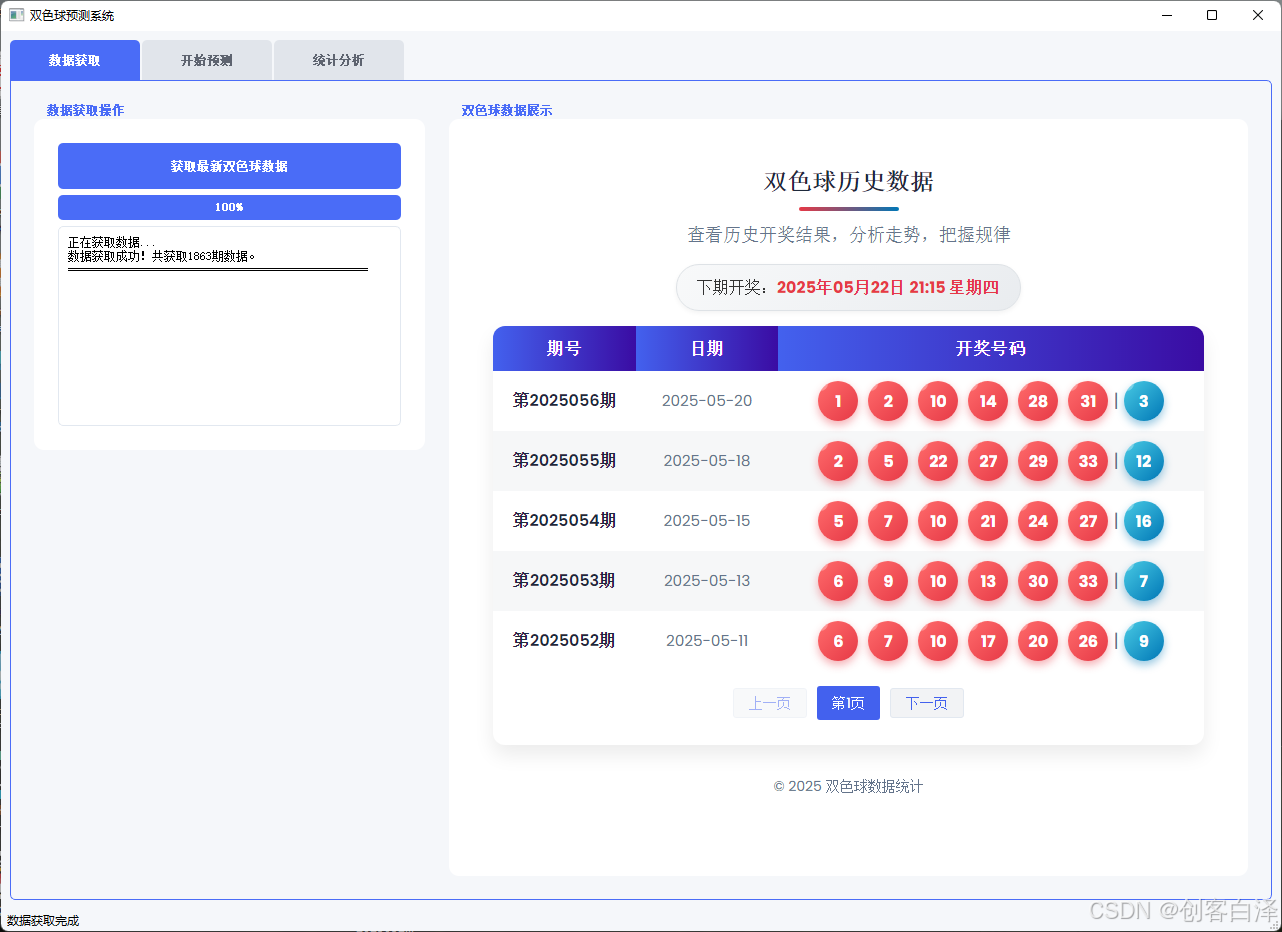
主界面采用标签页设计,分为"数据获取"、"开始预测"和"统计分析"三个主要功能区域。界面风格现代化,配色以蓝色和红色为主,符合双色球主题。
数据获取界面
左侧为操作面板,右侧以卡片式布局展示获取到的历史数据,支持分页浏览。数据表格采用响应式设计,在移动设备上也能良好显示。
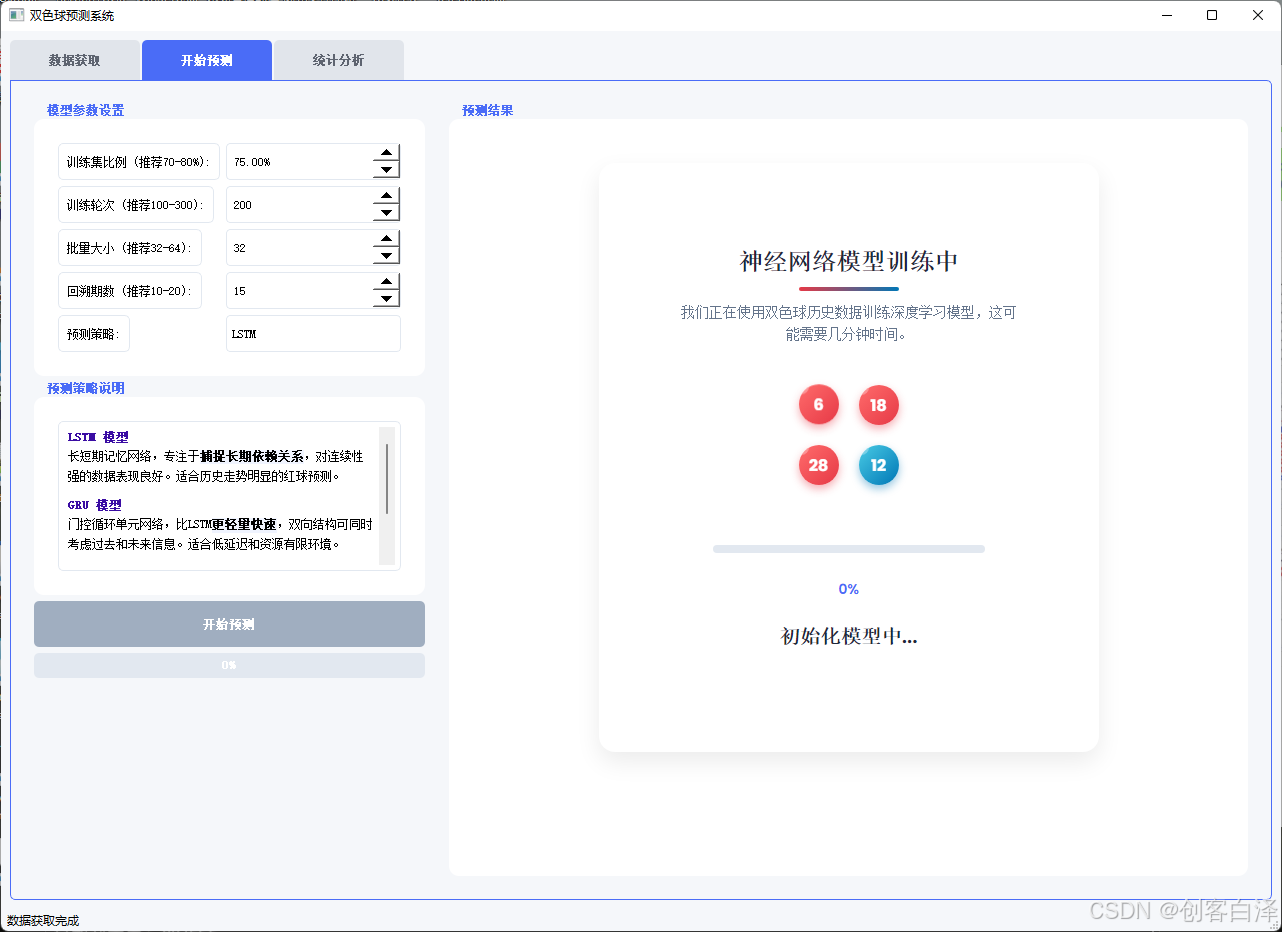
预测结果展示
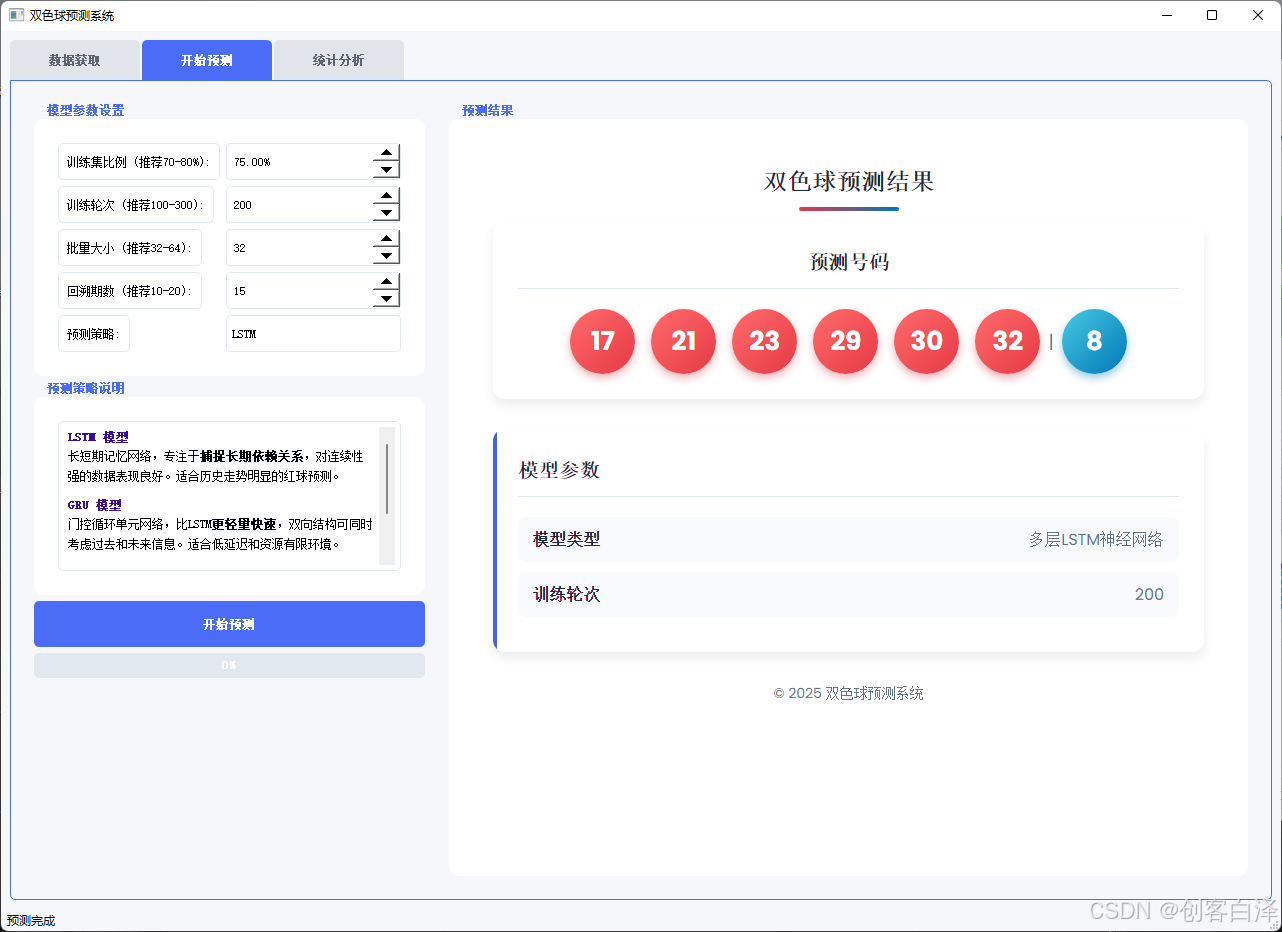
预测结果以醒目的红蓝球号码展示,并附带模型参数和训练信息。页面加载时有精美的加载动画,提升用户体验。
统计分析可视化
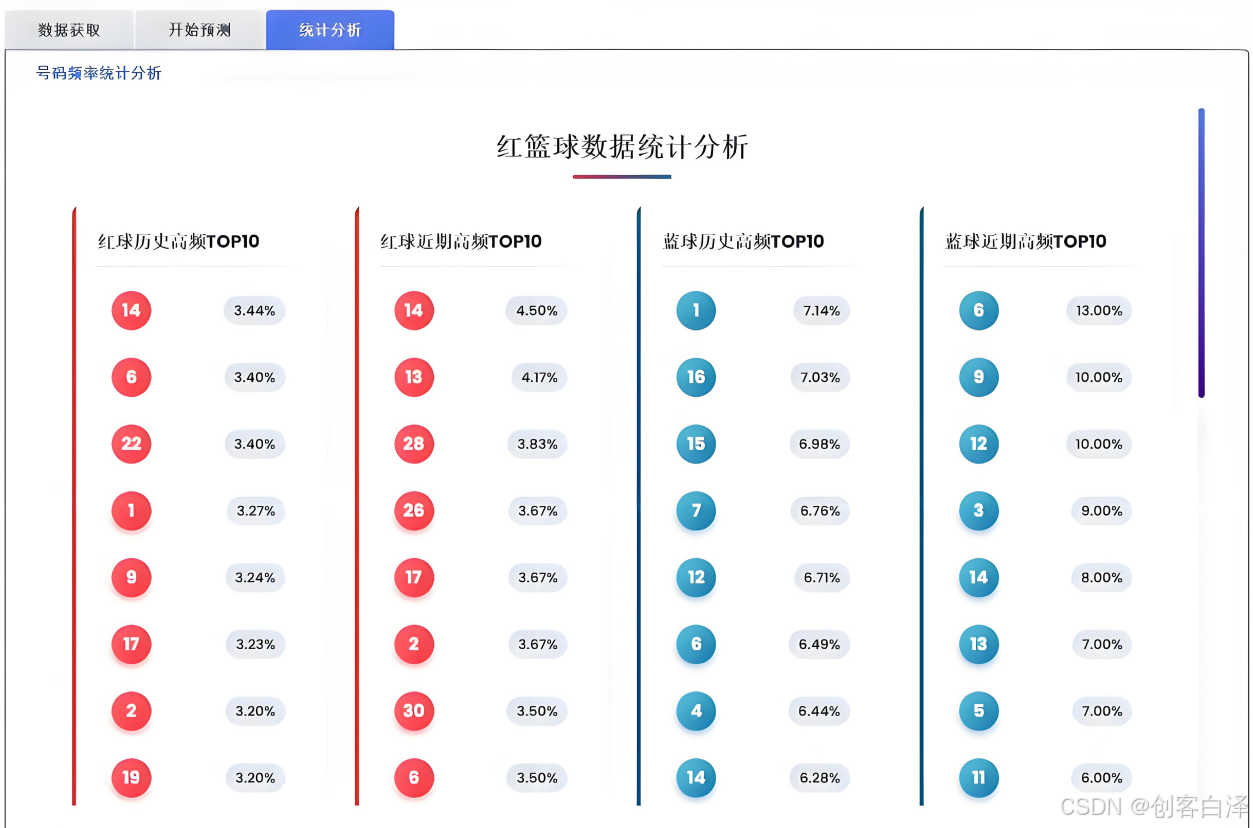
采用气泡图直观展示各号码的出现频率,高频号码会有脉冲动画效果。同时提供TOP10号码列表和详细统计数据。
实现原理
1. 整体架构
系统采用MVC(Model-View-Controller)设计模式:
- Model:数据处理和预测算法(
DataFetcher,EnhancedPredictor) - View:PyQt5界面和Web展示(
MainWindow, HTML模板) - Controller:事件处理和业务逻辑(
MainWindow方法)
2. 数据流图
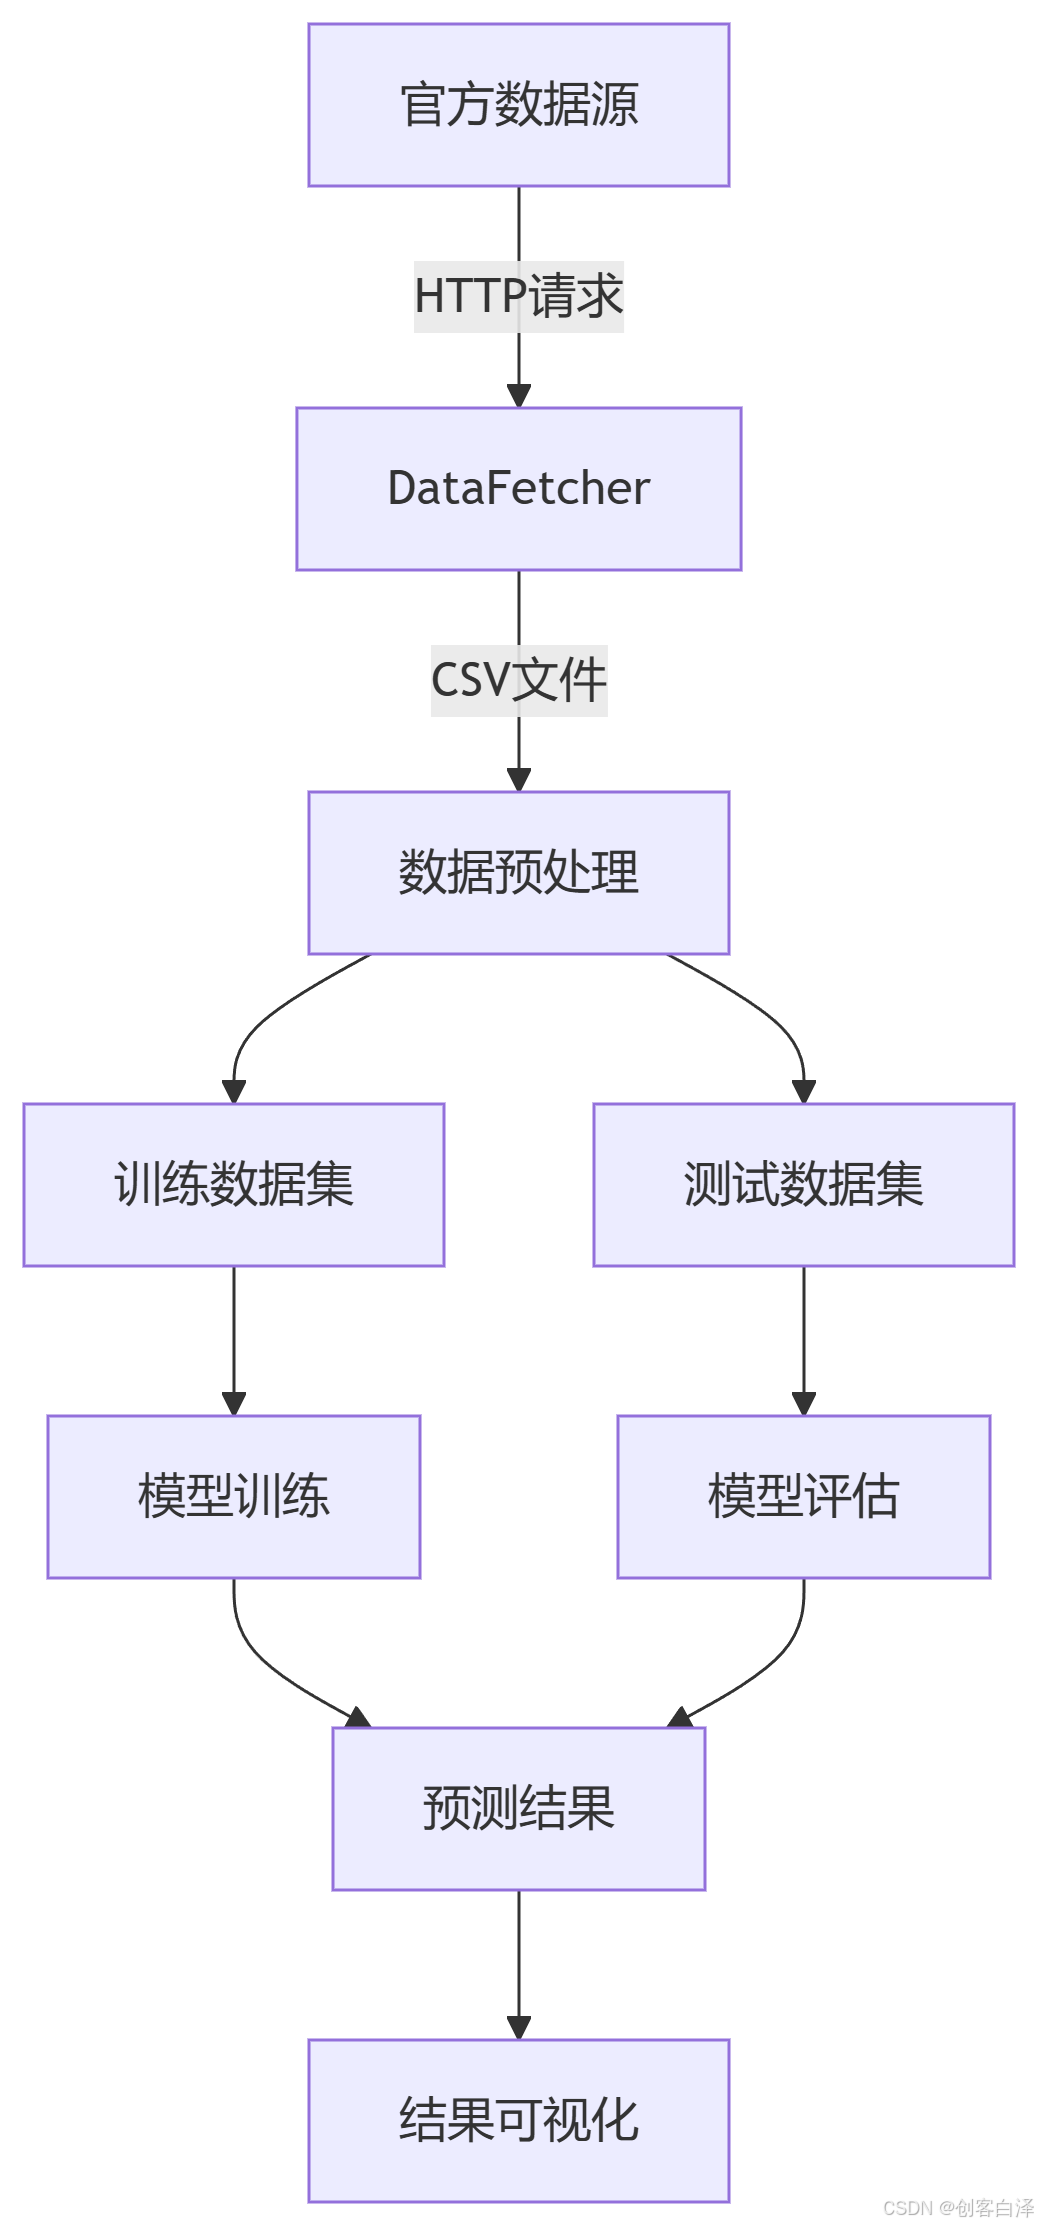
3. 关键技术点
- 惰性导入:仅在需要时导入TensorFlow等重型库,加快启动速度
- 多线程处理:使用QThread防止界面卡顿
- 异常处理:全面的错误捕获和备用方案
- 响应式设计:适配不同尺寸屏幕
- 动画效果:增强用户体验
代码解析
1. 数据获取模块
class DataFetcher(QThread):finished = pyqtSignal(str)progress = pyqtSignal(int)def run(self):try:import requestsimport pandas as pdurl = 'http://www.cwl.gov.cn/cwl_admin/front/cwlkj/search/kjxx/findDrawNotice'params = {'name': 'ssq','issueCount': '','issueStart': '','issueEnd': '','dayStart': '','dayEnd': '','pageNo': '1','pageSize': '9999','week': '','systemType': 'PC'}response = requests.get(url, params=params)jsondata = response.json()# 数据处理逻辑...df.to_csv('data.csv', index=False, encoding='utf-8-sig')self.finished.emit(f"数据获取成功!共获取{len(data)}期数据。")except Exception as e:self.finished.emit(f"数据获取失败:{str(e)}")
关键点:
- 继承QThread实现多线程
- 使用requests库获取数据
- 完善的数据清洗和异常处理
- 进度信号实时更新界面
2. 预测模型模块
class EnhancedPredictor(QThread):# ...初始化代码...def create_lstm_model(self, input_shape):import tensorflow as tffrom tensorflow.keras.models import Sequentialfrom tensorflow.keras.layers import Dense, LSTM, BatchNormalization, Dropoutmodel = Sequential([Input(shape=input_shape),LSTM(512, return_sequences=True,kernel_regularizer=l2(0.01), recurrent_regularizer=l2(0.01),dropout=0.2, recurrent_dropout=0.2),BatchNormalization(),LSTM(256, return_sequences=True),# ...更多层...Dense(7, activation='sigmoid')])model.compile(loss='mean_squared_error',optimizer=Adam(learning_rate=0.001),metrics=['mae'])return model
关键点:
- 三种模型架构可选
- 添加正则化和Dropout防止过拟合
- BatchNormalization加速训练
- 自定义Attention层增强关键特征
3. 界面交互设计
class MainWindow(QMainWindow):def __init__(self):super().__init__()self.setWindowTitle("红篮球预测系统")self.setGeometry(100, 100, 1280, 900)self.setStyleSheet("""QMainWindow {background-color: #f5f7fa;}/* 更多样式... */""")# 初始化UI组件self.initUI()def initUI(self):# 创建标签页self.tabs = QTabWidget()# 数据获取页data_tab = QWidget()# ...布局和组件...# 预测页predict_tab = QWidget()# ...布局和组件...# 统计页stats_tab = QWidget()# ...布局和组件...self.tabs.addTab(data_tab, "数据获取")self.tabs.addTab(predict_tab, "开始预测")self.tabs.addTab(stats_tab, "统计分析")
关键点:
- 现代化CSS样式
- 响应式布局
- 标签页导航
- WebEngineView集成
使用教程
1. 数据获取步骤
- 点击"数据获取"标签页
- 点击"获取最新红篮球数据"按钮
- 等待进度条完成
- 查看右侧表格展示的历史数据
2. 预测分析步骤
- 调整模型参数:
- 训练集比例:70-80%
- 训练轮次:100-300
- 批量大小:32-64
- 回溯期数:10-20
- 预测策略:根据需求选择
- 点击"开始预测"按钮
- 等待训练完成(有进度显示)
- 查看预测结果
3. 统计分析查看
- 数据获取完成后自动生成统计信息
- 点击"统计分析"标签页
- 查看号码频率分布和TOP10列表
源码解析
1. 核心类关系
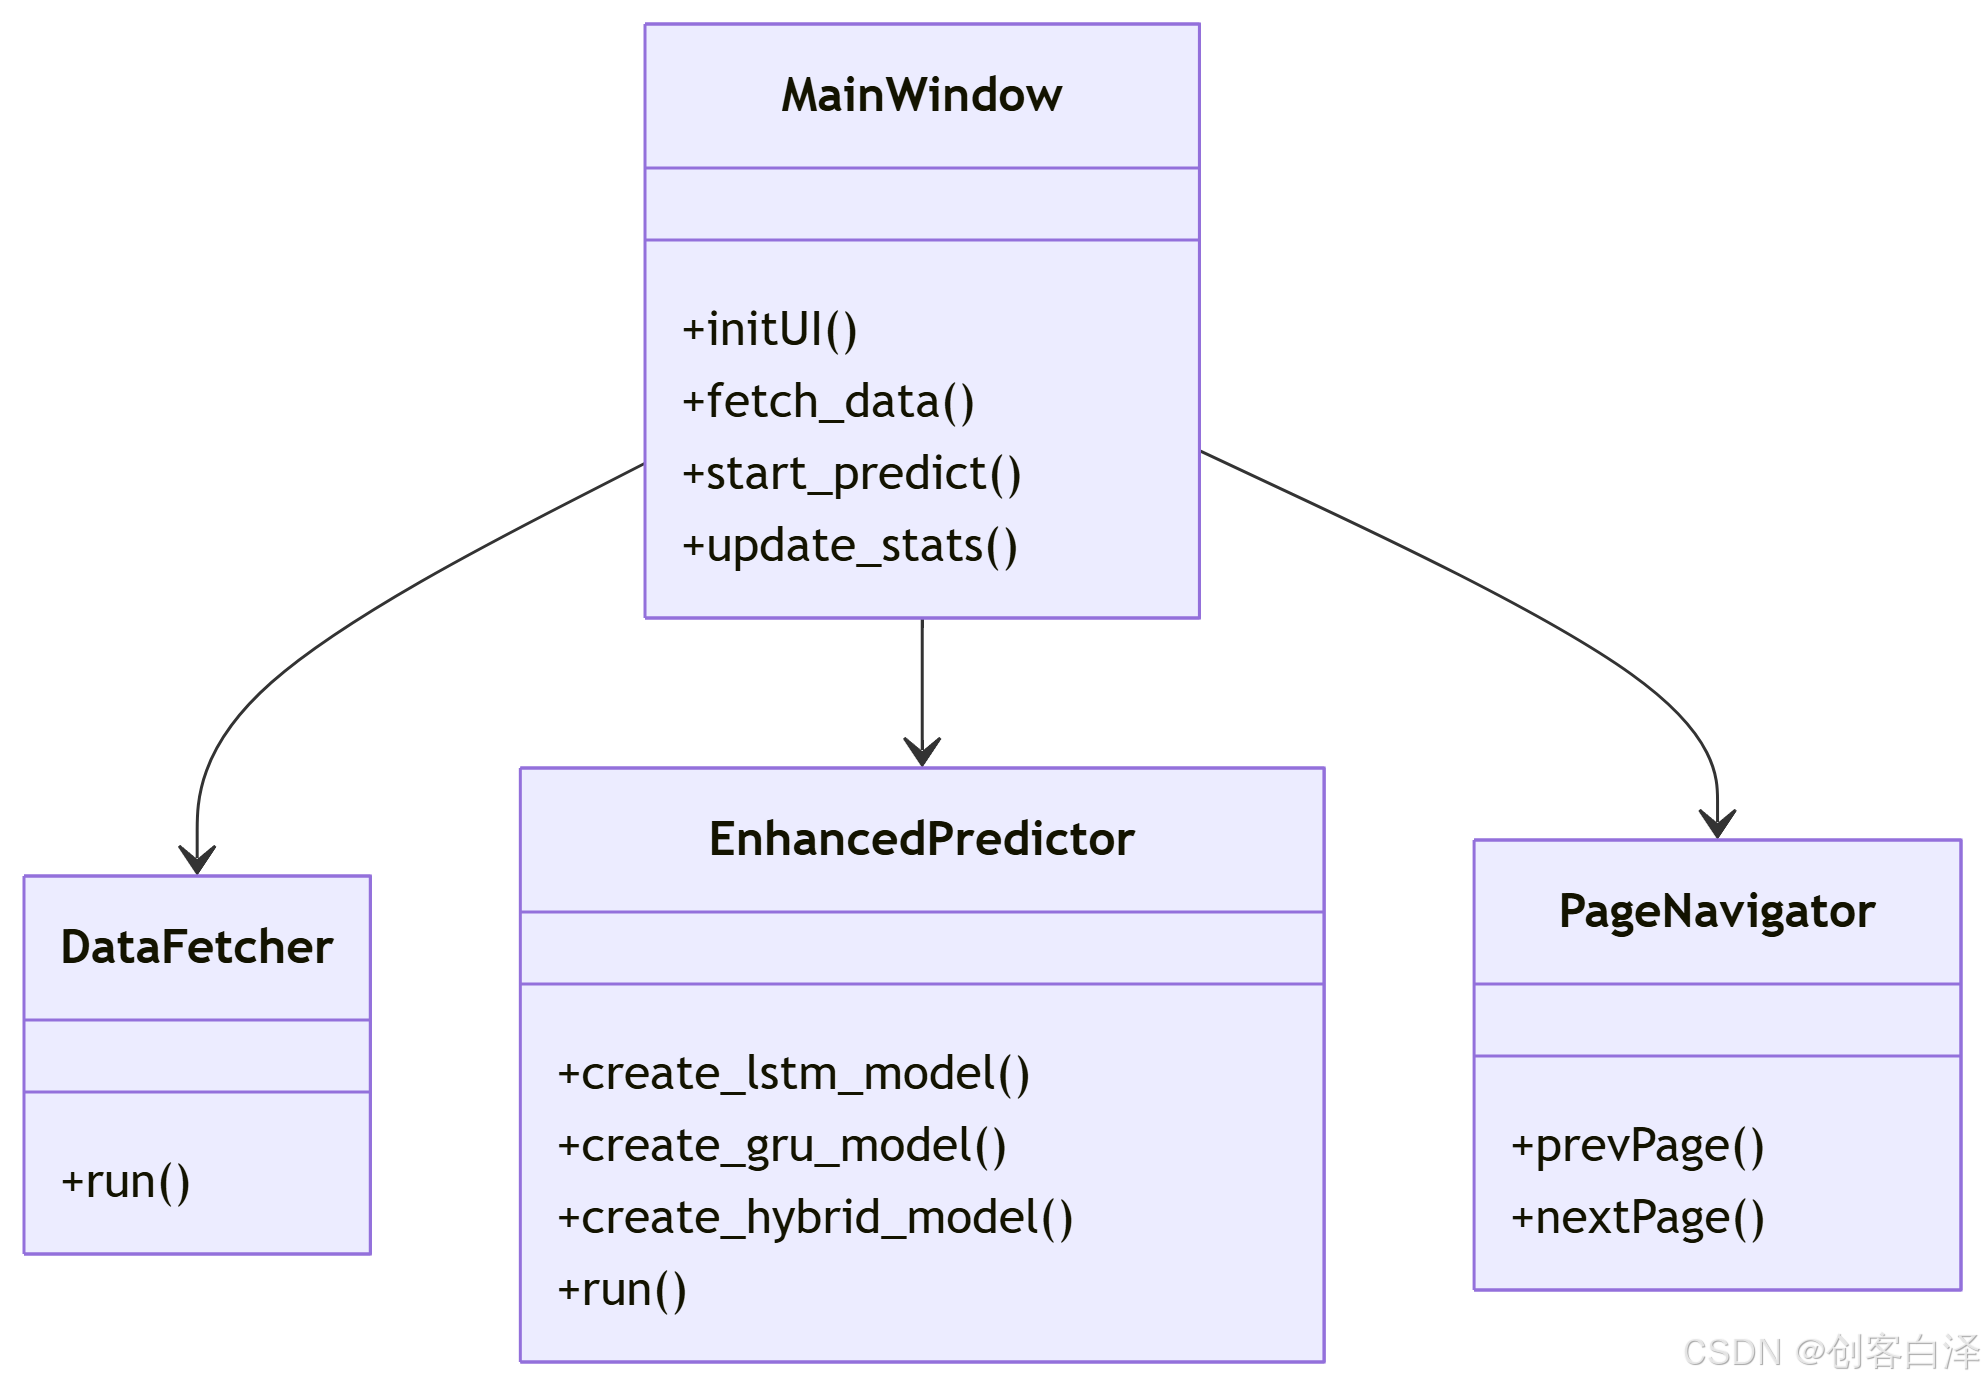
2. 关键方法说明
数据预处理
def preprocess_data(self, df):# 日期处理df['date'] = pd.to_datetime(df['日期'], errors='coerce')# 添加时间特征df['year'] = df['date'].dt.yeardf['month'] = df['date'].dt.month# ...其他特征...# 数值标准化numeric_cols = [col for col in df.columns if col not in non_numeric_cols]self.scaler = MinMaxScaler()scaled_data = self.scaler.fit_transform(df[numeric_cols])return scaled_data, numeric_cols
序列数据生成
def generate_sequences(self, data, lookback):X, y = [], []for i in range(len(data) - lookback):X.append(data[i:i + lookback])y.append(data[i + lookback, :7]) # 预测7个号码(6红+1蓝)return np.array(X), np.array(y)
结果后处理
def enhanced_postprocessing(self, prediction):# 处理预测结果prediction = np.nan_to_num(prediction, nan=0.5)# 映射到实际号码范围red_balls = []for i in range(6):ball = int(round(prediction[0][i] * 32 + 1))ball = max(1, min(33, ball))red_balls.append(ball)# 处理蓝球blue_ball = int(round(prediction[0][6] * 15 + 1))blue_ball = max(1, min(16, blue_ball))return sorted(red_balls), blue_ball
源码下载
import sys
import os# Simple Python modules first
import json
from collections import Counter# Core PyQt imports for UI
from PyQt5.QtWidgets import (QApplication, QMainWindow, QWidget, QVBoxLayout,QHBoxLayout, QLabel, QPushButton,QTextEdit, QSpinBox, QDoubleSpinBox, QProgressBar,QMessageBox, QTabWidget, QGroupBox, QFormLayout, QComboBox)
from PyQt5.QtCore import QThread, pyqtSignal, Qt, QUrl, QObject, pyqtSlot
from PyQt5.QtGui import QIcon
from PyQt5.QtWebEngineWidgets import QWebEngineView, QWebEnginePage
from PyQt5.QtWebChannel import QWebChannel# Import custom module for bubble charts
# from bubbles import generate_bubble_chart_htmldef resource_path(relative_path):""" 解决打包后资源文件路径问题 """if hasattr(sys, '_MEIPASS'):return os.path.join(sys._MEIPASS, relative_path)return os.path.join(os.path.abspath("."), relative_path)class AttentionLayer:def __init__(self, **kwargs):# Import TensorFlow here when the class is instantiatedimport tensorflow as tffrom tensorflow.keras.layers import Layerself.tf = tfsuper(Layer, self).__init__(**kwargs)def build(self, input_shape):self.W = self.add_weight(name='attention_weight',shape=(input_shape[-1], 1),initializer='random_normal',trainable=True)self.b = self.add_weight(name='attention_bias',shape=(input_shape[1], 1),initializer='zeros',trainable=True)super(AttentionLayer, self).build(input_shape)def call(self, x):e = self.tf.tanh(self.tf.matmul(x, self.W) + self.b)a = self.tf.nn.softmax(e, axis=1)output = x * areturn self.tf.reduce_sum(output, axis=1)def is_prime(n):"""判断是否为质数"""if n <= 1:return Falsefor i in range(2, int(n ** 0.5) + 1):if n % i == 0:return Falsereturn Trueclass DataFetcher(QThread):finished = pyqtSignal(str)progress = pyqtSignal(int)def run(self):try:# Import requests only when needed for data fetchingimport requestsimport pandas as pdurl = 'http://www.cwl.gov.cn/cwl_admin/front/cwlkj/search/kjxx/findDrawNotice'params = {'name': 'ssq','issueCount': '','issueStart': '','issueEnd': '','dayStart': '','dayEnd': '','pageNo': '1','pageSize': '9999','week': '','systemType': 'PC'}response = requests.get(url, params=params)jsondata = response.json()if jsondata['state'] == 0:data = []total = len(jsondata['result'])# 收集所有的日期字符串,用于日志记录all_dates = []for i, item in enumerate(jsondata['result']):# 获取日期字符串date_str = item['date']all_dates.append(date_str)# 更严格地处理日期格式try:# 首先尝试分离掉括号部分(如果有)date_str = date_str.split('(')[0].strip()# 移除日期字符串中的非法字符clean_date = ''.join([c for c in date_str if c.isdigit() or c == '-'])# 确保日期格式为YYYY-MM-DD并且长度正确if len(clean_date) >= 10:clean_date = clean_date[:10]else:# 对于格式不正确的日期,使用期号的前8位作为替代(如果可能)code = item['code']if len(code) >= 8:year = code[:4]month = code[4:6]day = code[6:8]clean_date = f"{year}-{month}-{day}"else:# 最后的备选方案clean_date = "2020-01-01"  # 使用占位符except Exception as e:print(f"处理日期时出错: {str(e)}, 原始日期: {date_str}")clean_date = "2020-01-01"  # 使用占位符# 获取蓝球和红球try:blue_ball = int(item['blue'])red_balls = [int(rb) for rb in item['red'].split(',')]# 确保有足够的红球while len(red_balls) < 6:red_balls.append(1)  # 使用1作为占位符# 添加到数据列表data.append([item['code'], clean_date, red_balls[0], red_balls[1], red_balls[2],red_balls[3], red_balls[4], red_balls[5], blue_ball])except Exception as e:print(f"处理球号时出错: {str(e)}, 期号: {item['code']}")# 跳过这条数据continueself.progress.emit(int((i + 1) / total * 100))# 记录日期收集情况print(f"收集到 {len(all_dates)} 个日期")if len(all_dates) > 0:print(f"示例日期: {all_dates[0]}")df = pd.DataFrame(data, columns=['期号', '日期', 'red1', 'red2', 'red3','red4', 'red5', 'red6', 'blue'])# 检查数据有效性print(f"数据总行数: {len(df)}")print(f"日期列类型: {df['日期'].dtype}")print(f"缺失值数量: {df.isna().sum().sum()}")# 保存前排序try:df['temp_date'] = pd.to_datetime(df['日期'], errors='coerce')df = df.sort_values(by='temp_date', ascending=False)# 修复链式赋值警告,避免使用 inplace=Truedf = df.drop('temp_date', axis=1)except Exception as e:print(f"排序数据时出错: {str(e)}")df.to_csv('data.csv', index=False, encoding='utf-8-sig')self.finished.emit(f"数据获取成功!共获取{len(data)}期数据。")else:self.finished.emit("数据获取失败:服务器返回错误状态。")except Exception as e:import tracebackerror_details = traceback.format_exc()self.finished.emit(f"数据获取失败:{str(e)}\n\n详细错误信息:\n{error_details}")class EnhancedPredictor(QThread):finished = pyqtSignal(str)progress = pyqtSignal(int)stats_ready = pyqtSignal(dict)model_trained = pyqtSignal(object)def __init__(self, train_ratio, epochs, batch_size, lookback, strategy, shared_css=None):super().__init__()self.train_ratio = train_ratioself.epochs = epochsself.batch_size = batch_sizeself.lookback = lookbackself.strategy = strategy.lower()self.red_stats = Noneself.blue_stats = Noneself.scaler = Noneself.model = Noneself.shared_css = shared_css or ""  # Default to empty string if None# We'll import tensorflow and other ML libraries on demand when run() is calleddef get_model_type(self):"""获取当前使用的模型类型"""if self.strategy == 'lstm':return "多层LSTM神经网络"elif self.strategy == 'gru':return "双向GRU神经网络"else:return "混合模型(CNN+LSTM+GRU+Attention)"def get_model_architecture(self):"""获取模型架构描述"""if self.strategy == 'lstm':return "LSTM(512)→LSTM(256)→Dense(128)"elif self.strategy == 'gru':return "BiGRU(256)→GRU(128)→Dense(64)"else:return "Conv1D→BiLSTM→GRU→Attention→Dense"def calculate_enhanced_stats(self, data):"""增强的统计分析"""try:# Import pandas here to use within this functionimport pandas as pdimport numpy as npstats = {}# 确保数据是数值型for i in range(1, 7):if f'red{i}' in data.columns:data[f'red{i}'] = pd.to_numeric(data[f'red{i}'], errors='coerce')if 'blue' in data.columns:data['blue'] = pd.to_numeric(data['blue'], errors='coerce')# 填充可能的NaN值 - 修复链式赋值警告for i in range(1, 7):if f'red{i}' in data.columns:# 使用推荐的方式替代 inplace=Truedata[f'red{i}'] = data[f'red{i}'].fillna(data[f'red{i}'].median())if 'blue' in data.columns:# 使用推荐的方式替代 inplace=Truedata['blue'] = data['blue'].fillna(data['blue'].median())# 红球分析red_balls = []for i in range(1, 7):if f'red{i}' in data.columns:red_balls.extend(data[f'red{i}'].values)# 计算所有红球出现次数red_counts = pd.Series(red_balls).value_counts().sort_index()red_probs = (red_counts / red_counts.sum()).sort_values(ascending=False)# 近期分析(最近100期)recent_data = data.tail(min(100, len(data)))recent_red = []for i in range(1, 7):if f'red{i}' in recent_data.columns:recent_red.extend(recent_data[f'red{i}'].values)recent_red_counts = pd.Series(recent_red).value_counts()recent_red_probs = (recent_red_counts / recent_red_counts.sum()).sort_values(ascending=False)# 蓝球分析if 'blue' in data.columns:blue_counts = data['blue'].value_counts().sort_index()blue_probs = (blue_counts / blue_counts.sum()).sort_values(ascending=False)recent_blue_counts = recent_data['blue'].value_counts()recent_blue_probs = (recent_blue_counts / recent_blue_counts.sum()).sort_values(ascending=False)else:# 创建默认值blue_probs = pd.Series([1/16]*16, index=range(1, 17)).sort_values(ascending=False)recent_blue_probs = blue_probs.copy()stats['red'] = {'all_time_top10': dict(list(red_probs.head(10).items())),'recent_top10': dict(list(recent_red_probs.head(10).items())),'all_time_sorted': dict(red_probs.sort_index())}stats['blue'] = {'all_time_top10': dict(list(blue_probs.head(10).items())),'recent_top10': dict(list(recent_blue_probs.head(10).items())),'all_time_sorted': dict(blue_probs.sort_index())}return statsexcept Exception as e:print(f"统计分析出错: {str(e)}")# 创建一个默认统计结果default_stats = {'red': {'all_time_top10': {i: 1/33 for i in range(1, 11)},'recent_top10': {i: 1/33 for i in range(1, 11)},'all_time_sorted': {i: 1/33 for i in range(1, 34)}},'blue': {'all_time_top10': {i: 1/16 for i in range(1, 11)},'recent_top10': {i: 1/16 for i in range(1, 11)},'all_time_sorted': {i: 1/16 for i in range(1, 17)}}}return default_statsdef create_lstm_model(self, input_shape):"""创建LSTM模型"""# Import TensorFlow components when the model is actually being createdimport tensorflow as tffrom tensorflow.keras.models import Sequentialfrom tensorflow.keras.layers import Dense, LSTM, BatchNormalization, Dropout, Inputfrom tensorflow.keras.regularizers import l2from tensorflow.keras.optimizers import Adammodel = Sequential([Input(shape=input_shape),LSTM(512, return_sequences=True,kernel_regularizer=l2(0.01), recurrent_regularizer=l2(0.01),dropout=0.2, recurrent_dropout=0.2),BatchNormalization(),LSTM(256, return_sequences=True),BatchNormalization(),Dropout(0.3),LSTM(128),BatchNormalization(),Dropout(0.3),Dense(128, activation='relu', kernel_regularizer=l2(0.01)),Dense(64, activation='relu'),Dense(7, activation='sigmoid')])model.compile(loss='mean_squared_error',optimizer=Adam(learning_rate=0.001),metrics=['mae'])return modeldef create_gru_model(self, input_shape):"""创建GRU模型"""# Import TensorFlow components when the model is actually being createdimport tensorflow as tffrom tensorflow.keras.models import Sequentialfrom tensorflow.keras.layers import Dense, GRU, BatchNormalization, Dropout, Input, Bidirectionalfrom tensorflow.keras.regularizers import l2from tensorflow.keras.optimizers import Adammodel = Sequential([Input(shape=input_shape),Bidirectional(GRU(256, return_sequences=True,kernel_regularizer=l2(0.01),recurrent_regularizer=l2(0.01),dropout=0.2,recurrent_dropout=0.2)),BatchNormalization(),GRU(128, return_sequences=True),BatchNormalization(),Dropout(0.3),GRU(64),BatchNormalization(),Dropout(0.3),Dense(64, activation='relu'),Dense(32, activation='relu'),Dense(7, activation='sigmoid')])model.compile(loss='mean_squared_error',optimizer=Adam(learning_rate=0.001),metrics=['mae'])return modeldef create_hybrid_model(self, input_shape):"""创建混合模型"""# Import TensorFlow components when the model is actually being createdimport tensorflow as tffrom tensorflow.keras.models import Sequentialfrom tensorflow.keras.layers import (Dense, LSTM, BatchNormalization, Dropout, Input, Bidirectional, GRU, Conv1D, MaxPooling1D)from tensorflow.keras.regularizers import l2from tensorflow.keras.optimizers import Adam# Import the AttentionLayer with TensorFlowglobal AttentionLayerfrom tensorflow.keras.layers import Layer# Redefine the class with proper TensorFlow inheritanceclass AttentionLayer(Layer):def __init__(self, **kwargs):super(AttentionLayer, self).__init__(**kwargs)def build(self, input_shape):self.W = self.add_weight(name='attention_weight',shape=(input_shape[-1], 1),initializer='random_normal',trainable=True)self.b = self.add_weight(name='attention_bias',shape=(input_shape[1], 1),initializer='zeros',trainable=True)super(AttentionLayer, self).build(input_shape)def call(self, x):e = tf.tanh(tf.matmul(x, self.W) + self.b)a = tf.nn.softmax(e, axis=1)output = x * areturn tf.reduce_sum(output, axis=1)model = Sequential([Input(shape=input_shape),Conv1D(64, 3, activation='relu', padding='same'),MaxPooling1D(2),BatchNormalization(),Bidirectional(LSTM(256, return_sequences=True)),BatchNormalization(),GRU(128, return_sequences=True),AttentionLayer(),BatchNormalization(),Dropout(0.4),Dense(128, activation='relu'),Dense(64, activation='relu'),Dense(7, activation='sigmoid')])model.compile(loss='mean_squared_error',optimizer=Adam(learning_rate=0.001),metrics=['mae'])return modeldef fix_date_column(self, data):"""修复日期列,确保它不会被转换为数值型"""# Import pandas here within the methodimport pandas as pdimport numpy as np# 创建一个新的日期列,避免破坏原始数据# 首先确保日期列是字符串类型data['日期'] = data['日期'].astype(str)# 检查日期格式并纠正valid_dates = []for date_str in data['日期']:# 清理日期字符串,只保留数字和连字符clean_date = ''.join([c for c in date_str if c.isdigit() or c == '-'])# 确保日期格式是YYYY-MM-DDif len(clean_date) >= 10:clean_date = clean_date[:10]  # 只取前10个字符valid_dates.append(clean_date)else:# 无效日期使用占位符valid_dates.append('2000-01-01')  # 使用占位符# 用清理后的日期创建新列data['clean_date'] = valid_datestry:# 转换为日期时间格式data['date'] = pd.to_datetime(data['clean_date'], errors='coerce')# 检查是否有无效日期invalid_dates = data['date'].isna().sum()if invalid_dates > 0:print(f"警告: 发现{invalid_dates}个无效日期,已替换为NaT")# 如果所有日期无效,抛出异常进入替代方案if invalid_dates == len(data):raise ValueError("所有日期转换均失败")# 手动添加时间特征,避免使用.dt属性# 检查date列是否正确转换为datetimeif pd.api.types.is_datetime64_any_dtype(data['date']):# 安全地使用.dt访问器data['year'] = data['date'].dt.yeardata['month'] = data['date'].dt.monthdata['day'] = data['date'].dt.daydata['day_of_week'] = data['date'].dt.dayofweekdata['day_of_year'] = data['date'].dt.dayofyearelse:raise TypeError("date列不是datetime类型")except Exception as e:print(f"日期转换异常: {str(e)}")# 创建一个假的日期序列date_range = pd.date_range(start='2020-01-01', periods=len(data))data['date'] = date_range# 基于生成的日期序列添加特征data['year'] = date_range.yeardata['month'] = date_range.monthdata['day'] = date_range.daydata['day_of_week'] = date_range.dayofweekdata['day_of_year'] = date_range.dayofyearprint("使用生成的日期序列代替原始日期")return datadef prepare_data(self, data):"""数据预处理和特征工程"""# Import needed libraries import pandas as pdimport numpy as npfrom sklearn.preprocessing import MinMaxScaler# 如果没有date列,先修复日期if 'date' not in data.columns:data = self.fix_date_column(data)# 添加时间特征try:# 确保date列是datetime类型if not pd.api.types.is_datetime64_any_dtype(data['date']):# 尝试转换date列为datetimedata['date'] = pd.to_datetime(data['date'], errors='coerce')# 检查转换后是否有效if data['date'].isna().all():raise ValueError("无法将date列转换为日期时间")# 现在安全地添加时间特征data['year'] = data['date'].dt.yeardata['month'] = data['date'].dt.monthdata['day'] = data['date'].dt.daydata['day_of_week'] = data['date'].dt.dayofweekdata['day_of_year'] = data['date'].dt.dayofyearexcept Exception as e:print(f"时间特征提取错误: {str(e)}")print("使用默认时间特征...")# 创建默认时间特征date_range = pd.date_range(start='2020-01-01', periods=len(data))data['date'] = date_rangedata['year'] = date_range.yeardata['month'] = date_range.monthdata['day'] = date_range.daydata['day_of_week'] = date_range.dayofweekdata['day_of_year'] = date_range.dayofyear# 明确排除非数值列non_numeric_cols = ['期号', '日期', 'date', 'clean_date']# 添加统计特征for i in range(1, 7):data[f'red{i}_rolling_mean_10'] = data[f'red{i}'].rolling(10).mean()data[f'red{i}_rolling_std_10'] = data[f'red{i}'].rolling(10).std()# 添加组合特征data['red_sum'] = data[[f'red{i}' for i in range(1, 7)]].sum(axis=1)data['red_odd_count'] = data[[f'red{i}' for i in range(1, 7)]].apply(lambda x: x % 2).sum(axis=1)data['red_prime_count'] = data[[f'red{i}' for i in range(1, 7)]].apply(lambda x: x.apply(is_prime)).sum(axis=1)# 添加滞后特征for lag in [1, 2, 3, 5, 10]:for i in range(1, 7):data[f'red{i}_lag{lag}'] = data[f'red{i}'].shift(lag)data[f'blue_lag{lag}'] = data['blue'].shift(lag)# 确保所有特征值为数值型并填充NaN值numeric_cols = [col for col in data.columns if col not in non_numeric_cols]# 转换为数值类型并处理错误for col in numeric_cols:try:data[col] = pd.to_numeric(data[col], errors='coerce')except Exception as e:print(f"无法将列 {col} 转换为数值型: {str(e)}")# 填充NaN值data[numeric_cols] = data[numeric_cols].fillna(data[numeric_cols].mean())# 标准化前,确保没有NaN值data[numeric_cols] = np.nan_to_num(data[numeric_cols])# 标准化self.scaler = MinMaxScaler()scaled_data = self.scaler.fit_transform(data[numeric_cols])return scaled_data, numeric_colsdef generate_sequences(self, data, lookback):"""生成时间序列数据"""# Import numpy for array operationsimport numpy as npX, y = [], []for i in range(len(data) - lookback):X.append(data[i:i + lookback])y.append(data[i + lookback, :7])  # 只预测红球和蓝球return np.array(X), np.array(y)def enhanced_postprocessing(self, prediction):"""改进的后处理方法,增强稳健性"""# Import numpy for array operationsimport numpy as nptry:# 首先确保预测结果不含NaN值prediction = np.nan_to_num(prediction, nan=0.5)# 检查预测数据形状if prediction.shape[0] == 0 or prediction.shape[1] < 7:print(f"警告: 预测结果形状不正确: {prediction.shape}")# 创建一个随机预测作为备选random_preds = np.random.random((1, 7))red_pred = random_preds[0][:6]blue_pred = random_preds[0][6]else:red_pred = prediction[0][:6]blue_pred = prediction[0][6]# 处理红球red_balls = []for i in range(6):# 再次检查并处理NaN值或无效值if np.isnan(red_pred[i]) or red_pred[i] < 0 or red_pred[i] > 1:red_pred[i] = np.random.random()  # 使用随机值代替无效值# 将0-1之间的值映射到1-33的整数ball = int(round(red_pred[i] * 32 + 1))ball = max(1, min(33, ball))  # 确保在合法范围内# 避免重复attempt = 0while ball in red_balls and attempt < 10:# 避免死循环if ball < 33:ball += 1else:ball = max(1, ball - 1)attempt += 1# 如果经过10次尝试后仍然有重复,生成一个不在当前列表中的随机号码if ball in red_balls:available = [num for num in range(1, 34) if num not in red_balls]if available:ball = np.random.choice(available)red_balls.append(ball)# 确保红球排序red_balls = sorted(red_balls)# 处理蓝球# 再次检查并处理NaN值或无效值if np.isnan(blue_pred) or blue_pred < 0 or blue_pred > 1:blue_pred = np.random.random()  # 使用随机值代替无效值# 将0-1之间的值映射到1-16的整数blue_ball = int(round(blue_pred * 15 + 1))blue_ball = max(1, min(16, blue_ball))  # 确保在合法范围内return red_balls, blue_ballexcept Exception as e:print(f"后处理过程中出错: {str(e)}")# 生成随机预测作为备选red_balls = sorted(np.random.choice(range(1, 34), 6, replace=False))blue_ball = np.random.randint(1, 17)return red_balls, blue_balldef run(self):try:# Import pandas, numpy, sklearn, and tensorflow hereimport pandas as pdimport numpy as npfrom sklearn.preprocessing import MinMaxScalerfrom sklearn.model_selection import train_test_splitimport tensorflow as tffrom tensorflow.keras.callbacks import EarlyStopping, ModelCheckpointprint("开始预测流程...")# 1. 数据加载 - 优先使用预处理过的数据self.progress.emit(5)if os.path.exists('data_processed.csv'):print("使用预处理好的数据文件")data = pd.read_csv('data_processed.csv')# 使用已预处理的数据时,调用特定于预测的特征添加方法try:scaled_data, feature_cols = self.add_prediction_features(data)except Exception as e:print(f"添加预测特征出错: {str(e)}")# 失败时尝试使用默认预处理scaled_data, feature_cols = self.prepare_data(data)else:print("找不到预处理数据,使用原始数据")data = pd.read_csv('data.csv')# 确保数据为数值型,但排除日期列for col in data.columns:if col not in ['期号', '日期']:try:data[col] = pd.to_numeric(data[col], errors='coerce')except Exception as e:print(f"无法将列 {col} 转换为数值型: {str(e)}")# 填充可能的NaN值numeric_cols = [col for col in data.columns if col not in ['期号', '日期']]data[numeric_cols] = data[numeric_cols].fillna(data[numeric_cols].mean())# 尝试为日期处理添加基本清理if 'date' not in data.columns:data = self.fix_date_column(data)# 对原始数据进行完整特征工程scaled_data, feature_cols = self.prepare_data(data)# 2. 统计分析self.progress.emit(10)print("进行统计分析...")try:stats = self.calculate_enhanced_stats(data)self.stats_ready.emit(stats)self.red_stats = stats['red']self.blue_stats = stats['blue']except Exception as e:print(f"统计分析出错,使用默认值: {str(e)}")# 创建默认统计信息stats = {'red': {'all_time_top10': {i: 1/33 for i in range(1, 11)},'recent_top10': {i: 1/33 for i in range(1, 11)},'all_time_sorted': {i: 1/33 for i in range(1, 34)}},'blue': {'all_time_top10': {i: 1/16 for i in range(1, 11)},'recent_top10': {i: 1/16 for i in range(1, 11)},'all_time_sorted': {i: 1/16 for i in range(1, 17)}}}self.stats_ready.emit(stats)self.red_stats = stats['red']self.blue_stats = stats['blue']# 3. 数据预处理self.progress.emit(20)print("进行数据预处理...")try:# 确保scaled_data中没有NaN值scaled_data = np.nan_to_num(scaled_data, nan=0.5)except Exception as e:print(f"数据预处理出错: {str(e)}")# 创建一个随机数据作为备选print("使用随机数据继续...")# 创建一个简单的随机数据代替scaled_data = np.random.random((len(data), 20))# 打印数据形状信息,便于调试print(f"处理后数据形状: {scaled_data.shape}")# 4. 划分训练集和测试集self.progress.emit(30)print("划分训练集和测试集...")try:train_size = int(len(scaled_data) * self.train_ratio)train_data = scaled_data[:train_size]test_data = scaled_data[train_size:]# 打印训练集测试集大小print(f"训练集大小: {train_data.shape}, 测试集大小: {test_data.shape}")except Exception as e:print(f"数据集划分出错: {str(e)}")# 使用简单划分作为备选mid_point = len(scaled_data) // 2train_data = scaled_data[:mid_point]test_data = scaled_data[mid_point:]# 5. 生成序列数据self.progress.emit(40)print("生成序列数据...")try:X_train, y_train = self.generate_sequences(train_data, self.lookback)X_test, y_test = self.generate_sequences(test_data, self.lookback)# 再次确保训练数据不含NaN值X_train = np.nan_to_num(X_train, nan=0.5)y_train = np.nan_to_num(y_train, nan=0.5)X_test = np.nan_to_num(X_test, nan=0.5)y_test = np.nan_to_num(y_test, nan=0.5)# 打印训练数据形状print(f"训练数据形状: X={X_train.shape}, y={y_train.shape}")print(f"测试数据形状: X={X_test.shape}, y={y_test.shape}")except Exception as e:print(f"序列数据生成出错: {str(e)}")# 创建简化的序列数据作为备选feature_count = scaled_data.shape[1] if len(scaled_data.shape) > 1 else 10X_train = np.random.random((10, self.lookback, feature_count))y_train = np.random.random((10, 7))X_test = np.random.random((5, self.lookback, feature_count))y_test = np.random.random((5, 7))# 6. 创建并训练模型self.progress.emit(50)print(f"创建{self.strategy}模型...")try:if self.strategy == 'lstm':self.model = self.create_lstm_model((self.lookback, X_train.shape[2]))elif self.strategy == 'gru':self.model = self.create_gru_model((self.lookback, X_train.shape[2]))else:self.model = self.create_hybrid_model((self.lookback, X_train.shape[2]))# 自定义回调函数用于更新进度class ProgressCallback(tf.keras.callbacks.Callback):def __init__(self, progress_signal):super().__init__()self.progress_signal = progress_signalself.epoch_count = 0def on_epoch_end(self, epoch, logs=None):self.epoch_count += 1progress = 50 + (self.epoch_count / self.params['epochs']) * 40self.progress_signal.emit(int(progress))print("开始训练模型...")# 训练模型history = self.model.fit(X_train, y_train,epochs=self.epochs,batch_size=self.batch_size,validation_data=(X_test, y_test),callbacks=[EarlyStopping(monitor='val_loss', patience=20),ModelCheckpoint('best_model.h5', save_best_only=True),ProgressCallback(self.progress)],verbose=0)print("模型训练完成")except Exception as e:print(f"模型训练出错: {str(e)}")# 创建一个简单的模型作为替代print("使用简单模型替代...")# 创建一个简单的Dense模型simple_model = tf.keras.Sequential([tf.keras.layers.Flatten(input_shape=(self.lookback, X_train.shape[2])),tf.keras.layers.Dense(64, activation='relu'),tf.keras.layers.Dense(7, activation='sigmoid')])simple_model.compile(optimizer='adam', loss='mse')simple_model.fit(X_train, y_train, epochs=2, batch_size=32, verbose=0)self.model = simple_model# 8. 预测下一期self.progress.emit(95)print("生成预测结果...")try:last_data = scaled_data[-self.lookback:]last_data = last_data[None, ...]# 确保预测数据不含NaN值last_data = np.nan_to_num(last_data, nan=0.5)# 检查预测数据的形状和是否包含NaN值print(f"预测数据形状: {last_data.shape}")nan_count = np.isnan(last_data).sum()if nan_count > 0:print(f"警告: 预测数据中有{nan_count}个NaN值,已替换为0.5")prediction = self.model.predict(last_data)# 检查预测结果print(f"预测结果形状: {prediction.shape}")print(f"预测结果内容: {prediction}")nan_count = np.isnan(prediction).sum()if nan_count > 0:print(f"警告: 预测结果中有{nan_count}个NaN值,已替换为0.5")# 确保预测结果不含NaN值prediction = np.nan_to_num(prediction, nan=0.5)except Exception as e:print(f"预测过程出错: {str(e)}")# 创建随机预测作为替代prediction = np.random.random((1, 7))# 9. 后处理try:red_balls, blue_ball = self.enhanced_postprocessing(prediction)print(f"最终预测号码 - 红球: {red_balls}, 蓝球: {blue_ball}")except Exception as e:print(f"后处理出错: {str(e)}")# 生成随机号码作为备选red_balls = sorted(np.random.choice(range(1, 34), 6, replace=False))blue_ball = np.random.randint(1, 17)print(f"使用随机号码 - 红球: {red_balls}, 蓝球: {blue_ball}")# 11. 生成最终结果try:result = self.generate_result(red_balls, blue_ball, stats)except Exception as e:print(f"结果生成出错: {str(e)}")# 创建基本结果字符串result = f"=== 红篮球优化预测结果 ===\n\n预测号码:\n红球: {', '.join(map(str, red_balls))}\n蓝球: {blue_ball}\n\n"result += f"=== 模型参数 ===\n模型类型: {self.get_model_type()}\n训练轮次: {self.epochs}\n"self.progress.emit(100)if self.model is not None:self.model_trained.emit(self.model)print("预测完成,发送结果...")self.finished.emit(result)except Exception as e:import tracebackerror_details = traceback.format_exc()print(f"预测失败,详细错误: {error_details}")# 即使失败,也要返回一些结果# 生成随机结果import numpy as npred_balls = sorted(np.random.choice(range(1, 34), 6, replace=False))blue_ball = np.random.randint(1, 17)# 创建简单的结果文本result = f"=== 预测过程中出错,显示随机结果 ===\n\n"result += f"错误信息: {str(e)}\n\n"result += f"随机预测号码:\n红球: {', '.join(map(str, red_balls))}\n蓝球: {blue_ball}\n\n"result += f"=== 模型参数 ===\n模型类型: {self.get_model_type()}\n训练轮次: {self.epochs}\n"self.finished.emit(result)def add_prediction_features(self, data):"""添加特定于预测的特征,用于已预处理的数据"""import pandas as pdimport numpy as npfrom sklearn.preprocessing import MinMaxScaler# 检查date列是否正确存在if 'date' in data.columns:# 确保date列是datetime类型if not pd.api.types.is_datetime64_any_dtype(data['date']):try:# 尝试转换为datetimedata['date'] = pd.to_datetime(data['date'], errors='coerce')# 检查转换是否成功if data['date'].isna().all():raise ValueError("date列无法转换为有效日期")# 添加时间特征data['year'] = data['date'].dt.yeardata['month'] = data['date'].dt.monthdata['day'] = data['date'].dt.daydata['day_of_week'] = data['date'].dt.dayofweekdata['day_of_year'] = data['date'].dt.dayofyearexcept Exception as e:print(f"特征转换中的日期错误: {str(e)}")# 生成替代日期特征date_range = pd.date_range(start='2020-01-01', periods=len(data))data['date'] = date_rangedata['year'] = date_range.yeardata['month'] = date_range.monthdata['day'] = date_range.daydata['day_of_week'] = date_range.dayofweekdata['day_of_year'] = date_range.dayofyear# 添加统计特征for i in range(1, 7):data[f'red{i}_rolling_mean_10'] = data[f'red{i}'].rolling(10).mean()data[f'red{i}_rolling_std_10'] = data[f'red{i}'].rolling(10).std()# 添加组合特征data['red_sum'] = data[[f'red{i}' for i in range(1, 7)]].sum(axis=1)data['red_odd_count'] = data[[f'red{i}' for i in range(1, 7)]].apply(lambda x: x % 2).sum(axis=1)data['red_prime_count'] = data[[f'red{i}' for i in range(1, 7)]].apply(lambda x: x.apply(is_prime)).sum(axis=1)# 添加滞后特征for lag in [1, 2, 3, 5, 10]:for i in range(1, 7):data[f'red{i}_lag{lag}'] = data[f'red{i}'].shift(lag)data[f'blue_lag{lag}'] = data['blue'].shift(lag)# 明确排除非数值列non_numeric_cols = ['期号', '日期', 'date', 'clean_date'] # 确保所有特征值为数值型numeric_cols = [col for col in data.columns if col not in non_numeric_cols]for col in numeric_cols:try:data[col] = pd.to_numeric(data[col], errors='coerce')except Exception as e:print(f"无法将列 {col} 转换为数值型: {str(e)}")# 填充NaN值data[numeric_cols] = data[numeric_cols].fillna(data[numeric_cols].mean())# 标准化前,确保没有NaN值data[numeric_cols] = np.nan_to_num(data[numeric_cols])# 标准化self.scaler = MinMaxScaler()scaled_data = self.scaler.fit_transform(data[numeric_cols])return scaled_data, numeric_colsdef generate_result(self, red_balls, blue_ball, stats):"""生成预测结果"""result = "=== 红篮球优化预测结果 ===\n\n"result += f"预测号码:\n红球: {', '.join(map(str, red_balls))}\n蓝球: {blue_ball}\n\n"result += "=== 模型参数 ===\n"result += f"模型类型: {self.get_model_type()}\n"result += f"网络结构: {self.get_model_architecture()}\n"result += f"训练集比例: {int(self.train_ratio * 100)}%\n"result += f"训练轮次: {self.epochs}\n"result += f"批量大小: {self.batch_size}\n"result += f"回溯期数: {self.lookback}\n"return resultdef format_prediction_result(self, result):"""将预测结果格式化为HTML"""# 解析预测结果lines = result.split('\n')# 提取预测号码red_balls = []blue_ball = None# 增强的解析逻辑,支持更多格式和更好的错误处理try:# 尝试提取红球号码for line in lines:# 支持中英文冒号格式if '红球:' in line or '红球:' in line:try:# 根据冒号类型提取数字部分nums_text = line.split(':', 1)[1].strip() if ':' in line else line.split(':', 1)[1].strip()# 仅提取有效数字,过滤非数字字符red_balls = [int(num.strip()) for num in nums_text.split(',') if num.strip().isdigit()]except Exception as e:print(f"提取红球号码时出错: {str(e)}")# 支持中英文冒号格式elif '蓝球:' in line or '蓝球:' in line:try:# 根据冒号类型提取数字部分nums_text = line.split(':', 1)[1].strip() if ':' in line else line.split(':', 1)[1].strip()# 确保转换为整数前是有效数字if nums_text.strip().isdigit():blue_ball = int(nums_text.strip())except Exception as e:print(f"提取蓝球号码时出错: {str(e)}")# 检查提取结果的有效性if not red_balls or len(red_balls) != 6:print(f"警告: 提取的红球数量不正确: {len(red_balls)}")# 如果没有提取到6个红球,生成随机球号补充import numpy as npexisting_reds = set(red_balls)remaining_count = 6 - len(existing_reds)if remaining_count > 0:available_numbers = [n for n in range(1, 34) if n not in existing_reds]additional_reds = sorted(np.random.choice(available_numbers, remaining_count, replace=False))red_balls = sorted(list(existing_reds) + additional_reds)print(f"已补充红球号码: {red_balls}")if blue_ball is None:print("警告: 未提取到蓝球号码")# 如果没有提取到蓝球,生成随机蓝球import numpy as npblue_ball = np.random.randint(1, 17)print(f"已生成随机蓝球号码: {blue_ball}")except Exception as e:# 在整个解析过程出错时的全局异常处理print(f"解析预测结果时出现严重错误: {str(e)}")# 生成完全随机的号码import numpy as npred_balls = sorted(np.random.choice(range(1, 34), 6, replace=False))blue_ball = np.random.randint(1, 17)print(f"已生成完全随机的号码 - 红球: {red_balls}, 蓝球: {blue_ball}")# 构建HTMLhtml = f"""<!DOCTYPE html><html><head><meta charset="UTF-8"><meta name="viewport" content="width=device-width, initial-scale=1.0"><title>红篮球预测结果</title><style>{self.shared_css}/* 预测结果特定样式 */.prediction-card {{background-color: #ffffff;border-radius: 12px;box-shadow: 0 6px 12px rgba(0, 0, 0, 0.08);padding: 25px;margin-bottom: 30px;text-align: center;}}.param-section {{background-color: #ffffff;border-radius: 12px;box-shadow: 0 6px 12px rgba(0, 0, 0, 0.08);padding: 25px;margin-bottom: 30px;position: relative;overflow: hidden;}}.param-section::before {{content: '';position: absolute;left: 0;top: 0;height: 100%;width: 4px;background-color: #4361ee;}}.param {{display: flex;justify-content: space-between;align-items: center;padding: 10px 15px;margin: 10px 0;background-color: #f8fafc;border-radius: 8px;}}.param:hover {{background-color: #f1f5f9;}}.param-name {{font-weight: 600;color: #1e293b;}}.param-value {{color: #64748b;}}/* 调整球的大小 */.ball {{width: 65px;height: 65px;line-height: 65px;font-size: 26px;margin: 0 3px;}}</style></head><body><div class="container"><h1>红篮球预测结果</h1><div class="prediction-card"><div class="section-title">预测号码</div><div class="ball-container">"""# 添加红球if red_balls:for i, ball in enumerate(red_balls):html += f'<span class="ball red-ball">{ball}</span>'if i < len(red_balls) - 1:html += f'<span class="separator"></span>'else:html += f'<span class="separator">|</span>'# 添加蓝球if blue_ball:html += f'<span class="ball blue-ball">{blue_ball}</span>'html += """</div></div><div class="param-section"><div class="section-title">模型参数</div>"""# 添加模型参数信息,更灵活的解析parameter_added = False  # 跟踪是否添加了任何参数for line in lines:# 更灵活的参数匹配parameter_keywords = ["模型类型", "网络结构", "训练集比例", "训练轮次", "批量大小", "回溯期数"]for keyword in parameter_keywords:if keyword in line and (":" in line or ":" in line):try:# 支持中英文冒号parts = line.split(":", 1) if ":" in line else line.split(":", 1)if len(parts) == 2:param_name = parts[0].strip()param_value = parts[1].strip()html += f'''<div class="param"><span class="param-name">{param_name}</span><span class="param-value">{param_value}</span></div>'''parameter_added = Trueexcept Exception as e:print(f"解析参数行时出错: {str(e)}")# 如果没有添加任何参数,添加默认参数信息if not parameter_added:html += f'''<div class="param"><span class="param-name">模型类型</span><span class="param-value">神经网络预测模型</span></div><div class="param"><span class="param-name">说明</span><span class="param-value">参数解析异常,部分信息可能未显示</span></div>'''html += """</div><footer><p>© 2025 红篮球预测系统 | 纯属娱乐,请理性buy</p></footer></div></body></html>"""return htmlclass MainWindow(QMainWindow):def __init__(self):super().__init__()self.setWindowTitle("红篮球预测系统 - 多维度神经网络模型 开发:Killerzeno 美化:nobiyou by 吾爱破解")self.setGeometry(100, 100, 1280, 900)self.setStyleSheet("""QMainWindow {background-color: #f5f7fa;}QTabWidget::pane {border: 1px solid #4a6cf7;border-top-left-radius: 0px;border-top-right-radius: 5px;border-bottom-left-radius: 5px;border-bottom-right-radius: 5px;background-color: #f5f7fa;margin: 0px;padding: 5px;}QTabBar::tab {background-color: #e1e5eb;color: #5e6470;min-width: 100px;min-height: 30px;padding: 5px 15px;border-top-left-radius: 5px;border-top-right-radius: 5px;margin-right: 2px;font-weight: bold;}QTabBar::tab:selected {background-color: #4a6cf7;color: white;}QGroupBox {background-color: white;border-radius: 10px;border: none;margin-top: 15px;font-weight: bold;padding: 15px;color: #2d3748;}QGroupBox::title {subcontrol-origin: margin;subcontrol-position: top left;padding: 0 10px;color: #4a6cf7;font-size: 14px;}QPushButton {background-color: #4a6cf7;color: white;border: none;border-radius: 5px;padding: 8px 15px;font-weight: bold;min-height: 30px;}QPushButton:hover {background-color: #3c5fe0;}QPushButton:pressed {background-color: #2d46bd;}QPushButton:disabled {background-color: #a0aec0;}QProgressBar {border: none;background-color: #e2e8f0;border-radius: 5px;text-align: center;color: white;font-weight: bold;min-height: 25px;}QProgressBar::chunk {background-color: #4a6cf7;border-radius: 5px;}QTextEdit, QLabel {background-color: white;border-radius: 5px;padding: 5px;border: 1px solid #e2e8f0;}QSpinBox, QDoubleSpinBox, QComboBox {border: 1px solid #e2e8f0;border-radius: 4px;padding: 5px;background-color: white;min-height: 25px;}QComboBox::drop-down {border: none;width: 20px;}""")# 设置图标icon_path = resource_path('logo.ico')if os.path.exists(icon_path):self.setWindowIcon(QIcon(icon_path))self.stats_data = Noneself.model = None# 设置Web通道self.channel = QWebChannel()self.handler = PageNavigator(self)self.channel.registerObject("pyObj", self.handler)# 共享CSS样式self.shared_css = """@import url('https://fonts.googleapis.com/css2?family=Poppins:wght@400;500;600;700&display=swap');:root {--primary-color: #4361ee;--red-ball-color: #e63946;--blue-ball-color: #0077b6;--background-color: #fff;--card-background: #ffffff;--text-primary: #1e293b;--text-secondary: #64748b;--border-radius: 12px;--box-shadow: 0 10px 20px rgba(0, 0, 0, 0.08);}* {margin: 0;padding: 0;box-sizing: border-box;}/* Custom Scrollbar Styling */::-webkit-scrollbar {width: 10px;height: 10px;}::-webkit-scrollbar-track {background: #f1f1f1;border-radius: 10px;}::-webkit-scrollbar-thumb {background: linear-gradient(to bottom, #4a6cf7, #3a0ca3);border-radius: 10px;border: 2px solid #f1f1f1;}::-webkit-scrollbar-thumb:hover {background: linear-gradient(to bottom, #3a0ca3, #4a6cf7);}/* For Firefox */html {scrollbar-width: thin;scrollbar-color: #4a6cf7 #f1f1f1;}body {font-family: 'Poppins', -apple-system, BlinkMacSystemFont, 'Segoe UI', Roboto, sans-serif;background-color: var(--background-color);color: var(--text-primary);padding: 20px;line-height: 1.6;}.container {max-width: 1200px;margin: 0 auto;}h1 {color: var(--text-primary);font-size: 28px;font-weight: 700;margin-bottom: 20px;text-align: center;position: relative;}h1:after {content: '';position: absolute;bottom: -10px;left: 50%;transform: translateX(-50%);width: 100px;height: 4px;background: linear-gradient(to right, var(--red-ball-color), var(--blue-ball-color));border-radius: 4px;}.card {background-color: var(--card-background);border-radius: var(--border-radius);box-shadow: var(--box-shadow);padding: 25px;margin-bottom: 30px;}.section-title {font-weight: 700;color: var(--text-primary);font-size: 20px;margin-bottom: 20px;padding-bottom: 10px;border-bottom: 1px solid #e2e8f0;}/* Ball styling */.ball-container {display: flex;justify-content: center;align-items: center;flex-wrap: wrap;gap: 10px;}.ball {width: 50px;height: 50px;display: flex;align-items: center;justify-content: center;border-radius: 50%;font-weight: 700;font-size: 20px;position: relative;overflow: hidden;}.red-ball {background: linear-gradient(135deg, #ff6b6b, var(--red-ball-color));color: white;box-shadow: 0 4px 8px rgba(230, 57, 70, 0.4);}.blue-ball {background: linear-gradient(135deg, #48cae4, var(--blue-ball-color));color: white;box-shadow: 0 4px 8px rgba(0, 119, 182, 0.4);}.ball::before {content: '';position: absolute;top: -5px;left: -5px;width: 15px;height: 15px;background-color: rgba(255, 255, 255, 0.3);border-radius: 50%;}.separator {color: var(--text-secondary);font-weight: 300;font-size: 18px;margin: 0 5px;}footer {text-align: center;margin-top: 30px;color: var(--text-secondary);font-size: 14px;}/* Responsive adjustments */@media (max-width: 768px) {.ball {width: 40px;height: 40px;font-size: 16px;}h1 {font-size: 24px;}}"""self.initUI()def initUI(self):main_widget = QWidget()layout = QVBoxLayout()# 创建标签页self.tabs = QTabWidget()# 第一页 - 数据获取功能data_tab = QWidget()data_layout = QHBoxLayout()  # 使用水平布局,左右分栏# 左侧 - 操作区data_left_widget = QWidget()data_left_layout = QVBoxLayout()# 数据获取部分data_group = QGroupBox("数据获取操作")data_control_layout = QVBoxLayout()self.fetch_btn = QPushButton("获取最新红篮球数据")self.fetch_btn.clicked.connect(self.fetch_data)data_control_layout.addWidget(self.fetch_btn)self.fetch_progress = QProgressBar()data_control_layout.addWidget(self.fetch_progress)self.data_status = QTextEdit()self.data_status.setReadOnly(True)self.data_status.setFixedHeight(200)data_control_layout.addWidget(self.data_status)data_group.setLayout(data_control_layout)data_left_layout.addWidget(data_group)data_left_layout.addStretch(1)  # 添加弹性空间data_left_widget.setLayout(data_left_layout)# 右侧 - 数据展示区data_right_widget = QWidget()data_right_layout = QVBoxLayout()data_display_group = QGroupBox("红篮球数据展示")data_display_layout = QVBoxLayout()# 替换QTextEdit为QWebEngineViewself.data_display = QWebEngineView()data_display_layout.addWidget(self.data_display)# 初始化分页变量self.current_page = 1self.items_per_page = 5self.total_data = None# 添加分页控制 - 隐藏显示,使用JS中的按钮pagination_widget = QWidget()pagination_layout = QHBoxLayout()pagination_layout.setContentsMargins(0, 0, 0, 0)# 网页风格分页按钮 - 隐藏显示self.page_prev_btn = QPushButton("上一页")self.page_prev_btn.setVisible(False)  # 隐藏按钮self.page_prev_btn.clicked.connect(lambda: self.change_data_page(-1))self.page_label = QLabel("第1页")self.page_label.setVisible(False)  # 隐藏标签self.page_next_btn = QPushButton("下一页")self.page_next_btn.setVisible(False)  # 隐藏按钮  self.page_next_btn.clicked.connect(lambda: self.change_data_page(1))pagination_layout.addWidget(self.page_prev_btn)pagination_layout.addWidget(self.page_label)pagination_layout.addWidget(self.page_next_btn)pagination_widget.setLayout(pagination_layout)pagination_widget.setVisible(False)  # 隐藏整个区域data_display_layout.addWidget(pagination_widget)data_display_group.setLayout(data_display_layout)data_right_layout.addWidget(data_display_group)data_right_widget.setLayout(data_right_layout)# 添加左右两部分到数据页面data_layout.addWidget(data_left_widget, 1)  # 左侧占1份宽度data_layout.addWidget(data_right_widget, 2)  # 右侧占2份宽度data_tab.setLayout(data_layout)# 第二页 - 预测功能predict_tab = QWidget()predict_layout = QHBoxLayout()  # 使用水平布局,左右分栏# 左侧 - 操作区predict_left_widget = QWidget()predict_left_layout = QVBoxLayout()# 预测参数设置param_group = QGroupBox("模型参数设置")param_layout = QFormLayout()# 训练集比例self.train_ratio = QDoubleSpinBox()self.train_ratio.setRange(50, 95)self.train_ratio.setValue(75)self.train_ratio.setSingleStep(5)self.train_ratio.setSuffix("%")param_layout.addRow("训练集比例 (推荐70-80%):", self.train_ratio)# 训练轮次self.epochs = QSpinBox()self.epochs.setRange(50, 1000)self.epochs.setValue(200)param_layout.addRow("训练轮次 (推荐100-300):", self.epochs)# 批量大小self.batch_size = QSpinBox()self.batch_size.setRange(16, 128)self.batch_size.setValue(32)param_layout.addRow("批量大小 (推荐32-64):", self.batch_size)# 回溯期数self.lookback = QSpinBox()self.lookback.setRange(5, 30)self.lookback.setValue(15)param_layout.addRow("回溯期数 (推荐10-20):", self.lookback)# 预测策略self.strategy = QComboBox()self.strategy.addItems(['LSTM', 'GRU', '混合模型'])self.strategy.setCurrentText('LSTM')param_layout.addRow("预测策略:", self.strategy)param_group.setLayout(param_layout)predict_left_layout.addWidget(param_group)# 添加预测策略说明strategy_info_group = QGroupBox("预测策略说明")strategy_info_layout = QVBoxLayout()strategy_info_text = QTextEdit()strategy_info_text.setReadOnly(True)strategy_info_text.setStyleSheet("""background-color: #f8f9fa; border: 1px solid #e2e8f0;/* 添加与全局样式一致的滚动条样式 */QScrollBar:vertical {width: 10px;background: #f1f1f1;border-radius: 5px;}QScrollBar::handle:vertical {background: qlineargradient(spread:pad, x1:0, y1:0, x2:0, y2:1, stop:0 #4a6cf7, stop:1 #3a0ca3);border-radius: 5px;min-height: 20px;border: 2px solid #f1f1f1;}QScrollBar::handle:vertical:hover {background: qlineargradient(spread:pad, x1:0, y1:0, x2:0, y2:1, stop:0 #3a0ca3, stop:1 #4a6cf7);}QScrollBar::add-line:vertical, QScrollBar::sub-line:vertical {height: 0px;}QScrollBar::add-page:vertical, QScrollBar::sub-page:vertical {background: none;}""")strategy_info_text.setFixedHeight(150)  # 设置固定高度为150像素strategy_info_text.setHtml("""<style>body { font-family: Arial, sans-serif; margin: 5px;color: #333;}h4 { margin-top: 10px; margin-bottom: 5px; color: #3a0ca3;}p { margin-top: 0; margin-bottom: 8px; line-height: 1.4;}.highlight {background-color: #f0f4ff;padding: 2px 4px;border-radius: 3px;font-weight: bold;}</style><h4>LSTM 模型</h4><p>长短期记忆网络,专注于<span class="highlight">捕捉长期依赖关系</span>,对连续性强的数据表现良好。适合历史走势明显的红球预测。</p><h4>GRU 模型</h4><p>门控循环单元网络,比LSTM<span class="highlight">更轻量快速</span>,双向结构可同时考虑过去和未来信息。适合低延迟和资源有限环境。</p><h4>混合模型</h4><p>结合CNN、LSTM、GRU和注意力机制,<span class="highlight">提取多层次特征</span>,性能最强但训练最慢。适合寻求最高预测精度的场景。</p>""")strategy_info_layout.addWidget(strategy_info_text)strategy_info_group.setLayout(strategy_info_layout)predict_left_layout.addWidget(strategy_info_group)# 预测按钮self.predict_btn = QPushButton("开始预测")self.predict_btn.clicked.connect(self.start_predict)predict_left_layout.addWidget(self.predict_btn)# 预测进度self.predict_progress = QProgressBar()predict_left_layout.addWidget(self.predict_progress)predict_left_layout.addStretch(1)  # 添加弹性空间predict_left_widget.setLayout(predict_left_layout)# 右侧 - 结果展示区predict_right_widget = QWidget()predict_right_layout = QVBoxLayout()result_group = QGroupBox("预测结果")result_layout = QVBoxLayout()self.result_display = QWebEngineView()result_layout.addWidget(self.result_display)result_group.setLayout(result_layout)predict_right_layout.addWidget(result_group)predict_right_widget.setLayout(predict_right_layout)# 添加左右两部分到预测页面predict_layout.addWidget(predict_left_widget, 1)  # 左侧占1份宽度predict_layout.addWidget(predict_right_widget, 2)  # 右侧占2份宽度predict_tab.setLayout(predict_layout)# 第三页 - 统计分析stats_tab = QWidget()stats_layout = QVBoxLayout()# 统计结果显示 - 使用HTML气泡图stats_group = QGroupBox("号码频率统计分析")stats_layout_inner = QVBoxLayout()self.stats_display = QWebEngineView()stats_layout_inner.addWidget(self.stats_display)stats_group.setLayout(stats_layout_inner)stats_layout.addWidget(stats_group)stats_tab.setLayout(stats_layout)# 添加标签页self.tabs.addTab(data_tab, "数据获取")self.tabs.addTab(predict_tab, "开始预测")self.tabs.addTab(stats_tab, "统计分析")# 添加到主布局layout.addWidget(self.tabs)main_widget.setLayout(layout)self.setCentralWidget(main_widget)# 初始化所有WebEngineView的WebChannelself.data_display.page().setWebChannel(self.channel)self.result_display.page().setWebChannel(self.channel)self.stats_display.page().setWebChannel(self.channel)# 添加状态栏self.statusBar().showMessage("就绪")def change_data_page(self, direction):"""切换数据显示页"""if self.total_data is None or len(self.total_data) == 0:return# Import pandas for this methodimport pandas as pdnew_page = self.current_page + directionmax_page = (len(self.total_data) + self.items_per_page - 1) // self.items_per_pageif 1 <= new_page <= max_page:self.current_page = new_page# 计算当前页的数据范围start_idx = (self.current_page - 1) * self.items_per_pageend_idx = min(start_idx + self.items_per_page, len(self.total_data))# 显示当前页的数据self.display_styled_data(self.total_data.iloc[start_idx:end_idx])def fetch_data(self):if not self.check_internet_connection():QMessageBox.warning(self, "警告", "无法连接到互联网,请检查网络连接!")returnself.fetch_btn.setEnabled(False)self.data_status.append("正在获取数据...")self.fetch_progress.setValue(0)self.fetcher = DataFetcher()self.fetcher.finished.connect(self.on_fetch_finished)self.fetcher.progress.connect(self.fetch_progress.setValue)self.fetcher.start()def check_internet_connection(self):"""检查网络连接"""try:# Import requests only when neededimport requestsrequests.get('http://www.baidu.com', timeout=5)return Trueexcept:return Falsedef on_fetch_finished(self, message):self.fetch_btn.setEnabled(True)self.data_status.append(message)self.data_status.append("=" * 50)self.statusBar().showMessage("数据获取完成")# 在数据获取完成后显示数据try:if os.path.exists('data.csv'):# Import pandas here to read the CSVimport pandas as pd# 读取数据并预处理df = pd.read_csv('data.csv')df = self.preprocess_data(df)# 存储处理好的数据df.to_csv('data_processed.csv', index=False, encoding='utf-8-sig')# 存储总数据self.total_data = df# 重置页码self.current_page = 1# 显示第一页self.display_styled_data(df.head(self.items_per_page))# 更新分页按钮状态self.page_prev_btn.setEnabled(False)  # 第一页,禁用上一页按钮if len(df) > self.items_per_page:self.page_next_btn.setEnabled(True)else:self.page_next_btn.setEnabled(False)except Exception as e:error_html = f"""<html><body><h1 style="color: red; text-align: center;">数据加载错误</h1><p style="text-align: center;">读取数据失败:{str(e)}</p></body></html>"""self.data_display.setHtml(error_html)# 禁用分页按钮self.page_prev_btn.setEnabled(False)self.page_next_btn.setEnabled(False)def calculate_next_draw_date(self, last_draw_date=None):"""计算下一期开奖时间,双色球通常每周二、四、日开奖"""import pandas as pdfrom datetime import datetime, timedelta# 定义开奖日为周二(1)、周四(3)和周日(6)draw_days = [1, 3, 6]  # 对应星期二、星期四和星期日try:# 始终使用当前日期作为参考点current_date = datetime.now()# 获取当前日期的星期几 (0-6, 0是星期一)current_weekday = current_date.weekday()# 计算到下一个开奖日的天数days_until_next_draw = min((day - current_weekday) % 7 for day in draw_days)# 如果当天就是开奖日,且已经过了开奖时间(通常为21:15),则找下一个开奖日if days_until_next_draw == 0 and current_date.hour >= 21 and current_date.minute >= 15:days_until_next_draw = min((day - current_weekday) % 7 for day in draw_days if day != current_weekday) or 7# 计算下一期开奖日期next_draw_date = current_date + timedelta(days=days_until_next_draw)# 设置开奖时间为21:15next_draw_date = next_draw_date.replace(hour=21, minute=15, second=0)# 格式化日期formatted_date = next_draw_date.strftime("%Y年%m月%d日 %H:%M")weekday_names = ["星期一", "星期二", "星期三", "星期四", "星期五", "星期六", "星期日"]weekday = weekday_names[next_draw_date.weekday()]return {"date": formatted_date,"weekday": weekday,"datetime": next_draw_date}except Exception as e:print(f"计算下一期开奖时间出错: {str(e)}")# 出错时返回占位信息return {"date": "敬请期待","weekday": "","datetime": datetime.now() + timedelta(days=2)}def display_styled_data(self, data):"""显示带有样式的红篮球数据"""# Import pandas to work with the dataframeimport pandas as pd# 获取当前页码和总页数max_page = (len(self.total_data) + self.items_per_page - 1) // self.items_per_page if self.total_data is not None else 1# 计算下一期开奖时间next_draw = self.calculate_next_draw_date()html = f"""<!DOCTYPE html>
<html lang="zh-CN">
<head>
<meta charset="UTF-8">
<meta name="viewport" content="width=device-width, initial-scale=1.0">
<title>红篮球历史数据</title>
<script src="qrc:///qtwebchannel/qwebchannel.js"></script>
<script>
// 设置Web通道,连接Python对象
var pyObj;window.onload = function() {{new QWebChannel(qt.webChannelTransport, function(channel) {{pyObj = channel.objects.pyObj;}});}}// 分页函数function prevPage() {{if (pyObj) {{pyObj.prevPage();}} else {{console.error("Python对象未加载");}}}}function nextPage() {{if (pyObj) {{pyObj.nextPage();}} else {{console.error("Python对象未加载");}}}}
</script>
<style>{self.shared_css}/* 数据页面特定样式 */header {{text-align: center;margin-bottom: 15px;}}.header-desc {{color: var(--text-secondary);font-size: 1.1rem;max-width: 600px;margin: 20px auto 0;}}.next-draw-info {{margin-top: 15px;padding: 10px 20px;background: linear-gradient(135deg, #f8f9fa, #e9ecef);border-radius: 50px;display: inline-block;font-size: 1rem;color: #333;border: 1px solid #dee2e6;box-shadow: 0 2px 5px rgba(0,0,0,0.05);}}.next-draw-info strong {{color: #e63946;}}.data-card {{background-color: var(--card-background);border-radius: var(--border-radius);box-shadow: var(--box-shadow);overflow: hidden;margin-bottom: 30px;}}table {{width: 100%;border-collapse: collapse;}}th, td {{padding: 10px 5px;text-align: center;}}th {{background: linear-gradient(to right, var(--primary-color), #3a0ca3);color: white;font-weight: 600;font-size: 1rem;letter-spacing: 0.5px;text-transform: uppercase;}}tr:nth-child(even) {{background-color: rgba(243, 244, 246, 0.7);}}tr:hover {{background-color: rgba(224, 231, 255, 0.5);transition: all 0.3s ease;}}.issue {{font-weight: 600;font-size: 1rem;color: var(--text-primary);}}.date {{font-size: 0.95rem;color: var(--text-secondary);}}.pagination {{display: flex;justify-content: center;align-items: center;padding: 15px 0 25px 0;}}.pagination-button {{background-color: #f2f3f5;color: #4361ee;border: 1px solid #e2e8f0;border-radius: 3px;padding: 6px 15px;margin: 0 5px;font-size: 14px;cursor: pointer;transition: all 0.2s ease;}}.pagination-button:hover {{background-color: #e2e8f0;}}.pagination-current {{background-color: #4361ee;color: white;border-radius: 3px;padding: 6px 15px;margin: 0 5px;font-size: 14px;}}
</style>
</head>
<body>
<div class="container"><header><h1>红篮球历史数据</h1><p class="header-desc">查看历史开奖结果,分析走势,把握规律</p><div class="next-draw-info">下期开奖:<strong>{next_draw["date"]} {next_draw["weekday"]}</strong></div></header><div class="data-card"><table><thead><tr><th width="20%">期号</th><th width="20%">日期</th><th width="60%">开奖号码</th></tr></thead><tbody>"""# 添加数据行for _, row in data.iterrows():html += f"""<tr><td class="issue">第{row['期号']}期</td><td class="date">{row['日期']}</td><td><div class="ball-container">"""# 添加红球for i in range(1, 7):html += f'<div class="ball red-ball">{int(row[f"red{i}"])}</div>'if i < 6:html += f'<span class="separator"></span>'else:html += f'<span class="separator">|</span>'# 添加蓝球html += f'<div class="ball blue-ball">{int(row["blue"])}</div>'html += """</div></td></tr>"""# 添加分页控件html += """</tbody></table><!-- 添加网页版分页 --><div class="pagination">"""# 动态生成上一页按钮if self.current_page > 1:html += f'<button id="prevPage" class="pagination-button">上一页</button>'else:html += f'<button disabled class="pagination-button" style="opacity:0.5;cursor:not-allowed;">上一页</button>'# 当前页码html += f'<span class="pagination-current">第{self.current_page}页</span>'# 动态生成下一页按钮if self.current_page < max_page:html += f'<button id="nextPage" class="pagination-button">下一页</button>'else:html += f'<button disabled class="pagination-button" style="opacity:0.5;cursor:not-allowed;">下一页</button>'html += """</div></div><footer><p>© 2025 红篮球数据统计 | 仅供参考,请理性buy</p></footer></div></body></html>"""# 设置HTML内容self.data_display.setHtml(html)# 连接Web通道self.data_display.page().setWebChannel(self.channel)def start_predict(self):if not os.path.exists('data.csv'):QMessageBox.warning(self, "警告", "请先获取数据!")returnself.predict_btn.setEnabled(False)# 创建一个加载动画HTML - 保留红篮球的跳动动画loading_html = f"""<!DOCTYPE html><html><head><meta charset="UTF-8"><meta name="viewport" content="width=device-width, initial-scale=1.0"><title>加载中</title><style>{self.shared_css}body {{text-align: center;}}.loader-container {{display: flex;flex-direction: column;align-items: center;justify-content: center;padding: 80px;background-color: white;border-radius: 16px;box-shadow: 0 10px 25px rgba(0, 0, 0, 0.08);width: 90%;max-width: 500px;margin: 0 auto;position: relative;}}.loader {{position: relative;width: 140px;height: 140px;margin: 20px auto;}}.lottery-balls {{position: absolute;top: 50%;left: 50%;transform: translate(-50%, -50%);width: 120px;height: 120px;}}@keyframes bounce {{0% {{transform: translateY(0);}}100% {{transform: translateY(-20px);}}}}.ball:nth-child(1) {{top: 10px;left: 10px;animation: bounce 1.5s ease-in-out infinite alternate;animation-delay: 0s;}}.ball:nth-child(2) {{top: 10px;right: 10px;animation: bounce 1.5s ease-in-out infinite alternate;animation-delay: 0.2s;}}.ball:nth-child(3) {{bottom: 10px;left: 10px;animation: bounce 1.5s ease-in-out infinite alternate;animation-delay: 0.4s;}}.ball:nth-child(4) {{bottom: 10px;right: 10px;animation: bounce 1.5s ease-in-out infinite alternate;animation-delay: 0.6s;}}.status-text {{font-size: 20px;font-weight: 600;margin: 20px 0;color: #1e293b;}}.info-text {{font-size: 14px;color: #64748b;margin-bottom: 20px;max-width: 400px;margin: 0 auto;}}.progress-container {{width: 80%;height: 8px;background-color: #e2e8f0;border-radius: 10px;margin: 20px auto;position: relative;overflow: hidden;}}#progress-bar {{height: 100%;background: linear-gradient(90deg, #4a6cf7, #3a0ca3);width: 0%;transition: width 0.3s;border-radius: 10px;}}#progress-text {{margin-top: 5px;font-size: 14px;font-weight: 600;color: #4a6cf7;}}</style></head><body><div class="container"><div class="loader-container"><h1>神经网络模型训练中</h1><p class="info-text">我们正在使用红篮球历史数据训练深度学习模型,这可能需要几分钟时间。</p><div class="loader"><div class="lottery-balls"><div class="ball red-ball" style="position:absolute">6</div><div class="ball red-ball" style="position:absolute">18</div><div class="ball red-ball" style="position:absolute">28</div><div class="ball blue-ball" style="position:absolute">12</div></div></div><div class="progress-container"><div id="progress-bar"></div></div><div id="progress-text">0%</div><div id="status" class="status-text">初始化模型中...</div></div></div></body></html>"""# 使用setHtml显示带有动画的进度页面self.result_display.setHtml(loading_html)self.predict_progress.setValue(0)# 连接进度条更新信号到我们的自定义函数self.predict_progress.valueChanged.connect(self.update_html_progress)train_ratio = self.train_ratio.value() / 100epochs = self.epochs.value()batch_size = self.batch_size.value()lookback = self.lookback.value()strategy = self.strategy.currentText().lower()self.predictor = EnhancedPredictor(train_ratio, epochs, batch_size, lookback, strategy, self.shared_css)self.predictor.finished.connect(self.on_predict_finished)self.predictor.progress.connect(self.predict_progress.setValue)self.predictor.stats_ready.connect(self.update_stats)self.predictor.model_trained.connect(self.set_model)self.predictor.start()# 添加一个新函数,用于更新HTML进度条def update_html_progress(self, value):"""更新HTML页面中的进度条,使用最简单的JavaScript"""# 直接使用DOM操作更新进度条script = """(function() {try {var progressBar = document.getElementById('progress-bar');var progressText = document.getElementById('progress-text');var status = document.getElementById('status');if (progressBar && progressText) {progressBar.style.width = '%d%%';progressText.textContent = '%d%%';// 更新状态文本if (status) {if (%d < 30) {status.textContent = '初始化模型中...';} else if (%d < 80) {status.textContent = '训练神经网络中...';} else {status.textContent = '生成预测结果中...';}}return true;}} catch(e) {console.error('更新进度条出错:', e);}return false;})();""" % (value, value, value, value)# 执行JavaScript脚本self.result_display.page().runJavaScript(script)def on_predict_finished(self, result):self.predict_btn.setEnabled(True)# 记录收到的结果print(f"收到预测结果: {result[:100]}...") # 只打印前100个字符避免过长# 检查结果是否为空if not result or len(result.strip()) == 0:print("警告: 收到空结果")# 创建一个错误结果import numpy as npred_balls = sorted(np.random.choice(range(1, 34), 6, replace=False))blue_ball = np.random.randint(1, 17)result = f"=== 预测结果异常,显示随机号码 ===\n\n预测号码:\n红球: {', '.join(map(str, red_balls))}\n蓝球: {blue_ball}\n\n"result += "=== 模型参数 ===\n模型类型: 随机生成\n"html_result = ""try:# 尝试使用优化后的HTML格式美化预测结果print("尝试格式化预测结果...")html_result = self.predictor.format_prediction_result(result)# 验证HTML结果是否有效if not html_result or len(html_result.strip()) == 0 or "<!DOCTYPE html>" not in html_result:print("警告: HTML格式化结果无效")raise ValueError("生成的HTML无效")except Exception as e:# 捕获任何格式化过程中的错误print(f"格式化预测结果出错: {str(e)}")print("使用备用HTML生成方法...")html_result = self.create_fallback_html_result(result)# 确保HTML结果有效,最后的安全检查if not html_result or len(html_result.strip()) == 0:print("严重错误: 两种HTML生成方法均失败,创建基本HTML")# 创建最简单的HTML结果html_result = f"""<!DOCTYPE html><html><head><title>预测结果</title><style>body {{ font-family: Arial; padding: 20px; }}.error {{ color: red; }}pre {{ background: #f0f0f0; padding: 10px; }}</style></head><body><h2>预测结果</h2><div class="error">注意: 结果格式化失败,显示原始结果</div><pre>{result.replace('<', '<').replace('>', '>')}</pre></body></html>"""# 设置HTML内容print("设置HTML结果...")self.result_display.setHtml(html_result)# 确保Web通道连接self.result_display.page().setWebChannel(self.channel)self.statusBar().showMessage("预测完成")def create_fallback_html_result(self, result):"""创建一个简单的HTML结果,用于format_prediction_result失败时"""# 解析预测结果中的基本信息red_balls = []blue_ball = Nonemodel_info = {}# 尝试从结果文本中提取红蓝球号码和模型信息try:lines = result.split('\n')for line in lines:# 提取红球号码(支持多种格式)if any(marker in line for marker in ['红球:', '红球:', '红球号码', '红球预测']):try:# 尝试从行中提取数字import renumbers = re.findall(r'\d+', line)# 确保只处理1-33范围内的数字valid_numbers = [int(num) for num in numbers if num.isdigit() and 1 <= int(num) <= 33]# 避免重复red_balls = sorted(list(set(valid_numbers)))[:6]  # 最多取6个except Exception as e:print(f"备用方法提取红球出错: {str(e)}")# 提取蓝球号码(支持多种格式)elif any(marker in line for marker in ['蓝球:', '蓝球:', '蓝球号码', '蓝球预测']):try:# 尝试从行中提取数字import renumbers = re.findall(r'\d+', line)# 确保是1-16范围内的数字for num in numbers:if num.isdigit() and 1 <= int(num) <= 16:blue_ball = int(num)breakexcept Exception as e:print(f"备用方法提取蓝球出错: {str(e)}")# 提取模型信息elif any(keyword in line for keyword in ["模型类型", "网络结构", "训练集比例", "训练轮次", "批量大小", "回溯期数"]):try:if ":" in line or ":" in line:parts = line.split(":", 1) if ":" in line else line.split(":", 1)if len(parts) == 2:key = parts[0].strip()value = parts[1].strip()model_info[key] = valueexcept Exception as e:print(f"备用方法提取模型信息出错: {str(e)}")except Exception as e:print(f"备用方法解析预测结果出错: {str(e)}")# 补充缺失的红球号码if not red_balls or len(red_balls) < 6:import numpy as npexisting = set(red_balls)needed = 6 - len(existing)if needed > 0:available = [n for n in range(1, 34) if n not in existing]additional = sorted(np.random.choice(available, needed, replace=False))red_balls = sorted(list(existing) + additional)print(f"备用方法补充红球: {red_balls}")# 补充缺失的蓝球号码if blue_ball is None:import numpy as npblue_ball = np.random.randint(1, 17)print(f"备用方法生成蓝球: {blue_ball}")# 创建一个简单但美观的HTMLhtml = f"""<!DOCTYPE html><html><head><meta charset="UTF-8"><meta name="viewport" content="width=device-width, initial-scale=1.0"><title>预测结果</title><style>{self.shared_css}.result-container {{background-color: white;border-radius: 10px;padding: 20px;box-shadow: 0 4px 8px rgba(0,0,0,0.1);margin-bottom: 20px;text-align: center;}}.model-info {{display: flex;flex-wrap: wrap;justify-content: space-between;margin-top: 15px;}}.info-item {{flex: 0 0 48%;background-color: #f8f9fa;padding: 10px;margin-bottom: 10px;border-radius: 5px;}}.info-name {{font-weight: bold;color: #4361ee;}}.raw-result {{white-space: pre-wrap;background-color: #f1f3f5;padding: 15px;border-radius: 5px;font-family: monospace;margin-top: 20px;text-align: left;max-height: 200px;overflow-y: auto;}}.note {{font-style: italic;color: #6c757d;margin-top: 10px;font-size: 0.9em;}}</style></head><body><div class="container"><h1>红篮球预测结果</h1><div class="result-container"><div class="section-title">预测号码</div><div class="ball-container">"""# 添加红球for ball in red_balls:html += f'<div class="ball red-ball">{ball}</div>'html += '<div class="separator">|</div>'# 添加蓝球html += f'<div class="ball blue-ball">{blue_ball}</div>'# 添加模型信息html += """</div></div><div class="result-container"><div class="section-title">模型参数</div><div class="model-info">"""# 添加提取到的模型信息if model_info:for key, value in model_info.items():html += f"""<div class="info-item"><div class="info-name">{key}</div><div>{value}</div></div>"""else:# 如果没有提取到模型信息,添加默认信息html += """<div class="info-item"><div class="info-name">模型类型</div><div>神经网络预测模型</div></div><div class="info-item"><div class="info-name">备注</div><div>原始模型参数解析失败</div></div>"""# 添加原始结果(有限的高度,可滚动)html += """</div><p class="note">注:使用备用格式化方法</p></div><div class="result-container"><div class="section-title">原始预测结果</div><div class="raw-result">"""html += result.replace('<', '<').replace('>', '>').replace('\n', '<br>')html += """</div></div><footer><p>© 2025 红篮球预测系统 | 纯属娱乐,请理性buy</p></footer></div></body></html>"""return htmldef set_model(self, model):self.model = modeldef update_stats(self, stats):try:self.stats_data = stats# 使用内置的方法生成HTML气泡图,而不是调用外部模块# 注意:原有的StatsCanvas类已从代码中移除,使用HTML气泡图替代了matplotlib可视化html = self.generate_bubble_chart_html(stats)# 设置HTML内容self.stats_display.setHtml(html)# 确保Web通道连接self.stats_display.page().setWebChannel(self.channel)except Exception as e:print(f"更新统计信息出错: {str(e)}")import tracebacktraceback_details = traceback.format_exc()print(f"详细错误: {traceback_details}")# 处理异常情况error_html = f"""<html><body><h1 style="color: red; text-align: center;">统计数据处理错误</h1><p style="text-align: center;">请重新获取数据。错误信息: {str(e)}</p></body></html>"""self.stats_display.setHtml(error_html)self.statusBar().showMessage("统计数据更新失败")def preprocess_data(self, df):"""集中处理数据类型转换和缺失值填充,避免重复操作"""# 导入所需库import pandas as pdimport numpy as np# 1. 确保日期处理正确try:# 首先确保日期列是字符串类型df['日期'] = df['日期'].astype(str)# 清理日期字符串,创建标准化日期列valid_dates = []for date_str in df['日期']:# 清理日期字符串,只保留数字和连字符clean_date = ''.join([c for c in date_str if c.isdigit() or c == '-'])# 确保日期格式是YYYY-MM-DDif len(clean_date) >= 10:clean_date = clean_date[:10]  # 只取前10个字符valid_dates.append(clean_date)else:# 无效日期使用占位符valid_dates.append('2000-01-01')# 添加清理后的日期列df['clean_date'] = valid_dates# 转换为日期时间格式并添加日期特征df['date'] = pd.to_datetime(df['clean_date'], errors='coerce')# 检查日期转换是否成功if df['date'].isna().all():raise ValueError("所有日期都转换失败")# 确认date列是datetime类型if not pd.api.types.is_datetime64_any_dtype(df['date']):print("警告: date列不是datetime类型,使用替代方法")raise TypeError("date列不是datetime类型")# 添加时间特征df['year'] = df['date'].dt.yeardf['month'] = df['date'].dt.monthdf['day'] = df['date'].dt.daydf['day_of_week'] = df['date'].dt.dayofweekdf['day_of_year'] = df['date'].dt.dayofyearexcept Exception as e:print(f"日期转换异常: {str(e)}")print("使用生成的日期序列代替原始日期")# 创建一个假的日期序列作为备选date_range = pd.date_range(start='2020-01-01', periods=len(df))df['date'] = date_range# 基于生成的日期序列添加特征df['year'] = date_range.yeardf['month'] = date_range.monthdf['day'] = date_range.daydf['day_of_week'] = date_range.dayofweekdf['day_of_year'] = date_range.dayofyear# 2. 数值转换和清理# 确保所有数值列为数值型non_numeric_cols = ['期号', '日期', 'date', 'clean_date']numeric_cols = [col for col in df.columns if col not in non_numeric_cols]for col in numeric_cols:try:df[col] = pd.to_numeric(df[col], errors='coerce')except Exception as e:print(f"无法将列 {col} 转换为数值型: {str(e)}")# 用均值填充数值列中的NaN值df[numeric_cols] = df[numeric_cols].fillna(df[numeric_cols].mean())# 用0填充任何剩余的NaN值df = df.fillna(0)return dfdef generate_bubble_chart_html(self, stats):"""根据统计数据生成HTML气泡图此方法替代了原先基于matplotlib的StatsCanvas类可视化功能使用纯HTML/CSS实现气泡图,减少了对matplotlib的依赖,提高了加载速度Args:stats: 包含红球和蓝球统计数据的字典Returns:html: 包含完整气泡图的HTML字符串"""html = f"""<!DOCTYPE html><html><head><meta charset="UTF-8"><meta name="viewport" content="width=device-width, initial-scale=1.0"><style>{self.shared_css}/* 气泡图特定样式 */.stats-grid {{display: flex;flex-wrap: wrap;justify-content: space-between;margin: 0 -10px 20px -10px;}}.stats-card {{flex: 0 0 calc(25% - 30px);background-color: #ffffff;border-radius: 12px;box-shadow: 0 6px 12px rgba(0, 0, 0, 0.08);padding: 25px;position: relative;overflow: hidden;margin: 15px;transition: transform 0.3s ease, box-shadow 0.3s ease;}}.stats-card:hover {{transform: translateY(-5px);box-shadow: 0 12px 24px rgba(0, 0, 0, 0.12);}}.red-border::before {{content: '';position: absolute;left: 0;top: 0;height: 100%;width: 4px;background-color: #e63946;}}.blue-border::before {{content: '';position: absolute;left: 0;top: 0;height: 100%;width: 4px;background-color: #0077b6;}}.stats-title {{font-size: 18px;font-weight: 700;color: #1e293b;margin-bottom: 15px;padding-bottom: 10px;border-bottom: 1px solid #e2e8f0;}}.stats-list {{list-style-type: none;margin: 0;padding: 0;}}.stats-item {{display: flex;justify-content: space-between;align-items: center;padding: 10px 15px;margin-bottom: 8px;background-color: #f8fafc;border-radius: 8px;transition: transform 0.2s ease, background-color 0.2s ease;}}.stats-item:hover {{transform: translateX(5px);background-color: #f1f5f9;}}.item-left {{display: flex;align-items: center;}}.rank {{display: inline-block;width: 25px;height: 25px;line-height: 25px;text-align: center;background-color: #94a3b8;color: white;border-radius: 50%;font-weight: 600;font-size: 14px;}}.red-ball {{display: inline-block;width: 40px;height: 40px;line-height: 40px;text-align: center;background-color: #e63946;color: white;border-radius: 50%;font-weight: 700;font-size: 18px;box-shadow: 0 3px 6px rgba(230, 57, 70, 0.4);transition: transform 0.2s ease, box-shadow 0.2s ease;}}.blue-ball {{display: inline-block;width: 40px;height: 40px;line-height: 40px;text-align: center;background-color: #0077b6;color: white;border-radius: 50%;font-weight: 700;font-size: 18px;box-shadow: 0 3px 6px rgba(0, 119, 182, 0.4);transition: transform 0.2s ease, box-shadow 0.2s ease;}}.stats-item:hover .red-ball,.stats-item:hover .blue-ball {{transform: scale(1.1);box-shadow: 0 5px 10px rgba(0, 0, 0, 0.2);}}.probability {{display: inline-block;padding: 4px 10px;background-color: #e2e8f0;color: #334155;border-radius: 20px;font-weight: 600;font-size: 14px;transition: background-color 0.2s ease;}}.stats-item:hover .probability {{background-color: #cbd5e1;}}/* 静态气泡图样式 */.bubble-chart-container {{background-color: #ffffff;border-radius: 12px;box-shadow: 0 6px 12px rgba(0, 0, 0, 0.08);padding: 20px;margin: 20px 0;transition: transform 0.3s ease, box-shadow 0.3s ease;position: relative;overflow: hidden;}}.bubble-chart-container:hover {{transform: translateY(-5px);box-shadow: 0 12px 24px rgba(0, 0, 0, 0.12);}}.bubble-chart-title {{font-size: 18px;font-weight: 700;color: #1e293b;margin-bottom: 15px;padding-bottom: 10px;border-bottom: 1px solid #e2e8f0;text-align: center;}}.bubble-chart {{display: grid;grid-template-columns: repeat(auto-fill, minmax(60px, 1fr));gap: 15px;padding: 45px 20px 45px 20px;position: relative;min-height: 180px;background-color: #fafbff;border-radius: 8px;justify-items: center;align-items: center;}}.bubble-chart-red {{background: linear-gradient(to bottom, #fff5f5, #fafbff);}}.bubble-chart-blue {{background: linear-gradient(to bottom, #f0f7ff, #fafbff);}}.bubble-chart::before {{content: '';position: absolute;left: 0;right: 0;top: 50%;height: 1px;border-top: 1.5px dashed #94a3b8;z-index: 0;opacity: 0.6;}}.bubble-chart-label {{position: absolute;bottom: 10px;left: 50%;transform: translateX(-50%);background-color: white;font-size: 12px;color: #334155;font-weight: 600;padding: 5px 12px;border-radius: 20px;box-shadow: 0 3px 6px rgba(0, 0, 0, 0.1);z-index: 5;transition: transform 0.2s ease, box-shadow 0.2s ease;border: 1px solid #e2e8f0;}}.bubble-chart-label:hover {{transform: translateX(-50%) translateY(-3px);box-shadow: 0 6px 12px rgba(0, 0, 0, 0.15);}}.static-bubble {{width: 50px;height: 50px;border-radius: 50%;margin: 0;display: flex;align-items: center;justify-content: center;color: white;font-weight: bold;position: relative;box-shadow: 0 4px 8px rgba(0, 0, 0, 0.15);z-index: 2;transform-origin: center bottom;transition: transform 0.3s cubic-bezier(0.175, 0.885, 0.32, 1.275), box-shadow 0.3s ease;animation: bubbleFloat 3s ease-in-out infinite;animation-delay: calc(var(--delay) * 0.3s);}}@keyframes bubbleFloat {{0%, 100% {{transform: translateY(0) scale(1);}}50% {{transform: translateY(-10px) scale(1.03);}}}}.static-bubble:hover {{transform: scale(1.2) translateY(-10px);z-index: 10;box-shadow: 0 8px 16px rgba(0, 0, 0, 0.2);animation-play-state: paused;}}.static-bubble-red {{background: linear-gradient(135deg, #ff6b6b, #e63946);border: 2px solid #C0392B;}}.static-bubble-blue {{background: linear-gradient(135deg, #48cae4, #0077b6);border: 2px solid #2980B9;}}.bubble-number {{font-size: 16px;text-shadow: 0 1px 2px rgba(0, 0, 0, 0.3);}}.bubble-freq {{position: absolute;top: -25px;left: 50%;transform: translateX(-50%);background-color: white;color: #1e293b;font-size: 10px;padding: 3px 8px;border-radius: 10px;box-shadow: 0 2px 5px rgba(0, 0, 0, 0.1);white-space: nowrap;transition: opacity 0.2s ease, transform 0.2s ease;opacity: 0.9;}}.static-bubble:hover .bubble-freq {{opacity: 1;transform: translateX(-50%) translateY(-3px);}}.high-freq {{animation: pulse 2s infinite;}}@keyframes pulse {{0% {{box-shadow: 0 0 0 0 rgba(230, 57, 70, 0.4);}}70% {{box-shadow: 0 0 0 10px rgba(230, 57, 70, 0);}}100% {{box-shadow: 0 0 0 0 rgba(230, 57, 70, 0);}}}}.red-pulse {{animation: redPulse 2s infinite;}}@keyframes redPulse {{0% {{box-shadow: 0 0 0 0 rgba(230, 57, 70, 0.4);}}70% {{box-shadow: 0 0 0 10px rgba(230, 57, 70, 0);}}100% {{box-shadow: 0 0 0 0 rgba(230, 57, 70, 0);}}}}.blue-pulse {{animation: bluePulse 2s infinite;}}@keyframes bluePulse {{0% {{box-shadow: 0 0 0 0 rgba(0, 119, 182, 0.4);}}70% {{box-shadow: 0 0 0 10px rgba(0, 119, 182, 0);}}100% {{box-shadow: 0 0 0 0 rgba(0, 119, 182, 0);}}}}.bubble-chart-divider-label {{position: absolute;left: 10px;top: 50%;transform: translateY(-50%);background-color: white;font-size: 11px;color: #64748b;font-weight: 500;padding: 2px 7px;border-radius: 10px;z-index: 2;border: 1px solid #e2e8f0;line-height: 1.2;opacity: 0.9;}}.bubble-chart-bottom-label {{position: absolute;left: 10px; bottom: 10px;background-color: white;font-size: 11px;color: #64748b;font-weight: 500;padding: 2px 7px;border-radius: 10px;z-index: 2;border: 1px solid #e2e8f0;line-height: 1.2;opacity: 0.9;}}</style></head><body><div class="container"><h1>红篮球数据统计分析</h1><div class="stats-grid"><!-- 红球历史高频 --><div class="stats-card red-border"><div class="stats-title">红球历史高频TOP10</div><ul class="stats-list">"""# 添加红球历史高频TOP10列表for i, (num, prob) in enumerate(stats['red']['all_time_top10'].items()):pulse_class = "red-pulse" if i < 3 else ""html += f"""<li class="stats-item"><div class="item-left"><span class="red-ball {pulse_class}">{int(num)}</span></div><span class="probability">{prob * 100:.2f}%</span></li>"""html += """</ul></div><!-- 红球近期高频 --><div class="stats-card red-border"><div class="stats-title">红球近期高频TOP10</div><ul class="stats-list">"""# 添加红球近期高频TOP10列表for i, (num, prob) in enumerate(stats['red']['recent_top10'].items()):pulse_class = "red-pulse" if i < 3 else ""html += f"""<li class="stats-item"><div class="item-left"><span class="red-ball {pulse_class}">{int(num)}</span></div><span class="probability">{prob * 100:.2f}%</span></li>"""html += """</ul></div><!-- 蓝球历史高频 --><div class="stats-card blue-border"><div class="stats-title">蓝球历史高频TOP10</div><ul class="stats-list">"""# 添加蓝球历史高频TOP10列表for i, (num, prob) in enumerate(stats['blue']['all_time_top10'].items()):pulse_class = "blue-pulse" if i < 3 else ""html += f"""<li class="stats-item"><div class="item-left"><span class="blue-ball {pulse_class}">{int(num)}</span></div><span class="probability">{prob * 100:.2f}%</span></li>"""html += """</ul></div><!-- 蓝球近期高频 --><div class="stats-card blue-border"><div class="stats-title">蓝球近期高频TOP10</div><ul class="stats-list">"""# 添加蓝球近期高频TOP10列表for i, (num, prob) in enumerate(stats['blue']['recent_top10'].items()):pulse_class = "blue-pulse" if i < 3 else ""html += f"""<li class="stats-item"><div class="item-left"><span class="blue-ball {pulse_class}">{int(num)}</span></div><span class="probability">{prob * 100:.2f}%</span></li>"""html += """</ul></div></div><!-- 红球静态气泡图 --><div class="bubble-chart-container"><div class="bubble-chart-title">红球号码频率分布</div><div class="bubble-chart bubble-chart-red">"""# 计算红球平均频率red_values = list(stats['red']['all_time_sorted'].values())red_avg = sum(red_values) / len(red_values) if red_values else 0red_max = max(red_values) if red_values else 0red_min = min(red_values) if red_values else 0# 添加红球平均频率标签html += f"""<div class="bubble-chart-label">平均出现频率: {red_avg * 100:.2f}% | 期望值: {(1/33) * 100:.2f}%</div><div class="bubble-chart-divider-label">高频号码</div><div class="bubble-chart-bottom-label">低频号码</div>"""# 对红球数据按频率排序,便于确定TOP5red_sorted = sorted(stats['red']['all_time_sorted'].items(), key=lambda x: x[1], reverse=True)red_top5_threshold = red_sorted[4][1] if len(red_sorted) > 4 else 0# 添加红球气泡# 先按频率排序sorted_red_balls = sorted(stats['red']['all_time_sorted'].items(), key=lambda x: float(x[1]), reverse=True)avg_freq = red_avgfor i, (num, freq) in enumerate(sorted_red_balls):# 计算气泡大小 (30px - 70px)size_factor = (freq - red_min) / (red_max - red_min) if red_max > red_min else 0.5size = 35 + size_factor * 35# 确定垂直位置 - 频率高于平均值的在上方,低于的在下方above_average = freq > avg_freqy_offset = -40 if above_average else 40  # 简化为上/下两行# 确定是否为TOP5,添加频率标签freq_label = ""if i < 5:  # 前5名显示标签freq_label = f'<div class="bubble-freq">{freq * 100:.2f}%</div>'# 确定是否添加脉冲效果和延迟动画pulse_class = "red-pulse" if i < 3 else ""  # 前3名添加脉冲animation_delay = i % 8  # 0-7的延迟变化# 计算整体透明度 - 频率越高越不透明opacity = 0.5 + 0.5 * size_factorhtml += f"""<div class="static-bubble static-bubble-red {pulse_class}" style="width:{size}px; height:{size}px; transform:translateY({y_offset}px); --delay:{animation_delay}; opacity:{opacity}">{freq_label}<span class="bubble-number">{int(num)}</span></div>"""html += """</div></div><!-- 蓝球静态气泡图 --><div class="bubble-chart-container"><div class="bubble-chart-title">蓝球号码频率分布</div><div class="bubble-chart bubble-chart-blue">"""# 计算蓝球平均频率blue_values = list(stats['blue']['all_time_sorted'].values())blue_avg = sum(blue_values) / len(blue_values) if blue_values else 0blue_max = max(blue_values) if blue_values else 0blue_min = min(blue_values) if blue_values else 0# 添加蓝球平均频率标签html += f"""<div class="bubble-chart-label">平均出现频率: {blue_avg * 100:.2f}% | 期望值: {(1/16) * 100:.2f}%</div><div class="bubble-chart-divider-label">高频号码</div><div class="bubble-chart-bottom-label">低频号码</div>"""# 对蓝球数据按频率排序,便于确定TOP5blue_sorted = sorted(stats['blue']['all_time_sorted'].items(), key=lambda x: x[1], reverse=True)blue_top5_threshold = blue_sorted[4][1] if len(blue_sorted) > 4 else 0# 添加蓝球气泡# 先按频率排序sorted_blue_balls = sorted(stats['blue']['all_time_sorted'].items(), key=lambda x: float(x[1]), reverse=True)avg_freq = blue_avgfor i, (num, freq) in enumerate(sorted_blue_balls):# 计算气泡大小 (30px - 70px)size_factor = (freq - blue_min) / (blue_max - blue_min) if blue_max > blue_min else 0.5size = 35 + size_factor * 35# 确定垂直位置 - 频率高于平均值的在上方,低于的在下方above_average = freq > avg_freqy_offset = -40 if above_average else 40  # 简化为上/下两行# 确定是否为TOP5,添加频率标签freq_label = ""if i < 5:  # 前5名显示标签freq_label = f'<div class="bubble-freq">{freq * 100:.2f}%</div>'# 确定是否添加脉冲效果和延迟动画pulse_class = "blue-pulse" if i < 3 else ""  # 前3名添加脉冲animation_delay = i % 8  # 0-7的延迟变化# 计算整体透明度 - 频率越高越不透明opacity = 0.5 + 0.5 * size_factorhtml += f"""<div class="static-bubble static-bubble-blue {pulse_class}" style="width:{size}px; height:{size}px; transform:translateY({y_offset}px); --delay:{animation_delay}; opacity:{opacity}">{freq_label}<span class="bubble-number">{int(num)}</span></div>"""html += """</div></div><footer><p>© 2025 红篮球数据统计 | 仅供参考,请理性buy</p></footer></div></body></html>"""return html# 页面导航器,用于JavaScript与PyQt交互
class PageNavigator(QObject):def __init__(self, main_window):super().__init__()self.main_window = main_window@pyqtSlot()def prevPage(self):self.main_window.change_data_page(-1)@pyqtSlot()def nextPage(self):self.main_window.change_data_page(1)@pyqtSlot()def pageLoaded(self):print("页面加载完成,JavaScript环境已就绪")if __name__ == "__main__":# Delay imports until actually needed to speed up startupapp = QApplication(sys.argv)icon_path = resource_path('logo.ico')if os.path.exists(icon_path):app.setWindowIcon(QIcon(icon_path))window = MainWindow()window.show()sys.exit(app.exec_())
运行环境配置
-
安装Python 3.8+
-
安装依赖库:
pip install -r requirements.txt
requirements.txt内容:
PyQt5==5.15.4
tensorflow==2.6.0
pandas==1.3.0
numpy==1.21.0
requests==2.26.0
PyQtWebEngine==5.15.4
- 运行主程序:
python main.py
总结与展望
本文详细介绍了一个基于深度学习的双色球预测系统的设计与实现。该系统具有以下优势:
- 完整的业务流程:从数据获取到预测分析一站式解决
- 多种模型选择:LSTM、GRU和混合模型满足不同需求
- 美观的交互界面:现代化的Web风格UI
- 全面的可视化:直观展示分析结果
未来可能的改进方向:
- 增加更多特征工程方法
- 集成XGBoost等传统机器学习算法
- 添加模型性能对比功能
- 支持自动参数调优
- 增加模型解释性分析
需要注意的是,彩票预测本质上属于随机事件,本系统仅供技术研究和学习使用。开发者不保证预测结果的准确性,也不鼓励任何形式的赌博行为。
希望通过本文的介绍,读者能够了解如何将深度学习技术应用于时间序列预测问题,并掌握PyQt5开发复杂GUI应用程序的方法。