Spring Web MVC————入门(3)
今天我们来一个大练习,我们要实现一个登录界面,登录进去了先获取到登录人信息,可以选择计算器和留言板两个功能,另外我们是学后端的,对于前端我们会些基础的就行了,知道ajax怎么用,知道怎么关联到后端的参数即可,对于那些漂亮的页面,我们可以去Bootstrap找到各种各样的模版。
1,定义接口文档
我们后端程序员要学会根据接口文档写代码,工作上就是这样的,我们根据接口文档来写写属于我们那部分的代码,我们现在来定义下面4个功能的接口文档:
1,登录接口文档:
请求路径:User/Login
请求方式:Post
请求参数:
参数名 类型 是否必须 备注
userName String 是 需要校验的第一个参数
password String 是 需要校验的第二个参数
响应数据:
Content-Type:text/html
响应内容:
返回true or false
2,计算器接口文档
请求路径:Calc/Count
请求方式:Get
请求参数:
参数名 类型 是否必须 备注
num1 Double 是 参与计算的第一个参数
num2 Double 是 参与计算的第二个参数
op String 是 运算符
响应数据:
Content-Type:text/html
响应内容:
返回计算结果Integer
3,留言板接口文档
1)获取内存历史留言
请求路径:Message/getList
请求方式:get
请求参数:无
相应数据:
Content-Type:application/json
响应内容:
集合都是json,传的对象
2)打印留言
请求路径:Message/publish
请求方式:get
请求参数:
MessageInfo messageinfo
对象中有String from String to String say
响应数据
Content-Type:text/html
响应内容:
json内容,如{"ok":0}
2,登录功能实现
我们现在就来根据接口文档来写代码:
@RequestMapping("/User")
@RestController
public class UserController {@RequestMapping("/Login")public boolean Login(String userName, String password, HttpServletRequest httpServletRequest){if(!StringUtils.hasLength(userName) || !StringUtils.hasLength(password)){return false;}if("admin".equals(userName) && "admin".equals(password)){httpServletRequest.setAttribute("userName",userName);return true;}return false;}
}
这里推荐大家去模版王找一些模版的前端代码,我觉得很方便
<!DOCTYPE html>
<html lang="zxx"><head><title>Hotair Login Form Responsive Widget Template</title><!-- Meta tag Keywords --><meta name="viewport" content="width=device-width, initial-scale=1"><meta charset="UTF-8"/><meta name="keywords"content="Hotair Login Form Responsive web template, Bootstrap Web Templates, Flat Web Templates, Android Compatible web template, Smartphone Compatible web template, free webdesigns for Nokia, Samsung, LG, SonyEricsson, Motorola web design"/><!-- //Meta tag Keywords --><link href="https://fonts.googleapis.com/css2?family=Noto+Serif+JP:wght@400;600;700;900&display=swap"rel="stylesheet"><!--/Style-CSS --><link rel="stylesheet" href="css/style.css" type="text/css" media="all"/><!--//Style-CSS --><link rel="stylesheet" href="css/font-awesome.min.css" type="text/css" media="all"></head><body><!-- form section start -->
<section class="w3l-hotair-form"><h1>Hotair Log In Form</h1><div class="container"><!-- /form --><div class="workinghny-form-grid"><div class="main-hotair"><div class="alert-close"><span class="fa fa-close"></span></div><div class="content-wthree"><h2>Log In</h2><p>To Your Account</p><form action="#" method="post"><input type="text" class="text" name="userName" placeholder="User Name" required=""id="userName"><input type="password" class="password" name="password" placeholder="User Password" required=""id="password"><button class="btn" type="submit" onclick="heihei()">Log In</button></form></div><div class="w3l_form align-self"><div class="left_grid_info"></div></div></div></div><!-- //form --></div><!-- copyright--><div class="copyright text-center"><p class="copy-footer-29">© 2020 Hotair Log In Form. All rights reserved | <a target="_blank"href="http://www.mobanwang.com/"title="网页模板">网页模板</a></p></div><!-- //copyright-->
</section>
<!-- //form section start --><script src="js/jquery.min.js"></script>
<script>$(document).ready(function (c) {$('.alert-close').on('click', function (c) {$('.main-hotair').fadeOut('slow', function (c) {$('.main-hotair').remove();});});});function heihei() {$.ajax({type: "post",url: "User/Login",data: {userName: $("#userName").val(),password: $("#password").val()},success: function (result) {if (result == false) {alert("用户名或者密码出错")} else {location.href = "calc.html"}}})}
</script></body></html>
我把html的文件放上去了,css,js都没有,大家去模版王找就行,之后,在Script中关联好后端传来的数据就行了;
来看看效果:
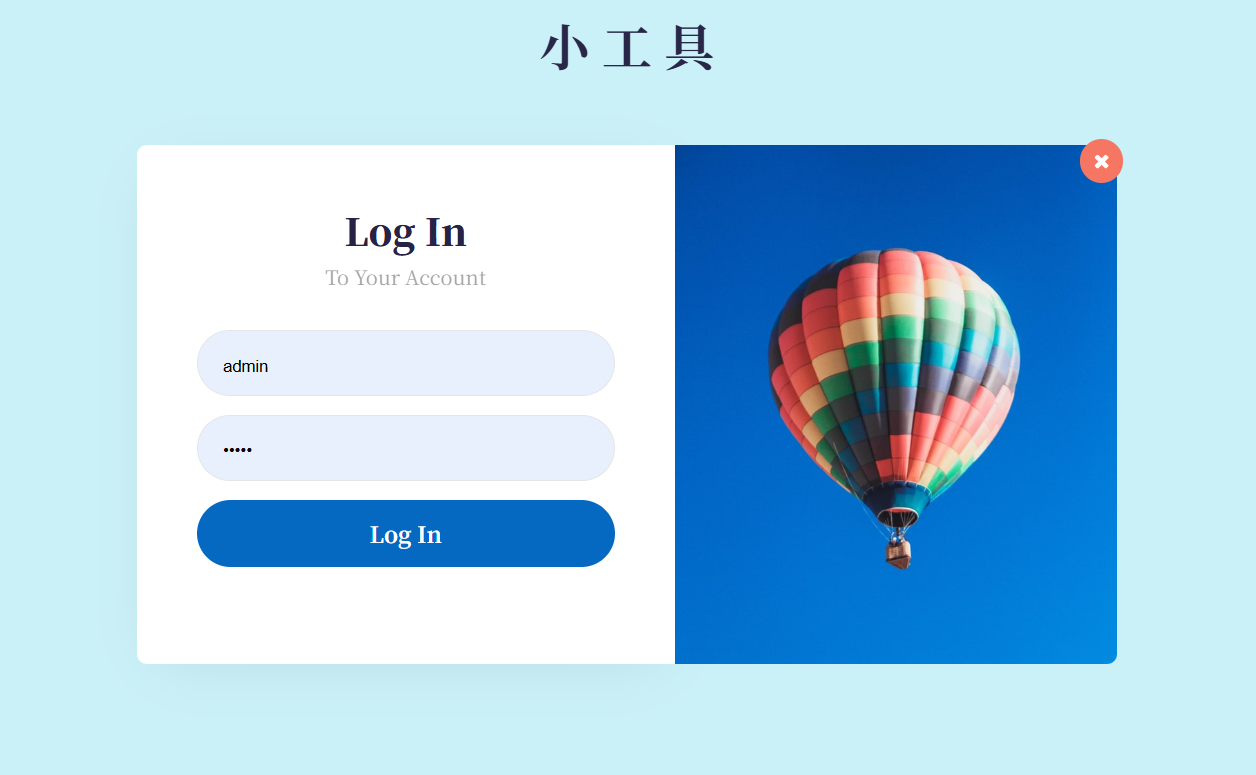
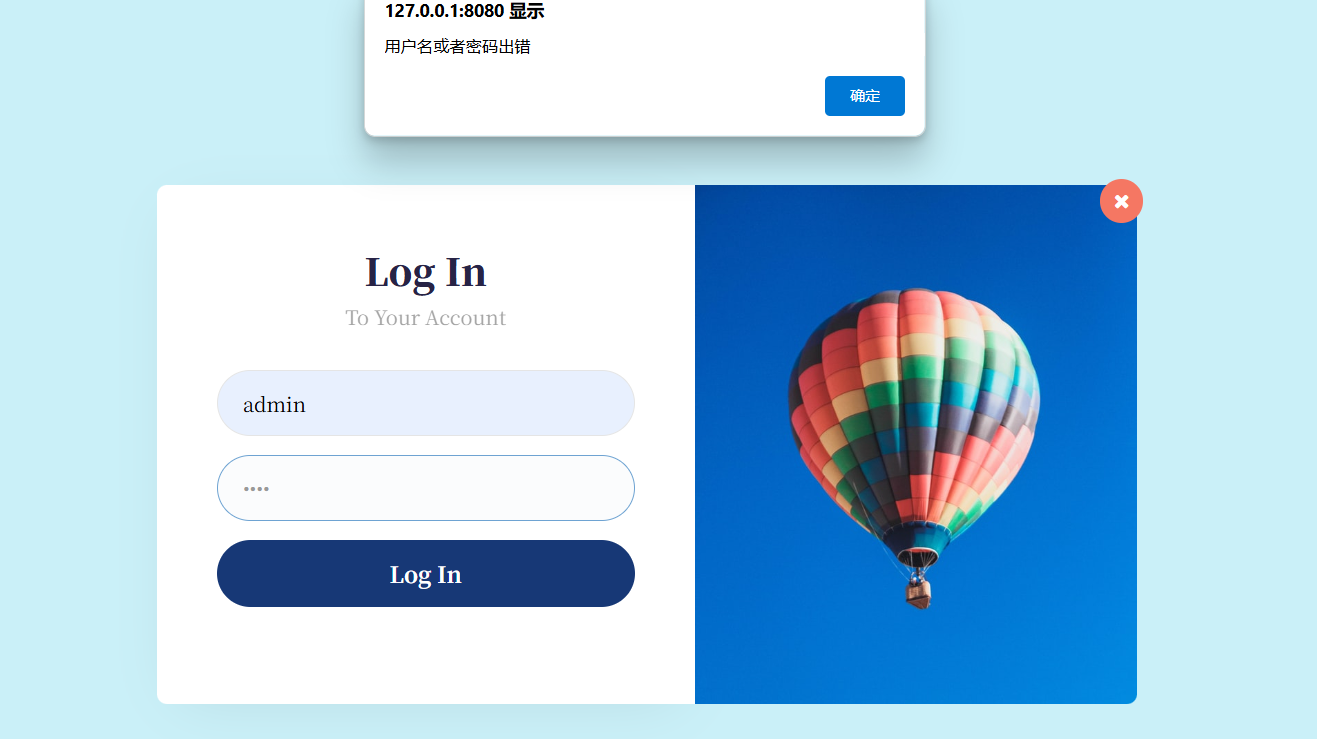
密码正确则成功跳转,
3,跳转界面实现
这块就是纯前端的内容了,对点击的框框进行页面的跳转,
<!DOCTYPE html>
<html lang="zxx"><head><title>Hotair Login Form Responsive Widget Template</title><!-- Meta tag Keywords --><meta name="viewport" content="width=device-width, initial-scale=1"><meta charset="UTF-8"/><meta name="keywords"content="Hotair Login Form Responsive web template, Bootstrap Web Templates, Flat Web Templates, Android Compatible web template, Smartphone Compatible web template, free webdesigns for Nokia, Samsung, LG, SonyEricsson, Motorola web design"/><!-- //Meta tag Keywords --><link href="https://fonts.googleapis.com/css2?family=Noto+Serif+JP:wght@400;600;700;900&display=swap"rel="stylesheet"><!--/Style-CSS --><link rel="stylesheet" href="css/style.css" type="text/css" media="all"/><!--//Style-CSS --><link rel="stylesheet" href="css/font-awesome.min.css" type="text/css" media="all"></head><body><!-- form section start -->
<section class="w3l-hotair-form"><h1>小 工 具</h1><div class="container"><!-- /form --><div class="workinghny-form-grid"><div class="main-hotair"><div class="alert-close"><span class="fa fa-close"></span></div><div class="content-wthree"><h2>Log In</h2><p>To Your Account</p><form action="#" method="post"><input type="text" class="text" name="userName" placeholder="User Name" required=""id="userName"><input type="password" class="password" name="password" placeholder="User Password" required=""id="password"><button class="btn" type="submit" onclick="heihei()">Log In</button></form></div><div class="w3l_form align-self"><div class="left_grid_info"></div></div></div></div><!-- //form --></div><!-- copyright--><!-- //copyright-->
</section>
<!-- //form section start --><script src="js/jquery.min.js"></script>
<script>$(document).ready(function (c) {$('.alert-close').on('click', function (c) {$('.main-hotair').fadeOut('slow', function (c) {$('.main-hotair').remove();});});});function heihei() {$.ajax({type: "post",url: "User/Login",data: {userName: $("#userName").val(),password: $("#password").val()},success: function (result) {if (result == false) {alert("用户名或者密码出错")location.href = "index.html"} else {location.href = "choose.html"}}})}
</script></body></html>
4,计算器功能实现
我们计算器呢就先不使用模版了,用模版的话在前端中就都写好了,没我们什么事了,我们自己来!
先来看后端代码:
@RequestMapping("/Calc")
@RestController
public class CalcController {@RequestMapping("/count")public Double count(Double num1,Double num2,String op){Double num=0.0;if(num1==null || num2==null){return null;} else {if("+".equals(op)){num=num1+num2;} else if ("-".equals(op)) {num=num1-num2;} else if ("*".equals(op)){num=num1*num2;} else if ("/".equals(op)) {if(num1==0){return null;}num=num1/num2;} else if ("%".equals(op)) {num=num1%num2;}}System.out.println(num);return num;}}
前端的:
<html lang="en">
<head><meta charset="UTF-8"><meta name="viewport" content="width=device-width, initial-scale=1.0"><title>Document</title>
</head>
<body><h1>计算器</h1><button type="button" onclick="clean()">AC</button><br>数字1:<input name="num1" type="text" id="num1"><br>数字2:<input name="num2" type="text" id="num2"><br><select id="op" name="op1"><option value="+">+</option><option value="-">-</option><option value="*">*</option><option value="/" selected>/</option><option value="%">%</option></select><br><span id="result"></span><br><button type="submit" onclick="count()">计算结果</button><script src="https://cdn.bootcdn.net/ajax/libs/jquery/3.6.4/jquery.min.js"></script>
<script>function count(){$.ajax({type:"get",url:"Calc/count",data:{num1:$("#num1").val(),num2:$("#num2").val(),op:$("#op").val()},success:function (result) {if(result==null){alert("输入参数有问题呀")}else {$("#result").html(result);}}})}function clean() {$("#num1").val("")$("#num2").val("")$("#result").html("")}
</script>
</body></html>
5,留言板功能实现
@Data
public class MessageInfo {private String from;private String to;private String say;
}
先来publish:
这里我们使用链表,这个是在内存中的,我们看publish方法,我们如果想要传入json数据给后端我们要使用produces,这样messageinfo对象就能接收到json格式的数据转化成对应的对象中的内容,之后我们想要输出json,我们就要使用produces,这个之前讲过,可以指定我们返回的类型;
@RequestMapping("/Message")
@RestController
public class MessageController {List<MessageInfo> arrayList = new ArrayList<>();@RequestMapping(value = "/publish",produces = "application/json")public String publish(@RequestBody MessageInfo messageInfo){if (messageInfo==null){return "{\"ok\":0}";}if(messageInfo.getTo()!=null || messageInfo.getFrom()!=null ||messageInfo.getSay()!=null){arrayList.add(messageInfo);return "{\"ok\":1}";}return "{\"ok\":0}";}}
<div class="container"><h1>留言板</h1><p class="grey">输入后点击提交, 会将信息显示下方空白处</p><div class="row"><span>谁:</span> <input type="text" name="" id="from"></div><div class="row"><span>对谁:</span> <input type="text" name="" id="to"></div><div class="row"><span>说什么:</span> <input type="text" name="" id="say"></div><input type="button" value="提交" id="submit" onclick="submit()"><!-- <div>A 对 B 说: hello</div> --></div>
在点击按钮后就会调用这个方法,重点!我们接收要使用Post方法接收JSON请求体 ,
ContentType:"application/json"表明我们传入的JSON数据会转化为对象,所以result就是对象了,这个data:JSON.stringify就是把data对象转变为json为啥呢,因为参数类型是json吗,所以我们就要前端上也写类型为json,
function submit() {var from1 = $("#from").val();var to1 = $("#to").val();var say1 = $("#say").val();var data1 = {from : $('#from').val(),to : $('#to').val(),say : $('#say').val(),}$.ajax({type:"post",url:"/Message/publish",contentType: "application/json",data: JSON.stringify(data1),success: function (result) {if(result.ok==0){alert("留言失败")}else{//2. 构造节点var divE = "<div>"+ from1 +"对" + to1 + "说:" + say1+"</div>";//3. 把节点添加到页面上$(".container").append(divE);//4. 清空输入框的值$('#from').val("");$('#to').val("");$('#say').val("");}}})}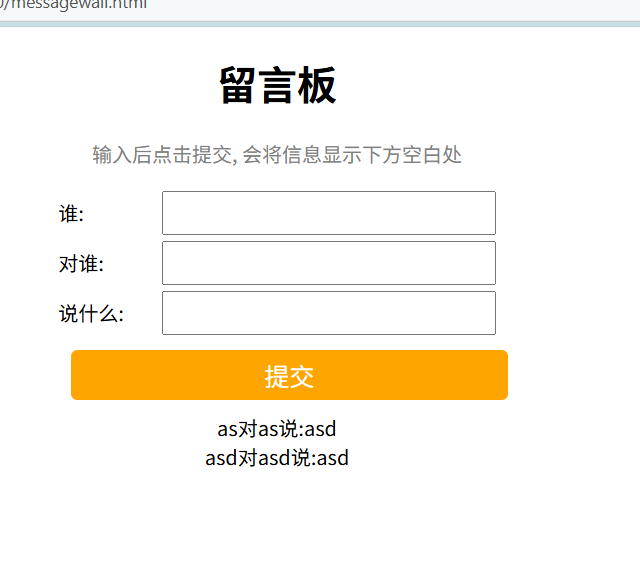
下面来getLIst方法,这个方法的主要目的就是我们刷新之后自动加载我们之前写的内容,容器是存活在内存中,所以关机或者长时间不使用都会发生错误的;
后端代码:
@RequestMapping("/getList")public List<MessageInfo> getList(){return arrayList;}前端代码:ajax:
$.ajax({type: "get",url: "/Message/getList",success: function (result) {if(result!=null && result.length>0){var html1=" ";for( var a of result){html1 += "<div>"+a.from +"对" + a.to + "说:" + a.say+"</div>";}$(".container").append(html1);}}}) 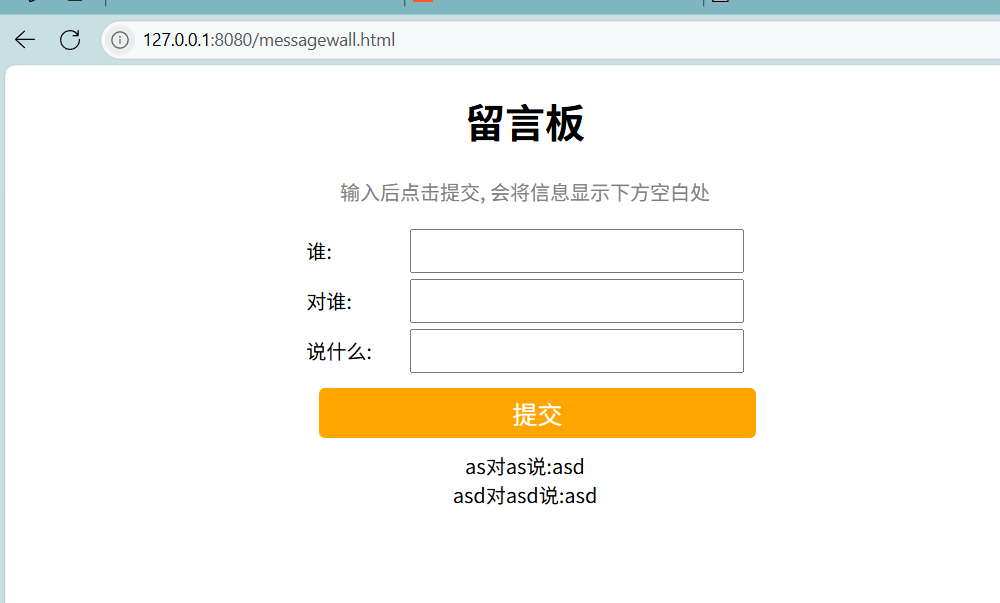
我们点击刷新之后还是有这些留言的: