Kubernetes(k8s)学习笔记(六)--KubeSphere前置环境安装
1、安装 helm(master 节点执行)
Helm 是 Kubernetes 的包管理器。包管理器类似于我们在 Ubuntu 中使用的apt、Centos 中使用的 yum 或者 Python 中的 pip 一样,能快速查找、下载和安装软件包。Helm由客户端组件 helm 和服务端组件 Tiller 组成(注:Helm 3.0以上版本不再需要Tiller ), 能够将一组 K8S 资源打包统一管理, 是查找、共享和使用为 Kubernetes 构建的软件的最佳方式。
wget https://get.helm.sh/helm-v2.16.3-linux-amd64.tar.gz在确保文件已完整下载到本地后,
2. 解压并安装 Helm 和 Tiller
执行下面的命令:
tar -zxvf helm-v2.16.3-linux-amd64.tar.gz
cd linux-amd64/
sudo cp helm /usr/local/bin/
sudo cp tiller /usr/local/bin/
3. 验证 Helm 安装
helm version --client输出类似于下面的提示:
Client: &version.Version{SemVer:"v2.16.3", GitCommit:"1ee0254c86d4ed6887327dabed7aa7da29d7eb0d", GitTreeState:"clean"}
4. 安装 Tiller 到 Kubernetes 集群
Helm 2 需要 Tiller 在 Kubernetes 集群中运行,先创建helm-rbac.yaml文件,并写入下面的内容:
apiVersion: v1
kind: ServiceAccount
metadata:name: tillernamespace: kube-system
---
apiVersion: rbac.authorization.k8s.io/v1
kind: ClusterRoleBinding
metadata:name: tiller
roleRef:apiGroup: rbac.authorization.k8s.iokind: ClusterRolename: cluster-admin
subjects:
- kind: ServiceAccountname: tillernamespace: kube-system
此配置为 Tiller 授予了 cluster-admin 权限(最高权限),仅适合测试环境
使用下面的命令执行helm初始化
helm init \--service-account=tiller \--tiller-image=registry.aliyuncs.com/google_containers/tiller:v2.16.3 \--history-max 300 \--skip-refresh使用kubectl get pods -n kube-system -l app=helm查看初始化情况
[root@k8s-node1 k8s]# kubectl get pods -n kube-system -l app=helm
NAME READY STATUS RESTARTS AGE
tiller-deploy-66657d6565-62cm4 1/1 Running 0 29s
5.安装openebs
安装前完成准备工作
kubectl describe node k8s-node1 | grep Taint #确定 master 节点是否有 taintkubectl taint nodes k8s-node1 node-role.kubernetes.io/master:NoSchedule- #取消 taint完成准备工作后在master节点 执行
# 添加新的源
helm repo add stable http://mirror.azure.cn/kubernetes/charts/
# 更新源
helm repo update
# 安装OpenEBS
helm install --namespace openebs --name openebs stable/openebs --version 1.5.0
目前这个镜像http://mirror.azure.cn/kubernetes/charts/是可用的,而下来这些都无法访问
http://mirror.azure.cn/kubernetes/charts-incubator/
https://kubernetes-charts.storage.googleapis.com/ 拒绝访问
https://registry.cn-hangzhou.aliyuncs.com/ 无法访问
https://quay.io/ 被墙https://swr.cn-east-3.myhuaweicloud.com/ 需登录
https://mcr.azk8s.cn 不可用
安装后提示
NOTES:
The OpenEBS has been installed. Check its status by running:
$ kubectl get pods -n openebsFor dynamically creating OpenEBS Volumes, you can either create a new StorageClass or
use one of the default storage classes provided by OpenEBS.Use `kubectl get sc` to see the list of installed OpenEBS StorageClasses. A sample
PVC spec using `openebs-jiva-default` StorageClass is given below:"
使用下面的命令查看节点的信息
kubectl get pods -n openebs输出下面的信息
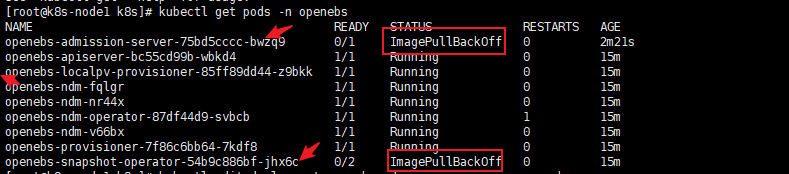
从中可以看出,第一个和最后一个镜像拉取失败。缺少的,通过docker pull命令拉取到本地。下面说下修复过程
1.临时修复 DNS
编辑 /etc/resolv.conf 文件,手动指定公共 DNS 服务器
vi /etc/resolv.conf添加下面这2个
nameserver 8.8.8.8
nameserver 223.5.5.5
其中
-
8.8.8.8是 Google 公共 DNS -
223.5.5.5是阿里云 DNS,国内速度更快
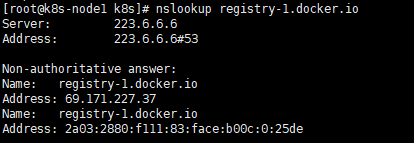
2.执行下面的命令测试DNS解析是否正常
nslookup registry-1.docker.io如果输出下面的文字,进入下一步,否则还须检查DNS解析
3.使用docker pull拉取缺失的镜像
docker pull openebs/admission-server:1.5.0观察拉取的结果,如果成功,观察openebs的状态
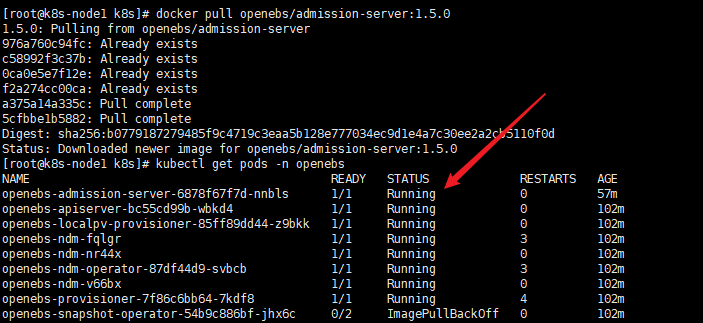
从上图可以看出,admission-server拉取成功后,对应Pods状态已经变为running状态了,还有一个snapshot存在问题。
使用下面的命令排查这个节点依赖的镜像
kubectl get deployment openebs-snapshot-operator -n openebs -o yaml | grep image:输出如下内容:

从图中看出 缺少了这两个:
image: quay.io/openebs/snapshot-controller:1.5.0
image: quay.io/openebs/snapshot-provisioner:1.5.0
由于quary.io在国内无法访问,直接拉取会失败,将其替换为openebs/snapshot-controller:1.5.0,由于网络原因,可能会失败,多试几次就可以成功,成功后输出下面的内容
[root@k8s-node1 k8s]# docker pull openebs/snapshot-controller:1.5.0
1.5.0: Pulling from openebs/snapshot-controller
11bd2e533caa: Pull complete
ef8a9f7e84b9: Pull complete
d3e9905eb0f7: Pull complete
35a77e35d9d3: Pull complete
Digest: sha256:5b13c32b6b952c08a932f05ad6157ede2f9c45fd6b67b4f062c940e5e9f44f5e
接下来还有一个snapshot-provisioner:1.5.0,使用openebs目录的试了多次依然不成功,最后换成docker.io/openebs/snapshot-provisioner:1.5.0,才拉取成功,由于网络原因,如果失败,建议多试几次。
[root@k8s-node1 k8s]# docker pull openebs/snapshot-provisioner:1.5.0
Error response from daemon: Get https://registry-1.docker.io/v2/: net/http: request canceled while waiting for connection (Client.Timeout exceeded while awaiting headers)
[root@k8s-node1 k8s]# docker pull docker.io/openebs/snapshot-provisioner:1.5.0
1.5.0: Pulling from openebs/snapshot-provisioner
Digest: sha256:7c63f7e7fac566e0bca93c65e81edfaf043f435e9c151a4831171c8c82e42df4
Status: Downloaded newer image for openebs/snapshot-provisioner:1.5.0
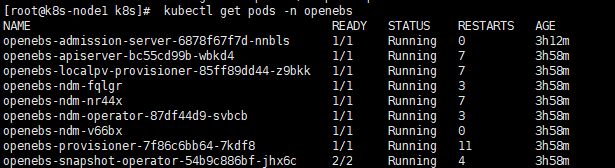
再次查看openebs节点状态,所有的都处于running状态了
最后将 openebs-hostpath 设置为 默认的 StorageClass:
kubectl patch storageclass openebs-hostpath -p \
{"metadata": {"annotations":{"storageclass.kubernetes.io/is-default-class":"true"}}}'
使用 kubectl get sc查看设置是否生效:

图中可以看出openebs-hostpath (default) 已设为默认存储类型了。
至此, OpenEBS 的 LocalPV 已作为默认的存储类型创建成功。 由于在前面的操作中手动去掉了 master 节点的 Taint, 在安装完 OpenEBS 后将 master 节点 Taint 加上, 避免业务相关的工作负载调度到 master 节点抢占 master 资源
kubectl taint nodes k8s-node1 node-role.kubernetes.io=master:NoSchedule