利用3台机器搭建Kubernetes集群
文章目录
- 1 机器准备
- 修改主机名(可选)
- 配置IP地址和主机名映射
- 关闭防火墙
- 关闭swap
- 2 安装docker
- 修改并更新软件源
- 安装docker
- 设置路由转发规则,并使配置生效
- 安装 kubelet,kubeadm,kubectl
- 3 初始化集群
- 4 集群初始化
- 5 work节点加入
- 6 部署网络插件
本博客记录如何利用3台机器搭建k8s集群,主要参考了一些大佬的博客,如:
- https://www.cnblogs.com/renshengdezheli/p/17632858.html
- https://yigongsui.blog.csdn.net/article/details/137024280
- https://blog.csdn.net/kiyokute/article/details/146237268
大佬们已经写得很很好了,这里主要记录一下自己搭建的过程,大家可以参考一下要点,期间踩了很多坑,没有一一记录,大家有问题可以留言讨论。
提示: 章节1,2,3中的操作都要在每台机器上执行;4,6只需要在master节点上执行
1 机器准备
准备3台机器或虚拟机,比如我的3台机器如下:
| 角色 | 节点 | IP地址 |
|---|---|---|
| master | node1 | 10.59.140.215 |
| worker1 | node2 | 10.59.140.220 |
| worker2 | node3 | 10.59.140.53 |
修改主机名(可选)
vi /etc/hostname
分别将机器改成 node1,node2,node3,可选。
配置IP地址和主机名映射
vim /etc/hosts
添加以下内容:
10.59.140.215 master
10.59.140.220 worker1
10.59.140.53 worker2
root@node1:/home/lab# vim /etc/hosts
root@node1:/home/lab# cat /etc/hosts
127.0.0.1 localhost
127.0.1.1 node110.59.140.215 master
10.59.140.220 worker1
10.59.140.53 worker2
配置后测试3台主机之间能够互相ping通
root@node1:/home/lab# ping worker1
PING worker1 (10.59.140.220) 56(84) bytes of data.
64 bytes from worker1 (10.59.140.220): icmp_seq=1 ttl=64 time=0.867 ms
^C
--- worker1 ping statistics ---
1 packets transmitted, 1 received, 0% packet loss, time 0ms
rtt min/avg/max/mdev = 0.867/0.867/0.867/0.000 ms
root@node1:/home/lab# ping worker2
PING worker2 (10.59.140.53) 56(84) bytes of data.
64 bytes from worker2 (10.59.140.53): icmp_seq=1 ttl=64 time=1.10 ms
^C
--- worker2 ping statistics ---
1 packets transmitted, 1 received, 0% packet loss, time 0ms
rtt min/avg/max/mdev = 1.107/1.107/1.107/0.000 m
关闭防火墙
root@node1:/home/lab# ufw disable
Firewall stopped and disabled on system startup
关闭swap
root@node1:/home/lab# swapoff -a ;sed -i '/swap/d' /etc/fstab
2 安装docker
修改并更新软件源
lab@node1:~$ cat /etc/apt/sources.list
deb http://mirrors.aliyun.com/ubuntu/ bionic main restricted universe multiverse
deb-src http://mirrors.aliyun.com/ubuntu/ bionic main restricted universe multiversedeb http://mirrors.aliyun.com/ubuntu/ bionic-security main restricted universe multiverse
deb-src http://mirrors.aliyun.com/ubuntu/ bionic-security main restricted universe multiversedeb http://mirrors.aliyun.com/ubuntu/ bionic-updates main restricted universe multiverse
deb-src http://mirrors.aliyun.com/ubuntu/ bionic-updates main restricted universe multiversedeb http://mirrors.aliyun.com/ubuntu/ bionic-proposed main restricted universe multiverse
deb-src http://mirrors.aliyun.com/ubuntu/ bionic-proposed main restricted universe multiversedeb http://mirrors.aliyun.com/ubuntu/ bionic-backports main restricted universe multiverse
deb-src http://mirrors.aliyun.com/ubuntu/ bionic-backports main restricted universe multiversedeb https://mirrors.aliyun.com/kubernetes/apt/ kubernetes-xenial main
deb [arch=amd64] https://mirrors.aliyun.com/docker-ce/linux/ubuntu bionic stable
修改后用apt-get update更新
root@node1:/home/lab# apt-get update
- 遇到以下错误的解决方法为
sudo apt-key adv --keyserver keyserver.ubuntu.com --recv-keys 7EA0A9C3F273FCD8「注意输入自己的公钥」
W: GPG error: https://mirrors.aliyun.com/docker-ce/linux/ubuntu bionic InRelease: The following signatures couldn’t be verified because the public key is not available: NO_PUBKEY 7EA0A9C3F273FCD8
安装docker
root@node1:/home/lab# apt install docker.io
如下表示安装成功:
root@node1:/home/lab# docker --version
Docker version 20.10.21, build 20.10.21-0ubuntu1~18.04.3
设置开机自启,并现在启动
root@node1:/home/lab# systemctl enable docker --now
修改docker下载的源和cgroup
root@node1:/home/lab# cat > /etc/docker/daemon.json <<EOF
> {
>     "registry-mirrors": ["https://docker.1ms.run"],
>     "exec-opts": ["native.cgroupdriver=systemd"]
> }
> EOF
重启docker
systemctl restart docker
设置路由转发规则,并使配置生效
root@node1:/home/lab# cat <<EOF> /etc/sysctl.d/k8s.conf
> net.bridge.bridge-nf-call-ip6tables = 1
> net.bridge.bridge-nf-call-iptables = 1
> net.ipv4.ip_forward = 1
> EOF
root@node1:/home/lab# sysctl -p /etc/sysctl.d/k8s.conf
net.bridge.bridge-nf-call-ip6tables = 1
net.bridge.bridge-nf-call-iptables = 1
net.ipv4.ip_forward = 1
安装 kubelet,kubeadm,kubectl
root@node1:/home/lab# apt-get -y install kubelet kubeadm kubectl
设置开机自启
root@node1:/home/lab# systemctl enable kubelet --now3 初始化集群
与大佬的博客中提到不同,本博客中我们使用的是k8s最新的版本,使用containrd作为运行时,为了能顺利下载镜像,需要增加配置文件,操作如下:
containerd config default > /etc/containerd/config.toml
vim /etc/containerd/config.toml 【直接添加下面 “cat /etc/containerd/config.toml”中的内容,修改了几处,为了方便,直接粘贴我的】
systemctl daemon-reload
systemctl restart containerd
注:先containerd config default > /etc/containerd/config.toml 之后再修改config.toml中的内容,否则会修改不成功(没有这个文件的话先创建)。
root@node1:/home/lab# cat /etc/containerd/config.toml
disabled_plugins = []
imports = []
oom_score = 0
plugin_dir = ""
required_plugins = []
root = "/var/lib/containerd"
state = "/run/containerd"
temp = ""
version = 2[cgroup]path = ""[debug]address = ""format = ""gid = 0level = ""uid = 0[grpc]address = "/run/containerd/containerd.sock"gid = 0max_recv_message_size = 16777216max_send_message_size = 16777216tcp_address = ""tcp_tls_ca = ""tcp_tls_cert = ""tcp_tls_key = ""uid = 0[metrics]address = ""grpc_histogram = false[plugins][plugins."io.containerd.gc.v1.scheduler"]deletion_threshold = 0mutation_threshold = 100pause_threshold = 0.02schedule_delay = "0s"startup_delay = "100ms"[plugins."io.containerd.grpc.v1.cri"]device_ownership_from_security_context = falsedisable_apparmor = falsedisable_cgroup = falsedisable_hugetlb_controller = truedisable_proc_mount = falsedisable_tcp_service = trueenable_selinux = falseenable_tls_streaming = falseenable_unprivileged_icmp = falseenable_unprivileged_ports = falseignore_image_defined_volumes = falsemax_concurrent_downloads = 3max_container_log_line_size = 16384netns_mounts_under_state_dir = falserestrict_oom_score_adj = falsesandbox_image = "registry.aliyuncs.com/google_containers/pause:3.6"selinux_category_range = 1024stats_collect_period = 10stream_idle_timeout = "4h0m0s"stream_server_address = "127.0.0.1"stream_server_port = "0"systemd_cgroup = falsetolerate_missing_hugetlb_controller = trueunset_seccomp_profile = ""[plugins."io.containerd.grpc.v1.cri".cni]bin_dir = "/opt/cni/bin"conf_dir = "/etc/cni/net.d"conf_template = ""ip_pref = ""max_conf_num = 1[plugins."io.containerd.grpc.v1.cri".containerd]default_runtime_name = "runc"disable_snapshot_annotations = truediscard_unpacked_layers = falseignore_rdt_not_enabled_errors = falseno_pivot = falsesnapshotter = "overlayfs"[plugins."io.containerd.grpc.v1.cri".containerd.default_runtime]base_runtime_spec = ""cni_conf_dir = ""cni_max_conf_num = 0container_annotations = []pod_annotations = []privileged_without_host_devices = falseruntime_engine = ""runtime_path = ""runtime_root = ""runtime_type = ""[plugins."io.containerd.grpc.v1.cri".containerd.default_runtime.options][plugins."io.containerd.grpc.v1.cri".containerd.runtimes][plugins."io.containerd.grpc.v1.cri".containerd.runtimes.runc]base_runtime_spec = ""cni_conf_dir = ""cni_max_conf_num = 0container_annotations = []pod_annotations = []privileged_without_host_devices = falseruntime_engine = ""runtime_path = ""runtime_root = ""runtime_type = "io.containerd.runc.v2"[plugins."io.containerd.grpc.v1.cri".containerd.runtimes.runc.options]BinaryName = ""CriuImagePath = ""CriuPath = ""CriuWorkPath = ""IoGid = 0IoUid = 0NoNewKeyring = falseNoPivotRoot = falseRoot = ""ShimCgroup = ""SystemdCgroup = false[plugins."io.containerd.grpc.v1.cri".containerd.untrusted_workload_runtime]base_runtime_spec = ""cni_conf_dir = ""cni_max_conf_num = 0container_annotations = []pod_annotations = []privileged_without_host_devices = falseruntime_engine = ""runtime_path = ""runtime_root = ""runtime_type = ""[plugins."io.containerd.grpc.v1.cri".containerd.untrusted_workload_runtime.options][plugins."io.containerd.grpc.v1.cri".image_decryption]key_model = "node"[plugins."io.containerd.grpc.v1.cri".registry]config_path = ""[plugins."io.containerd.grpc.v1.cri".registry.auths][plugins."io.containerd.grpc.v1.cri".registry.configs][plugins."io.containerd.grpc.v1.cri".registry.headers][plugins."io.containerd.grpc.v1.cri".registry.mirrors][plugins."io.containerd.grpc.v1.cri".registry.mirrors."docker.io"]endpoint=["https://docker.1ms.run", "hub.rat.dev"][plugins."io.containerd.grpc.v1.cri".registry.mirrors."registry.k8s.io"]endpoint=["https://docker.1ms.run", "hub.rat.dev"][plugins."io.containerd.grpc.v1.cri".x509_key_pair_streaming]tls_cert_file = ""tls_key_file = ""[plugins."io.containerd.internal.v1.opt"]path = "/opt/containerd"[plugins."io.containerd.internal.v1.restart"]interval = "10s"[plugins."io.containerd.internal.v1.tracing"]sampling_ratio = 1.0service_name = "containerd"[plugins."io.containerd.metadata.v1.bolt"]content_sharing_policy = "shared"[plugins."io.containerd.monitor.v1.cgroups"]no_prometheus = false[plugins."io.containerd.runtime.v1.linux"]no_shim = falseruntime = "runc"runtime_root = ""shim = "containerd-shim"shim_debug = false[plugins."io.containerd.runtime.v2.task"]platforms = ["linux/amd64"]sched_core = false[plugins."io.containerd.service.v1.diff-service"]default = ["walking"][plugins."io.containerd.service.v1.tasks-service"]rdt_config_file = ""[plugins."io.containerd.snapshotter.v1.aufs"]root_path = ""[plugins."io.containerd.snapshotter.v1.btrfs"]root_path = ""[plugins."io.containerd.snapshotter.v1.devmapper"]async_remove = falsebase_image_size = ""discard_blocks = falsefs_options = ""fs_type = ""pool_name = ""root_path = ""[plugins."io.containerd.snapshotter.v1.native"]root_path = ""[plugins."io.containerd.snapshotter.v1.overlayfs"]root_path = ""upperdir_label = false[plugins."io.containerd.snapshotter.v1.zfs"]root_path = ""[plugins."io.containerd.tracing.processor.v1.otlp"]endpoint = ""insecure = falseprotocol = ""[proxy_plugins][stream_processors][stream_processors."io.containerd.ocicrypt.decoder.v1.tar"]accepts = ["application/vnd.oci.image.layer.v1.tar+encrypted"]args = ["--decryption-keys-path", "/etc/containerd/ocicrypt/keys"]env = ["OCICRYPT_KEYPROVIDER_CONFIG=/etc/containerd/ocicrypt/ocicrypt_keyprovider.conf"]path = "ctd-decoder"returns = "application/vnd.oci.image.layer.v1.tar"[stream_processors."io.containerd.ocicrypt.decoder.v1.tar.gzip"]accepts = ["application/vnd.oci.image.layer.v1.tar+gzip+encrypted"]args = ["--decryption-keys-path", "/etc/containerd/ocicrypt/keys"]env = ["OCICRYPT_KEYPROVIDER_CONFIG=/etc/containerd/ocicrypt/ocicrypt_keyprovider.conf"]path = "ctd-decoder"returns = "application/vnd.oci.image.layer.v1.tar+gzip"[timeouts]"io.containerd.timeout.bolt.open" = "0s""io.containerd.timeout.shim.cleanup" = "5s""io.containerd.timeout.shim.load" = "5s""io.containerd.timeout.shim.shutdown" = "3s""io.containerd.timeout.task.state" = "2s"[ttrpc]address = ""gid = 0uid = 0
参考 https://blog.csdn.net/kiyokute/article/details/146237268 还需要如下设置,否则初始化后会卡住。
containerd config default > /etc/containerd/config.toml
sed -i 's/registry.k8s.io/registry.aliyuncs.com\/google_containers/' /etc/containerd/config.toml
systemctl daemon-reload
systemctl restart containerd
4 集群初始化
本节只需早master节点上执行即可,按照如下方式初始化集群:
kubeadm init --image-repository registry.aliyuncs.com/google_containers
根据提示操作:
mkdir -p $HOME/.kube
sudo cp -i /etc/kubernetes/admin.conf $HOME/.kube/config
sudo chown $(id -u):$(id -g) $HOME/.kube/config
可以看到初始化成功后能看到node1了
root@node1:/etc/containerd# kubectl get node
NAME    STATUS     ROLES           AGE     VERSION
node1   NotReady   control-plane   5m10s   v1.28.2
5 work节点加入
根据初始化最后的提示在node2和node3上运行加入命令(根据自己的来,每次都不一样)
kubeadm join 10.59.140.215:6443 --token ew5tnn.osctigiu5ptw6iei --discovery-token-ca-cert-hash sha256:cb77a9d8de64ff91d18736585ab52b4e0ee5744373b8a4ee11875774553db9c6
运行后可以看到node2 和node3 也加入了集群
root@node1:/etc/containerd# kubectl get node
NAME    STATUS     ROLES           AGE     VERSION
node1   NotReady   control-plane   5m49s   v1.28.2
node2   NotReady   <none>          10s     v1.28.2
node3   NotReady   <none>          1s      v1.28.2
查看pod
root@node1:/home/lab# kubectl get pod -A
NAMESPACE     NAME                            READY   STATUS    RESTARTS   AGE
kube-system   coredns-66f779496c-6rdbr        0/1     Pending   0          12m
kube-system   coredns-66f779496c-j98mk        0/1     Pending   0          12m
kube-system   etcd-node1                      1/1     Running   0          12m
kube-system   kube-apiserver-node1            1/1     Running   0          12m
kube-system   kube-controller-manager-node1   1/1     Running   0          12m
kube-system   kube-proxy-6mzkx                1/1     Running   0          12m
kube-system   kube-proxy-fvtbj                1/1     Running   0          7m9s
kube-system   kube-proxy-r4k8w                1/1     Running   0          7m18s
kube-system   kube-scheduler-node1            1/1     Running   0          12m
可以看到已经有pod在运行,coredns部分pending因为还没有配置网络。
6 部署网络插件
需要calico.ymal配置文件,和k8s具体的版本有关系,否则可能会报错,我的k8s的版本为:
root@node1:/home/lab# kubectl version
Client Version: v1.28.2
Kustomize Version: v5.0.4-0.20230601165947-6ce0bf390ce3
Server Version: v1.28.2
calico的官网为 https://docs.tigera.io/calico/latest/about , 进入后如下,注意和k8s版本的对应关系,如果下载的calico.yaml文件和k8s的对不上(官方没有测试过),可能会出错。

找到和我们版本对应的:
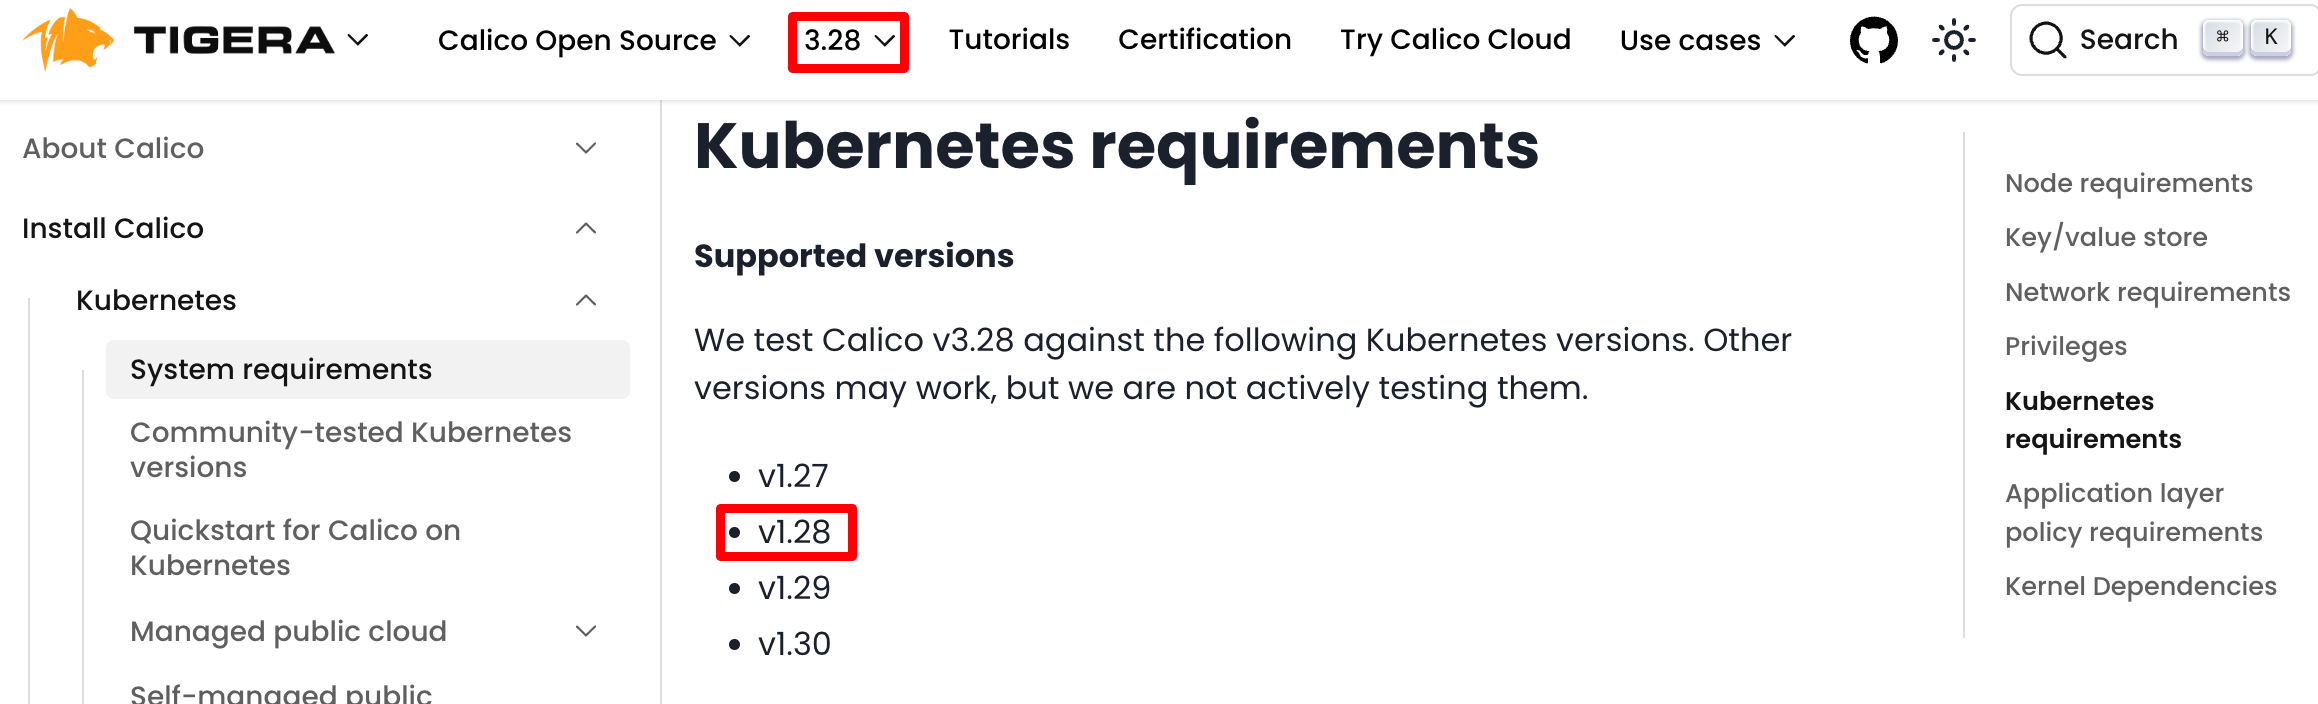
找到下载链接:
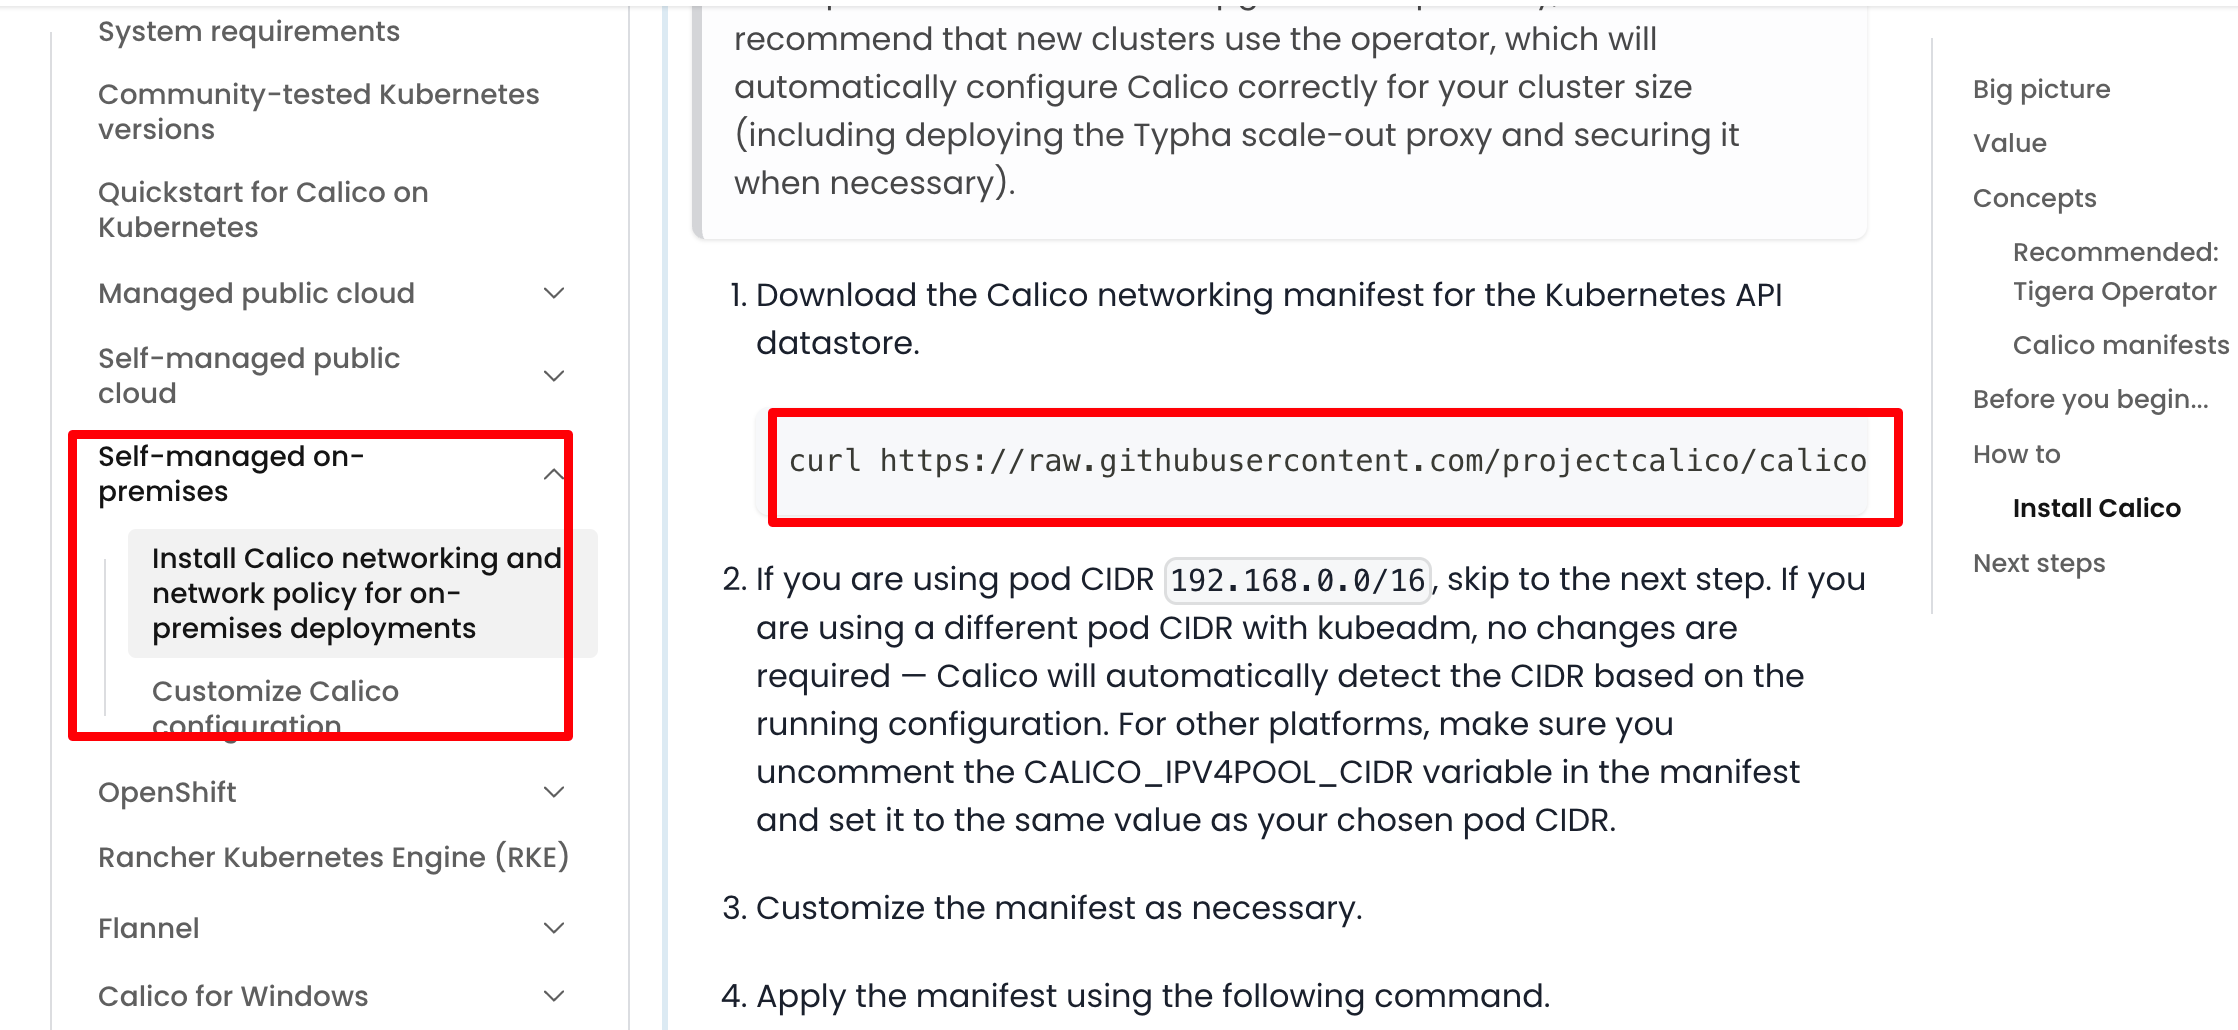
所以我这里是:
curl https://raw.githubusercontent.com/projectcalico/calico/v3.28.5/manifests/calico.yaml -O
然后应用:
kubectl apply -f calico.yaml
再查看,吼,我们成功了!
root@node1:/home/lab# kubectl get node
NAME    STATUS   ROLES           AGE     VERSION
node1   Ready    control-plane   4m54s   v1.28.2
node2   Ready    <none>          2m39s   v1.28.2
node3   Ready    <none>          2m34s   v1.28.2
root@node1:/home/lab# kubectl get pod -A
NAMESPACE     NAME                                      READY   STATUS    RESTARTS   AGE
kube-system   calico-kube-controllers-6476886d5-ch764   1/1     Running   0          86s
kube-system   calico-node-7jldn                         1/1     Running   0          86s
kube-system   calico-node-s6bbh                         1/1     Running   0          86s
kube-system   calico-node-xhfh5                         1/1     Running   0          86s
kube-system   coredns-66f779496c-7ddgn                  1/1     Running   0          4m53s
kube-system   coredns-66f779496c-h2jbx                  1/1     Running   0          4m53s
kube-system   etcd-node1                                1/1     Running   2          4m59s
kube-system   kube-apiserver-node1                      1/1     Running   0          5m1s
kube-system   kube-controller-manager-node1             1/1     Running   0          4m59s
kube-system   kube-proxy-d267d                          1/1     Running   0          2m47s
kube-system   kube-proxy-kt2rx                          1/1     Running   0          4m53s
kube-system   kube-proxy-mhpl4                          1/1     Running   0          2m42s
kube-system   kube-scheduler-node1                      1/1     Running   0          4m59s
以上就是整个过程,记录了一下关键步骤,有问题欢迎留言。
