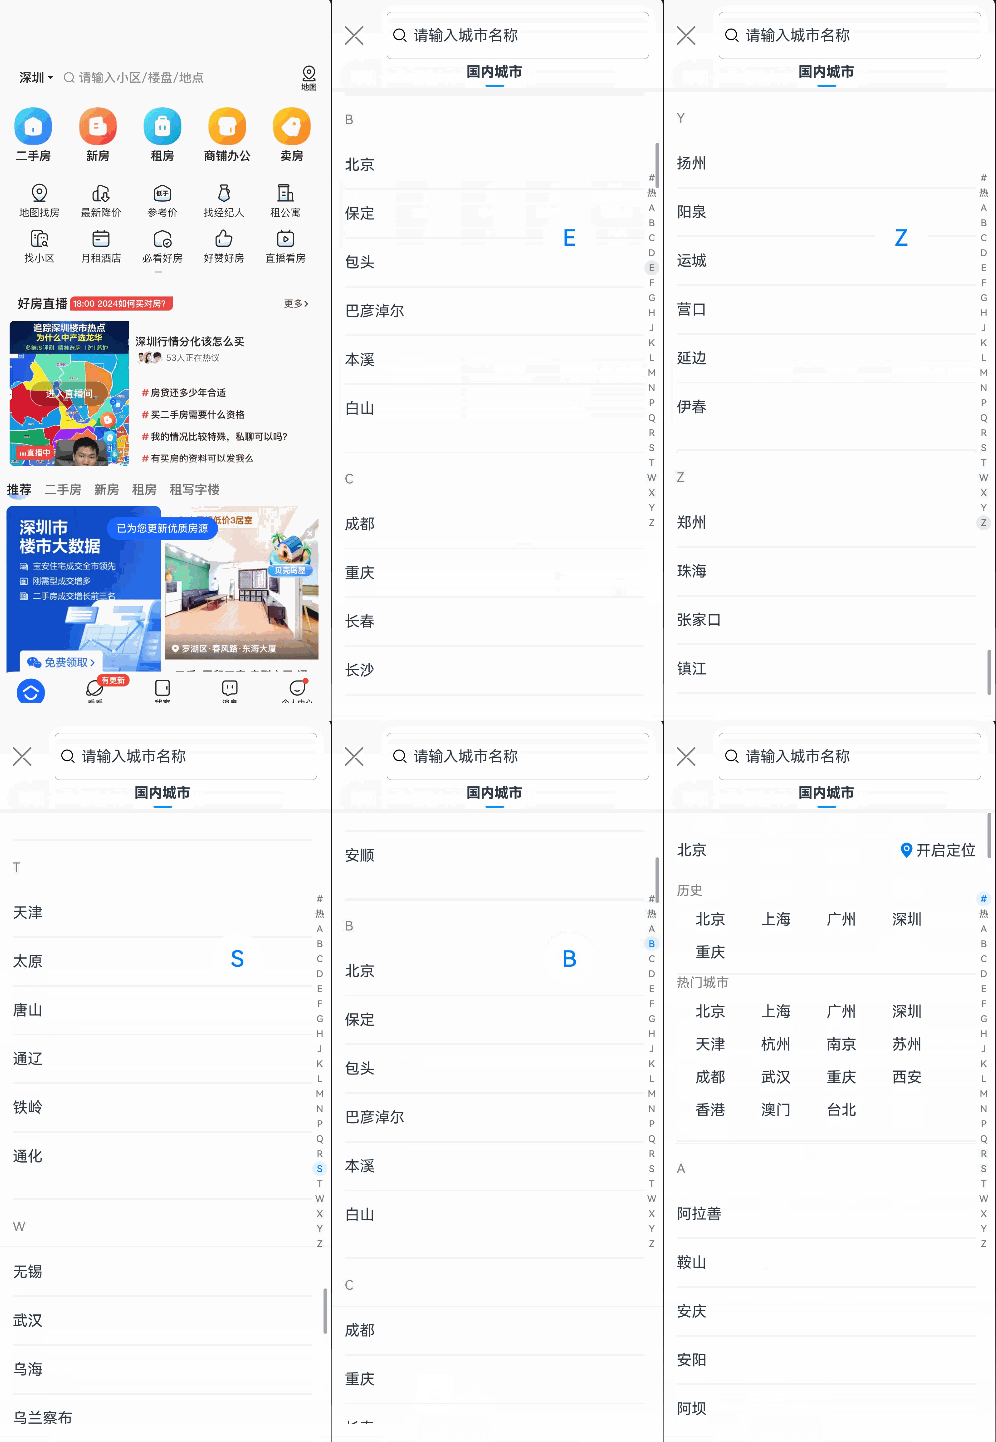
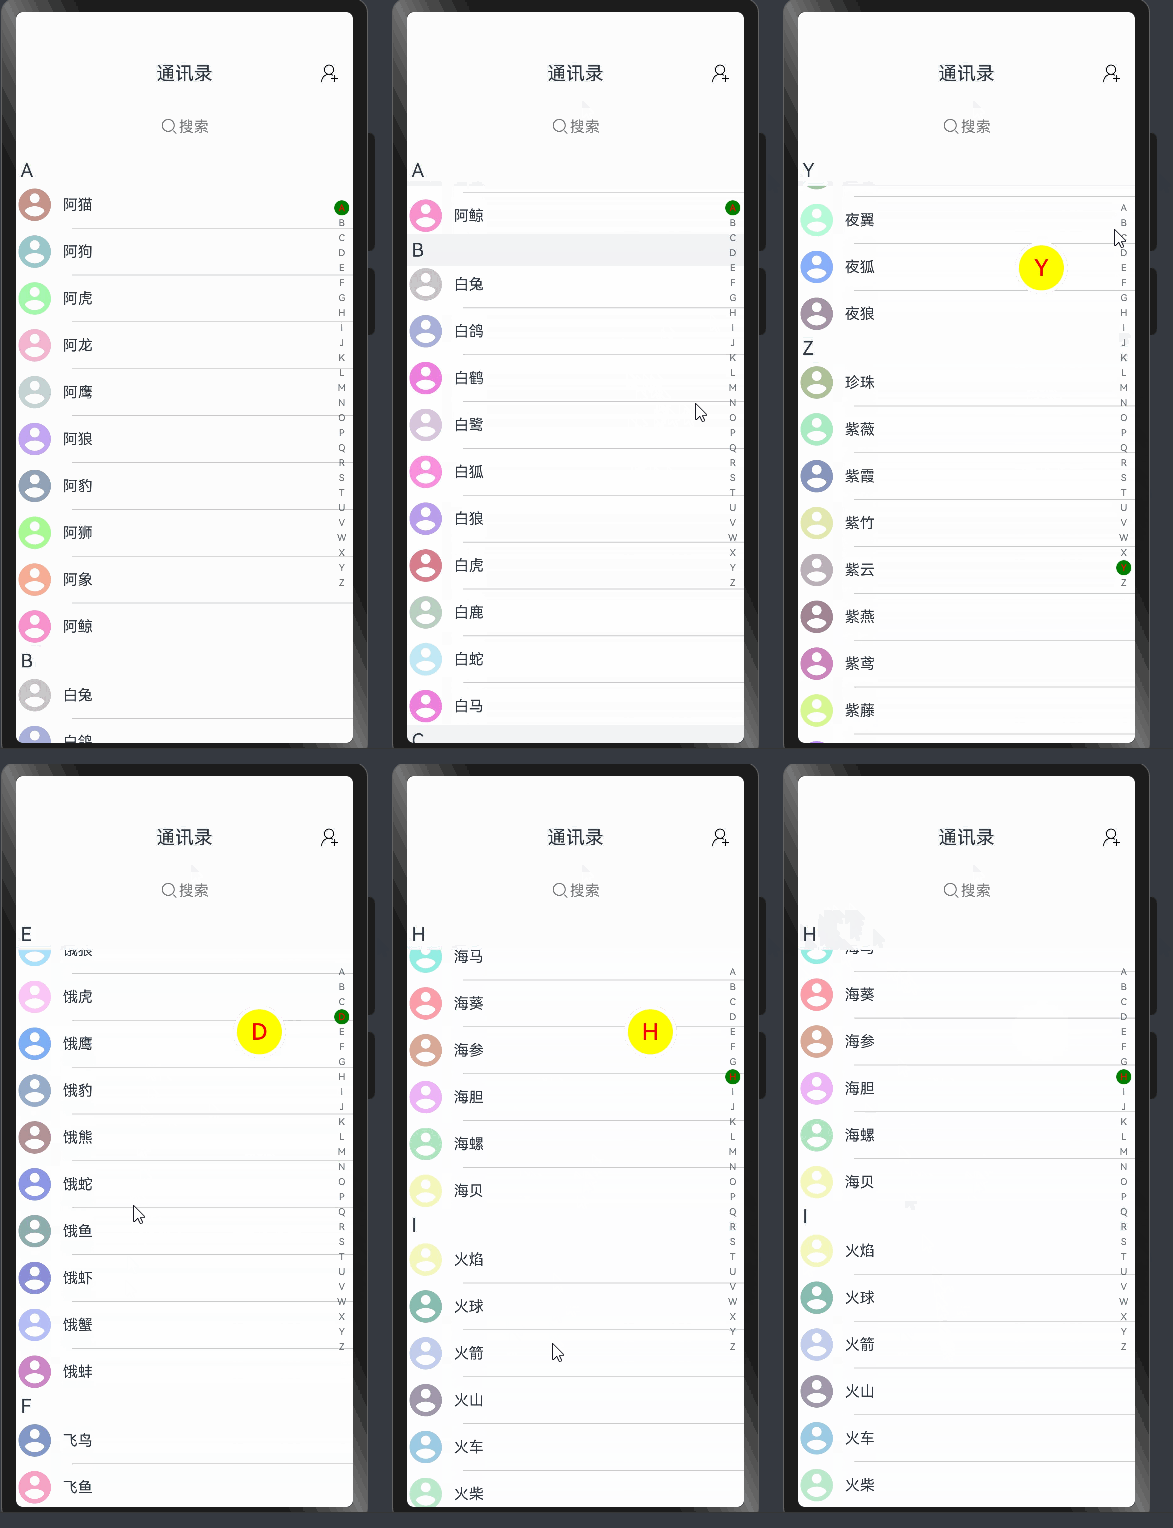
demo 通讯录 + 城市选择器 (字母索引左右联动 ListItemGroup+AlphabetIndexer)笔记
一、城市选择器实现笔记

1. 双层 for 循环渲染
数据结构
interface BKCityContent {initial: string; // 字母索引cityNameList: string[]; // 城市列表
}
核心实现
// 外层循环:字母分组 - 遍历城市数据,按字母分组显示
ForEach(this.cityContentList, (item: BKCityContent, index: number) => {// ListItemGroup:创建分组容器,header显示字母标题ListItemGroup({ header: this.ListItemGroupHeaderBuilder(item.initial) }) {// 内层循环:城市列表 - 遍历每个分组下的城市名称ForEach(item.cityNameList, (ele: string, index: number) => {ListItem() {Text(ele)  // 显示城市名称.width('100%').padding({ left: 20 })}.width('100%').height(50)  // 统一高度,保持列表整齐.backgroundColor(Color.White)})}
})要点:
- 外层遍历字母分组,内层遍历城市
- 用
ListItemGroup实现分组效果
2. 模态框左右联动
状态变量
@State isShow: boolean = false    // 模态框显示
@State selected: number = 0       // 选中索引
scroller: Scroller = new Scroller() // 滚动器
联动代码
// 模态框结构 - 使用Stack布局,右侧放置索引器
@Builder
ContentCoverBuilder() {Stack({ alignContent: Alignment.End }) {  // 内容右对齐,为索引器留出空间Column() {this.TopBuilder()    // 顶部搜索栏this.ListBuilder()   // 城市列表}.backgroundColor(Color.White)// 右侧索引器 - 提供快速定位功能AlphabetIndexer({arrayValue: this.alphabets, selected: this.selected}).usingPopup(true)  // 启用弹出提示,显示当前选中的字母.onSelect((index) => {this.scroller.scrollToIndex(index, true)  // 点击索引时滚动到对应位置})}
}// 列表滚动监听 - 实现双向联动
List({scroller: this.scroller}) {  // 绑定滚动控制器// 列表内容
}
.onScrollIndex((index) => {this.selected = index  // 手动滚动时同步更新索引器的选中状态
})联动机制:
- 点击索引 →
onSelect→scrollToIndex()滚动 - 手动滚动 →
onScrollIndex→ 更新selected
3. 关键组件
AlphabetIndexer
// 字母索引器 - 右侧快速定位组件
AlphabetIndexer({arrayValue: this.alphabets, // 索引数组:['#', '热', "A", "B", "C"...]selected: this.selected, // 当前选中的索引位置
}).usingPopup(true) // 启用弹出提示,显示当前选中的字母.onSelect((index) => {this.scroller.scrollToIndex(index, true); // 点击时滚动到对应位置});
ListItemGroup
// 列表分组组件 - 按字母对城市进行分组显示
ListItemGroup({header: this.ListItemGroupHeaderBuilder(item.initial) // 自定义分组头部,显示字母
}) {// 分组内容 - 该字母下的所有城市
}
.padding({ bottom: 20 })  // 分组底部间距
.divider({ startMargin: 20, endMargin: 20, color: '#f3f3f3', strokeWidth: 2 }) // 分组间分割线
4. 数据组织
城市数据
cityContentList: BKCityContent[] = [{ initial: 'A', cityNameList: ['阿拉善', '鞍山', '安庆'] },{ initial: 'B', cityNameList: ['北京', '保定', '包头'] },// ...
]
索引数组
alphabets: string[] = ['#', '热', "A", "B", "C", "D", "E", "F", "G", "H", "J", "K", "L", "M", "N", "P", "Q", "R", "S", "T", "W", "X", "Y", "Z"]5. 交互流程
- 打开模态框:
this.isShow = true - 点击索引:
onSelect→scrollToIndex(index) - 滚动列表:
onScrollIndex→this.selected = index - 关闭模态框:
this.isShow = false
6. 关键代码
模态框绑定
// 背景图片绑定模态框 - 点击图片显示城市选择器
Image($r("app.media.ic_BK_content")).bindContentCover($$this.isShow, this.ContentCoverBuilder()) // 绑定模态框内容.onClick(() => {this.isShow = true; // 点击时显示模态框});
分组头部
// 自定义分组头部构建器 - 显示字母标题
@Builder
ListItemGroupHeaderBuilder(title: string) {Text(title)  // 显示字母(如:A、B、C...).padding({ left: 20, bottom: 15, top: 20 })  // 内边距.fontSize(14)  // 字体大小.fontColor(Color.Gray)  // 灰色字体.backgroundColor('#f8f8f8')  // 浅灰色背景.width('100%')  // 占满宽度
}
总结
- 双层循环:外层分组 + 内层列表
- 左右联动:索引器 + 滚动器双向同步
- 状态管理:
@State控制显示,Scroller控制滚动 - 数据驱动:接口规范数据结构
城市选择全部代码:
interface BKCityContent {initial: stringcityNameList: string[]
}@Entry
@Component
struct Page10_Demo_BK {// 热门城市hotCitys: string[] = ['北京', '上海', '广州', '深圳', '天津', '杭州', '南京', '苏州', '成都', '武汉', '重庆', '西安', '香港', '澳门', '台北']// 历史城市historyCitys: string[] = ['北京', '上海', '广州', '深圳', '重庆']// 城市信息cityContentList: BKCityContent[] = [{initial: 'A',cityNameList: ['阿拉善', '鞍山', '安庆', '安阳', '阿坝', '安顺']},{initial: 'B',cityNameList: ['北京', '保定', '包头', '巴彦淖尔', '本溪', '白山']},{initial: 'C',cityNameList: ['成都', '重庆', '长春', '长沙', '承德', '沧州']},{initial: 'D',cityNameList: ['大连', '东莞', '大同', '丹东', '大庆', '大兴安岭']},{initial: 'E',cityNameList: ['鄂尔多斯', '鄂州', '恩施', '额尔古纳市', '二连浩特市', '恩施市']},{initial: 'F',cityNameList: ['福州', '佛山', '抚顺', '阜新', '阜阳', '抚州']},{initial: 'G',cityNameList: ['广州', '贵阳', '赣州', '桂林', '贵港', '广元']},{initial: 'H',cityNameList: ['杭州', '海口', '哈尔滨', '合肥', '呼和浩特', '邯郸']},{initial: 'J',cityNameList: ['济南', '晋城', '晋中', '锦州', '吉林', '鸡西']},{initial: 'K',cityNameList: ['昆明', '开封', '康定市', '昆山', '康保县', '宽城满族自治县']},{initial: 'L',cityNameList: ['兰州', '廊坊', '临汾', '吕梁', '辽阳', '辽源']},{initial: 'M',cityNameList: ['牡丹江', '马鞍山', '茂名', '梅州', '绵阳', '眉山']},{initial: 'N',cityNameList: ['南京', '宁波', '南昌', '南宁', '南通', '南平']},{initial: 'P',cityNameList: ['盘锦', '莆田', '萍乡', '平顶山', '濮阳', '攀枝花']},{initial: 'Q',cityNameList: ['青岛', '秦皇岛', '齐齐哈尔', '七台河', '衢州', '泉州']},{initial: 'R',cityNameList: ['日照', '日喀则', '饶阳县', '任丘市', '任泽区', '饶河县']},{initial: 'S',cityNameList: ['上海', '苏州', '深圳', '沈阳', '石家庄', '朔州']},{initial: 'T',cityNameList: ['天津', '太原', '唐山', '通辽', '铁岭', '通化']},{initial: 'W',cityNameList: ['无锡', '武汉', '乌海', '乌兰察布', '温州', '芜湖']},{initial: 'X',cityNameList: ['厦门', '西安', '西宁', '邢台', '忻州', '兴安盟']},{initial: 'Y',cityNameList: ['扬州', '阳泉', '运城', '营口', '延边', '伊春']},{initial: 'Z',cityNameList: ['郑州', '珠海', '张家口', '镇江', '舟山', '漳州']}]// 右侧导航索引alphabets: string[] = ['#', '热', "A", "B", "C", "D", "E", "F", "G", "H", "J", "K", "L", "M", "N", "P", "Q", "R", "S", "T", "W", "X", "Y", "Z"]//全模态的显示@State isShow:boolean=false//@State selected:number=0scroller:Scroller= new Scroller()build() {Column() {Image($r('app.media.ic_BK_content')).width('100%').bindContentCover($$this.isShow, this.ContentCoverBuilder()).onClick(()=>{this.isShow=true})// 全屏模态的内容}.width('100%').height('100%').backgroundColor('#f8f8f8')}@BuilderContentCoverBuilder() {Stack({ alignContent: Alignment.End }) {Column() {// 顶部this.TopBuilder();// 列表this.ListBuilder();}.backgroundColor(Color.White)AlphabetIndexer({arrayValue:this.alphabets,selected:this.selected}).usingPopup(true).onSelect((index)=>{this.scroller.scrollToIndex(index,true)})}}@BuilderListBuilder() {List({scroller:this.scroller}) {// 历史this.LocationListItemBuilder()// 热门this.HotListItemBuilder()// A-B的区域this.LetterListItemBuilder()}.divider({ startMargin: 20, endMargin: 20, color: '#f3f3f3', strokeWidth: 2 }).width('100%').layoutWeight(1).onScrollIndex((index)=>{this.selected=index})}@BuilderLetterListItemBuilder() {// A-B的区域ForEach(this.cityContentList,(item:BKCityContent,index:number)=>{ListItemGroup({ header: this.ListItemGroupHeaderBuilder(item.initial) }) {ForEach(item.cityNameList,(ele:string,index:number)=>{ListItem() {Text(ele).width('100%').padding({ left: 20 })}.width('100%').height(50).backgroundColor(Color.White)})}.padding({ bottom: 20 }).divider({ startMargin: 20, endMargin: 20, color: '#f3f3f3', strokeWidth: 2 })})}@BuilderListItemGroupHeaderBuilder(title: string) {Text(title).padding({ left: 20, bottom: 15, top: 20 }).fontSize(14).fontColor(Color.Gray).backgroundColor('#f8f8f8').width('100%')}@BuilderHotListItemBuilder() {// 热门ListItem() {Column({ space: 10 }) {Text('热门城市').alignSelf(ItemAlign.Start).fontColor(Color.Gray).fontSize(14)Flex({ wrap: FlexWrap.Wrap }) {ForEach(this.hotCitys,(item:string)=>{Text(item).height(25).backgroundColor(Color.White).width('25%').margin({ bottom: 10 })})}.padding({ left: 20, right: 20 })}.width('100%').padding({ left: 20, right: 20, bottom: 10 })}}@BuilderLocationListItemBuilder() {ListItem() {Column({ space: 15 }) {// 定位地址Row() {Text('北京')Text() {ImageSpan($r('app.media.ic_public_location_fill_blue')).width(20)Span('开启定位')}}.width('100%').padding({ top: 10, bottom: 10, right: 20, left: 20 }).justifyContent(FlexAlign.SpaceBetween).backgroundColor(Color.White)// 历史Column({ space: 10 }) {Text('历史').fontColor(Color.Gray).alignSelf(ItemAlign.Start).fontSize(14)Flex({ wrap: FlexWrap.Wrap }) {ForEach(this.historyCitys,(item:string,indedx:number)=>{Text(item).height(25).backgroundColor(Color.White).width('25%').margin({ bottom: 10 })})}.padding({ left: 20, right: 20 })}.width('100%').padding({ left: 20, right: 20 })}}.padding({ top: 20 })}@BuilderTopBuilder() {Column() {// X + 输入框Row({ space: 20 }) {Image($r('app.media.ic_public_cancel')).width(30).fillColor(Color.Gray).onClick(()=>{this.isShow=false})Row({ space: 5 }) {Image($r('app.media.ic_public_search')).width(18)Text('请输入城市名称').layoutWeight(1)}.height(50).border({ width: .5, color: Color.Gray, radius: 5 }).padding({ left: 5 }).layoutWeight(1).shadow({radius: 20,color: '#f6f6f7'})}.padding({left: 15,right: 15,top: 15})// 国内城市Column() {Text('国内城市').fontSize(15).fontWeight(800).padding(5)Row().width(20).height(2).backgroundColor('#0094ff').borderRadius(2)}}.width('100%').backgroundColor(Color.White).height(100).border({width: { bottom: 4 },color: '#f6f6f7',})}
}
效果展示:

二、通讯录字母索引左右联动笔记
1. 数据结构设计
// 定义联系人数据结构
interface ContactData {initial: string    // 首字母nameList: string[] // 该字母下的联系人列表
}// 数据组织:按字母分组存储
contacts: ContactData[] = [{ initial: 'A', nameList: ['阿猫', '阿狗', ...] },{ initial: 'B', nameList: ['白兔', '白鸽', ...] },// ... 26个字母分组
]
2. 核心变量定义
// 滚动控制器 - 控制列表滚动
scroller: Scroller = new Scroller()// 当前激活索引 - 用于左右联动
@State activeIndex: number = 0// 字母索引数组 - 提供给AlphabetIndexer使用
alphabets: string[] = ['A', 'B', 'C', ..., 'Z']
3. 随机颜色功能
getRandomColor(): ResourceColor {const r = Math.floor(Math.random() * 256);const g = Math.floor(Math.random() * 256);const b = Math.floor(Math.random() * 256);return `rgba(${r}, ${g}, ${b}, 0.5)`;
}
4. 左右联动实现流程
4.1 列表滚动 → 索引器高亮
List({ scroller: this.scroller }) {// 列表内容...
}
.onScrollIndex((index) => {this.activeIndex = index  // 关键:滚动时更新激活索引
})实现原理:
- 用户滚动列表时,
onScrollIndex回调触发 - 更新
activeIndex,触发 UI 重新渲染 - AlphabetIndexer 通过
$$this.activeIndex自动高亮对应字母
4.2 索引器点击 → 列表跳转
AlphabetIndexer({arrayValue: this.alphabets,selected: $$this.activeIndex, // 关键:双向绑定
}).onSelect((index) => {this.scroller.scrollToIndex(index); // 关键:点击时滚动到对应位置
});实现原理:
$$双向绑定:activeIndex变化时索引器自动更新onSelect回调:点击字母时调用scrollToIndex跳转
5. 分组列表渲染流程
5.1 分组头部组件
@Builder
itemHead(text: string) {Text(text).fontSize(20).backgroundColor('#fff1f3f5').width('100%').padding(5)
}
5.2 分组列表渲染
ForEach(this.contacts, (item: ContactData, index: number) => {ListItemGroup({header: this.itemHead(item.initial),  // 设置分组头部space: 10}) {ForEach(item.nameList, (it: string, i: number) => {ListItem() {Row({ space: 10 }) {Image($r('app.media.ic_public_lianxiren')).width(40).fillColor(this.getRandomColor())  // 随机颜色Text(it)}}})}.divider({ startMargin: 60, strokeWidth: 1, color: '#ccc' })
})渲染流程:
- 外层遍历 26 个字母分组
- 每个分组用
ListItemGroup包装 - 内层遍历该分组下的联系人
- 每个联系人显示头像+姓名
- 添加分割线
6. 弹窗功能实现
AlphabetIndexer({ arrayValue: this.alphabets, selected: $$this.activeIndex }).usingPopup(true) // 启用弹窗.selectedColor(Color.Red) // 选中字母颜色.selectedBackgroundColor(Color.Green) // 选中背景色.popupColor(Color.Red) // 弹窗文字颜色.popupBackground(Color.Brown) // 弹窗背景色.popupTitleBackground(Color.Yellow); // 弹窗标题背景色7. 关键样式设置
List({ scroller: this.scroller }).sticky(StickyStyle.Header) // 分组标题粘性显示.scrollBar(BarState.Off) // 隐藏滚动条AlphabetIndexer(...).offset({ x: 0, y: -100 }) // 调整位置避免遮挡8. 快速回到顶部
Text("通讯录").onClick(() => {this.scroller.scrollToIndex(0, true); // 滚动到第一个位置
});
9. 完整交互流程
- 页面加载:显示所有联系人分组
- 滚动列表:
onScrollIndex→activeIndex更新 → 索引器高亮 - 点击字母:
onSelect→scrollToIndex→ 列表跳转 - 弹窗反馈:操作时显示当前选中字母
- 回到顶部:点击标题 →
scrollToIndex(0)
10. 关键技术点
- 双向绑定:
$$this.activeIndex实现状态同步 - 滚动控制:
Scroller对象精确控制滚动 - 分组显示:
ListItemGroup实现分组列表 - 粘性头部:
.sticky(StickyStyle.Header)提升体验 - 随机颜色:动态生成增加视觉区分度
11. 常见问题
Q: 为什么用@State activeIndex?
A: 响应式状态,变化时 UI 自动更新,实现左右联动
Q: 如何实现平滑滚动?
A: scrollToIndex(index, true) 第二个参数 true
Q: 双向绑定怎么工作?
A: $$符号,activeIndex 变化时索引器自动更新,点击索引器时触发 onSelect
通讯录全部代码:
// 定义联系人数据结构 - 每个字母分组包含首字母和对应的联系人列表
interface ContactData {initial: string    // 首字母,如 'A', 'B', 'C'nameList: string[] // 该字母下的联系人列表
}@Entry
@Component
struct Page09_ContactAndAlpha {// 联系人数据 - 按字母A-Z分组存储,便于后续的字母索引和分组显示// 注意:这里不需要@State,因为数据不会动态变化,只是用来渲染contacts: ContactData[] = [{ initial: 'A', nameList: ['阿猫', '阿狗', '阿虎', '阿龙', '阿鹰', '阿狼', '阿豹', '阿狮', '阿象', '阿鲸'] },{ initial: 'B', nameList: ['白兔', '白鸽', '白鹤', '白鹭', '白狐', '白狼', '白虎', '白鹿', '白蛇', '白马'] },{ initial: 'C', nameList: ['春花', '春风', '春雨', '春草', '春柳', '春燕', '春莺', '春蝶', '春蓝', '春绿'] },{ initial: 'D', nameList: ['冬雪', '冬梅', '冬松', '冬竹', '冬云', '冬霜', '冬月', '冬夜', '冬青', '冬红'] },{ initial: 'E', nameList: ['饿狼', '饿虎', '饿鹰', '饿豹', '饿熊', '饿蛇', '饿鱼', '饿虾', '饿蟹', '饿蚌'] },{ initial: 'F', nameList: ['飞鸟', '飞鱼', '飞虫', '飞蜂', '飞蝶', '飞蛾', '飞蝉', '飞蝗', '飞鼠', '飞猫'] },{ initial: 'G', nameList: ['孤狼', '孤鹰', '孤虎', '孤豹', '孤蛇', '孤鲨', '孤鲸', '孤鹿', '孤雁', '孤鸿'] },{ initial: 'H', nameList: ['海鸥', '海龟', '海豚', '海星', '海马', '海葵', '海参', '海胆', '海螺', '海贝'] },{ initial: 'I', nameList: ['火焰', '火球', '火箭', '火山', '火车', '火柴', '火把', '火鸟'] },{ initial: 'J', nameList: ['金鱼', '金狮', '金刚', '金鹿', '金蛇', '金鹰', '金豹', '金虎', '金狐', '金猫'] },{ initial: 'K', nameList: ['孔雀', '恐龙', '开心', '开怀', '开朗', '开拓', '开口', '开花', '开眼', '开天'] },{ initial: 'L', nameList: ['老虎', '老鹰', '老鼠', '老狼', '老狗', '老猫', '老熊', '老鹿', '老龟', '老蛇'] },{ initial: 'M', nameList: ['玫瑰', '牡丹', '梅花', '茉莉', '木兰', '棉花', '蜜蜂', '蚂蚁', '马蜂', '蟒蛇'] },{ initial: 'N', nameList: ['南山', '南极', '南海', '南京', '南阳', '南风', '南瓜', '南竹', '南花', '南鸟'] },{initial: 'O',nameList: ['熊猫', '欧鹭', '欧洲', '欧阳', '欧文', '欧若拉', '欧米茄', '欧罗巴', '欧菲莉亚', '欧瑞斯']},{ initial: 'P', nameList: ['苹果', '葡萄', '琵琶', '枇杷', '菩提', '瓢虫', '瓢泼', '飘零', '飘渺', '飘飘然'] },{ initial: 'Q', nameList: ['七喜', '强风', '奇迹', '乾坤', '奇才', '晴天', '青竹', '秋水', '轻舞', '清泉'] },{ initial: 'R', nameList: ['瑞雪', '瑞兽', '瑞光', '瑞云', '瑞彩', '瑞气', '瑞香', '瑞草', '瑞莲', '瑞竹'] },{ initial: 'S', nameList: ['三羊', '三狗', '三猫', '三鱼', '三角', '三鹿', '三鹰', '三蛇', '三狐', '三豹'] },{ initial: 'T', nameList: ['太阳', '天空', '田园', '太极', '太湖', '天鹅', '太空', '天使', '坦克', '甜橙'] },{ initial: 'U', nameList: ['乌鸦', '乌鹊', '乌鱼', '乌龟', '乌云', '乌梅', '乌木', '乌金', '乌黑', '乌青'] },{ initial: 'V', nameList: ['五虎', '五狼', '五鹰', '五豹', '五熊', '五蛇', '五鲨', '五鲸', '五鹿', '五马'] },{ initial: 'W', nameList: ['悟空', '微笑', '温暖', '无畏', '温柔', '舞蹈', '问心', '悟道', '未来', '文学'] },{ initial: 'X', nameList: ['西风', '西洋', '西子', '西施', '西岳', '西湖', '西柚', '西竹', '西花', '西鸟'] },{ initial: 'Y', nameList: ['夜猫', '夜鹰', '夜莺', '夜空', '夜色', '夜月', '夜影', '夜翼', '夜狐', '夜狼'] },{ initial: 'Z', nameList: ['珍珠', '紫薇', '紫霞', '紫竹', '紫云', '紫燕', '紫鸢', '紫藤', '紫荆', '紫罗兰'] },]// 随机颜色生成函数 - 为每个联系人头像生成不同的背景色,增加视觉区分度getRandomColor(): ResourceColor {// 生成 0-255 的随机RGB值const r = Math.floor(Math.random() * 256);const g = Math.floor(Math.random() * 256);const b = Math.floor(Math.random() * 256);// 拼接成半透明的随机颜色并返回return `rgba(${r}, ${g}, ${b}, 0.5)`;}// 字母索引数组 - 提供给AlphabetIndexer组件使用的字母列表alphabets: string[] = ['A', 'B', 'C', 'D', 'E', 'F', 'G', 'H', 'I', 'J', 'K','L', 'M', 'N', 'O', 'P', 'Q', 'R', 'S', 'T', 'U', 'V', 'W', 'X', 'Y', 'Z']// 滚动控制器 - 用于控制列表的滚动行为scroller: Scroller = new Scroller()// 当前激活的索引位置 - 用于字母索引器的状态同步@State activeIndex: number = 0build() {Column() {// 顶部标题栏 - 包含标题和添加按钮Stack({ alignContent: Alignment.End }) {Text('通讯录').width('100%').textAlign(TextAlign.Center).fontSize(20).onClick(() => {// 点击标题回到顶部 - 滚动到第一个位置this.scroller.scrollToIndex(0, true)})Image($r('app.media.ic_public_add')).width(20)}.width('100%').padding(15).backgroundColor('#fff1f3f5')// 搜索区域 - 模拟搜索框Row() {Row() {Image($r('app.media.ic_public_search')).width(20).fillColor(Color.Gray)Text('搜索').fontColor(Color.Gray)}.backgroundColor(Color.White).width('100%').height(40).borderRadius(5).justifyContent(FlexAlign.Center)}.padding(10).width('100%').backgroundColor('#fff1f3f5')// 主要内容区域 - 使用Stack布局,列表和字母索引器重叠Stack({ alignContent: Alignment.End }) {// 联系人列表 - 核心显示区域List({ scroller: this.scroller }) {// 遍历所有字母分组ForEach(this.contacts, (item: ContactData, index: number) => {// 每个字母分组使用ListItemGroup包装ListItemGroup({ header: this.itemHead(item.initial), // 设置分组头部space: 10 }) {// 遍历该分组下的所有联系人ForEach(item.nameList, (it: string, i: number) => {// 每个联系人的列表项ListItem() {Row({ space: 10 }) {// 联系人头像 - 使用随机颜色作为背景Image($r('app.media.ic_public_lianxiren')).width(40).fillColor(this.getRandomColor())// 联系人姓名Text(it)}}})}// 添加分割线美化界面.divider({startMargin: 60,  // 分割线左边距strokeWidth: 1,   // 分割线宽度color: '#ccc'     // 分割线颜色})})}.sticky(StickyStyle.Header)  // 分组标题粘性显示,滚动时粘在顶部.scrollBar(BarState.Off)     // 隐藏滚动条,提供更清爽的界面.onScrollIndex((index) => {// 滚动监听 - 当列表滚动时更新激活索引,实现左右联动this.activeIndex = index})// 字母索引器 - 右侧的字母快速定位工具AlphabetIndexer({ arrayValue: this.alphabets,     // 字母数组selected: $$this.activeIndex    // 双向绑定当前选中索引}).offset({ x: 0, y: -100 })      // 调整位置,避免遮挡内容.usingPopup(true)               // 启用弹窗显示.selectedColor(Color.Red)       // 选中字母的颜色.selectedBackgroundColor(Color.Green) // 选中字母的背景色.popupColor(Color.Red)          // 弹窗内文字颜色.popupBackground(Color.Brown)   // 弹窗背景色.popupTitleBackground(Color.Yellow) // 弹窗标题背景色.onSelect((index) => {// 点击字母时的回调 - 滚动到对应的分组位置this.scroller.scrollToIndex(index)})}}}// 分组头部组件构建器 - 创建每个字母分组的标题显示组件@BuilderitemHead(text: string) {Text(text).fontSize(20).backgroundColor('#fff1f3f5').width('100%').padding(5)}
}