OpenVLA复现
0. 前言
为什么在看过那么多声称更先进的VLA,效果更好的VLA后,还要翻过头来尝试复现一下OpenVLA,首先因为OpenVLA的工作确实带来了相当大的影响,而且为后面的很多VLA都奠定了一定的基础;其次就是后续的很多VLA都会尝试去对比OpenVLA的效果;最后就是他的复现结果多一点,社区经验较为丰富,方便我这种初学者进行学习,没有太多其他复杂功能,整体思路比较明确。
最重要的可能还是学习吧,学习整个一套的流程,包括怎么微调以适应采摘任务,然后尝试使用openvla来应用于自己的特定任务上。
1. 开始复现
1.1 安装环境
conda create -n openvla python=3.10 -y
conda activate openvlaconda install pytorch torchvision torchaudio pytorch-cuda=12.4 -c pytorch -c nvidia -y git clone https://github.com/openvla/openvla.git
cd openvla
pip install -e .pip install packaging ninja
ninja --version; echo $?
pip install "flash-attn==2.5.5" --no-build-isolation
最后一步出现错误:
(openvla) strawberry@strawberry-E500-G9-WS760T:~/zzy/project/openvla$ pip install "flash-attn==2.5.5" --no-build-isolation
Collecting flash-attn==2.5.5Downloading flash_attn-2.5.5.tar.gz (2.5 MB)━━━━━━━━━━━━━━━━━━━━━━━━━━━━━━━━━━━━━━━━ 2.5/2.5 MB 9.1 MB/s eta 0:00:00Preparing metadata (setup.py) ... errorerror: subprocess-exited-with-errorRuntimeError: FlashAttention is only supported on CUDA 11.6 and above.  Note: make sure nvcc has a supported version by running nvcc -V.torch.__version__  = 2.2.0+cu121[end of output]note: This error originates from a subprocess, and is likely not a problem with pip.
error: metadata-generation-failed× Encountered error while generating package metadata.
╰─> See above for output.note: This is an issue with the package mentioned above, not pip.
hint: See above for details.
解决:
链接:https://github.com/Dao-AILab/flash-attention/releases/
下载那个对应python/torch/cuda版本的.whl文件。
查看python版本:python --version
查看torch版本:pip show torch
查看cuda版本:nvidia-smi 、ncvv -V,这两个看的是一个东西吗?
然后手动安装 pip install ./flash_attn-2.5.5+cu12torch2.5cxx11abiFALSE-cp310-cp310-linux_x86_64.whl
这样flash_attn-2.5.5安装是解决了,但是nvcc -V显示的版本是10.1,似乎还是存在问题。
1.2 配置仿真环境
git clone https://github.com/Lifelong-Robot-Learning/LIBERO.git
cd LIBERO
pip install -e .cd ..
pip install -r experiments/robot/libero/libero_requirements.txt
(可选)要下载我们在微调实验中使用的 LIBERO 数据集的修改版本,请运行以下命令。
这将下载 LIBERO-Spatial、LIBERO-Object、LIBERO-Goal 和 LIBERO-10 数据集,格式为 RLDS 数据(总计约 10 GB)。
您可以使用这些数据集来微调 OpenVLA 或训练其他方法。
conda install git-lfs
git lfs install
git clone https://huggingface.co/datasets/openvla/modified_libero_rlds
这一步是可选的,因为我们在下面提供了预训练的 OpenVLA 检查点。如果没有微调需求可以忽略。
我是选择下载了,当然下载会花一段时间(如果光标在闪请耐心等待)。
1.3 启动评估
他们通过 LoRA(r=32)在四个 LIBERO 任务套件上独立微调了 OpenVLA:
LIBERO-Spatial:包含10个任务,侧重于物体空间位置的变化,研究机器人对空间关系的理解和适应能力。
LIBERO-Object:包含10个任务,主要关注操作对象的变化,例如不同形状、大小或类型的物体,以考察机器人对不同物体的操作和认知能力。
LIBERO-Goal:包含10个任务,着重于任务目标的改变,检验机器人在不同目标下的规划和执行能力。
LIBERO-100:由100个任务组成,其中LIBERO-90和LIBERO-10可分别用于预训练和评估长期学习性能,涵盖更广泛的任务类型和变化,全面评估机器人的终身学习能力。
这四个检查点可在 Hugging Face 上获取:
- openvla/openvla-7b-finetuned-libero-spatial
- openvla/openvla-7b-finetuned-libero-object
- openvla/openvla-7b-finetuned-libero-goal
- openvla/openvla-7b-finetuned-libero-10
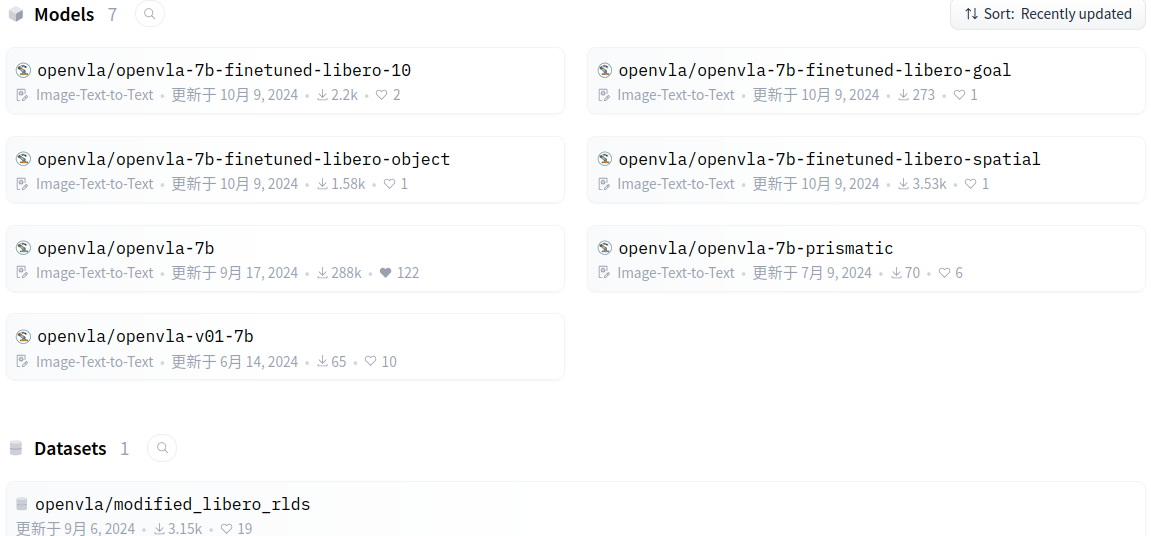 前四个都是数据集模型版本,没后缀那个就是最终版,也是下载次数最多的。
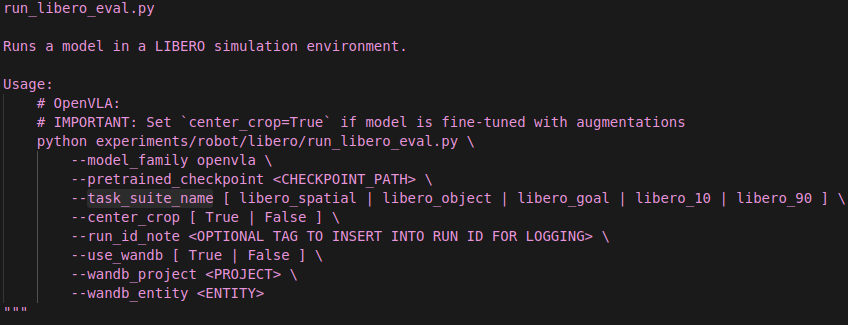
不过官方提供了对应的脚本,要使用这些检查点之一开始评估,请运行以下命令之一。每个命令都会自动下载上面列出的相应检查点。
# 启动 LIBERO-Spatial 评估
python experiments/robot/libero/run_libero_eval.py \--model_family openvla \--pretrained_checkpoint openvla/openvla-7b-finetuned-libero-spatial \--task_suite_name libero_spatial \--center_crop True# 启动 LIBERO-Object 评估
python experiments/robot/libero/run_libero_eval.py \--model_family openvla \--pretrained_checkpoint openvla/openvla-7b-finetuned-libero-object \--task_suite_name libero_object \--center_crop True# 启动 LIBERO-Goal 评估
python experiments/robot/libero/run_libero_eval.py \--model_family openvla \--pretrained_checkpoint openvla/openvla-7b-finetuned-libero-goal \--task_suite_name libero_goal \--center_crop True# 启动 LIBERO-10 (LIBERO-Long) 评估
python experiments/robot/libero/run_libero_eval.py \--model_family openvla \--pretrained_checkpoint openvla/openvla-7b-finetuned-libero-10 \--task_suite_name libero_10 \--center_crop True
- 评估脚本默认运行 500 次试验(10 个任务 × 每个任务 50 次)。您可以通过设置 --num_trials_per_task 来修改每个任务的试验次数。您也可以通过 --seed 更改随机种子。
- 注意:设置 --center_crop True 很重要,因为我们使用随机裁剪增强来微调 OpenVLA(我们在每个训练样本中随机裁剪 90% 的区域,所以在测试时我们简单地取中心 90% 的裁剪)。
- 评估脚本在本地记录结果。您也可以通过设置 --use_wandb True 并指定 --wandb_project 和 --wandb_entity
在 Weights & Biases 中记录结果。 - 我们论文中报告的结果是使用 Python 3.10.13、PyTorch 2.2.0、transformers 4.40.1 和 flash-attn 2.5.5
在 NVIDIA A100 GPU 上获得的,取三个随机种子的平均值。请坚持使用这些包版本。请注意,如果您使用不同的 GPU 进行评估,结果可能会略有不同,这是由于大型模型中的 GPU 非确定性(不过我们已经测试过,在使用 A100 GPU 的不同机器上结果是一致的)。
LIBERO-Spatial 评估:
我先来试试第一个:
python experiments/robot/libero/run_libero_eval.py \--model_family openvla \--pretrained_checkpoint openvla/openvla-7b-finetuned-libero-spatial \--task_suite_name libero_spatial \--center_crop True
默认要进行500次episodes,10个任务,每个任务50次,如果觉得太多的话可以–num_trials_per_task 来修改每个任务的试验次数(建议修改成10-20就可以了,50确实太多了,我跑了好久)。
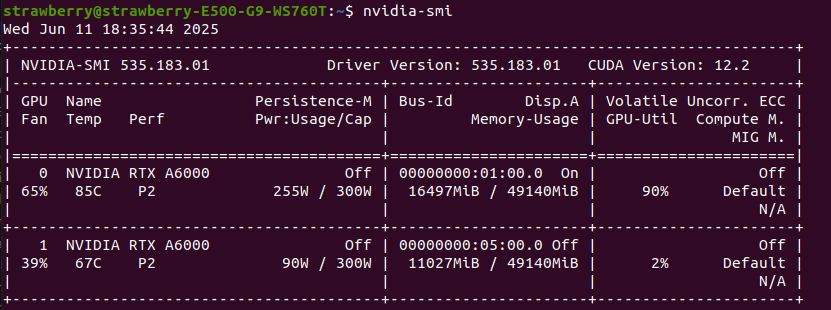
如下是评估时的显存占用,除去一些其他内容,基本与论文说明符合。
这是评估过程的演示:
Task: pick up the black bowl from table center and place it on the plate | 47/50 [30:15<01:40, 33.48s/it]
Starting episode 48...
huggingface/tokenizers: The current process just got forked, after parallelism has already been used. Disabling parallelism to avoid deadlocks...
To disable this warning, you can either:- Avoid using `tokenizers` before the fork if possible- Explicitly set the environment variable TOKENIZERS_PARALLELISM=(true | false)
Saved rollout MP4 at path ./rollouts/2025_06_11/2025_06_11-17_13_56--episode=148--success=True--task=pick_up_the_black_bowl_from_table_center_and_place.mp4
Success: True
# episodes completed so far: 148
# successes: 127 (85.8%)
评估过程中在openvla/experiments/logs 里有详细的日志输出,这是最后一条:
Task: pick up the black bowl on the wooden cabinet and place it on the plate
Starting episode 50...
Saved rollout MP4 at path ./rollouts/2025_06_11/2025_06_11-17_13_56--episode=500--success=False--task=pick_up_the_black_bowl_on_the_wooden_cabinet_and_p.mp4
Success: False
episodes completed so far: 500
successes: 424 (84.8%)
Current task success rate: 0.74
Current total success rate: 0.848
让我们来分析一下:
10个任务,每个任务50轮,最终的成功率是84.8%,与论文中声称的相符,每个任务的成功率都不同:
任务1:pick up the black bowl between the plate and the ramekin and place it on the plate,成功率0.84
任务2:pick up the black bowl next to the ramekin and place it on the plate,成功率0.9
任务3:pick up the black bowl from table center and place it on the plate,成功率0.84
任务4:pick up the black bowl on the cookie box and place it on the plate,成功率0.96
任务5:pick up the black bowl in the top drawer of the wooden cabinet and place it on the plate,成功率0.78
任务6:pick up the black bowl on the ramekin and place it on the plate,成功率0.94
任务7:pick up the black bowl next to the cookie box and place it on the plate,成功率0.9
任务8:pick up the black bowl on the stove and place it on the plate,成功率0.78
任务9:pick up the black bowl next to the plate and place it on the plate,成功率0.8
任务10: pick up the black bowl on the wooden cabinet and place it on the plate,成功率0.74
其他的也直接用上面的命令行就可以评估了。
2. 如何应用到自己的任务上
想要应用到自己的任务上,如要要开箱即用的话,应该仿照上面评估的流程,而且得用那个7B的没在libero数据集上微调过的模型,我们来拆解一下他的评估脚本:
以spatial为例子
python experiments/robot/libero/run_libero_eval.py \--model_family openvla \--pretrained_checkpoint openvla/openvla-7b-finetuned-libero-spatial \--task_suite_name libero_spatial \--center_crop True
-
python experiments/robot/libero/run_libero_eval.py
这是主评估脚本,负责加载模型、数据集,并运行评估流程。 -
–model_family openvla
指定模型家族,这里用的是 OpenVLA。如果你用自己的模型,可能需要修改为你的模型家族名(比如自定义的模型结构)。 -
–pretrained_checkpoint openvla/openvla-7b-finetuned-libero-spatial
指定要加载的预训练模型权重,可以是 Hugging Face 上的模型名,也可以是本地路径。如果你有自己的微调模型,替换为你自己的 checkpoint 路径或 Hugging Face 仓库名。 -
–task_suite_name libero_spatial
指定评估的任务套件(task suite),如 libero_spatial、libero_object 等。如果你有自定义任务集,需要将你的任务数据整理成类似的格式,并在代码中注册你的任务套件。你可以参考 LIBERO 的数据格式(RLDS),并在脚本或配置文件中添加你的任务套件名。
我们想用openvla去评估其他任务,model_family 不用改,pretrained_checkpoint 要改成 openvla/openvla-7b,这就会从官网自动下载这个模型了,重点就是 task_suite_name,目前脚本只支持 libero_spatial、libero_object、libero_goal、libero_10、libero_90 这5种 LIBERO 官方任务套件。
所以好像继续不了了。
2.2
现在是2025.7.30,距离上述OpenVLA的复现已经过去了将近2个月,目前发现:
- 可以在gr00t1.5环境中,利用gr00t脚本启动推理serve
- 利用leisaac的脚本调用这个服务,从而实现在仿真环境中的推理
如果这些工作可以延展到启动各种VLA的推理服务,各种任务场景调用推理,那无疑是令人兴奋的。
所以需要对leisaac的代码进行研究,看看他是怎么做到的。