鸿蒙网络编程系列58-仓颉版TLS数字证书查看及验签示例
1. TLS数字证书验签简介
数字证书的签名验证是网络编程中一个重要的功能,它保证了数字证书是由可信任的签发方签署的,在此基础上,我们才可以信任该证书,进而信任基于该证书建立的安全通道,所以说,数字证书的真实性是通讯安全的基石,了解数字证书验签的原理和方法,有助于我们建立安全的通讯。
一般来说,用户数字证书的来源是这样的:
- 首先,由受信任的根证书颁发机构生成根证书,这是数字证书信任链的起源;
- 其次,根证书颁发机构使用根证书签发中间证书,因为根证书的安全级别非常高,使用程序非常繁琐,轻易不使用,所以一般使用中间证书做为签发证书;
- 最后,使用中间证书签发用户数字证书。
本文将通过一个示例演示数字证书内容的查看方法以及如何对一个数字证书进行验签,本示例将使用仓颉语言在API17的环境下编写,下面是详细的演示过程。
2. TLS数字证书查看及验签演示
要进行数字证书的验签,需要提前准备根证书、中间证书和用户证书,为方便起见,这里使用百度的数字证书及其签发证书,获取证书的步骤如下:
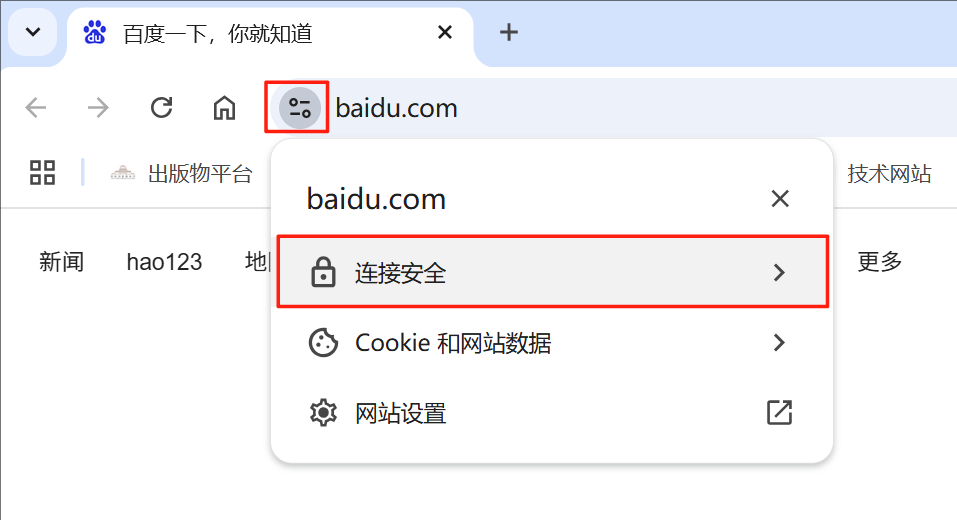
- 首先,打开百度网站,单击地址栏前的图标,会弹出下拉菜单,如图所示:
- 然后,单击“连接安全”菜单项,弹出安全菜单,如图所示:
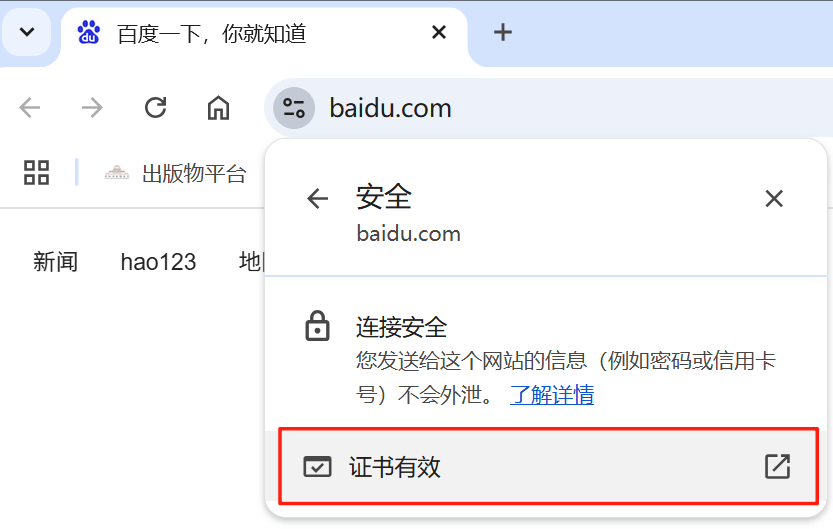
- 接着,单击“证书有效”菜单项,弹出证书信息,进入详细信息页面,如图所示:
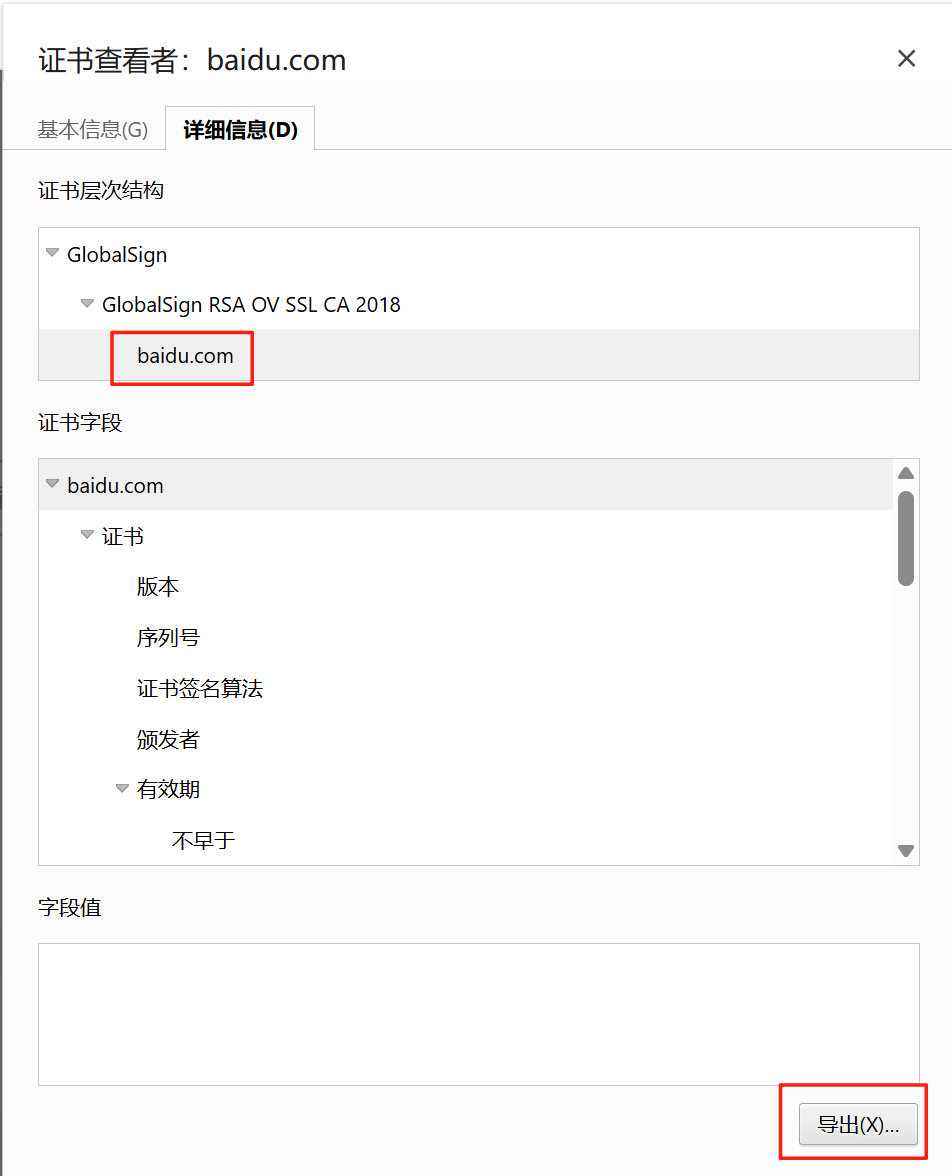
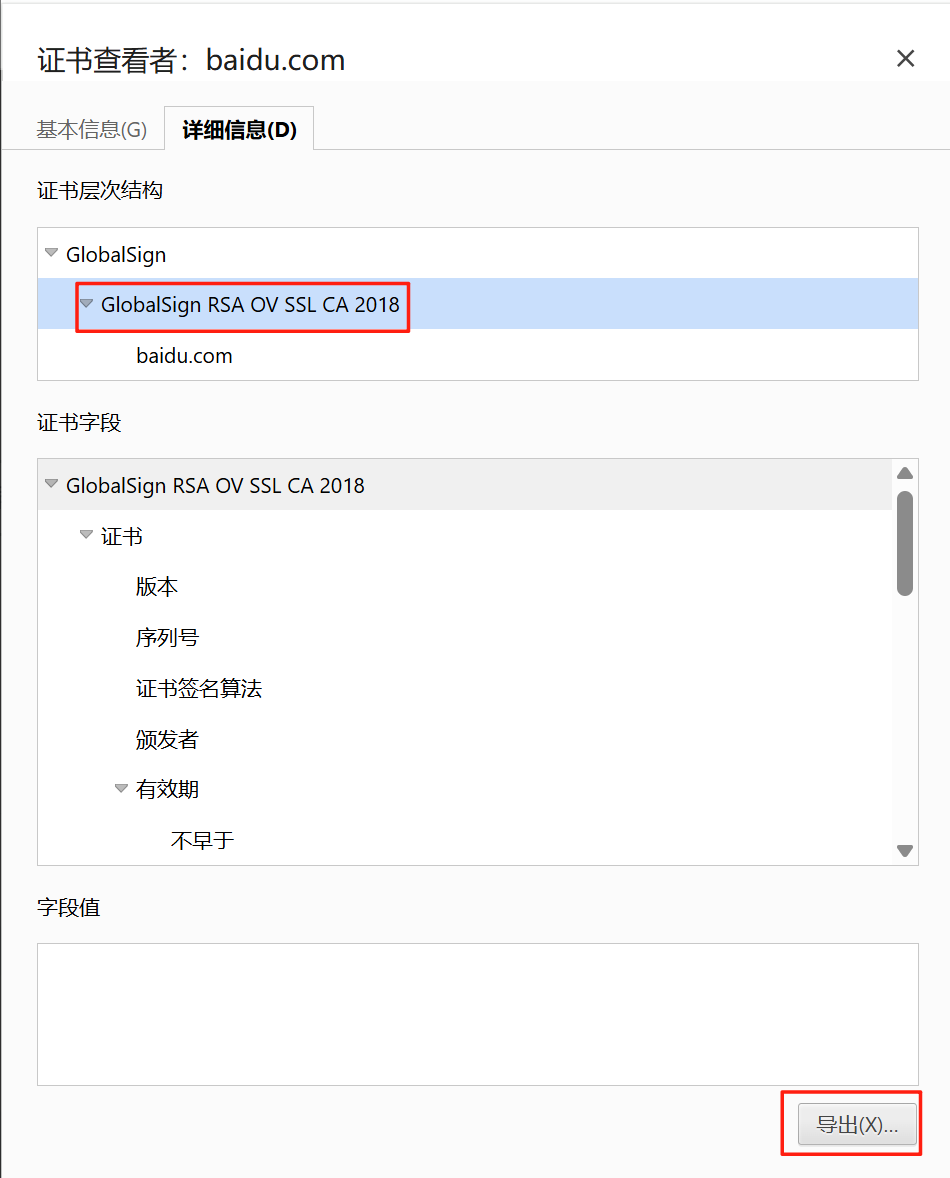
- 在证书层次结构那里选择 baidu.com,然后单击下面的“导出”按钮,即可导出百度的用户证书。然后在证书层次结构那里选择“GlobalSign RSA OV SSL CA 2018”,单击下面的“导出”按钮,即可导出中间证书,如图所示。依次也可以导出根证书。这些证书需要预先上传到手机上。
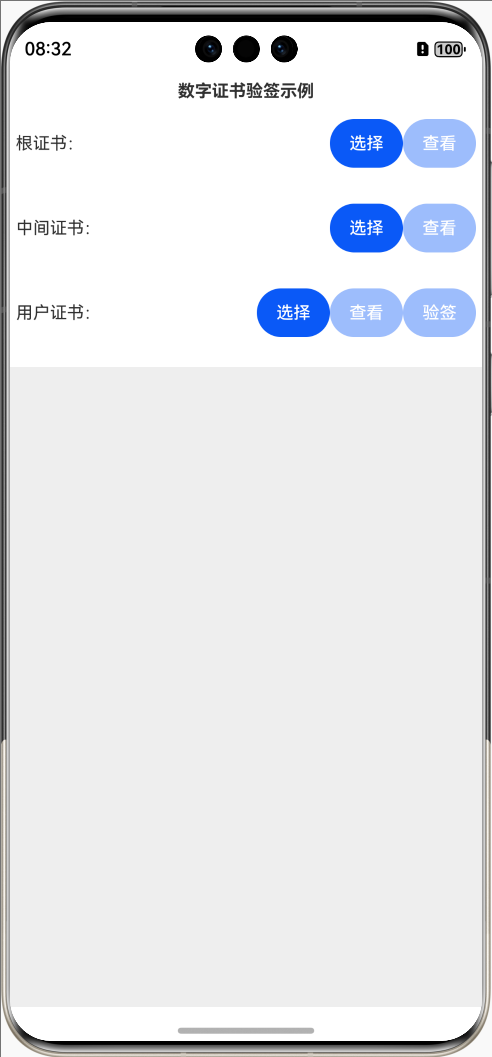
本应用打开的初始界面如图所示:
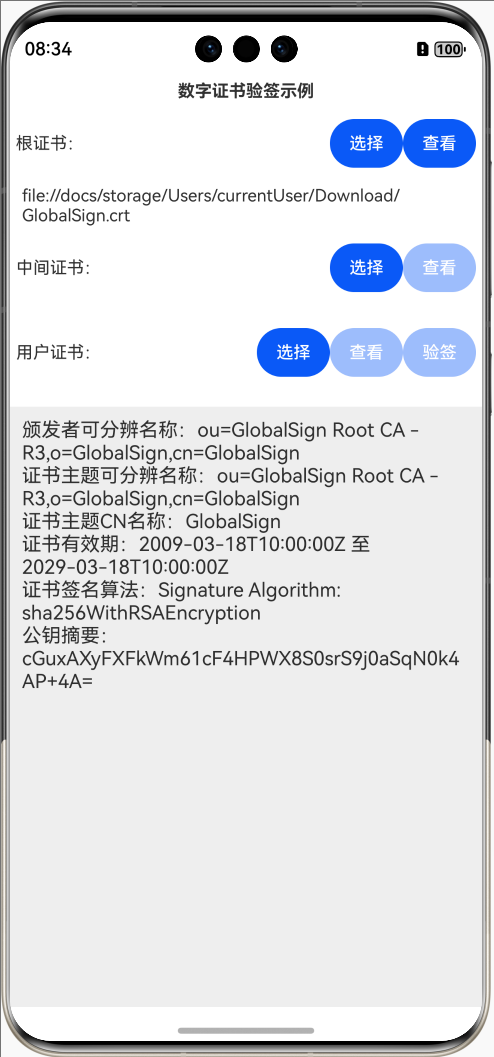
单击根证书后的“选择”按钮,弹出文件选择窗口,如图所示:

从中选择对应的根证书,返回界面后单击“查看”按钮,效果如图所示:
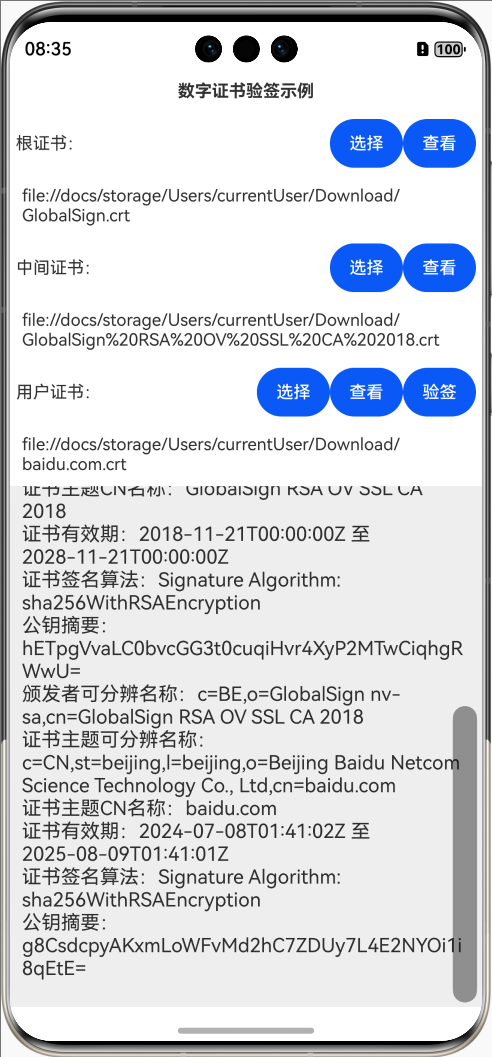
然后可以选择中间证书和用户证书,如图所示
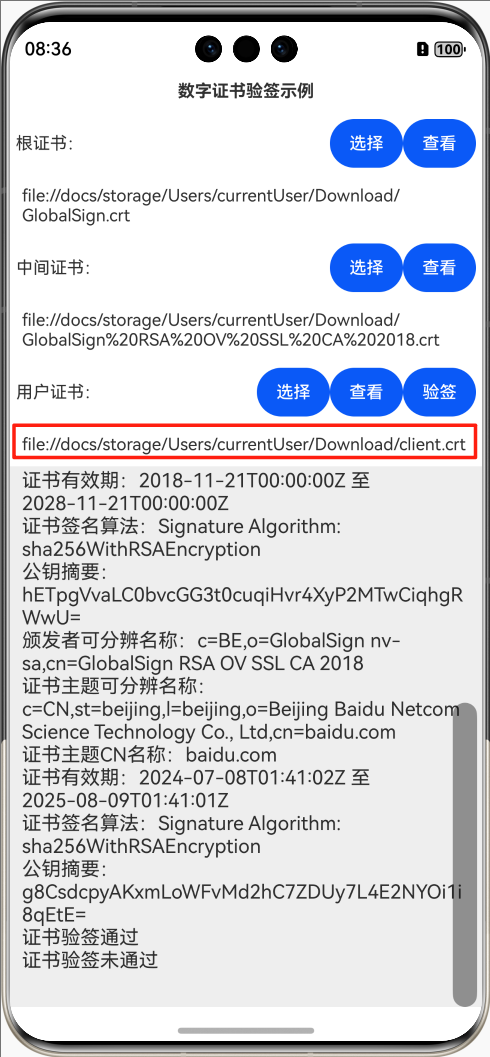
此时单击“验签”按钮,可以查看验签结果,如图所示:

如果把用户证书更换成其他的证书,然后再进行验签,会发现验签不通过,如图所示:
3. TLS数字证书查看及验签示例编写
下面详细介绍创建该示例的步骤(确保DevEco Studio已安装仓颉插件)。
步骤1:创建[Cangjie]Empty Ability项目。
步骤2:在module.json5配置文件加上对权限的声明:
"requestPermissions": [{"name": "ohos.permission.INTERNET"}]
这里添加了访问互联网的权限。
步骤3:在build-profile.json5配置文件加上仓颉编译架构:
"cangjieOptions": {"path": "./src/main/cangjie/cjpm.toml","abiFilters": ["arm64-v8a", "x86_64"]}
步骤4:在main_ability.cj文件里添加如下的代码:
package ohos_app_cangjie_entryinternal import ohos.base.AppLog
internal import ohos.ability.AbilityStage
internal import ohos.ability.LaunchReason
internal import cj_res_entry.app
import ohos.ability.*//Ability全局上下文
var globalAbilityContext: Option<AbilityContext> = Option<AbilityContext>.None
class MainAbility <: Ability {public init() {super()registerSelf()}public override func onCreate(want: Want, launchParam: LaunchParam): Unit {AppLog.info("MainAbility OnCreated.${want.abilityName}")globalAbilityContext = Option<AbilityContext>.Some(this.context)match (launchParam.launchReason) {case LaunchReason.START_ABILITY => AppLog.info("START_ABILITY")case _ => ()}}public override func onWindowStageCreate(windowStage: WindowStage): Unit {AppLog.info("MainAbility onWindowStageCreate.")windowStage.loadContent("EntryView")}
}
步骤5:在index.cj文件里添加如下的代码:
package ohos_app_cangjie_entryimport ohos.base.*
import ohos.component.*
import ohos.state_manage.*
import ohos.state_macro_manage.*
import ohos.file_picker.*
import ohos.ability.*
import ohos.file_fs.*
import crypto.x509.*
import ohos.crypto.*
import encoding.base64.toBase64String@Observed
//证书选择状态
class CertFileSelectStatus {@Publishpublic var certFileSelected: Bool = false@Publishpublic var certFileUri: String = ""
}@Entry
@Component
class EntryView {@Statevar title: String = '数字证书验签示例';//连接、通讯历史记录@Statevar msgHistory: String = ''//根证书选择状态@Statevar rootCertStatus: CertFileSelectStatus = CertFileSelectStatus()//中间证书选择状态@Statevar middleCertStatus: CertFileSelectStatus = CertFileSelectStatus()//用户证书选择状态@Statevar userCertStatus: CertFileSelectStatus = CertFileSelectStatus()let scroller: Scroller = Scroller()func build() {Row {Column {Text(title).fontSize(14).fontWeight(FontWeight.Bold).width(100.percent).textAlign(TextAlign.Center).padding(10)Flex(FlexParams(justifyContent: FlexAlign.Start, alignItems: ItemAlign.Center)) {Text("根证书:").fontSize(14).width(90).flexGrow(1)Button("选择").onClick {evt => selectCertFile(this.rootCertStatus)}.width(60).fontSize(14)Button("查看").onClick {evt =>let cert = getCert(rootCertStatus.certFileUri)showCertInfo(cert)}.width(60).fontSize(14).enabled(rootCertStatus.certFileSelected)}.width(100.percent).padding(5)Text(rootCertStatus.certFileUri).fontSize(14).width(100.percent).padding(10)Flex(FlexParams(justifyContent: FlexAlign.Start, alignItems: ItemAlign.Center)) {Text("中间证书:").fontSize(14).width(90).flexGrow(1)Button("选择").onClick {evt => selectCertFile(this.middleCertStatus)}.width(60).fontSize(14)Button("查看").onClick {evt =>let cert = getCert(middleCertStatus.certFileUri)showCertInfo(cert)}.width(60).fontSize(14).enabled(middleCertStatus.certFileSelected)}.width(100.percent).padding(5)Text(middleCertStatus.certFileUri).fontSize(14).width(100.percent).padding(10)Flex(FlexParams(justifyContent: FlexAlign.Start, alignItems: ItemAlign.Center)) {Text("用户证书:").fontSize(14).width(90).flexGrow(1)Button("选择").onClick {evt => selectCertFile(this.userCertStatus)}.width(60).fontSize(14)Button("查看").onClick {let cert = getCert(userCertStatus.certFileUri)showCertInfo(cert)}.width(60).fontSize(14).enabled(userCertStatus.certFileSelected)Button("验签").onClick {evt => verifyCert()}.width(60).fontSize(14).enabled(rootCertStatus.certFileSelected && userCertStatus.certFileSelected && middleCertStatus.certFileSelected)}.width(100.percent).padding(5)Text(userCertStatus.certFileUri).fontSize(14).width(100.percent).padding(10)Scroll(scroller) {Text(msgHistory).textAlign(TextAlign.Start).padding(10).width(100.percent).backgroundColor(0xeeeeee)}.align(Alignment.Top).backgroundColor(0xeeeeee).height(300).flexGrow(1).scrollable(ScrollDirection.Vertical).scrollBar(BarState.On).scrollBarWidth(20)}.width(100.percent).height(100.percent)}.height(100.percent)}//选择证书文件func selectCertFile(certFileStatus: CertFileSelectStatus) {let picker = DocumentViewPicker(getContext())let documentSelectCallback = {errorCode: Option<AsyncError>, data: Option<Array<String>> => match (errorCode) {case Some(e) => msgHistory += "选择失败,错误码:${e.code}\r\n"case _ => match (data) {case Some(value) =>certFileStatus.certFileUri = value[0]certFileStatus.certFileSelected = truecase _ => ()}}}picker.select(documentSelectCallback, option: DocumentSelectOptions(selectMode: DocumentSelectMode.MIXED))}//使用签发证书验证用户证书func verifyCert() {try {let caCert: X509Certificate = getCert(rootCertStatus.certFileUri)let middleCert: X509Certificate = getCert(middleCertStatus.certFileUri)let userCert: X509Certificate = getCert(userCertStatus.certFileUri)var verifyOpt: VerifyOption = VerifyOption()verifyOpt.roots = [caCert]verifyOpt.intermediates = [middleCert]let result = userCert.verify(verifyOpt)if (result) {msgHistory += "证书验签通过\r\n"} else {msgHistory += "证书验签未通过\r\n"}} catch (err: Exception) {msgHistory += "验签异常:${err.message}\r\n"}}//获取数字证书func getCert(certPath: String) {let fileName = getFileNameFromPath(certPath)let file = FileFs.open(certPath)//构造证书在沙箱cache文件夹的路径let realUrl = getContext().filesDir.replace("files", "cache") + "/" + fileName//复制证书到沙箱给定路径FileFs.copyFile(file.fd, realUrl)//关闭文件FileFs.close(file)//从沙箱读取证书文件信息let certContent = FileFs.readText(realUrl)return X509Certificate.decodeFromPem(certContent)[0]}//输出证书信息func showCertInfo(cert: X509Certificate) {try {this.msgHistory += "颁发者可分辨名称:${ cert.issuer}\r\n"this.msgHistory += "证书主题可分辨名称:${ cert.subject}\r\n"this.msgHistory += "证书主题CN名称:${ cert.subject.commonName.getOrThrow()}\r\n"this.msgHistory += "证书有效期:${ cert.notBefore} 至${ cert.notAfter}\r\n"this.msgHistory += "证书签名算法:${ cert.signatureAlgorithm}\r\n"let keyHash = getPubKeyHash(cert)this.msgHistory += "公钥摘要:${ keyHash}\r\n"} catch (err: Exception) {msgHistory += "出现异常:${err.message}\r\n"}}//获取证书的公钥摘要func getPubKeyHash(cert: X509Certificate) {let mdSHA256 = createMd("SHA256")mdSHA256.update(DataBlob(cert.publicKey.encodeToDer().body));//公钥摘要计算结果return toBase64String(mdSHA256.digest().data)}//从文件路径获取文件名称public func getFileNameFromPath(filePath: String) {let segments = filePath.split('/')//文件名称return segments[segments.size - 1]}//获取Ability上下文func getContext(): AbilityContext {match (globalAbilityContext) {case Some(context) => contextcase _ => throw Exception("获取全局Ability上下文异常")}}
}
步骤6:编译运行,可以使用模拟器或者真机。
步骤7:按照本文第2部分“TLS数字证书查看及验签演示”操作即可。
4. 代码分析
本示例中,读取数字证书内容的时候也存在权限的问题,所以也要把选择的数字证书复制到沙箱中,然后从沙箱中读取文件内容,该部分代码在getCert函数中。另外,获取Ability上下文的方式也要注意,首先在main_ability.cj中定义了全局上下文对象globalAbilityContext,然后在onCreate事件中对其赋值,这样在index.cj中就可以通过函数getContext获取该对象了。
(本文作者原创,除非明确授权禁止转载)
本文源码地址:
https://gitee.com/zl3624/harmonyos_network_samples/tree/master/code/tls/CertVerify4Cj
本系列源码地址:
https://gitee.com/zl3624/harmonyos_network_samples