入针点云在皮肤模型上的投影(去除肋骨)
入针点云在皮肤模型上的投影,不考虑去除肋骨
在上一篇总结中,主要介绍了如何求入针点云在皮肤模型上的投影,但是有很大局限:
将目标点p与入针点云上所有点形成的射线与皮肤模型的交点直接投影到zx平面是不行的,因为入针点云不一定在皮肤模型正上方。有可能像下面这样
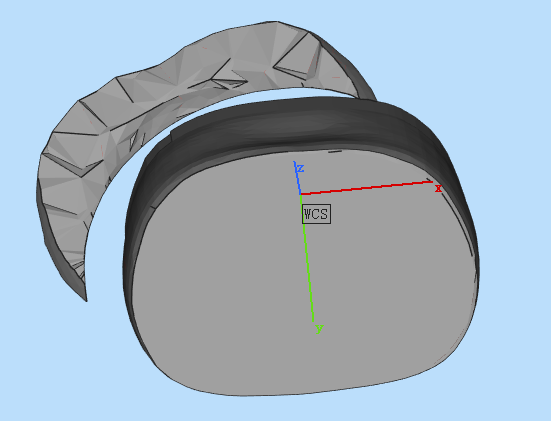
此时再直接将交点向zx平面投影显然是不行的。
所以考虑到入针点云跨度很大时算法依然有效,就需要一种新方法。最后采用方式为在皮肤模型外面构造一个圆柱,求所有的射线在圆柱侧面上的交点。如下图:
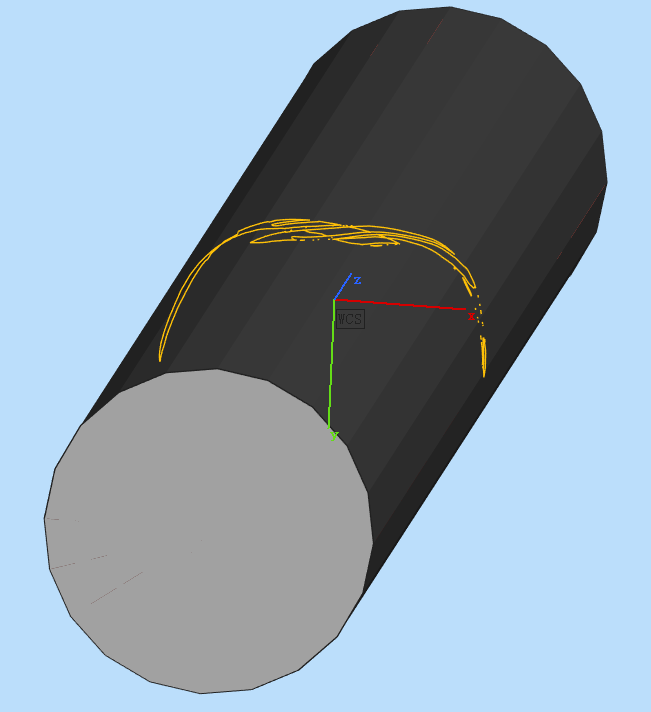
圆柱的中心是皮肤模型的质心。将圆柱侧面展开,相当于把所有交点都平铺到平面上,各个点之间的相对位置保持不变,即平面上求出的边界点映射会空间中的点后依然是边界点。下面是展开原理:
圆柱的参数化:
假设圆柱的半径为
r,高度为h。圆柱的侧面可以通过极坐标系来描述,圆柱的侧面上的每个点
(r, θ, z),其中θ是圆周方向的角度,z是高度方向的坐标。
展开过程:
圆柱侧面展开后,将变成一个矩形。矩形的宽度是圆柱的周长,计算公式为
2 * π * r。矩形的高度等于圆柱的高度
h。
展开坐标计算:
对于圆柱侧面上的每个点
(r, θ, z),可以将其映射到展开后的矩形坐标系上。其中
θ方向映射到矩形的横坐标,z方向映射到矩形的纵坐标。具体映射公式为:
展开后的横坐标:
x = θ * r(这里θ的范围是0到2π),弧长就是横坐标,r应该是一个固定值,不能根据点到原点的距离确定展开后的纵坐标:
y = z(与原始的z高度保持一致)
同一条射线在圆柱上的交点和在皮肤表面的交点差别在于到p的距离不同,可以理解为半径长度不同。但是展开时计算每个点的弧长时所用的半径都是相同的,即一个固定值,所以这么看来我们根本不需要构建圆柱。这里我构建圆柱的原因是用圆柱求与射线的交点所用的时间要比用皮肤模型求与射线的交点所用时间少得多,因为自己构建的圆柱点面数量很少。
捋一下思路:
首先求目标点p与入针点云上所有点形成的射线在圆柱上产生的交点。
将这些交点展平到二维平面上,通过α-shape求解边界点,根据对应关系找到3d空间中的边界点(这里找对应关系只需要用到两个数组)
根据3d空间中的边界点和目标点p构建锥形mesh
将锥形mesh与皮肤模型求交集得到mesh_intersection
利用
ProximityQuery求取mesh_intersection中与皮肤模型贴合的三角面,即得到最终入针点云在皮肤模型上的投影
上面是求取完整投影的思路。
防止构建的锥体顶面塌陷
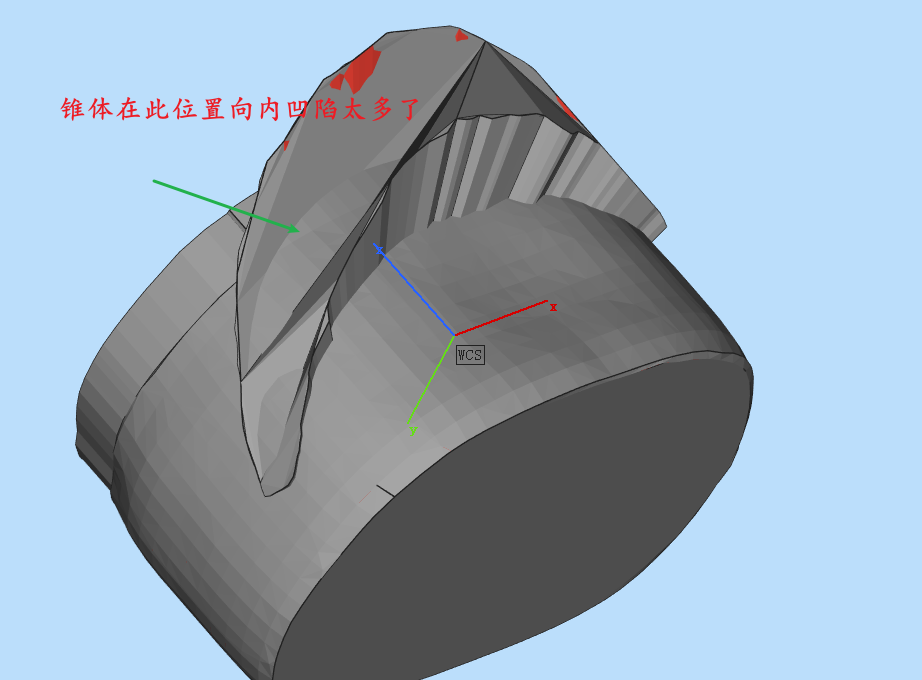
如上图所示,原来构建mesh时,顶面三角化采用的是耳切法,但是耳切法的结果不规则,导致面向下凹陷,如果凹陷的太多,那么与皮肤模型求得的交集是不符合要求的。在原来的方式中,我们构建的是柱形mesh,将边界点的y坐标都平移到特定高度形成上下底面,所以不会产生凹陷。
但是,当前逻辑中是不能构建成柱形mesh的,只有锥形才符合要求。但要解决凹陷问题。
因为对于锥体,我们只需要用到锥体的侧面与其他mesh相交,顶面只要不凹陷下去就行,最终方案如下: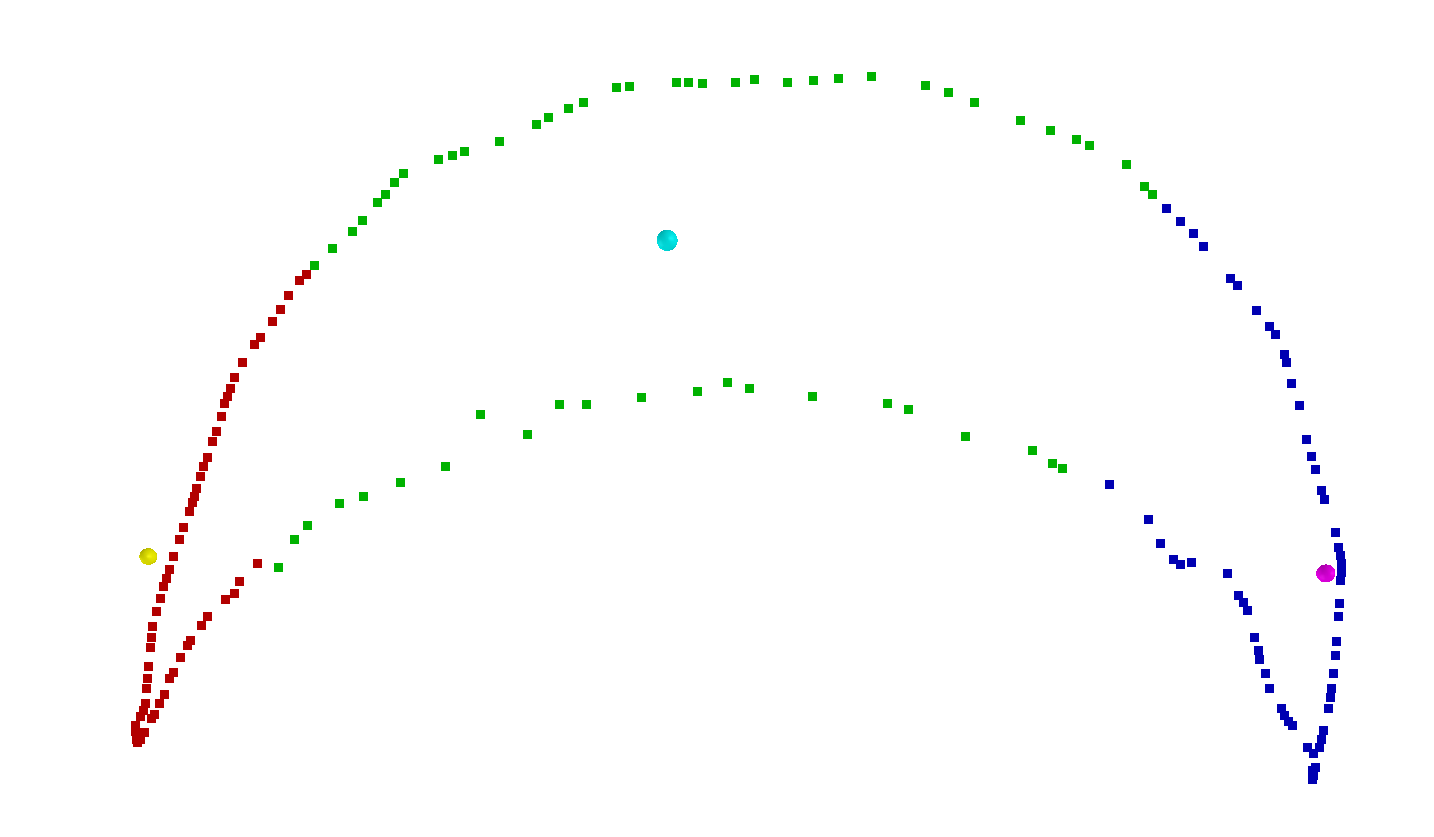
对于交点,按照x坐标分成左中右三部分,对每一部分都求出质心,然后将每部分的边界点与质心构成三角面,最后再对相邻部分的边界点构造三角面完整封闭即可。构成结果如下
通过上面这种方式,是能够解决mesh顶面凹陷问题的。
上面这种分为左中右三部分的方式是有问题的。
在投影上去除肋骨
从皮肤模型上的入针位置到目标点p的路径中是不能经过肋骨的。所以要在上面得到入针点云在皮肤模型上投影上去掉肋骨在其上面的投影。得到最终的结果,例如某个最终结果如下: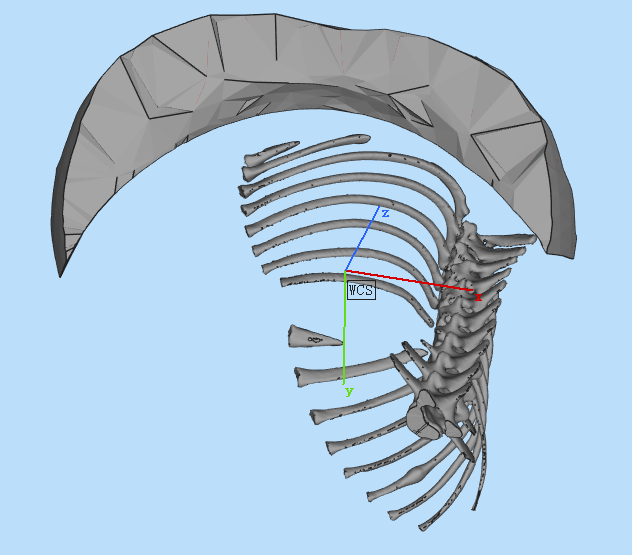

其实这个任务在思路上和上一个求解投影的思路大致是相同的,下面捋一下思路:
首先求出目标点和入针点云上各点形成的射线在圆柱上产生的交点cylinder_intersections_cloud
将交点cylinder_intersections_cloud展平到平面上得到对应的二维点flat_points
利用α-shape方法求解flat_points中的边界点,将这些边界点映射会三维空间,得三维空间边界点boundary_cylinder_points_3d
对边界点boundary_cylinder_points_3d和目标点p构建锥形mesh,记为mesh_cylinder_cone,如图1
求锥形mesh与肋骨mesh_rib的交集m_rib_operated,如图2
求目标点p与处理后肋骨m_rib_operated上所有点形成的射线在圆柱上交点cylinder_intersections_rib
将交点cylinder_intersections_rib展平到二维,利用DBSCAN 进行聚类分簇,求出每一个簇的边界点
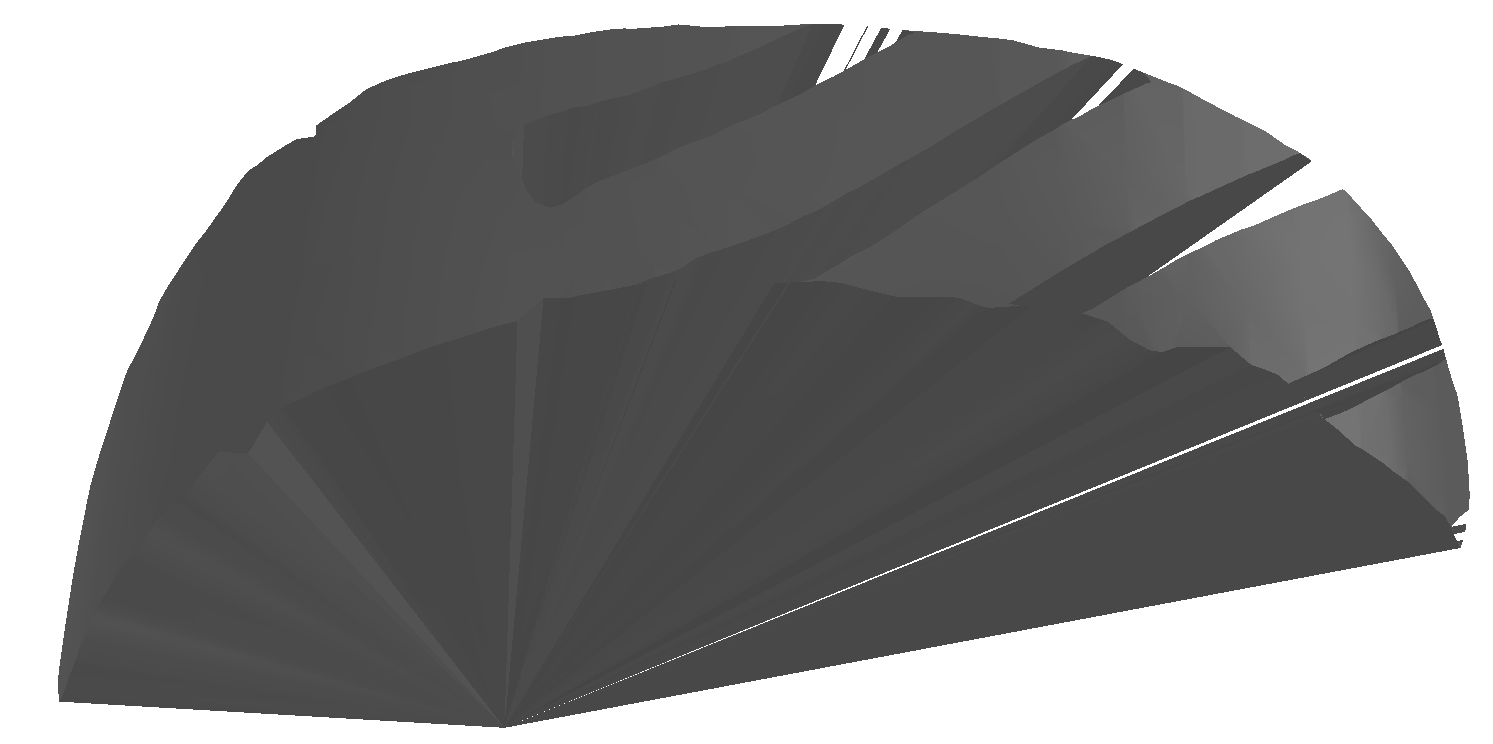
对每一个簇结合目标点p构建锥形mesh。
然后将每个簇形成的mesh与皮肤模型依次求差集,如图3;结果再与mesh_cylinder_cone求交集,就得到最后的mesh,如图4;对这个mesh 我们提取与皮肤模型贴合的表面即可。即得到最终答案。
图1:
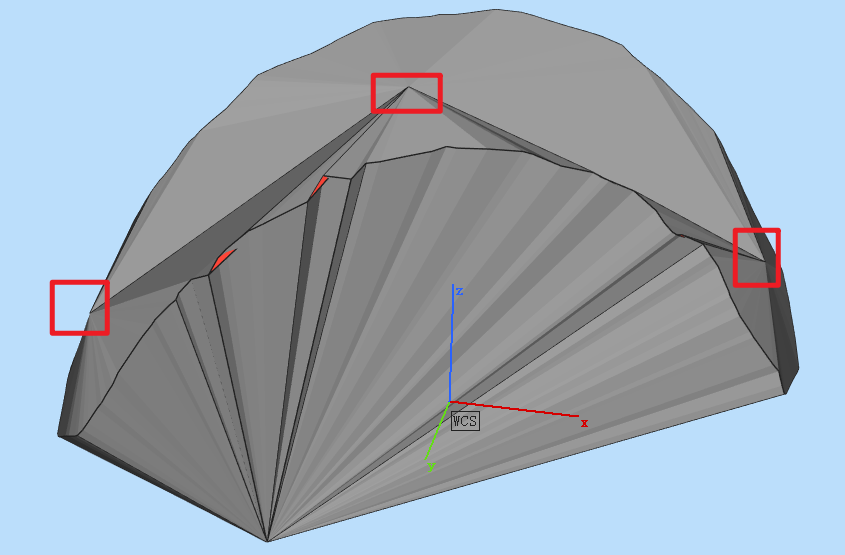
图2:
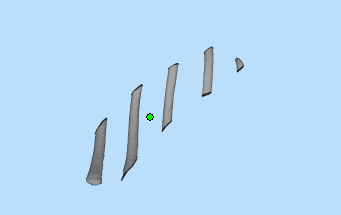
这里得到的肋骨上的点与目标点形成的所有射线与皮肤表面都是有交点的。这一步,简化了求交点时肋骨点的数量,也即减少了射线的数量,速度上有提升。
图3:

图4:
以上就是整体思路,下面介绍具体实现过程中的一些措施:
投影点优化
trimesh对mesh的布尔运算,例如:m_cone.intersection(m_better),该操作的耗时和mesh的点面数量有直接关系,同时也和mesh本身的几何复杂程度有关系。按照经验,对于比较复杂的mesh,相同点面数量的情况下,体积越大,耗时越多。如果mesh结构复杂度很低,例如圆柱,那么mesh的体积几乎没影响。
因为肋骨上点数量特别多,对肋骨进行的操作都比较耗时,例如求交集、求交点等。所采取的措施是在程序运行前降低肋骨的顶点规模:
搜索资料发现简化模型点面数量主要是对stl格式的mesh网格进行处理。我尝试了三种方式:
方式一:通过trimesh的simplify_quadric_decimation函数进行简化,这种方式对结构相对简单的锥体,圆柱那几个mesh进行简化后结果都是满足水密性的,但是对rib简化后并不能满足水密性,且简化后的rib并没有单边。推测原因是因为肋骨模型过于复杂。
方式二:通过PyMeshLab 简化并保持水密性,此方法在简化后不能保存,而且对结果不是水密的。原因不明。
方式三:通过open3d简化,此方法成功对手头上所有mesh进行简化,并保持水密性。但gpt说从原理上来看此方法并不一定保证处理后结果是水密的。
降低顶点规模后设计到肋骨的操作速度都有明显的提升。
即使降低顶点规模,在上面步骤6中求的射线数量依然很多,在求解交点边界时耗时依然很多,决定在求解边界前再次优化,采用提取每个簇的边界网格,效果图如下:
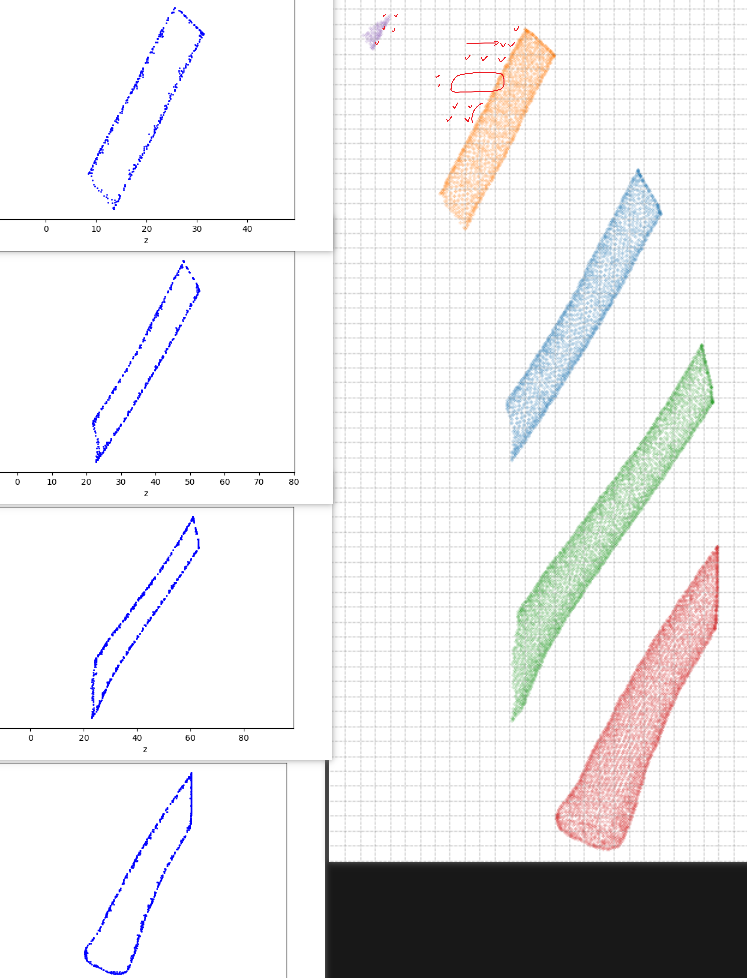
上图左边是提取边界网格后的结果,右边是原本的交点。
原理如下:
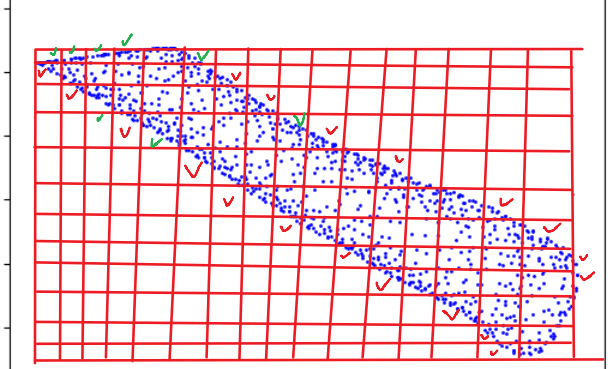
对网格按行扫描,取每一行第一个和最后一个有点的网格;
对网格按列扫描,取每一列第一个和最后一个有点的网格;
此方法关键因素是网格的大小,如果网格太大或者太小,最终处理后网格点数量和原来都差不多。这里设置一个经验值2,如果2对交点来说太小,那么说明交点之间本身距离较大,此时对网格边界提取的必要性也不大。因为点本身数量较少。
全部代码如下:
import numpy as np
import trimesh
from trimesh.proximity import ProximityQuery
import alphashape
# import matplotlib.pyplot as plt
# import mapbox_earcut as earcut
from sklearn.cluster import DBSCANdef load_mesh():# 1. 读入 STLpath_cloud = r'E:\works\mydata\3.入针点云\entry_range_projection\debug_0_reach.stl'# path_cloud = r'debug_0_reach_rotate.stl'# path_cloud = r'debug_0_reach_rotate_right.stl'# path_cloud = r'debug_0_reach_rotate_left_more.stl'path_skin = r'E:\works\mydata\3.入针点云\entry_range_projection\debug_closed_skin.stl'# path_rib_cut = r'm_rib_better_after_operation_no_others.stl'path_rib_cut = r'rib_simplified_open3d_0.3.stl'# path_rib_cut = r'rib_simplified_open3d_0.1.stl'# path_rib_cut = r'm_rib_after_cut.stl'# path_rib_cut = r'MR_FY_6_201_rib_cut.stl'm1 = trimesh.load(path_cloud, force='mesh')m2 = trimesh.load(path_skin, force='mesh')m3 = trimesh.load(path_rib_cut, force='mesh')return m1, m2, m3def build_cylinder(mesh_skin):# 构建圆柱体y_max = np.max(mesh_skin.vertices[:, 1])y_min = np.min(mesh_skin.vertices[:, 1])x_max = np.max(mesh_skin.vertices[:, 0])x_min = np.min(mesh_skin.vertices[:, 0])z_max = np.max(mesh_skin.vertices[:, 2])z_min = np.min(mesh_skin.vertices[:, 2])r_cylinder_small = max(y_max - y_min, x_max - x_min) // 2 + 5height_cylinder = (z_max - z_min) * 10# 构建一个圆柱centroid = np.mean(mesh_skin.vertices[np.unique(mesh_skin.faces)], axis=0)        # 皮肤模型的质心# 构造圆柱体,以z轴为圆柱轴mesh_cylinder = trimesh.creation.cylinder(radius=r_cylinder_small, height=height_cylinder, sections=20)mesh_cylinder.vertices += centroid    # 让圆柱体的体心和皮肤模型的质心重合return mesh_cylinder, centroid, r_cylinder_smalldef get_intersections_on_cylinder(m1, m2, p):# 求p与m1上各点组成的射线与m2的交点# 计算从p指向m1上所有点的方向向量targets = m1.vertices  # shape (N, 3)origins = np.tile(p, (targets.shape[0], 1))  # p作为起点,shape (N, 3)directions = targets - origins  # shape (N, 3)# 归一化方向向量norms = np.linalg.norm(directions, axis=1, keepdims=True)# 防止除零norms[norms == 0] = 1directions = directions / norms# trimesh的ray.intersects_location一次可批量求交# origins: (N, 3), directions: (N, 3)# index_ray_skin[i] = t 表示第t条射线,i表示第i个交点locations_skin, _, _ = m2.ray.intersects_location(ray_origins=origins,ray_directions=directions,multiple_hits=False)return locations_skindef grid_sampling(points, grid_size):# 设定z轴(points[:, 0])和x轴(points[:, 1])的最小值和最大值z_min, z_max = np.min(points[:, 0]), np.max(points[:, 0])x_min, x_max = np.min(points[:, 1]), np.max(points[:, 1])# 根据给定的网格大小生成z和x的网格z_grid = np.arange(z_min, z_max, grid_size)x_grid = np.arange(x_min, x_max, grid_size)# 遍历所有网格,收集每个网格内的点all_grid_points = []# 向量化方式统计每个网格的点数和对应点num_grid = np.zeros((len(z_grid), len(x_grid)), dtype=int)all_grid_points = [[[] for _ in range(len(x_grid))] for _ in range(len(z_grid))]all_grid_indices = [[[] for _ in range(len(x_grid))] for _ in range(len(z_grid))]  # 新增:记录原始下标# 计算每个点属于哪个网格,传进函数的points记录展平后的二维点,在二维上提取交点边界网格之后,# 我们要能够找到边界网格中点在三维中对应的点,所以,下面的操作是为了记录每个点原来的索引z_idx = np.floor((points[:, 0] - z_min) / grid_size).astype(int)x_idx = np.floor((points[:, 1] - x_min) / grid_size).astype(int)# 过滤越界valid_mask = (z_idx >= 0) & (z_idx < len(z_grid)) & (x_idx >= 0) & (x_idx < len(x_grid))z_idx = z_idx[valid_mask]x_idx = x_idx[valid_mask]valid_points = points[valid_mask]valid_indices = np.where(valid_mask)[0]  # 新增:原始下标# print(f'valid_points:{valid_points.shape}')for i in range(len(valid_points)):zi = z_idx[i]xi = x_idx[i]all_grid_points[zi][xi].append(valid_points[i])all_grid_indices[zi][xi].append(valid_indices[i])  # 新增num_grid[zi, xi] += 1# all_grid_points: 每个网格的点的列表,num_grid: 每个网格的点的数量"""这里思路是1、按行遍历每个网格,保留每行第一个和最后一个有点的网格。2、按列遍历每个网格,保留每列第一个和最后一个有点的网格。这两次遍历可以合并到一起,下面的代码是按行遍历,第二个elif完成功能1,第三个elif完成功能2"""ret_indices = []  # 新增:记录原始下标for i in range(len(z_grid)):for j in range(len(x_grid)):if num_grid[i, j] > 0 and (i == 0 or j == 0 or i == len(z_grid) - 1 or j == len(x_grid) - 1):ret_indices.extend(all_grid_indices[i][j])elif num_grid[i,j] > 0 and (num_grid[i,j-1] == 0 or num_grid[i,j+1] == 0):ret_indices.extend(all_grid_indices[i][j])elif num_grid[i,j] > 0 and (num_grid[i-1,j] == 0 or num_grid[i+1,j] == 0):ret_indices.extend(all_grid_indices[i][j])sampled_indices = np.array(ret_indices)  # 新增return sampled_indicesdef unfolding_points(points, centroid, r):# centroid: 质心# r: 圆柱面的半径# 2. 计算每个点的极坐标x, y, z = points[:, 0], points[:, 1], points[:, 2]cx, cy, cz = centroid  # 质心坐标# 计算 r(质心到点的距离)和 theta(相对于 y 轴的角度)theta = np.arctan2(x - cx, y - cy)  # 计算每个点的角度(y轴为极轴)theta = np.where(theta < 0, theta + 2 * np.pi, theta)  # 将负角度转换为 [0, 2π]# 3. 映射到展开平面x_flat = theta * r  # 展开后的横坐标y_flat = z  # 展开后的纵坐标(z坐标保持不变)# flat_points和points中,是一一对应的flat_points = np.stack([x_flat, y_flat], axis=1)return flat_pointsdef get_boundary(points):# 计算Alpha Shape,直接用库函数alpha = 0.1  # 可以根据点的密度调整alphaalpha_shape = alphashape.alphashape(points, alpha)# alpha_shape是shapely.geometry.Polygon或MultiPolygon# 获取多边形的顶点坐标if alpha_shape.is_empty:print("Alpha Shape为空")return []else:# 只取外环if hasattr(alpha_shape, 'exterior'):coords = np.array(alpha_shape.exterior.coords)else:# MultiPolygon,取最大的largest = max(alpha_shape.geoms, key=lambda g: g.area)coords = np.array(largest.exterior.coords)# coords是(N,2),我们要找到这些点在points中的索引# 注意coords最后一个点和第一个点重复(闭合),去掉最后一个coords = coords[:-1]# 计算相邻点的距离,如果距离小于3,则删除后一个点filtered_points = []n = len(coords)i = 0while i < n:filtered_points.append(coords[i])# 检查下一个点是否存在且距离小于1j = i + 1while j < n and np.linalg.norm(coords[j] - coords[i]) < 2:j += 1i = jcoords = np.array(filtered_points)hull_indices = []for c in coords:# 找到与c最近的点索引dists = np.linalg.norm(points - c, axis=1)idx = np.argmin(dists)hull_indices.append(idx)return hull_indicesdef get_boundary_of_clusters(clusters_indices,cylinder_intersections_rib):# 如果这个簇点数量小于50,则直接删除这个簇,因为这个簇太小,构建的锥体没有意义;# 如果大于300,则进行网格采样,小于300,不需要网格采样;# 网格采样目的是为了筛选簇的边界,减少簇的点数量,避免求边界时计算量过大boundary_points_3d = []for label, points_idx in clusters_indices.items():points_2d = flat_points[points_idx]points_3d = cylinder_intersections_rib[points_idx]if len(points_2d) < 50:     # 小于50个点,则过滤掉这个簇continue# print(f'points:{points.shape}')if len(points_2d) > 300:# 这里返回的indices表示采样后的点在flat_points中的索引,通过这个索引可以找到采样后的点在cylinder_small_intersections中对应的点sampled_indices = grid_sampling(points_2d, grid_size=2)     # 网格采样,点过滤,返回过滤后点的索引points_2d = points_2d[sampled_indices]points_3d = cylinder_intersections_rib[points_idx][sampled_indices]hull_indices = get_boundary(points_2d)   # 对2d上顶点求边界              b3d = points_3d[hull_indices]  # 3d上的边界点boundary_points_3d.append(b3d)return boundary_points_3ddef generate_mesh_cone_of_intersection(points_3d, p):# 测试发现耳切法构建的锥体,顶部过于扭曲,不适合。弃用耳切法。# 这里为了防止mesh顶面凹陷,取交点质心,用交点和质心构建三角面,此函数和下面的generate_mesh_cone没有合并# 因为generate_mesh_cone函数中将交点分成左中右三部分,各部分都求一个质心。# 当前函数的交点是目标点p与处理后的肋骨上点形成的射线在圆柱上的交点,每一块肋骨的交点都非常集中,并且范围不大,# 所以对于只需要取一个质心。centroid = np.mean(points_3d, axis=0)all_faces = []# 上部分面for i in range(0, len(points_3d) - 1):a = points_3d[i]b = points_3d[i+1]all_faces.append([a, b, centroid])all_faces.append([points_3d[0], centroid, points_3d[-1]])    # 闭合# 侧面for i in range(0, len(points_3d) - 1):a = points_3d[i]b = points_3d[i+1]all_faces.append([b, a, p])all_faces.append([points_3d[-1], p, points_3d[0]])    # 闭合all_faces = np.array(all_faces)# all_faces是三角面顶点的坐标 (N, 3, 3)# 需要将其转换为mesh的vertices和faces格式# 首先,将所有三角形的顶点合并为一个点集,并去重all_vertices = np.vstack(all_faces)# 去重并获得新索引unique_vertices, inverse_indices = np.unique(all_vertices, axis=0, return_inverse=True)# 重新构建faces索引faces = inverse_indices.reshape((-1, 3))# 创建meshmesh = trimesh.Trimesh(vertices=unique_vertices, faces=faces, process=False)return mesh    def generate_mesh_cone(points_3d, p, centroid, r_cylinder_small):# points_3d: (N, 3) 3d点"""这里为了防止锥体顶面凹陷下去,将边界点按照x坐标分成左中右三部分,对每一部分求出质心,然后每一部分的点与质心构建三角面,最终构建出锥体。(代码中有处理边界点问题,即左中右三部分的边界点)要展平后在按照x坐标等分,不能直接对三维中点进行等分,因为三维中点是曲面上的,完全按照x分会出错。"""flat_points = unfolding_points(points_3d, centroid, r_cylinder_small)x = flat_points[:, 0]x1, x2 = np.percentile(x, [33.33, 66.66])  # 三等分阈值# (~,x1]为part1,(x1,x2]为part2,(x2,~)为part3part1_index = np.where(x <= x1)[0]part2_index = np.where((x > x1) & (x <= x2))[0]part3_index = np.where(x > x2)[0]part1 = points_3d[part1_index]part2 = points_3d[part2_index]part3 = points_3d[part3_index]center1 = np.mean(part1, axis=0)center1[0] += 10    # 将质心向左移动10个单位center2 = np.mean(part2, axis=0)center2[1] -= 10    # 将质心向左移动10个单位center3 = np.mean(part3, axis=0)center3[0] -= 10    # 将质心向右移动10个单位# 用一种新的结构记录points_3d中每个点的坐标,和它所属的part,part用1,2,3来表示# 这里用一个结构化的numpy数组来存储dtype = [('coord', float, (3,)), ('part', int)]points_with_part = np.empty(len(points_3d), dtype=dtype)points_with_part['coord'] = points_3dpoints_with_part['part'] = 0  # 先全部置0points_with_part['part'][part1_index] = 1points_with_part['part'][part2_index] = 2points_with_part['part'][part3_index] = 3all_faces = []# 上侧面length = len(points_3d)for i in range(0, length):a = points_with_part['coord'][i % length]          # a点的坐标b = points_with_part['coord'][(i+1) % length]      # b点的坐标a_part = points_with_part['part'][i % length]      # a点所属的partb_part = points_with_part['part'][(i+1) % length]  # b点所属的partif b_part == 3:all_faces.append([a, b, center3])if a_part == 2:all_faces.append([a, center3, center2])elif b_part == 2:all_faces.append([a, b, center2])if a_part == 3:all_faces.append([a, center2, center3])elif a_part == 1:all_faces.append([a, center2, center1])else:all_faces.append([a, b, center1])if a_part == 2:all_faces.append([a, center1, center2])# 下侧面for i in range(0, len(points_3d) - 1):a = points_3d[i]b = points_3d[i+1]all_faces.append([b, a, p])all_faces.append([points_3d[-1], p, points_3d[0]])    # 闭合all_faces = np.array(all_faces)# all_faces是三角面顶点的坐标 (N, 3, 3)# 需要将其转换为mesh的vertices和faces格式# 首先,将所有三角形的顶点合并为一个点集,并去重all_vertices = np.vstack(all_faces)# 去重并获得新索引unique_vertices, inverse_indices = np.unique(all_vertices, axis=0, return_inverse=True)# 重新构建faces索引faces = inverse_indices.reshape((-1, 3))# 创建meshmesh = trimesh.Trimesh(vertices=unique_vertices, faces=faces, process=False)return meshdef intersection_rib_cone(m_better, m_cone):m_rib = m_cone.intersection(m_better)return m_ribdef get_clusters(zx_points):# 1. 使用 DBSCAN 进行聚类db = DBSCAN(eps=8.0, min_samples=5).fit(zx_points)  # 可调参数labels = db.labels_  # 每个点所属的簇编号,-1 表示噪声点# 2. 分组存储,并记录每个簇中每个点在final_locations中的索引clusters = {}clusters_indices = {}  # 新增:记录每个簇中每个点在final_locations中的索引for i, label in enumerate(labels):if label == -1:continue  # 跳过噪声点clusters.setdefault(label, []).append(zx_points[i])clusters_indices.setdefault(label, []).append(i)  # i即为final_locations中的索引# 3. 转换成 numpy 数组clusters = {label: np.array(points) for label, points in clusters.items()}clusters_indices = {label: np.array(indices) for label, indices in clusters_indices.items()}  # 新增return clusters, clusters_indicesdef get_ans_mesh(all_meshes, mesh_skin, mesh_cylinder_cone):try:mesh_skin_copy = mesh_skin.copy()# 每个簇形成的mesh依次与皮肤模型求差集for mesh in all_meshes:mesh_skin = mesh_skin.difference(mesh)# 结果和圆锥mesh求交集mesh_intersection = mesh_cylinder_cone.intersection(mesh_skin)  # 提取表面# 建立对 mesh_skin 的距离查询器pq = ProximityQuery(mesh_skin_copy)# 获取 mesh_intersection 中每个三角面的中心点face_centers = mesh_intersection.triangles_center  # shape: (N, 3)# 查询这些面中心点到 mesh_skin 的最近距离distances = pq.signed_distance(face_centers)  # shape: (N,)# 选出那些“与 skin 接近”的面,阈值设为 1e-3matched_faces = np.where(np.abs(distances) < 1e-3)[0]# 提取这些面ans_faces = mesh_intersection.faces[matched_faces]ans_mesh = trimesh.Trimesh(vertices=mesh_intersection.vertices,faces=ans_faces,process=False)except Exception as e:print(f"交集布尔运算出错: {e}")return ans_meshif __name__ == '__main__':# 1、读入入针点云,皮肤模型,肋骨模型mesh_cloud, mesh_skin, mesh_rib = load_mesh()  tx, ty, tz = -60.6, 60, -40    # 目标点坐标p = np.array([tx, ty, tz])  # 2、构建圆柱体,传进去皮肤模型,构建圆柱需要用到皮肤模型的信息,返回圆柱和皮肤模型质心, 圆柱底面半径mesh_cylinder, centroid, r_cylinder_small = build_cylinder(mesh_skin)mesh_cylinder.export('cylinder.stl')# 3、求目标点与入针点云上各点形成的射线在圆柱上的交点cylinder_intersections_cloud = get_intersections_on_cylinder(mesh_cloud, mesh_cylinder, p)  # 4、将圆柱上的交点展平到平面,返回的flat_pointsflat_points = unfolding_points(cylinder_intersections_cloud, centroid, r_cylinder_small)# 5、通过α-shape求出这些交点的边界hull_indices = get_boundary(flat_points)                                          # 3d上的边界点boundary_cylinder_points_3d = np.array([cylinder_intersections_cloud[i] for i in hull_indices])# 4、根据边界点boundary_cylinder_points_3d和目标点p构建圆锥型meshmesh_cylinder_cone = generate_mesh_cone(boundary_cylinder_points_3d, p, centroid, r_cylinder_small)    # 5、将圆锥型mesh与肋骨进行交集运算,得到目标区域肋骨m_rib_operated,其上所有点与目标点p形成的射线与圆柱都有交点m_rib_operated = intersection_rib_cone(mesh_rib, mesh_cylinder_cone) # 6、求目标点与m_rib_operated上所有点组成的射线与圆柱的交点cylinder_intersections_rib = get_intersections_on_cylinder(m_rib_operated, mesh_cylinder, p)# 7、将交点展平到平面, 返回的flat_points中点和cylinder_intersections_rib中点一一对应flat_points = unfolding_points(cylinder_intersections_rib, centroid, r_cylinder_small)  # 将3d点展平, 2d# 8、对交点分簇clusters, clusters_indices = get_clusters(flat_points)    # 0.206s# 9、对每个簇求取边界boundary_points_3d = get_boundary_of_clusters(clusters_indices,cylinder_intersections_rib)# 10、对每个簇构建meshall_meshes = []for i in range(len(boundary_points_3d)):p3d = boundary_points_3d[i]mesh = generate_mesh_cone_of_intersection(p3d, p)all_meshes.append(mesh)# 10、对每个簇的mesh,和mesh_skin求差集,结果再和mesh_cylinder_cone求交集,最后提取最终去除肋骨的投影ans_mesh = get_ans_mesh(all_meshes, mesh_skin, mesh_cylinder_cone)    # ans_mesh.export('ans_mesh_lefe_more.stl')# scene = trimesh.Scene()# print(f'ans_mesh:{ans_mesh.vertices.shape}')# print(f'watertight:{ans_mesh.is_watertight}')# scene.add_geometry(ans_mesh)# scene.show()print('结束...')