Mongo索引
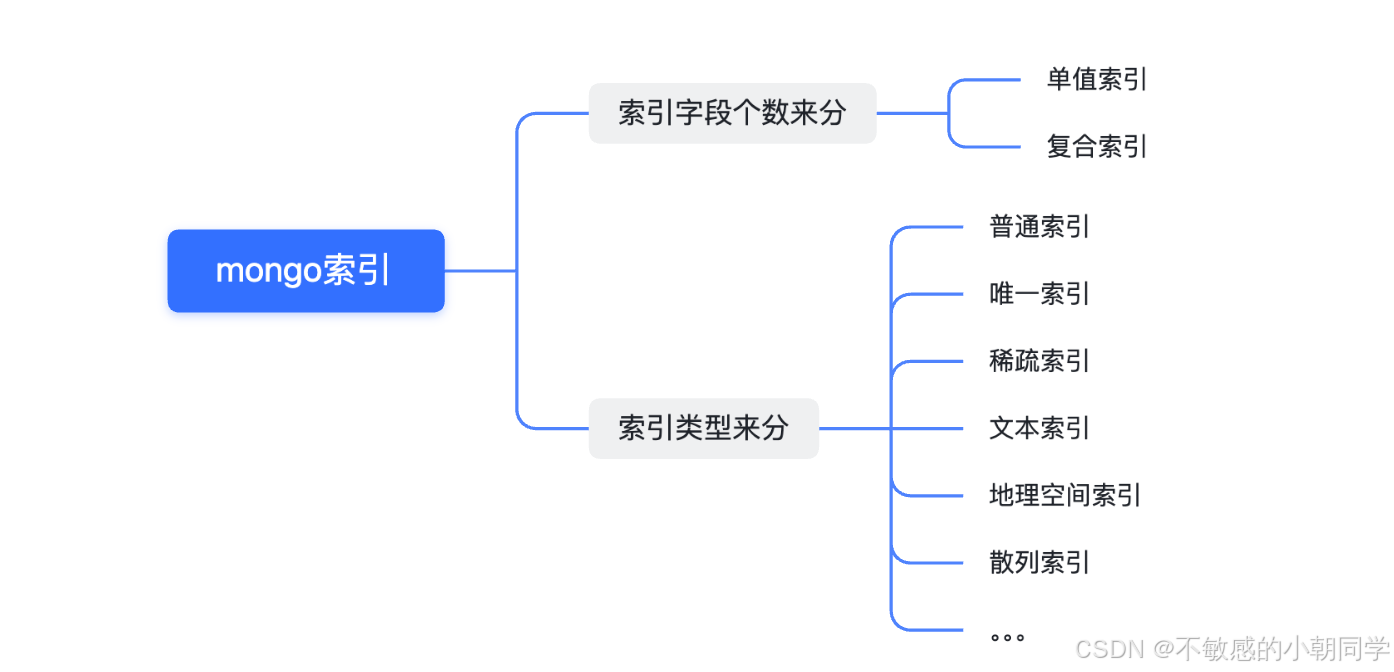
索引种类
Demo
- 先创建 1000w 条有效数据
func generateRandomNumber() int {rand.Seed(time.Now().UnixNano())return rand.Intn(100) + 1
}func generateRandomName() string {// 定义可用的字符集合chars := "abcdefghijklmnopqrstuvwxyzABCDEFGHIJKLMNOPQRSTUVWXYZ"// 设置随机种子rand.Seed(time.Now().UnixNano())// 生成随机名字name := make([]byte, 16)for i := range name {name[i] = chars[rand.Intn(len(chars))]}return string(name)
}type Family struct {FatherName stringMotherName string
}type Student struct {Name   string  `bson:"name"`Age    int     `bson:"age"`Family *Family `bson:"family,omitempty"`
}
func main() {client, err := mongo.NewClient(options.Client().ApplyURI("mongodb://localhost:27017"))if err != nil {panic(err)}ctx, cancel := context.WithTimeout(context.Background(), 100*time.Hour)defer cancel()// 2.连接上数据库if err = client.Connect(ctx); err == nil {fmt.Println("connect to db success")}// 延迟断开连接defer func() {if err = client.Disconnect(ctx); err != nil {panic(err)}}()cli := client.Database("mydb")var insertObjects []any创建100w条数据不包含Family字段for i := 0; i < 1000000; i++ {name := generateRandomName()Age := generateRandomNumber()stu := Student{Name: name,Age:  Age,}insertObjects = append(insertObjects, stu)}创建1k条数据包含Family字段那对Family这个字段的查询就适合使用 稀疏索引 来查询for i := 0; i < 1000; i++ {name := generateRandomName()Age := generateRandomNumber()stu := Student{Name: name,Age:  Age,Family: &Family{FatherName: name + "'father",MotherName: name + "'mother",},}insertObjects = append(insertObjects, stu)}_, err = cli.Collection("student").InsertMany(ctx, insertObjects)if err != nil {panic(err)}
}
- 执行任意查询
db.student.find({name:"SjdpDLawXWnNzGBd"}).explain("executionStats");
输出结果如下
{explainVersion: '1',queryPlanner: {namespace: 'mydb.student',indexFilterSet: false,parsedQuery: { name: { '$eq': 'SjdpDLawXWnNzGBd' } },....maxScansToExplodeReached: false,winningPlan: {
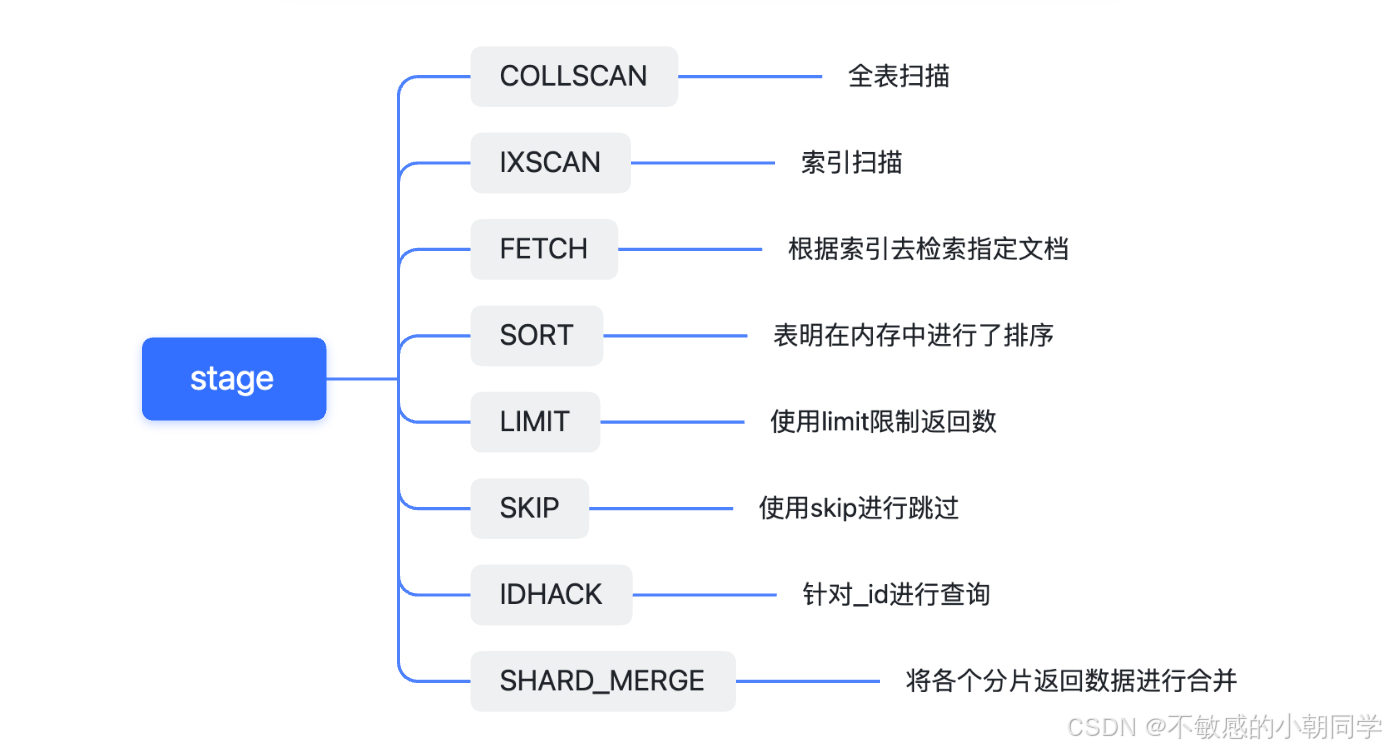
stage : 'COLLSCAN' , 表示Mongo会执行全表扫描filter: { name: { '$eq': 'SjdpDLawXWnNzGBd' } },direction: 'forward'},rejectedPlans: []},executionStats: {executionSuccess: true,
nReturned : 1 , 查询返回的记录数量
executionTimeMillis : 535 , 查询耗时totalKeysExamined: 0,
totalDocsExamined : 1001000 , 查询一共检索了多少条记录executionStages: {stage: 'COLLSCAN',....}},...ok: 1
}
- 我们对name字段建立索引再来查看执行耗时
db.student.createIndex({"name":1});
{explainVersion: '1',queryPlanner: {...winningPlan: {stage: 'FETCH',inputStage: {
stage : 'IXSCAN' ,     表示命中了索引keyPattern: { name: 1 },
indexName : 'name_1' , 使用的索引名isMultiKey: false,multiKeyPaths: { name: [] },isUnique: false,isSparse: false,isPartial: false,indexVersion: 2,
direction : 'forward' , 向前检索索引,因为定义的索引方向是 1indexBounds: { name: [ '["SjdpDLawXWnNzGBd", "SjdpDLawXWnNzGBd"]' ] }}},rejectedPlans: []},executionStats: {executionSuccess: true,nReturned: 1,executionTimeMillis: 1,totalKeysExamined: 1,totalDocsExamined: 1,executionStages: {stage: 'FETCH',
nReturned :  1 , 返回了一条executionTimeMillisEstimate: 0,works: 2,advanced: 1,needTime: 0,needYield: 0,saveState: 0,restoreState: 0,isEOF: 1,
docsExamined :  1 ,   只检索了一条alreadyHasObj: 0,inputStage: {stage: 'IXSCAN',....}}},
}
普通索引
如上面的createIndex 便会创建对应的索引
索引失效
$exists操作, 会遍历每个文档,以确定字段是否存在
$nin, 总是扫描整个集合
索引失效
db.student.find({name:{$exists:"true"}}).explain("executionStats");
db.student.find({name:{$nin:["hello","world"]}}).explain("executionStats");
复合索引
- 区分方向:
db.users.createIndex({"name": 1, "age": 1}) 与
db.users.createIndex({"name": 1, "age": -1})是两个不同的索引
只有要针对多个字段进行排序时, 索引的方向才是重要的, mongo会自动的翻转索引, 也就是说{"name": 1}与{"name": -1}在使用时是一致的。{"name": 1, "age": 1}与 {"name": -1, "age": -1}也是一致的
- 字段有序 (精确匹配的字段应该放在索引的前面, 范围字段放在后面)
索引字段要有序 为了能够更加有效的利用索引, 用于精确匹配的字段应该放在索引的前面, 范围字段放在后面, 这样mongo就能利用精确匹配过滤掉大部分文档, 然后利用之后的索引去再次过滤结果。
例如我们要查询name=user10&age>20, 那么我们的索引应该是{"name": 1, "age": 1}, 而不是{"age": 1, "name": 1}
- 最左前缀匹配原则
隐式索引 如果我们创建一个复合索引{"name": 1, "age": 1, "created": -1}, 当利用{"name": 1}进行排序的时候, 也能够使用前面创建的索引, 注意, 必须是从左往右依次匹配才行, 也就是说{"age": 1}, 这种是不会用到索引的
稀疏索引
稀疏索引(或者称间隙索引)就是只包含有索引字段的文档的条目,跳过索引键不存在的文档
那相反的非稀疏索引或者普通索引则包含所有的文档以及为那些不包含索引的字段存储null值
总结:间隙索引就是创建索引的索引列在某些文档上列不存在,导致索引存在间隙
使用场景:某个字段查询的频率非常高,但是不是所有的记录都包含这个字段,就适合对这个字段建立稀疏索引
我们对上面 Demo 里面的 student 表的 family 字段建立稀疏索引
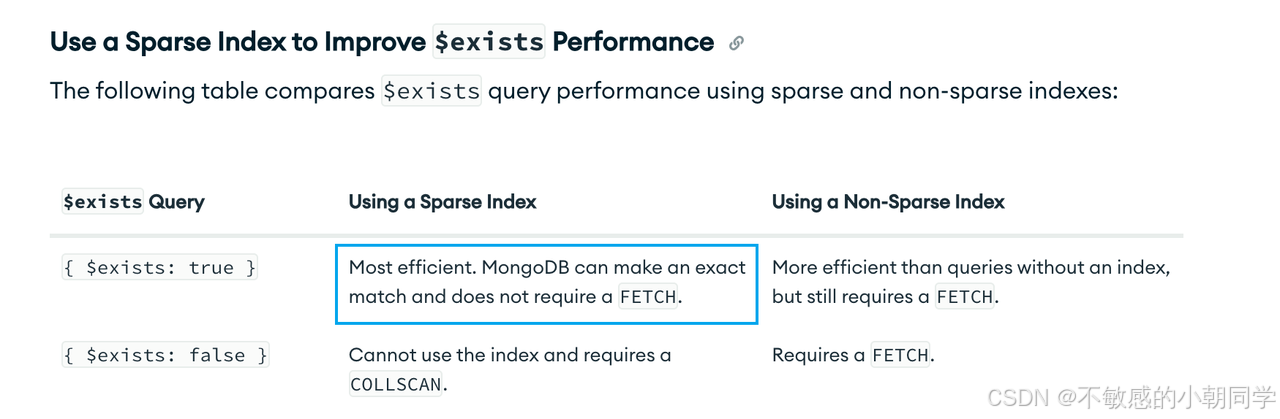
db.scores.createIndex( { family: 1 } , {sparse:true} ){$exists:true} 就会使用到该稀疏索引,参考这里
db.student.find({"family":{$exists:true}}).explain("executionStats");
索引失效
{ 被索引键:{$exists:false}},不会使用该稀疏索引,除非显示指定hint({被索引键:1})
db.student.find({"family":{$exists:false}}).explain("executionStats");
什么时候使用

创建稀疏索引之后,必须使用 $exists 来对索引执行操作才能生效
To use a sparse index that you have created in a query, you must use the $exists clause on the fields that cover the index.
{$exists:true}  生效
{$ne:null}      不生效
Mongo 官方文档
查询是否生效
使用 mongo 的 explain 命令你可以获取到下面信息
-
查询是否利用到了索引
-
利用的是哪个索引
-
查询了多少条记录
-
返回了多少条记录
-
查询耗时多久
-
…
explain 有三种 mode
-
queryPlanner(默认模式). At this level, explain provides information about the winning plan, including the index used or if a collection scan is needed (COLLSCAN);解释当前执行使用了哪个执行计划,以及是否进行了全表扫描
-
executionStats – this mode includes all the information provided by the queryPlanner, plus the statistics. Statistics include details such as the number of documents examined and returned, the execution time in milliseconds, and so on.
-
allPlansExecution – this mode includes all the information provided by the executionStats plus information about the discarded execution plans
queryPlanner.winningPlan.stage 字段含义
参考文章
https://juejin.cn/post/7124703919896428580
https://www.percona.com/blog/mongodb-investigate-queries-with-explain-index-usage-part-2/