SpringBoot项目接入DeepSeek
在这个demo当中,我使用的是JDK8+Spring Boot 2.6.x,下面直接给大家附上完整的代码。
一、项目结构
deepseek - demo/
├── src/
│   ├── main/
│   │   ├── java/
│   │   │   └── cn/
│   │   │       └── mzl/
│   │   │           └── deepseekdemo/
│   │   │               ├── config/
│   │   │               │   ├── DeepSeekConfig  # 配置相关类
│   │   │               │   └── RetryInterceptor  # 重试拦截器类
│   │   │               ├── controller/
│   │   │               │   └── ChatController  # REST接口类
│   │   │               ├── exception/
│   │   │               │   ├── ApiException  # 自定义异常类
│   │   │               │   └── GlobalExceptionHandler  # 全局异常处理类
│   │   │               ├── service/
│   │   │               │   ├── impl/
│   │   │               │   │   └── DeepSeekServiceImpl  # 服务实现类
│   │   │               │   └── DeepSeekService  # 核心服务接口
│   │   │               └── DeepseekDemoApplication  # 启动类
│   │   └── resources/
│   │       ├── static/
│   │       │   ├── css/
│   │       │   │   └── chat.css  # 聊天页面样式文件
│   │       │   ├── js/
│   │       │   │   └── chat.js  # 聊天功能相关脚本文件
│   │       │   └── index.html  # 页面文件
│   │       └── application.yml  # 配置文件
│   └── test/
└── target/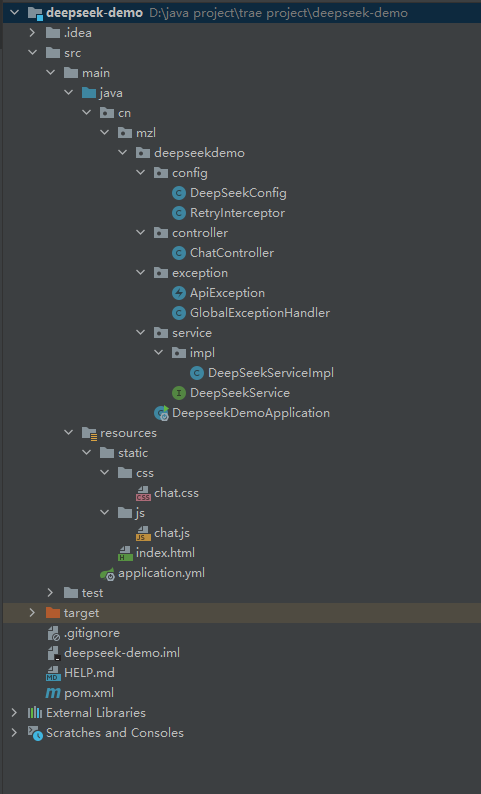
二、项目代码 (后端)
1.pom.xml
<?xml version="1.0" encoding="UTF-8"?>
<project xmlns="http://maven.apache.org/POM/4.0.0" xmlns:xsi="http://www.w3.org/2001/XMLSchema-instance"xsi:schemaLocation="http://maven.apache.org/POM/4.0.0 https://maven.apache.org/xsd/maven-4.0.0.xsd"><modelVersion>4.0.0</modelVersion><groupId>cn.mzl</groupId><artifactId>deepseek-demo</artifactId><version>0.0.1-SNAPSHOT</version><name>deepseek-demo</name><description>Demo project for Spring Boot</description><properties><java.version>1.8</java.version><project.build.sourceEncoding>UTF-8</project.build.sourceEncoding><project.reporting.outputEncoding>UTF-8</project.reporting.outputEncoding><spring-boot.version>2.6.13</spring-boot.version><okhttp.version>4.9.3</okhttp.version><lombok.version>1.18.34</lombok.version><snakeyaml.version>1.33</snakeyaml.version> <!-- 兼容JDK8的版本 --></properties><dependencies><!-- Spring Boot Starter --><dependency><groupId>org.springframework.boot</groupId><artifactId>spring-boot-starter-web</artifactId><version>${spring-boot.version}</version></dependency><!-- 添加显式依赖 --><dependency><groupId>org.yaml</groupId><artifactId>snakeyaml</artifactId><version>${snakeyaml.version}</version></dependency><!-- HTTP Client --><dependency><groupId>com.squareup.okhttp3</groupId><artifactId>okhttp</artifactId><version>${okhttp.version}</version></dependency><!-- Lombok --><dependency><groupId>org.projectlombok</groupId><artifactId>lombok</artifactId><version>${lombok.version}</version><scope>provided</scope></dependency><!-- 测试 --><dependency><groupId>org.springframework.boot</groupId><artifactId>spring-boot-starter-test</artifactId><version>${spring-boot.version}</version><scope>test</scope></dependency><!-- 接口文档 --><dependency><groupId>io.swagger.core.v3</groupId><artifactId>swagger-core</artifactId><version>2.2.15</version></dependency><dependency><groupId>org.projectlombok</groupId><artifactId>lombok</artifactId><version>RELEASE</version><scope>compile</scope></dependency></dependencies><build><plugins><plugin><groupId>org.apache.maven.plugins</groupId><artifactId>maven-compiler-plugin</artifactId><version>3.8.1</version><configuration><source>1.8</source><target>1.8</target><encoding>UTF-8</encoding></configuration></plugin><plugin><groupId>org.springframework.boot</groupId><artifactId>spring-boot-maven-plugin</artifactId><version>${spring-boot.version}</version><configuration><mainClass>cn.mzl.deepseekdemo.DeepseekDemoApplication</mainClass><skip>true</skip></configuration><executions><execution><id>repackage</id><goals><goal>repackage</goal></goals></execution></executions></plugin></plugins></build></project>
2. application.yml
server:port: 8080deepseek:api:url: https://api.deepseek.com/v1/chat/completionskey: ${DEEPSEEK_API_KEY:填写自己的API_KEY} # 优先使用环境变量timeout: 30000 # 毫秒logging:level:root: INFOcom.example.deepseek: DEBUGAPI_KEY可以登录DeepSeek官网的API开放平台创建,具体如下图所示:
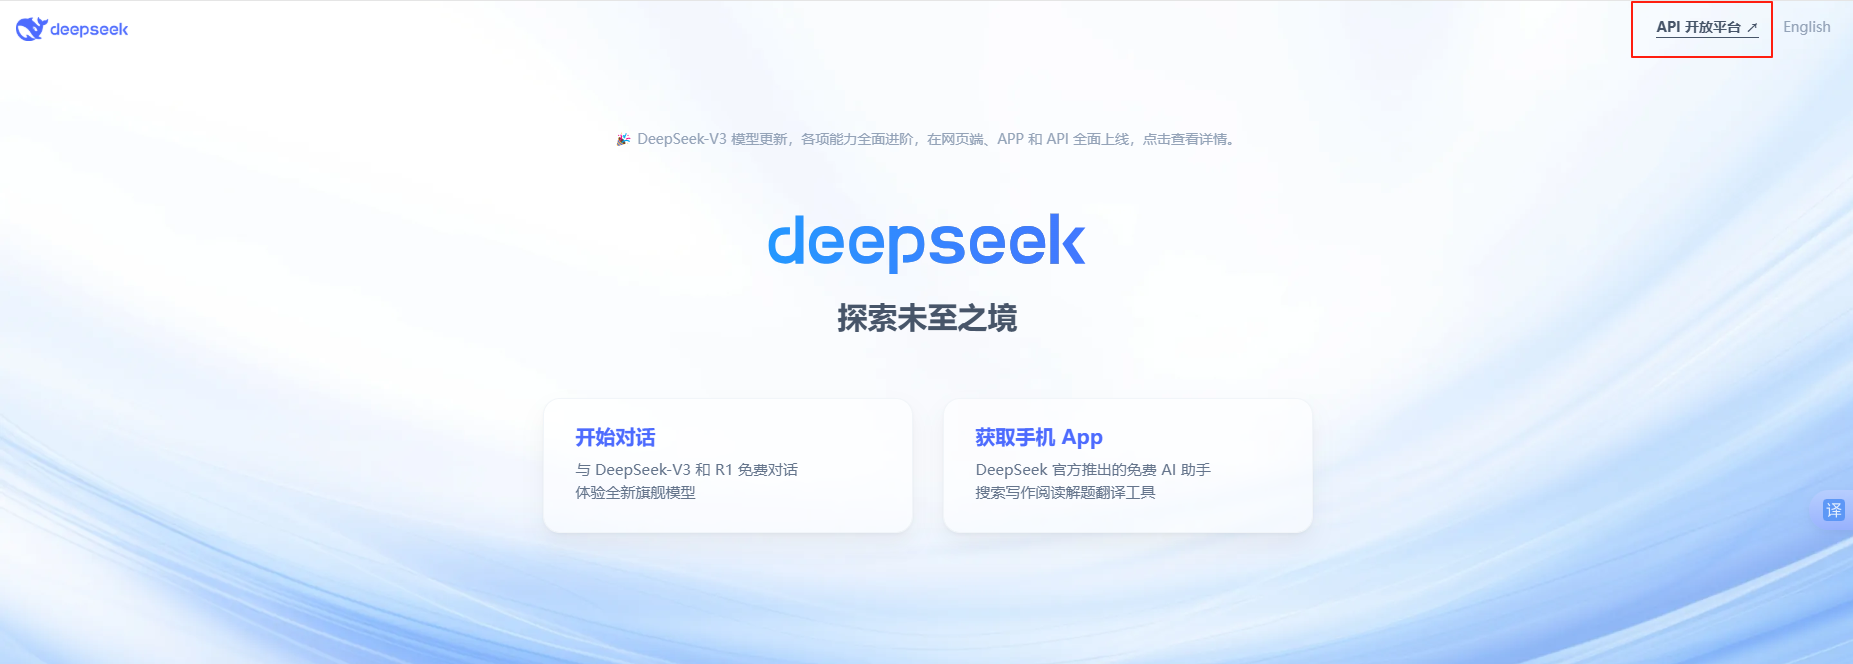
在DeepSeek官网点击右上角的“API开放平台”,会出现如下页面:
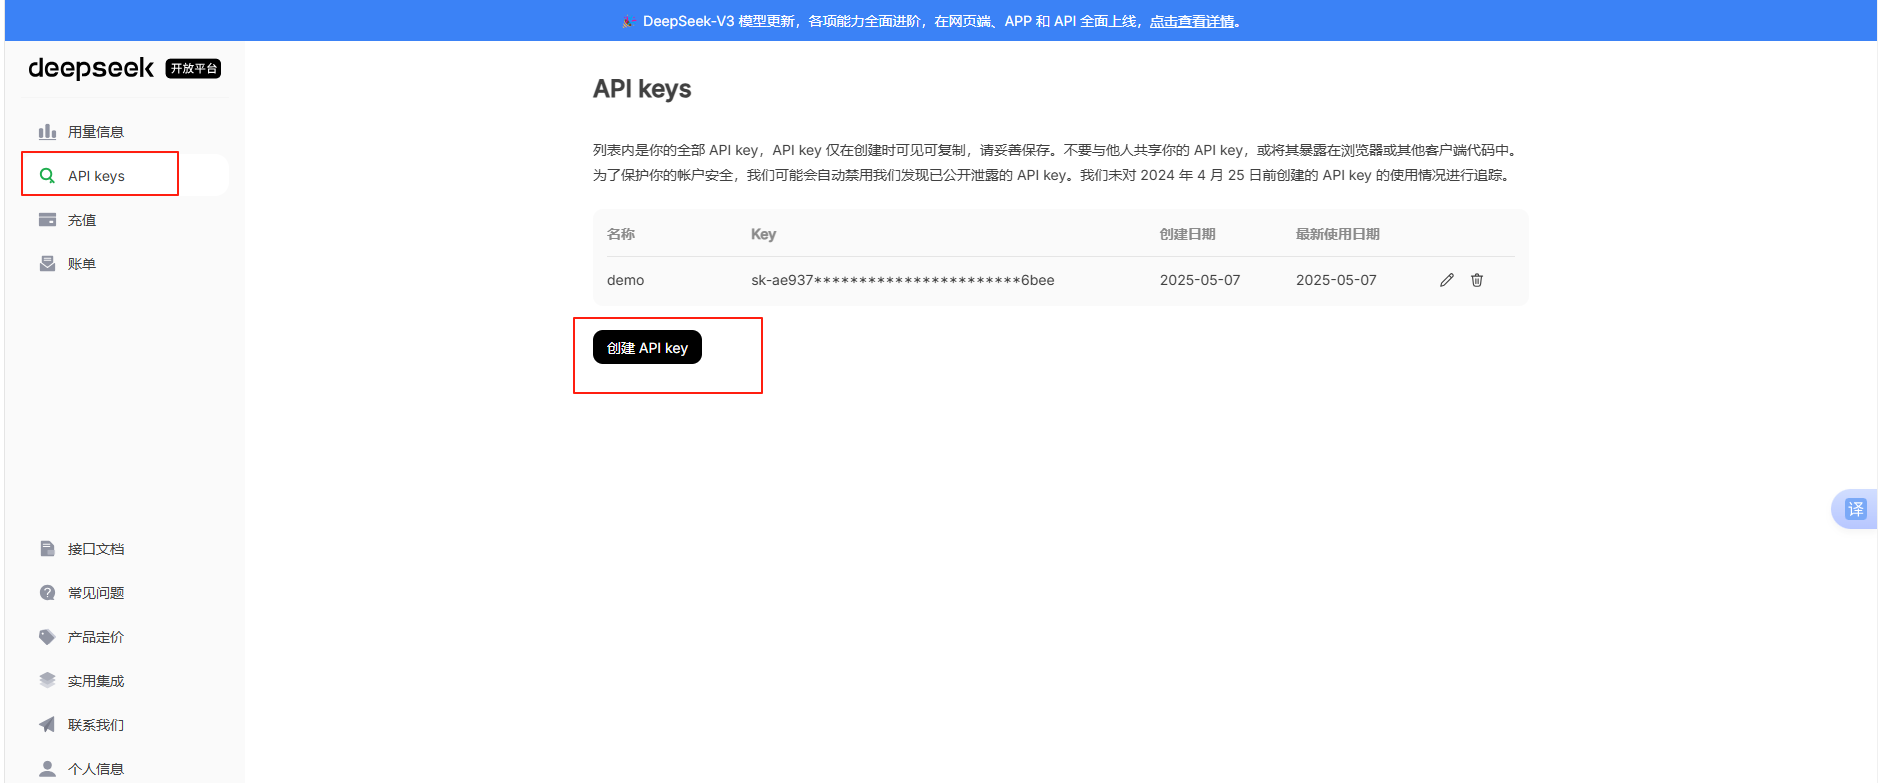
点击API Keys,接着再点击创建API Key,弹出如下窗口:
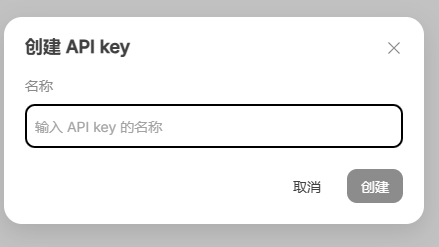
该名称可以随便填写,然后点击创建即可。需要注意的是:API key 仅在创建时可见可复制。
3. DeepSeekConfig.java
@Data
@Configuration
@ConfigurationProperties(prefix = "deepseek.api")
public class DeepSeekConfig {private String url;private String key;private Integer timeout;@Beanpublic OkHttpClient okHttpClient() {return new OkHttpClient.Builder()//重试3次.addInterceptor(new RetryInterceptor(3)).connectTimeout(timeout, TimeUnit.MILLISECONDS).readTimeout(timeout, TimeUnit.MILLISECONDS).writeTimeout(timeout, TimeUnit.SECONDS).build();}/*** 验证API密钥有效性*/@PostConstructpublic void validateConfig() {if (StringUtils.isEmpty(key)) {throw new IllegalStateException("DeepSeek API密钥未配置");}if (!key.startsWith("sk-")) {throw new IllegalStateException("API密钥格式不正确");}}
}
4. RetryInterceptor.java
public class RetryInterceptor implements Interceptor {private int maxRetries;public RetryInterceptor(int maxRetries) {this.maxRetries = maxRetries;}@Overridepublic Response intercept(Chain chain) throws IOException {Request request = chain.request();Response response = null;IOException exception = null;for (int i = 0; i <= maxRetries; i++) {try {response = chain.proceed(request);if (response.isSuccessful()) {return response;}} catch (IOException e) {exception = e;}}if (exception != null){ throw exception;}return response;}
}
5. DeepSeekService.java
public interface DeepSeekService {String chatCompletion(String prompt) throws ApiException;
}
6. DeepSeekServiceImpl.java
@Service
@Slf4j
public class DeepSeekServiceImpl implements DeepSeekService {private final OkHttpClient client;private final ObjectMapper objectMapper;private final DeepSeekConfig config;public DeepSeekServiceImpl(OkHttpClient client,DeepSeekConfig config) {this.client = client;this.objectMapper = new ObjectMapper();this.config = config;}@Overridepublic String chatCompletion(String prompt) throws ApiException {try {Request request = buildRequest(prompt);log.debug("Sending request to: {}", config.getUrl());log.debug("Request headers: {}", request.headers());Response response = client.newCall(request).execute();log.debug("Response code: {}", response.code());return processResponse(client.newCall(request).execute());} catch (IOException e) {log.error("API请求失败: {}", e.getMessage());throw new ApiException("DeepSeek服务调用失败", e);}}private Request buildRequest(String prompt) throws IOException {String jsonBody = objectMapper.createObjectNode().put("model", "deepseek-chat").set("messages", objectMapper.createArrayNode().add(objectMapper.createObjectNode().put("role", "user").put("content", prompt))).toString();return new Request.Builder().url(config.getUrl()).addHeader("Authorization", "Bearer " + config.getKey()).post(RequestBody.create(jsonBody, MediaType.get("application/json"))).build();}private String processResponse(Response response) throws IOException {if (!response.isSuccessful()) {throw new IOException("HTTP错误: " + response.code());}JsonNode rootNode = objectMapper.readTree(response.body().byteStream());return rootNode.path("choices").get(0).path("message").path("content").asText();}
}
7. ChatController.java
@RestController
@RequestMapping("/api/chat")
public class ChatController {private final DeepSeekService deepSeekService;public ChatController(DeepSeekService deepSeekService) {this.deepSeekService = deepSeekService;}@PostMappingpublic String chat(@RequestBody String prompt) {try {return deepSeekService.chatCompletion(prompt);} catch (ApiException e) {throw new RuntimeException("服务调用失败");}}
}
8. 全局异常处理(GlobalExceptionHandler.java & ApiException.java)
GlobalExceptionHandler.java
@RestControllerAdvice
public class GlobalExceptionHandler {@ExceptionHandler(ApiException.class)public String handleApiException(ApiException e) {return "错误: " + e.getMessage();}@ExceptionHandler(Exception.class)public String handleGeneralException(Exception e) {return "系统错误: " + e.getMessage();}
}
ApiException.java
@Getter
public class ApiException extends Exception {private final int errorCode;public ApiException(String message) {super(message);this.errorCode = 500;}public ApiException(int errorCode, String message) {super(message);this.errorCode = errorCode;}public ApiException(String message, Throwable cause) {super(message, cause);this.errorCode = 500;}
}
9. DeepseekDemoApplication.java
@SpringBootApplication
public class DeepseekDemoApplication {public static void main(String[] args) {SpringApplication.run(DeepseekDemoApplication.class, args);}}
后端部分的代码到这里就算是写完了,接下来再看写前端部分的代码,前端只实现了基础的对话及展示功能,后续可以自己根据需要进行修改和添加更多功能。
三、项目代码 (前端)
1. chat.css
/* 基础样式 */
body {margin: 0;background: #f0f2f5;font-family: -apple-system, BlinkMacSystemFont, 'Segoe UI', Roboto, sans-serif;
}.chat-container {max-width: 800px;margin: 20px auto;background: white;border-radius: 10px;box-shadow: 0 2px 10px rgba(0,0,0,0.1);padding: 20px;
}/* 对话历史区域 */
.chat-history {height: 70vh;overflow-y: auto;padding: 10px;border-bottom: 1px solid #eee;
}/* 消息通用样式 */
.message {display: flex;gap: 15px;margin: 15px 0;animation: fadeIn 0.3s ease-in;
}.user-message {flex-direction: row-reverse;
}/* 头像 */
.avatar {width: 40px;height: 40px;border-radius: 50%;background: #e8e8e8;display: flex;align-items: center;justify-content: center;font-size: 20px;
}/* 消息内容 */
.content {max-width: 70%;padding: 12px 16px;border-radius: 15px;line-height: 1.6;
}.user-message .content {background: #1890ff;color: white;border-radius: 15px 15px 0 15px;
}.bot-message .content {background: #f5f5f5;color: #333;border-radius: 15px 15px 15px 0;
}/* 输入区域 */
.input-area {display: flex;gap: 10px;padding: 20px 10px 0;
}textarea {flex: 1;padding: 12px;border: 1px solid #ddd;border-radius: 8px;resize: none;font-size: 16px;min-height: 44px;
}button {padding: 0 20px;height: 44px;background: #1890ff;color: white;border: none;border-radius: 8px;cursor: pointer;transition: background 0.2s;
}button:hover {background: #096dd9;
}/* 加载动画 */
.loading {display: none;padding: 15px;text-align: center;
}.dot-flashing {position: relative;width: 10px;height: 10px;border-radius: 5px;background-color: #1890ff;animation: dotFlashing 1s infinite linear;
}@keyframes fadeIn {from { opacity: 0; transform: translateY(10px); }to { opacity: 1; transform: translateY(0); }
}@keyframes dotFlashing {0% { background-color: #1890ff; }50%, 100% { background-color: rgba(24, 144, 255, 0.2); }
}
2. chat.js
// 对话管理
let isGenerating = false;// 发送消息
async function sendMessage() {if (isGenerating) return;const inputBox = document.getElementById('inputBox');const message = inputBox.value.trim();if (!message) return;// 清空输入框inputBox.value = '';toggleLoading(true);try {// 添加用户消息appendMessage(message, 'user');// 调用APIconst response = await fetch('/api/chat', {method: 'POST',headers: {'Content-Type': 'text/plain'},body: message});if (!response.ok) {throw new Error(`HTTP错误: ${response.status}`);}const result = await response.text();appendMessage(result, 'bot');} catch (error) {appendMessage(`请求失败: ${error.message}`, 'error');} finally {toggleLoading(false);}
}// 添加消息到历史
function appendMessage(content, type = 'bot') {const history = document.getElementById('chatHistory');const messageDiv = document.createElement('div');messageDiv.className = `message ${type}-message`;const avatar = document.createElement('div');avatar.className = 'avatar';avatar.textContent = type === 'user' ? '👤' : '🤖';const contentDiv = document.createElement('div');contentDiv.className = 'content';contentDiv.innerHTML = marked.parse(content); // 使用Markdown解析messageDiv.appendChild(avatar);messageDiv.appendChild(contentDiv);history.appendChild(messageDiv);// 自动滚动到底部history.scrollTop = history.scrollHeight;
}// 加载状态控制
function toggleLoading(show) {const loading = document.getElementById('loading');loading.style.display = show ? 'block' : 'none';isGenerating = show;
}// 使用localStorage(历史记录持久化到本地)
function saveHistory() {localStorage.setItem('chatHistory',document.getElementById('chatHistory').innerHTML);
}// 文本打字效果(打字机效果)
function typewriterEffect(element, text, speed = 30) {let i = 0;function type() {if (i < text.length) {element.innerHTML += text.charAt(i);i++;setTimeout(type, speed);}}type();
}// 回车发送(Shift+回车换行)
document.getElementById('inputBox').addEventListener('keydown', (e) => {if (e.key === 'Enter' && !e.shiftKey) {e.preventDefault();sendMessage();}
});
3. index.html
<!DOCTYPE html>
<html lang="zh-CN">
<head><meta charset="UTF-8"><meta name="viewport" content="width=device-width, initial-scale=1.0"><title>DeepSeek对话助手</title><link rel="stylesheet" href="css/chat.css"><!-- 添加highlight.js --><link rel="stylesheet" href="https://cdnjs.cloudflare.com/ajax/libs/highlight.js/11.5.0/styles/default.min.css"><!-- 添加Markdown解析库 --><script src="https://cdn.jsdelivr.net/npm/marked/marked.min.js"></script>
</head>
<body>
<div class="chat-container"><!-- 对话历史区域 --><div class="chat-history" id="chatHistory"><div class="message bot-message"><div class="avatar">🤖</div><div class="content">您好!我是DeepSeek助手,有什么可以帮您?</div></div></div><!-- 输入区域 --><div class="input-area"><textareaid="inputBox"placeholder="输入您的问题..."rows="2"@keydown.enter.prevent="handleSend"></textarea><button id="sendBtn" onclick="sendMessage()">发送</button></div><!-- 加载状态 --><div class="loading" id="loading"><div class="dot-flashing"></div></div>
</div><script src="js/chat.js"></script>
<script src="https://cdnjs.cloudflare.com/ajax/libs/highlight.js/11.5.0/highlight.min.js"></script>
</body>
</html>
前端部分的代码到这里就结束了,后续根据个人需求进行修改和添加。
四、运行
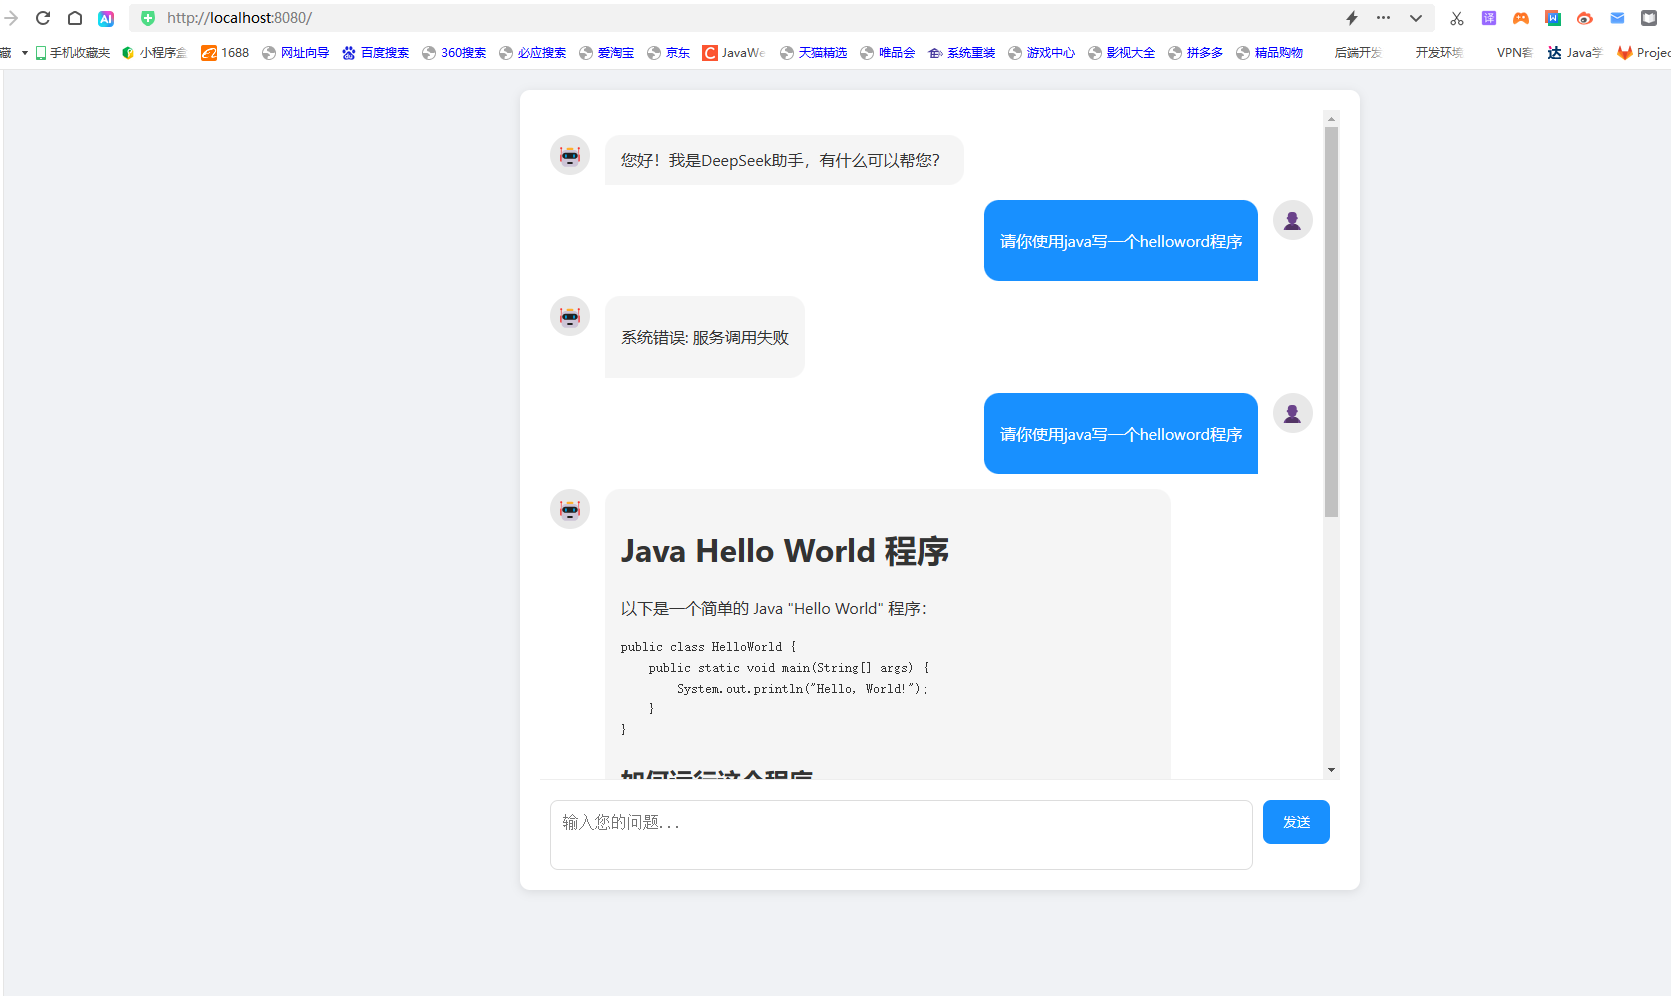
利用上面展示的代码将SpringBoot工程构建好,接着再idea上运行,然后在浏览器中输入地址:localhost:8080即可访问到项目的前端页面,试着在对话框输入:“请你使用java写一个helloword程序”,结果如下:
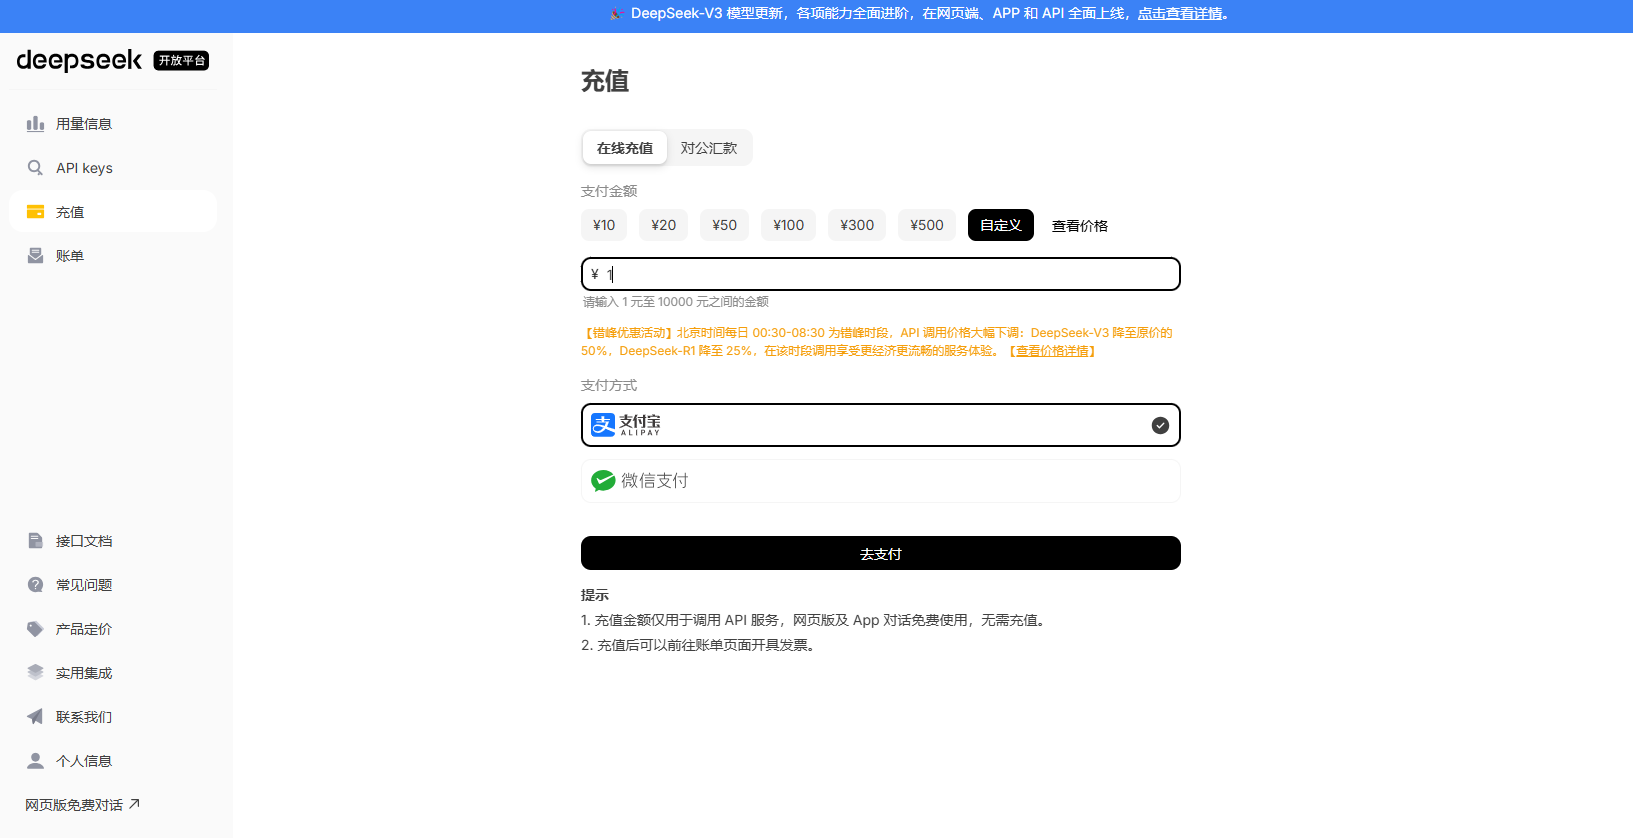
如果你调用接口报错,错误代码为402,说明你没有充值,要到DeepSeek的API开放平台进行充值,最低只需一元,充值过后就可以正常调用了。